1
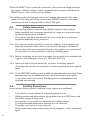
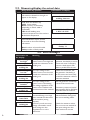
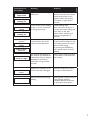
protecting your liquid assets
UPP Welder 230Volts
EW/E7/230V
User Manual
Issue 1
PetroTechnik Ltd, PetroTechnik House, Olympus Close, Whitehouse Industrial Estate,
Ipswich, Suffolk, IP1 5LN, United Kingdom.
tel. +44 (0) 1473 243300
fax. +44 (0) 1473 243301
www.petrotechnik.com
email. [email protected]
1
Table of Contents
1.
2.
3.
4.
5.
1.
Construction of the welding machine
General
Operating Instructions
Technical Details
Maintenance and Service
Page 2
Page 3
Page 5
Page 9
Page 10
Construction of the welding machine
Secondary Containment welding cable
Temperature sensor on Power Cable
Bridging Leads
LCD Display
Primary welding cable
SELECT key
ENTER key
Power Cable
2
2.
General
2.1.
Application
The UPP welding machine EW/E7/230V is designed for automatic welding of
Primary and Secondary UPP welding sockets and Primary electrofusion fittings. It
is suitable for use with environment temperatures between –10° C and +45°
2.2.
Operating The Machine
UPP welding sockets and electrofusion fittings are welded using a constant
current. The welding machine automatically applies the correct amount of energy
for the fitting being welded.
The machine takes into account the ambient temperature when welding. For this
reason the machine should always be at the same ambient temperature as the
fitting that is to be welded. The temperature sensor is on the power cable inside
the unit.
The machine has a back light LCD display with 2 lines of 16 characters each. The
user-guided menu is available in 8 different languages.
During the welding process, the following key value will be shown on the display:
• Applied current
• Remaining welding time (counting down)
The welding machine operates on standard alternating current. Normal, fixed
power connections can be used or an electrically stable portable generator with
a rated output of at least 4 kW.
The power input must be maintained between the following values:
230 V ~ ± 15% (195,5 V – 264,5 V) and 45 – 65 Hz
The input voltage will be automatically measured by the machine and can be
shown on the display by keeping the SELECT key pressed down. At the same
time the following information will be shown:
• Welding mode
Primary Mode (Primry) or Secondary Mode
(Secndr) depending on which welding cable is connected.
• Actual welding time, depending on the ambient temperature
• Measured temperatures:
# I: Temperature measured inside the machine
# O: Ambient temperature measured by the sensor temperature
3
When the SELECT key is pressed for more than 10 seconds, the display will show
the number of faulty and good welds completed with the machine. Release the
SELECT key to return to the previous display.
The welding machine is equipped with a earth leakage safety switch. This safety
switch is in the same part of the circuit as the ON/OFF switch. It is therefore
reset when the unit is switched OFF and back ON again.
2.3.
Safety Instructions
2.3.1 The welding machine meets all applicable European and International
safety standards and is designed specifically for usage on construction sites
(protected against water and dust).
The machine should be handled with the care usually given to electrical
equipment especially during transport.
2.3.2 Each time the welding machine is used, the condition of the machine, and
especially the power cable needs to be checked. If damage is discovered,
the machine needs to be returned directly to the supplier or an authorised
service centre. It is also advisable to check the welding cables.
2.3.3 Before connecting the machine, the power source needs to be checked with
regard to the values given above (i.e. 230 V and 45-65 Hz).
2.3.4 Never pull and/or lift the machine by its power or welding cables. To
disconnect the machine, the connectors need to be pulled off, never pull the
cable.
2.3.5 The EW/E7/230V welding machine fulfils all applicable safety standards. These
approvals can only be maintained if any repairs are done by the supplier
or an authorised, service centre. Disobeying this recommendations will
invalidate the warranty.
2.4.
Liability Restrictions
In each of the following cases, all liabilities of the supplier are invalidated:
•
•
•
•
•
•
4
The machine is used outside the indicated application area
Welding sockets and electrofusion fittings other than the UPP Primary and
Secondary range are being used
The operator is not trained to weld with this welding machine
The recommended maintenance intervals are not observed
The safety instructions are not observed
Repairs have been performed by other than the supplier or their authorised
agent
Operating Instructions
3.
3.1. Welding
Step
Entry/action by operator
1
Connect power cable to power source
Switch the machine on using the ON/
OFF switch on the side of the main
panel
2
3
4
The welding mode is displayed,
depending on the which welding cable is
connected the display shows:
Orange cable: Primary Mode
Green cable: Secondary Mode
Information on display
PetroTechnik
Primary Mode
After approximately 5 seconds
Connect welding element
Push the connectors firmly on to the
terminal pins of the fitting and push
down to the stop
Welding start with
ENTER
Welding starts by pressing the ENTER
key.
Welding in prog.
4.0A 168 sec
After welding
The display shows the current in Amps
and the actual welding time in seconds
(corrected for ambient temperature),
counting down to 0.
Welding completed
After approximately 3 seconds
Unplug
connectors
3.2.
Choosing the language
Step
Entry/action by operator
1
Switch on the machine and wait for the
information, indicated on the right, to
appear on the display.
(No welding cables to be connected
during the set-up operation)
Press the SELECT key and the ENTER
key together to enter languages set-up
mode
→GB
2
NL
DE FR IT
ES SE PL
3
Choose the desired language by
pressing the SELECT key several times
GB
NL
DE FR→IT
ES SE PL
Complete this operation by pressing the
ENTER key.
4
The language of your choice appears
Information on display
Connect
welding element
Raccodare
elemento
5
3.3. Measuring/display the actual data
Entry/action by operator
1
2
3
Information on display
Switch on the machine and wait for the
information, indicated on the right, to
appear on the display.
Hold down the SELECT key
234V: Input voltage
Mode: Primary or Secondary
(depending on which cable is
connected)
185s: Actual welding time
I: Internal temperature of the machine
O: Ambient temperature
Press the SELECT key for at least
10 seconds to show the following
information
Good: number of succesful welds
Faulty: number of faulty welds
Connect
welding element
234V Mode 185s
I: 28ºC O: 21ºC
Good: 756
Faulty: 11
3.4. Error messages
Information on
the display
Meaning
Solution
Input voltage
too high
alternating with
Switch off
welding kit
The input voltage of the
power source is too high and
outside the tolerances of the
welding unit
Check the connection. Get the
generator checked by a service
centre and reset. If necassary
connect a load, approx 500
Watt in parallel with the unit
Input voltage
too low
alternating with
Switch off
welding kit
The input voltage of the
power source is too low and
outside the tolerances of the
welding unit
Check the connection. Get
the generator checked by a
service centre and reset. Fully
unwind the extension cable to
minimise resistance
The input voltage of the
power source is fluctuating.
The voltage regulation of the
power source inteferes with
the electronics of the machine
Get the generator checked by
a service centre and reset.
The resistance value of the
connected fitting is too high
and is outside the tolerances
of the machine (wrong
element)
In Primary mode: too many
fittings connected in series
Input voltage too low
Regulation error in the
electronics
Use only UPP welding sockets
and electrofusion fittings and
the correct welding cables.
Input voltage
variable
alternating with
Switch off
welding kit
Current below
lower limit
alternating with
Switch off
welding kit
6
If necassary connect a load of
approximately 300 to 500 Watt
in parallel with the machine.
Check the resistance values.
The sum must not exceed 10
See input voltage too low
Send machine for service
Information on
the display
Current above
upper limit
alternating with
Switch off
welding kit
Open secondary
circuit
alternating with
Switch off
welding kit
after switching on
machine
Weld was
faulty
alternating with
Repeat after
one hour
Box internal
temp. too high
General hardware
error
Meaning
Solution
Regulation error in the
electronics
If this error occurs several
times in succesion the machine
should be sent back to the
supplier. Switch off machine
and switch on again after 5
seconds
Loose contact in the welding
circuit or a poor connection
to fitting terminal pin
Check welding cable.
Push connectors firmly on to
terminal pins of the fitting and
push down to the stop.
Switch off the machine and
switch it on again after 5
seconds
The previous weld has been
interrupted for one of the
reasons mentioned above
Let the fitting cool down for
at least one hour, before a new,
full welding process is started
with the same fitting.
By pressing the ENTER key,
the machine will be reset for
welding
The internal temperatire of
the machine has reached the
critical value. This can happen
especially in the Primary
mode, after a large number
of welds
Switch off the machine and let
it cool down in the shade for a
few minutes
Software or hardware of the
machine has been damaged
Sent the machine for service
and repair at PetroTechnik
Machine switches off during
welding
Wrong power supply, incorrect
input voltage, electrical
instability. Resolve temporary
or permanent interruption
7
3.5. Other useful tips
Positioning the machine
Always place the welding machine in the same ambient temperature to the
fittings to be welded. The rear of the machine needs to be free and it should not
be directly exposed to the sun.
The welding machine should only be operated in areas outside zones 0, 1 and 2
Switch off the machine during breaks in the work and at the end of the job.
Connectors
The connectors at the end of the welding cables need to be pushed firmly
onto the UPP welding sockets and electrofusion fittings down to the stop.
Disconnecting the cable from the UPP welding sockets and electrofusion fittings
must not be done by pulling the cable.
Repeating a weld
Adding extra energy after the welding process (immediate repetition of a weld)
by disobeying the repetition lock and without allowing the fitting to cool down
is strictly prohibited. Overheating of the fitting can damage the components and
cause hot material to be ejected from the weld zone causing severe burns of the
skin. In addition power-conducting elements could become touchable.
In case of doubt about the weld, UPP welding sockets and electrofusion fittings,
can be welded again after allowing them to cool for at least one hour.
Welding in series, Primary (Primry) mode
In the Primary (Primry) mode the welding machine can simultaneously weld two
to three (maximum) UPP welding sockets fittings provided the following rules are
applied:• The sum of the connected resistance values (circled figure on UPP sockets)
must not be higher than 10.
• The UPP welding sockets to be welded need to be connected in series, using
the coloured bridging leads (red or yellow), in such a way that each fitting is
always connected by two cables of a different colour (red or yellow).
• To ensure that it is OK check that all the fittings get warm during the welding
process.
Welding in Secondary (Secndr) Mode
UPP Secondary welding socket may not be welded in series. These fittings can be
recognised by their special smaller terminal pins. These connections require the
use of a green Secondary welding cable.
8
4.
Technical Details
4.1 Welding machine
UPP Combi Welder Unit 230V
(with European Style plug)
EW/E7/230V
Voltage
Frequency
Power rating
230 V~ ± 15% (195.5 V to 264.5 V)
50 Hz (45 to 65 Hz)
1000 W
Fuses input side
min. 10 A slow
Welding voltage
8 V to 230 V
Switching power of the FI safety switch 10 mA
Protection class
IP 65
II (reinforced isolation)
Ambient temperature limits
- 10ºC to + 45ºC
Dimensions
width
340 mm
depth
300 mm
height
150 mm
total weight
4.68 kgs
4.2 Accessories
Included:
Description
Primary UPP Welding Cable
Secondary UPP Welding Cable
UPP Bridging Lead red or yellow
Operating Manual
Available as spare parts:
Description
Primary UPP Welding Cable
Secondary UPP Welding Cable
UPP Bridging Lead red or yellow
PetroTechnik Code
EW/BC/C
EW/BC/SC
EW/BC/BL
PetroTechnik Code
EW/BC/C
EW/BC/SC
EW/BC/BL
9
4.3 Approval
This machine has the safety mark of the Swiss Approval Board. Furthermore the
machine carries the CE mark for European conformity.
4.4 Guarantee
This guarantee includes the repair or replacement of the machine provided it has
been used as described in this manual. The guarantee period is one year from the
date of purchase.
5. Maintenance and Service
From a safety point of view, all cables need to be checked each time before use.
The other parts of the machine are maintenance free.
To clean the frame and the display, only use soapy water or other non-acid and
non-scratching cleaning liquids.
To ensure a long lifetime of the machine, it is recommended that the machine is
returned for service on a regular basis for a check by the PetroTechnik service
organisation. Maximum service interval: 3 years.
Repairs to the machine may only be carried out by PetroTechnik or by their
authorised service centres.
10
11
Waste Electrical Electronic Equipment
Within the European Union, this sybol indicated that this product
should not be disposed of with household waste. It should be taken
to an appropriate recycling facility.
Certificate of Conformity
PetroTechnik UK (head office)
+44 1473 243 300
PetroTechnik Australia
+61 3 95 50 18 74
PetroTechnik do Brasil
+55 11 3159 0909
PetroTechnik France
+33 1 69 21 41 41
PetroTeknik AB
+46 8 767 86 34
PetroTechnik Inc.
+1 201 871 73 00
P&D Japan
+81 3 32 97 78 70
PetroTechnik Ltd
PetroTechnik House, Olympus Close,
Whitehouse Ind. Estate,
Ipswich
Suffolk, IP1 5LN, UK
t: +44 (0) 1473 243300
f: +44 (0) 1473 243301
e: [email protected]
w w w . p e t r o t e c h n i k . c o m
E7Man-v.2.03/06
This welding unit has been designed to comply with the harmonised
standards under the “New Approach” directives, and has been CE
marked accordingly.
The applicable standards are:
89/336/EEC - Electromagnetic compatibility
73/23/EEC - Low voltage equipment
98/37/EEC - Machinery safety