1
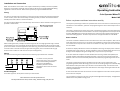
Installation and Connection
NOTE: The installation of this device must only be undertaken by a suitably trained and qualified
electrician; all local safety standards must be observed. All work must satisfy Building/IEE Wiring
regulations in force at the time. Work must be passed by an approved NICEIC member.
Operating Instructions
Fixing
Coin Operated Meter/Timer
The meter is intended to be used within an indoor environment and must be positioned away from
sources of water, excess heat and humidity. If installing outside, the meter must be fitted within a
weatherproof meter cabinet or similar IP rated box.
Model: MP11.z
Before use please read these instructions carefully
The meter should be fitted onto a level firm wall, meter board or cabinet. Several mounting points are
provided as shown below.
Thank you for purchasing an emlite coin operated meter. These instructions are intended to provide
information on the installation, operation and programming of the meter. Please keep for future
reference.
This meter is designed to be used for the control of the electricity supply in secondary metered sites
such as Holiday and Landlord accommodation. The meter is fully approved to the European metering
standard, MID (Metering Instruments Directive), the meter is therefore tested and approved as
accurate for billing purposes. The meter may be used in a Prepayment Mode or Timer Mode.
Basic Features
When installing the meter, initially it should be hung from the rear hanging bracket using a suitable
round headed screw. The screw depth should be adjusted so the head fits snugly under the hanging
point and the meter is held firm against the wall. Once hung, ensure the meter is level then mark and
screw the meter to the wall securely using the four fixing points; two are located under the grey
terminal cover and two are under the coin box (see drawing above).
The meter is available in different versions that allow £ or € coins to be accepted. In both cases the
meter will accept 1 and 2 £/€ coins. The meter is also available in a version that accepts Tokens. Coins
are inserted into the top coin hole as shown on the meter front. Any reject coins are returned from
the chute below.
An electronic display indicates the amount of credit/time remaining. The display is also used for the
programming of energy prices etc. The grey pushbutton next to the display allows the user to cycle
through a set of displays showing their usage totals, rate prices and any set charges.
Wiring
The meter is wired using the connections found under the grey terminal cover as follows:
The meter must be protected
against overcurrent. This is normally
as part of the building installation
(Service fuse to BS1361) or
equivalent; maximum current
through the meter must not exceed
100Amps.
Product Support
For further support or service please contact your local stockist.
Manufactured in the UK by EM-Lite Ltd
10 Reynolds Business Park, Stevern Way, Peterborough, UK, PE1 5EL
A coin box collects all accepted coins and should be secured using a 6 mm shank padlock (not
supplied). Smaller sized padlocks will allow movement in the coin box and should not be used.
Removal of the coin box is automatically detected and enables the programming function of the
meter.
The meter is programmed using the two buttons found in the coin tray compartment. The
programming function allows the energy price to be set and standing charge to be collected daily. A
debt collection facility also allows a pre-set amount to be collected daily. The total amount for
collection is programmed and the meter will reduce this each day by collecting monies from the users
remaining credit balance.
A timer mode allows the meter to be used for control of appliances and services. A time period can be
set for each coin accepted.
The consumption of energy can be seen using the red LED light below the display. The light flashes
1000 times for every 1kWh of energy used.
User Display Operation
Programming Display Cycle – Prepayment Mode
Normal Operating Display
The programming cycle is entered by pressing button A. The first press actives a display test where all
display segments are shown. Press the A button again to move to the first option, each following press
of the A button moves through the following cycle one number at a time. Values shown below are
provided as an example. PLEASE NOTE: Before changes are accepted by the meter, the complete cycle
must be moved through until End is shown.
In Prepayment Mode the meter will show the amount of credit remaining to the user from coins
inserted. Example: Cr 3.50 means a credit of £3.50 or €3.50 is remaining.
In Timer Mode the meter will show the amount of time remaining to the user from coin inserted.
Example: 00.02.30 means a time of 0 hours, 2 minutes and 30 seconds is remaining.
Func 1
Alternatively, when all credit/time has been used the word OFF will be shown on the display and the
supply disconnected. A red illuminated cross symbol also indicates supply disconnection.
PC 0010
When a coin is inserted and accepted by the meter Coin in will be shown on the display. The value of
the coins accepted is added to the credit value.
t Cr 0029
Display Cycle
CLEAr n
Allows the meter to be cleared e.g. for next occupant. Remaining Credit
balance is cleared if set to yes - setting ‘y’ (included in timer mode cycle).
run
Timer Mode Run time - sets the amount of time in hours/minutes the meter
will run for each 1 £/€ accepted (only shown in timer mode cycle).
In Prepayment Mode a display cycle allows the user to look through their energy readings and see the
prices & values set into the meter. The display list can be cycled using the grey push button to the left
hand side of the display, each press of the button will move through the following example sequence.
At the end of the display sequence End is shown. NOTE: there is no display cycle in Timer Mode.
t 00001.95 kWh
Total energy recorded by the meter since manufacture.
r1 00001.45 kWh
Energy Register for Rate 1. Amount of energy used at the Rate 1 price.
r2 00000.50 kWh
Energy Register for Rate 2. Amount of energy used at the Rate 2 price.
NOTE: This display will only appear if the meter has been set for a 2 rate
tariff where a different price is applied for part of the day e.g. day use,
in Economy 7 type tariffs.
r1 022.78
Price charged in pence/eurocents. The credit value will be reduced by
this value each time a kWh is consumed (while Rate 1 is active).
r2 015.93
Price charged in pence/eurocents for each kWh consumed (when Rate 2
is active). See note above.
st ch 25.00
dt ch 01.00
dt t 015.00
Amount of standing charge being collected each day in pence/eurocents
Debt charge. Amount being collected through debt collection each day.
Value is in £/ €.
Total amount of debt to be collected in £/€. Will reduce each day by the
amount set in the Debt charge register until reduced to zero.
Programming
The meter is programmed using two push buttons accessed when the coin tray is removed. The
buttons are shown in the diagram below and are described as A and B.
The A button is used to move through each display.
When moving through a display the active
(settable) number is shown flashing, the value of
the active number can be increased using the B
button.
00:10
Function Setting – Selects between Prepayment Mode and Timer Mode.
1= Prepayment Mode, 0=Timer Mode (see timer section below).
Program Counter - Number of the times the meter has been programmed.
For information only, cannot be changed (included in timer mode cycle).
Total Credit- Total amount of cash accepted by the meter in £/€. For
information only. Value is reset if meter cleared. (included in timer mode
cycle).
15:35
Clock Time - allows the clock time of meter to be adjusted in 24hr clock
format. NOTE: the meter does not automatically correct for daylight saving.
01.01.13
Date – allows the date to be set in the meter in the format dd.mm.yy.
r1 00001.45 kWh
Start time when the rate 1 price becomes active in 24hr clock time. When
only using a single tariff price, set time to 00:00.
Start time when the rate 2 price becomes active. As an example set to 07:00
for Economy 7 day usage. When only using a single tariff price set time to
00:00 (Rate 2 is then deactivated and not shown in the user display cycle).
Rate 1 Unit price - Price in pence/eurocents charged for each kWh consumed
when rate 1 is active. Use the rate 1 price for single tariff pricing.
Rate 2 Unit Price - Price in pence/eurocents charged for each kWh consumed
when rate 2 is active (use for Economy 7 or similar type tariffs).
Standing charge – Amount to be collected every day as a standing charge.
Set as pence/eurocents per day value.
Total debt – Total amount of debt to be collected in £/ €. The meter will
automatically reduce the Total debt by the Debt charge amount each day.
Debt charge - Amount of debt collected each day – used in conjunction with
the total debt setting. The meter automatically reduces the remaining credit
and total debt by the amount set in £/€ per day until the Total debt is zero.
For information - Rate 1 energy register.
r2 00000.50 kWh
t 00001.95 kWh
For information - Rate 2 energy register.
For information - Total energy recorded by the meter since manufacture.
r1 00:00
r2 00:00
r1 022.78
r2 015.93
st ch 25.00
db t 015.00
dt ch 01.00
Programming Display Cycle – Timer Mode
The meter can be programmed to act as a timer. The meter is put into Timer Mode using the Function
Setting, a setting of 0 sets the meter to act as a timer. When set to timer mode the programming cycle
will change, only the first five displays (as indicated above) are shown.