1
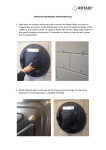
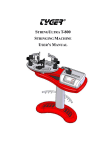
INSTALLATION MANUAL FOR ROTAID SOLID PLUS HEAT PLEASE NOTE: only a certified company should install the cabinet. The heating device is not ready for use yet! Determine the location where you wish to mount the Rotaid. Make sure that no irregularities are present at the desired spot on the wall. The cabinet is preferably placed on a location with shade and under some sort of roof / cover. The center of the Rotaid is preferably on a height of 1.60 meters when placed. 1. Use the paper mold to mark the holes for mounting the back plate. You need a total of 4 marks for wall mounting. You should also mark the additional hole that will house the power cable of the heating device. After drilling the 4 holes, please use the 4 wall anchors. 2. On the left bottom-‐side of the back plate you will find an eye. Use an awl or screwdriver to puncture the sealing plug. Run the whole cable of the heating element through the hole. Do not attach the heating element to the back plate yet! 3. Attach the back plate by using the 4 long screws. Next, attach the heating element on the back plate, using the 4 small screws and rings. 4 small holes are pre-‐drilled in the back plate. The element is also fitted with a sticker finish, so you can additionally glue the element to the back plate. When correctly placed, the control unit is on the left bottom side of the back plate. 4. Use an Allen key (5 mm) to attach the nylon belt to the back plate. Make sure the belt is firmly attached. 5. You can now rotate the front cover on the back plate. Place the hood slightly counter-‐clockwise on the back wall and turn clockwise. When correctly placed, the hook on the bottom of the cabinet falls through the slot on the bottom of the cover. 6. Attach a power strip to the cable and plug it into the wall outlet. Your Rotaid Solid Plus Heat Cabinet is now ready for usage!