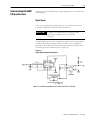
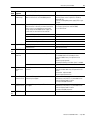
1
Ultra5000 Intelligent Positioning Drives Catalog Numbers (2098-IPD-005, -010, and -020) Installation Manual Important User Information Because of the variety of uses for the products described in this publication, those responsible for the application and use of this control equipment must satisfy themselves that all necessary steps have been taken to assure that each application and use meets all performance and safety requirements, including any applicable laws, regulations, codes and standards. The illustrations, charts, sample programs and layout examples shown in this guide are intended solely for purposes of example. Since there are many variables and requirements associated with any particular installation, Allen-Bradley does not assume responsibility or liability (to include intellectual property liability) for actual use based upon the examples shown in this publication. Allen-Bradley publication SGI-1.1, Safety Guidelines for the Application, Installation and Maintenance of Solid-State Control (available from your local Allen-Bradley office), describes some important differences between solid-state equipment and electromechanical devices that should be taken into consideration when applying products such as those described in this publication. Reproduction of the contents of this copyrighted publication, in whole or part, without written permission of Rockwell Automation, is prohibited. Throughout this manual we use notes to make you aware of safety considerations: ATTENTION ! Identifies information about practices or circumstances that can lead to personal injury or death, property damage or economic loss Attention statements help you to: • identify a hazard • avoid a hazard • recognize the consequences IMPORTANT Identifies information that is critical for successful application and understanding of the product. Allen-Bradley is a registered trademark of Rockwell Automation. Ultraware is a trademark of Rockwell Automation. UL and cUL are registered trademarks of Underwriters Laboratories. Windows is a trademark of Microsoft Corporation. Table of Contents Preface Introduction . . . . . . . . . . . . . . . . . . . . . . . . . . . . . . . . . . . . . . . . . . . . . . . . . . Who Should Use this Manual . . . . . . . . . . . . . . . . . . . . . . . . . . . . . . . . . . . . Purpose of this Manual . . . . . . . . . . . . . . . . . . . . . . . . . . . . . . . . . . . . . . . . . Contents of this Manual . . . . . . . . . . . . . . . . . . . . . . . . . . . . . . . . . . . . . . . . Related Documentation. . . . . . . . . . . . . . . . . . . . . . . . . . . . . . . . . . . . . . . . . Conventions Used in this Manual . . . . . . . . . . . . . . . . . . . . . . . . . . . . . . . . . Product Receiving and Storage Responsibility . . . . . . . . . . . . . . . . . . . . . . . Allen-Bradley Support . . . . . . . . . . . . . . . . . . . . . . . . . . . . . . . . . . . . . . . . . . Local Product Support . . . . . . . . . . . . . . . . . . . . . . . . . . . . . . . . . . . . . . Technical Product Assistance. . . . . . . . . . . . . . . . . . . . . . . . . . . . . . . . . P-1 P-1 P-1 P-2 P-2 P-2 P-3 P-3 P-3 P-3 Chapter 1 Installing Your Ultra5000 Chapter Objectives . . . . . . . . . . . . . . . . . . . . . . . . . . . . . . . . . . . . . . . . . . . . . Complying with European Union Directives. . . . . . . . . . . . . . . . . . . . . . . . . EMC Directive . . . . . . . . . . . . . . . . . . . . . . . . . . . . . . . . . . . . . . . . . . . . . Low Voltage Directive . . . . . . . . . . . . . . . . . . . . . . . . . . . . . . . . . . . . . . . Before Mounting Your System . . . . . . . . . . . . . . . . . . . . . . . . . . . . . . . . . . . . Storing Your Ultra5000 Before Installation . . . . . . . . . . . . . . . . . . . . . . Unpacking Modules . . . . . . . . . . . . . . . . . . . . . . . . . . . . . . . . . . . . . . . . . System Mounting Requirements . . . . . . . . . . . . . . . . . . . . . . . . . . . . . . . Ventilation Requirements . . . . . . . . . . . . . . . . . . . . . . . . . . . . . . . . . . . . . Transformer Sizing . . . . . . . . . . . . . . . . . . . . . . . . . . . . . . . . . . . . . . . . . . Bonding Your System . . . . . . . . . . . . . . . . . . . . . . . . . . . . . . . . . . . . . . . . . . . Bonding Modules . . . . . . . . . . . . . . . . . . . . . . . . . . . . . . . . . . . . . . . . . . . Bonding Multiple Subpanels . . . . . . . . . . . . . . . . . . . . . . . . . . . . . . . . . . Mounting Your Ultra5000 Drive . . . . . . . . . . . . . . . . . . . . . . . . . . . . . . . . . . 1-1 1-1 1-1 1-2 1-2 1-2 1-3 1-3 1-4 1-5 1-6 1-6 1-7 1-8 Chapter 2 Connecting Your Ultra5000 i Chapter Objectives . . . . . . . . . . . . . . . . . . . . . . . . . . . . . . . . . . . . . . . . . . . . . 2-1 Understanding Ultra5000 Connectors . . . . . . . . . . . . . . . . . . . . . . . . . . . . . . 2-1 Ultra5000 Block Diagram. . . . . . . . . . . . . . . . . . . . . . . . . . . . . . . . . . . . . 2-1 Front Panel Connections . . . . . . . . . . . . . . . . . . . . . . . . . . . . . . . . . . . . . 2-2 I/O Connectors . . . . . . . . . . . . . . . . . . . . . . . . . . . . . . . . . . . . . . . . . . . . 2-3 Motor Encoder Connector. . . . . . . . . . . . . . . . . . . . . . . . . . . . . . . . . . . . 2-4 Serial Port Connectors . . . . . . . . . . . . . . . . . . . . . . . . . . . . . . . . . . . . . . . 2-4 Understanding Ultra5000 I/O Specifications . . . . . . . . . . . . . . . . . . . . . . . . 2-5 Digital Inputs . . . . . . . . . . . . . . . . . . . . . . . . . . . . . . . . . . . . . . . . . . . . . . 2-5 Digital Outputs . . . . . . . . . . . . . . . . . . . . . . . . . . . . . . . . . . . . . . . . . . . . . 2-6 Analog Inputs . . . . . . . . . . . . . . . . . . . . . . . . . . . . . . . . . . . . . . . . . . . . . . 2-8 Analog Outputs. . . . . . . . . . . . . . . . . . . . . . . . . . . . . . . . . . . . . . . . . . . . . 2-8 Understanding Encoder Feedback Specifications . . . . . . . . . . . . . . . . . . . . . 2-9 Encoder Interface . . . . . . . . . . . . . . . . . . . . . . . . . . . . . . . . . . . . . . . . . . . 2-9 Auxiliary Encoder Interface . . . . . . . . . . . . . . . . . . . . . . . . . . . . . . . . . . 2-10 Understanding Serial Interfaces . . . . . . . . . . . . . . . . . . . . . . . . . . . . . . . . . . 2-11 Understanding Basic Wiring Requirements . . . . . . . . . . . . . . . . . . . . . . . . . 2-12 Routing High and Low Voltage Cables . . . . . . . . . . . . . . . . . . . . . . . . . 2-13 Grounding Your Ultra5000. . . . . . . . . . . . . . . . . . . . . . . . . . . . . . . . . . . . . . 2-14 Grounding Your System to the Subpanel . . . . . . . . . . . . . . . . . . . . . . . 2-14 Grounding Multiple Subpanels . . . . . . . . . . . . . . . . . . . . . . . . . . . . . . . 2-15 EMC Motor Ground Termination. . . . . . . . . . . . . . . . . . . . . . . . . . . . . 2-15 Publication 2098-IN001B-EN-P — July 2000 ii Table of Contents Wiring Your Ultra5000 . . . . . . . . . . . . . . . . . . . . . . . . . . . . . . . . . . . . . . . . . Connecting Interface Cables . . . . . . . . . . . . . . . . . . . . . . . . . . . . . . . . . Wiring I/O Connections . . . . . . . . . . . . . . . . . . . . . . . . . . . . . . . . . . . . Wiring Power Connections . . . . . . . . . . . . . . . . . . . . . . . . . . . . . . . . . . 2-16 2-17 2-17 2-18 Chapter 3 Commissioning Your Ultra5000 Chapter Objectives . . . . . . . . . . . . . . . . . . . . . . . . . . . . . . . . . . . . . . . . . . . . . General Startup Precautions . . . . . . . . . . . . . . . . . . . . . . . . . . . . . . . . . . . . . . Understanding Communication Switch Settings . . . . . . . . . . . . . . . . . . . . . . Applying Power To Your System . . . . . . . . . . . . . . . . . . . . . . . . . . . . . . . . . . Configuring Your Ultra5000 . . . . . . . . . . . . . . . . . . . . . . . . . . . . . . . . . . . . . . 3-1 3-1 3-2 3-2 3-3 Chapter 4 Maintaining Your Ultra5000 Chapter Objectives . . . . . . . . . . . . . . . . . . . . . . . . . . . . . . . . . . . . . . . . . . . . . Maintaining the Drive . . . . . . . . . . . . . . . . . . . . . . . . . . . . . . . . . . . . . . . . . . . Periodic Maintenance . . . . . . . . . . . . . . . . . . . . . . . . . . . . . . . . . . . . . . . . Troubleshooting. . . . . . . . . . . . . . . . . . . . . . . . . . . . . . . . . . . . . . . . . . . . . . . . Error Codes. . . . . . . . . . . . . . . . . . . . . . . . . . . . . . . . . . . . . . . . . . . . . . . . 4-1 4-1 4-1 4-2 4-2 Appendix A Specifications and Dimensions Chapter Objectives . . . . . . . . . . . . . . . . . . . . . . . . . . . . . . . . . . . . . . . . . . . . Ultra5000 Specifications . . . . . . . . . . . . . . . . . . . . . . . . . . . . . . . . . . . . . . . . General Power Specifications. . . . . . . . . . . . . . . . . . . . . . . . . . . . . . . . . Physical and Environmental. . . . . . . . . . . . . . . . . . . . . . . . . . . . . . . . . . Power Dissipation. . . . . . . . . . . . . . . . . . . . . . . . . . . . . . . . . . . . . . . . . . User Programming . . . . . . . . . . . . . . . . . . . . . . . . . . . . . . . . . . . . . . . . . Controller . . . . . . . . . . . . . . . . . . . . . . . . . . . . . . . . . . . . . . . . . . . . . . . . Inputs and Outputs. . . . . . . . . . . . . . . . . . . . . . . . . . . . . . . . . . . . . . . . . Communications. . . . . . . . . . . . . . . . . . . . . . . . . . . . . . . . . . . . . . . . . . . Motor Feedback . . . . . . . . . . . . . . . . . . . . . . . . . . . . . . . . . . . . . . . . . . . Auxiliary Feedback . . . . . . . . . . . . . . . . . . . . . . . . . . . . . . . . . . . . . . . . . Connectors . . . . . . . . . . . . . . . . . . . . . . . . . . . . . . . . . . . . . . . . . . . . . . . Dimensions . . . . . . . . . . . . . . . . . . . . . . . . . . . . . . . . . . . . . . . . . . . . . . . . . . A-1 A-1 A-1 A-2 A-2 A-3 A-3 A-4 A-4 A-4 A-5 A-5 A-6 Appendix B Options and Accessories Publication 2098-IN001B-EN-P — July 2000 Chapter Objectives . . . . . . . . . . . . . . . . . . . . . . . . . . . . . . . . . . . . . . . . . . . . Ultra5000 Family . . . . . . . . . . . . . . . . . . . . . . . . . . . . . . . . . . . . . . . . . . . . . . Option Cards . . . . . . . . . . . . . . . . . . . . . . . . . . . . . . . . . . . . . . . . . . . . . Ultra5000 Accessories . . . . . . . . . . . . . . . . . . . . . . . . . . . . . . . . . . . . . . . . . . External Shunt Kit . . . . . . . . . . . . . . . . . . . . . . . . . . . . . . . . . . . . . . . . . AC Line Filters . . . . . . . . . . . . . . . . . . . . . . . . . . . . . . . . . . . . . . . . . . . . Mating Connector Kits . . . . . . . . . . . . . . . . . . . . . . . . . . . . . . . . . . . . . . Break Out Board, Cables, and Kits . . . . . . . . . . . . . . . . . . . . . . . . . . . . Motor Power Cables . . . . . . . . . . . . . . . . . . . . . . . . . . . . . . . . . . . . . . . . . . . Motor Feedback Cables. . . . . . . . . . . . . . . . . . . . . . . . . . . . . . . . . . . . . . . . . Interface Cables . . . . . . . . . . . . . . . . . . . . . . . . . . . . . . . . . . . . . . . . . . . . . . . B-1 B-1 B-1 B-2 B-2 B-2 B-3 B-3 B-4 B-4 B-5 Table of Contents iii Appendix C Application Information Chapter Objectives . . . . . . . . . . . . . . . . . . . . . . . . . . . . . . . . . . . . . . . . . . . . Mechanical Resonance. . . . . . . . . . . . . . . . . . . . . . . . . . . . . . . . . . . . . . . . . . Backlash. . . . . . . . . . . . . . . . . . . . . . . . . . . . . . . . . . . . . . . . . . . . . . . . . . Using an Emergency Stop Contactor . . . . . . . . . . . . . . . . . . . . . . . . . . . . . . Grounding for Ultra5000 CE Requirements . . . . . . . . . . . . . . . . . . . . . . . . Building Your Own Cables . . . . . . . . . . . . . . . . . . . . . . . . . . . . . . . . . . . . . . Building Your Own Cables . . . . . . . . . . . . . . . . . . . . . . . . . . . . . . . . . . Persistent EMI Problems . . . . . . . . . . . . . . . . . . . . . . . . . . . . . . . . . . . C-1 C-1 C-2 C-2 C-4 C-5 C-5 C-5 Publication 2098-IN001B-EN-P — July 2000 iv Table of Contents Publication 2098-IN001B-EN-P — July 2000 Preface Introduction Read this preface to familiarize yourself with the rest of the manual. This preface contains the following topics. • • • • • • • Who should use this manual The purpose of this manual Contents of this manual Related documentation Conventions used in this manual Product receiving and storage responsibility Allen-Bradley support Who Should Use this Manual Use this manual for designing, installing, programming, or troubleshooting the Ultra5000 Intelligent Positioning Drive (IPD). If you do not have a basic understanding of the Ultra5000, contact your local Allen-Bradley representative for information on available training courses before using this product. Purpose of this Manual This manual describes the function and installation of the Ultra5000 products and standard Rockwell Automation/Allen-Bradley motors recommended for use with the Ultra5000. The manual is intended for engineers or technicians directly involved in the installation, operation, and field maintenance of the Ultra5000. 1 Publication 2098-IN001B-EN-P — July 2000 P-2 Preface Contents of this Manual Refer to the following listing for the descriptive contents of this installation manual. Chapter Related Documentation Conventions Used in this Manual Publication 2098-IN001B-EN-P — July 2000 Title Contents Preface Describes the purpose, background, and scope of this manual. Also specifies the audience for whom this manual is intended. 1 Installing Your Ultra5000 Provides mounting information for the Ultra5000. 2 Connecting Your Ultra5000 Provides connection and wiring information for the Ultra5000. 3 Commissioning Your Ultra5000 Outline steps when applying power to equipment for the first time. 4 Maintaining Your Ultra5000 Diagnostic aids that help isolate problems to a system module. Appendix A Specifications and Dimensions Provides physical, electrical, environmental, and functional specifications for the Ultra5000. Appendix B Options and Accessories Provides identification numbers and descriptions of the Ultra5000 and related products. Appendix C Application Information Provides information for specific applications. The following documents contain additional information concerning related Allen-Bradley products. To obtain a copy, contact your local Allen-Bradley office or distributor. For information about Read This Document Product Number Configure and operate Ultra5000 drives Ultraware User Manual 2098-UM001A-EN-P Ultra5000 Programming Instructions Ultraware Programming Manual 2098-PM001A-EN-P Ultraware Installation Instructions Ultraware CD Installation Instructions 2098-UM002A-EN-P The following conventions are used throughout this manual. • Bulleted lists such as this one provide information, not procedural steps • Numbered lists provide sequential steps or hierarchical information • Words that you type or select appear in bold • When we refer you to another location, the section or chapter name appears in italics Preface Product Receiving and Storage Responsibility P-3 You, the customer, are responsible for thoroughly inspecting the equipment before accepting the shipment from the freight company. Check the item(s) you receive against your purchase order. If any items are obviously damaged, it is your responsibility to refuse delivery until the freight agent has noted the damage on the freight bill. Should you discover any concealed damage during unpacking, you are responsible for notifying the freight agent. Leave the shipping container intact and request that the freight agent make a visual inspection of the equipment. Store the product in its shipping container prior to installation. If you are not going to use the equipment for a period of time, store using the following guidelines. • Use a clean, dry location • Maintain an ambient temperature range of -40 to 70°C (-40 to 158°F) • Maintain a relative humidity range of 5% to 95%, non-condensing • Store it where it cannot be exposed to a corrosive atmosphere • Store it in a non-construction area Allen-Bradley Support Allen-Bradley offers support services worldwide, with over 75 Sales/Support Offices, 512 authorized Distributors and 260 authorized Systems Integrators located throughout the United States alone, plus Allen-Bradley representatives in every major country in the world. Local Product Support Contact your local Allen-Bradley representative for: • Sales and order support • Product technical training • Warranty support • Support service agreements Technical Product Assistance If you need to contact Allen-Bradley for technical assistance, please review the information in the Maintaining Your Ultra5000 chapter first. Then call your local Allen-Bradley representative. For the quickest possible response, please have the catalog numbers of your products available when you call. Publication 2098-IN001B-EN-P — July 2000 P-4 Preface Publication 2098-IN001B-EN-P — July 2000 Chapter 1 Installing Your Ultra5000 Chapter Objectives This chapter covers the following topics: • • • • Complying with European Union directives Before mounting your system Bonding your system Mounting your Ultra5000 drive ATTENTION ! Complying with European Union Directives The following information is a guideline for proper installation. The National Electrical Code and any other governing regional or local codes overrule this information. The Allen-Bradley Company cannot assume responsibility for the compliance or the noncompliance with any code, national, local or otherwise, for the proper installation of this system or associated equipment. If you ignore codes during installation, hazard of personal injury and/or equipment damage exists. If this product is installed within the European Union or EEC regions and has the CE mark, the following regulations apply. EMC Directive This unit is tested to meet Council Directive 89/336 Electromagnetic Compatibility (EMC) using a technical construction file and the following standards, in whole or in part: • EN 5008x-2 EMC - Emission Standard, Part 2 - Industrial Environment • EN 5008x-2 EMC - Immunity Standard, Part 2 - Industrial Environment The product described in this manual is intended for use in an industrial environment. 1 Publication 2098-IN001B-EN-P — July 2000 1-2 Installing Your Ultra5000 To meet CE requirements, the following additions are required: • You must run single-phase input wiring in a conduit that is grounded to the enclosure. • You must install a power line filter (Allen-Bradley catalog number 2090-UXLF-106, 2090-UXLF-110, 2090-UXLF-123 or equivalent based on system current) between the single-phase input line and the system module input. • You must terminate the shields of the motor power cables and the motor feedback cables to the enclosure at the point of entry. Low Voltage Directive These units are tested to meet Council Directive 73/23/EEC Low Voltage Directive. The EN 60204-1 Safety of Machinery-Electrical Equipment of Machines, Part 1-Specification for General Requirements standard applies in whole or in part. Refer to Appendix C for interconnect information. Before Mounting Your System Before you mount your Ultra5000 system make sure you understand the following: • how to store your Ultra5000 before installation • how to unpack the system • the minimum mounting requirements Storing Your Ultra5000 Before Installation The Ultra5000 should remain in the shipping container prior to installation. If the equipment is not to be used for a period of time, store it as follows: • • • • • Publication 2098-IN001B-EN-P — July 2000 Use a clean, dry location Maintain an ambient temperature range of -40 to 70°C (-40 to 158°F) Maintain a relative humidity range of 5% to 95%, non-condensing Store it where it cannot be exposed to a corrosive atmosphere Store it in a non-construction area Installing Your Ultra5000 1-3 Unpacking Modules Each Ultra5000 ships with the following: • • • • One Ultra5000 drive One screwdriver One instruction manual (publication 2098-IN001B-EN-P) Two I/O connector plugs (14 and 28 pin) Remove all packing material, wedges, and braces from within and around the components. After unpacking, check the item(s) nameplate catalog number against the purchase order. System Mounting Requirements There are several things that you need to take into account when preparing to mount the Ultra5000: • The Ultra5000 must be enclosed in a grounded conductive enclosure offering protection as defined in standard EN 60529 (IEC 529) to IP55 such that they are not accessible to an operator or unskilled person. A NEMA 4X enclosure exceeds these requirements providing protection to IP66. • The ambient temperature of the location in which you will install the Ultra5000 must not exceed 55° C (131° F). • You must install the panel on a flat, rigid, vertical surface that won’t be subjected to shock, vibration, moisture, oil mist, dust, or corrosive vapors. • You need to maintain minimum clearances (refer to Figure 1.1) for proper airflow, easy module access, and proper cable bend radius. Refer to Appendix A for mounting dimensions, power dissipation, and environmental specifications for the Ultra5000. Publication 2098-IN001B-EN-P — July 2000 1-4 Installing Your Ultra5000 Ventilation Requirements This section provides information to assist you in sizing your cabinet and locating your Ultra5000 drive(s) inside the cabinet. Figure 1.1 Minimum Clearance Requirements 50.8 mm (2.00 in.) Clearance for Airflow and Installation Allow 12.7 mm (0.5 in.) side clearance Allow 12.7 mm (0.5 in.) side clearance Minimum Cabinet Depth = 243.8 mm (9.6 in.) Minimum Front Clearance = 76.2 mm (3.0 in.) Motor cable entry area for ground clamp 50.8 mm (2.00 in.) Clearance for Airflow and Installation IMPORTANT If the cabinet is ventilated, use filtered or conditioned air to prevent the accumulation of dust and dirt on electronic components. The air should be free of oil, corrosives, or electrically conductive contaminates. Use the following approximate equations as an aid in sizing an enclosure when no active method of heat dissipation is available. Publication 2098-IN001B-EN-P — July 2000 Metric Standard English TC = 79.05 (Q/A) + 1.98 TF = 4.08 (Q/A) + 1.1 Where T is temperature difference between inside air and outside ambient (°C), Q is heat generated in enclosure (Watts), and A is enclosure surface area (m2). The exterior surface of all six sides of an enclosure is calculated as Where T is temperature difference between inside air and outside ambient (°F), Q is heat generated in enclosure (Watts), and A is enclosure surface area (ft²). The exterior surface of all six sides of an enclosure is calculated as A = 2dw + 2dh + 2wh A = (2dw + 2dh + 2wh) / 144 Where d (depth), w (width), and h (height) are in meters. Where d (depth), w (width), and h (height) are in inches. Installing Your Ultra5000 1-5 Transformer Sizing The Ultra5000 does not require isolation transformers. A transformer may be required, however, to match the voltage requirements of the controller to the available service. To size a transformer, the power output (KVA) of each axis must be known. This can be derived by calculating the horsepower for each axis and converting that horsepower into units of watts. If you are supplying power to more than one motor and an Ultra5000, simply add the KW ratings together from each calculation to get a system KW total. Definitions: KW = power or real power KVA = apparent power Transformer KVA rating = (Sum of average output power of each axis) x 2.0. IMPORTANT IMPORTANT If you are using the Allen-Bradley system sizing program, the average speed and average torque data has already been calculated and can be used in the above equation. If you are not sure of the exact speed and torque in your application, another approach is to look at the speed/torque curve for your Ultra5000/motor combination and use the values for the worst case continuous speed and torque. Calculations are multiplied by a factor to compensate for the power and loss elements within a power system. A factor of 2.0 is used with a single phase system and a factor of 1.5 is used with a three phase system. This factor should minimize the effects of the secondary line voltage sagging in the transformer during peak current periods. Example: sizing a transformer to the voltage requirements of an 2098-IPD-020 and MPL-A320P motor: Intro Speed ( RPM ) × Torque ( lb – in ) 746Watts KVA KVA = -------------------------------------------------------------------------------- × ------------------------ × --------------------------- × 2.0 63, 025 HP 1000Watts 5, 000 ( RPM ) × 26 ( lb – in ) KVA = ---------------------------------------------------------42, 250 Intro Intro Intro Intro Intro Intro Intro Intro Intro Transformer Size = 3.1KVA Intro The speed/torque curve information is based upon an Ultra5000 input voltage of 230 VAC. For a 115 VAC input voltage, the maximum speed can be reduced up to one half. Publication 2098-IN001B-EN-P — July 2000 1-6 Installing Your Ultra5000 Bonding is the practice of connecting metal chassis, assemblies, frames, shields and enclosures to reduce the effects of electromagnetic interference (EMI). Bonding Your System Bonding Modules Unless specified, most paints are not conductive, and they act as insulators. To achieve a good bond between modules and the subpanel, surfaces need to be paint-free or plated. Bonding metal surfaces creates a low-impedance exit path for high-frequency energy. Improper bonding blocks that direct exit path and allows high-frequency energy to travel elsewhere in the cabinet. Excessive high-frequency energy can effect the operation of other microprocessor controlled equipment. The illustrations that follow (refer to Figure 1.2) show details of recommended bonding practices for painted panels, enclosures, and mounting brackets. Figure 1.2 Recommended Bonding Practices Stud-mounting a ground bus or chassis to the subpanel Stud-mounting the subpanel to the enclosure back wall Subpanel Back wall of enclosure Mounting bracket or ground bus Subpanel Star washer Nut Welded stud Scrape paint Flat washer Welded stud Flat washer Nut Use a wire brush to remove paint from threads to maximize ground connection. Star washer Use plated panels or scrape paint on front of panel If the mounting bracket is coated with a non-conductive material (anodized, painted, etc.), scrape the material around the mounting hole. Bolt-mounting a ground bus or chassis to the back-panel Subpanel Bolt Tapped hole Ground bus or mounting bracket Nut Star washer Scrape paint on both sides of panel and use star washers. Star washer Flat washer Nut Flat washer Star washer Publication 2098-IN001B-EN-P — July 2000 If the mounting bracket is coated with a non-conductive material (anodized, painted, etc.), scrape the material around each mounting hole. Installing Your Ultra5000 1-7 Bonding Multiple Subpanels Bonding multiple subpanels creates a common low impedance exit path for the high frequency energy inside the cabinet. Subpanels that are not bonded together may not share a common low impedance path. This difference in impedance may affect networks and other devices that span multiple panels. Refer to the figure below for recommended bonding practices. Figure 1.3 Multiple Subpanels and Cabinet Recommended: Bond the top and bottom of each subpanel to the cabinet using 25.4 mm (1.0 in.) by 6.35 mm (.25 in.) (minimum) wire braid Bonded cabinet ground bus to subpanel Scrape the paint around each fastener to maximize Publication 2098-IN001B-EN-P — July 2000 1-8 Installing Your Ultra5000 Mounting Your Ultra5000 Drive The procedures in this section assume you have prepared your panel and understand how to bond your system. For installation instructions regarding other equipment and accessories, refer to the instructions that came with each of the accessories for their specific requirements. To mount your Ultra5000 drive: 1. Layout the positions for the Ultra5000 and accessories in the enclosure. Mounting hole dimensions for the Ultra5000 are shown in Appendix A. 2. Attach the Ultra5000 to the cabinet, first using the upper mounting slots of the drive and then the lower. The recommended mounting hardware is M5 metric (1/4-20) or #10 MS bolts. Observe bonding techniques as described in Bonding Your System. 3. Tighten all mounting fasteners. Publication 2098-IN001B-EN-P — July 2000 Chapter 2 Connecting Your Ultra5000 This chapter describes how to make wiring and cable connections for your Ultra5000. This chapter includes: Chapter Objectives • • • • • • • Understanding Ultra5000 Connectors Understanding Ultra5000 connectors Understanding Ultra5000 I/O specifications Understanding encoder feedback specifications Understanding serial interfaces Understanding basic wiring requirements Grounding your Ultra5000 Wiring your Ultra5000 This section provides an overview of the Ultra5000 front panel connectors. Ultra5000 Block Diagram The Ultra5000 uses a two-stage circuit card solution with the capability of adding two additional option cards. The first stage is the processor circuit board and the second stage handles I/O connections including a power module interface, as shown in Figure 2.1. Figure 2.1 Block Diagram of Ultra5000 Controller Functions I/O CARD Option Card Port 1 PROCESSOR CARD Option Card Port 2 Interface Digital Inputs Interface Digital Outputs Interface Auxiliary Encoder Inputs Motor Encoder Outputs Interface Motor Encoder Interface Analog Inputs Interface Analog Outputs Interface Interface Bus Voltage Input 1 Field Programmable Gate Array 512Kx8 Low Speed Flash EEPROM Dual DAC Interface Serial Port 1 Serial Port 2 7-Segment LED Display 256Kx32 System Flash Quad ADC Serial Interface 128Kx32 High Speed SRAM Rotary DIP Switches 64Kx8 Non-Volatile SRAM TMS320C32 DSP Quad ADC POWER MODULE Current Inputs PWM Outputs Publication 2098-IN001B-EN-P — July 2000 2-2 Connecting Your Ultra5000 Front Panel Connections The following table provides a brief description of the Ultra5000 front panel connectors and describes the connector type. Designator Description Connector CN1A User Input/Output 28-Pin, 3.5mm, double-row, plugable spring clamp CN1B User Input/Output 14-Pin, 3.5mm, double-row, plugable spring clamp CN2 Motor Encoder 15-Pin, high-density D-shell CN3A Main Serial Port 1 9-Pin, standard D-shell CN3B Auxiliary Serial Port 2 9-Pin, standard D-shell TB DC bus, Motor and 9 position screw style barrier terminal strip AC power All connections on the Ultra5000 that require shielding use commonly available D-Shell type connectors. To locate the Ultra5000 front panel connectors, switches, and status LED, refer to the figure below. Figure 2.2 Ultra5000 Front Panel Connections CN1A 28-pin Digital I/O Connector CN1B 14-pin Auxiliary Encoder and Analog I/O Connector Seven Segment Status LED Power Indicator Communication Address Selector Switches DC Bus Connections for Active Shunt Resistor Kit AC Input Power Connections Motor Power Connections CN3A 9-pin Main Serial Port Connector CN3B 9-pin Auxiliary Serial Port Connector CN2 15-pin Motor Encoder Connector Publication 2098-IN001B-EN-P — July 2000 Connecting Your Ultra5000 2-3 I/O Connectors CN1A (28-pin) and CN1B (14-pin) are plugable, double-row, spring clamp connectors with 3.5mm spacing and are included with your Ultra5000. The following table provides the signal description and pin-outs for the CN1A I/O connector. Signal Description CN1A Pin Signal Description CN1A Pin INPUT1 Digital Input 1 1 INPUT9 Digital Input 9 15 INPUT2 Digital Input 2 2 INPUT10 Digital Input 10 16 INPUT3 Digital Input 3 3 INPUT11 Digital Input 11 17 INPUT4 Digital Input 4 4 INPUT12 Digital Input 12 18 INPUT5 Digital Input 5 5 INPUT13 Digital Input 13 19 INPUT6 Digital Input 6 6 INPUT14 Digital Input 14 20 INPUT7 Digital Input 7 7 INPUT15 Digital Input 15 21 INPUT8 Digital Input 8 8 INPUT16 Digital Input 16 22 OUTPUT1 Digital Output 1 9 OUTPUT5 Digital Output 5 23 OUTPUT2 Digital Output 2 10 OUTPUT6 Digital Output 6 24 OUTPUT3 Digital Output 3 11 OUTPUT7 Digital Output 7 25 OUTPUT4 Digital Output 4 12 OUTPUT8+ Relay Output 8+ 26 SHIELD Shield Termination 13 OUTPUT8- Relay Output 8- 27 IOPWR I/O Power Supply 14 IOCOM I/O Ground 28 The following table provides the signal description and pin-outs for the CN1B I/O connector. Signal Description CN1B Pin Signal Description CN1B Pin +5V 5v Power Supply 1 +5VCOM 5v Ground 8 AX+ Auxiliary Encoder Input / Output A+ 2 AIN1 Analog Input 1 9 AX- Auxiliary Encoder Input / Output A- 3 AIN2 Analog Input 2 10 BX+ Auxiliary Encoder Input / Output B+ 4 +5VCOM 5v Ground 11 BX- Auxiliary Encoder Input / Output B- 5 AOUT1 Analog Output 1 12 IX+ Auxiliary Encoder Input / Output I+ 6 AOUT2 Analog Output 2 13 IX- Auxiliary Encoder Input / Output I- 7 SHIELD Shield Termination 14 Publication 2098-IN001B-EN-P — July 2000 2-4 Connecting Your Ultra5000 Motor Encoder Connector CN2 is a 15-pin high-density D-shell connector used for connection to the motor encoder. The following table provides the signal description and pin-outs for the CN2 motor encoder connector. Signal Description CN2 Pin Signal Description CN2 Pin A+ Motor Encoder Channel A+ 1 +Limit +Limit 9 A- Motor Encoder Channel A- 2 I- / DATA- Motor Encoder Channel Index/Data- 10 B+ Motor Encoder Channel B+ 3 TS Thermostat 11 B- Motor Encoder Channel B- 4 S1 Hall Channel 1 12 I+ / DATA+ Motor Encoder Channel Index/Data+ 5 S2 Hall Channel 2 13 ECOM Encoder Common 6 EPWR Encoder Power (+5v only) 14 — Reserved 7 -Limit -Limit 15 S3 Hall Channel 3 8 Serial Port Connectors CN3A and CN3B are 9-pin serial port connectors. The following table provides the signal description and pin-outs for the CN3A and CN3B serial port connectors. Signal Description Publication 2098-IN001B-EN-P — July 2000 CN3A and CN3B Pins Signal Description CN3A and CN3B Pins 6 RCV+ RS-422/RS-485 1 Input+ — Not Connected RCV RS-232 Input 2 RCV- RS-422/RS-485 7 Input- XMT RS-232 Output 3 XMT- RS-422/RS-485 8 Output- XMT+ RS-422/RS-485 4 Output+ — Not Connected DGND Logic Ground 5 9 Connecting Your Ultra5000 Understanding Ultra5000 I/O Specifications 2-5 A description of the Ultra5000 input/output specifications is provided on the following pages. Digital Inputs There are 16 general purpose digital inputs to use as needed. They are not connected in hardware to perform a particular function. IMPORTANT Configure your digital inputs (as a group) as active high (current sinking) or active low (current sourcing). All digital inputs have the same configuration. Inputs 1 and 2 use high-speed circuitry, with minimal propagation delays, suitable for use in registration applications. Any input can be assigned through firmware to latch the motor or auxiliary position in hardware (refer to Figure 2.3). Figure 2.3 Digital Input Hardware Configuration Publication 2098-IN001B-EN-P — July 2000 2-6 Connecting Your Ultra5000 The following table provides a description of the digital input specifications. Parameter Description Minimum Maximum ON State Voltage, Active High Configuration Voltage applied to the input, with respect to IOCOM, to guarantee an ON state. 10.8.V 26.4V ON State Voltage, Active Low Configuration Voltage applied to the input, with respect to IOPWR, to guarantee an ON state. -26.4 V -10.8 V ON State Current Current flow to guarantee an ON State 3.0 mA 12.0 mA OFF State Voltage, Voltage applied to the input, with Active High respect to IOCOM, to guarantee an OFF Configuration state. -1.0 V 3.0 V OFF State Voltage, Voltage applied to the input, with Active Low respect to IOPWR, to guarantee an OFF Configuration state. -3.0 V 1.0 V Propagation Signal propagation delay from the high Delay, speed digital input to the firmware High Speed Inputs accessible registers, active high or active low, turning ON or turning OFF. — 0.5 µS Propagation Delay, Low Speed Inputs — 100 µS Signal propagation delay from the low speed digital input to the firmware-accessible registers, active high or active low, turning ON or turning OFF. Digital Outputs There are eight general purpose digital outputs to use as needed. They are not connected in hardware to perform any function. Digital outputs (Outputs 1-7) are transistor outputs, as shown in Figure 2.4. Output 8 is a normally open relay output. IMPORTANT Publication 2098-IN001B-EN-P — July 2000 There is no output short circuit protection on the transistor outputs. To some degree, the bipolar transistors limit their own current output, but they have not been designed to specifically protect against shorts to power or ground. Connecting Your Ultra5000 2-7 Figure 2.4 Transistor Output Hardware Configuration The following table provides a description of the digital (transistor) output specifications. Parameter Description Minimum Maximum ON State Current Current flow when the output transistor is ON — 50 mA OFF State Current Current flow when the output transistor is OFF — 0.1 mA ON State Voltage Voltage across the output transistor when ON — 1.5 V OFF State Voltage Voltage across the output transistor when OFF — 50 V The following table provides a description of the digital (relay) output specifications. Parameter Description Minimum Maximum ON State Current Current flow when the relay is closed — 1A ON State Resistance Contact resistance when the relay is closed — 1Ω OFF State Voltage Voltage across the contacts when the relay is open — 30 V OFF State Current Current flow when the relay is open — 0.01 mA Publication 2098-IN001B-EN-P — July 2000 2-8 Connecting Your Ultra5000 Analog Inputs There are two single-ended general purpose analog inputs to use as needed. A 12-bit sampling A/D converter generates the digital representation of the analog inputs. The following table provides a description of the analog input specifications. Parameter Description Minimum Maximum Resolution Number of states that the input signal is divided 12 Bits into which is 2(to the number of bits). — Input Impedance Open circuit impedance measured between the input and analog common. 10 kΩ — Input Signal Voltage applied to the input - Usable Range Voltage applied to the input - Limit -10 V +10 V - 14 V + 14 V Offset Error Deviation from the correct value expected from analog-to-digital conversion when 0 V is applied to the input. — 50 mV Gain Error Deviation of the transfer function from unity gain, expressed in a percent of full scale. — 1% — 100 µS Propagation Delay from the input to the firmware-accessible Delay registers. Analog Outputs There are two single-ended general purpose analog outputs to use as needed. A 12-bit D/A converter generates an analog representation of the digital command value. The two analog outputs are set to zero volts after power comes up. The following table provides a description of the analog output specifications. IMPORTANT Publication 2098-IN001B-EN-P — July 2000 Output values can vary during power-up until the specified power supply voltage is reached. Parameter Description Minimum Maximum Resolution Number of states that the output signal is divided into, which is 2(to the number of bits). 12 Bits — Output Current Current capability of the output. -2 mA +2 mA Output Signal Range Range of the output voltage. -10 V +10 V Offset Error Deviation when the output should be at 0V. — 50 mV Gain Error Deviation of the transfer function from unity gain, expressed in a percent of full scale. — 1% Connecting Your Ultra5000 Understanding Encoder Feedback Specifications 2-9 The Ultra5000 offers two motor feedback interfaces. A description of the Ultra5000 encoder feedback specifications is provided starting below. Encoder Interface The Ultra5000 main encoder feedback connector is CN2. The motor encoder interface circuitry features include: • • • • 2.5 MHz maximum line frequency RS-485 serial channel for communicating with intelligent encoders Hall input for start-up commutation only Interpolation of sine/cosine encoders All encoder signals are filtered using analog and digital filtering. The inputs also include illegal state change detection. Refer to Figure 2.5 for a schematic of the motor encoder inputs. Hardware latches can be used for latching the encoder position based on an index input or a digital input transition. Figure 2.5 Schematic of the Motor Encoder Inputs Publication 2098-IN001B-EN-P — July 2000 2-10 Connecting Your Ultra5000 The following table provides a description of the motor encoder interface specifications. Parameter Description Minimum Maximum AM, BM, and IM ON State Input Voltage Input voltage difference between the + input and the - input that is detected as an ON state. +1.0 V +12.0 V AM, BM, and IM OFF State Input Voltage Input voltage difference between the + input and the - input that is detected as an OFF state. -1.0 V -12.0 V Common Mode Input Voltage Potential difference between any encoder signal and logic ground. -7.0 V +12.0 V DC Current Draw Current draw into the + or - input. -30 mA 30 mA AM, BM Input Signal Frequency Frequency of the AM or BM signal inputs. The count frequency is 4 times this frequency, since the circuitry counts all four transitions. — 2.5 MHz IM Pulse Width Pulse width of the index input signal. Since the index is active for a 125 nS percentage of a revolution, the speed will determine the pulse width. AM / BM Phase Error, 2.5 MHz Line Frequency Amount that the phase relationship between the AM and BM inputs can deviate from the nominal 90°. -22.5° +22.5° AM / BM Phase Error, 1 MHz Line Frequency Amount that the phase relationship between the AM and BM inputs can deviate from the nominal 90°. -45° +45° AM and BM Input Voltage, Sine/Cosine Interpolation Peak-to-peak input voltages of the AM and BM inputs for high resolution interpolation. 0.9 V (p-p) 1.1 V (p-p) Auxiliary Encoder Interface All encoder input signals (CN1B) are filtered using analog and digital filtering, including illegal state change detection. The input circuitry includes pull-up and pull-down resistors for compatibility with single-ended and open collector signals, in addition to differential signals. A single channel schematic of the auxiliary encoder interface is shown in the figure below. Figure 2.6 Schematic of the Auxiliary Encoder Circuitry Publication 2098-IN001B-EN-P — July 2000 Connecting Your Ultra5000 2-11 The following table provides a description of the auxiliary encoder interface specifications. Parameter Description Minimum Maximum ON State Input Voltage Input voltage difference between the + input and the - input that is detected as an ON state. +1.0 V +12.0 V OFF State Input Voltage Input voltage difference between the + input and the - input that is detected as an OFF state. -1.0 V -12.0 V Common Mode Input Voltage Potential difference between any encoder signal and logic ground. -7.0 V +12.0 V DC Current Draw Current draw into the + or - input. -5 mA 5 mA Input Signal Frequency Frequency of the AX or BX signal inputs. In A/B/I mode, the count — frequency is 4 times this frequency, since the circuitry counts all four transitions of these lines. In Step/Direction or CW/CCW mode, the count frequency is the same as the signal frequency. 2.5 MHz IX Pulse Width, A/B/I Mode Pulse width of the index input signal. Since the index is active for a 125 nS percentage of a revolution, the speed will determine the pulse width. — AX / BX Phase Error, 2.5 MHz Line Frequency, A/B/I Mode Amount that the phase relationship between the AM and BM inputs can deviate from the nominal 90°. -22.5° +22.5° AX / BX Phase Error, 1 MHz Line Frequency, A/B/I Mode Amount that the phase relationship between the AM and BM inputs can deviate from the nominal 90°. -45° +45° Understanding Serial Interfaces The Ultra5000 contains two identical serial port connectors (Main Serial Port CN3A and Auxiliary Serial Port CN3B) that implement the standard NRZ asynchronous serial format, and support RS-232, RS-422, and RS-485 communication standards. Standard baud rates include 1,200, 2,400, 4,800, 9,600, 19,200, and 38,400 baud. Data lengths of 7 and 8 bits are supported. The connector pinout dedicates separate pins for the RS-232 and RS-422/ RS-485 signals, so that the communication standard can be changed by just using a different cable. Refer to Figure 2.7 for the serial interface hardware configuration. Figure 2.7 Serial Interface Hardware Configuration Publication 2098-IN001B-EN-P — July 2000 2-12 Connecting Your Ultra5000 Understanding Basic Wiring Requirements This section contains basic wiring information for the Ultra5000. ATTENTION ! IMPORTANT Plan the installation of your system so that you can perform all cutting, drilling, tapping, and welding with the system removed from the enclosure. Because the system is of the open type construction, be careful to keep any metal debris from falling into it. Metal debris or other foreign matter can become lodged in the circuitry, which can result in damage to components. This section contains common PWM servo system wiring configurations, size, and practices that can be used in a majority of applications. National Electrical Code, local electrical codes, special operating temperatures, duty cycles, or system configurations take precedence over the values and methods provided. For emergency stop (E-stop) wiring information, refer to Appendix C. Publication 2098-IN001B-EN-P — July 2000 Connecting Your Ultra5000 2-13 Routing High and Low Voltage Cables Be aware that when you connect and route power and signal wiring on a machine or system, radiated noise from nearby relays (relay coils should have surge suppressors), transformers, and other electronic drives can be induced into motor or encoder feedback, communications, or other sensitive, low voltage signals. This can cause system faults and communication problems. To minimize the levels of radiated noise, route machine power and signal lines separately. Figure 2.8 Routing Cables Inside Your Cabinet Low voltage Communications Control I/O wiring Motor feedback cables Motor power cables Always separate all low voltage signal wiring from high voltage power wiring to reduce affects of EMI and RFI. 120/240V AC power Always cross high and low voltage conductors at 90 degree angles. Unshielded conductors Maximize distance between high and low voltage cables on parallel runs Do not run low and high voltage wires in the same wire way Minimize unshielded lead length Publication 2098-IN001B-EN-P — July 2000 2-14 Connecting Your Ultra5000 Grounding Your Ultra5000 We recommend that all equipment and components of a machine or process system have a common earth ground point connected to their chassis. A grounded system provides a safety ground path for short circuit protection. Grounding your modules and panels minimizes shock hazards to personnel and damage to equipment caused by short circuits, transient overvoltages, and accidental connection of energized conductors to the equipment chassis. For CE grounding requirements, refer to Appendix C. Grounding Your System to the Subpanel ATTENTION ! The National Electrical Code contains grounding requirements, conventions, and definitions. Follow all applicable local codes and regulations to safely ground your system. Refer to the illustration below for details on grounding your Ultra5000. Refer to Figure 2.15 for the power wiring diagram. Figure 2.9 Safety Ground Configuration with Multiple Ultra5000 Systems on One Panel Ultra5000 Intelligent Positioning Drives Bonded ground bar (optional) All ground wiring must comply with local codes Safety Ground (pin 5) Always follow NEC and applicable local codes Ground grid or power distribution ground Bonded cabinet ground bus Publication 2098-IN001B-EN-P — July 2000 Connecting Your Ultra5000 2-15 Grounding Multiple Subpanels To ground multiple subpanels, refer to the figure below. Figure 2.10 Subpanels Connected to a Single Ground Point Always follow NEC and applicable local codes Ground grid or power distribution ground EMC Motor Ground Termination For F-Series, H-Series, and N-Series motors the factory supplied power cables are shielded. The power cable is designed to be terminated at the drive during installation. A small portion of the cable jacket is removed which exposes the shield braid. The exposed area must be clamped to the bottom of the drive chassis using the clamp provided. Refer to Figure 2.11 for an illustration. ATTENTION To avoid hazard of electrical shock, ensure shielded power cables are grounded at a minimum of one point for safety. ! Publication 2098-IN001B-EN-P — July 2000 2-16 Connecting Your Ultra5000 Figure 2.11 Motor Cable EMC Shield Connection Ultra5000 V W Motor Cable Jacket Clamp Shield Motor Cable Jacket Y-Series motors have a short pigtail cable which connects to the motor, but is not shielded. These motor power cables have a 152.4 mm (6.0 in.) shield termination wire with a ring lug that connects to the closest earth ground. The termination wire may be extended to the full length of the motor pigtail if necessary, but it is best to connect the supplied wire directly to ground without lengthening. Refer to Figure 2.12 for an illustration. Figure 2.12 Y-Series Motor Cable EMC Connection Connectors Motor Power Cable 152.4 mm (6.0 in.) Termination Wiring Your Ultra5000 Y-Series Motor These procedures assume you have bonded and mounted your Ultra5000 to the subpanel and that there is no power applied to the system. ATTENTION ! Publication 2098-IN001B-EN-P — July 2000 Pigtail Cable This drive contains ESD (Electrostatic Discharge) sensitive parts and assemblies. You are required to follow static control precautions when you install, test, service, or repair this assembly. If you do not follow ESD control procedures, components can be damaged. If you are not familiar with static control procedures, refer to Allen-Bradley publication 8000-4.5.2, Guarding Against Electrostatic Damage or any other applicable ESD Protection Handbook. Connecting Your Ultra5000 2-17 The following sections provide information and procedures on how to wire your Ultra5000. Connecting Interface Cables Connect all interface cables as shown in the table below. This cable: Plugs into this connector: 28-pin, Digital I/O CN1A 14-pin, Auxiliary encoder/analog I/O CN1B 15-pin, Motor encoder feedback CN2 9-pin, Main serial port CN3A 9-pin, Auxiliary serial port CN3B Wiring I/O Connections To wire your CN1A and CN1B I/O connectors: 1. Prepare your I/O wires by stripping approximately 6 mm (0.25 in.) of insulation from the end. Note: Use caution not to nick, cut, or otherwise damage strands as you remove the insulation. 2. Using the small blade type screw driver supplied with your Ultra5000 (part number 9111-0031) depress the spring clamp next to the pin you’re prepared to wire and insert the wire, as shown in Figure 2.13. Figure 2.13 Inserting Wires into the Connector Housing 3. Remove the screw driver and gently pull on the wire to make sure it does not come out of its terminal. Re-insert and test any loose wires. Publication 2098-IN001B-EN-P — July 2000 2-18 Connecting Your Ultra5000 Wiring Power Connections The Ultra5000 requires single phase AC power, 100 to 240 VAC. The input power may be optionally isolated through a transformer. Field wiring must be copper, with 75°C (194°F) minimum rating. The phasing of L1 and L2/N is arbitrary. The earth ground connection is required for safe and proper system operation. Terminal block connections should be torqued to 1.25 Nm (11 lb-in.). Refer to Figure 2.15 for a power wiring diagram. The Motor Encoder and Auxiliary Encoder ports are powered by a single internal power supply. The power supply has a resettable fuse that opens at 3 amps and automatically resets itself when the current falls below 3 amps. There are no internal fuses requiring replacement. The Ultra5000 utilizes solid state motor overload protection which operates in accordance with UL 508C. Motor overload protection trips: At: Eventually 100% overload Within 8 minutes 200% overload Within 20 seconds 600% overload ATTENTION ! To avoid personal injury and/or equipment damage, ensure installation complies with specifications regarding wire types, conductor sizes, branch circuit protection, and disconnect devices. The National Electrical Code (NEC) and local codes outline provisions for safely installing electrical equipment. To avoid personal injury and/or equipment damage, ensure motor power connectors are used for connection purposes only. Do not use them to turn the unit on and off. To avoid personal injury and/or equipment damage, ensure shielded power cables are grounded to prevent potentially high voltages on the shield. To wire your input power and motor connections: 1. Prepare your wires for connection to the terminal block by stripping approximately 12 mm (0.50 in.) of insulation from the end. Note: Publication 2098-IN001B-EN-P — July 2000 Use caution not to nick, cut, or otherwise damage strands as you remove the insulation. Connecting Your Ultra5000 2-19 2. Check for continuity in the motor leads (wires marked U, V, and W). Verify that the resistance reading from each wire to earth ground is above 500k ohms. If your resistance reading is: Then: Above 500k ohms Go to main step 3. Below 500k ohms Go to the chapter Maintaining Your Ultra5000. 3. Prepare your motor cable for the CE clamp on the bottom of the Ultra5000 drive by removing 12 mm (0.50 in.) of insulation 185 mm (7.25 in.) from the end of the motor leads (wires marked U, V, and W). Refer to the figure below for an illustration. Figure 2.14 CE Clamp Cable Preparation 185 mm (7.25 in.) 12 mm (0.50 in.) U Exposed Braid V W Motor Cable 4. Using a screw driver, loosen the screw for each of the terminal locations and attach wires as shown in the table below. Refer to Figure 2.2 for the location of the terminal block. Refer to Figure 2.15 for the Ultra5000 power wiring diagram. Insert the wire labeled: Into this terminal block position: DC bus +1 1 DC bus -1 2 2 L1 (Line 1) 3 3 L2 (Line 2)/ N (Neutral) 4 4 Safety (earth) ground 5 U2 6 2 7 8 W2 8 9 Motor case ground 9 V Terminal Block Pin-out 1 5 6 7 1 Do not connect an external I/O power supply to the DC bus. The DC+ and DC- terminals connect directly to the power bus of the drive. 2 Ensure motor power is wired with proper phasing relative to the motor terminals. Publication 2098-IN001B-EN-P — July 2000 2-20 Connecting Your Ultra5000 5. Tighten each screw with a torque of 1.25 Nm (11 lb-in.). 6. Gently pull on each wire to make sure it does not come out of its terminal. Re-insert and tighten any loose wires. 7. If your motor is: Then: F-Series, H-Series, or N-Series Go to Connecting F-Series, H-Series, and N-Series EMC Cable Shield Y-Series Go to Connecting Y-Series EMC Cable Shield Connecting F-Series, H-Series, and N-Series EMC Cable Shield 1. Remove the two screws securing the cable clamp on the bottom of the Ultra5000 drive (refer to Figure 2.11 for cable clamp location). 2. Place the cable within the clamp and replace the screws (do not tighten). 3. Position the exposed portion of the cable braid directly in line with the clamp. 4. Tighten the screws with a torque of 0.9-1.1 Nm (8.0-10.0 lb-in.). Connecting Y-Series EMC Cable Shield Connect the 152.4 mm (6.0 in.) termination wire to the closest earth ground (refer to Figure 2.12 for pigtail location). Publication 2098-IN001B-EN-P — July 2000 11 10 9 5 6. 8. 4 10 TRANSFORMER CHASSIS L2/N L1 SIGNAL U V W MOTOR CASE MOTOR POWER CONNECTOR PIN A B C D ISOLATION OR AUTO TRANSFORMER (OPTIONAL, NOT REQUIRED WHEN DESIRED INPUT VOLTAGE IS AVAILABLE DIRECTLY FROM THE LINE) 4.0mm2 (12 AWG) 2.5mm2 (14 AWG) 1.5mm2 (16 AWG) 2.5mm2 (14 AWG) 1.5mm2 (16 AWG) MINIMUM RECOMMENDED POWER WIRE mm2 (AWG) (75°C COPPER MIN) 5 TERM. BLOCK L1,L2/N, 2000W TO PROTECTIVE EARTH TERMINAL FUSE BLOCK AC LINE FILTER 9 TERMINAL STRIP ACCEPTABLE WIRE RANGE mm 2 (AWG) 0.5-4.0mm2 (20-12 AWG) TORQUE ALL TERMINALS TO 1.25 Nm (11 LB-IN.) L1,L2/N, L1,L2/N, 11 U V W DC+ DCL1 L2/N DIGITAL DRIVE MODULE 4.0mm2 (12 AWG) 2.5mm2 (14 AWG) 1.5mm2 (16 AWG) MACHINE COMMON GROUNDING BUS BAR COMMON GROUNDING POINT FOR AMPLIFIER SYSTEM (ONE PER AXIS) XCON TERMINAL(S) 1000W 500W DRIVE RECOMMENDED POWER WIRE mm2 (AWG) (75°C COPPER MIN) INPUT POWER WIRES 10 WIRE SIZES ARE MINIMUM RECOMMENDED VALUES. THE REQUIREMENTS OF LOCAL REGULATIONS SHOULD BE OBSERVED. TERMINATE THE MOTOR POWER CABLE SHIELD BY CLAMPING IT TO THE DRIVE WITH THE BRACKET PROVIDED. THIS BRACKET CAN BE USED FOR STRAIN RELIEF IF NON-SHIELDED CABLES ARE USED. SNUG BRACKET SCREWS, DO NOT OVER TIGHTEN. NEVER TORQUE OVER 10 LB-IN. A SUPPLY DISCONNECTING DEVICE IS REQUIRED FOR MAINTENANCE & SAFETY. LOCAL REGULATIONS SHOULD BE OBSERVED. IF A GROUNDED NEUTRAL IS USED INSTEAD OF L2, ONLY L1 MAY BE SWITCHED OR FUSED. CURRENT RATINGS ARE INDEPENDENT OF THE INPUT VOLTAGE. REDUCED VOLTAGE WILL RESULT IN A REDUCTION IN SPEED, BUT NOT TORQUE. DRIVE RATED 100-240 VAC RMS, SINGLE PHASE INPUT VOLTAGE (230 VAC STANDARD). DO NOT DAISY CHAIN DRIVE MODULE POWER CONNECTIONS. MAKE SEPARATE CONNECTIONS DIRECTLY TO THE AC SUPPLY. MULTIPLE DRIVE MODULES MAY BE POWERED FROM ONE TRANSFORMER OR OTHER AC SUPPLY SOURCE. AC LINE FILTER AND SHIELDED MOTOR CABLE ARE TO BE USED FOR IMPROVING THE DRIVE MODULES ELECTROMAGNETIC COMPATIBILITY, AND ARE REQUIRED TO MEET THE EUROPEAN ELECTROMAGNETIC COMPATIBILITY DIRECTIVE. CAUTION: AC LINE FILTERS HAVE LARGE LEAKAGE CURRENTS AND REQUIRE DISCHARGE TIME UPON POWER REMOVAL. WIRING BETWEEN THE DRIVE MODULE AND FILTER SHOULD BE KEPT AS SHORT AS POSSIBLE. THE COMMON GROUND BUS BAR SHOULD BE AS CLOSE TO THE DRIVE AS POSSIBLE. NOTES SINGLE PHASE AC LINE 50/60Hz 2 4.0mm2 (12 AWG) 1.5mm2 (16 AWG) mm2 (AWG) FUSED DISCONNECT 2 OR CIRCUIT BREAKER Y-SERIES N-SERIES H-3007 H-3016 H-4030 F-4030 H-4050 F-4050 MPL-A310 MPL-A320 MPL-A330 MPL-A420 MPL-A430 MPL-A4520 MPL-A4530 MOTOR MOTOR POWER MATING CONNECTOR CONTACT SIZE MOTOR POWER WIRES U, V, W, AND GND 9 Y-SERIES N-SERIES H-SERIES F-SERIES W-SERIES MP-SERIES MOTORS 4 FUSE BLOCK AC LINE FILTER 9 11 U V W DC+ DCL1 L2/N DRAWN BY DATE DATE DESIGN ENGR 3-3-00 DATE CHKR __ BB SHEET 1 of 1 9111-0010 DC DO NOT SCALE DRAWING JM 11-9-99 DIMENSIONS ARE IN INCHES DIAG,POWER CONN, BREAK ALL EDGES .02 MAX FILLETS AND ROUNDS .02 R MAX ULTRA 3000/5000 TOLERANCE ON: PART NO. ANGLES ±1ANGLES ° Confidential information of FRACTIONS:±1/64" ROCKWELL AUTOMATION SCALE DWG SIZE DECIMALS.XX±.010 Eden Prairie, MN 55344 1:1 .XXX±.005 D UNLESS OTHERWISE SPECIFIED 3-2-00 __ MOTOR POWER CONNECTOR CHGD DRIVE & SIGNAL TYPES, ADDED MP MTRS. RELEASED 9111-0010 PART NO. MOTOR POWER CONNECTOR MATING Y-SERIES N-SERIES H-SERIES F-SERIES W-SERIES MP-SERIES MOTORS 9 REV ECO BY REVISION DESCRIPTION 02 00R2015 JM A 23244 JM COMMON GROUNDING POINT FOR AMPLIFIER SYSTEM (ONE PER AXIS) XCON DIGITAL DRIVE MODULE DRIVES CURRENT REQUIREMENT, MAXIMUM (AMPS AC RMS) 5.0 Amps AC at 100-240 Volts AC 500W 9.0 Amps AC at 100-240 Volts AC 1000W 18.0 Amps AC at 100-240 Volts AC 2000W NOTE: POWER INITIALIZATION REQUIRES A SHORT PERIOD OF INRUSH CURRENT OF 100A FOR THE INPUT. DUAL ELEMENT TIME DELAY (SLOW BLOW) FUSES ARE RECOMMENDED. FUSE SIZES MUST BE SELECTED ACCORDING TO LOCAL REGULATIONS. DIGITAL DRIVE MODULE INPUT CURRENT REQUIREMENTS TERMINALS L1,L2/N, Connecting Your Ultra5000 2-21 Figure 2.15 Ultra5000 Power Wiring Diagram Publication 2098-IN001B-EN-P — July 2000 2-22 Connecting Your Ultra5000 Publication 2098-IN001B-EN-P — July 2000 Chapter 3 Commissioning Your Ultra5000 Chapter Objectives This chapter provides you with information to power up and start your Ultra5000. This chapter includes: • • • • General startup precautions Understanding communication switch settings Applying power to your system Configuring your Ultra5000 Before you begin these procedures, be sure to read and understand the information in the previous chapters of this manual. Note: General Startup Precautions The procedures in this chapter do not include information regarding integration with other products. The following precautions pertain to all of the procedures in this chapter. Be sure to read and thoroughly understand them before proceeding. ATTENTION ! ATTENTION ! 1 This product contains stored energy devices. To avoid hazard of electrical shock, verify that all voltages on the system bus network have been discharged before attempting to service, repair or remove this unit. Only qualified personnel familiar with solid state control equipment and safety procedures in publication NFPA 70E or applicable local codes should attempt this procedure. This drive contains ESD (Electrostatic Discharge) sensitive parts and assemblies. You are required to follow static control precautions when you install, test, service, or repair this assembly. If you do not follow ESD control procedures, components can be damaged. If you are not familiar with static control procedures, refer to Allen-Bradley publication 8000-4.5.2, Guarding Against Electrostatic Damage or any other applicable ESD Protection Handbook. Publication 2098-IN001B-EN-P — July 2000 3-2 Commissioning Your Ultra5000 Understanding Communication Switch Settings The Ultra5000 communication address selector switches (MSD and LSD) allow setting a unique address for each Ultra5000 connected on a serial network. The switches allow setting addresses 0-99. Refer to Figure 2.2 for the switch locations. Addresses are reserved for use as shown in the table below. Switch Settings: Description: 0-63 Valid settings for normal drive operation 64-95 Reserved for factory use only 96 Disable Program Auto Run mode. With this setting during power-up, programs are not allowed to run. This mode is useful to correct programming problems that may have caused communications loss when the program is running. Applying Power To Your System 97 Set Factory Default Objects mode. With this setting during power-up, all internal firmware objects are reset to factory defaults. Any objects created by a user program is also reset. This mode is useful to return a drive to factory defaults. 98 Reserved for factory use only 99 Boot mode. With this setting during power-up, the only action that my be performed is to upgrade the drive firmware using Ultraware. This procedure assumes you have wired your Ultra5000 system, verified the wiring, and are ready to begin using your Ultraware software. To apply power to your Ultra5000 system: 1. Disconnect any load to the motor. Ensure the motor is free of all linkages when initially applying power to the system. 2. Verify the input supply voltage. The Ultra5000 requires single phase, 100-240V AC rms power with an input frequency of 47-63 Hz. Publication 2098-IN001B-EN-P — July 2000 If the input power is: Then: Within the acceptable range (100-240V AC) Go to main step 3. Not within the acceptable range Stop and call for technical support. Do not proceed until proper input power is supplied. Once you have proper input power, proceed to main step 3. Commissioning Your Ultra5000 3-3 3. Set the communication address switches as shown in the example table below. For the location of the address switches, refer to Figure 2.2. For example, if you have: Set the MSD switch to: Set the LSD switch to: 1 drive 0 1 2 drives 0 2 3 drives 0 3 4 drives 0 4 4. Apply input power to the Ultra5000 and observe the power indicator LED on the Ultra5000 front panel (refer to Figure 2.2 for LED location). If the power LED: Then: Is on Go to main step 5. Is not on 1. Check your input power connections. 2. Repeat main step 4. 5. Check the seven segment status LEDs. Configuring Your Ultra5000 If the seven segment status LEDs: Then: Actively cycle in a full circle The drive is ready. Go to Configuring Your Ultra5000. Actively cycle in a half circle with address switches set to MSD=9 and LSD=9 Go to main step 3 and reset your address switches according to the table. Actively cycle in a half circle with address switches set according to the table in step 3 Your firmware requires an upgrade. Go to Configuring Your Ultra5000 Display an E (indicates error) Go to the chapter Maintaining Your Ultra5000. This procedure assumes you have applied power to your system. To configure your Ultra5000 system: 1. Start your Ultraware software. Refer to the Ultraware User Manual (publication 2098-UM001A-EN-P) for information on starting the Ultraware software. 2. Open a recently used file or create a new file. Ultraware will scan for on-line drives. Publication 2098-IN001B-EN-P — July 2000 3-4 Commissioning Your Ultra5000 3. Click on the Stop Scanning button when your drive is detected or wait for the scanning to time out. 4. Look for the Ultra5k icon under the On-Line Drives tree. The Ultra5k icon indicates that your drive is detected. If your Ultra5000 drive: Then: Is detected and listed under the On-Line The system is ready. Go to Drives tree main step 5. Is not detected 1. Go to the previous section, Applying Power to Your System, step 3, and verify your address switch settings. 2. Check your serial cable connections. 3. Go to main step 1 of this section. 5. Refer to step 5 in the previous section, Applying Power to Your System. If you were told: Then: The drive is ready Go to main step 6 below. Your firmware requires an upgrade 1. Select File from the main menu bar. 2. Select Upgrade Firmware. 3. Go back to main step 1 and repeat procedure. 6. Refer to the Ultraware User Manual (publication 2098-UM001A-EN-P) for further configuration and tuning instructions. The software and hardware are communicating and you are ready to configure your Ultra5000. Publication 2098-IN001B-EN-P — July 2000 Chapter 4 Maintaining Your Ultra5000 Chapter Objectives This chapter covers the following topics: • Maintaining the drive • Troubleshooting Maintaining the Drive The Ultra5000 Drive is designed to function with a minimum of maintenance. ATTENTION ! DC bus capacitors may retain hazardous voltages after input power has been removed, but will normally discharge in several seconds. Before working on the drive, measure the DC bus voltage to verify it has reached a safe level or wait the full time interval listed on the warning on the front of the drive. Failure to observe this precaution could result in severe bodily injury or loss of life. Periodic Maintenance Normally the only maintenance required is removal of superficial dust and dirt from the drive and a quick check of cabling insulation and connections. Cleaning the Drive To clean the drive, use an OSHA approved nozzle that provides compressed air under low pressure <20 kPa (30 psi) to blow the exterior surface and the vents clean. Inspecting the Cables Ensure input power is disconnected before touching cabling or connections: • Visually inspect all cables for abrasion, • D-shell connectors should be inspected for proper seating and signal continuity end-to-end. 1 Publication 2098-IN001B-EN-P — July 2000 4-2 Maintaining Your Ultra5000 The normal state of the 7-segment LED is to actively cycle its segments and show an illuminated decimal point that indicates +5 volts. Refer to the table below to identify problems, potential causes, and appropriate actions to take to resolve the problems. If problems persist after attempting to troubleshoot the system, please contact your Allen-Bradley representative for further assistance. Troubleshooting Error Codes The following list of problematic symptoms (no error code shown) and problems with assigned error codes is designed to help you resolve problems. The 7-segment LED (located on the front of the drive) displays the error codes. An E will be displayed followed by flashing the two-digit error code one digit at a time. This is repeated until the problem is cleared. Error Problem or Code Symptom Possible Cause(s) Action/Solution Power (PWR) indicator not illuminated No AC power. Verify power (115/230V AC single phase) is applied to the Ultra5000. Internal power supply malfunction. Call your Allen-Bradley representative. 7-Segment LED not cycling Firmware corrupt Set node address to 99 and reload firmware Small LED segment cycling Node address set to 99 Change node address Firmware corrupt Set node address to 99 and reload firmware Motor jumps when first enabled Motor encoder wiring error. Check motor encoder wiring. Incorrect motor chosen. Select the proper motor in Ultraware Software. Digital I/O not working correctly I/O power supply disconnected. Verify connections and I/O power source. Incorrectly configured for active high or active low. Change configuration. Call your A-B representative 04 Motor Motor thermostat trips due to: Overtemperature High motor ambient temperature, and/or Excessive RMS torque. Operate within (not above) the continuous torque rating for the ambient temperature (40°C maximum). Lower ambient temperature, increase motor cooling. 05 IPM Fault Motor cables shorted. Verify continuity of motor power cable and connector. Motor winding shorted internally. Check for short on U,V,W and Gnd windings of the motor. Ultra5000 temperature too high. Check for clogged vents or defective fan. Ensure cooling is not restricted by insufficient space around the unit. Operation above continuous power rating. Verify ambient temperature is not too high (above 60° C). Operate within the continuous power rating. Ultra5000 has a bad IPM, output short circuit, or overcurrent. Replace Ultra5000. Publication 2098-IN001B-EN-P — July 2000 Maintaining Your Ultra5000 4-3 Error Problem or Code Symptom Possible Cause(s) Action/Solution 09 Bus Undervoltage Low AC line/AC power input. 100V AC minimum for safe Ultra5000 operation. Verify voltage level of the incoming AC power. Check AC power source for glitches or line drop (below 90V AC). Install an uninterruptible power supply (UPS) on your AC input. 10 Bus Overvoltage Excessive regeneration of power. When the motor is driven by an external mechanical power source, it may regenerate too much peak energy through the Ultra5000’s power supply. The system faults to save itself from an overload. Change the deceleration or motion profile. Use a larger system (motor and Ultra5000). Use an Active Shunt. Excessive AC input voltage. Verify input is below 264V AC. Output short circuit. Check for shorts. Motor cabling wires shorted together. Check for shorts. Internal motor winding short circuit. Check for shorts. 11 Illegal Hall State Incorrect phasing. 12 to 19 RESERVED 20 Motor Encoder State Error Check the Hall phasing. Bad connections. Verify the Hall wiring. The motor encoder encountered an illegal transition. Replace the motor/encoder. Use shielded cables with twisted pair wires. Route the feedback away from potential noise sources. Check the system grounds. Ensure digital filtering of encoder signals is enabled. Bad encoder. Replace motor/encoder. 21 Auxiliary Encoder state error The auxiliary encoder encountered an illegal transition. Use shielded cables with twisted pair wires. Route the encoder cable away from potential noise sources. Bad encoder - replace encoder. Check the ground connections. 22 Motor Thermal Protection Fault The internal filter protecting the motor from overheating has tripped. Reduce acceleration rates. Reduce duty cycle (ON/OFF) of commanded motion. Increase time permitted for motion. Use larger Ultra5000 and motor. 23 IPM Thermal Protection Fault The internal filter protecting the IPM at slow speed has tripped. Reduce acceleration rates. Reduce duty cycle (ON/OFF) of commanded motion. Increase time permitted for motion. Use larger Ultra5000 and motor. 24 to 99 RESERVED Call your local Allen-Bradley representative. Publication 2098-IN001B-EN-P — July 2000 4-4 Maintaining Your Ultra5000 Publication 2098-IN001B-EN-P — July 2000 Appendix A Specifications and Dimensions Chapter Objectives This chapter covers: • Ultra5000 specifications • Dimensions Ultra5000 Specifications This section lists the specifications for the Ultra5000. General Power Specifications The table below lists general power specifications and requirements. Specification Description IPD-005 IPD-010 IPD-020 AC Input Voltage and Frequency 100-240 Vacrms nominal Single Phase, 47 - 63 Hz 100-240 Vacrms nominal Single Phase, 47 - 63 Hz 100-240 Vacrms nominal Single Phase, 47 - 63 Hz AC Input Current 5 Arms 9 Arms 18 Arms Bus Voltage 141-339 Vdc 141-339 Vdc 141-339 Vdc Output Peak Current (0-peak) 7.5 Amps 15 Amps 30 Amps Continuous Output Current (0-peak) 2.5 Amps 5 Amps 10 Amps Bus Capacitance Energy Absorption (from 325-400 Vdc Bus)(1) 51 Joules 1880µF 51 Joules 1880µF 51 Joules 1880µF Peak Power Output(2) 120 V AC 0.75 kWatts 240 V AC 1.5 kWatts 120 V AC 1.5 kWatts 240 V AC 3.0 kWatts 120 V AC 3.0 kWatts 240 V AC 6.0 kWatts Continuous Power Output 120 V AC 0.25 kWatts 240 V AC 0.5 kWatts 120 V AC 0.5 kWatts 240 V AC 1.0 kWatts 120 V AC 1.0 kWatts 240 V AC 2.0 kWatts (1) Bus capacitance energy absorption is based on the following equations: 1 1 2 2 E = --- C ( V f ) – --- C ( V i ) 2 2 1 2 1 2 E = --- C ( 400 ) – --- C ( 325 ) 2 2 1 --- C ⋅ ( 400 2 – 325 2 ) = C ( 27187 ) 2 if C = 4 × 470uF (2) 1 E = 51 Peak Power is system and speed dependent and is not tested for the Drive alone. Publication 2098-IN001B-EN-P — July 2000 A-2 Specifications and Dimensions Physical and Environmental The table below lists physical and environmental specifications and requirements. Specification Description IPD-005 1.77 Kg (3.9 lbs) IPD-010 2.06 Kg (4.55 lbs) IPD-020 2.05 Kg (4.51 lbs) Operating Temperature 0oC to 55oC (32oF to 131oF) Storage Temperature -40oC to 70oC (-40oF to 158oF) Humidity 5% to 95% non-condensing Altitude 1500 meters (5000 ft) Derate 3% for each 300 m above 1500 meters Vibration 10 to 2000 Hz @ 2g Shock 15g 11 millisecond half sine Power Dissipation The maximum power losses are shown below to help in sizing an enclosure and any required ventilation. Typical heat losses can run approximately one-half maximum power losses. Publication 2098-IN001B-EN-P — July 2000 Model Maximum Loss (Watts) IPD-005 48 + dissipative shunt IPD-010 48 + dissipative shunt IPD-020 50 + dissipative shunt Specifications and Dimensions A-3 User Programming The table below lists physical and programming specifications. Specification Description Language Compiled ANSI C with Library of Motion Functions Programming Environment Full-featured Color Syntax Editor and C Compiler Integrated with Ultraware Operating System Real-time, multi-tasking, field upgradable flash User Program Memory 512 Kbytes Flash Memory, 100,000 Write Cycles Non-Volatile Memory 32 Kbytes (approximately 8000 non-volatile user variables) nvSRAM (High speed SRAM/EEPROM) Controller The table below lists controller specifications. Specification Description Processor Texas Instruments TMS320C32 32 Bit Floating Point Digital Signal Processor Clock Speed 60 MHz Commutation 3 Phase Sinusoidal, Space Vector Modulated (SVM) Current Loop SVM - 125 µsec update rate Velocity Loop Digital PI - 250 µsec update rate Position Loop Digital PI - 500 µsec update rate Position Range 32-bit signed Velocity Range 32-bit floating point Acceleration Range 32-bit floating point Electronic Gearing 64-bit signed Publication 2098-IN001B-EN-P — July 2000 A-4 Specifications and Dimensions Inputs and Outputs The table below lists I/O specifications. Specification Description General Purpose Digital Inputs 16 Optically Isolated 12-24 Volt Inputs Inputs/Outputs Sinking/Sourcing Selection Software Selectable as a Group to be Active High, Current Sinking or Active Low, Current Sourcing General Purpose Digital Outputs 7 Optically Isolated 12-24 Volt Outputs - 50 Milliamperes Maximum General Purpose Relay Output 1 Normally Open Relay - 30 Volts DC Maximum, 1 Ampere Maximum Current General Purpose I/O Response 100 µsec High Speed Input Response < 1 µsec (Inputs 1 and 2) Position Capture Response < 1 µsec (Input 1, Input 2, Motor Encoder Index, and Auxiliary Encoder Index) General Purpose Analog Inputs 2 12-Bit Analog to Digital Converters (+/- 10V, single-ended) General Purpose Analog Outputs 2 12-Bit Digital to Analog Converters (+/- 10V, +/- 2mA, single-ended) Communications The table below lists communication specifications. Specification Description Serial 2 Independent RS-232/RS-422/RS-485 Ports, 1200-38,400 Baud Motor Feedback The table below lists motor feedback specifications. Publication 2098-IN001B-EN-P — July 2000 Specification Description Input Modes Incremental with Index Maximum Input Frequency 2.5 MHz (Encoder Lines) Commutation Feedback Hall Sensor Specifications and Dimensions A-5 Auxiliary Feedback The table below lists auxiliary feedback specifications. Specification Description Operation Auxiliary Feedback Input Input Modes A quad B Input Type Line Receiver Maximum Input Frequency 2.5 MHz (Encoder Lines) Connectors The table below lists connector specifications. Specification Description Digital I/O Connector CN1A 28 Position Plugable Spring Clamp Terminal Block Auxiliary Feedback/Analog I/O Connector CN1B 14 Position Plugable Spring Clamp Terminal Block Motor Feedback Connector CN2 15 Position High Density Female D-Sub Connector Serial Port Connectors CN3A and CN3B 9 Position Female D-Sub Connector Main AC, Motor Power, and 9 Position Screw Terminal Block DC Bus Connector Publication 2098-IN001B-EN-P — July 2000 A-6 Specifications and Dimensions The following diagrams show the dimensions and mounting hole locations for the 2098-IPD-005, -010, and -020. Dimensions Figure A.1 Ultra5000 500W Mounting Diagram 83.82 mm (3.30 in.) 43.18 mm (1.70 in. ) 193.55 mm (7.62 in. ) 20.32 mm (.80 in. ) 131.83 mm (5.19 in. ) 205.23 mm (8.08 in. ) 184.91 mm (7.28 in. ) 144.53 mm (5.69 in. ) 91.19 mm (3.59 in. ) Publication 2098-IN001B-EN-P — July 2000 Specifications and Dimensions A-7 Figure A.2 Ultra5000 1 kW & 2 kW Mounting Diagram 63.82 mm (2.51 in.) 43.18 mm (1.70 in.) 193.55 mm (7.62 in.) 20.32 mm (0.80 in.) 131.83 mm (5.19 in.) 205.23 mm (8.08 in.) 184.91 mm (7.28 in.) 144.53 mm (5.89 in.) 114.30 mm (4.50 in.) Fan only on 2 kW units Publication 2098-IN001B-EN-P — July 2000 A-8 Specifications and Dimensions Publication 2098-IN001B-EN-P — July 2000 Appendix B Options and Accessories Chapter Objectives This appendix provides the Ultra5000 options and accessory catalog numbers. This appendix covers catalog numbers for the: • • • • • Ultra5000 family Ultra5000 accessories Motor power cables Motor feedback cables Interface cables Contact your local Allen-Bradley sales office for additional information. Ultra5000 Family The Ultra5000 has power ratings from 500W to 15 kW. The Ultra5000 family models are listed in the following table. Model Description Power Rating 2098-IPD-005 Ultra5000 Intelligent Positioning Drive 500W 2098-IPD-010 Ultra5000 Intelligent Positioning Drive 1 kW 2098-IPD-020 Ultra5000 Intelligent Positioning Drive 2 kW Option Cards Option cards added to the Ultra5000 Series drives are indicated by a suffix after the model number. In the event that two option cards are added to the drive, the model number will include a slash (/) between the option board designators. 1 Publication 2098-IN001B-EN-P — July 2000 B-2 Options and Accessories Ultra5000 Accessories External Shunt Kit Only the Active Shunt can be used with the Ultra5000. Use the following table to identify your External Shunt. Description Catalog Number Active Shunt Module (300W) 2090-UCSR-A300 Ferrites are used at both ends of the DC Bus wires for CE radiated emissions compliance. Use the following table to select a ferrite assembly. Box shaped ferrite assembly in fully enclosed nylon case. End ports are surrounded with flexible spring flutes to grip a range of cable diameters from.125 to.500” (3.2 to 12.7mm). FerriShield, Inc. 350 Fifth Avenue, Suite 7310 New York, NY 10118-7591 Mfg. Part/No. D E Impedance SS28B2034 0.250 0.120 125 Ω SS28B2037 0.350 0.200 154 Ω SS28B2032 0.500 0.200 230 Ω AC Line Filters A single filter per Ultra5000 would have a matching fuse rating of 6, 10, 23, 36, 50, or 70 AMPS respectively. Use the following table to identify the AC Line Filter for your application. Publication 2098-IN001B-EN-P — July 2000 Description Catalog Number AC Line Filter (6 Amp, Single phase) 2090-UXLF-106 AC Line Filter (10 Amp, Single phase) 2090-UXLF-110 AC Line Filter (23 Amp, Single phase) 2090-UXLF-123 AC Line Filter (36 Amp, Single phase) 2090-UXLF-136 AC Line Filter (36 Amp, Three phase) 2090-UXLF-336 AC Line Filter (50 Amp, Single phase) 2090-UXLF-150 AC Line Filter (50 Amp, Three phase) 2090-UXLF-350 AC Line Filter (70 Amp, Three phase) 2090-UXLF-370 Options and Accessories B-3 Mating Connector Kits The Ultra5000 has two serial connectors, one motor feedback connector, two I/O connectors and one terminal block for power connections. Connectors are D-shell type except for the terminal block connector and the I/O connectors. The I/O connectors are plugable connectors and are not available in a connector kit. Refer to the chapter Connecting Your Ultra5000 for pin and signal information for wiring the connectors. Description Catalog Number Mating Connector Kit (9 pin D-Shell, serial interface) 2090-UXCK-D09 Mating Connector Kit (15 pin D-Shell, motor feedback) 2090-UXCK-D15 Mating Connector Kit (Terminal Block) 2090-UXCK-TB Break Out Board, Cables, and Kits Use the following table to identify your break out board components. Description Catalog Number Break Out Board 2090-UXBB-D15 Break Out Board cable (14 Pin, D-Shell) 2090-UXBC-D1501 Break Out Board cable (28 Pin, D-Shell) 2090-UXBC-D1503 Break Out Board Kit (14 Pin, D-Shell) 2090-UXBK-D1501 Break Out Board Kit (28 Pin, D-Shell) 2090-UXBK-D1503 Publication 2098-IN001B-EN-P — July 2000 B-4 Options and Accessories Motor Power Cables Motor Feedback Cables Publication 2098-IN001B-EN-P — July 2000 Use the following table to identify motor power cables for your F, H, MP, N, and Y-Series motors. Length of cable xx is in meters (01, 03, 09, 15, and 30). Description Catalog Number H-2000/3000 Series Motor Power Cable, up to 2 kW Ultra3000/5000, (non flex, 16 AWG, straight angle) 2090-UXNPA-H16Sxx F-4000 Series Motor Power Cable, 2 and 3 kW Ultra3000/5000, (non flex, 14 AWG, straight angle) 2090-UXNPA-F14Sxx H-4000 Series Motor Power Cable, 2 and 3 kW Ultra3000/5000, (non flex, 14 AWG, straight angle) 2090-UXNPA-H14Sxx MP-Series Motor Power Cable, up to 2 kW Ultra3000/5000, (non flex, 16 AWG, straight angle) 2090-UXNPA-MP16Sxx N-Series Motor Power Cable, Ultra3000/5000, (non flex, 16 AWG, straight angle) 2090-UXNPA-N16Sxx Y-Series Motor Power Cable, Ultra3000/5000, (non flex, 16 AWG, straight angle) 2090-UXNPA-Y16Sxx Use the following table to identify motor feedback cables for your F, H, MP, N, and Y-Series motors. Length of cable xx is in meters (01, 03, 09, 15, and 30). Description Catalog Number F-Series Motor Feedback Cable, Ultra3000/5000, (Feedback to drive) 2090-UXNFB-FSxx F-Series Motor Feedback Cable, (Feedback to no connector) 2090-UXNFD-FSxx H-Series Motor Feedback Cable, Ultra3000/5000, (Feedback to drive) 2090-UXNFB-HSxx H-Series Motor Feedback Cable, (Feedback to no connector) 2090-UXNFD-HSxx MP-Series Motor Feedback Cable, Ultra3000/5000, (Feedback to drive) 2090-UXNFB-MPSxx MP-Series Motor Feedback Cable, (Feedback to no connector) 2090-UXNFD-MPSxx N-Series Motor Feedback Cable, Ultra3000/5000, (Feedback to drive) 2090-UXNFB-NSxx N-Series Motor Feedback Cable, (Feedback to no connector) 2090-UXNFD-NSxx Y-Series Motor Feedback Cable, Ultra3000/5000, (Feedback to drive) 2090-UXNFB-YSxx Y-Series Motor Feedback Cable, (Feedback to no connector) 2090-UXNFD-YSxx Options and Accessories Interface Cables B-5 Use the following table to identify controller cables for your Ultra5000. Length of cable xx is in meters (01, 03, 09, and 15). Description Catalog Number Interface Cable to Ultra3000/5000 (Computer Connection) 2090-UXPC-D09xx Publication 2098-IN001B-EN-P — July 2000 B-6 Options and Accessories Publication 2098-IN001B-EN-P — July 2000 Appendix C Application Information Chapter Objectives The following information is considered application specific and does not apply to all installations. This appendix covers the following topics: • • • • Mechanical resonance Using an emergency stop contactor Grounding for Ultra5000 CE requirements Building your own cables For additional information contact your local Allen-Bradley sales representative. Mechanical Resonance Mechanical resonance between the motor and the load occurs when the motor and load are oscillating with the same frequency but opposite phase (when the motor is moving clockwise the load is moving counter clockwise). The amplitude of the motor and load oscillations is such that the total momentum of the oscillating system is zero. Mechanical resonance occurs as a result of compliance between the motor inertia and load inertia. It may result from belts, flexible couplings or the finite torsional stiffness of shafts. In general, the stiffer the couplings, the higher the resonant frequency and lower the amplitude. If the motor shaft is directly coupled to the load, a mechanically resonating system usually emits a buzz or squeal at the motor. There are several ways of dealing with this problem, but they generally fall into one of two groups: • Change the mechanical system • Change the servo motor response Changing the mechanical system might involve reducing the inertia ratio via gearboxes or pulleys, or by increasing the stiffness of the couplings. For very high performance systems and systems with low resonance frequencies the mechanics may require changing to effectively deal with the resonance. Changing the servo motor response is done by reducing the P-gain, I-gain, or low-pass filter value. Reducing the value of the P-gain and low-pass filter frequency have the effect of reducing the servo motor bandwidth. This is acceptable as long as the resonating frequency is fairly high. But, if the resonating frequency is low it may be necessary to modify the mechanics of the system. 1 Publication 2098-IN001B-EN-P — July 2000 C-2 Application Information Backlash Backlash between the motor and load effectively unloads the motor over a small angle. Within this small angle, the increased gain can result in oscillations. Some backlash may be unavoidable, especially with gear reduction. If backlash is present, the inertia match between the load and motor must be properly sized for good servo performance (load inertia should roughly equal motor inertia). Gearing reduces the inertia reflected to the motor by the square of the gear reduction from motor to load. Therefore, the gear ratio must provide the required match. Using an Emergency Stop Contactor Some applications require that a contactor be inserted between the motor and Ultra5000 for emergency stop purposes. To determine if this is necessary, perform a hazard analysis of the machine. If used, the contactor must not simply break the motor current, it must switch a 3-phase resistive load in parallel with the motor windings. The three resistors provide dynamic braking and a category zero stop. The resistors also prevent continuous arcing at the main contacts when breaking DC currents, such as when the motor is at stall. It is important to sequence the E-stop string to disable the drive prior to or at the same time the contactor is released. Conversely, upon power-up the contactor must be fully engaged before the drive is enabled. Use an auxiliary contact on the contactor for the drive enable circuit for sequencing. ATTENTION ! Publication 2098-IN001B-EN-P — July 2000 To avoid personal injury and/or equipment damage, do not simply break the motor current. This can result in very high voltages due to motor inductance, prolonged arcing in the contactor, and eventually can cause fire in extreme cases. Application Information C-3 Shield and ground cable connection methods are shown in Figure C.1. Implementation of safety circuits and risk assessment is the responsibility of the machine builder. Please reference international standards EN1050 and EN954 estimation and safety performance categories. For more information refer to Understanding the Machinery Directive (publication SHB-900). ATTENTION ! Figure C.1 Emergency Stop Contactor Wiring Contactors Resistor Resistor Resistor 1 1 1 1 1 1 U U Drive V V Motor W W GND GND 2 Unbraided shield 3 Grounded terminal or stud Isolated terminal Enclosure wall 1 Exposed power wiring conductors that are not shielded are a source of RFI noise. Keep exposed conductors as short as possible and isolated from sensitive devices and wiring. 2 The safety ground (GND) and shield connections are permanently connected. This is essential for electrical safety. 3 Unbraid all cable shields and bond together, connecting directly to the grounded terminal or stud. Do not use the shield drain wire for this bonded connection. IMPORTANT The safety ground is not connected to local ground at the point where the contactor is inserted in the lines, but the shield is. This is done for EMC reasons. Publication 2098-IN001B-EN-P — July 2000 C-4 Application Information Grounding for Ultra5000 CE Requirements Refer to the figure below for Ultra5000 CE requirements. Figure C.2 Ultra5000 CE Requirements Enclosure Ground Conduit to Enclosure Single-Phase Mains with Ground User-Supplied Discrete I/O Filter E User-Supplied 24V Power Source 1 Conduit Clamp Unfiltered Conductors Filtered Conductors Single-Phase Contactor 2 Bonded Cabinet Ground Bus Enclosure 1 3 4 Mount the filter as close to the Ultra5000 as possible. If the distance exceeds 600 mm (2.0 ft), use a strap (greater in width than length) rather than a wire, to connect the ground between the Ultra5000 and the filter. This is particularly important for attenuation of higher frequency emissions (5-30 MHz). Shield or separate the wires connecting the AC power to the filter from other power cables (e.g., connections between the Ultra5000 and the filter, motor power cable, etc.). The best method of achieving this is to mount the filter near where the AC power enters the enclosure. If the connections are not separated from each other, the EMI on the Ultra5000 side of the filter can couple over to the source side of the filter, thereby reducing or eliminating the filter’s effectiveness. The coupling mechanism can radiate or allow stray capacitance between the wires. Filters need to be on all lines for filtering to be effective. When multiple power cables enter an enclosure, an unfiltered line can contaminate a filtered line. Bond the filter and the Ultra5000 to a grounded conductive surface (the enclosure) to establish a high frequency (HF) connection. To achieve the HF ground, the contact surface interface between the filter, Ultra5000, and the enclosure should be free from paint or any other type of insulator. 2 The filter shown is sized for one Ultra5000. Equivalent filters may be used for multiple units. Size the filter following the manufacturers recommendations. 3 Ground bar is customer-supplied item. 4 Clamp motor power cable shield for EMC termination. IMPORTANT ATTENTION ! Publication 2098-IN001B-EN-P — July 2000 All single-phase power in the cabinet must be filtered to reduce EMI. High voltage exists in AC line filters. The filter must be grounded properly before applying power. Filter capacitors retain high voltages after power removal. Before handling the equipment, voltages should be measured to determine safe levels. Failure to observe this precaution could result in personal injury. Application Information Building Your Own Cables C-5 This section provides information to assist you in building your own cables. Allen-Bradley power and feedback cables are available and recommended for robust system integrity to EMI. Refer to Appendix B for cable catalog number information. For motor and encoder connector kit and wiring information refer to the appropriate Allen-Bradley motor product data publication. Building Your Own Cables When building your own cables follow the guidelines listed below. • Connect the cable shield to the motor case and to the Ultra5000 chassis through the connectors for a complete 360° connection (per the cable assembly diagram). • Use a 4-conductor cable, with the 4 conductors twisted. • Attach a ground conductor to the motor and the Ultra 5000 earth terminal. Persistent EMI Problems If EMI problems persist, use ferrite doughnuts or torroids around signal cables. The ferrite will attenuate common mode noise but will do nothing for differential mode noise. Specifically, ferrite doughnuts help RS232 communication noise problems by: • Suppressing EMI at each switched inductive device that is near the servo amplifier. This includes solenoids, relay coils, starter coils, and AC motors (such as in motor driven mechanical timers). • Suppressing EMI at DC coils with a “fly-back” (1N4004) diode connected across the coil. • Suppressing EMI at AC coils with RC filters (e.g., a 200 ohm 1/2 watt resistor in series with a 1/2 micro farad, 600 volt capacitor). • Suppressing EMI at motor power windings by grounding, shielding, and filtering. Refer to Figure C.3 and Figure C.4 for additional information. Publication 2098-IN001B-EN-P — July 2000 C-6 Application Information Figure C.3 Torroid Encode oder Shielding Method hod for Brushless Servo Motors Ultra5000 Brushless Motor Encoder Cable Encoder Shield Motor Case Recommended raw cable for building your own cable Belden Part number 8337 Carol Part number C0625 Figure C.4 Motor Power Windi nding Methods to Minimize Noise Em Emissi ssions Ultra5000 Preferred Method Brushless Motor Twisted together U U V W V W Chassis Motor Case Shield To single point earth ground Ultra5000 Common mode choke (10-20 turns on common ferrite torroid core) Brushless Motor U U V W V W Chassis Motor Case Twisted together To single point earth ground Publication 2098-IN001B-EN-P — July 2000 Index breakout boards B-3 external shunt kit B-2 interface cables B-5 mating connector kits B-3 motor feedback cables B-4 motor power cables B-4 Ultra5000 family B-1 A A/D converter 2-8 AC Coils suppressed with RC filters C-5 Current input A-1 Frequency, input A-1 Power 2-18 Voltage, input A-1 Altitude A-2 Analog Inputs 2-8 Outputs 2-8 Application Information Backlash C-2 building your own cables C-5 Mechanical Resonance C-1 Auxiliary Encoder interface 2-11 Auxiliary Encoder Error, see Troubleshooting B Backlash Application Information C-2 Baud rate 2-11 Before Mounting Your System 1-2 Bonding Mounting 1-6 Subpanels 1-7 building your own cables C-5 Bus Capacitance A-1 Overvoltage 4-3 Undervoltage 4-3 Voltage A-1 C cables building your own C-5 catalog numbers breakout board B-3 interface B-5 motor feedback B-4 motor power B-4 catalog numbers B-1 ac line filters B-2 CE filter requirements C-4 grounding requirements C-4 low voltage directive 1-2 meeting requirements 1-2 Commissioning 3-1 Applying Power 3-2 Startup Precautions 3-1 Communication Address Switches Setting 3-3 Complying with European Union Directives 1-1 EMC directive 1-1 Configuring 3-3 Drive Detection 3-4 Firmware Upgrade 3-4 Ultraware software 3-3 Connector Block Diagram 2-1 CN2 2-4 CN3A 2-4 CN3B 2-4 Front Panel Connectors 2-2 Locator diagram 2-2 Motor Encoder 2-4 Serial Ports 2-4 Contents of manual P-2 Conventions Used in this manual P-2 D DC Coils suppressed with diode C-5 Digital Inputs 2-5 Hardware Configuration 2-5 Outputs 2-6 Hardware Configuration 2-7 dimensions 1 and 2 kW Ultra5000 A-7 500W Ultra5000 A-6 Publication 2098-IN001B-EN-P — July 2000 I-2 Index Documentation Related P-2 E EMC motor ground termination, F, H, N-series motors 2-15 motor ground termination, Y-series motors 2-16 Emergency stop contactor C-2 EMI (ElectroMagnetic Interference) Bonding 1-6 Problems C-5 Enclosure Sizing A-2 Error Codes and Messages 4-2 E-stop wiring C-3 European Directive Compliance Emergency Stop Contactor C-2 F filter, AC C-4 Firmware Upgrade 3-4 G Ground Torroid encoder shielding C-5 grounding multiple subpanels 2-15 system to subpanel 2-14 H Heat Heat Losses for sizing enclosures A-2 High frequency energy 1-7 Humidity A-2 I I/O Connectors 2-3 CN1A 2-3 CN1B 2-3 Inertia Possible Effects C-1 Input Digital I/O 2-5 Installation Installing for European Union Compliance Publication 2098-IN001B-EN-P — July 2000 Emergency Stop Contactor C-2 IPM Short, see Troubleshooting IPM Thermal Protection Fault, see Troubleshooting L low voltage directive 1-2 M Maintenance 4-1 Cleaning 4-1 inspecting cables 4-1 Mechanical Resonance Application Information C-1 Possible Causes C-1 Motor Encoder connector 2-4 Encoder interface 2-9 Overload Protection C-2 Troubleshooting Encoder Error 4-3 Overtemperature 4-2 Thermal Protection Fault 4-3 Mounting Before mounting 1-2 Bonding 1-6 procedure 1-8 requirements, system 1-3 N Noise Emission supression diagrams C-6 See Bonding 1-6 O Operating Temperature A-2 Option cards 2-1 option cards B-1 options and accessories B-1 Output Current Continuous (peak) A-1 Peak A-1 Outputs Digital I/O 2-6 P Power Index Applying Power 3-2 dissipation A-2 Losses A-2 Output Continuous A-1 Peak A-1 Wiring Diagram 2-21 Power Supply Protection 2-18 Precautions General Startup 3-1 Protection Circuitry Motor Overload C-2 R RS-232 2-11 RS-422 2-11 RS-485 2-11 S Safety ground C-3 Serial Serial Port Connectors 2-4 Serial port Interface 2-11 Shock A-2 Specifications AC Input Current A-1 Frequency A-1 AC Voltage A-1 Altitude A-2 Auxiliary Encoder 2-11 auxiliary feedback A-5 Bus Capacitance A-1 Bus Voltage A-1 communications A-4 connectors A-5 controller A-3 general power A-1 Humidity A-2 I/O 2-5 Digital Inputs 2-5 Digital Outputs 2-7 inputs and outputs A-4 motor feedback A-4 Operating Temperature A-2 Output Current Continuous (peak) A-1 Peak A-1 I-3 Power Output Continuous A-1 Peak A-1 Shock A-2 Storage Temperature A-2 user programming A-3 Vibration A-2 weight, Ultra5000 A-2 specifications and dimensions A-1 dimensions A-6 specifications A-1 Status LEDs 3-3 Storage Before installation 1-2 Responsibility P-3 Temperature A-2 Support Local product P-3 Technical product assistance P-3 System Mounting Requirements 1-3 minimum clearances 1-4 spacing 1-3 ventilation 1-4 T terminal block connections 2-18 Transformer Sizing 1-5 Troubleshooting 4-1 Auxiliary Encoder Error 4-3 Bus Overvoltage 4-3 Bus Undervoltage 4-3 Gain Adjustments C-1 Illegal Hall State 4-3 IPM Short 4-2 IPM Thermal Protection Fault 4-3 maintenance 4-1 Motor Buzz or Squeal C-1 Motor Encoder Error 4-3 Motor Overtemperature 4-2 Motor Thermal Protection Fault 4-3 U Ultraware 5000 User Manual 3-4 Ultraware software 3-3 understanding basic wiring requirements 2-12 routing cables 2-13 unpacking modules 1-3 Publication 2098-IN001B-EN-P — July 2000 I-4 Index V Vibration A-2 W Wiring 2-16 Publication 2098-IN001B-EN-P — July 2000 Connecting I/F Cables 2-17 I/O Connections 2-17 Power Connections 2-18 procedure 2-18 Wiring Diagram 2-21 For more information refer to our web site: www.ab.com/motion Publication 2098-IN001B-EN-P — July 2000 Supersedes Publication 2098-IN001A-EN-P — June 2000 PN 0013-1079-001-01 Copyright 2000 Rockwell International Corporation. Printed in USA.