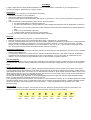
1
Solva Software
Chimica User Manual
Thank you for choosing ChimicaChimica. This guide outlines the main features of this software.
Overview of Chimica
Chimica contains facilities to both edit and view chemical safety assessments. What capabilities are available to users depends on
the password entered. There is a password for enabling the editing facilities and a separate password which allows viewing of data
only. Initially the password is the same for both and is the one sent to users when they download the trial version. By default,
entering this password enables all facilities within the software. By opening the Options window, it is possible to set different
passwords for both editing and viewing thus allowing any authorised user to view data whilst preventing unauthorised changes.
Benefits
Chimica simplifies the creation of COSHH assessments in many ways. Particular features include:
•
•
•
•
•
Editing
Substance information needs to be entered once only. In many workplaces, substances have more than one use. The
entry of duplicate data is tedious, time-consuming and prone to errors since all this information must be maintained and
kept up to date. Chimica eliminates these problems since data is entered once no matter how many uses a substance
has.
When you create an application assessment, simply select the substance from a list and all relevant hazard data is added
to your assessment.
Maintenance
Even when an assessment has been created, it must be maintained and reviewed on a regular basis. When review is
necessary, the assessment may be reviewed with just a few clicks of the mouse.
Availability
Paper copies of COSHH assessments are easily lost! There is also a temptation to photocopy and store useful COSHH
assessments for future reference. If a copied assessment is used, there is no guarantee that the information is correct or
that the assessment is not the latest revision. Chimica removes this problem by ensuring that all assessments are stored,
electronically, in one place, are always available and are up to date. Paper copies may also be kept if absolutely
necessary.
Reporting
As well as being viewed electronically, assessments may be printed, exported to other popular formats such as Microsoftâ
Word and Rich Text Format (RTF), and emailed (internet connection is required).
Hazard Summaries
The hazards of all substances included in the library may be viewed as a table. This is automatic
Windows Layout
Chimica comprises 7 separate windows, each with specific capabilities. These are:
• Applications Library - for viewing application assessments
• Applications Editor - for editing application assessments
• Substances Library - for viewing substance assessments
• Substances Editor - for editing substance assessments
• Action Plans - for viewing and editing corrective action plans
• Inventory - Indexes all applications by substance and by location and tabulates the hazards of each substance
• Options - For specifying report titles, email addresses, password. Standard phrases may be edited here
Any number of these windows may be open at any one time. For example, all 7 windows may be open at one time and any number
of instances of any window may be open simultaneously. There is one specific restriction applying to the Applications Editor and
Substance Editor windows: If editing a record in one window, you may not edit the same record in another window at the same
time. This is purely a precautionary measure designed to ensure that important data cannot be overwritten by accident. If you wish,
you may have two or more records open for editing in separate windows at the same time. This may be of use if you wish to copy
information between records. You may also edit a record in one window and view it in another window. Beware, however, that until
the edited record is saved, the data will not appear in another window.
First Steps
In order to make full use of all the facilities available in Chimica, it is advisable to customise it for your own application. To
customise the program, please open the “Options” window.
Organisation
On the first page, you may like to enter the following information:
• The name and location of your organisation
• Titles for the Substance and Applications reports
• Specify the expiry period for the assessments. This may be any period from 1 day to 5 years. By default, the expiry period is 1
year.
• If you anticipate using the email facilities, please enter or clear the following:
♦ The default email address to which data will be sent
♦ Any other email addresses for sending additional copies. Multiple email addresses must be separated by a semicolon
(;).
♦ On occasion, you may wish to send data to other addresses. Please enter these addresses in the ‘Special Addresses’
field.
♦ A title for the email message subject line.
♦ A standard email message (for the body of the message)
If you do not wish to use email, you may leave these settings unchanged.
Password
You may change the password at any time. To change the password:
• Select the ‘Password’ page, type in the password (when typing, it will appear as *) and press Enter
• Enter the new password twice and tab out of the password fields. If the passwords entered are identical, the “Change Password”
button will become enabled. Click the button to change the password to whatever you have typed. At this stage, you will be
asked if you want the password emailed to you for future reference. This is up to you. If you request an email, it will then be
sent. This program has been tested with Outlook Express and works seamlessly.
Miscellaneous Information
• The colours of some windows may be changed by selecting the appropriate box and selecting the new colour from the standard
windows colour dialogue box.
• You may decide whether or not to enforce unique, individual assessment references. If this option is selected, all application
assessments and all substance assessments must have unique identifiers. You may then search for assessments by this
reference. If you do not enforce unique identifiers, then you will not be able to search by reference.
Lists and Suppliers
When editing assessments, much of the information required (such as quantities, locations, assessor names etc;) may be selected
by drop down lists. These lists may be edited at any time through the ‘Lists’ page. Supplier data may be entered on the ‘Suppliers’
page.
Spillage and Waste Disposal
When editing an assessment, most of the spillage and waste disposal information may be entered by a few clicks of the mouse.
To add a phrase click the appropriate box. A tick will be displayed and the phrase will be added to the box below. Clicking the box
again will add the phrase again. The check box is an aide memoire to remind you which phrases have been added. Since you may
edit the phrase in the box, move it or completely remove it, the check box cannot be used to remove the phrase since the software
will be unable to determine which words should be removed.
You may edit standard, single statements on the ‘Standard Spillage Statements’ pages and ‘Standard Waste Disposal Phrases’
pages. You may also define 4 separate statements of your own.
If you repeatedly enter the same information, you may wish to construct standard procedures. Up to 4 standard spillage and 4 waste
disposal procedures may be saved. A standard procedure may be created by typing the information or selecting standard phrases.
To save the procedure, click the appropriate “Save as Procedure ...“ button. The procedures may be viewed on the “View
procedure” pages.
Important Note:
When you have changed your options, it is necessary to save your changes by clicking the tick at the top of the window. The
functions of the keys is shown below. Depending on the current action, certain keys may be disabled.
Last
record
Previous
record
Next
record
Last
record
Add new
record
Edit
record
Save
record
Cancel
changes
Refresh
data
Creating Assessments
There are two steps to creating an application assessment:
Assess a substance
Assess an application of this substance
To assess a substance:
1. Open the Substances Editor which will open to display a page labelled “Essentials”.
• Add a new record (either click the + sign on the toolbar, select Records/Add New Record or Right click and select Add New
Record.
• Enter the systematic name of the substance and a unique reference (if required).
• Enter the formula and any UN or EU hazard classification codes.
• Select the supplier, enter the product code and select the purchased state of the substance.
• Enter purchase quantities information: number of containers, container size and type and storage location.
2. If you wish to attach the Material Safety Data Sheet (MSDS), select the MSDS page. You may either copy and paste the data or
import a file (.txt or .RTF format) by clicking the “Import MSDS” button and navigate to the file.
3. If there are any risk phrases associated with this substance, select the “Risk Phrases” page. All possible phrases are listed
spread over two pages and grouped as single phrases and combined phrases. Select the appropriate phrases by clicking the
box alongside the phrases abbreviation. (To view the phrases, move the cursor over the abbreviation. The phrase will appear in
the yellow box at the bottom of the page.
4. If there are any safety phrases, associated with this substance, then select the “Safety Phrases” page. Four more pages will
appear. Single and combined safety phrases are grouped separately on two of these. A few safety phrases require additional
information and are coloured orange. For example: S23: Do not breathe gas/fumes/vapour/spray requires selection of the
hazard. To enter this information, click the “Additional Comments” page. The phrases requiring further information are marked
with a tick. Click the box alongside and the entire safety phrase will be displayed. The information to edit will be selected, ready
for editing.
5. If the substance has any known hazards e.g. corrosive etc;, select the “Classification” page and click the appropriate box(es). If
any hazards are selected then the appropriate safety labelling image will appear. You may also enter any MEL,OEL and TWA
data you have available.
6. To specify required safety precautions open the “Precautions” page. Five sub-sections will be displayed which relate to safe
handling, spillage and waste disposal procedures, fire procedures and first aid measures.
•
Safe handling: Select any requirements by clicking the appropriate box(es). Any other comments may be entered in the box
below. This box is intended for one line short comments not essays. Only one line will be displayed on a paper report.
•
In case of spillage: Procedures for spillage cleanup may be entered directly or built with a few clicks of the mouse. This
program contains a number of standard, editable statements and procedures which may be selected by clicking the
appropriate buttons. Move the cursor over the button to display the statements in the right hand box. The procedures are not
displayed in this way since they may be too large for the box. When you have selected the appropriate statements, you may
still edit the procedure directly in the display box.
•
Waste disposal: Procedures for waste disposal may be entered directly or built with a few clicks of the mouse. This program
contains a number of standard, editable statements and procedures which may be selected by clicking the appropriate
buttons. Move the cursor over the button to display the statements in the right hand box. The procedures are not displayed in
this way since they may be too large for the box. When you have selected the appropriate statements, you may still edit the
procedure directly in the display box.
•
In case of fire: Select the fire extinguishing media as required by clicking the appropriate button. A procedure may also be
entered directly.
•
First aid: Four first aid procedures are built into the program: a general procedure together with 3 specific procedures
relating to cyanide, phenol and hydrofluoric acid. These are intended as a guide only and should be edited as required. A
first aid procedure may also be entered simply by clicking the button and may also be edited at will.
7. Saving data
To save the record, click the toolbar button containing an image of a floppy disk, select Records/Save Record or right click and
select Save Record. If sufficient information has been entered, the data will be saved, an appropriate expiry date set and a the
substance assessment will be displayed on the “Summary” page which will be displayed automatically. If substance information
is incomplete, a warning message will appear and incomplete information will be displayed in red boxes. Most commonly, we
find that users forget to enter additional safety phrase information which may be entered as described above. When the
information has been completed, save the record.
8. Corrective Action Plans: When assessing a substance, it is often found that there is room for improvement in one or more
aspect. You may wish to complete a substance Corrective Action Plan for this substance which may be entered on the last
page. This is an extremely useful facility for recording notes as required. The plan may be edited at any time using the toolbar
buttons on the “Corrective Action Plan” page. You do not have to edit the assessment to edit the plan.
To assess an application
Note: You cannot create application assessments until the particular substance has been assessed. Although this may appear to be
extra work, if you have to assess many applications of a substance, assess that substance once and much of the work is done.
To create an Application Assessment
1. Open The Applications Assessment Editor
2. Add a new record (either click the + sign on the toolbar, select Records/Add New Record or Right click and select Add New
Record.
On the “Essentials” page
3. Enter a title for the assessment and a unique reference (if required).
4. Enter a description of the application and select the substance from the list box display.
5. For this substance summarise the quantity used, the frequency this application is performed, the duration of the application, the
number of people exposed to the substance and the location where the work takes place.
On the “Application Details” page
6. Detail any hazards arising from reacting the substance with another, heating the substance and list any atmospheric monitoring
required. You do not have to enter anything; if you don’t then “No remarks” will be added when the record is saved.
On the “Substance Details” page
Nothing is required here; this page and sub-sections display the previously entered substance data.
On the “Controls and Health Surveillance” page
7. Detail any control measures required and any health surveillance required.
On the “Comments” page
8. You may enter any other pertinent comments you like here.
Corrective Action Plans
9. Corrective Action Plans: When assessing an application, it is often found that there is room for improvement in one or more
aspect. You may wish to complete an application Corrective Action Plan for this substance which may be entered on the last
page. This is an extremely useful facility for recording notes as required. The plan may be edited at any time using the toolbar
buttons on the “Corrective Action Plan” page. You do not have to edit the assessment to edit the plan.
Reports
Chimica is designed for the electronic editing, storage and display of substance and application information. However, a user may
choose whether to employ this benefit or simply maintain a paper system. In either case, paper copies of assessment may be
printed at will. Through the “Options” window, you may select whether to maintain an electronic or a paper system. In both cases,
information may be viewed electronically and printed at any time. In all cases, the print date is added to the bottom of the report.
If the ‘Limit Printed Copy Validity to One Day’ option is selected, the print dates of all substance and application assessments is
prefixed with “This printed copy is invalid after:”. This reminds users that the most recent information may not be contained on the
paper report, renders copying the report pointless and helps to ensure that up to date information is consulted.
If the ‘Maintain paper system” option is selected, the print date is prefixed with “Printed:”. The choice is yours.
Chimica contains a comprehensive series of reports that may be printed at will:
Substance Reports:
Application Reports:
Assessment of the intrinsic hazards of a substance. This is derived from information entered when
creating a substance assessment.
Assessment of hazards arising from application of a substance e.g.: the COSHH assessment.
This is derived from the substance assessment and the information entered when creating an
application assessment.
Material Safety Data Sheet
Reports:
When creating or editing a substance assessment, an MSDS may be attached to the record. The
MSDS report contains this information and may be printed at any time. If there is no MSDS
information, this option is disabled (for that particular substance).
Corrective Action Plans
Reports:
Corrective action plans may be created or edited at any time. These plans may be printed at any
time from the substance or application assessment editors.
Applications by substance
and location:
Substance Hazards:
Applications may be listed by substance or location and printed in the same way.
Substance hazards may be designated by a specific code for example: T+ for extremely toxic. The
Hazards Listing Reports lists the substances with ticks corresponding to appropriate codes.
The description of these reports refers to printing. In addition, these reports may be emailed anywhere or exported to Microsoftâ
Word, Rich Text Format (RTF) and Crystal Reports format. The default export option may be selected in the “Options” window.
Many other export formats are available. A report may be saved to floppy disk or other location or may be exported to any of:
character separated variable, comma separated variables, Crystal Reports, Data Interchange Format (DIF), Microsoftâ Excel
(Versions 2-8), HTML, Lotusâ 1-2-3, paginated text, columnar, report definition, Rich Text Format, tab-separated text, tab-separated
values and Microsoftâ Word.
To export a report follow the following steps:
1. Select the report from the menu and then choose export report. For example, to export a substance report from the Substance
Assessment Editor do the following: Select reports/Substance/ Export Report. A small dialogue box will appear.
2. Select “Export the report” from the first drop down box and click “Export Options”.
3. Select the export option from the “Format” drop down list.
4. Select the destination (disk file etc;)
5. You will be prompted to specify a location.
When exporting is complete, the file may be opened as specified. That’s it!
Note: If you select the HTML option, you will be asked to select a folder and not a file name. The file name will be selected for you.
In this, all reports may be exported to HTML and it is then straightforward to display all assessments through a web browser.
Technical Support
Thank you for choosing Chimica. To enable you to get the most use out of this software, we provide technical support by email. We
aim to reply to queries within 72 hours.
Please email your queries to: [email protected]