1
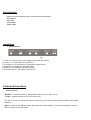
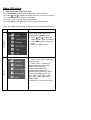
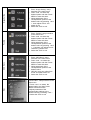
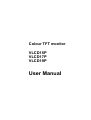
Colour TFT monitor
VLCD15P
VLCD17P
VLCD19P
User Manual
Safety Statement
This equipment has been tested and found to comply with the limits of a class B digital device. These limits are
designed to provide reasonable protection against harmful interference in a residential installation. This equipment
generates, uses and can radiate radio frequency energy and, if not installed and used in accordance with the
instructions, may cause harmful interference to radio communications. However, t here is no guarantee that
interference will not occur in a particular installation. If this equipment does cause harmful interference to radio
or television, which can be determined by turning the equipment off and in, the user is encouraged to try to
correct the interference by one or more of the following measures:
•
Reorient/Relocate the receiving antenna.
•
Increase the separation between the equipment and receiver.
•
Connect the equipment into an outlet on a circuit different from that to which the receiver is connected.
•
Consult the dealer of an experienced radio/MONITOR technician for help.
Caution: To comply with the limits for a Class B computing device, always use the shielded signal cord and
shielded power cord supplied with this unit.
Caution to the User:
The dealer warns the user that changes or modifications to the unit not expressly approved by the party
responsible for compliance could void the user’s authority to operate the equipment. If necessary, the user should
contact the dealer or an experienced radio/television technician for additional suggestions.
Safety Information
Please read the below notes before use the monitor set and keep it well for future reference.
(a) Use only a power source and connection appropriate for the monitor as indicated on the marking
label.
(b) Slots and openings in the cabinet are provided for ventilation; these openings must not be blocked
or covered. Never push objects of any kind into cabinet slots or other openings.
(c) Never insert anything metallic into the monitor openings. Doing so may create a danger of electric
shock.
(d) To avoid electric shock, never touch the inside of the monitor. Only a qualified technician should
open the monitor case.
(e) Unplug the monitor from the wall outlet before cleaning. Do not use liquid cleaner or aerosol
cleaners. Use a damp, lint free cloth for cleaning.
Install the monitor near an outlet that you can reach easily. Disconnect the product by grasping the plug firmly and
pulling in from the outlet. Never disconnect it by pulling the cord.
Accessories
Please check the following listed accessories before installation:
AC adapter
AC Lead
VGA cable
Audio cable
Installation
1. Rear Interface
fig.1
(1) DC 12V: Use only the power supply included with the monitor
(2) VGA : For connection to a standard PC
(3) S-Video In: For connection to a standard S-Video source.
(4) BNC IN: Connection for composite video
(5) BNC OUT: Composite video loop through
(6) AUDIO IN/OUT:PC audio in and loop out
Controls & Functions
1.Front Control
“SELECT”: press this button to change input modes, such as VGA, AV etc.
“Power”: press this button to turn on or off the unit.
“+” and “-”: to turn up or down the volume, and move up and down or left and right direction under setup
interface.
Menu”: Pressing the “MENU” button calls up the On-Screen Display. The functions and menu screens
differ according to the input mode.
Basic OSD setup
1. OSD setup under VGA input mode
(a). Press MENU button to access Main Menu setting interface
(b). Press ∧ and ∨ to select the desired submenu, total six sub-menus.
(c). Press MENU again to enter the submenu
(d). Use < and > to adjust the parameter value.
(e). Press EXIT to exit the setup or return to previous interface.
*Note: the setting interface only available when connected with computer
Color
Main Menu
item
Interface
Remark
1.enter Main Menu interface by
pressing once MENU button.
2. Press ∧ and ∨ to select the
desired option, total six options.
3. Press MENU again to enter submenu
4. Select the “Exit” to exit.
1.Enter “Color” setup interface in
the main menu.
2.Press ∧and ∨ to select the
desired option and then Press
MENU to enter this item.
3. Adjust parameter of the
correspondent options to the
desired value by pressing < and >.
Contrast and brightness: 0-100.
Color adjust : Red. Green. Blue
Color temp: 9300. 6500. 5800.
SRGB.USER
4. Select “Exit” to exit current oper.
Image Setting
Position
1. Enter “Position” setup interface
in the main menu.
2. Press ∧and ∨to select the
desired option and then Press
MENU to enter this item.
3. Adjust parameter of the
correspondent options to the
desired value by pressing < and
>. H position can adjust from 0198 and v position:0-20
4. Select the “Exit” to exit.
OSD Menu
1. Enter “OSD Menu” setup
interface in the main menu.
2. Press ∧and ∨ to select the
desired option and then Press
MENU to enter this item.
3. Adjust parameter of the
correspondent options to the
desired value.
4. OSD H/V pos. can adjust from
0-200 and OSD timer:0-27
5. Select the “Exit” to exit.
Misc
1. Enter “Image Setting” setup
interface in the main menu.
2. Press ∧and ∨to select the
desired option and then Press
MENU to enter this item.
3. Adjust parameter of the
correspondent options to the
desired value by pressing < and
>. clock adjust from 0-100
phase :0-63.
4. Select the “Exit” to exit.
1.Enter “Misc.” setup interface in the
main menu.
2. Press ∧and ∨ to select the
desired option and then Press
MENU to enter this item.
3.Adjust parameter of the
correspondent options to the
desired value by PressIing ∧and ∨
4. Select the “Exit” to exit