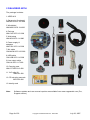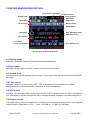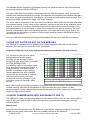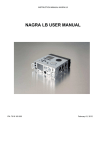
1
NAGRA ARES-M II
USER MANUAL
Software version
V3.18 Build 0724
July 26, 2007
Copyright © NAGRAVISION S.A. 2005-2007
P/N : 2070 002 150
1 GUARANTEE ..................................................................................................................................... 5
2 DELIVERED WITH ............................................................................................................................. 6
3.1 Front panel key functions........................................................................................................ 7
3.2 Left side key functions............................................................................................................. 8
3.3 Right side .................................................................................................................................. 8
3.4 Top face..................................................................................................................................... 9
3.5 Bottom face............................................................................................................................... 9
4 INSTALLING BATTERIES ................................................................................................................. 9
5 FIRST POWER ON............................................................................................................................. 9
6 RECORD WINDOW DESCRIPTION ................................................................................................ 10
6.1 Display name .......................................................................................................................... 10
6.2 Input name .............................................................................................................................. 10
6.3 Record level ............................................................................................................................ 10
6.4 Filter status ............................................................................................................................. 10
6.5 AGC status .............................................................................................................................. 10
6.6 Output volume ........................................................................................................................ 10
6.7 VOR status .............................................................................................................................. 11
6.8 Modulometer ........................................................................................................................... 11
6.9 Play / Record file name .......................................................................................................... 11
6.10 Play / Record time ................................................................................................................ 11
6.11 Play progress & free disk space bar (3 colour) ................................................................. 11
6.12 Total file / Free record time.................................................................................................. 11
6.13 File counters ......................................................................................................................... 11
6.14 Run status ............................................................................................................................. 11
6.15 Audio parameters ................................................................................................................. 11
6.16 USB status ............................................................................................................................ 11
6.17 Keyboard status ................................................................................................................... 11
6.18 Battery status........................................................................................................................ 11
7 USING THE ARES-M II .................................................................................................................... 12
7.1 Recording audio in the field .................................................................................................. 12
7.1.1 The Automatic Gain Control (A.G.C) ............................................................................ 13
7.2 Voice Operated Recording .................................................................................................... 13
7.3 Playback of a previous recording ......................................................................................... 13
7.3.1 Adjusting playback levels ............................................................................................. 14
7.4 Storing settings in a template ............................................................................................... 14
7.5 Deleting an audio recording rapidly ..................................................................................... 14
8 MENUS ............................................................................................................................................. 14
8.1 Menu Tree................................................................................................................................ 15
8.2 Set input device ...................................................................................................................... 15
8.3 Set compress template .......................................................................................................... 15
8.4 Set VOR mode......................................................................................................................... 15
8.5. Set VOR stop mode .............................................................................................................. 16
8.6 Set VOR stop delay ................................................................................................................ 16
8.7 Set the pre-rec buffer ............................................................................................................. 16
8.8 Setting the loop mode............................................................................................................ 16
8.9 Setting the search speed ....................................................................................................... 16
8.10 Setting the input matrix ....................................................................................................... 16
8.11 Setting the work directory ................................................................................................... 16
9 FILE / FOLDER MANAGER............................................................................................................. 17
9.1 Renaming ................................................................................................................................ 17
9.1.1 Renaming a directory .................................................................................................... 17
9.1.2 Renaming a file............................................................................................................... 17
9.2 Erasing .................................................................................................................................... 17
9.2.1 Erasing a directory......................................................................................................... 17
9.2.2 Erasing a file................................................................................................................... 18
9.3 Entering a directory................................................................................................................ 18
9.4 Return to root.......................................................................................................................... 18
Page 2 of 56
Copyright © NAGRAVISION S.A. 2005-2007
July 26, 2007
9.5 Make a directory ..................................................................................................................... 18
9.6 Edit........................................................................................................................................... 18
10.1 Display language .................................................................................................................. 21
10.2 Auto power............................................................................................................................ 21
10.3 Screen save........................................................................................................................... 21
10.4 Template selection ............................................................................................................... 21
10.4.1 Template name ............................................................................................................. 21
10.4.2 Recording file compression type setting “CORE” ................................................... 21
10.4.3 Sampling Rate setting “SR”........................................................................................ 22
10.4.4 Bit Rate & Mono / Stereo selection “BR”................................................................... 22
10.4.5 File extension name setting “EXT” ............................................................................ 22
10.5 Input device manager........................................................................................................... 22
10.5.1 Input device manager, NAME...................................................................................... 22
10.5.2 Input device type manager.......................................................................................... 23
10.5.3 Input gain manager ...................................................................................................... 23
10.5.4 Input boost manager.................................................................................................... 23
10.5.5 Input power manager................................................................................................... 23
10.5.6 Input filter manager...................................................................................................... 23
10.6 Speaker mode ....................................................................................................................... 24
10.7 Set AGC target level ............................................................................................................. 24
10.8 Set STOP key during record................................................................................................ 24
10.9 Set OK key during record .................................................................................................... 24
10.10 Set display brightness ....................................................................................................... 24
10.11 Lock input device gain....................................................................................................... 24
10.12 Set record name prefix....................................................................................................... 24
10.13 Date & Time......................................................................................................................... 24
10.14 Clear record counter .......................................................................................................... 24
10.15 Restore factory settings .................................................................................................... 25
10.16 Format disk ......................................................................................................................... 25
10.17 Check Disk space ............................................................................................................... 25
10.18 Check Software version..................................................................................................... 25
10.19 Check Machine ID............................................................................................................... 25
11 EDITING ......................................................................................................................................... 25
11.1 Editing display ...................................................................................................................... 26
11.1.1 Playback head position ............................................................................................... 26
11.1.2 Waveform...................................................................................................................... 26
11.1.3 Marker A........................................................................................................................ 26
11.1.4 Marker B........................................................................................................................ 26
11.1.5 Play position................................................................................................................. 26
11.1.6 Run status..................................................................................................................... 26
11.1.7 Modulometer................................................................................................................. 26
11.1.8 Marker A position......................................................................................................... 27
11.1.9 Marker B position......................................................................................................... 27
11.1.10 Original file length...................................................................................................... 27
11.1.11 Actual file length ........................................................................................................ 27
11.1.12 Playback counter ....................................................................................................... 27
11.2 Editing Menus ....................................................................................................................... 28
11.2.1 Jump position (GOTO function) ................................................................................. 28
11.2.2 Markers ......................................................................................................................... 28
11.2.3 Undo table..................................................................................................................... 28
11.2.4 Frames/Pixel (Graphic Zoom) ..................................................................................... 29
11.2.5 Playback around the edit............................................................................................. 29
11.2.6 Trimming edit points.................................................................................................... 29
11.2.7 Completing the edit and saving the resulting file ..................................................... 29
11.2.8 Quick reference to the editor function keys:............................................................. 29
12 ARES-M II GAIN AND LEVEL STRUCTURE. ............................................................................... 30
13 LINE INPUTS ON THE ARES-M II................................................................................................. 31
Page 3 of 56
Copyright © NAGRAVISION S.A. 2005-2007
July 26, 2007
14 MICROPHONES AND SETTINGS. ................................................................................................ 31
15 LOW CUT FILTER OR NOT ON THE ARES-M II.......................................................................... 32
16 AUDIO COMPRESSION (WHY AND WHEN TO USE IT). ............................................................ 32
17 MP2 OR MP3 IMPORT / PLAYBACK............................................................................................ 33
18 USB ................................................................................................................................................ 34
19 SOFTWARE UPDATE.................................................................................................................... 35
20 FILE TYPES ................................................................................................................................... 36
21 ALARMS......................................................................................................................................... 39
21.1 Low battery ........................................................................................................................... 39
21.2 Low memory ......................................................................................................................... 39
22 DEFAULT SETTINGS .................................................................................................................... 40
23 MESSAGES.................................................................................................................................... 41
24 LANGUAGE TABLE ...................................................................................................................... 42
25 SPECIFICATIONS.......................................................................................................................... 53
26 DECLARATION OF CONFORMITY............................................................................................... 54
26 INDEX TABLE ................................................................................................................................ 55
Page 4 of 56
Copyright © NAGRAVISION S.A. 2005-2007
July 26, 2007
1 GUARANTEE
Nagra / Kudelski certifies that this instrument was thoroughly inspected and tested prior to leaving our
factory.
We guarantee the products of our own manufacture against any defect arising from faulty
manufacture for a period of two years from the date of delivery.
This guarantee covers the repair of confirmed defects or, if necessary, the replacement of the faulty
parts, excluding all other indemnities.
All freight costs, as well as customs duty and other possible charges, are at the customer's expense.
Our guarantee remains valid in the event of emergency repairs or modification being made by the
user. However we reserve the right to invoice the customer for any damage caused by an unqualified
person or a false manoeuvre by the operator.
We decline any responsibility for any and all damages resulting, directly or indirectly, from the use of
our products.
Other products sold by KUDELSKI S.A. are covered by the guarantee clauses of their respective
manufacturers.
We decline any responsibility for damages resulting from the use of these products.
We reserve the right to modify the product, and / or the specifications without notice.
Identification card.
Each ARES-M II machine is delivered with its own unique identity card. The purpose of this card is to
allow the user to keep information concerning his machine, and our full contact details available
should the machine be lost or stolen.
We maintain an international database of lost or stolen NAGRA equipment, so if such a machine
turns up for repair, or update it will immediately be identified.
Please keep this card safely, and please indicate the serial number and software version of your
machine upon all correspondence concerning the recorder.
Unique serial #
Please note:
Page 5 of 56
NAGRA contact details
These cards are unique and cannot be replaced. Only ONE card per machine
has been made.
Copyright © NAGRAVISION S.A. 2005-2007
July 26, 2007
2 DELIVERED WITH
The package includes:
1 ARES-M II
2 Stereo mic (if ordered)
NM-MICS 2070 120 000
3 Windshield
NM-MWS 2070 124 000
4 End cap
NM-CAP 2070 131 000
5 Wrist-strap
NM-WSI 2070 114 000
6 Power supply &
adapters
NM-PSU 2070 110 000
7 Mic cable
CM-MICM 2070 122 000
8 USB cable
CM-USB 2070 116 000
9 Line output cable
CM-LIN 2070 117 000
10 Carrying case
NM-CCI 2070 212 000
11 “AA” cells (2)
7098 301 000
12 CD including manuals
2070 203 000
13 Identity card
Note:
Software updates and user manual reprints are available from www.nagraaudio.com (Pro,
Support section)
Page 6 of 56
Copyright © NAGRAVISION S.A. 2005-2007
July 26, 2007
3 PANEL DESCRIPTION
3.1 Front panel key functions
1 OK / II key:
•
Pause / Next recording function during record.
•
Pause function during playback.
•
Executes functions in the menu mode.
•
Selects PRE-RECORD from STOP.
2 REC led:
•
Turns red during record (flashing).
3 Edit key:
•
Removes the selected portion between 2 marks during
editing.
•
Removes the selected index in the directory.
4 A-B key:
•
Selects the position of marker A or B in the edit mode.
•
When hold, removes the markers A and B during edit.
•
In all other modes, put the display into high brightness for
5 seconds.
5 Play / Stop / Power key:
•
Main Power ON / OFF key. (Press for 3 seconds to power
off)
•
Toggles between play and stop.
6 C key:
•
Cancels (escape) a menu operation or exits a display
mode.
•
Enters folder and setup menus.
7 Left key:
•
Rewind key during playback.
•
Decreases the input level sensitivity (Input gain) (0.5dB steps).
•
Move to the “Left” in the menu mode or exit some menus.
•
In the editing mode, (Stop mode) moves the marker backwards. In playback, the marker
will be set to the play locator position.
• In the editing mode without markers during stop, moves the current position backwards.
• In the editing mode with markers, moves the selected marker backwards.
8 Down key:
•
Decreases the input level sensitivity (Input Gain), (Coarse adjustment – locked by default).
•
Skip forward to next index in the play mode.
•
Moves to next available position in the menu mode.
•
Fast forward in the editing mode.
9 Right key:
•
Fast forward key during playback.
•
Increases the input sensitivity (0.5 dB steps)
•
Move “Right” in the menu mode.
•
In the editing mode, (Stop mode) moves the marker forwards. In playback, the marker will
be set to the play locator position.
Page 7 of 56
Copyright © NAGRAVISION S.A. 2005-2007
July 26, 2007
•
•
•
In the editing mode without markers during stop, moves the current position forwards.
In the editing mode with markers, moves the selected marker forwards.
In the menus, confirms a setting.
10 Up key:
•
Increases the input level sensitivity (Input gain) (Coarse adjustment – locked by default).
•
Skip back to previous index in play mode.
•
Moves to the previous available position in the menu mode.
•
Fast return in the editing mode.
11 Menu key:
•
Display the sub-menu for fast input selections, templates etc. in the stop menu mode.
•
Enter marker positions during record.
•
In the edit mode, several additional functions: go to, marker list, undo erase, zoom level.
3.2 Left side key functions
1
3
2
1Record switch:
•
Sliding the switch up puts the ARES-M II in record.
2 AGC switch (Automatic Gain Control):
•
Sliding the switch up turns on the Automatic Gain Control
•
In the edit mode it selects the playback mode (outside or inside markers) .
3 Hold switch:
•
Sliding the switch up locks the keyboard controls.
3.3 Right side
1
2
2
3
4
1 USB port:
•
Used for connecting to a PC / MAC for file download.
•
External DC powering of the unit.
2 Output volume adjustments:
•
Headphones, internal speaker & line ouput.
•
In the sub-menus, permits to select a character or a number (name changing)
•
VOL + key for software update.
3 Line output:
•
Stereo 3.5 mm line output jack.
4 Headphone output:
•
Stereo 3.5 mm headphone output jack.
Page 8 of 56
Copyright © NAGRAVISION S.A. 2005-2007
July 26, 2007
3.4 Top face
1 Cover:
•
Removable protective cover hiding mike & line input
connectors.
1
2
4
3
2 Line input:
•
3.5 mm stereo jack for line inputs.
3 Mike input:
•
3.5 mm stereo jack for external mike inputs.
4 Int Mic:
•
Built-in Electret mono microphone.
3.5 Bottom face
1 Battery compartment:
•
Slide down to open.
1
4 INSTALLING BATTERIES
Insert 2 “AA” batteries taking care of the correct polarity and
close the cover. Rechargeable batteries (NiCd or Ni-mH) can
also be used but they can not be charged inside the ARES-M II.
+
-
5 FIRST POWER ON
Push and hold the “Play & Stop” key (5) for 3 seconds, the machine turns on and shows the ARES-M
II icon for 1.5 seconds followed by the “STOP” window display. To skip the ARES-M II icon screen,
press any key. To jump to the “PRE-RECORD” window, press the “OK” key.
Page 9 of 56
Copyright © NAGRAVISION S.A. 2005-2007
July 26, 2007
6 RECORD WINDOW DESCRIPTION
Filter status USB status
Keyboard status
Battery status
Display name
AGC status
Input name
VOR status
Record level
Output volume
Modulometer
Run status
Play / Record file name
Audio parameters
File counters
Total file /
Free record time
Play / Record time
Play progress bar & free disk space
6.1 Display name
Area that indicates the name and function of the selected display
6.2 Input name
Indicates the input status (internal / external microphone or line input.)
6.3 Record level
The record level can be adjusted with the keys 7 & 9 in steps of 0.5 dB from +144 dB to +84 dB (60
dB range).
6.4 Filter status
Indicates if the low cut filter is ON or OFF. OFF is indicated by blue characters on a black
background, ON is indicated by black characters on a blue background.
6.5 AGC status
Indicates if the Automatic Gain Control is turned ON or OFF (Left side button 2). OFF is indicated by
blue characters on a black background, ON is indicated by black characters on a blue background.
6.6 Output volume
The output volume level for headphones, line output or internal speaker (play mode) can be adjusted
with the buttons (Right side 2, VOL +, -) from – 40.0 dB to + 1.0 dB in 0.5 dB steps.
Page 10 of 56
Copyright © NAGRAVISION S.A. 2005-2007
July 26, 2007
6.7 VOR status
Indicates if the Voice Operating Record is turned ON or OFF. OFF is indicated by blue characters on
a black background, ON is indicated by black characters on a blue background.
6.8 Modulometer
Full scale from -40 dB to 0 dB with peak hold indicator for left and right channels.
6.9 Play / Record file name
The name of the current file during record or playback.
6.10 Play / Record time
Display in hours, minutes & seconds since the playback or recording was started.
6.11 Play progress & free disk space bar (3 colour)
During playback the entire bar corresponds to the selected file. The “filled-in” part indicates the
playback progression. In stop or record mode, it indicates the remaining record space available in the
memory.
6.12 Total file / Free record time
In playback the counter shows the duration of the current file and in record it shows the remaining
capacity left in the memory.
6.13 File counters
The upper counter indicates the total number of recorded files. The lower counter indicates the
number of the file ready to be played back.
6.14 Run status
Stop
Monitoring (EE) mode (pre-record buffer)
Record
Play
Forward
Rewind
Pause
6.15 Audio parameters
This area shows (left to right), the current file type, the sampling frequency, the bit rate and the Mono
/ Stereo selection.
6.16 USB status
This icon appears when the machine is connected via USB to a PC / MAC.
6.17 Keyboard status
The key icon appears when the keyboard is locked by means of the hold key (3) on the left side.
6.18 Battery status
5 stripes inside the icon indicate full capacity.
Page 11 of 56
Copyright © NAGRAVISION S.A. 2005-2007
July 26, 2007
7 USING THE ARES-M II
Basic Introduction and General Information.
The ARES-M II is designed as a flexible hand-held recorder for a variety of applications. It can
perform many functions, which are all covered in this manual. The operating concept is designed
around a system of preset TEMPLATES in which all the required operating modes are stored. The
user can choose different parameters of the machine and these personalised settings are stored in a
template for future quick access. There are two sets of templates, one for the compression mode to
be used and the other for different input devices.
If no specific user Template profiles are stored then the ARES-M II will operate using the “default”
factory settings.
This introduction covers various important global subjects. More complex operations can be
understood by studying the different menus in detail. The topics covered are:
Recording audio in the field
Replaying a previous recording
Storing settings in a template
Editing a recording
File / Folder management
Downloading to a computer
7.1 Recording audio in the field
General preparation:
Before making a recording the input source and compression mode need to be chosen. The ARES-M
II makes recordings according to the pre-selected settings stored in the templates. If nothing is set
prior to the first recording then the “default” settings will be adopted. If specific settings are required,
then they must be selected first using a previously customized template.
-
Input device (Internal / external microphone / Line input)
Compression format (linear PCM, MPEG, a-Law, μ-Law, G729a)
Working directory (Where the recorded files are to be stored)
Note:
When selecting the input device, the input gain and the use (or not) of the input filter and
power is automatically set according to the devices template.
Select the input device and compression mode (and working directory if necessary) using the
“MENU” key according to the pre-saved templates.
When ready, press the “OK” key and the ARES-M II will go to the “PRE-REC” mode where the audio
input can be heard on the headphones and the levels seen on the display. In this mode the Prerecord buffer (max. 3 seconds) is also active.
If the AGC is turned off, the input gain can now be adjusted in 0.5 dB steps from +144 dB to +84 dB
using the “LEFT” or “RIGHT” keys, and the value is shown in a sub-window on the display. Initially,
the value corresponds to the preset value stored along in the input device template.
To begin recording, press the “RECORD” slide switch upwards (with default settings: Towards the
microphone). The red LED will flash and the record symbol on the display will start flashing. The
levels can be seen on the display and adjusted during recording as necessary, assuming the AGC is
not activated.
To enter markers, during record, press the “MENU” key.
To stop recording, simply press and hold the “PLAY / STOP” key (5) for 3 seconds.
Page 12 of 56
Copyright © NAGRAVISION S.A. 2005-2007
July 26, 2007
Note:
If the recording is started directly from the “STOP” mode, the Pre-record buffer will be off. If
during record the “RECORD” switch is pushed upwards again, a new file will be started
(seamless recording).
Each new recording will be given a file name made up of 8 digits. This file will be stored in the
working directory.
See “File naming and working directory” for details.
7.1.1 The Automatic Gain Control (A.G.C)
The AGC is not an audio limiter. It operates in the digital domain and allows the operator to make
recordings without under / over modulating when the audio levels are unpredictable.
It makes recording in the field easier and guarantees that a respectable level will be recorded.
Automatic adjustment systems are rarely “better” than the manual modes, but can be considered
“safer” in certain circumstances. The operating target level or average level to be recorded can be set
to either –6 dB or –12 dB in the “SCREWDRIVER” menu. It is also strongly recommended to switch
on the low cut filter when using the AGC for recordings in noisy environments (example: Street
noise).
7.2 Voice Operated Recording
The VOR permits to start a recording depending on the input level. Two more parameters need to be
entered (see also “MENU”). The first is to enter the recording duration after that the input signal falls
25 dB below the trigger level. The second is to select the VOR stop mode. The last parameter to
enter is to set the trigger level to start a recording (VOR mode).
Once the VOR mode is turned on, the main display shows “PAUSE”. This means that the machine is
ready to start the first record once the trigger level reached. If other menu parameters still need to be
changed, press first the STOP key. Once the changes occurred, select again the VOR mode trigger
level, or press the OK key (display returns to PAUSE).
Once a recording is started using the VOR mode it will be PAUSED automatically when one of the
following applies:
•
•
•
The input signal drops 25 dB below the threshold setting for more than X (User defined)
seconds.
The internal memory of the machine is full.
The batteries of the machine are exhausted.
There are two modes of operation for the VOR system:
Split Track: Each VOR operation will create a new TAKE
Pause Rec: Each VOR operation will be added to the previous, thus creating a continuous TAKE.
Important: If after a power OFF / ON the display shows a PAUSE screen, it means that VOR is still
turned on.
7.3 Playback of a previous recording
The ARES-M II can play back files irrespective of the current compression mode selected. To
playback the last recorded file, press “PLAY” and the machine starts playback immediately. To stop
the playback, press the “PLAY” key again. To pause the playback, use the “OK” key.
If the recording was made with markers, during the playback, briefly press the “RIGHT” or “LEFT”
keys to jump to the next or previous marker position respectively.
To playback another file from the same working directory, use the “UP” or “DOWN” keys to scroll
through the recorded files available. Once “PLAY” is pressed, the new file will be played immediately.
Page 13 of 56
Copyright © NAGRAVISION S.A. 2005-2007
July 26, 2007
During a playback of a file, the full 3 colour “PLAY PROGRESS BAR” corresponds to the total length
of the file.
When a new file has been selected for playback the “TOTAL TIME” counter will indicate its full length
and the “PLAY TIME” counter starts incrementing once the playback begins.
During playback, to “REWIND” press and hold the “LEFT” key, to go “FORWARD” press and hold the
“RIGHT” key.
7.3.1 Adjusting playback levels
The output volume level for the headphones and line output can be adjusted by the “+ VOL -” buttons
on the right side of the machine in steps of 0.5 dB from -40 dB up to +1 dB. This value is also shown
on the display (see Record window description) and stored in the memory of the machine.
7.4 Storing settings in a template
Templates are used to store the settings for the ARES-M II. These templates contain input device,
levels, filter selection, Electret powering, type of compression, mono or stereo etc.
Input device manager: 10 templates are available and each can store the name and characteristics
of different input devices such as different microphone capsules, line inputs and the gain settings,
powering and filters can be selected for each device.
Compression template: 10 templates are available and each can be given a dedicated name and
can store the desired compression mode, sampling frequency, bit rate and the file extension desired.
To go to the programming position, jump to the paragraphs entitled “MANAGER” & “SETUP MENU”.
Once completed, the desired template can be selected by pressing the “MENU” key. Choose the
corresponding template by its name in the “Set compress template” or “Set input device”.
7.5 Deleting an audio recording rapidly
Any audio file can be selected from the “STOP” mode by pressing the “UP” or “DOWN” keys. Once
the corresponding file is shown on the display, press the “EDIT” key and confirm to delete the file.
8 MENUS
All the settings and parameters of the ARES-M II are made
through a selection of Menu’s. There are two sets of menus. One
is used for the selection of the pre-set choices and the other is
used for storing the different settings of the machine.
Press the centre “MENU” key (11) and a sub-menu appears
giving access to the input device selection, the compression
template to be used, auto-record function, settings of the pre-rec
buffer, the loop mode, search speed, input matrix and selection
of the working directory.
The “UP” or “DOWN” keys (10) or (8) will highlight the different
choices and the “OK” key (1) or “RIGHT” key (9) confirms the
selection.
Page 14 of 56
Copyright © NAGRAVISION S.A. 2005-2007
Set
Set
Set
Set
Set
Set
Set
Set
Set
Set
input device
compress template
VOR mode
VOR stop mode
VOR stop delay
pre-rec buff
loop mode
search speed
input matrix
work directory
July 26, 2007
P re ss m e n u
8.1 Menu Tree
The “Tree” shows all the different menus
available. All BLUE text is preset in the “Setup”
menus and can be personalized.
In general to set or confirm a selection, press
the “OK” key (1) or the “RIGHT” key (9). To
move to the right, use the “RIGHT” key (9). To
move to the left or escape from the menu
selection, press the “LEFT” key (7).
S e t in p u t d e v ic e
OK
DYN
NAGRA
COND
IN T
L IN E H
L IN E L
S e t c o m p r e s s te m p la t e
OK
H I Q U A L IT Y
M U S IC
SPEECH
8.2 Set input device
Choice between the INTERNAL or EXTERNAL
microphones or the LINE INPUT.
Pressing the “OK” key (1), allows selection
between the line input, internal or external
microphone. Press “C” twice to return to the
main window. Each input name can be
personalized in the “Setup” menu. To change
the input device, highlight the new input and
press “OK”.
STENO
Set VO R m ode
OK
V O R o ff
-1 0 d B
-2 0 d B
-3 0 d B
-4 0 d B
S e t V O R sto p m o d e
OK
Pause REC
S p lit t r a c k
S e t V O R s t o p d e la y
OK
8.3 Set compress template
5 sec
10 sec
Allows the selection of different operating
templates, containing all the recording
compression settings.
15 sec
20 sec
S e t p r e -r e c b u f f
OK
Select the “Compress template” by using the
“UP” (10) or “DOWN” (8) keys followed by
pressing the “OK” key (19). The preset template
can then be chosen from the list. Once
selected, press the “OK” key (1).
Each template stores the following parameters:
•
Template name
•
MPEG 1 L II, MPEG 1 L III, G729a, aLaw, µ-Law or PCM selection
•
Sampling frequency
•
Bit rate & Mono / Stereo selection
•
File extension name
500 m s
1000 m s
1 .5 s e c
2 sec
3 sec
S e t lo o p m o d e
OK
N o lo o p
C u rre n t
O rd e r
Random
S e t se a rch sp e e d
OK
10X
20X
30X
This information is shown on the display in the
audio parameters area.
40X
50X
8.4 Set VOR mode
S e t in p u t m a t r ix
Access to the parameters of the Voice Operated
Recording mode trigger level. This sub-menu
permits to set the minimum input level before
the recording starts, or to turn off the VOR
mode.
Page 15 of 56
OK
A u to
D o u b le C h
M ono L
S e t w o rk d ir e c t o r y
Copyright © NAGRAVISION S.A. 2005-2007
OK
ARESM
MP3
PROF
July 26, 2007
8.5. Set VOR stop mode
If “Pause REC” is selected, the recording will be paused (with default settings: depending from the
stop delay) if the level drops 25 dB below the trigger level. If the input level rises again above the
trigger level, the recording on the same file will continue.
If “Split track” is selected, the recording will be stopped (with default settings: depending upon the
stop delay) if the level drops 25 dB below the trigger level. If the input level rises again above the
trigger level, a new record will start.
8.6 Set VOR stop delay
Once the VOR recording started, it allows maximum recording length before it stops to be selected, if
the input level drops to 25 dB below the trigger level.
8.7 Set the pre-rec buffer
Permits the size of the pre-record to be set.
8.8 Setting the loop mode
Permits the following possibilities in the playback mode:
No loop:
Plays the selected file once followed by stop.
Current:
Continuous playback of the selected file.
Order:
Playback continues with the next consecutive file.
Random:
Randomly selects the next file to be played.
8.9 Setting the search speed
Allows the search forward or backward speed when using the “LEFT” or “RIGHT” key to be selected.
The speed can be set from 10x to 50x nominal speed.
8.10 Setting the input matrix
Permits to route the inputs to specific recording channels.
Auto:
If a stereo recording format is selected, the left input goes to the left
recording channel, the right input goes to the right recording channel. If
a mono recording format is selected, only the left input goes to the left
recording channel.
Double Ch:
The left input is forced to the left recording channel, the right input is
forced to the right channel and does not depend on the recording
format (Mono or Stereo).
Mono L:
Only the left input is directed to both recording channels. In the case of
a stereo recording with a single left input, both output channels will be
identical.
8.11 Setting the work directory
Select the preferred sub-directory into which files are to be stored or played from and press “OK”.
Note: Work directories can only be selected from this menu (Blue menu key). New work directories
can only be created in the “Setup” menu. If the internal memory of the machine has just been
formatted, only the “ARESM” directory exists.
Page 16 of 56
Copyright © NAGRAVISION S.A. 2005-2007
July 26, 2007
9 FILE / FOLDER MANAGER
The “MANAGER” acts like the
explorer on a PC. It offers the
possibility to create, erase,
move, copy and rename
directories or files.
To access the “MANAGER”
from the main display, press
“C”, followed by the “LEFT” or
“RIGHT” keys to select the
“folder” icon and press “OK”.
OK
MANAGER
OK
Return
OK
Return
NEWDIR
USER0001.WAV
USER0002.WAV
OK
MANAGER
OK
Return
NEWDIR
USER0001.WAV
USER0002.WAV
Entry
OK
ARESM
SYS.INI
OK
MANAGER
Return
Play
Return
Make dir
Erase
Cancel
Make dir
Rename
OK
New name
NEWDIR
OK
MANAGER
Return
NEWDIR
USER0001.WAV
USER0002.WAV
OK
Play
Erase
Edit
The following functions can be
selected: Entry, Play, Erase,
Edit, Make dir, Rename.
Note:
Make dir
Rename
OK
OK
OK
OK
Returns to the play window
USER0001.WAV
Confirm file delete ?
DELE Cancel
Returns to edit window
New directory made
OK
New name
USER0001
Not all these functions will always appear. It depends on the selected file or folder (“SYSINI”,
a “Directory” or an audio file “USERxxxx.wav”).
9.1 Renaming
9.1.1 Renaming a directory
To rename a directory, highlight the directory name and press “OK”. Then select
“Rename” and press “OK”. The first character can now be changed by using
the “+” or “-” volume keys or the “UP” and “DOWN” keys. Press the “RIGHT” key
to move to the next character. Press “OK” when completed. A maximum of 8
characters can be entered.
New name
N E W D I R
9.1.2 Renaming a file
To rename a file, proceed in the same manner as described for renaming a directory but by
highlighting the file name to be changed.
9.2 Erasing
9.2.1 Erasing a directory
To erase a directory, highlight the directory name and press “OK”. Then select “Erase” followed by
“OK”. A confirmation window appears to confirm the erasure of the directory and all included files. If
“DELE” is selected the directory and all included files will be deleted.
Page 17 of 56
Copyright © NAGRAVISION S.A. 2005-2007
July 26, 2007
9.2.2 Erasing a file
To erase a file, highlight the file name and press “OK”. Then select “Erase” and press “OK”. A
confirmation window will appear. Select “DELE” and confirm by pressing “OK”.
9.3 Entering a directory
Highlight the directory name and press “OK”. Then select “Entry” and press “OK”. The files in this
directory will then be shown.
9.4 Return to root
To return to the ROOT level, press “OK” then select “Return” followed by “OK” or press the “LEFT”
key once to go back one level. Repeat this until at least the “SYSINI” folder is shown: This means that
the ROOT is attended.
9.5 Make a directory
Press “OK” and select “Make dir”. Press “OK” once and the folder “NEWDIR” will be shown on the
display.
9.6 Edit
Press “OK” and select “Edit”. The selected audio file will be shown in the edit display. Another
possibility is to select first the audio file followed by pressing the “Scissors icon” key
Note: Editing is only possible on audio files recorded with the ARES-M II if the file type is a-Law, µLaw, G729a, PCM or MPEG 1 layer II. Audio files imported via USB cannot be edited. If in the
“MANAGER” the selected audio file is shown with the icon
it can be edited, if it is shown
with the icon
it cannot be edited. MPEG 1 layer II files recorded at 44.1kHz sampling
frequency, even if generated on the ARES-M II cannot be edited on the machine. MPEG 1
layer III files cannot be edited.
Page 18 of 56
Copyright © NAGRAVISION S.A. 2005-2007
July 26, 2007
10 SETUP MENU
Select display language
OK
The “SETUP” menu gives access to
several sub-menus. The most important
are the Template creation and the Input
device manager as they can be recalled
by the blue “MENU” key to select the
type of compression as well as the input
device.
To access to “SETUP” from the main
display, press “C”. The microphone and
folder icon appears. Press and hold the
“RIGHT” or “LEFT” key until the
screwdriver icon appears. By using the
“LEFT” or “RIGHT” keys, select the
screwdriver icon and press “OK”.
English
Deutch
Français
Español
Polski
Nederlands
OK
Set auto power down
15 sec
30 sec
45 sec
1 min
2 min
Disable
OK
Set screen save
15 sec
30 sec
45 sec
1 min
2 min
Disable
Manager compress template
OK
HI QUALITY
OK
Template manage
NAME: HI QUA
MUSIC
CORE: WAV-PCM16
SR: 48000 Hz
BR: 1536Kbps ST
EXT: WAV
SPEECH
STENO
Template manage
Empty
Empty
Empty
Empty
Empty
Empty
Template manage
NAME: HI QUA
CORE: WAV-PCM16
SR: 48000 Hz
BR: 1536Kbps ST
EXT: WAV
OK
Template manage
NAME: Empty
CORE:
SR:
BR:
EXT:
NONE
NONE
NONE
NONE
NAME: HI QUA
CORE: WAV-PCM16
SR: 48000 Hz
BR: 1536Kbps ST
EXT: WAV
Template manage
NAME: HI QUA
CORE: WAV-PCM16
SR: 48000 Hz
BR: 1536Kbps ST
EXT: WAV
Template manage
NAME: HI QUA
CORE: WAV-PCM16
SR: 48000 Hz
BR: 1536Kbps ST
EXT: WAV
Page 19 of 56
Copyright © NAGRAVISION S.A. 2005-2007
July 26, 2007
OK
M a n a g e r in p u t d e v ic e
DYN
OK
NAGRA
COND
IN T
L iN E H
In D e v m a n a g e
In D e v m a n a g e
NAME: NAGRA
NAME: NAGRA
TYPE:
G A IN :
BST:
PW R:
FLT:
TYPE:
G A IN :
BST:
PWR:
FLT:
E X T -M IC
+0dB
+19 dB
ON
1 0 0 -2 0 k H z
In D e v m a n a g e
L IN E L
NAME: NAGRA
E m p ty
TYPE:
G A IN :
BST:
PWR:
FLT:
E m p ty
E m p ty
S et sp eaker m ode
NAME: NAGRA
O ff
TYPE:
G A IN :
BST:
PWR:
FLT:
A uto
OK
S e t A G C T a r g e t le v e l
-6 d B F S
OK
NAME: NAGRA
TYPE:
G A IN :
BST:
PWR:
FLT:
T im e r o n
T im e r o ff
OK
O K k e y in re c o r d
E X T -M IC
+0dB
+19d B
ON
1 0 0 -2 0 k H z
In D e v m a n a g e
-1 2 d B F S
S T O P k e y in r e c o r d
E X T -M IC
+ 3dB
+19 dB
ON
1 0 0 -2 0 k H z
In D e v m a n a g e
E m p ty
OK
E X T -M IC
+0dB
+19 dB
ON
1 0 0 -2 0 k H z
P au s e reco rd
E X T -M IC
+0dB
+19d B
ON
1 0 0 -2 0 k H z
In D e v m a n a g e
N ex t re cord
OK
S e t d is p la y b r ig h t n e s s
NAME: NAGRA
TYPE:
G A IN :
BST:
PWR:
FLT:
100 %
85%
5%
L o c k in p u t d e v ic e g a in
OK
E X T -M IC
+0dB
+19d B
ON
1 0 0 -2 0 k H z
M a nual
Loc k
S e t r e c o r d n a m e p re fix
OK
In p u t r e c o r d p r e fix
U
OK
S e t d a t e a n d t im e
S
E
R
D a t e s e t t in g
Y EAR
M O NTH
20 05
10
H OUR
31
M IN
09
OK
C le a r R e c o rd c o u n te r
R e s t o r e fa c t o ry s e t t in g s
OK
F o r m a t d is k
OK
C h e c k d is k s p a c e
C h e c k s o ft w a re v e r s io n
C h e c k m a c h in e ID
Page 20 of 56
OK
OK
OK
DAY
45
C le a r t o z e r o
E n try
Fo rm a t
!
!
!
OK
OK
R e s u m e fa c to r y s e ttin g s
P le a s e c o n firm ?
C on f ir m
C ancel
D a ta w ill b e los t
P le a s e c o n firm ?
C on fir m
C a n c el
U SED : 39 M B
FR EE: 10 15 M B
In fo m e d ia
A R E S -M
v e r X .X X
B U IL D : X X X X
M A C H IN E ID
FFF F - FF FF
FFF F - FF FF
*00*
Copyright © NAGRAVISION S.A. 2005-2007
July 26, 2007
Note:
While surfing through the different menu windows, in some cases not only the “OK” key or
“RIGHT” key can be used to advance one step but also the “UP” and “DOWN” keys. To go
one step back or to escape from a particular screen press “C” or the “LEFT” key.
When
display.
appears, select the microphone icon and press “OK” to return to the main
10.1 Display language
Several languages are available: Chinese, English, French, German, Spanish, Polish, Dutch.
10.2 Auto power
This menu allows 5 possible settings to power down the machine when no keys were pressed for a
period (except when in record, edit or play modes). It can be set to 15, 30, 45 seconds, 1 and 2
minutes. To turn the auto power down off, select “Disable”.
10.3 Screen save
To save battery power, the screen can be turned off automatically with 5 different settings. It can be
set to 15, 30, 45 seconds, 1 and 2 minutes. To turn the screen save off, select “Disable”.
Note:
If activated, the display will automatically turn off when no key is pressed for the selected
period. Push any key to turn the display on again.
10.4 Template selection
Before the templates can be selected from the blue menu key, they first need to be stored. Maximum
10 templates for the input device as well as 10 templates for the compression can be entered.
Templates are used to store different user profiles or “machine set-ups” for quick access.
10.4.1 Template name
Note:
Remember that all text in blue colour (sample text) can be modified by the user.
To enter a new name or to change the name of a template, select the desired name “HI QUALITY”
and press “OK”.
Manager compress template
OK
HI QUALITY
The window “Template manage” will appear. The first character can now be
changed by using the “+” and “-” volume buttons. Press the “RIGHT” key to jump to
the next character. Maximum 6 characters can be entered. To validate the new
name press the “DOWN” key to go to the next step.
OK
Template manage
NAME: HI QUA
CORE: WAV-PCM16
SR:
48000 Hz
BR:
1536kbps ST
EXT: WAV
10.4.2 Recording file compression type setting “CORE”
Once the corresponding template is selected, press “OK” followed by the “DOWN” key to highlight
“CORE”.
Manager compress template
OK
HI QUALITY
OK
Several possibilities exist: “RAW-MPEG1L2”, “BWF-MPEG1L2”,”RAW-MPEG1L3”,
“WAV-PCM16”, “BWF-PCM16”, “WAV-aLAW”, “WAV-uLAW” and “WAV-G729a”.
Select one of the possibilities using the “LEFT” or “RIGHT” key and press the
“DOWN” key to go to the next step.
Page 21 of 56
Copyright © NAGRAVISION S.A. 2005-2007
Template manage
NAME: HI QUA
CORE: WAV-PCM16
SR:
48000 Hz
BR:
1536kbps ST
EXT:
WAV
July 26, 2007
10.4.3 Sampling Rate setting “SR”
Once the corresponding template is selected, press “OK” followed by “DOWN” twice to highlight “SR”.
Manager compress template
OK
HI QUALITY
Template manage
OK
Several selections are available (see the table at the end of the manual). Select one
of the possibilities using the “LEFT” or “RIGHT” keys and press the “DOWN” to go to
the next step.
NAME: HI QUA
CORE: WAV-PCM16
SR:
48000 Hz
BR:
1536kbps ST
EXT: WAV
10.4.4 Bit Rate & Mono / Stereo selection “BR”
Once the corresponding template is selected, press “OK” followed by “DOWN” three times to highlight
“BR”.
Manager compress template
OK
HI QUALITY
Template manage
OK
Several selections are available (see the table at the end of the manual). Select one
of the possibilities using the “LEFT” or “RIGHT” keys and press the “DOWN” to go to
the next step.
NAME: HI QUA
CORE: WAV-PCM16
SR:
48000 Hz
BR:
1536kbps ST
EXT: WAV
10.4.5 File extension name setting “EXT”
Once the corresponding template is selected, press “OK” followed by “DOWN” four times to highlight
“EXT”.
Manager compress template
OK
HI QUALITY
Template manage
OK
NAME: HI QUA
CORE: WAV-PCM16
SR:
48000 Hz
BR:
1536kbps ST
EXT: WAV
By using the “+” or “-” volume keys, the first character can be changed.
Press the “RIGHT” key to proceed to the next character position. To confirm the
new extension name, press “OK”. Maximum 3 characters can be entered.
10.5 Input device manager
This allows a specific name to be given to an input selection as well as the presets for the input gain,
power and input filter selection for that particular device name.
10.5.1 Input device manager, NAME
To enter a new name or to change the name of an input device, first select the desired name
“NAGRA” and press “OK”.
Manager input device
OK
NAGRA
The “Input device manage” window will appear. The first character can now be
changed by using the “+” or “-” volume buttons. Press the “RIGHT” key to jump to
the next character. Maximum 6 characters can be entered. To validate the new
name press “DOWN” to go to the next step.
Page 22 of 56
Copyright © NAGRAVISION S.A. 2005-2007
OK
InDev manage
NAME: NAGRA
TYPE:
GAIN:
BST:
PWR:
FLT:
EXT-MIC
+0dB
+19dB
ON
100-20kHz
July 26, 2007
10.5.2 Input device type manager
This sub-menu gives the selection of the input that will be used for recording. To change the input
type, go to “Manager input device” and press “OK” followed by the “DOWN” key. Then “TYPE” will be
highlighted.
NAGRA
InDev manage
Manager input device
OK
OK
Five selections are possible: Internal mike, External mike, Line, Line Lo and Line Hi
input.
By using the “LEFT” or “RIGHT” keys, select the corresponding input type and press
“DOWN” to go to the next step.
NAME: NAGRA
TYPE:
GAIN:
BST:
PWR:
FLT:
EXT-MIC
+0dB
+19dB
ON
100-20kHz
10.5.3 Input gain manager
To change the input gain of an input device type, select the corresponding name and press “OK”
followed by the “DOWN” key twice.
Manager input device
OK
NAGRA
OK
InDev manage
NAME: NAGRA
The “INT-MIC” gain can be pre-adjusted from 0 dB to 28 dB in steps of 2 dB. The
“EXT-MIC” can be adjusted from 0 dB to 24 dB in steps of 3 dB. The “LINE” input
can be adjusted from 0 dB to 24 dB in steps of 3 dB. To modify the value, use the
“LEFT” or “RIGHT” keys. Once the corresponding value is set, press “DOWN” to go
to the next step.
TYPE:
GAIN:
BST:
PWR:
FLT:
EXT-MIC
+0dB
+19dB
ON
100-20kHz
10.5.4 Input boost manager
Only for the “EXT-MIC” an additional boost can be added to the previous gain setting. To change the
input boost, select the corresponding name and press “OK” followed by the “DOWN” key three times.
Manager input device
OK
NAGRA
OK
InDev manage
NAME: NAGRA
By pressing the “LEFT” or “RIGHT” keys, the “BST” can be set to +19 dB or +34
dB. Once the corresponding setting is made, press “DOWN” to go to the next step.
10.5.5 Input power manager
TYPE:
GAIN:
BST:
PWR:
FLT:
EXT-MIC
+0dB
+19dB
ON
100-20kHz
Power can only be turned on for the “EXT- MIC”. To select the input power, select the corresponding
name and press the “OK” followed by the “DOWN” key four times.
Manager input device
OK
NAGRA
OK
InDev manage
NAME: NAGRA
The power available for Electret mikes is 3V dc. By pressing the “LEFT” or “RIGHT”
keys, the “PWR” can be turned ON or OFF, then press “DOWN” to go to the next
step.
TYPE:
GAIN:
BST:
PWR:
FLT:
EXT-MIC
+0dB
+19dB
ON
100-20kHz
10.5.6 Input filter manager
A filter can be selected for the “EXT-MIC”. To select the input filter, select the corresponding name
and press “OK” followed by the “DOWN” key five times.
Manager input device
OK
NAGRA
OK
InDev manage
NAME: NAGRA
Two possibilities are available: Flat (20-20kHz) or Low cut (100-20kHz). By
pressing the “LEFT” or “RIGHT” keys, the “FLT” can be turned ON or OFF. Press
“OK” to validate.
Page 23 of 56
Copyright © NAGRAVISION S.A. 2005-2007
TYPE:
GAIN:
BST:
PWR:
FLT:
EXT-MIC
+0dB
+19dB
ON
100-20kHz
July 26, 2007
10.6 Speaker mode
The ARES-M II has a built-in speaker for audio monitoring. The speaker can be turned “Off” or set to
“Auto”. In the “Auto” mode the speaker is active during playback or editing only. During record or
monitoring (EE) mode, the speaker is turned off.
10.7 Set AGC target level
This sub-menu allows the mean maximum target record level to be selected. 2 levels are available.
10.8 Set STOP key during record
Timer on selected: to stop a recording the stop key must be pressed and hold for approximately 3
seconds.
Timer off selected: if during a record the stop key is pressed, the recording stops immediately.
10.9 Set OK key during record
Pause record selected: if the OK key is pressed during record, the record is paused. To continue the
record (same index), press the OK key once again.
Next record selected: Permits to use the OK key as a second record key. From stop mode, press
once the OK key and the ARES-M II is in PRE-REC mode, pressing a second time the OK key put
the machine in record mode, pressing a next time starts a new seamless recording index.
10.10 Set display brightness
Permits to adjust the display brightness from minimum 5% up to 100% If set to 100%, the brightness
key (4) on the front panel is disabled. Beware that the current consumption for high brightness will
decrease the battery life. The default settings is 25%.
Consumption at 25% is 100 mA, at 100% is 115 mA, at 5% is 85 mA.
10.11 Lock input device gain
Permits to lock or unlock (Manual) the input gain (“UP” & “DOWN” keys) adjustment from the record
or pre-record display. Normally the input gain is stored in the input templates.
10.12 Set record name prefix
Set record name prefix
This sub-menu allows 4 characters to be
entered. Once being in the “Input record prefix” menu use the “+” or “-” volume
keys to select the corresponding character. Press the “RIGHT” key for the next
character position. Once all characters entered, press “OK”.
OK
Input record prefix
U
S
E
R
Example of a file name: USER0001.
Date setting
10.13 Date & Time
YEAR
The “DATE & TIME” sub-menu permits to set the correct time start and date for
each recording. Use the “UP” or “DOWN” keys to set “YEAR”. Use the “RIGHT” or
“LEFT” keys to go to the next step. Once the settings made, press “OK”.
MONTH DAY
2005
HOUR
10
31
MIN
09
45
10.14 Clear record counter
Every recording has an index number incrementing automatically. Resetting the counter, by pressing
“OK” when “Clear to zero” is shown, resets it to 1. The next recording will have the full name
XXXX0001.
Page 24 of 56
Copyright © NAGRAVISION S.A. 2005-2007
July 26, 2007
Note: If there are still files in memory and the USER name has not been changed, the next recording
with the same name prefix and index will overwrite the old one.
10.15 Restore factory settings
This sub-menu is used to restore the factory “default” settings, including the template settings,
names, input devices etc. After restore, the machine is set for a Nagra mike input with the low cut
filter on, recording in PCM standard WAV, 48 kHz stereo.
10.16 Format disk
If all information on the internal memory needs to be erased, the fastest way is to format it. Once
formatted, the three xxx.dat files in the “SYSINI” folder will be re-entered in the root, just before power
off. “No File” will be shown on the display.
Note: The xxx.dat files are storing all the entered templates, language selection, record name prefix
etc.
10.17 Check Disk space
Indicates in Mbytes, the remaining space left in the memory.
10.18 Check Software version
This sub-menu shows the type of the machine and the software version
installed.
10.19 Check Machine ID
Shows the unique identification number of the machine.
!
!
!
USED: 210 MB
FREE: 1898 MB
Infomedia
ARES-M II
ver X.X
BUILD: XXXX
MACHINE ID
720F - 003B
4158 - 81FE
*04*
11 EDITING
The ARES-M II is fitted with an internal audio editor allowing basic “cut” editing by the user in the
field. It allows “high lighted” sections of audio to be either removed or to be saved as a new file.
This is done by the setting 2 markers, A and B and then deleting or saving the portion between the 2
points.
In addition several “position markers” can be placed anywhere throughout the audio piece which
serve as different cue points for the quick location of different specific points in the audio. These
markers are totally independent from the two “cut” markers “A” and “B”.
To begin editing on a file, go to the “MANAGER” (folder icon) by pressing “C” and then choose the file
to be edited. Press the “EDIT” key (3) (alternatively press the “OK” key followed by selecting “Edit”
and “OK”). The selected file will then appear as a graphic display representing the audio.
IMPORTANT NOTE: Only files recorded on the ARES-M II can be edited except if they are recorded
in MP3 (any sampling rate) or in MP2 at 44.1 kHz
Page 25 of 56
Copyright © NAGRAVISION S.A. 2005-2007
July 26, 2007
11.1 Editing display
Run status
Playback head position
Marker A
Marker B
Waveform
Play position
Playback counter
Original file length
Actual file length
Marker A position
Marker B position
Modulometer
Description of the different display indications
11.1.1 Playback head position
This is the exact position, during playback, on the waveform.
11.1.2 Waveform
The full length of the screen corresponds to approximately 10 seconds of sound (without zooming).
11.1.3 Marker A
To set the first “CUT” marker, press the “A-B” key once (during playback or stop mode).
11.1.4 Marker B
To set the second “CUT” marker, press the “A-B” key again (during playback or stop mode). Once the
second marker is set, the portion of the waveform between marker A and B will be shown as inverted
(As shown above).
To jump alternately from the marker “B” position to the marker “A” position, press the “A-B” key (4).
To remove the markers “A” & “B”, press and hold a few seconds the “A-B” key.
11.1.5 Play position
The small moving indicator shows the playback position versus the total length of the file.
11.1.6 Run status
Indicates if the mode of the machine (stop, play).
11.1.7 Modulometer
Full scale from -40 dB to 0 dB with peak hold indicator for left and right channels.
Page 26 of 56
Copyright © NAGRAVISION S.A. 2005-2007
July 26, 2007
11.1.8 Marker A position
Indicates the exact position of marker A with respect to the beginning of the file.
11.1.9 Marker B position
Indicates the exact position of marker B with respect to the beginning of the file.
11.1.10 Original file length
Indicates the original total length of the file.
11.1.11 Actual file length
Indicates the actual length of the file. If no cuts were made, it corresponds to the original length.
11.1.12 Playback counter
Indicates the exact playback position with respect to the playback “head” position.
Page 27 of 56
Copyright © NAGRAVISION S.A. 2005-2007
July 26, 2007
MENU
11.2 Editing Menus
While in the editing mode, pressing the MENU key can access four
different editing menus, which are very helpful to the user.
11.2.1 Jump position (GOTO function)
To rapidly “GOTO” a known point in the audio file simply put the
location (in minutes and seconds) in the “Jump position” and press
“OK”. To do so, press the “Menu” key. A sub-window appears allowing
the requested position to be entered in minutes and seconds. Use the
“UP”, “DOWN” keys to select the correct number, use the “RIGHT” and
“LEFT” keys to move the cursor horizontally. Once all numbers entered,
press “OK” and the playback point will jump immediately to that
location.
This feature is especially useful when editing long files: jumping to the
very beginning or end of the file can be done easily by holding the
“LEFT” or “RIGHT” key down so the jump position goes to 000:00 or
999:99 respectively.
11.2.2 Markers
Two types of markers can be used during editing:
•
Cut markers “A” and “B” (maximum 2). These markers are
used to cut or save the marked area.
Jump position
000:00
MENU
Marker 1 000:07
Marker 2 000:12
Marker 3 001:05
MENU
1: 06-06-14 10.15
2: 06-06-14 10.14
Undo3: EMPTY
MENU
1 Frame/Pixel
To set the first cut marker during play or stop, press the “A-B” key once,
and a second time to set the second cut marker. They can be removed
3 Frames/Pixel
by holding the “A-B” key until they disappear (This will not remove the
6 Frames/Pixel
selected audio portion). Once the cut markers are in the right place,
10 Frames/Pixel
press the “CUT” key (3) and the marked area (Inverted colour) will be
removed. If the marked area needs to be saved as a new file, press the “OK” key. A confirmation
window will appear. If confirmed, the portion between the markers will be saved as “USER000X1.XXX”.
•
Location markers. Several markers, for rapid location of points in the audio can be entered
during playback in the edit mode.
By pressing the “OK” key during playback in the edit mode consecutive location markers will be
stored. Press the “MENU” key twice to see the list of location markers that have been set. Move the
curser to the desired marker and press “OK” and the editor will immediately jump to this location.
These markers cannot be removed or altered once set.
11.2.3 Undo table
Pressing the “MENU” key three times will show the Undo table. If by error, an incorrect portion was
cut while editing, it can be restored via Undo table. Select one of the Undo rows and press the “OK”
key and the portion will be re-integrated into the graphic and will be shown inverted (Cut markers are
present).
Example: “1 06-06-14 11:41” means that cut # “1” made on July 14, 2006 “06-06-14” at 11h41 will
be restored to the original if “OK” is pressed.
Page 28 of 56
Copyright © NAGRAVISION S.A. 2005-2007
July 26, 2007
11.2.4 Frames/Pixel (Graphic Zoom)
Horizontal zoom-in can be obtained step-by-step by pressing the “MENU” key 4 times, select
between 1 to 10 frames per pixel using the “UP” and “DOWN” keys to choose the desired Zoom and
press the “OK” key. (“1” represents greatest zoom while “10” represents the least zoom).
11.2.5 Playback around the edit
Once the two “CUT” points “A” and “B” have been set, there are two ways of listening to the audio.
The first is to listen from 3 seconds before the first cut marker, then “SKIP” or “jump over” the portion
between the A and B markers and then continue to play for 3 seconds after the second cut marker.
This is a loop feature and will continue until STOP is pressed. This mode is selected by leaving the
AGC switch OFF (towards the bottom of the ARES-M).
The second method is to simply play the section between the markers without any “pre-roll” or “postroll”, by putting the AGC switch to the ON position.
These two methods allow the edit to be listened to accurately before the actual cut is made or the
audio portion is saved.
11.2.6 Trimming edit points
If one of the cut markers is not in the correct place, it may be trimmed.
Select the desired “CUT” marker by briefly pressing the “A-B” key. Press the “LEFT” or “RIGHT” keys
to slide the marker frame-by-frame to the left or right. If the “LEFT” or “RIGHT” keys are held, the
marker will move at approximately 10 frames per second. If the “UP” or “DOWN” keys are pressed
briefly, the corresponding marker will move at a rate of 100 frames/sec. If the “UP” or “DOWN” keys
are held, the corresponding marker will move at a rate of 1000 frames/sec.
11.2.7 Completing the edit and saving the resulting file
Once the file is cleaned it can be saved by pressing the “C” key (6). A sub-window appears giving the
possibility to return to the edit window “Cancel” or to abort the editing “Don’t” or to “Save” the editing.
The file will be saved as a new file.
Example: File USER0004 was used for edit, the edited file will be called USER0004-1
If an audio portion needs to be saved (AGC switch is ON and marker A & B is set), press the “OK”
key and it will be saved as a new file.
Example: File USER0004 was used to select an audio portion, the new file will be called USER00042 etc.
11.2.8 Quick reference to the editor function keys:
OK
UP
DOWN
PLAY / STOP
AB
CUT
RIGHT
LEFT
C
AGC
Page 29 of 56
Place location marker / Save selection as…
Fast return / Move marker to the left
Fast forward / Move marker to the right
Start or Stop the audio playback
Set cut markers / Jump between cut markers / remove both cut markers
Remove highlighted section of audio
Slow forward / Move marker step-by-step to the right
Slow return / Move marker step-by-step to the left
End editing (save as or undo or cancel)
Listen with / without Pre and Post roll
Copyright © NAGRAVISION S.A. 2005-2007
July 26, 2007
12 ARES-M II GAIN AND LEVEL STRUCTURE.
The input of the ARES-M II has 3 principal stages: The analogue microphone pre-amplifier “front
end”, the PGA (Programmable Gain Amplifier) and the DGA (Digital Gain Adjustment).
Different adjustments are available at all three stages. Only one, the “recording level” is readily
accessible from the front panel by the user (using the left/right keys).
The microphone pre-amplifier stage has two selectable sensitivity settings which correspond to a
typical dynamic microphone (34 dB) and the NAGRA microphone (19 dB); this selection is made in
the “Screwdriver” menu in the “Input device manager”.
Dynamic microphone sensitivity is low and needs more gain than a condenser or Electret
microphone. So, if a dynamic microphone is used, 34 dB gain is needed, and if a condenser
microphone such as the NAGRA one, or any other external condenser microphone (such as the
SONY ECM MS907 Stereo microphone) then 19dB gain should be selected. The correct selection of
this gain will avoid the saturation of the PGA and DGA stages.
In the Codec section of the machine the first stage is equipped with a PGA adjustable gain setting
allowing the modulometer to be calibrated to give an accurate indication of SPL (Sound Pressure
Level). This setting is available in 3 dB steps and is also found in the Screwdriver menu and allows a
range of 24 dB variation. This value is factory set to 9 dB for the NAGRA microphone and 6 dB for an
external dynamic microphone such as a Sennheiser MD21.
Finally, the MAIN RECORD LEVEL is the actual level that should be used to adjust the recording
level during operation of the machine and is accessible using the Left and Right keys without any
need for going into the menus. This task is achieved by the DGA, and the range of adjustment allows
0dB Full Scale to be displayed on the modulometer for 84 dB to 144 dB SPL. The normal range of
acceptable input levels ranges from 84 dB to 110dB SPL. The range from 110dB to 144 dB SPL will
not allow 0 dB to be indicated on the modulometer without risk of saturation of the codec.
84 dB is the usual setting for an interview in a quiet environment. 110 dB allows the recording of
somebody shouting at a distance of about 40 cm from the microphone.
The zone from 110 to 144 allows the user to make a fade out or to record with headroom (by
recording below the 0dB point on the modulometer).
Page 30 of 56
Copyright © NAGRAVISION S.A. 2005-2007
July 26, 2007
13 LINE INPUTS ON THE ARES-M II
The line inputs of the ARES-M II are asymmetrical and present an input impedance of about 60 kΩ.
They allow the entire dynamic range of the machine to be used, typically 95 dB ASA weighted when
measured on the USB output, or 92 dB ASA weighted on the analogue outputs.
Two sensitivities are available: Line H (for High level inputs) and Line L (for low level inputs). The Line
H position allows 0 dB to be recorded throughout the input voltage range of 300 mV to 4.9V and the
Line L from 19 mV to 310 mV.
The adjustment zone (using the level adjustment keys) ranges from +20 dB to –12 dB in the Line H
mode and –3 dB to –35 dB in Line L (referenced to 1V).
As an example, one can say that if the modulometer indicates –10dBfs and that the level adjustment
is set to –12 dB, then the input level is 12db – 10 dB= -22 dB with respect to 1 V or in other words
794 mV.
The following
drawing
clarifies the
above.
14 MICROPHONES AND SETTINGS.
The ARES-M II can use the following microphones:
Internal built-in mono microphone
External standard stereo clip-on mic (Red band)
External mono clip-on mic (Blue band)
External high quality stereo clip-on mic (Green band)
External dynamic microphone (with cable)
External electret microphone (with cable)
Stereo
Mono
Stereo HQ
For each of these microphone types an “Input device” should be pre-programmed allowing quick
selection in the field. In the input device manager (Screwdriver set-up menu) various different
parameters can be set and these vary for the different types of microphone. Below is a table showing
our “recommended” settings for various mics. You may choose to alter these settings to get different
performance but the indicated settings are optimal suggestions.
Microphone
Clip-on (Red)
Clip-on (Blue)
Clip-on (Green)
Generic Dynamic
MD-21 (Sennheiser)
RE-6 (Electrovoice)
ECM-MS907(Sony)
Type
Ext-Mic
Ext-Mic
Ext-Mic
Ext-Mic
Ext-Mic
Ext-Mic
Ext-Mic
Gain (dB)
+9
+9
+9
+6
+6
+12
0
BST (dB)
+19
+19
+19
+34
+34
+34
+34
PWR
ON
ON
ON
OFF
OFF
OFF
OFF
FLT
100-20 kHz
100-20 kHz
100-20 kHz
20-20 kHz
20-20 kHz
20-20 kHz
20-20 kHz
This built-in internal microphone should be considered only for “Dictaphone” quality speech
recordings. It should only be used in emergency situations where no other microphone is available.
Page 31 of 56
Copyright © NAGRAVISION S.A. 2005-2007
July 26, 2007
The standard Stereo microphone (Red band) contains two cardioïd capsules, and is the standard
microphone delivered with the ARES-M II.
The high quality stereo microphone (Green band) has two cardioïd capsules inside, mounted on
special shock resistant neoprene mountings. The capsules are individually selected and matched in
both noise and gain characteristics, according to a strict selection and measurement protocol. This
microphone offers a good stereo image, and is very versatile.
The mono capsule (Blue band) is an omni-directional capsule, which offers two principal differences
to the stereo capsule. Firstly, being an omni capsule it captures much more of the ambience and is
ideal for on-the-move journalism, especially because most interviews are mono. Secondly, in an
interview situation it is not necessary to “point” the microphone at the person speaking. The omnidirection characteristics allow all those being recorded to be captured equally, hence making the
journalist job less intimidating. In addition it offers longer recording times to the ARES-M II as the
recorded files are mono.
The use of the foam windshield is strongly recommended with the clip-on NAGRA microphones.
15 LOW CUT FILTER OR NOT ON THE ARES-M II
The ARES-M II is equipped with a analogue low cut filter integrated within the microphone preamplifier. This filter can be turned ON of OFF as desired.
Frequency response curve of the External microphone pre-amplifier (flat and Low cut) :
The frequency of the cut is at 200Hz
with a gradient of 40 dB / octave.
This filter can be activated for each
microphone type, as defined in the USER
list (DYN, NAGRA,COND……)
It is specially useful for recordings made
using directional microphones outside in
windy conditions, such as the stereo
NAGRA microphone. In fact, cardioïd
(speed capsules) such as the NAGRA
microphone are susceptible to vortexes
induced by wind moving round the
microphone capsule, contrary to omnidirectional (pressure) capsules, which
are not.
Audio Precision
02/07/05 11:27:26
+5
+0
-5
-10
d
B
r
-15
-20
-25
-30
-35
-40
10
20
50
100
200
500
1k
2k
5k
10k
20k
50k
Hz
Sweep
Trace
Color
Line Style
Thick
Data
Axis
1
2
1
1
Cyan
Green
Solid
Solid
1
1
Anlr.Am pl
Anlr.Am pl
Left
Left
Com m ent
default.at1
Note however that the NAGRA microphone is equipped with a fine silk screen directly behind the grill
/ basket carefully positioned to compensate for these vortexes and “pop” effects. It is also
recommended to use the external foam windshield whenever one works outside when unexpected
wind noise may be encountered.
16 AUDIO COMPRESSION (WHY AND WHEN TO USE IT).
The ARES-M II is able to record using different Audio qualities PCM Linear, A-Law, µ-Law, MPEG 1
Layer II (MP2) and MPEG layer III (MP3) that have their own particular advantages, which are
explained below.
What to use?
Firstly, the less compression used, the better the quality will be. However at higher bit rates (384
kbits/s) you can easily record music and it will probably not notice any difference.
Page 32 of 56
Copyright © NAGRAVISION S.A. 2005-2007
July 26, 2007
A few guidelines should be considered:
For journalism / interview work it is
unnecessary to use PCM linear. Generally
MPEG 1 Layer II is used and the
compression / bit rate is generally defined
by the broadcaster.
For music / effects PCM linear is the best
quality although MPEG at a high bit rate is
probably good enough and gives faster
download time.
For ultra long recordings use a very low bit
rate, where quality will be “Dictaphone”
quality.
Some important things to remember:
-
Some computers will not play MPEG 1 Layer II compressed files without an appropriate
audio editing software. Typically some versions of the Windows Media player fall into this
category.
-
Audio CD’s will only accept 44.1 kHz linear PCM if they are to be played on a standard CD
player.
-
Download speed from the machine to the computer is at a fixed bit rate and the full memory
(in whatever format) will take about 13 minutes to empty. This could correspond to almost 3
hours of PCM linear or equally 68h of MPEG (as an example). Looking at it from the other
direction, 1 hour of recording in PCM will take approx 5 minutes.
17 MP2 OR MP3 IMPORT / PLAYBACK
MP2 or MP3 audio files can be imported via USB. To playback, select the corresponding file and
press play.
Note: The name of each file to be imported must not be modified except if the same filename exist
already. Beware that those imported files cannot be edited on the Ares-M II.
Page 33 of 56
Copyright © NAGRAVISION S.A. 2005-2007
July 26, 2007
18 USB
The miniature USB port serves two purposes: File download or external DC powering.
As the internal memory of the ARES-M II cannot be removed, audio can be extracted either through
the line output in normal playback mode or alternatively via the USB port to the PC / MAC.
Connect the USB cable to the computer and to the ARES-M II. The ARES-M II will immediately switch
on as it is automatically powered through the USB connection.
When the USB is connected, a sub-window appears giving the possibility to select “USB POWER” or
“USB TRANSFER”. Make a selection and press the “OK” key.
The USB power position is for simply powering the ARES-M II through the USB port for normal
operation without internal batteries.
If the USB transfer is selected, the machine will immediately appear as
a removable disk in the explorer of the PC/MAC. And the following
display will be shown on the ARES-M II:
On a PC, the Windows Explorer will display the following:
PC
As an example of 3 recordings, it shows 4 folders and 3 audio files:
SYSINI
- Is the folder that contains the files with all the stored settings.
USER000X.DIR
- Are the folders containing the audio envelops and editing information.
USER000X.WAV
- Audio files
Note: Do not erase the “SYSINI” folder because the next time the machine will be turned on it
“wakes up” with the default factory settings. If several ARES-M II machines need to be set up
with the same parameters, this folder can be copied from the first machine and then copied
into all the other machines.
An identical situation of 3 recordings is shown on the next picture.
MAC
Beware that xxx.wav files are recognized by Mac as PCM files. MPEG files need to be recorded with
the extension xxx.mp2 or xxx.mp3.
Page 34 of 56
Copyright © NAGRAVISION S.A. 2005-2007
July 26, 2007
19 SOFTWARE UPDATE
Important: As a safety precaution, before updating the Ares-M II, be sure that all audio files are
saved on your Mac or PC, this is to prevent any loss of audio files.
To install new software in the Ares-M II, a computer, the machine and a USB cable are needed. New
software, called “APP.COE” can be downloaded from the web at www.nagraaudio.com
Important: Be sure that you have downloaded the APP.COE software corresponding to your ARESM II and not the one for ARES-M or others.
Before updating, verify that the batteries inside the machine are in good condition.
Before connecting the machine via the USB cable to the PC or MAC, the machine must first be
switched on using a key combination: Press and hold the “VOL +” key (2) while pressing the poweron key (5).
The display will show the following text:
1.
2.
System update
1. Check battery power
2. Plug in USB cable
3. Copy "APP.COE"
4. Remove USB cable
5. Wait for shutdown
6. Turn on the device
4.
5.
6.
Must be checked before “System update”
Connect the USB cable between the machine and the
PC, run explorer and search for the removable disk
called “UPDATE”:
PC
MAC
3. Copy the new “APP.COE” to the Ares-M II
Before disconnecting the cable, dismount the USB mass storage device from the desktop.
The ARES-M II will automatically shut down.
Switch on the ARES-M II and verify the software version.
Note for Windows 2000 & XP users:
If the Explorer window doesn’t show the file “APP.COE”,
check the following:
In Explorer, select “Tools”, followed
by “Folder Options”.
In the “Folder Options” window,
select “View”.
In the “View” section, verify that
“Show hidden files and folders” is
checked.
In the “View” section, verify that “Hide protected operating system files (Recommended)” is not
checked.
Note for Mac X.4 (or higher) users:
Page 35 of 56
If the file APP.COE appears locked (padlock icon as shown
on the above MAC picture) the file must be unlocked before
it can be replaced by the new software. Use the Mac
program “Buddy 8” or a program “File Buddy 9” or similar to
unlock.
Copyright © NAGRAVISION S.A. 2005-2007
July 26, 2007
20 FILE TYPES
Recording
Sampling
type
Frequency
Hz
WAVPCM16
48000
Bitrate
kb/s
768
WAVPCM16
48000
1536
WAVPCM16
44100
705
WAVPCM16
44100
1411
WAVPCM16
32000
512
Mono
Rec. T
Recording
Sampling
Stereo
On 1 GB
type
frequency
M/S
__h__m
Bitrate
Mono
Rec. T
Stereo
On 1 GB
Hz
kb/s
M/S
__h__m
32000
56
M
39h40
2h53
BWFMP1L2
S
1h26
BWFMP1L2
32000
64
M
34h43
M
3h08
BWFMP1L2
32000
64
S
34h43
S
1h34
BWFMP1L2
32000
80
M
27h46
M
4h20
BWFMP1L2
32000
96
M
23h08
23h08
M
WAVPCM16
32000
1024
S
2h10
BWFMP1L2
32000
96
S
WAVPCM16
24000
384
M
5h47
BWFMP1L2
32000
112
M
19h50
WAVPCM16
24000
768
S
2h53
BWFMP1L2
32000
112
S
19h50
WAVPCM16
22050
352
M
6h17
BWFMP1L2
32000
128
M
17h21
WAVPCM16
22050
705
S
3h08
BWFMP1L2
32000
128
S
17h21
WAVPCM16
16000
256
M
8h40
BWFMP1L2
32000
160
M
13h53
13h53
WAVPCM16
16000
512
S
4h20
BWFMP1L2
32000
160
S
WAV-G729a
8000
8
M
277h44
BWFMP1L2
32000
192
M
11h34
WAV-aLaw
48000
384
M
6h06
BWFMP1L2
32000
192
S
11h34
WAV-aLaw
48000
768
S
3h03
BWFMP1L2
32000
224
S
9h55
WAV-aLaw
44100
352
M
6h38
BWFMP1L2
32000
256
S
8h40
WAV-aLaw
44100
705
S
3h19
BWFMP1L2
32000
320
S
6h56
WAV-aLaw
32000
256
M
9h09
BWFMP1L2
32000
384
S
5h47
WAV-aLaw
32000
512
S
4h34
BWFPCM16
48000
768
M
2h53
WAV-aLaw
24000
192
M
12h12
BWFPCM16
48000
1536
S
1h26
WAV-aLaw
24000
384
S
6h06
BWFPCM16
44100
705
M
3h08
1h34
WAV-aLaw
22050
176
M
13h17
BWFPCM16
44100
1411
S
WAV-aLaw
22050
352
S
6h38
BWFPCM16
32000
512
M
4h20
WAV-aLaw
16000
128
M
18h18
BWFPCM16
32000
1024
S
2h10
WAV-aLaw
16000
256
S
9h09
BWFPCM16
24000
384
M
5h47
WAV-aLaw
12000
96
M
24h24
BWFPCM16
24000
768
S
2h53
WAV-aLaw
12000
192
S
12h12
BWFPCM16
22050
352
M
6h17
WAV-aLaw
11025
88
M
26h34
BWFPCM16
22050
705
S
3h08
WAV-aLaw
11025
176
S
13h17
BWFPCM16
16000
256
M
8h40
WAV-aLaw
8000
64
M
34h43
BWFPCM16
16000
512
S
4h20
WAV-aLaw
8000
128
S
17h21
RAWMP1L2
48000
32
M
69h26
WAV-uLaw
48000
384
M
6h06
RAWMP1L2
48000
48
M
46h16
WAV-uLaw
48000
768
S
3h03
RAWMP1L2
48000
56
M
39h40
48000
64
M
34h43
48000
64
S
34h43
WAV-uLaw
44100
352
M
6h38
RAWMP1L2
WAV-uLaw
44100
705
S
3h19
RAWMP1L2
Page 36 of 56
Copyright © NAGRAVISION S.A. 2005-2007
July 26, 2007
WAV-uLaw
32000
256
WAV-uLaw
32000
512
S
4h34
RAWMP1L2
RAWMP1L2
WAV-uLaw
24000
192
M
12h12
RAWMP1L2
WAV-uLaw
24000
384
S
6h06
RAWMP1L2
M
9h09
48000
80
M
27h46
48000
96
M
23h08
48000
96
S
23h08
48000
112
M
19h50
19h50
WAV-uLaw
22050
176
M
13h17
RAWMP1L2
48000
112
S
WAV-uLaw
22050
352
S
6h38
RAWMP1L2
48000
128
M
17h21
WAV-uLaw
16000
128
M
18h18
RAWMP1L2
48000
128
S
17h21
WAV-uLaw
16000
256
S
9h09
RAWMP1L2
48000
160
M
13h53
WAV-uLaw
12000
96
M
24h24
RAWMP1L2
48000
160
S
13h53
WAV-uLaw
12000
192
S
12h12
RAWMP1L2
48000
192
M
11h34
WAV-uLaw
11025
88
M
26h34
RAWMP1L2
48000
192
S
11h34
WAV-uLaw
11025
176
S
13h17
RAWMP1L2
48000
224
S
9h55
WAV-uLaw
8000
64
M
34h43
RAWMP1L2
48000
256
S
8h40
WAV-uLaw
8000
128
S
17h21
RAWMP1L2
48000
320
S
6h56
BWFMP1L2
48000
32
M
69h26
RAWMP1L2
48000
384
S
5h47
BWFMP1L2
48000
48
M
46h16
RAWMP1L2
32000
32
M
69h26
BWFMP1L2
48000
56
M
39h40
RAWMP1L2
32000
48
M
46h16
BWFMP1L2
48000
64
M
34h43
RAWMP1L2
32000
56
M
39h40
BWFMP1L2
48000
64
S
34h43
RAWMP1L2
32000
64
M
34h43
BWFMP1L2
48000
80
M
27h46
RAWMP1L2
32000
64
S
34h43
BWFMP1L2
48000
96
M
23h08
RAWMP1L2
32000
80
M
27h46
BWFMP1L2
48000
96
S
23h08
RAWMP1L2
32000
96
M
23h08
BWFMP1L2
48000
112
M
19h50
RAWMP1L2
32000
96
S
23h08
BWFMP1L2
48000
112
S
19h50
RAWMP1L2
32000
112
M
19h50
BWFMP1L2
48000
128
M
17h21
RAWMP1L2
32000
112
S
19h50
BWFMP1L2
48000
128
S
17h21
RAWMP1L2
32000
128
M
17h21
BWFMP1L2
48000
160
M
13h53
RAWMP1L2
32000
128
S
17h21
BWFMP1L2
48000
160
S
13h53
RAWMP1L2
32000
160
M
13h53
BWFMP1L2
48000
192
M
11h34
RAWMP1L2
32000
160
S
13h53
BWFMP1L2
48000
192
S
11h34
RAWMP1L2
32000
192
M
11h34
BWFMP1L2
48000
224
S
9h55
RAWMP1L2
32000
192
S
11h34
BWFMP1L2
48000
256
S
8h40
RAWMP1L2
32000
224
S
9h55
BWFMP1L2
48000
320
S
6h56
RAWMP1L2
32000
256
S
8h40
32000
320
S
6h56
32000
384
S
5h47
BWFMP1L2
48000
384
S
5h47
RAWMP1L2
BWFMP1L2
32000
32
M
69h26
RAWMP1L2
BWFMP1L2
32000
48
M
46h16
Page 37 of 56
Copyright © NAGRAVISION S.A. 2005-2007
July 26, 2007
WITHOUT EDITING FACILITY
Recording
Sampling
type
frequency
Hz
RAW-MP1L3
48000
Bitrate
Mono
Rec. T
Recording
Sampling
Stereo
On 2 GB
type
frequency
kb/s
M/S
__h__m
Hz
32
M
69h26
RAWMP1L3
44100
Bitrate
Mono
Rec. T
Stereo
On 2 GB
kb/s
M/S
__h__m
112
S
19h50
RAW-MP1L3
48000
40
M
55h32
RAWMP1L3
44100
128
M
17h21
RAW-MP1L3
48000
48
M
46h16
RAWMP1L3
44100
128
S
17h21
RAW-MP1L3
48000
56
M
39h40
RAWMP1L3
44100
160
M
13h53
13h53
RAW-MP1L3
48000
64
M
34h43
RAWMP1L3
44100
160
S
RAW-MP1L3
48000
64
S
34h43
RAWMP1L3
44100
192
M
11h34
RAW-MP1L3
48000
80
M
27h46
RAWMP1L3
44100
192
S
11h34
RAW-MP1L3
48000
96
M
23h08
RAWMP1L3
44100
224
S
9h55
RAW-MP1L3
48000
96
S
23h08
RAWMP1L3
44100
256
S
8h40
RAW-MP1L3
48000
112
M
19h50
RAWMP1L3
44100
320
S
6h56
69h26
RAW-MP1L3
48000
112
S
19h50
RAWMP1L3
32000
32
M
RAW-MP1L3
48000
128
M
17h21
RAWMP1L3
32000
40
M
55h32
RAW-MP1L3
48000
128
S
17h21
RAWMP1L3
32000
48
M
46h16
RAW-MP1L3
48000
160
M
13h53
RAWMP1L3
32000
56
M
39h40
RAW-MP1L3
48000
160
S
13h53
RAWMP1L3
32000
64
M
34h43
RAW-MP1L3
48000
192
M
11h34
RAWMP1L3
32000
64
S
34h43
RAW-MP1L3
48000
192
S
11h34
RAWMP1L3
32000
80
M
27h46
RAW-MP1L3
48000
224
S
9h55
RAWMP1L3
32000
96
M
23h08
RAW-MP1L3
48000
256
S
8h40
RAWMP1L3
32000
96
S
23h08
RAW-MP1L3
48000
320
S
6h56
RAWMP1L3
32000
112
M
19h50
RAW-MP1L3
44100
32
M
69h26
RAWMP1L3
32000
112
S
19h50
RAW-MP1L3
44100
40
M
55h32
RAWMP1L3
32000
128
M
17h21
RAW-MP1L3
44100
48
M
46h16
RAWMP1L3
32000
128
S
17h21
13h53
RAW-MP1L3
44100
56
M
39h40
RAWMP1L3
32000
160
M
RAW-MP1L3
44100
64
M
34h43
RAWMP1L3
32000
160
S
13h53
RAW-MP1L3
44100
64
S
34h43
RAWMP1L3
32000
192
M
11h34
RAW-MP1L3
44100
80
M
27h46
RAWMP1L3
32000
192
S
11h34
RAW-MP1L3
44100
96
M
23h08
RAWMP1L3
32000
224
S
9h55
RAW-MP1L3
44100
96
S
23h08
RAWMP1L3
32000
256
S
8h40
19h50
RAWMP1L3
32000
320
S
6h56
RAW-MP1L3
44100
Page 38 of 56
112
M
Copyright © NAGRAVISION S.A. 2005-2007
July 26, 2007
WITHOUT EDITING FACILITY
RAW-MP1L2
44100
32
M
69h26
RAW-MP1L2
44100
48
M
46h16
BWFMP1L2
BWFMP1L2
44100
32
M
32
44100
48
M
48
56
RAW-MP1L2
44100
56
M
39h40
BWFMP1L2
44100
56
M
RAW-MP1L2
44100
64
M
34h43
BWFMP1L2
44100
64
M
64
RAW-MP1L2
44100
64
S
34h43
BWFMP1L2
44100
64
S
64
RAW-MP1L2
44100
80
M
27h46
BWFMP1L2
44100
80
M
80
96
RAW-MP1L2
44100
96
M
23h08
BWFMP1L2
44100
96
M
RAW-MP1L2
44100
96
S
23h08
BWFMP1L2
44100
96
S
96
RAW-MP1L2
44100
112
M
19h50
BWFMP1L2
44100
112
M
112
RAW-MP1L2
44100
112
S
19h50
BWFMP1L2
44100
112
S
112
RAW-MP1L2
44100
128
M
17h21
BWFMP1L2
44100
128
M
128
RAW-MP1L2
44100
128
S
17h21
BWFMP1L2
44100
128
S
128
160
RAW-MP1L2
44100
160
M
13h53
BWFMP1L2
44100
160
M
RAW-MP1L2
44100
160
S
13h53
BWFMP1L2
44100
160
S
160
RAW-MP1L2
44100
192
M
11h34
BWFMP1L2
44100
192
M
192
RAW-MP1L2
44100
192
S
11h34
BWFMP1L2
44100
192
S
192
RAW-MP1L2
44100
224
S
9h55
BWFMP1L2
44100
224
S
224
RAW-MP1L2
44100
256
S
8h40
BWFMP1L2
44100
256
S
256
44100
320
S
320
44100
384
S
384
RAW-MP1L2
44100
320
S
6h56
BWFMP1L2
RAW-MP1L2
44100
384
S
5h47
BWFMP1L2
21 ALARMS
21.1 Low battery
If the machine is in stop, play or edit mode, a warning message “ Low power, please change
batteries” appears for a few seconds. The Ares-M II will continue to work for a few minutes. The
battery icon will be shown empty.
If the machine is in the record mode, the led will light up twice per second instead of once every
second. The battery icon will be shown empty.
21.2 Low memory
Once the free memory drops below 1 minute of recording, the led will light up twice per second
instead of once every second. The remaining time on the display will show a figure below 1 minute.
Page 39 of 56
Copyright © NAGRAVISION S.A. 2005-2007
July 26, 2007
22 DEFAULT SETTINGS
Screwdriver
Select display language
English
Set auto power down
30 sec
Set screen save
30 sec
Manager compress
Manager input device
Name
Core
SR
BR
EXT
HI QUALITY
WAV-PCM16
48000 Hz
1536 kbps ST
WAV
MUSIC
BWF-MP1L2
48000 Hz
256 kbps ST
BWF
SPEECH
BWF-MP1L2
48000 Hz
64 kbps MO
BWF
STENO
WAV-G729a
8000 Hz
8 kbps MO
WAV
Name
Type
Gain
BST
PWR
FLT
DYN
EXT-MIC
+ 6 dB
+34 dB
OFF
20-20 kHz
NAGRA
EXT-MIC
+ 9 dB
+ 19 dB
ON
100-20 kHz
COND
EXT-MIC
+ 9 dB
+ 19 dB
OFF
100-20 kHz
INT
INT-MIC
+ 10 dB
OFF
OFF
OFF
LINEH
LINE
+ 24 dB
OFF
OFF
OFF
LINEL
LINE
+ 0 dB
OFF
OFF
OFF
Set speaker mode
Auto
Lock input device gain
Disable
Set record name prefix
USER
Menu
Display
Page 40 of 56
Set input device
DYN
Set compress template
HI QUALITY
Set VOR mode
OFF
Set VOR stop mode
Pause REC
Set VOR stop delay
10 sec
Set AGC target
- 5 dB
Set pre-rec buffer
300 ms
Set work directory
ARESM
RECLV
+ 108.0 dB
VOL
- 9.0 dB
Copyright © NAGRAVISION S.A. 2005-2007
July 26, 2007
23 MESSAGES
Message
Symptom
Solution
“Key is locked, can’t power up!”
“Hold” key is engaged
Move the “Hold” switch to the other position
Features during record are blocked
Stop recording first and press the “C” key.
Appears for a few seconds, just before switching off
automatically due to low battery voltage.
Stop recording or use USB power. Replace
batteries
“If you want to change module, first stop
recording!”
“Battery low power, will power off!”
If this happens during record, the record stops and the
file will be closed before power off.
“Disk is formatted!”
Appears for a few seconds if the memory is formatted.
“Stop record”
Appears (including a timer) when the “STOP” key is
pressed during a record.
“Not enough disk space to save …..!”
Insufficient free memory to save edited file.
“Power off”
Appears (including a timer) when the “STOP”
Reduce file size or erase first other files
key is pressed to switch off the machine
Page 41 of 56
Copyright © NAGRAVISION S.A. 2005-2007
July 26, 2007
24 LANGUAGE TABLE
English ENG
Pause REC
Split track
Cancel
5 sec
10 sec
15 sec
20 sec
Cancel
-5 dBFS
-8 dBFS
-11.5 dBFS
-14 dBFS
Cancel
500 ms
1000 ms
1.5 sec
2 sec
3 sec
Cancel
No loop
Current
Order
Random
Set input device
Set compress template
Set VOR mode
Set VOR stop mode
Set VOR stop delay
Set AGC target level
Set pre-rec buff
Set Loop mode
Set work directory
Spanish SPA
Pausa REC
Nuevo
Anula
5 sec
10 sec
15 sec
20 sec
Anula
-5 dBFS
-8 dBFS
-11.5 dBFS
-14 dBFS
Anula
500 ms
1000 ms
1.5 sec
2 sec
3 sec
Anula
Sin bucle
Actual
Orden
Casual
Dispositivo entrada
Formato plantilla
Modo VOR
Modo parada VOR
Retardo parada VOR
Nivel límite AGC
Memoria pregrabación
Modo bucle
Carpeta de trabajo
Page 42 of 56
French FRE
Pause ENR
Nouveau
Annul.
5 sec
10 sec
15 sec
20 sec
Annul.
-5 dBFS
-8 dBFS
-11.5 dBFS
-14 dBFS
Annul.
500 ms
1000 ms
1.5 sec
2 sec
3 sec
Annul.
Non
En cours
Ordre
Aléa.
Entrée
Format fichier
VOR
Mode VOR
Délai VOR
Niveau AGC
Mémoire tampon
Bouclage lecture
Dossier de travail
Copyright © NAGRAVISION S.A. 2005-2007
German DE
Pause REC
Neue Datei
Abbruch
5 sek
10 sek
15 sek
20 sek
Abbruch
-5 dBFS
-8 dBFS
-11.5 dBFS
-14 dBFS
Abbruch
500 ms
1000 ms
1.5 sek
2 sek
3 sek
Abbruch
No Loop
Datei
Liste
Zufall
Eingang
Dateiformat
VOR
VOR Stop Modus
VOR Stop Delay
AGC Pegel
Pre-Rec Buffer
Loop Modus
Arbeitsordner
July 26, 2007
Confirm
Cancel
DELE
Confirm file delete ?
Don't change settings in record!
If you want to change module,first stop
recording!
Acepta
Anula
Borra
Acepta borrar archivo?
No cambia preajustes en grabación
Oui
Non
Eff.
Confirmer effacer ?
Modification des paramètres impossible !
Pare la grabación si quiere cambiar el módulo!
Arrêt de l'enregistrement avant modification
OK
Stop
Ja
Wirklich löschen?
Einstellungen bei Aufnahme nicht verändern!
Um Einstellungen zu ändern Aufnahme
beenden!
Play
Erase
Edit
Wipe
Copy to…
Move To…
Make dir
Rename
Return
Play
Erase
Copy to…
Move to…
Make dir
Rename
Return
Erase
Copy to…
Move to…
Make dir
Rename
Return
Entry
Play
Erase
Make dir
Rename
Return
Make dir
Return
Return
Make dir
Lee
Borra
Edita
Limpiar
Copia a…
Mueve a…
Crea dir
Renombra
Vuelve
Lee
Borra
Copia a
Mueve a
Crea dir
Renombra
Vuelve
Borra
Copia a
Mueve a
Crea dir
Renombra
Vuelve
Entra
Lee
Borra
Crea dir
Renombra
Vuelve
Crea dir
Vuelve
Vuelve
Crea dir
Lecture
Effacer
Montage
Sauver
Copier…
Déplacer…
Créer
Renommer
Retour
Lecture
Effacer
Copier…
Déplacer…
Créer
Renommer
Retour
Effacer
Copier…
Déplacer…
Créer
Renommer
Retour
Entrée
Lecture
Effacer
Créer
Renommer
Retour
Créer
Renommer
Retour
Créer
Play
Löschen
Edit
Wipe
Kopieren
Bewegen
New Dir
Rename
Zurück
Play
Löschen
Kopieren
Bewegen
New Dir
Rename
Zurück
Löschen
Kopieren
Bewegen
New Dir
Rename
Zurück
Enter
Play
Löschen
New Dir
Rename
Zurück
New Dir
Zurück
Zurück
New Dir
Page 43 of 56
Copyright © NAGRAVISION S.A. 2005-2007
July 26, 2007
Cancel
Return
File or directory not found
Erasing failed
Folder isn't empty, operation failed
NEWDIR
File operating path error!
Failed to copy file!
Failed to move file!
Confirm del. directory and file(s)?
English
Français
Deutsch
Polski
Español
中文
Anula
Vuelve
Archivo o directorio no encontrado
Error al borrar
Archivo no vacío, operación fallada
NUEVODIR
Error dirección archivo
Error al copiar archivo
Error al mover archivo
Confirmar borrar directorio y archivo(s)
English
Français
Deutsch
Polski
Español
中文
Annul.
Retour
Non trouvé
Efface. Échoué
L'action a échoué, dossier non vide
NOUVEAU
Chemin incorrect !
La copie a échoué !
Erreur déplacement !
Confirmer l'effacement ?
English
Français
Deutsch
Polski
Español
中文
Abbruch
Zurück
Datei oder Ordner nicht gefunden
Löschen fehlgeschlagen
Ordner nicht leer, Vorgang fehlgeschlagen
NEU
Dateipfad fehlerhaft
Kopieren fehlgeschlagen!
Bewegen fehlgeschlagen!
Löschen bestätigen!
English
Français
Deutsch
Polski
Español
中文
Nederlands
Cancel
15 sec
30 sec
45 sec
1 min
2 min
Disable
Cancel
15 sec
30 sec
45 sec
1 min
2 min
Disable
Cancel
Off
Auto
Cancel
Reset counter
Cancel
Nederlands
Anula
15 sec
30 sec
45 sec
1 min
2 min
Inhábil
Anula
15 sec
30 sec
45 sec
1 min
2 min
Inhábil
Anula
Apagado
Auto
Anula
Puesta a cero
Anula
Nederlands
Annul.
15 sec
30 sec
45 sec
1 min
2 min
Non
Annul.
15 sec
30 sec
45 sec
1 min
2 min
Non
Annul.
Non
Auto
Annul.
Oui
Annul.
Nederlands
Abbruch
15 sek
30 sek
45 sek
1 min
2 min
Aus
Abbruch
15 sek
30 sek
45 sek
1 min
2 min
Aus
Abbruch
Aus
Auto
Abbruch
Reset
Abbruch
Format
Formato
Format
Löschen
Page 44 of 56
Copyright © NAGRAVISION S.A. 2005-2007
July 26, 2007
Cancel
Entry
Cancel
Manual
Lock
Cancel
Select display language
Set auto power down
Set screen save
Manager compress template
Manager input device
Set speaker mode
Clear record counter
Lock input device gain
Set record name prefix
Set date and time
Restore factory settings
Format disk
Check disk space
Check software ver
Check machine ID
File counter is cleared!
Disk is formatted!
Formatting failed!
New name
Template manage
Input device manage
Input record prefix
USB Power
USB Transfer
USB Charge
Key is locked, please unlock first!
Key is locked, can't power up!
Stop record
Battery low power, will power off!
Can't start record, because disk is full!
Save
Don't
Don't you save before quit?
Anula
Entra
Anula
Manual
Bloquear
Anula
Selección idioma
Ajuste apagado automático
Ajuste salvapantalla
Gestión plantillas
Gestión útiles entrada
Modo escucha
Contador grabación a cero
Bloqueo ganancia útiles
Prefijo nombres archivos
Fecha y hora
Restaurar ajustes fábrica
Formatear disco
Comprobar espacio disco
Versión programa
ID máquina
Contador a cero!
Disco formateado!
Error formateado!
Nuevo nombre
Gestión plantillas
Gestión entradas
Prefijo grabación
Alimentación USB
Volcado USB
Carga USB
Teclado bloqueado, pf, desbloquee!
Teclado bloqueado, no arranca!
Para grabación
Bateria baja, se apagará
imposible iniciar grabación, disco lleno
Guarda
No
Guardar antes de salir?
Page 45 of 56
Annul.
Entrée
Annul.
Non
Oui
Annul.
Langues
Extinction automatique
Economiseur d'écran
Formats fichiers
Gestion entrées
Haut-parleur
Raz compteur
Verrouillage gain
Entrée préfixe
Date & heure
Paramètres usine
Formatage
Espace disque
Version logicielle
Identifiant ARES
Le compteur est à 0 !
Disque formaté !
Erreur formatage !
Nouveau
Gestion mémoires
Gestion des entrées
Entrée du préfixe
Alim. USB
Transfert USB
Charge USB
Déverrouiller clavier !
Clavier verrouillé !
Stopper l'enr.
Batterie vide, extinction !
Disque plein !
Sauve
Non !
Sauver avant de quitter ?
Copyright © NAGRAVISION S.A. 2005-2007
Abbruch
Reset
Abbruch
Unlock
Lock
Abbruch
Sprache
Auto Power Down
Screen Saver
Dateiformate
Eingangsquellen
Lautsprechermodus
Reset Counter
Lock Gain
Präfix Dateinamen
Datum und Uhrzeit
Werkseinstellung
Speicher löschen
Freier Speicher
Softwareversion
Geräte ID
Counter reset!
Speicher gelöscht!
Löschfehler!
Neuer Name
Format verwalten
Eingänge verwalten
Präfix eingeben
USB Power
USB Transfer
USB Akku Laden
Bitte erst entriegeln!
Kann nicht einschalten, bitte entriegeln!
Stop Record
Batterie leer, schalte ab!
Speicher ist voll, keine Aufnahme möglich!
Save
Don't
Änderungen speichern?
July 26, 2007
Not enough disk space to save audio file!
Jump position
Jump pos. error
Data will be lost!
Please confirm?
Cut operation failed!
Low power, please change battery!
No File
Resume factory setting!
Date setting
File counter to be reset!
System update
1 Check battery power
2 Plug in USB cable
3 Copy "APP.COE"
4 Remove USB cable
5 Wait for shutdown
6 Turn on the device
Set record mode
Normal
Tape mode
Undo list
Marker list
Zoom
Set search speed
Set input matrix
Auto
Double Ch
Mono L
Marker not found
Undo list not found
Selection is saved as file xxxx.xx
Save selection to a new file
Confirm operation?
Create marker at current position!
VOR off
OK key in record
Pause record
Next record
Sin espacio para guardar archivo audio
Salto de posición
Err. salto de pos.
Pérdida datos
Confirme, pf
Error corte edición
Batería baja, pf cambielas
Vacío
Puesta a punto origen!
Fecha actual
Contador ficheros a cero!
Actualización sistema
1 Estado batería
2 Conecte cable USB
3 Copie "APP.COE"
4 Retire el cable USB
5 Espere para apagar
6 Encienda la unidad
Modo de registro
Directo
Regreso
Deshaga lista
Lista de marcador
Zoom
Elegir velocidad
Matriz entrada
Auto
2 Canales
Mono izdo
Marca no localizada
Lista deshacer perdida
Selección guardada como xxxx.xx
Guardar selección en nuevo archivo
Confirma operación?
Crear marca en posición actual
Desconectar VOR
Modo boton OK en REC
Pausa
Nuevo archivo
Page 46 of 56
Espace disque insuffisant !
Saut position
Erreur position
Tout sera effacé !
Confirmer ?
Le montage a échoué !
Changer la batterie !
Vide
Paramètres par défaut !
Entrée date
Le compteur sera raz !
Mise à jour du soft
1 Vérifier piles
2 Brancher câble USB
3 Copier "APP.COE"
4 Enlever câble USB
5 Extinction
6 Allumer l'appareil
Mode de sortie
Direct
Retour
Liste des annulations
Liste des marqueurs
Zoom
Vitesse <<, >>
Matrice d'entrée
Auto
Stéréo
Mono G
Marqueur non trouvé
Undo non trouvé
Sauvegarde sous xxxx.xx
Sauvegarder la sélection
Confirmer ?
Créer un marqueur ici !
VOR coupé
Touche OK en ENR.
Pause
Nouveau fichier
Copyright © NAGRAVISION S.A. 2005-2007
Nicht genügend Speicherplatz!
Springe zu
Position Error
Datenverlust!
Bestätigen?
Schnitt nicht möglicht!
Batterie ist bald leer, bitte erneuern!
Keine Datei
Werkseinstellungen!
Datum setzen
Counter Reset?
Software Update
1.Batterie prüfen
2.USB-Kabel verbinden
3."APP.COE" kopieren
4.USB-Kabel entfernen
5.Endabschaltung
6.Einschalten
Aufnahme Modos setzen
Normal
Band Modus
Undo Liste
Marker Liste
Zoom
Setze Such Speed
Setze Inp Matrix
Auto
Zweikanal
Mono L
Marker nicht gefun.
UndoList nicht gef.
Auswahl gespeichert unter xxxx.xx
Auswahl speichern unter
Vorgang bestätig.?
Marker gesetzt!
VOR aus
OK während Aufnahme
Pause REC
Next REC
July 26, 2007
STOP key in record
Timer on
Timer off
Save as a new file
Set display brightness
Low memory, < 1 min!
Retardo STOP en REC
Si
No
Salvar como nuevo a.
Luminosidad pantalla
Memoria baja, < 1min!
English ENG
Pause REC
Split track
Cancel
5 sec
10 sec
15 sec
20 sec
Cancel
-5 dBFS
-8 dBFS
-11.5 dBFS
-14 dBFS
Cancel
500 ms
1000 ms
1.5 sec
2 sec
3 sec
Cancel
No loop
Current
Order
Random
Set input device
Set compress template
Set VOR mode
Set VOR stop mode
Set VOR stop delay
Set AGC target level
Délai STOP en ENR.
Oui
Non
Sauver comme nouveau f.
Luminosité
Temps restant, moins d'1 mn!
Polish PL
Pauza REC
Dziel ślad
Cofnij
5 sek
10 sek
15 sek
20 sek
Cofnij
-5 dBFS
-8 dBFS
-11.5 dBFS
-14 dBFS
Cofnij
500 ms
1000 ms
1.5 sek
2 sek
3 sek
Cofnij
Brak
Bieżąca
Ustalona
Losowa
Wybór wejścia
Wybór kompresji
Ustaw tryb VOR
Ustaw stop VOR
Ustaw opóźnienie VOR
Ustaw poziom AGC
Page 47 of 56
STOP während Aufnahme
Timer An
Timer Aus
Save neue datei
Display Helligkeit
Speicher bald voll, < 1 min!
Dutch NL
Pauze OPNAME
Splits
Annuleer
5 sec
10 sec
15 sec
20 sec
Annuleer
-5 dBFS
-8 dBFS
-11.5 dBFS
-14 dBFS
Annuleer
500 ms
1000 ms
1.5 sec
2 sec
3 sec
Annuleer
Niet herhalen
Huidig
In volgorde
Willekeurig
Ingangsbron
Compressie
VOR mode
VOR stop mode
VOR stop vertraging
AGC doelniveau
Copyright © NAGRAVISION S.A. 2005-2007
July 26, 2007
Set pre-rec buff
Set Loop mode
Set work directory
Confirm
Cancel
DELE
Confirm file delete ?
Don't change settings in record!
If you want to change module,first stop
recording!
Play
Erase
Edit
Wipe
Copy to…
Move To…
Make dir
Rename
Return
Play
Erase
Copy to…
Move to…
Make dir
Rename
Return
Erase
Copy to…
Move to…
Make dir
Rename
Return
Entry
Play
Erase
Make dir
Rename
Return
Make dir
Ustaw bufor nagrania
Ustaw tryb pętli
Ustaw folder roboczy
Akcept.
Cofnij
USUŃ
Czy usunąć plik?
Nie zmieniać ustawień nagrania!
Aby zmienić tryb zatrzymaj nagranie!
Opnamebuffer
Herhalen
Actieve map
Bevestig
Annuleer
WIS
Bevestig wissen
Instellingen niet veranderen tijdens opname!
Voor aanpassing instellingen, opname
beëindigen!
Odtwórz
Weergave
Kasuj
Edytuj
Zmaż
Kopiuj
Przenieś
Utwórz
Zmień
Powrót
Odtwórz
Kasuj
Kopiuj
Przenieś
Utwórz
Zmień
Powrót
Kasuj
Kopiuj
Przenieś
Utwórz
Zmień
Powrót
Wejście
Odtwórz
Kasuj
Utwórz
Zmień
Powrót
Utwórz
Wis
Bewerk
Bouw
Kopieer naar…
Verplaats naar…
Maak map
Herbenoem
Terug
Weergave
Wis
Kopieer naar…
Verplaats naar…
Maak map
Herbenoem
Terug
Wis
Kopieer naar…
Verplaats naar…
Maak map
Herbenoem
Terug
Ingave
Weergave
Wis
Maak map
Herbenoem
Terug
Maak map
Page 48 of 56
Copyright © NAGRAVISION S.A. 2005-2007
July 26, 2007
Return
Return
Make dir
Cancel
Return
File or directory not found
Erasing failed
Folder isn't empty, operation failed
NEWDIR
File operating path error!
Failed to copy file!
Failed to move file!
Confirm del. directory and file(s)?
English
Français
Deutsch
Polski
Español
中文
Powrót
Powrót
Utwórz
Cofnij
Powrót
Brak pliku lub folderu
Błąd kasowania
Niepusty folder-błąd operacji
FOLDER
Błąd ścieżki dostępu!
Błąd kopiowania pliku!
Błąd przeniesienia pliku!
Czy usunąć folder i pliki?
English
Français
Deutsch
Polski
Español
中文
Terug
Terug
Maak map
Annuleer
Terug
Bestand of map niet gevonden
Wissen mislukt
Map is niet leeg, bewerking mislukt
NIEUW
Actieve map fout!
Kopie mislukt!
Verplaatsen bestand mislukt!
Bevestig wissen map of bestand?
English
Français
Deutsch
Polski
Español
中文
Nederlands
Cancel
15 sec
30 sec
45 sec
1 min
2 min
Disable
Cancel
15 sec
30 sec
45 sec
1 min
2 min
Disable
Cancel
Off
Auto
Cancel
Reset counter
Nederlands
Cofnij
15 sek
30 sek
45 sek
1 min
2 min
Wyłącz
Cofnij
15 sek
30 sek
45 sek
1 min
2 min
Wyłącz
Cofnij
Wyłącz
Auto
Cofnij
Zeruj licznik
Nederlands
Annuleer
15 sec
30 sec
45 sec
1 min
2 min
Uit
Annuleer
15 sec
30 sec
45 sec
1 min
2 min
Uit
Annuleer
Uit
Automatisch
Annuleer
Herstel teller
Page 49 of 56
Copyright © NAGRAVISION S.A. 2005-2007
July 26, 2007
Cancel
x
Format
Cancel
Entry
Cancel
Manual
Lock
Cancel
Select display language
Set auto power down
Set screen save
Manager compress template
Manager input device
Set speaker mode
Clear record counter
Lock input device gain
Set record name prefix
Set date and time
Restore factory settings
Format disk
Check disk space
Check software ver
Check machine ID
File counter is cleared!
Disk is formatted!
Formatting failed!
New name
Template manage
Input device manage
Input record prefix
USB Power
USB Transfer
USB Charge
Key is locked, please unlock first!
Key is locked, can't power up!
Stop record
Battery low power, will power off!
Can't start record, because disk is full!
Cofnij
Annuleer
Format
Cofnij
Wej.
Cofnij
Ręczny
Blokuj
Cofnij
Wybór języka
Ustaw autowyłączenie
Ustaw wył. wyświetlacza
Ustaw szablon kompresji
Ustaw urządz. wejścia
Ustaw tryb głośnika
Zeruj licznik nagrań
Blokada wzmocnienia wej.
Ustaw prefiks nazwy nagr.
Ustaw datę i czas
Przywróć ustawienia fabr.
Formatuj dysk
Sprawdź pojemność dysku
Sprawdź wersję oprog.
Sprawdź ID urządzenia
Licznik wyzerowany!
Dysk sformatowany
Błąd formatowania!
Nazwa
Szablony
Ustaw urządz. wej.
Prefiks nagrania
Zasilanie USB
Transm. USB
Ładow. USB
Odblokuj klawiaturę!
Blokada zasilania!
Stop nagrania
Słaba bateria!
Dysk zapełniony!
Formatteer
Annuleer
Ingave
Annuleer
Handmatig
Blokkeer
Annuleer
Taalkeuze
Automatisch uitschakelen
Schermbeveiliging
Beheer compressie
Beheer ingangsbron
Kies luidsprekermodus
Zet teller op 0
Vergrendel ingangsgevoeligheid
Kies opnamenaam
Datum en tijd
Herstel fabrieksinstellingen
Formatteer schijf
Controleer schijfruimte
Softwareversie
Identificatie toestel
Teller is hersteld!
Schijf is geformatteerd!
Formatteren mislukt!
Nieuwe naam
Beheer sjablonen
Beheer ingangsbronnen
Opnamenaam
USB-voeding
USB-overdracht
USB-laden
Vergrendeld, eerst ontgrendelen!
Vergrendeld, inschakelen onmogelijk!
Stop opname
Batterij bijna leeg, ik schakel uit!
Ik kan niet opnemen, schijf is vol!
Page 50 of 56
Copyright © NAGRAVISION S.A. 2005-2007
July 26, 2007
Save
Don't
Don't you save before quit?
Not enough disk space to save audio file!
Jump position
Jump pos. error
Data will be lost!
Please confirm?
Cut operation failed!
Low power, please change battery!
No File
Resume factory setting!
Date setting
File counter to be reset!
System update
1 Check battery power
2 Plug in USB cable
3 Copy "APP.COE"
4 Remove USB cable
5 Wait for shutdown
6 Turn on the device
Set record mode
Normal
Tape mode
Undo list
Marker list
Zoom
Set search speed
Set input matrix
Auto
Double Ch
Mono L
Marker not found
Undo list not found
Selection is saved as file xxxx.xx
Save selection to a new file
Confirm operation?
Create marker at current position!
VOR off
Zapis
Nie
Czy zapisać przed wyjściem?
Za mała pojemność dysku!
Omiń pozycję
Błąd pozycji
Utracisz dane!
Potwierdzasz?
Błąd przy "wytnij"!
Zmień baterię!
Brak
Ustawienia fabryczne
Ustaw datę
Zeruję licznik plików!
Aktualizacja systemu
1 Sprawdź baterię
2 Włącz kabel USB
3 Kopiuj "APP.COE"
4 Usuń kabel USB
5 Oczekuj wyłączenia
6 Włącz urządzenie
Tryb nagrania
Zwykły
Taśmy
Cofnięcia
Znaczniki
Zoom
Pręd. przeglądu
Matryca wejść
Auto
Dwa kan.
Mono L
Brak znaczników
Brak listy cofnięć
Wybór zapisany jako xxxx.xx
Zapisz wybór do pliku
Czy potwierdzasz?
Wstaw znacznik!
Wył. VOR
Page 51 of 56
Sla op
Neen
Opslaan voor afsluiten?
Niet genoeg schijfruimte om op te slaan!
Ga naar
Positiefout
Gegevens zullen verloren gaan!
Bevestig aub!
Knippen mislukt!
Lage spanning, verwissel batterijen aub!
Geen bestand
Keer terug naar fabrieksinstellingen!
Datum & tijd
Teller weer op nul zetten!
Vernieuw software
1 Controleer batterijen
2 Verbind de USB kabel
3 Kopieer "APP.COE"
4 Verwijder de USB-kabel
5 Wacht op uitschakeling
6 Zet het toestel aan
Opnamemodus
Normaal
Bandopnemermodus
Lijst ongedaan maken
Lijst markers
Zoomen
Zoeksnelheid
Ingangsmatrix
Automatisch
Stereo
Mono L.
Geen marker
Geen herstellijst
Selectie opgeslagen als xxxx.xx
Bewaar selectie als nieuw bestand
Bevestig bewerking ?
Plaats hier een marker !
VOR uit
Copyright © NAGRAVISION S.A. 2005-2007
July 26, 2007
OK key in record
Pause record
Next record
STOP key in record
Timer on
Timer off
Save as a new file
Set display brightness
Low memory, < 1 min!
OK dla nagrania
Pauza
Nowe nagranie
STOP dla nagrania
Wł timer
Wył timer
Zapisz jako nowy plik
Ustaw jasność wyśw
Uwaga, ostatnia min. nagrania!
Page 52 of 56
OK toets tijdens rec.
Pause opname
Volgende opname
STOP toets tijdens rec.
Timer aan
Timer uit
Opslaan als nieuw best.
Scherm intensiteit +/Geheugen, < 1 min!
Copyright © NAGRAVISION S.A. 2005-2007
July 26, 2007
25 SPECIFICATIONS
GENERAL
Data Storage medium
Recording Method
Compression type
A/D & D/A, PCM, MPEG conversion
File Format
Sampling Rate
Compress Bit-Rates
Mono/Stereo
Recording Capacity
Dynamic Range Adjustment
Filters
Automatic Gain Control
Built-in 2GB memory FAT 32
Digital (PCM) or Digital compression
ISO MPEG 1 Layer II / III
24 bit Philips UDA1380
16 Bit Wave Format (xxx.WAV) or MPEG Raw
(xxx.MP2, xxx.MP3)
From 8 to 48 kHz
32 to 384 kb/s
Switchable
2 hour 52 minutes Stereo 48 kHz PCM
69 hours 26 minutes Mono 48 kHz,64 kb/s
50 dB for 0 dB record
“Flat”, “LFA”
“ON”, “OFF” (Target level adjustable)
INPUTS
Built-in Mike
Mike Inputs
Electret
3.5 mm stereo jack connector
Mike Powering
Mike Input Sensitivity
Line Input
Line Input Sensitivity, Low & High Range
3V Electret
Minimum 1.5 mV for full scale
3.5 mm stereo jack connector
19 mV to 4.9 V for 0 dB recording
OUTPUTS
Headphone
Line Output
Line Output Level
THD at 1 kHz
Frequency Response
Total Dynamic Range Line Output
Total Dynamic Range On Recorded File
Built-in Speaker
USB
3.5 mm stereo jack connector
3.5 mm stereo jack connector
Maximum 0.9 V
0.1 %
30 Hz – 20 kHz (-3 dB in EE mode)
Up to 80 dB
Up to 90 dB
0.1 W
V2.0
POWER SUPPLY
Internal Batteries
Consumption
2 x “AA” cells
3 V, maximum 100 mA (approx. 10 hours)
PHYSICAL
Dimensions
Weight
125 x 53 x 23 mm (5 x 2 x 1 in) w/o plug-on mike
150g, (0.33 lb) incl. batteries, w/o plug-on mike
Page 53 of 56
Copyright © NAGRAVISION S.A. 2005-2007
July 26, 2007
26 DECLARATION OF CONFORMITY
DECLARATION DE CONFORMITE
DECLARATION OF CONFORMITY
FABRICANT:
MANUFACTURER:
Infomedia & Phihong pour NAGRAVISION
Infomedia & Phihong for NAGRAVISION
APPAREIL :
MODEL:
ARES-M II & alimentation PSC03R-050
ARES-M II & power supply PSC03R-050
NORMES APPLICABLES :
APPLICABLE NORMS:
Champ électromagnétique rayonné
Radiated electromagnetic field
EN 55022 Cl. B
EN 55022 Cl. B
Immunité aux champs électromagnétiques
Immunity to electromagnetic fields
EN 61000-4-3
EN 61000-4-3
Immunité aux décharges électrostatiques
Immunity to electrostatic discharges
EN 61000-4-2
EN 61000-4-2
Immunité aux aux transitoires électriques
rapides en salves sur câbles d’entrées/sorties
(500V)
Immunity to burst on input/output signal line
(500V)
EN 61000-4-4 level 1
Cheseaux
Cheseaux
EN 61000-4-4 level 1
Premier trimestre 2007
First quarter 2007
Signature
Gestion des déchets d’équipements électriques et éléctroniques
Regulation on waste electrical and electronic equipment
En fin de vie de l’appareil, amener à un centre de récupération des déchets.
This product contains elements that could harm the environment. Please dispose of it
through an appropriate recycling centre.
Page 54 of 56
Copyright © NAGRAVISION S.A. 2005-2007
July 26, 2007
26 INDEX TABLE
AGC, 8, 10, 12, 14, 40
Auto, 16, 21, 24, 40
Auto power, 21
Batteries, 57
Bitrate, 22, 36, 38
Compression, 12, 14, 57
Copy, 35
Date, 24
Disk, 25, 41
Entering, 18
Erasing, 17, 18
Filter, 10
Format, 25, 57
Front panel, 7
Headphone, 8, 57
Identification, 5
Input, 10, 12, 14, 22, 23, 24, 30, 31, 57
Input device, 12, 14, 22, 23, 24, 30, 31
Input gain, 23
Input sensitivity, 24
MAC, 8, 11, 34, 35
Marker, 26, 27
Menu, 8, 15, 28, 40
Mic, 9, 31
Microphone, 31
Modulometer, 11, 26
Page 55 of 56
Move, 7, 29, 41
MP2, 32, 33, 57
MP3, 32, 33
Pause, 7, 11, 13, 15, 40
PC, 8, 11, 17, 34, 35
Play, 7, 9, 11, 26
Playback, 13, 16, 26, 27
Pre-rec, 12, 13
Record, 10, 11, 14, 24, 40
Record level, 10
Renaming, 17
Sampling frequency, 15, 22
Screen save, 21
Software, 1, 6, 25
Software update, 6
SOFTWARE UPDATE, 35
Speaker, 24, 57
Stop, 7, 9, 11, 29, 41
Template, 12, 15, 21
Templates, 14, 21
Time, 24
updating, 35
USB, 8, 11, 18, 31, 33, 34, 35, 41
Voice, 11, 13, 15
VOR, 11, 13, 15, 16, 40
Copyright © NAGRAVISION S.A. 2005-2007
July 26, 2007
NAGRAVISION SA KUDELSKI GROUP
Route de Genève 22
CH-1033 Cheseaux
Switzerland
Phone +41 (0)21 732-0101
Fax +41 (0)21 732-0100
E-mail: [email protected]
All rights reserved-© July, 2007
Page 56 of 56
Copyright © NAGRAVISION S.A. 2005-2007
July 26, 2007