1
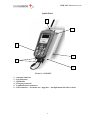
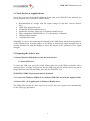
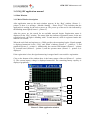
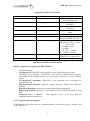
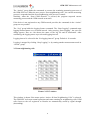
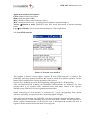
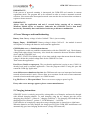
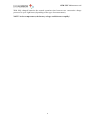
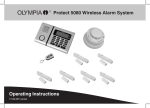
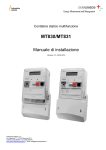
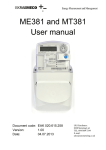
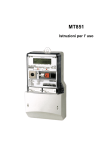
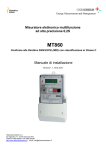
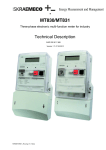
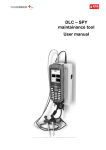
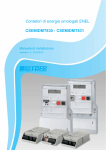
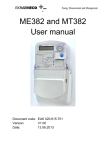
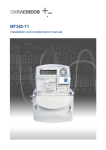
GSM SPY Maintenance tool GSM–SPY Maintenance Tool Quick user manual CONTENTS: Quick Start Operating manual Charging instructions Error Messages and troubleshooting Charging Instruction Technical Specifications © ISKRAEMECO March, 2009 GSM SPY Maintenance tool Quick Start 1 2 6 3 5 4 Picture 1: GSM-SPY 1 – Antenna connector 2 – Led indication 3 – SIM holder 4 – Charging connector 5 – Communication connectors 6 – USB connector – for future use / upgrades – not implemented in this versions 2 GSM SPY Maintenance tool 1. Check the list of supplied items Verify that you have received the following items with your GSM–SPY tool and that you have a proposed type of Windows Mobile device. Recommended AC charger with DC output voltage 8V and max. Current 500mA. 4VA GSM–SPY maintenance tool Compatible Windows Mobile device Application software GSM_Spy on Windows Mobile device Four rechargeable NiMH batteries 1.2V with capacity >1800mAh GSM dual band antenna Communication cable GSM-SPY is a device for measuring the strength of the GSM signal and the basic parameters of the GSM network. Its main purpose is the ability to measure the signal strength from an external antenna and with that helping to place the antenna in the position for best signal strength. 2. Preparing the tool for use: 2.1 Insert Windows Mobile device into the insertion slot 1.2 Insert SIM card To insert the SIM card, press the yellow button right side of the SIM card holder with a pointing object. A holder will pop out. Put the SIM card onto the holder (facing up and in proper direction) and slide the holder back into the GSM-SPY tool. WARNING! SIM PIN protection must be disabled! 2.3 Connect the Windows Mobile device and the GSM-SPY tool with the supplied cable 2.4 Start GSM – SPY application on Windows Mobile device The GSM–SPY tool doesn’t have a power on switch. The tool is powered on automatically by the GSM_Spy application. 3 GSM SPY Maintenance tool 3. GSM_SPY application manual 3.1 Main Window 3.1.1 Main Window description After application start-up, the main window appears. In the “Reg” window (Picture 2 – pointer 2) there is a message: “Module Starting – Please Wait!”. This indicates that the application is waiting for the tool to power up. The power up of the tool is also indicated by the blinking status light (Picture1 – pointer 2). After the power up, the search for an available network begins. Registration status is displayed in the “Reg” window. The status light also indicates registration status. In the not registered mode, the light is blinking with 1 second interval, while in registered mode this interval is 4 seconds. When the tool finds and registers to a GSM provider, the measuring begins. Signal strength is displayed numerical in the “CSQ” and “dBm” windows (Picture 2 – pointer 6, 7) and graphical (Picture 2 – pointer 1). Additionally, the current GSM channel (Picture 2 – pointer 8), network band (Picture2 – pointer 3) and the operator name (Picture 2 – pointer 4) is displayed. If the registration is lost, the signal measuring is stopped until a successful re-registration. Close to the bottom of the window there is the battery status of the tool (Picture 2 – pointer 5). The current battery voltage is displayed numerical. The remaining battery capacity is displayed graphically. 1 6 2 7 3 8 4 9* 5 Picture 2: Main application window 4 GSM SPY Maintenance tool Application windows description: Position 1 Identification signal strength history Description measurements history showed graphically registration status Registration status of the 2 GSM-SPY. GSM network band 900/1800 MHz network 3 frequency operator name Alpha numerical operator 4 name battery voltage Battery voltage in mV 5 signal strength dBm Received signal strength 6 measured in dBm (also see 7) signal strength CSQ Received signal strength 7 measured in CSQ – scaled dbm result 0: -113 dBm or less 1: -111 dbM 2…30: -109…-53dBm 31: -51dBm or greater channel Base station channel which 8 GSM-SPY is registered to Menu Command menu 9* *Note: the displayed menu positions may be different, depending on the operating system of the Windows Mobile device Further explanation of application REG window: - - Possible messages: Not Registered: GSM-SPY is not registered on the GSM network and is not searching for new networks – this usually occurs when no GSM network is present. The search for an available network is executed less frequently to preserve battery power. Not Registered, Searching: GSM-SPY is not registered and is searching for available network Registered, home network: registered to home network – based on the SIM card provider Registered, Roaming: registered to network other than home network Registration Denied: registration is not allowed to this GSM-SPY module or SIM card Unknown: status is unknown – only happens if there is an error with the communication or internal error. 3.1.2 Command menu description At the bottom of the screen there is a command menu. There are to groups: “Actions” and “Log” (Picture 3). 5 GSM SPY Maintenance tool The “Action” group holds the commands to execute the remaining measuring processes of the GSM-SPY tool. When the user presses “Scan neighbouring cells”, the current measuring process is suspended and the Scan neighbouring cells process is started. Similarly, when the “Scan GSM network” is pressed, the program suspends current measuring process and the GSM network scan starts. If the device is not registered to any GSM network provider, the commands in the “Action” group are not possible. The “Log” group holds the logging feature command. The “Start Logging” command starts logging measurements every selected interval. After pressing “Start Logging”, the open file dialog appears. Here we can choose the name of the log file and its destination. After confirming, the logging starts at pre-selected logging interval. Logging interval is selected in the “Set logging interval” group. Default is 10 seconds. Logging is stopped by clicking “Stop Logging” or by starting another measurement mode in “Action” group. 3.2 Scan neighbouring cells Picture 2: SNC window This window is shown if the menu option “Action Scan Neighbouring Cells” is selected. The GSM-SPY tool stops normal operations and starts scanning for neighbouring cells; GSM cells closest to the one registered to. Results are automatically sorted by signal strength (descending). 6 GSM SPY Maintenance tool Application windows description: Chan: channel of the base station dBm: signal strength in dBm MCC: mobile country code of the base station MNC: mobile network code – to which network that base station belongs to Actions Return to main: GSM-SPY stops SNC mode and returns to normal scanning mode. Log Save Results: saves current measurements to a file (single shot). 3.3. Scan GSM network Picture 3: Network scan window This window is shown if menu option “Actions Scan GSM network” is selected. The GSM-SPY tool stops normal operations and executes search for available operators. On the Status field is displayed the current operation of the process. Process flow: Scanning network Deregistering Registering to: Measuring: . After successful network scanning, the detectable GSM networks are displayed. For each operator there is its operator name, numerical name and status. Status of the operator depends on the SIM card (if it has registration permissions). Signal measuring for each operator is performed in 3 steps: deregistering from current operator, registering to selected operator, measuring signal strength. After successful measuring, the GSM-SPY tool enters automatic network registration mode. The whole process is time consuming and can take more than a minute for each operator to get the required measurements. If the network scan is interrupted the module first tries to register to home network before the main screen appears. 7 GSM SPY Maintenance tool IMPORTANT! If the process of network scanning is interrupted, the GSM-SPY tool remains in custom registration mode. The program has to be restarted in order to reactive automatic network selection. Next restart after interrupted network scan can take the tool more than a minute to register to home network. IMPORTANT! Always close the application and wait 3 seconds before turning off or removing Windows Mobile device or batteries. Otherwise the GSM-SPY tool is shut down incorrectly. Potentially that could lead to hardware problems or malfunction. 4. Error Messages and troubleshooting: Battery Low: Battery voltage is below 3660mV. This is just a warning. Battery Empty - POWEROFF: Battery voltage is below 3630 mV – the module is turned off. Replace or recharge the batteries and restart the application. GSM Module error or Initialization timeout: The application could not establish communication with the GSM-SPY tool. Check battery voltage and replace them if necessary. Also check the connection between Windows Mobile device and the GSM-SPY tool. If the REG. STATUS led blinks only a few times and the stops that means that the battery voltage is below the needed voltage limit for the GSM-SPY to start. Then restart the application. Port Error (Unable to open port): The port that the application is trying to use (COM 1) is already been used by another application. Close the program which is using the port and restart the GSM-Spy application. error 99-Incorrect shutdown-slow init: the GSM network scan was interrupted and custom network selection mode is active. Please allow up to a minute for the tool to enters automatic network selection mode and registers to a GSM network. Log File Error! or File open failure! There was an error trying to open a log file. If any other error message appears, please contact manufacturer. 5. Charging instructions GSM–SPY device is entirely powered by rechargeable set of batteries and must be charged with defined charging adapter. To start charging, plug the AC adapter into the power charging plug (Picture 1, pointer 4: ”charging connector”). The charging LED indicates the charging process (Picture 1, pointer 2: “LED indication” – red LED). If the batteries are completely empty the average charging time is around six to eight hours. When the batteries are fully charged, the charge process of the GSM–SPY maintenance tool automatically goes into charging sustain mode. (charge LED turns off). 8 GSM SPY Maintenance tool With fully charged batteries the normal operation time between two consecutive charge processes is up to eight hours (depending on the type of measurements). NOTE! At low temperatures, the battery voltage could decrease rapidly! 9