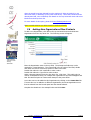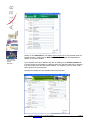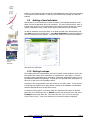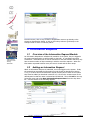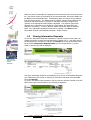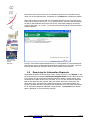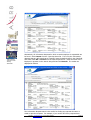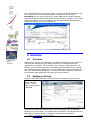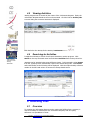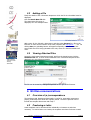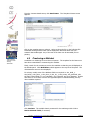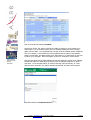
1
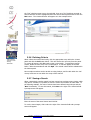
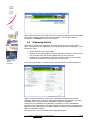
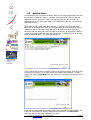
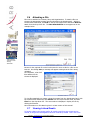
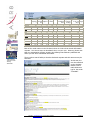
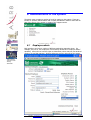
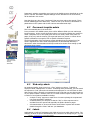
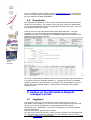
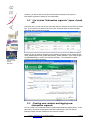
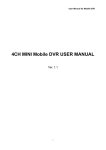
WebFastTrack
FOI Request Tracker System
User Manual
Award winning
systems for fast
moving
businesses
Contact: [email protected] or call 01344 776500
Page 1
Table Of Contents
1
FOI SYSTEM OVERVIEW AND AIMS ......................................................................... 4
2
SEARCHING FOR CONTACTS...................................................................................... 5
2.1
MAIN SCREEN OVERVIEW .............................................................................................. 5
2.2
UNDERSTANDING CONTACT DATA ................................................................................ 5
2.3
SEARCH CRITERIA ......................................................................................................... 6
2.3.1
Searching for Organisations ................................................................................. 6
2.3.2
Searching for Addresses........................................................................................ 6
2.3.3
Searching for Contacts.......................................................................................... 7
2.3.4
Combining Search Criteria ................................................................................... 7
2.3.5
Excluding Criteria................................................................................................. 7
2.3.6
Refining Criteria ................................................................................................... 8
2.3.7
Saving a Search..................................................................................................... 8
2.4
DISPLAYING DETAILS .................................................................................................... 9
2.5
ADDING NOTES ............................................................................................................ 10
2.6
ATTACHING A FILE ...................................................................................................... 11
2.7
VIEWING LINKED EMAILS ............................................................................................ 11
2.8
ADDING NEW ORGANISATIONS/SITES/CONTACTS ....................................................... 12
2.9
ADDING A NEW INDIVIDUAL ........................................................................................ 14
2.10 SETTING LOOKUPS ....................................................................................................... 14
2.11 SEARCHING LOOKUPS .................................................................................................. 15
3
Award winning
systems for fast
moving
businesses
INFORMATION REQUESTS......................................................................................... 16
3.1
3.2
3.3
3.4
4
ACTIVITIES ..................................................................................................................... 20
4.1
4.2
4.3
4.4
5
OVERVIEW ................................................................................................................... 21
ADDING A FILE ............................................................................................................ 22
VIEWING ATTACHED FILES .......................................................................................... 22
WRITTEN COMMUNICATIONS ................................................................................. 22
6.1
6.2
6.3
6.4
7
OVERVIEW ................................................................................................................... 20
ADDING AN ACTIVITY.................................................................................................. 20
VIEWING ACTIVITIES ................................................................................................... 21
SEARCHING FOR ACTIVITIES ........................................................................................ 21
ATTACHING FILES ....................................................................................................... 21
5.1
5.2
5.3
6
OVERVIEW OF THE INFORMATION REQUEST MODULE ................................................. 16
ADDING AN INFORMATION REQUEST ........................................................................... 16
VIEWING INFORMATION REQUESTS ............................................................................. 17
SEARCHING FOR INFORMATION REQUESTS .................................................................. 18
OVERVIEW OF (E-)CORRESPONDENCE .......................................................................... 22
PRODUCING A LETTER ................................................................................................. 22
PRODUCING A MAILSHOT ............................................................................................ 23
EMAILSHOTS ................................................................................................................ 26
REPORTS.......................................................................................................................... 29
7.1
OVERVIEW ................................................................................................................... 29
7.2
REPORTS MENU ........................................................................................................... 29
7.2.1
Information Request Date Raised Report............................................................ 30
7.2.2
Information Request Cost Report........................................................................ 31
7.2.3
Information Request Number of Days to Resolve Report.................................... 31
7.2.4
Information Request Ongoing or Overdue Report .............................................. 32
7.2.5
Public disclosure Log.......................................................................................... 32
8
ADMINISTRATION OF THE SYSTEM. ...................................................................... 34
8.1
8.2
8.3
8.4
EMPLOYEE ADMIN ....................................................................................................... 34
DOCUMENT TEMPLATE ADMIN ..................................................................................... 35
WEB ENTRY ADMIN ...................................................................................................... 35
LABELS ........................................................................................................................ 35
Contact: [email protected] or call 01344 776500
Page 2
8.5
9
DROP DOWNS ............................................................................................................... 36
SECTION ON THE INFORMATION REQUEST MANAGER’S PORTAL............. 36
9.1
9.2
9.3
9.4
9.5
LOGGING IN ................................................................................................................. 36
LIST OF JOBS/”INFORMATION REQUESTS” (OPEN, CLOSED, ALL) .................................. 37
CREATING NEW CONTACTS AND LOGGING NEW INFORMATION REQUESTS ................... 37
LOOKING AT OTHER COLLEAGUES’ LISTS ..................................................................... 39
SEARCHING FOR PREVIOUS ANSWERS........................................................................... 39
Award winning
systems for fast
moving
businesses
Contact: [email protected] or call 01344 776500
Page 3
1 FOI system overview and aims
The system is designed to deal with Information requests in a timely and effective
fashion. Timely because the law states that the requests we put in as citizens should
be answered within certain defined timescales. The system helps effectiveness and
efficiency – for example you can refer to previous answers to answer current requests
more quickly and people are provided with reports ad reminders. Below is a diagram
of how an Information Request such as and FOI request might be dealt with.
Information
Request
visit
write
Found?
Award winning
systems for fast
moving
businesses
email
telephone
Web
No
Formally Log FOI
Request
LOGGED
Yes
Wait x days and offer to
close or reclarify
Request Dealt
with successfully
No
CLARIFYING
Clarify Request
Estimate Cost to
provide
information
Send quotation
Yes
MATTER
CLOSED
Chargeable?
Stop clock
No
QUOTED
Yes
Paid?
Restart
clock
PAID
Collect and collate
documents from
different
departments
Redaction
suggestions
Redaction
Approval and log
documents and
exceptions
Check receipt
Satisfied with
response ?
Send information
to requestor
Dispute Procedure
(reclarify, etc)
DEPT REQUEST
COLLECTED
EXCEPTIONS
SUGGESTED
RESPONSE
APPROVED
SENT INFO
DISPUTE
The Tracker system enables local authority employees to log Information Requests,
pass them to colleagues in other departments, while monitoring their progress, add
Contact: [email protected] or call 01344 776500
Page 4
notes and files to the requests, mail merge template responses for the regular
requests, and finally close them. A countdown starts as the request is logged. Email
triggers can be automated at times defined by the System Administrator.
NB In this manual, the expression (System)
Administrator refers to one or more senior
managers who directly or by delegation set the
business rules up within the system and change
them from time to time.
2 Searching for contacts
2.1
Main screen Overview
You will be provided with a log in username & password and the web address for your
organisation. Once logged on successfully, the main screen is presented.
Award winning
systems for fast
moving
businesses
Information Requests might be submitted by either an Organisation or a member of
the public. The system allows for creation of both these types of “Requestor”. This
screen allows one to search for both businesses and contacts. Criteria are entered in
the search fields by Organisation or Contact, or a combination of these, or by Address
Details. each criterion is added to the Criteria panel in the top right of the screen. The
Search results are displayed in the wide panel below.
The horizontal menu across the top of screen gives fast access to the many tools
within the system via customisable drop down menus. The 3 icons in the top right of
the screen are shortcuts to details, notes and lookups.
2.2
Understanding Contact Data
Within AXLR8 Request Tracker system, customer data is hierarchical. Organisation is
the top level. An organisation can have many sites, and a site can have many
contacts.
Notes can be kept at any of the 3 levels. Lookups (user-defined data) add to the
profile. Emails, if tracked through the system, can be viewed, as can call history. Files
can be attached to build a complete picture of a contact.
Contact: [email protected] or call 01344 776500
Page 5
2.3
Search Criteria
2.3.1 Searching for Organisations
Enter the initial letter(s) of the required Organisation into the field to the right of
Organisation, with Name selected from the drop down list, and click Add to add it to
the Search Criteria. Then click on Search. In the example below, all organisations
have been found starting with the letters “A”
Award winning
systems for fast
moving
businesses
2.3.2 Searching for Addresses
To find all organisations in a specific postcode area, enter as much of the postcode as
possible into the field to the right of Address, with Postcode selected from the drop
down list, and click Add to add it to the Search Criteria. Then click on Search. For
example, enter “LE” in the postcode field and click on Search to find all organisations in
the LE postcode area, as in the following example.
Contact: [email protected] or call 01344 776500
Page 6
2.3.3 Searching for Contacts
Contact data is searched in the same way. All contacts with a last name “Smith” can
be found by entering “Smith” in the field to the right of the contact field, ensuring Last
Name is selected from the drop down list. In the following example, all contacts with a
last name starting with “M” have been found.
Award winning
systems for fast
moving
businesses
2.3.4 Combining Search Criteria
Combinations of criteria can also be specified. In the following example all contacts
have been found in the 020 telephone area who also have an e-mail address. This is
achieved by selecting “Telephone” from the Address drop down menu and entering
020 as the criteria, and selecting Email from the Contact drop down menu and entering
“%@” as the criteria. The “%” acts as the wildcard within the system and is
automatically entered as a following character in the search field.
2.3.5 Excluding Criteria
To further refine searches, data can be excluded from the criteria. If, for example, all
Contacts with last names beginning with “A” were to be searched but all those within
Contact: [email protected] or call 01344 776500
Page 7
the “020” telephone area were to be excluded, then once “020” had been entered as
search criteria it must be highlighted within the search criteria panel and then click the
Not button. The criteria selection will appear as in the example below.
2.3.6 Refining Criteria
Award winning
systems for fast
moving
businesses
When criteria are entered incorrectly, click the appropriate entry within the Criteria
panel and click the Del button below. This will remove the one entry from the panel.
To remove all entries, click Clr ready to start a new search. To amend any search
criteria, double click the entry in the Criteria panel. It will then appear in the field
below. Make the amendment and click Upd. The revised criteria will be substituted in
the Criteria panel.
More complex searches can be carried out using lookups, and for calls within the Call
Centre, but these are not within the scope of this manual.
2.3.7 Saving a Search
When a particularly complex search has been carried out involving many criteria, which
may also be reusable, it is possible to save the search and reload it at a later date. In
the following example, four sets of criteria have been defined using lookups and the
“Not” functionality. To save this search, click Save to the right of the Searches field.
A prompt screen will appear.
Enter the name of the saved Search and click OK.
To use the Search again, click Load to the right of the Searches field and a prompt
screen will appear.
Contact: [email protected] or call 01344 776500
Page 8
Use the drop down list to select the name of the required saved Search and click Load.
The criteria set will be imported into the Criteria panel. This can then either be
amended or click Search to run the search again.
2.4
Displaying Details
The results of a search are displayed in the lower half of the screen in the results
panel. More details of the organisation, site and contact can then be displayed. This is
achieved by either:
•
•
•
Award winning
systems for fast
moving
businesses
Double clicking on the required data
Clicking on the required data to underline it and then clicking on Actions on the
top horizontal menu and selecting Details from the drop down list
Clicking on the required data to underline it and then clicking on the Details
shortcut (the Globe) in the top right corner of the screen
In the following example, a contact has been selected and the Details are displayed.
When a contact is selected, as in this case, Organisation and Site details are also
displayed. When a Site is selected, Organisation details are also displayed, and when
an Organisation is selected, only the organisation details are displayed.
In the case of an individual, the organisation is created as a unique deduplication
identifier using a combination of surname and postcode (but some times configured in
larger fast moving B2C systems to include telephone number(s) and email addresses to
define an individual or family)
From this screen, any of the details can be updated and saved.
Contact: [email protected] or call 01344 776500
Page 9
2.5
Adding Notes
From this screen also, notes can be added. Notes are stored at Organisation, Site, and
Contact level. If notes are made on a Contact, they can also be viewed at Site and
Organisation level. If notes are made on a Site level, they can also be viewed at
Organisation level, but if notes are made on an Organisation, they are only viewed at
Organisation level.
The method to add a Note is the same whether on a Contact, Site or Organisation.
Either click on the required Contact, Site or Organisation on the Results panel, select
Details from the top horizontal menu and click on Notes from the drop down list.
(Shortcut: Click the Notes icon in the top right of the screen) An alternative method is
to click on the Notes link below either the Contact, Site or Organisation on the Details
panel, as displayed above. The Notes panel appears.
Award winning
systems for fast
moving
businesses
In the example above, there is already a note on the selected contact. Each note gives
the name of the author (i.e. the login name) and is date & time stamped. To add a
further note, click the New Note link. The screen clears ready for the new note to be
entered.
If the note is to be viewed on the public portal, check the Public Viewable tickbox, else
if solely for Local Authority viewing, leave this box unchecked. Click Save Note.
Notes can never be amended or deleted once saved.
Contact: [email protected] or call 01344 776500
Page 10
2.6
Attaching a File
Files can be attached to Contacts, Sites, and Organisations. To attach a file to a
Contact, the appropriate contact must be selected on the Results panel. With the
Contact name underlined, click Add on the top horizontal menu and select New File
Attach from the drop down list. The New Attached File screen appears as in the
example below.
Award winning
systems for fast
moving
businesses
Browse for the required file on the local network or enter a URL for a file on the
internet. On clicking Save, a message will appear warning that the file is being
uploaded.
On completion, a list of all
files attached to the
Contact is displayed.
To view files attached to a contact, select the contact from the Results panel and, with
the contact name underlined, click Details from the top horizontal menu, and then
Files from the drop down list. The screen above is displayed. Display the file by
clicking the filename.
More information on File Attach is given in a later section of this manual.
2.7
Viewing Linked Emails
To further enhance the contact profile, all emails to and from any contact can be
viewed, as long as the MessageStore has been created by AXLR8. This is true even
Contact: [email protected] or call 01344 776500
Page 11
when the emails have been deleted from the employee’s Inbox in Outlook (or any
other mail client) or Exchange (or any other mail server). Select the Contact from the
Results panel and, once underlined, click Details on the top horizontal menu and select
Emails from the drop down list.
For more details of this option, please visit www.ExchangeVault.co.uk.
Please consider whether you allow access to emails by all staff?
2.8
Adding New Organisations/Sites/Contacts
To add a new Organisation, click Add on the top horizontal menu and select New
Organisation from the drop down list. The following screen will appear.
Award winning
systems for fast
moving
businesses
Enter the Organisation name in the top field. The subsequent fields may not be
required for a Local Authority. The Source field is for the origin of the lead; double
click within the field to select from options or add a new value.
Double click within the SIC code field to select a value.
Double click within the Type field to select a value.
Select a Request Manager from the drop down list. Click Save. This mighy only be
used in circumstances where, for example the organisation is the local newspaper and
their first and final point of contact must always be the press officer.
A new Site can now be added to this Organisation by clicking on the Create Site link.
If a new Site is to be added to a different Organisation, then that Organisation must
first be selected from the Results panel and the Details selected.
Complete the details as in the example below and click Save.
Contact: [email protected] or call 01344 776500
Page 12
Award winning
systems for fast
moving
businesses
Clicking on the Postcode link will display maps.google.com for the postcode area in a
browser window. Clicking on the Web Address link will display the Organisation’s
website in a browser window.
A new Contact can now be added to this Site by clicking on the Create Contact link.
If a new Contact is to be added to a different Site, then that Site must first be selected
from the Results panel and the Details selected. For example, you may want to add
three reporters at the local paper.
Complete the details as in the example below and click Save.
Contact: [email protected] or call 01344 776500
Page 13
Clicking on the E-Mail link will generate an email addressed to the email name specified
in the preferred client software. It will load your default mail package (normally MS
Outlook)
2.9
Adding a New Individual
Most clients for a Local Authority however are likely to be individual members of the
public, and the Organisation will not be necessary. For these cases therefore, there is
a quick entry screen for the contact details to be entered, and the system will create a
dummy Organisation name, which will be useful nonetheless for fast searching.
To add an individual, ensure that there is no detail selected in the Results panel, and
click Add on the top horizontal menu. Select New Individual from the dropdown list.
The New Individual screen appears. Complete the fields as in the following example:
Award winning
systems for fast
moving
businesses
Click Save New Individual.
2.10 Setting Lookups
The Details screens for Organisations, Sites and Contacts contain fields for most of the
information that is likely to be required for a comprehensive client history. However,
inevitably, there will be data to be retained for a particular organisation which is not in
the standard WebFastTrack package. Lookups are user-defined fields, designed for to
allow you to add your own searchable criteria.
Lookups are set at Organisation, Site and Contact or any other object. It may be that
a Local Authority might need to flag whether contacts in the database were disabled
and have defined this as a Contact level lookup.
To assign a lookup value to a Contact, select the required Contact from the Results
panel and, once underlined, click on Details from the top horizontal menu and select
Lookups from the drop down list. (Shortcut: Click the “eye” icon in the top right
corner of the screen). A list of all lookups for the selected Contact is displayed.
Contact: [email protected] or call 01344 776500
Page 14
To alter the lookup value, click on the lookup to be amended. A screen similar to the
following will appear.
Award winning
systems for fast
moving
businesses
Enter the required lookup into the Lookup Value field and click Ok. If the value is to be
made available to other users to select from, it should firstly be entered into the Add
to Available Options field and Add selected. The value will then be entered into
the Available Options panel, from where it can be selected for the contact in question.
2.11 Searching Lookups
It is also possible to search on Lookup values. Click Search from the top horizontal
menu and select Lookups from the drop down list.
Firstly, select from the drop down list in the Object field whether it is an Organisation,
Site or Contact lookup to be searched. Then click the Lookup drop down and select
the Lookup to be searched. Finally enter the value to be searched for in the Search
String field, using the “%” wildcard if necessary. In the following example, all
occurrences of the Contact lookup “Disabled?” have been searched for any string
beginning with “y”, which brings back all contacts with the value “Yes” in the Disabled?
lookup.
Contact: [email protected] or call 01344 776500
Page 15
From this screen, click on any Contact or Organisation name to go directly to the
Contact or Organisation details, or click on the lookup values to go directly to the
Lookups screen to view or reset any values.
3 Information Requests
3.1
Award winning
systems for fast
moving
businesses
Overview of the Information Request Module
As Information Requests are submitted by members of the public, they are logged in
the system and assigned to a staff member to deal with. A countdown timer then
commences. Email alerts can be sent as reminders to the staff member that they only
have a certain number of days remaining in which to send the response. When the
information requested has been sent, the issue is closed and the timer stops.
3.2
Adding an Information Request
When an Information Request is submitted, it must be logged on the system. Firstly
the contact that requested the information must be found (as described in Section
2.3.3), or if this is their first information request and they do not exist on the system
they must be added (as described in Section 2.8). Click on the contact name on the
Results panel so that the name is selected and underlined. Then click Add on the top
horizontal menu and select New Information Request Item from the drop down
list. A screen similar to the following appears.
Contact: [email protected] or call 01344 776500
Page 16
Select the person responsible for supplying the information from the Owner drop down
list. Give a brief outline of the Request in the Description field, and further details can
be added in the Details field below. If Exemptions apply, the reason can be selected
from this drop down list. The Status remains “Logged”, and the current date can be
entered as the Passed Date i.e. the date on which the Information Request was
“passed” to the appropriate staff member responsible. The Request Type is then
selected; this is important as if it should be a DPA request, the countdown then
changes to be 40 days. In future, different stautes may define different response
times. The responsible Department must also be selected. Click Save and the
Information Request is automatically assigned a unique number.
3.3
Viewing Information Requests
To view the Information Requests submitted by a specific member of the public, the
contact in question must be found (as described in Section 2.3.3). Click their name in
the Results panel to underline it, and then click Details from the top horizontal menu
bar and select Information Request Items from the drop down list. A screen
similar to the following will be displayed.
Award winning
systems for fast
moving
businesses
Only Open Information Requests are displayed, but if a list of all Information Requests
ever submitted by the contact is required, click the Filter drop down and select All.
Then click Refresh.
To see the full details of any Requests in the list, click the reference number in the left
hand column and a screen similar to the following is displayed.
Contact: [email protected] or call 01344 776500
Page 17
Any details on the above screen can be amended, except for the Countdown timer,
which can not be tampered with. Remember to click Save after updating any details.
Notes and Lookups connected with the Information Request can be accessed via the
links in the top right of the screen. In the example above, the tick in the checkbox by
the link to Notes indicates that notes exist for the Information Request, otherwise it
would be left blank (i.e. no tick). To see the Notes, click the link and a screen similar
to below appears.
Award winning
systems for fast
moving
businesses
From the Information Request Details screen, it is also possible to view and add Files
and Activities, and to mailmerge and Emailmerge responses to the contact. All these
functions are dealt with in greater detail in other sections of this manual.
3.4
Searching for Information Requests
Information Requests can be searched using a variety of criteria. Click Search on the
top horizontal menu and select Information Request Items from the drop down list.
If you wish to find all Information Requests submitted within a certain month, leave
the default All in Date Range in the Type field. If it is only the Information Requests
that are still Open that are required, leave the default Open in the Filter field, else
select either All or Closed from the Filter drop down list. Leave Date Raised in the
second Type field and enter 01/08/2008 and 31/08/2008 in the two Date range fields
for all Information Requests submitted in August 2008. Click Search and a Results
panel is displayed, as in the following example.
Contact: [email protected] or call 01344 776500
Page 18
Award winning
systems for fast
moving
businesses
Alternatively, all Information Requests for which a certain employee is responsible can
be found. Select Owner from the Type drop down list. If it is only the Information
Requests that are still Open that are required, leave the default Open in the Filter field,
else select either All or Closed from the Filter drop down list. Enter the name of the
Employee in question in the Search String field and click Search. The results are
displayed as follows:
The Information Request search is also useful for finding any requests the same or
similar to previous requests. For example, if you need to find if any requests have
Contact: [email protected] or call 01344 776500
Page 19
been submitted previously concerning “waste”, as long as this keyword has been used
in the Description of the Information Request, it is possible to find it. Select
Description from the Type drop down list. Select “All” from the Filter so that both
Open and Closed Information Requests are included, and enter “%waste” in the Search
String field, using the “%” as the wildcard. Any Information Requests satisfying the
criteria will be found, as in the example below.
4 Activities
Award winning
systems for fast
moving
businesses
4.1
Overview
Sometimes it is necessary to break down Information Requests into various Activities
concerned with collecting the information together prior to assembling the final
response to the requestor. This is primarily for the purpose of allocating costs. For
example, if an Information Request was submitted requesting details of use of a local
lake, activities might be assigned to the Leisure department to gather information and
also to the Environmental department. The cost of information gathering could then
be recorded by each department and reported on when necessary.
4.2
Adding an Activity
Firstly the Information Request to which the Activity is connected must be opened.
From the Details
screen, click New
Activity. A screen
similar to the following
is displayed.
In the above example, the fields have been completed together with an estimated
length of time for the activity. The actual length of time taken must be entered by the
staff member when the Activity is completed. Costs can then be assigned.
Contact: [email protected] or call 01344 776500
Page 20
4.3
Viewing Activities
Activity progress can be viewed by the Owner of the Information Request. Firstly the
Information Request Details screen must be accessed. Click the link for Activity List.
A screen listing the connected Activities is displayed.
Click the link to the Activity for the Activity Details screen.
4.4
Award winning
systems for fast
moving
businesses
Searching for Activities
It might be necessary to search for all Open Activities to monitor progress. Click
Search on the top horizontal menu bar and select Activities from the drop down list.
Activities can be searched using many different criteria. In this example, select Status
from the Type drop down list and enter Open in the Search String field. Click Search
and results similar to the following will be displayed. Click the unique Activity reference
number in the left hand column to access the Activity Details screen.
5 Attaching Files
5.1
Overview
To complete the Information Request, and to assist with fulfilling future requests, it
may be necessary to attach files to the Information Request, such as a policy
document or a spreadsheet of costs.
Contact: [email protected] or call 01344 776500
Page 21
5.2
Adding a File
Firstly the details of the Information Request to which the file is to be added must be
displayed.
Click the Attach New File link.
The Attach New File screen is
displayed, as in the example below.
Add a name for the File and a Desscripton, and then either Browse for a file on the
local disc or enter the file location on the web, complete with http://www …… etc. On
clicking Save, an Uploading banner will appear temporarily at the bottom of this
screen while the file is being uploaded to the web, where it is then accessible to all
users.
5.3
Award winning
systems for fast
moving
businesses
Viewing Attached Files
Access the Information Request concerned, and from the Details screen click the
Attached Files link. A list of all Files attached to the Information Request is then
displayed, as in the following example.
The File can be viewed by clicking the Open link to the right of the filename.
6 Written communications
6.1
Overview of (e-)correspondence
The Mailmerge and Emailmerge functionality is useful for generating responses to
people, particularly those which are regularly issued. Common responses can be
formed into template documents and easily I.
6.2
Producing a Letter
Letter templates can be stored and sent individually to Contacts as and when
necessary. To send a letter to a Contact, the template must have first been created.
Contact: [email protected] or call 01344 776500
Page 22
From the Contact Details screen, click Send Letter. The Template Chooser screen
appears.
Click on the template name to select it. Select to Open the file on the following File
Download warning and the letter will be displayed in Microsoft Word with your
contact’s data mailmerged. Any of the text of the letter can be amended prior to
printing.
Award winning
systems for fast
moving
businesses
6.3
Producing a Mailshot
A mailshot is a mailmerge to more than one person. The template for the letter must
have been created before commencing the mailshot.
Firstly, search for the contacts to receive the mailshot so that they are all displayed on
the Results panel. Click MultiSelect, which appears to the top left of the panel. The
Field Selection screen is then displayed.
For a letter, usually most of the Address fields are required i.e. site_build_1,
site_build_2, site_thoro_1, site_thoro_2, site_loc_1, site_county, site_postcode, plus
the main contact fields i.e. cont_salutation, cont_1stname, and cont_lastname. Double
click these to move them across to the right hand panel of Selected Fields, plus any
other variables required.
Click Continue. The variable data is presented for the mailmerge with a link to
Revise Selected Fields, if necessary.
Contact: [email protected] or call 01344 776500
Page 23
Click to proceed with selected Contacts.
On the next screen, the option is offered to update a Lookup for each contact to be
mailmerged. It is an excellent idea to do so to facilitate finding the same contacts
again at a later date. It is suggested that a lookup could be created entitled “Mailshots
sent” for example. If all contacts were then updated with the name of the Mailshot
and the current date, this data could then be searched on in 2 weeks when it was time
to follow up for example. More information is found on Lookups in a later section.
Award winning
systems for fast
moving
businesses
Click the drop down list for Batch Update Lookup and select the Lookup to be updated.
Double click within the With Value(s) field for a list of available options or to input a
new value. In the example below, no values have been input previously, so a new
value has been entered in the Add to Available Items field, and then been selected.
Click Ok to return to the previous screen.
Contact: [email protected] or call 01344 776500
Page 24
The Lookup value has been entered in the With Value(s) field. Click Go to update.
You will be asked to confirm.
Award winning
systems for fast
moving
businesses
Click OK to confirm.
Select to Merge Options for Contacts. A confirmation screen appears, as below.
Click to Mail Merge the Contacts. The Template Chooser screen appears.
Contact: [email protected] or call 01344 776500
Page 25
Click the required template name, and then select to open the file when prompted by
the file download warning. A document then appears in Microsoft Word with one page
for each Contact originally selected. Individual pages can be amended as required
prior to printing.
6.4
Award winning
systems for fast
moving
businesses
Emailshots
Emailshots are easily achieved and are a 2-stage process. Firstly the mailing list must
be built so that the contacts to be mailed appear in the results panel. So, if all
contacts within the “SL” postcode area are to be mailed, this search must be
performed.
When all contacts are displayed on the Results panel, click MultiSelect, which appears
to the top left of the panel. The Field Selection screen is then displayed. For an
emailshot, generally very few fields are required and often only the email address.
Select the required fields from the list of Available Fields on the left so that they appear
in the Selected Fields panel on the right. In the following example, only the Contact
email field (cont_email) has been selected.
Click Continue to progress. The data for the emailmerge is then displayed. In this
example, many contacts have been selected who do not have an email address
Contact: [email protected] or call 01344 776500
Page 26
entered on the system. Emails will be generated for these contacts with blank ‘To’
fields, so these may as well be deselected, as in the following example.
Click to Proceed with selected Contacts.
Award winning
systems for fast
moving
businesses
On the next screen, the option is offered to update a Lookup for each contact to be
mailmerged. It is an excellent idea to do so to facilitate finding the same contacts
again at a later date. It is suggested that a lookup could be created entitled “Mailshots
sent” for example. If all contacts were then updated with the name of the Mailshot
and the current date, this data could then be searched on in 2 weeks when it was time
to follow up for example. More information is found on Lookups elsewhere in this
manual.
Click the drop down list for Batch Update Lookup and select the Lookup to be
updated. Double click within the With Value(s) field for a list of available options or
to input a new value. In the example below, no values have been input previously, so
a new value has been entered in the Add to Available Options field.
Click Ok to return to the previous screen.
Contact: [email protected] or call 01344 776500
Page 27
The Lookup value has been entered in the With Value(s) field. Click Go to update.
You will be asked to confirm.
Award winning
systems for fast
moving
businesses
Click OK to confirm.
Select to Merge Options for Contacts. A confirmation screen appears, as below.
Click to Email Merge the Contacts. The Template Chooser screen appears.
On the Template Chooser screen, the template email must be selected. Click the
required template.
Contact: [email protected] or call 01344 776500
Page 28
It is also possible to edit templates and use files of your own, but this is discussed in
greater detail later in this manual.
Award winning
systems for fast
moving
businesses
Click to Merge it. The emailshot file is displayed for final checking before sending.
The email can be edited prior to being sent if necessary. It is also possible to browse
through each email and edit accordingly. Finally click to send to recipients.
7 Reports
7.1
Overview
Several reports are included in the AXLR8 FOI installation. Any bespoke reports
required can be produced by AXLR8.
7.2
Reports Menu
Contact: [email protected] or call 01344 776500
Page 29
Click on Admin on the top horizontal menu and select Reports from the drop down list.
A screen similar to the following is displayed.
7.2.1 Information Request Date Raised Report
The Information Request Date Raised Report supplies a breakdown by the year
selected of the numbers of Information Requests raised per month, as in the example
below.
Award winning
systems for fast
moving
businesses
In the above example, Information Requests have only been logged in September
of the selected year. Click on any of the totals to run the Information Request Cost
Report. This gives a breakdown of the costs (expenses and charges) for the selected
month. The employee name, department and date range can all be reselected and the
report re-run at this stage.
Contact: [email protected] or call 01344 776500
Page 30
7.2.2 Information Request Cost Report
As described above, this report can be generated from the Information Request Date
Raised Report. There is also a direct link to the Information Request Cost Report
from the main Reports Menu.
7.2.3 Information Request Number of Days to Resolve
Report
Award winning
systems for fast
moving
businesses
The Information Request Number of Days to Resolve Report gives a breakdown of the
number of days over a defined time period that it has taken to respond to Information
Requests, the current status of the Information Requests, with totals to summarise, as
in the example below.
Click on the Information Request reference number in the left hand column to access
the Information Request details screen.
Contact: [email protected] or call 01344 776500
Page 31
7.2.4 Information Request Ongoing or Overdue Report
The Information Request Ongoing or Overdue Report gives a breakdown of the
Information Requests that are current. By default, Overdue Information Requests are
included in this report, whether they have been closed or not, so the option is given by
the checkbox to exclude these from the Report, as in the following example.
Award winning
systems for fast
moving
businesses
Click on the Information Request reference number in the left hand column to access
the Information Request details screen.
7.2.5 Public Disclosure Log
The public disclosure log presents the information that its name suggests. It shows
the requests that have come in and how they were answered. More public authorities
are publishing this information and the information commissioner encourages the
practice.
Contact: [email protected] or call 01344 776500
Page 32
Month
No of contact
email foi@hor letter
sham
request @horsh request
am
s
Website responded responded to Over
feedback to in under
in 10 - 20 target
form
10 days
days
January
20
6
4
6
4
0
13
7
0
February
27
3
6
10
5
0
18
7
2
March
16
2
5
4
3
0
10
6
0
April
19
3
3
6
5
0
12
7
0
May
16
2
4
6
3
1
11
5
0
June
20
2
6
5
6
1
10
10
0
July
25
2
8
8
5
0
13
12
0
August
27
2
5
9
10
0
12
12
3
September
35
2
6
6
5
0
31
4
0
October
11
1
1
4
2
1
11
0
0
November
0
0
0
0
0
0
0
0
0
December
Totals
0
0
0
0
0
0
0
0
0
216
25
48
64
48
3
141
70
5
Each of the month names in the left hand column is a link to that months information
requests. You can see more on Horsham’s site or on your own. However, please note
that your organisation will have certain rules defining what fields are published and
where you can store confidential information.
Award winning
systems for fast
moving
businesses
There is also a search facility so that the disclosed requests and their answers may be
searched.
In this case, the
user has searched
on the Horsham
District Council
Public Disclosure
Log for the words
“TownHall”.
Contact: [email protected] or call 01344 776500
Page 33
8 Administration of the system.
The admin menu contains a number of tools for setting up the system. These are
intuitive to systems administrators and normally introduced in detail to client SAs as
part of the set up of the system or a part of the support service.
8.1
Employee admin
Each employee can have a number of different authorities granted to them. For
example, only one or two employees of an authority should have “Employee Admin”
capability. Some will not have the rights to delete data, others may not see attached
emails or to see DPA requests. All these rights are set up in this part of the system.
Award winning
systems for fast
moving
businesses
Contact: [email protected] or call 01344 776500
Page 34
Importantly, whether a particular user logs into the default screens described up to this
point or into the Information Request Manager screen described in the next section,
will be defined in this screen.
Note that there are also some “employees” that are robots rather than people. These
include AXLR8Triggers and Web entry. These are set up as sources of information or
placeholders in the system and do their various automated tasks 24/7.
8.2
Document template admin
This is an essential part of the work flow.
In any context in the AXLR8 system, there will be different fields you can mail merge
into documents. As the screen shot below shows, you need to consider the medium in
which a template is to be sent (SMS, plain text or RTF email, HTML email, letter on
paper of fax, etc) and the context (just a general letter to a person or a letter where
specific information is merged in from a specific information request.
The full functionality of the mail merge system including how the subject line of an
email is significant for where email correspondence is automatically attached, is
discussed in other documentation and fully introduced to clients when setting up and
developing their system.
Award winning
systems for fast
moving
businesses
8.3
Web entry admin
As mentioned earlier, these come in to a “box” which you choose. Typically an
employee called “FOIRequests” or similar. Examining them periodically, you can attach
the requests to “real” jobs and real contacts and employees to own and work on them.
Web entries (online requests) are managed through a link that you can place anywhere
on your public website. Because some of our clients received “spam” entries, there are
a number of new features available including:
• A simple “Turing” type test to make sure a human is placing the requests and
not some automated “spiderbot”.
• A selected status you can pick so that the “silly” or false requests can be
excluded from the reports and especially the public disclosure pages.
• A human decision to let new self service web visitors’ requests and contact
details through the “Gate” and into your datasbase.
8.4
Labels
Labels admin is really self explanatory AS LONG AS you know which label is which. The
changing of labels is open to administrators but it should be an infrequent job. So, feel
Contact: [email protected] or call 01344 776500
Page 35
free to call AXLR8 on 01344 776500 or write to [email protected] if you have any
issues. For most changes to the information request tracking sheets, the drop down
list you should load is called “SUPLABELS”.
8.5
Drop downs
This important area allows you to set, not just the drop down choices for the system
but also how they behave. For example, in the drop down choices for departments,
you can put the departments that your organisation has from time to time. They are
just names that come up in reports
However, there are some drop down choices that change behaviour. The most
significant one in the Information Request Management system is the one that
associates the status of the request (see first diagram describing the workflow at the
beginning of this document) with the
Award winning
systems for fast
moving
businesses
The “close” variable defines whether a status closes an information request and causes
it to stop the clock if the trackable variable is 2. It pauses the clock if the trackable
variable is 0 however, the clock carries on running (for 20 working days for an FOI or
EIR request and 40 calendar days for a DPA request for example) if the trackable
variable is set to 1.
9 Section on the Information Request
manager’s portal.
9.1
Logging in
You will get eh same log in screen as the the ,main system but, if you are an
information request manager, you will see a screen that is primarily a list of jobs and
has none of the search and general contact management facilities that an
administrator gets. Depending on your level of involvement, you will have different
functions switched on:
DPA and other specific queries may be blocked
You may not be able to see reports or search on other requests in the knowledge base
You may not be able to add new requests or see your colleagues request queues
Contact: [email protected] or call 01344 776500
Page 36
However, you will be able to see all the information necessary to answer the
information requests for which you are responsible.
9.2
List of jobs/”Information requests” (open, closed,
all)
In this list view, you can see all your open IRs and you can also see the filter on closed
IRs. If you wish to see closed or all of your IRs then pick them from the top right
hand drop down list and click refresh.
Award winning
systems for fast
moving
businesses
Clicking on any IR number will bring up the details from which you can access all the
notes, attached documents (public and private), emails attached ( if you have bought
the AXLR8MailTracker service) and sub task activities. The information request
workflow is described elsewhere.
9.3
Creating new contacts and logging new
information requests
You can create new contacts and then log Information Requests against them. In the
case below, the select contact button has been clicked on the top row and the
following search has been initiated on the surname “Smith”
Contact: [email protected] or call 01344 776500
Page 37
This brings up all the Smith families in this training system.
If the “Smith” you need is not
there, you can hit the new
individual button.
Award winning
systems for fast
moving
businesses
This brings up the form for
adding new people and you
can add this new lady’s details
Once the new or exisiting individual has been selected, you can create a new
information request and assign it to them by clicking on the Create New
Information Request Item link on the middle of the to row under the banner, next
to where you selected the individual. The resulting new Information Request
Details dialogue screen, (which is explained in the appropriate section of this manual)
will then appear for you to select the type of request, an owner, the department
responsible, any exemptions, etc.
Contact: [email protected] or call 01344 776500
Page 38
9.4
looking at other colleagues’ lists
You can, if you have been authorised, look at the list of a colleague in order to help
them out if, for example, they are off sick.
Award winning
systems for fast
moving
businesses
9.5
Searching for previous answers
There are facilities for searching for different names and subjects as shown on this
screen shot. If you remember a person’s name or some key word, you should find it
quite intuitive. In the case below, we have looked for all queries for “E Ranzen”,
regardless of whether they are closed or open or by whom they were answered.
Contact: [email protected] or call 01344 776500
Page 39
This search facility will save you a great deal of time ”reinventing the wheel” when
answering queries from people. Hopefully, it will avoid wasted time repeating the
collection and collation of documents if the same hours of research and some of the
the same resulting documents can be reused in similar queries.
Award winning
systems for fast
moving
businesses
Contact: [email protected] or call 01344 776500
Page 40