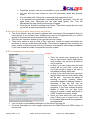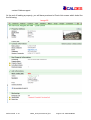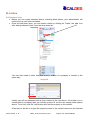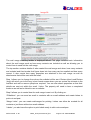
1
Table of Contents
1. Getting Started ................................................................................................................................ 4
1.1 Logging On .................................................................................................................................. 4
1.2 Home Page .................................................................................................................................. 4
2. Contacts ........................................................................................................................................... 6
2.1 Adding a new contact ................................................................................................................... 6
2.2 The contact form .......................................................................................................................... 7
2.3 The contact menu bar .................................................................................................................. 8
3. Applicants ...................................................................................................................................... 10
3.1 Requirement details ................................................................................................................... 10
3.2 Location Information .................................................................................................................. 10
4. Matching ........................................................................................................................................ 12
4.1 Select properties from your match.............................................................................................. 12
4.2 Confirm that the property has not been sent before ................................................................... 13
4.3 The mailmerge summary page................................................................................................... 13
5. Properties ...................................................................................................................................... 14
5.1 Adding a New Property .............................................................................................................. 14
5.2 Adding the address of the property ............................................................................................ 14
5.3 The property check list ............................................................................................................... 16
5.4 Add the main contact/client for the property ............................................................................... 16
5.5 Add the key property and matching information ......................................................................... 17
5.6 Images ....................................................................................................................................... 17
5.7 Brochures and Floor plans ......................................................................................................... 18
5.7i Creating a PDF brochure from a template ............................................................................. 18
5.7ii E-Brochure............................................................................................................................ 19
5.8 Jobs ........................................................................................................................................... 21
5.8i How to add a new job ............................................................................................................ 22
Melissa Read P.1
CM13_Enterprise Manual_doc
Support Tel : 08704208348
5.8ii How to archive / delete a job ................................................................................................. 23
6. Briefcases ...................................................................................................................................... 25
6.1 Back-office briefcase .................................................................................................................. 25
6.2 How to set up a back-office briefcase......................................................................................... 25
6.3 Web-briefcases .......................................................................................................................... 27
7. Activities ......................................................................................................................................... 28
8. Tasks .............................................................................................................................................. 29
8.1 The Task List ............................................................................................................................. 29
9. Letters ............................................................................................................................................ 31
9.1 Standard letters.......................................................................................................................... 31
9.2 Editing and printing your letter.................................................................................................... 32
10.Mail Shots and CRM (Contact Relationship Management) ..................................................... 33
10.1 Producing a mail shot............................................................................................................... 33
10.2 Mail Merge Summary Screen ................................................................................................... 37
10.3 Sending Mail Merge Emails...................................................................................................... 40
10.4 Creating Mail Merge Letters for Printing ................................................................................... 41
11. Reports......................................................................................................................................... 43
11.1 Property ................................................................................................................................... 43
11.1i Property Marketing Report ................................................................................................... 43
11.1ii Activities.............................................................................................................................. 44
11.1iii Local Information and Comparables ................................................................................... 45
11.1iv Create Briefcase ................................................................................................................ 45
11.1v List Briefcases .................................................................................................................... 46
11.1vi Leasehold Transactional Analysis Report (LAR) and Sales Transactional Analysis Report
(TAR) ........................................................................................................................................... 46
11.1vii Property Exports ............................................................................................................... 47
11.2 Contacts................................................................................................................................... 47
11.2i Contact activities.................................................................................................................. 47
11.2ii Local Information and Comparables.................................................................................... 47
Melissa Read P.2
CM13_Enterprise Manual_doc
Support Tel : 08704208348
11.2iii Company activities ............................................................................................................. 47
11.2iv Contact list mail shot .......................................................................................................... 47
11.2v Multiple contact activity report ............................................................................................. 48
11.3 Other reports ............................................................................................................................ 49
11.3i Work in progress report ....................................................................................................... 49
11.3ii Workgroup activity report .................................................................................................... 49
11.3iii Workgroup activity chart ..................................................................................................... 49
11.3v Non-activity report:.............................................................................................................. 50
12.Diary and Calendar ...................................................................................................................... 51
12.1 Using the diary ......................................................................................................................... 51
12.2 Summary of views and functionality ......................................................................................... 51
12.3 Icons ........................................................................................................................................ 51
12.4 Adding to your diary ................................................................................................................. 51
12.5 Appointment details.................................................................................................................. 52
13 Administrator ................................................................................................................................ 54
14. Archiving ...................................................................................................................................... 55
14.1 Archiving a job ......................................................................................................................... 55
14.2 Archiving a Member of Staff ..................................................................................................... 55
15 Deleting ......................................................................................................................................... 56
15.1 Deleting a Property .................................................................................................................. 56
15.2 Deleting a Job .......................................................................................................................... 56
15.3 Deleting a Contact ................................................................................................................... 56
15.4 Deleting an Activity................................................................................................................... 56
16. Appendix ...................................................................................................................................... 57
Melissa Read P.3
CM13_Enterprise Manual_doc
Support Tel : 08704208348
1. Getting Started
1.1 Logging On
The Caldes database system, also known by the product name of ‘Enterprise’, uses
your internet or network connection to centralise your information in a single database.
When you update any information in Caldes Enterprise, it is instantly available.
Whilst the system is internet based, it is not open to the general public and all
information is held securely within it. This website should not be confused with a public
website.
How to log on to Caldes:
1. From Windows, start Internet Explorer.
2. Go to the website address that you have been given. The address (URL) will be
something like: http://myplc.caldes.com (don’t add ‘www’).
3. You will now see a screen like the one below.
4. Enter your surname in the space provided.
5. Add your password and press the ‘return’ or ‘enter’ key on your keyboard. Alternatively
click the ‘Log-in’ button.
Image 1
Troubleshooting:
If you have any problems logging on, or if you do not have a password, please contact Caldes
support on the number at the bottom of this page and we will be happy to help you. If the user
name list does not change when you change the work group then you will need to install Java
on your computer before you can access Caldes. Visit www.caldessupport.co.uk for more
help.
If you want to change your password, login and find the ‘Change your password’ link in
the ‘My Quick Links’ box.
1.2 Home Page
Once you have logged into the system you will see the home page, similar to the one
Melissa Read P.4
CM13_Enterprise Manual_doc
Support Tel : 08704208348
shown here:
Image 2
How the home page works:
• To get back to the home page at any time, click the ‘Home’ button in the top left corner.
This button remains on screen wherever you are in the system.
• The main menu is shown at the bottom left. This menu provides you with access to the
main areas of the system. The small icons on the right provide additional functionality.
This is covered later in the guide under each section as necessary.
• The large Caldes logo shown in this example will be replaced by your own logo.
• The section below the large Caldes logo is used for displaying internal information and
is the same for all users. This area will be configured to your own requirements. This
section is useful for displaying internal messages and can be used as a notice board. It
can also automatically display items in diaries and viewings as we have shown.
• Other home page options are available, such as a list of users who are logged in and a
link to your tasks list, showing what tasks are due and overdue. You can download this
guide too.
• The diary is initially shown in what is called the ‘Quick Search’ area. This area is
replaced when you search for properties or contacts.
Melissa Read P.5
CM13_Enterprise Manual_doc
Support Tel : 08704208348
2. Contacts
All people added to the system are contacts, whether they may be clients, staff, tenants,
applicants etc. Applicants are simply contacts that have requirements. Please refer to the
‘Applicants’ section of this manual for further information on adding requirements to an
applicant’s record.
2.1 Adding a new contact
Image 3
• Click on the ‘Contacts’ button in the main menu.
• A search form will now appear in the ‘Quick Search’
area. All other areas of the screen will remain the
same at this point.
• Type in the surname of the contact that you want to
add and then click ‘find’. The system will first check
that the contact does not already exist. You do not
need to fill out any other fields unless you are using a
name that is likely to return a lot of results.
• Select the contact type: ‘Applicant’ if the contact has
requirements and ‘Other’ if not and then click the ‘Add
New’ button which has now automatically appeared.
• Now that you have added your contact, see the next
page entitled ‘The contact form’ for instructions on
adding further details.
Tip 1 - You should use the same form shown here to search
for an existing contact in the system as well as add a new
one.
Tip 2 - There are some quick links at the top of the form which
give you some advanced search and report options.
Tip 3 - You do not need to fill out every box in the search
form. Remember that as with all search forms in software less
is more. When searching, the fewer fields you fill out, the
more results you will get.
Tip 4 - The gold star icon in the ‘Contacts’ section of the menu allows you to list and manage
all of your hot, warm, and cold contacts. This is generally an agency only function.
Tip 5 - The history/clock icon next to the gold star links you to the last fifty contacts that you
added or clicked on in the system. The clock in the property row does the same for properties.
Melissa Read P.6
CM13_Enterprise Manual_doc
Support Tel : 08704208348
2.2 The contact form
This form has been designed to allow you to add all of the relevant contact’s details in a
single page. The top half is reserved for the contact’s individual information. The bottom
half is reserved for their company information. The split allows you to add more than
one contact to the same company/branch. Type in your information and then click the
red ‘Save’ button.
The page automatically capitalises each field if you use the tab key on your keyboard to move
to the next field. If you leave a field blank, such as the salutation, then it will automatically work
this out for you.
Image 4
•
By hovering your cursor over any part of the form that you do not understand, a pop up
box will explain that button or drop down box’s function.
•
In the above image, you can see that by ticking the box next to the email address of the
contact, that contact’s address will be removed from ALL emailshots. This is useful if
that contact has requested not to be contacted by email or, having received an
emailshot, they then wish to unsubscribe. For further information on mailmerges and
how to set up parameters for clients who should and should not receive mailshots,
please see the relevant section in this manual.
Mandatory fields – Pink fields are mandatory and orange fields are recommended.
•
Melissa Read P.7
CM13_Enterprise Manual_doc
Support Tel : 08704208348
•
•
•
•
Your administrator can configure which fields have these options set.
Ranking – You can give each contact a ranking score as to whether they are a hot lead
or not. This function is generally used only for agency.
Contact types and contact categories – The contact types list is for defining big
groups such as applicants, staff, and clients. The category list is used for mailing and
CRM purposes.
The ‘Clipboard’ button copies the contacts name and address to your clipboard so that
you can paste into another document.
If the company name is underlined, you can click it to see a tree of all contacts at that
company.
2.3 The contact menu bar
Image 5
The menu bar along the top of the contact’s record provides you with access to further
information. Click on the relevant button to view the following:
•
Address – Click here to view the contact’s address details. This is the default form.
•
Activity – Click here to view all activity and history related to this contact such as
meetings, letters and phone calls etc. A list will show. Click on any activity to drill down
to the relevant form, where you can update the comments.
•
Company activity – As above, but for everyone at the same address/branch as this
contact.
•
Jobs – This button provides a list of all jobs that the contact has any involvement with in
the system and provides an excellent way to check for conflicts of interest. You can add
a contact to a job from here so long as it is not related to a specific property. To add a
job that is related to a property, you must first add the property and then attach this
contact to the relevant job for that property.
•
Meet – This button provides access to your diary and allows you to quickly add in a
client meeting. You simply double click on the start time and double click on the end
time to book an appointment. Please see the ‘Diary’ section for more information about
using the diary.
•
Relate – This button allows you to relate a contact to another contact, however it is
mostly used for relating staff to a contact. Once you relate yourself to a contact in the
system you can then synchronise their contact details with your MS Outlook database,
via our automated synchronisation software. Please contact support for details.
•
Red Briefcase button - This special button allows you to create a ‘web-briefcase’ for
this contact. Once the contact has a briefcase, you can communicate with them via the
Internet and email directly from Caldes. This button is particularly useful for creating a
portfolio of properties for this contact, or for updating them with progress on a job. The
briefcase is red if they do not have a web briefcase and green if they do.
•
Click the @ sign to send an email to this contact. Your administrator/Caldes can set up
your emails to include your corporate branding.
Melissa Read P.8
CM13_Enterprise Manual_doc
Support Tel : 08704208348
•
Click the graph sign to report on this contact. See the ‘Reports’ section for more
information.
•
The drop down list shows you who owns this contact. Even though you may not be the
owner of some contacts, you can still assign yourself as ‘known to’ that contact by
clicking on the relate button as described above.
Melissa Read P.9
CM13_Enterprise Manual_doc
Support Tel : 08704208348
3. Applicants
Adding a new applicant is similar to adding a new contact. However, instead of clicking
‘Other’, click ‘Applicant’ from the initial search screen. (See the first page of the contacts
section for more information – the ‘Applicant’ check box can be clearly seen at the
bottom of the search form, shown in red).
3.1 Requirement details
You should then fill out the details page as for any other contact. However you will
notice that this time the contact has a contact type of ‘Applicant.’ If required, you can
change an existing contact into an applicant by changing their contact type. A contact
can have as many different contact types as you require.
When you save the contact’s details form you will then be shown a new form for adding
requirements. The form below is for mixed use, but can be easily configured to match
just residential or commercial agency. You can have any property types that you like
and the list can be added to by your administrator/Caldes. The information loaded onto
this will form the criteria when you match this applicant against properties within the
system (please see section entitled ‘Matching’).
Image 6
3.2 Location Information
Once you have added the applicant’s core requirements, you now need to add their
geographical requirements. These can be anywhere in the world. Caldes already includes all
the UK postal towns, but you can add country, region, county, and town information as
necessary. For additional areas that are less easily defined, you can also add localities.
The screen displayed on the following page shows just Towns and Localities.
Melissa Read P.10
CM13_Enterprise Manual_doc
Support Tel : 08704208348
Tip – The more information you add to the applicant’s page, the more you can
drill down in your reporting section. For example, you might at a later date wish
to produce a report based on clients looking for properties within a very specific
price range. If the data is not in the system, then that applicant will not appear on
that report and you may have a missed marketing opportunity.
Tip – Caldes includes a macro system which can be taught which towns or
postcodes relate to which localities. For instance, if a property is in Slough then
the M4 corridor locality can automatically be ticked, making it easier to match
your applicant to a suitable property.
Image 7
Melissa Read P.11
CM13_Enterprise Manual_doc
Support Tel : 08704208348
4. Matching
The purpose of matching is to enable your clients and your properties to ‘find’ each other on
the system. It is a very efficient way of ensuring that you do not miss any marketing
opportunities because, if you select ‘match’ every time you input a new client or new property,
the system will generate a mailmerge so that you can market a new property to existing
clients, or existing properties to a new client. Once a client has been matched to existing
properties, he/she will only have new properties matched because the system recognises that
a client should not be emailed with properties over and again. That said, you do have the
option to mailshot clients with properties they have received before; please see section the
image below.
Of course, matching relies on there being some properties to match against. It is important to
understand that you do not need to complete all sections. If you pick a large geographical
location the applicant will receive details on everything in that location even if you also pick a
smaller location.
For example, if you pick Oxfordshire as a region and Oxford as a town/city then they will get
everything in Oxfordshire, including everything in Oxford. If you pick Oxfordshire as a region
and Bristol as a town/city then you will get everything in Oxfordshire plus everything in Bristol.
These examples are of course subject to other matching criteria such as price or floor area etc.
Localities behave in the same way. Each section is treated as an ‘OR’.
Image 8
4.1 Select properties from your match
•
•
Melissa Read P.12
Once you have filled out the location form (which will vary from system to
system depending upon where you have properties) click ‘Save’ and then
click the ‘Match’ button.
The top left hand section of the screen, known as the ‘Quick Search’ area, will
be replaced with a scrolling list of properties which match this applicant’s
requirements. These are grouped into property status
CM13_Enterprise Manual_doc
Support Tel : 08704208348
•
•
•
•
•
Properties shown in red are not available on your website or for emailing.
You can click the links shown to view full information about any property
listed.
You can either click ‘Select all’ or manually pick properties to mail.
If an applicant has specifically requested particular properties, click the left
hand (blue) box. Otherwise tick the right hand (green) box. This will
differentiate the way that the mail merge is logged
Click the red ‘Submit to mailing now’ button. This button cannot be seen until
you select at least one property to send.
4.2 Confirm that the property has not been sent before
• The ‘Quick Search’ area will now be replaced with a summary of the properties that you
have picked. If any of them have already been sent to this applicant then you will be
alerted to this here and these properties will not be ticked.
• Click the red ‘Continue’ button to carry on with the mail merge.
• There is an option to use an ‘End of Day’ mail shot, where all emails and letters are
produced in one go, rather than individually. This stops an applicant from receiving too
many emails on the same day as they will receive one property with multiple properties
if you have loaded a number of properties onto the system.
4.3 The mailmerge summary page
Image 9
•
•
•
From the screen now showing on the
left you can control exactly what will be
sent to whom, the screen is divided up
into 3 sections.
• In Step 1 you can change who the mail
merge will be sent from, review who
your mail merge is going to be sent to
and attach property particulars.
• In Step 2 you can control how your mail
merge will be sent out and exactly what
will be sent. You have the option of
sending by email, creating letters,
generating pages of address labels or
exporting a text file that can be
imported into Word, Excel and other
programs. If you have multiple property
details to send out you also have
options to create a ‘match and batch’ or
a PDF booklet of property details.
• Once you have sent your mail merge,
step 3 allows you to control how it will
be recorded against both the properties
and applicants.
You can find a more detailed description of this screen on page 33.
For more information on mail merges, please see the ‘Mail Shots and CRM’ section of
this manual.
Melissa Read P.13
CM13_Enterprise Manual_doc
Support Tel : 08704208348
5. Properties
5.1 Adding a New Property
As with contacts, you must search for a property before you can add a new one. Check
that the property does not exist already.
Image 10
•
•
•
•
From the main menu, click the ‘Property’ button and the form shown on the left will
show in the ‘Quick Search’ area.
Type in the first line of the address of the property that you want to add into the long
search field shown and click ‘Quick Search’.
Assuming that the property is not already in the system you will see a ‘No properties
found’ notice.
You will now also see the red ‘Add New’ button. Click this button to add the new
property.
You should also use this screen to find the property again. If necessary, use the ‘advanced
property search’ link.
Tip 1 - You can also use this form to find a property from its property reference number
or the job number (prefixed by an ‘N’), which a unique number in the system is allocated
when you enter the property or job onto the system.
Tip 2 - You can also add your own job numbers if required. Please contact support for
further information.
Tip 3 – If you click on the history/clock icon from the main menu then you can see the
last fifty properties that you added or clicked on in the system.
5.2 Adding the address of the property
You will now see the address form shown below. Please fill out the details as necessary
and then click the Save button to complete this form.
Melissa Read P.14
CM13_Enterprise Manual_doc
Support Tel : 08704208348
Image 11
•
•
•
•
•
•
The first letter of each word will capitalise as you move to the next line. You can take
this off temporarily by un-ticking the ‘Capitalise’ box.
The ‘Town’ field is a look up field. Type in the name of the postal town or city and a pop
up list of towns will show. When the correct town is highlighted, press the ‘return’ or
‘enter’ key on your keyboard, or click on the town with your mouse. This town will then
be added to the address. Every postal town in the UK is already in the system. Add a
village to one of the other ‘Address’ fields. All villages belong to a postal town. If the
town is not shown for any reason, (for example if it is an overseas town) then click the
‘Add’ button (your administrator/Caldes may need to make this button available).
Lookup tables are used so that when it comes to matching all location based integrity is
maintained.
If you have the post code lookup system switched on then you will see a question mark
next to the ‘Postcode’ field. You can click this to look up the full address from any UK
postcode. It is important to add the correct postcode as this is what the feeds pick up
when the property is exported to external sites such as ‘EG Property Link’ or ‘Zoopla’.
‘Property Age’ and ‘Tenure’ fields are optional and may not be available on your
system. ‘Tenure’ is a matching field if used.
If you have a virtual tour or online property survey for your property and want to show
this on your website, you should add the URL to the relevant field. Please contact
support for further information.
The information that is loaded onto this page is also the information that populates the
Ebrochure when you come to upload it so you need to be mindful of your ‘Outline
description’.
Melissa Read P.15
CM13_Enterprise Manual_doc
Support Tel : 08704208348
5.3 The property check list
Once you have clicked the save button you will be taken to the property check list page, shown
below.
Image 12
•
•
•
•
•
The property check list is used as a guide as to which areas of the property have yet to
be completed. These areas are to some extent configurable by your
administrator/Caldes.
The page can also be printed as a useful list for taking out of the office or adding to a
file.
All of the areas shown with a yellow exclamation mark need to be completed. You can
either complete them via the property menu buttons along the top or from the links next
to the yellow alert icon. The property information is complete once there are no more
alert icons showing.
Work your way down the list one section at a time by clicking on each link. Once a
section is complete, a green tick will show at the top of the section.
Each time you save a section you will be brought back to this screen. Alternatively, click
on the ‘Check-List’ button at the top to come back to this screen.
5.4 Add the main contact/client for the property
• Click the underlined ‘Client’ link (This link might also be labelled ‘Main Contact’)
• Find the ‘Client’, using the form shown in the ‘Quick Search’ areas on the left. It is
preferable that the client already exists in the system, but if they do not you can click the
red ‘Add New’ button. See the ‘Contacts’ section for further information regarding
adding new contacts.
• Once you have added the client, return to the ‘Check list’
• You should now add any viewing/comments for this property by clicking the link shown.
• Once both of the above are done you will see a green tick against the contact
information section as shown here. To change the main contact, click the ‘Change
Contact’ link now showing and repeat the process.
Melissa Read P.16
CM13_Enterprise Manual_doc
Support Tel : 08704208348
Image 13
5.5 Add the key property and matching information
Some of the key property information may have already been completed when you
completed the address form.
Image 14
•
•
Extra Match Fields - Click the ‘Extra Match Fields’ link. You will then be shown a form
with all of the matching fields that you might require. This area is configurable to suit the
needs of your business. Select the options that apply to this property and then click the
red ‘Save’ button at the bottom of the form to return to the check list. Options include
multiple property types, amenities and localities.
Images - Click the Images link. This will take you to the images upload area. See the
next page for more information about adding images.
5.6 Images
• This is simply a process of uploading an image you have already saved on your
desktop into Caldes.
•
You can also get to the Images page by clicking on the property ‘Images’ menu item
along the top.
•
The first image that you upload will be the master image and will be used as the main
image on your website.
•
The Caldes Enterprise system includes automated image resizing software. Images will
be automatically resized depending upon what they are used for.
Follow the onscreen instructions regarding adding an image
Melissa Read P.17
CM13_Enterprise Manual_doc
Support Tel : 08704208348
Image 15
Tip 1 – You can also sort the images by clicking on the sort button.
Tip 2 - You can replace an image by clicking on the ‘Browse’ button on the same row as
the image that you want to replace to find the image. Click ‘upload’ to add it.
Tip 3 - You can delete images by clicking the Delete button on the same row as the
image that you want to delete.
5.7 Brochures and Floor plans
Caldes Enterprise automatically creates PDF brochures from you text and images. You
may however wish to upload a bespoke PDF instead which you can do following the
same process as uploading an image.
For sales and lettings jobs you will normally want to include a brochure with your
property. We have already shown how you can add a bespoke PDF brochure to the
images section.
However, a PDF on its own is not enough for your website. You also need to add some
basic text and images for your search system or for external websites and automated
portal feeds.
5.7i Creating a PDF brochure from a template
Caldes can create a PDF for you using a template based E-brochure system. EBrochures can also be emailed directly from the system.
The images that you have already uploaded form part of the E-Brochure. Now you need
to add the text. To do this, click on the Brochure text link on the ‘Check List’ form or
click the E-Brochure button at the top of the page.
A pop up window will now appear. If it does not then you may have a pop-up blocker.
Melissa Read P.18
CM13_Enterprise Manual_doc
Support Tel : 08704208348
Please make sure that you allow all pop-ups from this site.
5.7ii E-Brochure
Image 16
The system will automatically fill in relevant fields from the database, but you then have the
option to override how they will be shown in your brochure and on your website.
o Template - Select a brochure template style from here. For example, you can use this
drop down list to switch between how a property will look in a PDF and how the same
property will be shown in your website search results. The same text, or relevant parts
of it, will be used for all template styles. Each template will have been pre-configured by
your administrator/Caldes. For instance one template might be a two sided PDF in A3
format, ready for duplex printing and another might be a set of details on your website in
HTML as 4 pages of A4.
o Edit button - Click this button to edit the page that you have selected. This will provide
you with a form to fill out. Click the red ‘Save’ button to save the form
o Preview button - Click this button to preview the brochure in the style of the template
chosen to the left.
o Page Icon - There will be between 1 and 4 Page icons showing. The above example
has only Page 1. When there is more than one page, click on any page icon to view
that page in Edit Mode or Preview Mode. Note that pages 2, 3 and 4 provide a more
Melissa Read P.19
CM13_Enterprise Manual_doc
Support Tel : 08704208348
flexible layout than page 1.
o Floor plan Icon - Click here to view any attached floor plans in Edit Mode or Preview
Mode. You must have uploaded the floor plan first, in the images upload section.
o Quality - We recommend that you edit PDF brochures in draft quality and print in the
highest quality. However, if you have included high resolution images in your PDF then
you may not be able to download your brochure on the highest setting because of the
size of the file. In this case select a lower quality. You will find that this will still print well
because the image(s) started as a higher resolution image. The more images that you
have in a brochure, the larger the PDF file will be. For websites, the system
automatically uses a medium quality for fast downloads/quality balance.
o Workgroup - Depending upon administration settings, a drop down list of office
workgroups may or may not be available here. Changing the workgroup will
automatically fill out the contact details for that workgroup straight into your brochure.
This will always default to your own workgroup.
o Auto Fill button - Click this button to replace all text already showing with the relevant
information assigned against database fields for this property. This button is
automatically clicked when you first open a new E-Brochure. The mapping used can be
changed by your administrator.
o Save button - Saves the text shown.
o Labels down the left hand side - These labels are predefined by your administrator to
meet your needs for each template.
o Text fields in the middle - Fill out the text for each field up to the maximum number of
characters remaining, as defined by your administrator. In addition fields can be set to
automatically capitalise as you leave each field.
Preview mode
Once you have uploaded the relevant details, you can click on the ‘Preview’ button to see how
your PDF is coming along.
Melissa Read P.20
CM13_Enterprise Manual_doc
Support Tel : 08704208348
Image 17
You can preview your brochures as web pages or as PDF documents.
The technology used in Edit mode is web based HTML format. Caldes has produced behind
the scenes software to convert this to a PDF document on demand.
It is not simply a case of converting the Edit mode information in to a PDF, because the edit
mode information includes borders, backgrounds, layouts and blocks, and you do not want
these on your finished document. Most PDF conversion software converts exactly what you
see and so this would not work.
The Caldes PDF conversion system converts the data in a proportional way. For this reason
there are some limitations. It is possible that text will wrap in a different place in Edit mode and
Preview mode. In addition margins may vary occasionally.
There is a trade off between ease of use and functionality. If you need very accurate PDF
documents, we recommend that you use a professional publishing software program such as
Quark and then upload the finished PDF to the Caldes system. Having said that, you can
expect very professional high quality results from our template system, but there will be some
limitations. For instance you cannot add transparent text over the top of an image in the PDF
document (although you can for an HTML document). If you do use an external product then
you will still have to add enough information for your website and exports.
5.8 Jobs
The Caldes Enterprise system allows you to add multiple jobs to the same property
address. This allows the same property to undergo a number of different job types and
retain a history of jobs over time.
Melissa Read P.21
CM13_Enterprise Manual_doc
Support Tel : 08704208348
For example the first job might be a valuation. This then might be followed by an
investment sale. In time there might also be a rent-review. All of these jobs are held
under the same property address. Each job might contain a number of units or floors.
The first step is therefore to pick the job type that you want to add. The job types will be
specific for your company and can be wide ranging. Caldes will liaise with your system
administrator to ensure that the right jobs are added for you. Please contact support for
further information.
5.8i How to add a new job
Image 18
o Select the new job type that you want to add and then click the red ‘Add New Job’
button.
o You will then be presented with a form that has been tailored to your own requirements.
As there are an infinite number of permutations of this form, (which might vary from job
type to job type,) we have not shown the form here.
o Fill out the form as fully as possible. Please contact support or your systems
administrator if you have any problems.
o In particular it is important to fill out the job status. A job form can include a floor area
breakdown sub-form if required. Please contact support to include a floor area break
down sub-form.
o Click the red ‘Save’ button to complete the job form. You will then be taken back to the
‘Check-list’ page.
o Job information can be used as comparable information later. Optional leasehold and
sales analysis forms can also be used for capturing more detailed information if
required.
o You can get to these by clicking the Jobs button in the top menu bar for the property.
Then click on either Leasehold or Sales Analysis form buttons. This will then bring up a
form which can be filled in. When completing this form, it is important to remember not
to use unusual punctuation such as ‘&’ or ‘:’ as this might bring up an error on the page.
If the information already exists it will show on the property check list and you can click
through to it from there.
Melissa Read P.22
CM13_Enterprise Manual_doc
Support Tel : 08704208348
o These forms then link in to the Transaction analysis report for Leasehold and Sales.
These can be found by going to Reports then at the bottom of that page clicking Other
Reports. This then brings up a list of reports and there you should find TAR Reporting –
Leasehold and TAR Reporting – Sold. Both reports have a number of filters to narrow
down the results. You can either create the report in to a PDF or html based.
o You can change the status of a job at any time and this will then affect your reporting
system. For example, if you sell a property which had previously been let then by
changing the status will then change any report you generate for that property.
o If you delete a job, it cannot be retrieved, so if you no longer need the particular job
information, it is best to archive it. Should you choose to delete a job, you will need a
password from your administrator to do so.
5.8ii How to archive / delete a job
You can do this by simply changing the status of a job
Image 40
In the above image under Work order 123456 simply click on the drop down box as
above and you have an option to archive.
If you have archived a job but wish to retrieve it, at the bottom of your Property Check
List page (see Image 22 on page 25) you will see in red writing ‘Click here to list all jobs’
which, by clicking on it, will then allow you to change the status of any job simply by
clicking on the job you wish to change.
If the job already exists as part of a property record, then do not delete the job but
rather archive it. You only delete jobs added in error. To delete the job, first find the
property to which the job pertains, click on the ‘jobs’ tab to view a list of all jobs related
to that property. Then choose the job you wish to delete and click the ‘delete job’ button.
It will ask you to enter a password which your Administrator may have, else please
Melissa Read P.23
CM13_Enterprise Manual_doc
Support Tel : 08704208348
contact Caldes support
At the end of loading a property, you will have produced a Check List screen which looks like
the following:
Image 22
Melissa Read P.24
CM13_Enterprise Manual_doc
Support Tel : 08704208348
6. Briefcases
There are back-office briefcases for staff and users as well as web-briefcases for
applicants.
6.1 Back-office briefcase
A briefcase is essentially a group of properties that all meet a certain criteria of your
choosing. This gives the ability to have a wide range of uses for briefcases such as
creating a selection of properties that meet someone’s specific requirements or a list of
properties being handled by a specific negotiator.
6.2 How to set up a back-office briefcase
•
Click on ‘Reports’ in bottom left of your screen (irrespective of which screen you are in).
•
Select ‘Create Briefcase’ and the screen below will show.
Image 19
•
See drop down options above which allow you to filter out the kind of briefcase you are
creating. For example, if you want to create a list of all properties that are currently
available for sale you would select job type as ‘For sale’, job status as ‘available’ etc.,
etc
•
Once you have made all your selections, click on the ‘submit’ button and Enterprise will
find all properties that match your requirements and you will have the option of naming
this briefcase.
•
At any one time you can have an active briefcase and all previous briefcases you have
created can be seen. You can also ‘share’ briefcases so that your colleagues can
access them.
Melissa Read P.25
CM13_Enterprise Manual_doc
Support Tel : 08704208348
By clicking on this icon, you can change the briefcase from being ‘hidden’ to other staff
to sharing or vice versa.
By clicking on this icon, you can access this page and see all briefcases.
Melissa Read P.26
CM13_Enterprise Manual_doc
Support Tel : 08704208348
It is also possible to use briefcases to see, for example, how many properties you have that fill
certain criteria as a cross check because you could then use the results as a report. For
example, you may need to know how many active properties are in the system and have a
disposal job within a certain town. The image below shows the screen that appears once you
have created a briefcase having set such parameters.
6.3 Web-briefcases
A web briefcase is like an ordinary briefcase but is for applicants. It holds the properties that
they are interested in one place and you can see the briefcase icon on their record page. If the
icon is red they do not have a briefcase but if they do it is green. As you receive new
properties, by clicking on the ‘match’ button on the property page, your web applicant will have
that property drop into their briefcase if there is a match.
Melissa Read P.27
CM13_Enterprise Manual_doc
Support Tel : 08704208348
7. Activities
Every activity is logged against a property, contact or applicant so you can see at any
one time a current snapshot of the status.
Image 20
The above screen shows that by selecting a property and clicking ‘activities’ along the
top bar, you can see a full history. By clicking on
on the right hand side of the page
you can see the details for that particular activity.
All activities are logged in the back office which then allows you to produce a report on, say, a
particular property or applicant. Simply go to ‘Reports’, click on activities and the following
page will appear:
Image 21
From this, you can select various criteria which you can report on and then generate a very
specific report. Please see the ‘Reports’ section of this manual for further details.
Melissa Read P.28
CM13_Enterprise Manual_doc
Support Tel : 08704208348
8. Tasks
•
•
•
•
•
•
•
•
•
•
•
•
From the main menu, click on the ‘Tasks’ button.
The tasks list will appear in the ‘Quick Search’ area.
To add a new task, select the task type from the drop down list and then click the ‘Add’
button. Then fill out the form shown and click ‘save’. This task will then appear in your
task list when you refresh the task list page (from the Tasks menu).
To view existing tasks, click on the relevant link.
Any new tasks added in the last 2 hours will be shown in a separate section called ‘Just
in’.
Tasks are grouped by priority and by activity type. All tasks will appear in both groups.
You can change the time period over which tasks are filtered, using the filter drop down
box. The ‘Up to today (default)’ option is the best one to choose as this will show you all
tasks that are due or overdue, but ignore ones in the future that are not yet due.
Depending upon security options, you will also be able to view tasks for other users and
workgroups.
The ‘Mail merges’ link shows you all mail merges created through the reports system
and through matching which have not yet been completed fully.
The ‘Invoicing’ link is an optional module and provides access to the invoicing system. If
you are using invoicing then you can also get to it from the same icon in the main menu
in the tasks row.
The ‘Outlook Synchronise’ link takes you to a new page where you can download and
implement the Outlook synchronisation software.
The ‘Task Search’ link provides you with the facility to search for specific tasks.
8.1 The Task List
By clicking on ‘My workgroup’, task lists are shown in a similar format to the screen shot
below. The sort order can be changed by clicking on the small pyramid arrows at the top
of each section.
Image 23
•
Each task is made up of a Date and Time, the activity Type, any contact and company
attached to the task, the staff member who will action the task and any property
Melissa Read P.29
CM13_Enterprise Manual_doc
Support Tel : 08704208348
•
•
•
•
•
•
•
•
•
attached to the task.
Tasks can be colour coded by your administrator or left neutral.
Click on the date and time and a pop up calendar will allow you to change the date
followed by the time.
Click on the contact name to go to that contact’s record.
Click on the staff name to give the task to someone else.
Click on the property name to go to that property record.
Click in the white text area to add to/update the text. A pop up form will allow you to add
text which will be automatically date stamped when it is saved.
To complete tasks, click in the small check box for each row that you want to complete.
Then click the small OK button in the top left hand corner. Completed tasks are not
deleted. They remain stored against the contact or property as history. If no property or
contact is attached then you can still find all of your old tasks from the ‘Task search’ link
as described on the last page.
You can change the priority of a task by clicking on the small + button to the right of the
check box. Select a priority to change to from the drop down list to complete the
change.
If someone adds in a new task for you then you will get a pop up message telling you,
even if you are using other software at the time. You must be logged in for this to
happen. You can also ask your administrator to tell the software to email you about new
items added to the software when you are not logged in. Only specific activity types will
be emailed.
Melissa Read P.30
CM13_Enterprise Manual_doc
Support Tel : 08704208348
9. Letters
9.1 Standard letters
• Before you can create standard letters, including blank letters, your administrator will
need to set up your letter templates.
• Once this has been done, you can create a letter by clicking on ‘Tasks’, the ‘add’ icon
after having selected ‘letter’ from the drop down list:
You can also create a letter from the ‘activity’ section of a property or contact in the
same way:
Image 24
Initially you will be presented with a form, similar to the one above. If the letter is to a
contact about a property then you initially need to fill out the two orange fields shown
above. To do this, click the ‘Add’ button and find the property or the contact.
A fast way to do this is to type the property name or the contact name into the relevant
Melissa Read P.31
CM13_Enterprise Manual_doc
Support Tel : 08704208348
orange field and a pick list will pop up on the right hand side of your screen. Click on the
contact to add them.
Text stored in templates can be used for emails as well as letters.
Once you have filled out any relevant information to the form, select a template from the
list. You will then see a new button titled ‘Preview letter’. Click this button to view the
letter in a pop up window. You can see the saved letter at any time in the future by
clicking this button.
9.2 Editing and printing your letter
The Caldes letter writing system produces letters that are saved back to the server (in
MS Word format) so that they can be recalled at any time. The tool offers the key
elements available in MS Word, whilst remaining fast over the Internet or a wide area
network.
If you cannot see this screen there may be two reasons. The first is that you have a
pop-up blocker switched on. Please ensure that you turn it off for this site. The second
is that you need to install a ‘Plug-in’ on your computer to use this letter writing tool for
the first time. This should install automatically, but please contact support if it does not.
Templates can automatically pull information and create data driven paragraphs from
the database based upon a property price etc.
Image 25
Melissa Read P.32
CM13_Enterprise Manual_doc
Support Tel : 08704208348
10.Mail Shots and CRM (Contact Relationship Management)
Introduction
Caldes Enterprise allows you to relate contacts to other contacts, properties and staff. It also
allows you to define contact types, contact categories and applicant requirements. By
providing this functionality in a single centralised database, you have a very powerful tool for
targeting clients and customers or for reporting on relationships and activity.
Most of the time, this functionality will be used for mail shots. For instance you might want to
send a mail shot to all contacts in London, who have not been sent a mail shot this year and
who are interested in development opportunities.
The mail shot tool allows you to precisely target different contacts across the entire business
and send them emails or letters.
Emails need not be bland and single dimensional. Not only can you include HTML formatting,
but you can also include dynamic links to information, such as a portfolio of properties. When a
customer clicks on these links, you can record this information. This serves a number of
purposes, including the ability to sift out live and dead leads based upon interest. It also acts
as proof of introduction.
Before you can use the mail shot system you will need to ensure that all staff add the correct
contact types and categories to each new contact that they add to the system. This can be
enforced via mandatory field options in administration.
10.1 Producing a mail shot
From the main menu, click on ‘Reports’ then ‘Contact List Mail Shot’.
Whilst it is possible to save and re-use mail shots, most of the time you will just click the
red ‘Create Mail shot’ button and define a new mail shot from the next screen.
From the next screen you can define your mail shot, the screen is divided up into
sections.
Melissa Read P.33
CM13_Enterprise Manual_doc
Support Tel : 08704208348
Image 26
Step 1: Choose your mail merge options:
Contact Search
This allows you to drill down into detail about who you would like to include in your mail shot
thus giving you the option to make it as wide ranging or as detailed as you require.
If you wanted to send a mail merge to all applicants you can simply click on ‘applicant’ in the
contact type section.
If you wanted to narrow your selection down further to applicants who live in Birmingham you
then choose ‘Birmingham’ in the town box and so on.
Different boxes on this screen work in different ways because you can either use the arrows to
scroll through the selections or you can click on the ‘+’ button to make a drop down list appear.
To deselect an option, double click on it and it will disappear.
On the right hand side of the screen you can make further selections such as archived
contacts, contacts with or without an email address etc.
If at any time you have become confused with your selection, simply click the purple ‘Reset all
Fields’ box at the top of the page.
Tips:
1. You do not have to select something in every category on the screen. Selecting more
parameters will refine your results so the fewer fields are selected, the smaller the mail
shot.
Melissa Read P.34
CM13_Enterprise Manual_doc
Support Tel : 08704208348
2. You can select more than one item in a list by holding down ‘Ctrl’ on your keyboard
whilst clicking.
3. If you select 2 or more items in one box it will find contacts that match either one or
other. i.e. if you select the contact types Applicant and Estate Agent, it will find contacts
who are Applicants, contacts who are Estate Agents as well as contacts who are both
Applicants and Estate Agents
4. OPT OUT: If you have a client who wants to opt out of receiving ALL emails, you can
tick the box next to their email address on their contact screen (see below).
5. MAILING LIST: If, however, you want to email certain clients with specific email shots
(e.g newsletters), you can create a mailing list by ticking ‘Mailing List?’ on their contact
screen.
Then, when you wish to send the mailmerge, you need to tick the ‘On Mailing List’ box
on the mailmerge screen (see below) to only find contacts on the mailing list. The
function of the mailing list boxes is to allow you to create a bespoke list of clients.
Melissa Read P.35
CM13_Enterprise Manual_doc
Support Tel : 08704208348
Options
Image 27
•
•
•
Option 1 Exclude by activity allows you to automatically exclude contacts from the mail
merge based on their activity history. You could, for example, exclude contacts that
have had 2 mail merge activities within the last week.
Option 2 Include by activity allows you to only include contacts based on their activity
history. You could use this to mail merge just contacts that have been added to the
system within the last 3 months. You can use the property reference box to specify a
certain property so only activities relating to that property are included. An example of
this is to alert contacts who have booked a viewing on a particular property in the past
that it is back on the market.
Option 3 allows you to only find applicants whose maximum price range is between the
lower and upper figure and allows you to only find applicants whose floor/land area
requirements are between certain values. It also helps define the type of property the
contact is looking for.
Melissa Read P.36
CM13_Enterprise Manual_doc
Support Tel : 08704208348
Step 2: Select a mail merge type
Image 28
Before moving onto Step 2, you can use the ‘Quick result list’ button to see how many
results from your selection you will get. This gives you a snapshot of the size of the mail
shot as well as other factors such as how many have emails addresses.
Step 2 will move you onto the next stage of the mail merge. Short Format Mailshot and
Long Format Mailshot both allow you to review the contacts included in the merge. The
short format mailshot contains only very basic information about each contact. The long
format mailshot contain more detailed information such as contact details and
requirements where applicable but will take longer to load. Therefore it is suggested
that you use short format wherever possible and the long format when you need to see
more information to select the correct people for the merge.
10.2 Mail Merge Summary Screen
Once you have pressed either Long Format or Short Format mailshot, you are given a
list of the matching contacts to review. By default they all have ticks next to their name.
You can untick anyone you would like to remove from the mailshot. If you are using the
long format mailshot, you can also press ‘refresh long format view’ which will remove
the unticked contacts from the list but allow you to continue reviewing.
Melissa Read P.37
CM13_Enterprise Manual_doc
Support Tel : 08704208348
Image 28
The mail merge summary screen is displayed above. This page contains basic information
about the mail merge such as how many contacts are included as well as allowing you to
control how to send out the mail merge.
The top section contains details of who created the mail merge and when, how many contacts
are included and then breaks that figure down into how many can be emailed and how many
cannot. It also counts how many properties are attached to the mail merge as well as
attachments that will be sent with the email.
Step 1 allows you to change from whom the mailshot will be sent. Review (short) and Review
(long) will return you to the long / short format screen where you can review the contacts in the
mailshot and add or remove people as required. You can also attach properties so that their
details are sent out within the email / letter. The property will need to have a completed
brochure as well as be ticked to use on website.
Step 2 allows you to control how the mail merge is sent out. By clicking on:
‘E-Mailshot’: you can send an email to contacts with an email address and create letters to
print out and post.
‘Merge Letter’: you can create mailmerges for printing. Letters can either be created for all
contacts or just those without an email address.
‘Labels’: you also have the option to print labels ready to stick onto envelopes
Melissa Read P.38
CM13_Enterprise Manual_doc
Support Tel : 08704208348
‘Export File’: you have the option to export all of the contact details into a text file that can be
opened in Word or Excel.
Step 3 is the last thing to do after you have sent all emails and created all letters and labels
that you require. When you send the mailshot by email, it will be logged in a
‘mailmergeEmailSent’ activity. You can choose what activity letters will be logged as from the
list provided. You can also create follow-up activities for the future to remind you to contact the
recipients for feedback. To do this you must select who you want to follow up, choose a date
and also an activity for the reminder.
Tips:
1. If your mailshot is sent to more than 1500 contacts, it will split into batches to ensure the
page does not time out. You might have to return to the mail merge screen to send
more batches: a message will pop up on the screen instructing you to do this and you
simply click the envelope on the ‘Reports’ button to get back to that page.
2. Once on the mail merge summary screen you can leave your mail merge and return to
it at any time by clicking Reports > Mail Merges and selecting the corresponding mail
merge from the list.
3. If your mail shot seems to abort before it has finished, this is normally an indication of a
corrupt email address. Go back to the mailmerge and resend it (it will continue to send
from where it left off) and at the end of the mailmerge, you will receive a summary which
should indicate the corrupt email address.
4. If you are sending a mailmerge with a lot of recipients the process can be slowed by
other office users receiving emails etc.
Melissa Read P.39
CM13_Enterprise Manual_doc
Support Tel : 08704208348
10.3 Sending Mail Merge Emails
The screen below right is what will appear if you press the ‘e-mailshot’ button. At the top
is a summary of how many contacts and properties will be included in the e-mailshot.
When your mailshot is sent, the recipients will not be able to see the other recipients of
the email and will appear as if only sent to them.
To the right of the sender’s details is a box that allows you to select a template to use
for the text of the email. If you would like additional templates added to the list, please
speak to your administrator.
When you choose a template, the text will appear in the main box which you can then
go on to edit as suits your requirements. The text can include mail merge fields that are
within double square brackets and these will pull through information from the database
that may be specific to each applicant. There are other fields that can be used, please
contact Caldes Support.
When you are ready to send
your mailshot, press the ‘send emailshot’ button and the emails
will begin sending.
There are also buttons that allow
you to save the mailshot and
come back to it at a later time.
The ‘preview email’ button will
show you on screen what the
email will look like and the ‘Send
Test email’ button will send an
exact copy to the sender’s email
address.
If you have made any changes to
the email, you must save this
before you leave the screen.
The last option on this page
enables you to show all your
recipients of the email the other recipients. This is useful if you are emailing a number of
people in the same company so that they are aware they are not the sole recipient.
Generally you will not need to select this option.
Melissa Read P.40
CM13_Enterprise Manual_doc
Support Tel : 08704208348
10.4 Creating Mail Merge Letters for Printing
Before pressing the ‘merge letter’ button on the Mail Merge Summary page, you must
first decide if you wish to create letters for all contacts or just those without an email
address. If you have already emailed your mailshot to those people with email
addresses, you will probably want to tick the box marked ‘exclude contacts with email
addresses from the letter mail merge’. If you want to generate letters to all recipients
then ensure this box is unticked.
Upon pressing the button you are given three options which are explained in detail further
down the page;
1. ‘Simple mail merge to multiple contacts’,
2. ‘Mail merge from a word template to multiple contacts’,
3. ‘Mail merge a single property from a word template’.
In most cases you will only need to select one of these; the mail merge from a word
template. This allows you to select from a list of pre defined templates that have been
created in Word and then uploaded to the system. If you have any templates you would like
uploading, please contact Caldes.
Upon selecting this option, you are given a menu with a list of all uploaded templates in the
system. You can then choose your desired template and press ‘create letters’ and your
letters will be generated.
If you have not done this on this particular PC before, you may be asked to install a small
piece of software at this point, if you have any problems doing so please contact Caldes
Support.
Image 29
Like the letter to the left, yours should appear
correctly filled in with everyone’s names and
addresses and other relevant details filled in
automatically, unless you want to make any
changes to any of the letters, all you need to
do is print them out and send them. Once
you have closed the letters, you will return to
the mail merge summary screen where you
can print out envelope labels if required.
Melissa Read P.41
CM13_Enterprise Manual_doc
Support Tel : 08704208348
Once you have created all of your letters and sent your email, the final step is to complete the
mailshot. Completing the mailshot means that the mailshot is closed and cannot be used
again. This is the time when the selected activities are applied to the relevant contacts and
properties that you have mailed.
When you send emails, the activities are logged as they send. This means that if for any
reason there is a problem and the mail merge stops sending, you can see exactly where it
stopped and pick it up from where it left off. The letters on the other hand do not log until you
complete the mail merge. This is in case you print the letters but then decide not to send them,
or you only ever intended the email contacts with an email address and did not mean to
include people without email addresses. If you do not want to log the letter activities, press the
delete button and the mailshot will be closed, only activities relating to any emails sent will be
logged.
You can log follow up activities for the future to remind you to follow up the mail merge if
required. You can select whether to log follow up activities for emails, letters or both. You can
choose the activity type for the follow up, the name of the staff member to log them against
and also a deadline date. Upon completion, these activities will be logged and will sit in the
staff member’s task list until they are acted upon. For more information on the task list and
how to use it, see the Tasks section of this manual.
Melissa Read P.42
CM13_Enterprise Manual_doc
Support Tel : 08704208348
11. Reports
Reports are broken down into three areas: properties, contacts and other. It is worth
noting that there follows a description of every report available on the system and the
reports appropriate for your needs will be ‘switched on’ for your use so not all of the
following will be available for you.
Image 30
11.1 Property
Some reports require that you find the property to report on first. Find the property in the
usual way and then it will be kept in memory so that you can run the report. The name
of the current property is shown in red.
Reports for Current Property:
11.1i Property Marketing Report
You can:
return details of applicants that have activities logged against properties in the
system,
use the search filters on this page to refine the results that you wish to return,
remove results from the report and re-run it to tailor your results as you require.
Melissa Read P.43
CM13_Enterprise Manual_doc
Support Tel : 08704208348
Image 31
Purpose of the report:
• This report is a Client/Property Marketing Report that is created dynamically from data
entered against the Property. The report can be run for a single property or a group of
properties (portfolio). It reports all applicants that have a requirement for the property or
who have had some activity logged against the Job.
• The user can decide which activities are to be included on the report.
• Which columns will be displayed on the report and between which dates the report will
be run. Based on either the date the requirement was added or the date the activity
was logged.
• When the report is displayed on screen the user has the ability to edit it before it is
printed.
• This report also holds a library of logos that the user can update. This will allow a logo
to be displayed on the report, such as the client logo or your own logo. Please speak to
your administrator to have a new logo added.
• The report can be exported into Word and Excel if required.
11.1ii Activities
Generate viewing reports etc. from here. This report produces a list with dates, times
and comments as configured against each activity in administration.
Melissa Read P.44
CM13_Enterprise Manual_doc
Support Tel : 08704208348
Purpose of report:
o The purpose of this report is to produce a text based report on the activities held against
a property.
o The report allows the user to select the activities to be included in the report and then
save that selection under a report name.
o The user can also use the right hand boxes to prioritise activities by giving it a number.
For example, if the main priority Mailings, the user would select ‘Mailings’ then put the
number ‘1’ to the right.
o The columns shown in the report are based on the set-up for each activity and can be
changed if required.
o The report can
be printed
from Caldes or
exported into
Excel or Word
for
enhancement
if required
Image 32
11.1iii Local Information and Comparables
A helpful tool that provides links to third party websites that provide information on
property comparables, valuations, maps, local information, environmental, titles, plans
and rates and local professionals.
Reports for All Properties:
11.1iv Create Briefcase
This report allows you to create one or more containers or briefcases to hold properties
Melissa Read P.45
CM13_Enterprise Manual_doc
Support Tel : 08704208348
in. Once you have created a briefcase you can quickly get to it again from the main
menu, using these icons:
Briefcases are an ideal way to quickly see properties under offer or of a certain property
type.
11.1v List Briefcases
Image 33
The page explains both how to create a briefcase and what a briefcase would be used
for. The ‘?!’ icon at the top right hand corner of the page will link the user to Caldes FAQ
page if they have any further queries regarding briefcases or you can turn to the
‘Briefcases’ section of this manual for further information.
11.1vi Leasehold Transactional Analysis Report (LAR) and Sales Transactional
Analysis Report (TAR)
There are a number of possible uses for this report depending on what you are
searching on.
Professional Staff might use it to find Rent Reviews, Lease Expiry’s, Break Dates that
are coming up, or to filter the above by Client.
Agency might use the report for comparable data based on floor space, property type
and town.
The report could produce automated reminders for certain workgroups, therefore
ensuring that no Rent Review goes un-noticed.
Melissa Read P.46
CM13_Enterprise Manual_doc
Support Tel : 08704208348
The report can be run based on a number of different criteria and once produced can be
sorted in date or alphabetical order.
Each Transaction Analysis record can be viewed in its entirety and printed for
comparable purposed whilst the report is on screen. The report can be exported to
Excel and Word if required.
11.1vii Property Exports
You can see which properties have been exported to via the various feeds that have
been set up.
11.2 Contacts
Some reports require that you select a contact first. Find the contact in the usual way
and then they will be kept in memory whilst you run the report. The name of the current
contact is shown in red in Image 30.
11.2i Contact activities
Select specific or all activities and then report on them between two dates for the
selected contact. This report produces a list with dates, times and comments as
configured against each activity in administration. e.g. show me all the viewings that this
contact has had.
11.2ii Local Information and Comparables
A helpful tool that picks up the postcode of your contact and provides links to third party
websites that provide information in the client’s local area on property comparables,
valuations, maps, local information, environmental, titles, plans and rates and local
professionals.
11.2iii Company activities
This report produces the same report as the contact activities report, but for everyone at
the same branch. This report produces a list with dates, times and comments as
configured against each activity in administration. E.g. show me all the viewings done
by anyone at the same company branch as the contact that I have selected.
11.2iv Contact list mail shot
This is covered in the previous section in full; see section 10 ‘Mailshots and CRM
Management’.
Melissa Read P.47
CM13_Enterprise Manual_doc
Support Tel : 08704208348
11.2v Multiple contact activity report
This report will find all contacts that meet the search criteria that you select and show
their contact details along with all activity and history that is relevant. To decide which
activities are relevant, there is a link in the reports page. This report produces a list with
dates, times and comments as configured against each activity in administration. E.g.
show me all the people that have had viewings between two dates and tell me their
requirements and which show which properties they have viewed in a single report.
Image 34
Melissa Read P.48
CM13_Enterprise Manual_doc
Support Tel : 08704208348
11.3 Other Reports
11.3i Work in progress report
As below, shows by contact their work in progress.
Image 35
11.3ii Workgroup activity report
This report allows you to search for all or individual activities by workgroups or staff,
between two. This report produces a list with dates, times and comments as configured
against each activity in administration.
Image 36
’
11.3iii Workgroup activity chart
As above, this produces an easy to read graphical chart of activity within your business.
Results can be broken down into weeks, months, quarters, bi-annual and annual
columns. E.g. Show me all the viewings and valuations between two dates for the
London branch.
Melissa Read P.49
CM13_Enterprise Manual_doc
Support Tel : 08704208348
11.3v Non-activity report:
Image 37
As explained in the above image, this shows contacts that have had not any activities between
dates that you can select, and will then produce a mailshot for those contacts.
Melissa Read P.50
CM13_Enterprise Manual_doc
Support Tel : 08704208348
12.Diary and Calendar
The Calendar is always shown on the home page in the ‘Quick Search’ area, when you
first log into the Enterprise system. You can also view your diary by clicking on the
‘Calendar’ button in the main menu.
12.1 Using the diary
• The current day will always be highlighted in red.
• Select the view style that you want, by clicking on one of the
view icons above the calendar. The background behind the
icon will turn dark blue. There are 3 standard views: list view,
single day view and 7 day view. If you have the time
management module then you will have the additional time
management icon showing too.
• Click on the day that you want to view the diary for.
• The Calendar will stay on the left, and your diary will be
shown in the view format that you have chosen on the right hand side of the screen.
12.2 Summary of views and functionality
• List View - The list view shows all the activities for that day in a single list, in time order
with the earliest in the day at the top. This is useful for printing out if you have
overlapping appointments.
• One Day View - This shows your diary in wide format with each item blocked out during
the time that is taken up.
• Seven Day View - This view is similar to the one day view, but with all the days of the
week showing.
12.3 Icons
Click this icon to jump to another day of the week.
Click this icon to print the current page.
Click this icon to toggle between seeing just your diary and seeing everyone else’s
diaries in the same view (multi-user diary view).
Click this icon to select which diaries you want to be able to view whilst in multi-user
diary view.
Diary items can be colour coded by your administrator.
12.4 Adding to your diary
Whenever you add a task with a date and time it will appear in your diary regardless of
where you add it in the system. However, the best way to avoid conflicts is to use the
diary/calendar system.
Melissa Read P.51
CM13_Enterprise Manual_doc
Support Tel : 08704208348
Image 38
1. First select the view and day that you want to add to from the calendar. You will then
see the diary on the right, similar to that shown here.
2. Double click on the start time of your appointment.
3. Double click on the end time of your appointment.
4. A pop up will then display.
You can also click on an existing item in your diary from here to view further details or edit
that appointment.
A pop up reminder will tell you when an appointment is coming due, so long as you are
logged into the software. This will show in front of any other software that you are using.
12.5 Appointment details
When you add a new appointment to the diary, the following new form will show in the
aforementioned pop up window:
Image 39
Melissa Read P.52
CM13_Enterprise Manual_doc
Support Tel : 08704208348
•
•
•
•
•
•
•
The date and time will already be set but it can also be changed here.
You can also change the reminder default.
Select the activity type, such as a viewing or meeting. The selection has been
previously determined by your administrator, but you could add in other activities, such
as a valuation.
Tick the staff who will attend the meeting. Only those in your ‘Staff Short List’ will be
shown. If you want to add more staff, click the green + button.
To attach a non staff contact to the meeting, click the ‘Add’ button in the contact section
and find the contact in the system. This will attach them to the appointment and register
it in their record too. (The contact shown here has a ‘Change’ button because they have
already been added).
To attach a property to the meeting click the ‘Add’ button in the property section and
find the property.
Fill out any comments regarding the meeting.
Melissa Read P.53
CM13_Enterprise Manual_doc
Support Tel : 08704208348
13 Administrator
In order to make full use of the adaptability of the Enterprise system, Caldes appoints a
member of your team to be the Enterprise ‘Administrator’. This gives that one person the
ability to make changes to the programming which allows it to becom bespoke for individual
company’s needs. The administrator can do such things as add extra localities and
templates to your system. We have created ‘Caldes Mini Manual: Administrator’ to explain
further.
Melissa Read P.54
CM13_Enterprise Manual_doc
Support Tel : 08704208348
14. Archiving
It often falls to the Administrator to do archiving or deleting as there is some information
that is sensitive and should not be deleted. However, there are a few areas that each user
can do:
14.1 Archiving a job
You can do this by simply changing the status of a job
Image 40
In the above image under Work order 123456 simply click on the drop down box as above
and you have an option to archive.
If you have archived a job but wish to retrieve it, at the bottom of your Property Check List
page (see Image ? on page 23) you will see in red writing ‘Click here to list all jobs’ which
will then allow you to change the status of any job simply by clicking on the job you wish to
change.
14.2 Archiving a Member of Staff
If you archive a member of staff you also run the risk of archiving all jobs, contacts, etc
associated with that person. For this reason, archiving a member of staff is something only
your administrator should do and this process is explained in the ‘Caldes Mini Manual ;
Administrator’.
Melissa Read P.55
CM13_Enterprise Manual_doc
Support Tel : 08704208348
15 Deleting
You must always remember that once something is deleted on Enterprise it cannot be
retrieved. So if you are ever in doubt, please archive rather than delete.
15.1 Deleting a Property
You should only ever need to delete a property it has been added in error, possibly as a
duplication. To delete a property, click on the ‘jobs’ tab of the relevant property then click
on the ‘delete property’ button and follow the on-screen instructions. Please also ensure
that any jobs associated with a property are not active as they may still show up in matches
and on websites despite the property being deleted.
15.2 Deleting a Job
If the job already exists as part of a property record, then do not delete the job but rather
archive it. You only delete jobs added in error. To delete the job, first find the property to
which the job pertains, click on the ‘jobs’ tab to view a list of all jobs related to that property.
Then choose the job you wish to delete and click the ‘delete job’ button. It will ask you to
enter a password which your Administrator may have, else please contact Caldes support.
15.3 Deleting a Contact
You cannot delete a contact but you can archive them instead. Go to their contact details
and on the right hand side of the screen click on the icon
contact.
. This will archive that
15.4 Deleting an Activity
First go to the relevant property or contact that the activity is logged against. Click on the
‘activity’ tab and locate the activity. Next tick the box next to the activity and click ‘delete
selected activities’.
Melissa Read P.56
CM13_Enterprise Manual_doc
Support Tel : 08704208348
16. Appendix
Standard Features
Fully configurable and customisation option
Web based, including full hosting and upgrades
Desktop / Office network option (There is a setup cost for this and you will need to buy all 3rd party
licenses. Only realistic for medium to large companies.)
Estate Agency Version
Commercial Agency Version
Overseas Agency Version
Easy to use
Multiple jobs per property (e.g. sale, valuation, comparable)
Multiple property types per property (important for cross matching with applicants)
Mandatory information variable by job type or status
Applicant matching (with multiple requirements and multiple property types)
Multiple images per property
Multiple floorplans per property
Maps
Reports
Template driven PDF brochure to your own designs
(Note that there is a one-off admin charge to create these, typically £75 a template depending upon
design. Please supply original artwork as a photoshop file, jpeg file or high quality PDF. We can recreate
from an existing scanned brochure, or develop a new one but these will be more expensive.)
Upload externally created PDF brochures
Contact management and CRM
Mass mailshots by email (Personalised, unlimited volume, automatically batched, links to PDFs etc.)
Personalised HTML marketing email merges with embedded links.
Mailshots by post
Standard letters template creation
Office diary
Standard and graphical reports
Full telephone and email support
Regular upgrades
360 Virtual tours
PDF booklet property lists
Slide show
Applicant rating
Spell checker
Advanced searching
EPC / HIPS support
Outlook synchronisation
Multiple workgroup security levels
Automated archiving
Work in progress
Money Laundering Check
Professional work, rent reviews, lease renewals, breaks, leasehold analysis
Comparables
Melissa Read P.57
CM13_Enterprise Manual_doc
Support Tel : 08704208348
Fully configurable and customisation options
Additional Modules
Exports to all major portals
Mobile version.
Version specifically designed for Blackberries and IPhones. Access your data whilst out of the office.
SMS /MMS text messaging options
Overseas / Multi-currency
Post code lookup
Automated background applicant matching and emailing
Process management and workflow module
Document management module
Time management module
Invoicing and billing module, with export to accounts systems
Marketing costs, budgets and recoverables module
Online payments (e.g. Paypal, Worldpay)
Secure Socket Layers (SSL)
Website Integration
Integrate property searches with your existing website
Bespoke website development
Integrate applicant feedback and registration forms
Global maps integration
Full website content management system
Track hits to your website
Melissa Read P.58
CM13_Enterprise Manual_doc
Support Tel : 08704208348