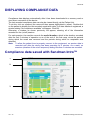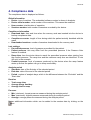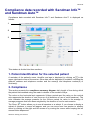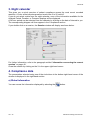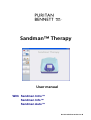
1
Sandman™ Therapy
User manual
With Sandman Intro™
Sandman Info™
Sandman Auto™
Ref. M-151DFU00-60 Version B
Version B
List of revisions to the
Sandman™ Therapy
user manual with
Sandman Intro™, Sandman Info™ and Sandman Auto™
The following pages are included in the Sandman™ Therapy user manual
Ref. M-151DFU00-60 Version B.
Current pages
Version
Cover
B
List of revisions
B
Table of Contents
B
1 – 50
B
Glossary
B
Reference or version
Description
Date
Ref. M-151DFU00-60 Version A.
Creation of the software manual for use
with Sandman Intro™
(software version 1.0)
April 2007
Ref. M-151DFU00-60 Version B
Modification of the manual: addition of
usage with Sandman Info™ et Sandman
Auto™ devices
(software version 1.1)
March 2008
Sandman™ is a brand owned by Puritan Bennett Inc.
© 2007 – 2008 Puritan Bennett Inc.
All rights reserved.
US – ii
Sandman Therapy user manual user manual
Version B
Table of Contents
INTRODUCTION .................................................................................................................................................................1
SOFTWARE DESCRIPTION ......................................................................................................................................................1
INSTRUCTIONS FOR USE ........................................................................................................................................................2
STANDARD EQUIPMENT ........................................................................................................................................................3
LAUNCHING THE PROGRAMME...................................................................................................................................4
THE WELCOME SCREEN ........................................................................................................................................................4
SOFTWARE PROPERTIES ........................................................................................................................................................5
SOFTWARE CONFIGURATION ................................................................................................................................................5
1. Selecting a Language .............................................................................................................................................6
2. Configuring the serial port .....................................................................................................................................6
3. Choosing the units of size and weight ....................................................................................................................6
4. Choosing a pressure unit........................................................................................................................................7
5. Choosing analysis criteria .....................................................................................................................................7
ARCHIVING ..........................................................................................................................................................................7
PATIENT FILES COPY UTILITY..............................................................................................................................................8
1. Description .............................................................................................................................................................8
2. Use .........................................................................................................................................................................8
PATIENT MANAGEMENT ................................................................................................................................................9
DESCRIPTION .......................................................................................................................................................................9
1. Patient List .............................................................................................................................................................9
2. Patient Sort ............................................................................................................................................................9
3. Patient Search ........................................................................................................................................................9
PATIENT INFORMATION ......................................................................................................................................................10
1. Displaying information ........................................................................................................................................10
2. Changing information ..........................................................................................................................................10
3. Treatment history .................................................................................................................................................10
4. Creating a patient ................................................................................................................................................11
5. Deleting a patient .................................................................................................................................................11
DISPLAYING COMPLIANCE DATA .............................................................................................................................12
COMPLIANCE DATA SAVED WITH SANDMAN INTRO™ .......................................................................................................12
1. Patient identification for the selected patient .......................................................................................................13
2. Compliance ..........................................................................................................................................................13
3. Night calendar......................................................................................................................................................13
4. Compliance data ..................................................................................................................................................14
COMPLIANCE DATA RECORDED WITH SANDMAN INFO™ AND SANDMAN AUTO™ ............................................................15
1. Patient identification for the selected patient .......................................................................................................15
2. Compliance ..........................................................................................................................................................15
3. Night calendar......................................................................................................................................................16
4. Compliance data ..................................................................................................................................................16
EXPORTING AND PRINTING REPORTS ..................................................................................................................................26
USING THE ASCII EXPORT FEATURE ..................................................................................................................................28
1. Launching ASCII export .......................................................................................................................................28
2. File structure ........................................................................................................................................................29
USING A MEMORY CARD ..............................................................................................................................................31
CONFIGURING THE DEVICE ........................................................................................................................................32
CONNECTING TO THE DEVICE .............................................................................................................................................32
THE CONNECTION SCREEN ..................................................................................................................................................32
1. Device status ........................................................................................................................................................33
2. Displayed information ..........................................................................................................................................33
Sandman Therapy user manual
US – iii
Version B
3.
4.
Device settings .....................................................................................................................................................34
Other functionalities.............................................................................................................................................34
CHECKING SERIAL PORT CONFIGURATION ..........................................................................................................................34
DOWNLOADING DATA ........................................................................................................................................................35
ACCESSING DEVICE SETTINGS ............................................................................................................................................36
1. Patient reference ..................................................................................................................................................36
2. Patient information ..............................................................................................................................................36
3. Customer number .................................................................................................................................................37
4. User configuration ...............................................................................................................................................37
5. Date and time .......................................................................................................................................................39
6. Settings .................................................................................................................................................................40
OTHER FUNCTIONALITIES ...................................................................................................................................................46
1. Information concerning the current session .........................................................................................................46
2. Data for all the sessions .......................................................................................................................................48
GLOSSARY .........................................................................................................................................................................49
US – iv
Sandman Therapy user manual
Version B
Manufacturer
Mallinckrodt Développement France
10, allée Pelletier-Doisy
54600 Villers-lès-Nancy
France
Tel. +33.3.83.44.85.00
Service representatives
USA
Covidien
6135 Gunbarrel Ave.
Boulder, CO 80301-3214
Customer Service: 1.800.635.5267
Technical Support: 1.800.255.6774
Solv-IT Center Knowledge Base at www.puritanbennett.com
Sandman Therapy user manual
US – v
Page intentionally left blank
US – vi
Sandman Therapy user manual
Version B
INTRODUCTION
Software description
Sandman™ Therapy is a software product that can be used with Puritan Bennett Sandman
CPAP series devices designed for the treatment of patients who suffer from Obstructive
Sleep Apnea Syndrome (OSAS).
CAUTION
Federal (U.S.A.) law restricts the Sandman CPAP devices to sale
by or on the order of a physician.
The software allows compliance data recorded on the devices to be configured and output
for analysis and storage, and simple reports (in formats such as PDF and ASCII) to be
generated for use by the Clinician and Home Care Provider.
CAUTION
Sandman™ Therapy software is only a tool to aid compliance data analysis and under no
circumstances does it provide an automated diagnosis.
Before you use it with the Sandman Intro™, Sandman Info™ and Sandman Auto™ devices,
it is essential that you understand how the Sandman™ Therapy software operates. To that
end, we recommend that you read this user manual carefully. If you have any further
questions concerning the use of this software, contact one of the technical agents whose
contact information is shown at the front of this manual.
Note:
User manuals for the Sandman™ Therapy software are provided in PDF files on
the software installation CD-ROM. However, paper copies of the manuals may be
obtained upon request.
All information contained in this manual is valid for use of the Sandman™ Therapy software
with the Sandman Intro™, Sandman Info™ and Sandman Auto™ devices from the Sandman
CPAP series range unless otherwise stated.
When the software is launched, it automatically recognizes the Sandman CPAP device to
which it is connected.
Sandman™ Therapy is user-friendly, allowing the user by means of buttons and icons to:
• record and view compliance and pressure data saved in the device (145 ON/OFF
sessions for Sandman Intro™ and approximately 150 8-hour sessions for Sandman
Info™ and Sandman Auto™) either downloaded onto the memory card or by direct
connection (with Sandman Info™ and Sandman Auto™).
• display and print session compliance data, which is accessible once the device has been
operating for at least 5 minutes.
• generate a patient list which provides direct access to nominative data such as: personal
information, information about the equipment used, and compliance data history.
• configure the operating parameters for the Sandman Info™ and Sandman Auto™
devices only.
Sandman Therapy user manual
US – 1
Version B
•
send an Acrobat Reader compatible PDF report via email and export data to
spreadsheet software programs.
Note:
All of the screenshots provided by way of example in this manual are presented in
English. The screens that the program displays have been translated into all
available languages and therefore the language shown on your device may differ
from that shown in this manual. Translations of menus and information presented
are given in brackets.
Instructions for use
To ensure that your software performs reliably and efficiently, please read all of the
information provided in this user manual. Pay very close attention to the passages flagged
by the following terms:
CAUTION
Note
This indicates that there is a risk of damaging the device.
This identifies a particular point aimed at more efficient and practical
operation.
CAUTION
•
•
•
•
•
The Sandman™ Therapy software can only be used with Sandman CPAP series devices
and can only manage one machine at a time.
Before using the Sandman™ Therapy software with the Sandman Intro™, Sandman Info™
and Sandman Auto™ devices, familiarize yourself with the safety instructions associated
with the device, which are found in the Patient Manual and the Clinician and Home Care
Provider Manual.
The computer used must meet the applicable safety standard. For personal computers,
this is the ICE 60950 standard or equivalent.
Regularly run antivirus software on the computer where the Sandman™ Therapy software
is installed.
You are advised to keep a backup copy of the software.
Note:
Before installing the software, read the installation procedure provided with the CDROM as well as the instructions for storing the CD-ROM.
The language is chosen the first time the program is launched after installing the application.
To select the language, follow the instruction in paragraph "Selecting a Language" on page
6.
US – 2
Sandman Therapy user manual
Version B
Standard equipment
The Sandman™ Therapy software is delivered in a clinical kit containing the following items:
• a Sandman™ Therapy installation CD-ROM (item available separately).
Besides the software, the CD-ROM contains the prior version of the software, the user
manuals in PDF format for all languages, and the English version of Adobe® Acrobat®
Reader 8 (free software).
• a memory card reader Ref. M-214830-03.
• a 2 m RS232 PC-machine connection cable Ref. M-214831-05 or 15 m Ref. M-21483104, a 2 m USB PC-machine connection cable Ref. M-214831-06, used to connect the
Sandman Info™ and Sandman Auto™ devices only.
CAUTION
•
•
On receipt, confirm that the packaging is undamaged.
Confirm that the memory card is undamaged.
Protection against unauthorized data access is accomplished through the Windows User
Profile Manager. You are therefore advised to enable this management tool to ensure the
confidentiality of all information.
Sandman Therapy user manual
US – 3
Version B
LAUNCHING THE PROGRAM
To use this software, all you have to do is double-click on the
Sandman™ Therapy
shortcut on the desktop or select "All Programs" in the "Start" menu of your computer, then
Sandman™ Therapy.
The welcome screen appears and gives access to the program functions.
The welcome screen
1
2
3
4
5
This screen is mainly used to access the following functions, allowing you to:
1. display the Patient List and patient data histories, view patient compliance data and
open a Patient file containing stored treatment data.
2. download data from a memory card.
3. set up a serial connection between the machine and the software via a Sandman
CPAP series RS232 cable or a Sandman CPAP series USB cable. This function can only
be used with Sandman Info™ and Sandman Auto™.
4. use software configuration tools: language choice, data filing, etc
5. software version and access to the "Help" file.
When you are navigating through the program, you can return to the welcome screen by
clicking on the
icon.
Similarly, you can exit the program by clicking on the
button located in the upper right-hand corner.
US – 4
icon or using the Windows
Sandman Therapy user manual
Version B
Software properties
You can access the software version and software help by clicking on the
following screen will appear:
button. The
*
* your software version
Click OK. The software help is then displayed in the selected language.
Software configuration
To configure the software, click on the
button. The tools screen appears, giving you
the options of Patient files copy utility, Archiving or Configuration.
If you click on Configuration, you can access the options for Language, Serial Port, Units:
Weight/Size and Units: Pressure and Analysis parameters.
Sandman Therapy user manual
US – 5
Version B
1. Selecting a Language
Select Language. A window opens where you can select the software language by clicking
the corresponding button, irrespective of what has been chosen in the machine.
Click on
to return to the previous screen.
2. Configuring the serial port
The Serial Port option can only be used with the Sandman Info™ and Sandman Auto™
devices. The port and communication speed can be configured using the dialogue box which
opens:
You can select a USB port with a default speed set at 921,600 bauds, but this can also be
reduced to 38,400 bauds.
You can also select an RS232 port. The COM1 port with a speed of 2,400 bauds is selected
by default when the machine is switched on. Another port can be chosen from the 8 ports
available (COM1 to COM8) and the speed can be set between 1,200 and 38,400 bauds.
Click on OK to confirm your choice or on Cancel to cancel it.
3. Choosing the units of size and weight
You can select the units of size and weight by clicking on Units: Weight/Size. The following
window will appear.
Click OK after selecting cm/kg or in/lb or click Cancel to cancel your selection.
US – 6
Sandman Therapy user manual
Version B
4. Choosing a pressure unit
Similarly, you can select the pressure unit for values displayed on the various screens by
clicking on Units: Pressure. The following window will appear.
Select a pressure unit option by clicking on either cmH2O or hPa. Confirm your choice by
clicking on OK or click on Cancel to cancel your selection.
5. Choosing analysis criteria
If you click on Analysis parameters a window will appear from which you can modify the
threshold used to calculate the percentage of days of use. This threshold is defined in
number of hours per day. The value is set to 6 hours/day by default.
You can also modify the threshold used to calculate the effective pressure. This threshold is
defined as a percentage of time. The value is set to 90% by default.
Confirm your choice by clicking on OK or click on Cancel to cancel your selection.
Archiving
The Archiving option allows you to reconstruct a list of Patient files from the Patient files in
the directory. By clicking on the Reconstruction of the patients list option, the following
window will open:
Sandman Therapy user manual
US – 7
Version B
Patient Files Copy Utility
1. Description
The Patient files copy utility enables you to copy one or more Patient directories and all
the compliance data files they contain to a destination directory.
Click on this option and the following window will open:
This interface ensures that if you merge two patient lists you will not create more than one
file per patient in the same root directory.
It is recommended that patient files in the root directory used by the software be archived in
a separate backup directory selected by the user.
2. Use
1. From the left-hand window, select the source directory by clicking on the
icon.
2. From the list, select the patient file to be copied or select all patient files.
3. In the right-hand window, select the target directory where you want to place the copy by
clicking on the
icon.
4. Click on the
icon to make the copy.
When patient files are copied into a directory that already contains files relating to that
patient, a window will appear allowing you to select the patient data that you wish to keep.
Note:
It is normal for the patient identifier to change from the source directory to the target
directory.
The directory paths selected are memorized for future use.
US – 8
Sandman Therapy user manual
Version B
PATIENT MANAGEMENT
Description
1. Patient List
Click on the
button to open the List of Patients window which lists all the patients
for whom the software keeps certain data (personal information, information about the
equipment used, and compliance data).
You can scroll back and forth through the list by using the
go directly to the top of the list by clicking on
on
.
and
icons and you can
or directly to the end of the list by clicking
2. Patient Sort
The Patient List can be sorted alphabetically and filtered by selecting the corresponding
letter on the right; only names beginning with that letter will be displayed.
3. Patient Search
You can search for a patient by typing the patient's name in the Search field and clicking on
the magnifying glass icon. All patients having that name will be displayed on the screen.
If you wish to return to the whole list, click the
button in the upper right of the
Patient List.
Sandman Therapy user manual
US – 9
Version B
Patient information
1. Displaying information
You can select a patient by highlighting the patient’s name. The patient’s name will appear at
the top of the window and the information on file (last name, first name, contact information,
physician, etc.) for that patient will appear when you click on the See patient information
option on the
button.
2. Changing information
From the Patient personal information window, you can add, change or delete data about
the patient by clicking on the Edit Data button. Insert changes where you wish by using the
Tab key on your keyboard to move from field to field. Click on the Save data button when
you have finished making your changes. A window will appear asking you to confirm whether
you want to make the changes. Click on OK to confirm or on Cancel to cancel the changes.
Then select Return to Patient List.
3. Treatment history
You can access a patient's treatment history by selecting See patient treatment history. A
window will identify the machine involved, the origin of recorded compliance data, the
treatment start and end dates, the number of sessions recorded, the number of settings, and
the total duration of use.
US – 10
Sandman Therapy user manual
Version B
Click on Back to return to the Patient List.
4. Creating a patient
You can create up to 20,000 patients.
To create a new patient, click on
. A window will open in which you can enter information
about the patient. You can add the information requested, moving from one line of a frame to
the next by using the Tab key on the computer keyboard.
You can record information about the patient by clicking on the Save data button. Return to
the Patient List by clicking on
Note:
.
When compliance data for a patient not on the list is read, the option to create a new
patient file is offered automatically so that the data can be saved
5. Deleting a patient
If you want to delete a patient from the list, select the patient and click on
. A window will
appear asking whether you really want to delete the patient. Click OK to confirm deletion or
click on Cancel if you wish to keep the patient.
Note:
To permanently delete a patient’s data, pull up the patient ID of the patient
(displayed at the top of the screen), (after clicking on
in the upper right-hand
corner), then using Windows Explorer, search in the Patients root directory for a
subdirectory name that is the patient's ID preceded by the characters ####. Delete
this directory and all the files in it.
Sandman Therapy user manual
US – 11
Version B
DISPLAYING COMPLIANCE DATA
Compliance data displays automatically after it has been downloaded to a memory card or
via a direct connection to the device.
The last recorded compliance data can also be viewed directly via the Patient List.
To do this, click on a patient (the name will then appear highlighted in yellow). Double-click
on the patient to display the last recorded compliance data. If no data has been registered, a
window stating “No compliance available” will appear. Click OK.
Otherwise, a window as shown previously will appear, showing all of the information
recorded for the (on/off) session.
For each session, the machine records the useful duration, which is the duration recorded
after the first 5 minutes of operation or as of the end of the first ramp, minus the periods
during which the mask was removed and the periods during which no respiration was
detected.
Note:
To allow the patient time to properly connect to the equipment, no session data is
recorded until after the device has been operating for 5 minutes. As a result, no
sessions (duration of the on/off sequence) lasting less than 5 minutes are recorded.
Compliance data saved with Sandman Intro™
1
2
3
US – 12
4
Sandman Therapy user manual
Version B
This window is divided into four sections:
1. Patient identification for the selected patient
A reminder of the patient's name identifier and age is displayed by clicking on
in the upper
right-hand corner of the screen. Other data can be displayed if available, including the
patient’s address and telephone number and the name(s) and telephone number(s) of
clinician(s).
2. Compliance
This section presents the compliance summary diagram: daily length of time during which
the patient has breathed using the mask in relation to the number of days.
The value on the horizontal axis represents 24-hour periods and the value on the vertical
axis represents the Duration of use (the sum of all durations of use of on/off sessions). The
color indicates the average pressure for the 24-hour period. Its value is the average of
average pressures that have been weighted by the duration of use for each session.
The Zoom
button allows you to see all sessions or a subset. If you choose to display a
subset of sessions, a cursor will appear, and you can move from one session to another
either by clicking on the right and left arrows or by moving the cursor while keeping the left
mouse button depressed.
3. Night calendar
This gives you a quick overview of patient compliance across the most recent recorded
sessions. A color scale indicates pressure levels from 3 to 20 cmH2O.
If you do not select a date from the night calendar, none of the information available for the
Analysis Period, Duration, or Pressure displays will be displayed.
A 24-hour period can be selected from the calendar by clicking on the date of interest to you.
The corresponding diagram will then appear in the Compliance section.
If you double-click on a session, the Session window will display as shown below:
Close the window by clicking on the X in the upper right-hand corner.
Sandman Therapy user manual
US – 13
Version B
4. Compliance data
The compliance data is displayed as follows:
Global Information
• Device: type of machine. The embedded software version is shown in brackets.
• Device serial number: serial number of the machine. This cannot be modified.
• Hour counter: total duration of operation.
• Sessions number: total number of sessions recorded by the device.
Compliance information
• Download date: date and time when the memory card was inserted into the device to
backup compliance data.
• Compliance counter: length of time during which the patient actually breathed with the
mask.
• Downloaded sessions: number of sessions downloaded to the memory card.
Last settings
• Prescribed pressure: level of pressure prescribed for the patient.
• Patient pressure: this may differ from the prescribed pressure if the Pressure Alter
feature is enabled.
• Ramp time: time the device takes to reach the prescribed pressure when starting from
the comfort pressure. The ramp time and the maximum ramp time are identified: 15 min
(45 min) in the example.
• Comfort pressure: level of pressure produced by the device when the ramp feature
starts up so that the patient can go to sleep comfortably.
Analysis period
• Start date: date of the first day of the selected period.
• End date: date of the end of the selected period.
• Period: number of analysis days, which is the difference between the “End date” and the
“Start date”.
Duration
• Total usage time.
• Average usage time/day.
• Average time in ramp.
Pressure
• Min. (minimum): lowest pressure measured during the analysis period.
• Max. (maximum): highest pressure measured during the analysis period.
• Average: average pressure measured during the analysis period.
Notes: additional information which can be added to the session data by clicking on the
icon.
US – 14
Sandman Therapy user manual
Version B
Compliance data recorded with Sandman Info™
and Sandman Auto™
Compliance data recorded with Sandman Info™ and Sandman Auto™ is displayed as
follows:
1
2
3
4
This window is divided into three sections:
1. Patient identification for the selected patient
A reminder of the patient's name, identifier and age is displayed by clicking on
in the
upper right-hand corner of the screen. Other data can be displayed if available, including the
patient’s address and telephone number and the name(s) and telephone number(s) of
clinician(s).
2. Compliance
This section presents the compliance summary diagram: daily length of time during which
the patient has breathed using the mask in relation to the number of days.
The value on the horizontal axis represents 24-hour periods and the value on the vertical
axis represents the duration of use (the sum of all durations of use of on/off sessions). The
color indicates the average pressure for the 24-hour period. Its value is the average of
average pressures that have been weighted by the duration of use for each session.
The Zoom
button allows you to see all sessions or a subset. If you choose to display a
subset of sessions, a cursor will appear, and you can move from one session to another
either by clicking on the right and left arrows or by moving the cursor while keeping the left
mouse button depressed.
Sandman Therapy user manual
US – 15
Version B
3. Night calendar
This gives you a quick overview of patient compliance across the most recent recorded
sessions. A color scale indicates pressure levels from 3 to 20 cmH2O.
If you do not select a date from the night calendar, none of the information available for the
Analysis Period, Duration, or Pressure displays will be displayed.
A 24-hour period can be selected from the calendar by clicking on the date of interest to you.
The corresponding diagram will then appear in the Compliance section.
If you double-click on a session, the Session window will display as shown below:
For further information, refer to the paragraph entitled “Information concerning the current
session” on page 46.
Close the window by clicking on the X in the upper right-hand corner.
4. Compliance data
The presentation selected using one of the six buttons in the bottom right-hand corner of the
window is displayed in the right-hand section.
a) Global information
You can access the information displayed by selecting the
US – 16
button.
Sandman Therapy user manual
Version B
Device
• Device: type of machine. The embedded software version is shown in brackets.
• Device serial number: serial number of the machine. This cannot be modified.
• Patient reference: reference assigned to the patient.
• Hour counter: total operating time for the machine (ON/OFF)
• Sessions number: total number of sessions recorded by the device.
• Download date: date and time when the memory card was inserted into the device to
backup compliance data.
• Downloaded sessions: total number of sessions in the compliance data.
Patient information: This information is only filled in if it has been programmed in the
machine.
• Inventory number.
• Last name.
• First name.
• Sleep specialist.
• General practitioner.
Notes: additional information which can be added to the session data by clicking on the
icon.
Sandman Therapy user manual
US – 17
Version B
b) Settings list
You can access the information displayed by selecting the
button.
The different settings applied to the device are displayed in reverse chronological order. The
dates and times correspond to the start of sessions affected by the new settings. The
following information is displayed for each session:
•
•
•
•
•
•
•
•
•
•
•
Mode: CPAP or AutoCPAP operating mode on Sandman Auto™ only.
Prescribed pressure: level of pressure prescribed for the patient in CPAP mode only.
Min. Pressure in AutoCPAP mode only.
Max. Pressure in AutoCPAP mode only.
Pressure Alter. The Pressure Alter function allows the patient to modify the prescribed
pressure by±1 cmH2O within the limits of 3 to 20cmH2O. On the Sandman Auto™ device,
this function is only available in CPAP mode.
Patient pressure: level of pressure applied to the patient in CPAP mode, different from
the prescribed pressure if the Pressure Alter function is enabled.
Ramp time: time the device takes to reach the prescribed pressure after the first 5
minutes when starting from the comfort pressure in CPAP mode. The ramp time and the
maximum ramp time are identified: 15 min (45 min) in the example.
Ramp Latency: waiting time after the first 5 minutes of use with the machine set to
comfort pressure before AutoCPAP is activated. This parameter is only displayed in
AutoCPAP mode on Sandman Auto™.
Pressure decrease: Fast or Slow in AutoCPAP mode only.
Command on Flow limitation Run: enabled or disabled in AutoCPAP mode only.
Max pressure for command on Apnea in AutoCPAP mode only.
US – 18
Sandman Therapy user manual
Version B
•
Comfort pressure: level of pressure produced by the device in CPAP mode when the
ramp feature starts up so that the patient can go to sleep comfortably.
For the Sandman Auto only, in AutoCPAP mode, this is the pressure at which treatment
starts, even if ramp latency has not been set. Pressure returns to comfort pressure when
no breathing cycles are detected for more than two minutes.
c) Synthesis report
The data given in the synthesis report is displayed by default or can be accessed by
selecting the
button (see screen shot on page15).
Usage information
• Start date: date of the first day of the selected period.
• End date: date of the end of the selected period.
• Period: number of analysis days, which is the difference between the “End date” and the
“Start date”.
• Device ON duration: length of time during which the machine is applying pressure.
• Usage duration: average duration during which the patient is really breathing with the
mask, given in number of hours per day.
• Time/Latency in ramp: time spent in ramp in CPAP mode or AutoCPAP mode latency.
• Mask disconnected. length of time during which the patient is not wearing the mask
• % of utilization days >= 6 h/d: percentage of days during which the patient has really
breathed with the machine for a number of hours over the specified threshold. This
threshold can be configured from the software Configuration menu (see paragraph
"Choosing analysis criteria" on page 7).
Last settings
Displays data concerning the settings: CPAP or AutoCPAP operating mode, prescribed
pressure (in CPAP mode) or Minimum Pressure and Maximum Pressure. (in AutoCPAP
mode), whether the Pressure Alter function is enabled or not (in CPAP mode), Patient
pressure (in CPAP mode), ramp time (in CPAP mode) or ramp latency in AutoCPAP
mode, pressure reduction, command on Flow limitation run and Maximum pressure for
command on Apnea in AutoCPAP mode. Comfort pressure is indicated for all modes.
Pressure
•
•
Min. / Max. / Average: average minimum/maximum and average pressures measured
over the period analyzed.
Pressure efficient more than 90% of time: pressure level at which the patient has
spent over a certain percentage of the time. This threshold can be configured from the
software Configuration menu (see paragraph "Choosing analysis criteria" on page 7).
Leaks
•
Min. / Max. / Average: minimum/maximum and average value of leaks measured in the
mask hour by hour over the period analyzed.
Apnea / Hypopnea Index
• AHI obs.: number and index (number per hour) of apneas and hypopneas detected and
classed as obstructive over the period analyzed.
Sandman Therapy user manual
US – 19
Version B
•
AHI cnt.: number and index (number per hour) of apneas and hypopneas detected and
classed as central over the period analyzed.
Detected events
• Apneas: number of apneas detected over the period analyzed and the index/hour.
• Apneas/CA number of apneas with cardiac oscillations (CA) detected over the period
analyzed and the index/hour.
• Hypopneas: number of hypopneas detected over the period analyzed and the
index/hour.
• Hypopneas CNT: number of hypopneas detected and not classed as obstructive over
the period analyzed and the index/hour.
• Snorings: number of snores detected over the period analyzed and the index/hour.
• Runs: Number of Flow limitation Runs detected over the period analyzed and the
index/hour.
d) Usage report
You can access the information in the usage report by selecting the
button.
This report concerns the analysis period selected in the Night Calendar.
Analysis period
Shows the start and end dates for the analysis period selected in the calendar, and the
number of days.
US – 20
Sandman Therapy user manual
Version B
Summary:
Displays the data concerning the average compliance and to the usage days over the
analysis period. The following data is also given: usage efficiency and real duration
efficiency (percentage of days for which use is over a certain duration which you can
define in paragraph "Choosing analysis criteria" on page 7).
Last settings
Displays data concerning the settings: CPAP or AutoCPAP operating mode, prescribed
pressure (in CPAP mode) or Minimum Pressure and Maximum Pressure. (in AutoCPAP
mode), whether the Pressure Alter function is enabled or not (in CPAP mode), Patient
pressure (in CPAP mode), ramp time (in CPAP mode) or ramp latency in AutoCPAP
mode, pressure reduction, command on Flow limitation run and Maximum pressure for
command on Apnea in AutoCPAP mode. Comfort pressure is indicated for all modes.
Days:
Gives the number of days when the machine was used and was not used, and the
average number of days per week and the average usage percentage over the period.
Usage:
This section gives the analysis of the duration of use during which the patient actually
breathed in the mask according to usage days or the total period. It groups together:
•
•
Average: average duration of use over 24 hours during which the patient breathed in
the mask.
Min / Max: minimum and maximum duration of use over 24 hours for the selected
period.
e) Pressure graph and Pressure, events and leaks report
You can access the information in the Pressure, events and leaks report by selecting the
button.
It concerns the analysis period selected in the pressure graph displayed on the left of the
window.
Sandman Therapy user manual
US – 21
Version B
Pressure graph
Three types of information appear on the curve displayed on the left of the screen:
• Prescribed pressure: prescribed pressure range within which the device is authorized
to operate (yellow background).
• Pressure measured: estimated pressure in the mask (vertical shading).
• Average pressure: average pressure for each day of use (blue curve).
A 24-hour period can be selected from the pressure graph by clicking on the desired date or
by selecting the whole period of a²
²²²²²²²²²²²²²²²²²²²²²²² &nalysis.
US – 22
Sandman Therapy user manual
Version B
Pressure, events and leaks report
This report only concerns the analysis period selected in the pressure graph.
Analysis period
Shows the start and end dates for the analysis period selected in the pressure graph,
and the number of days.
Last settings
Displays data concerning the settings: CPAP or AutoCPAP operating mode, prescribed
pressure (in CPAP mode) or Minimum Pressure and Maximum Pressure (in AutoCPAP
mode), Pressure Alter (in CPAP mode), Patient pressure (in CPAP mode), ramp time (in
CPAP mode) or ramp latency in AutoCPAP mode, pressure reduction, Flow limitation run
command and Maximum pressure for command on Apnea in AutoCPAP mode. Comfort
pressure is indicated for all modes.
Pressure
•
•
Min. / Max. / Average: average minimum/maximum and average pressures measured
over the period analyzed.
Pressure efficient more than 90% of time: Pressure level at which the patient has
spent over a certain percentage of the time. This threshold can be configured from the
software Configuration menu (see paragraph "Choosing analysis criteria" on page 7).
Apnea / Hypopnea Index
• AHI obs.: number and index (number per hour) of apneas and hypopneas detected and
classed as obstructive over the period analyzed.
Sandman Therapy user manual
US – 23
Version B
•
•
AHI cnt.: number and index (number per hour) of apneas and hypopneas detected and
classed as central over the period analyzed.
Detected events
Displays the number and index/h of detected events (apneas, apneas with Cardiac
oscillations, hypopneas, central hypopneas, snoring and flow limitation runs).
Leaks
Min. / Max. / Average: high/low value of leaks measured in the mask hour by hour over
the period analyzed.
The presentation below gives a view of the leak flow level in the mask in l/s for each full
pressure value.
Pressure histogram
The pressure histogram gives a view of the % of time spent at each pressure level.
f) Wave forms
You can access the curves displayed by selecting the
button.
This presentation gives a summary view of the detected events, for measured leak level and
the curve for pressure measured in the mask during recording.
US – 24
Sandman Therapy user manual
Version B
The upper section shows the events encountered (whether they are selected for controlling
the device or not):
• Obstructive events which include obstructive apneas and hypopneas,
• Central events which include central apneas and hypopneas,
• Patient's snoring.
• Runs indicating a breathing period with limited flow.
• Cycle state characterizing variations in resistance of the upper airways.
Changes in settings are indicated in the Settings and Sessions sections.
A report is displayed in the right-hand part of the windows including:
Global Information
Displays data relating to the machine, patient reference and compliance counter.
Pressure
This shows the minimum pressure, maximum pressure and average pressures
measured over the analyzed period.
Detected events
Gives the number and index/hour of detected events (obstructive and central events,
snoring and flow limitation runs).
Leaks
Gives the high, low and average values of leaks measured in the mask hour by hour over
the period analyzed.
The presentation below gives a view of the leak flow level in the mask in l/s for each full
pressure value.
Pressure histogram
The pressure histogram gives a view of the % of time spent at each pressure level.
Click on the icon
to return to the welcome screen.
Sandman Therapy user manual
US – 25
Version B
Exporting and printing reports
You can export recorded compliance data as a PDF format report. To do so, click on the
icon. The file can be saved to your computer hard drive.
Note:
you cannot export a report as a PDF file if the period you select from the night
calendar is less than 24 hours.
For the Sandman Intro™ the report can contain information about the patient, various notes
that you may have made, the summary report, and the night calendar itself. For Sandman
Info™ and Sandman Auto™ it can also display global information, information from the
usage report, pressure graph, and pressure report, events and leaks and the list of settings.
You can print the full report by clicking on the
icon.
You can also select the items you wish to print. To do so, click on the
icon.
The Select items to print window will appear. From it, you can select the files you want to
print, as shown below:
To select items for printing, all you need to do is check the box to the left of those items.
Note:
US – 26
you can define the print sequence for these items. Just click on an element and drag
it to the place of another element.
Sandman Therapy user manual
Version B
The
icon launches the following window which presents the PDF options by default:
1
2
Besides the usual configurations common to all printers (page layout, orientation, margins,
font), you can select the following properties:
1. Color display in Adobe Reader.
Printer colors
Screen colors
If the first option is selected, the colors displayed will be the same as those printed.
Otherwise, you will see a difference between the way Sandman™ Therapy displays on
the screen and the colors on the paper.
2. Password protect the exported PDF document.
The password is MDFPDF2007 (case-sensitive), but can be changed.
Click OK to accept the new configuration or Cancel to cancel it.
You will be returned to the Select items to print window. Close it by clicking on the X in the
upper right-hand corner.
You can add simple comments in the form of notes. To do so, click on the
Sandman Therapy user manual
icon.
US – 27
Version B
A window appears in which you can enter your comments and add a date stamp.
Date Stamp
The date stamp lets you show today's date.
Click OK to confirm your text or Cancel to cancel the action.
Using the ASCII export feature
1. Launching ASCII export
The ASCII export feature allows you to export data in file formats that can be read by
spreadsheet software programs for statistical analysis based on data formats different from
the format used by Sandman™ Therapy.
The export file format generated is an ASCII format with a semi-colon (;) field delimiter which
cannot be changed.
Exported file names consist of the name of the patient file in question plus an extension that
specifies the file content; by default, the files are saved to the Patient subdirectory of the
Sandman™ Therapy software directory (Patient).
icon to launch the ASCII export module. The Save As dialog box appears
Click on the
with the name, the path where the created file will be saved, and the file type with the .txt
extension.
CAUTION
After creating the ASCII file it is recommended that you make a copy of the file in a separate
directory of your choice before making changes in it using the spreadsheet program.
US – 28
Sandman Therapy user manual
Version B
2. File structure
Data is exported in Unicode, with each character encoded in 2 bytes.
a. Sandman Intro™
The data exported by Sandman Intro is as follows per session:
Number:
State:
Date:
Time:
Duration:
Usage Time:
Time in ramp:
Set pressure:
Average pressure:
Session number
Session status: OK, Empty, Invalid data, or Checksum error
Session date
Session time
The operating time for the machine during the session in
hours and minutes
The usage time for the machine during the session in hours
and minutes
Ramp duration in hours and minutes
Set pressure in mmH2O
Average pressure measured by the machine in mmH2O
b. Sandman Info™ and Sandman Auto™ in CPAP mode
Data exported with Sandman Info and Sandman Auto operating in CPAP mode are for one
session as follows:
Number:
State:
Date:
Time:
Duration:
Usage Time:
Time in ramp:
Average pressure:
Average Leaks:
Apnea number:
Apnea with CArdiac:
oscillations number:
Hypopnea number:
Hypopnea number CNT:
Snoring number:
Run number:
Setting change:
Mode:
Pressure level:
Patient pressure:
Sandman Therapy user manual
Session number
Session status: OK, Empty, Invalid data, or Checksum error
Session date
Session time
The operating time for the machine during the session in
hours and minutes
The usage time for the machine during the session in hours
and minutes
Ramp duration in hours and minutes
Average pressure measured by the machine in mmH2O
Average number of leaks
Number of apneas classed as obstructive
Number of apneas with cardiac oscillations
Number of hypopneas classed as obstructive
Number of hypopneas classed as central
Number of snores
Number of Flow limitation runs
Change of settings
CPAP mode
Pressure level in mmH2O
Patient pressure in mmH2O
US – 29
Version B
Ramp:
Ramp time:
Max ramp time:
Comfort pressure:
Ramp
Ramp time in minutes
Maximum ramp time in minutes
Comfort Pressure
c. Sandman Auto™ in mode AutoCPAP
Data exported with Sandman Auto operating in AutoCPAP mode are for one session as
follows:
Number:
State:
Date:
Time:
Duration:
Usage Time:
Average pressure:
Average Leaks:
Apnea number:
Apnea with CArdiac
oscillations number:
Hypopnea number:
Hypopnea number CNT:
Snoring number:
Run number:
Setting change:
Mode:
Pressure level:
Min. pressure:
Max. pressure:
Max. press. for command on
Apnea:
Command on Flow Limitation
Run:
Pressure decrease:
Ramp:
Ramp latency
Max ramp time:
Comfort pressure:
US – 30
Session number
Session status: OK, Empty, Invalid data, or Checksum error
Session date
Session time
The operating time for the machine during the session in
hours and minutes
The usage time for the machine during the session in hours
and minutes
Average pressure measured by the machine in mmH2O
Average number of leaks
Number of apneas classed as obstructive
Number of apneas with cardiac oscillations
Number of hypopneas classed as obstructive
Number of hypopneas classed as central
Number of snores
Number of Flow limitation runs
Change of settings
AutoCPAP mode
Pressure level in mmH2O
Minimum pressure in mmH2O
Maximum pressure in mmH2O
Maximum Apnea pressure control in mmH2O
Limited Flow Run control
Pressure decrease
Ramp
AutoCPAP mode latency time in minutes
Maximum latency ramp time in minutes
Comfort Pressure
Sandman Therapy user manual
Version B
USING A MEMORY CARD
The patient can use external memory media to backup the most recent compliance data in
the Sandman CPAP series device memory by following the instructions in the Patient
Manual.
Once the data is backed up, the patient delivers the memory card to you and you can
retrieve the compliance data and analyze it using the Sandman™ Therapy software.
Insert the card sent by the patient into the memory card drive supplied with the software as
shown in the diagram.
Then insert the card drive into a free USB port on your computer.
Next click on the
screen will appear:
button in the Sandman™Therapy software. The following
Click on the Download data from mem.card option. An animation will appear until the data
download is complete.
Note:
Any memory card, whether it is new or has been used previously for backups
from this or another Sandman CPAP series device, can be used to backup
data.
A window will appear identical to the one described in paragraph "Displaying compliance
data" on page 12.
Sandman Therapy user manual
US – 31
Version B
CONFIGURING THE DEVICE
Connecting to the device
A computer can be connected to the Sandman Info™ and Sandman Auto™ devices only.
Before connecting, first configure the serial port and communication speed by following
instructions in paragraph "Configuring the serial port" on page 6.
Then connect the serial link cable as follows:
1. Place the Sandman Info or Sandman Auto device beside the patient's bed on a stable,
flat surface.
2. Connect the Sandman CPAP series RS232 cable of a suitable length (2m or 15 m) or the
Sandman CPAP series USB cable to the computer using the corresponding serial port.
3. Connect the other end of the Sandman CPAP series RS232 cable or the Sandman
CPAP USB cable to the serial link/USB connector on the device
CAUTION
•
•
•
To avoid damaging the devices, ensure that the Sandman Info or Sandman Auto device
and the computer are switched off before connecting up.
Only use the serial cables supplied with the software. Using other serial cables may
damage the Sandman Info or Sandman Auto device.
The welcome screen is automatically displayed if communication is lost.
The connection screen
When you click on the
button a window appears showing data concerning
operation of the device used, settings configuration, retrieving recorded compliance data and
viewing the current session or all the sessions.
4
1
2
3
US – 32
Sandman Therapy user manual
Version B
1. Device status
The screen shows the Sandman Info™ or Sandman Auto™ device you are using. The
display shows the status of the machine, the current time if the device is in standby mode or
the estimated pressure in the mask, updated in real time, when the machine is operating.
Estimated mask pressure
Indicator showing operation in
AutoCPAP mode on Sandman
Auto
Compliance operation indicator
The ON/OFF button
is operational and allows the device to be switched on or off.
2. Displayed information
The information displayed below the machine identifies the machine and gives its settings:
1.
•
•
•
•
•
Device:
Patient reference
Serial number:
Version
Inventory number
Hour counter
2. Settings:
• Mode: CPAP or AutoCPAP operating mode (monitoring detected events).
• Pressure level (prescribed pressure) is given with Sandman Info or Sandman Auto in
CPAP mode only, with the set pressure in brackets.
• Min. Pressure in cmH2O with Sandman Auto in AutoCPAP mode.
• Max. Pressure in cmH2O with Sandman Auto in AutoCPAP mode.
• Max. Pressure for command on Apnea in cmH2O with Sandman Auto in AutoCPAP
mode.
• Ramp duration in CPAP mode, with the maximum ramp time and comfort pressure given
in brackets.
• Ramp latency time is given with Sandman Auto in AutoCPAP mode, with maximum
latency and comfort pressure in brackets.
• Comfort pressure in CPAP or AutoCPAP mode.
Sandman Therapy user manual
US – 33
Version B
3. Device settings
The six buttons below are located under the picture of the machine and allow you to access
the device settings.
4. Other functionalities
The four buttons on the right of the screen allow you to check serial port configuration, to
back up compliance data saved in the device and display the current session or all the
sessions.
Checking serial port configuration
The
button allows you to configure the serial port used and access the
communication speed used. The following window appears:
Click OK to exit it.
US – 34
Sandman Therapy user manual
Version B
Downloading data
The
button allows you to download compliance data saved in the device. A
window shows how download is progressing:
Once download is complete, a New Patient profile dialog box appears which you can
complete with the patient's data. If the patient's data has already been entered in the device
(see paragraph "Accessing device settings" on page 36) the "Last name" and "First name"
fields are already completed to help create the patient file.
Click OK to confirm.
If data for a referenced patient has already been downloaded, a dialog box will appear with
the patient reference and identification, and will ask if you wish to save the data in the file for
this patient.
Click on OK to continue or on Cancel to cancel the action.
If you select Cancel, a window will appear in which you can create a new patient file, select
an existing patient file from a list or choose not to save.
Choose an option and click on OK to confirm.
Sandman Therapy user manual
US – 35
Version B
Accessing device settings
1. Patient reference
An 8-character alphanumeric code known as the patient reference can be used to assign
the device to a patient. By default the patient reference will be the letter R followed by the 7
last characters from the serial number (e.g. "R8814AAA").
CAUTION
Assigning a new patient reference causes the deletion of all data stored in the device memory (i.e., all
general data stored since the last configuration). For further information, see the technical manual for
the device.
If you click on the
button, a window appears:
If you enter a new patient reference, a dialog box will warn you of the change.
Select cancel if you wish to cancel or OK to confirm your choice. The new patient reference
will replace the one which was displayed.
2. Patient information
Information concerning the patient assigned to the Sandman Info or Sandman Auto device
button.
can be displayed, modified or entered using the
Enter the desired data and confirm your choice by OK. A dialog box warns you that you have
made changes and asks if you wish to continue. Click on OK to confirm or Cancel to cancel.
US – 36
Sandman Therapy user manual
Version B
3. Customer number
The customer number can only be accessed using the computer. It is a 10-character
alphanumeric code specific to the machine in which it is memorized.
The customer number can be modified by clicking on the
following dialog box appears:
button. The
You can enter a new customer number. Confirm your choice by clicking on OK or select
Cancel to cancel your selection. A dialog box warns you that you have made changes and
asks if you wish to continue. Click on OK to confirm or Cancel to cancel.
4. User configuration
If you click on the
button, the following window appears:
You can choose the language and pressure unit, set the humidification power and
reminders, and adjust the contrast from this window.
a) Selecting a Language
All the languages available in the device are marked "activated" in the "Available languages"
section. Select one of them (English in this example) by clicking on the "current" box.
b) Humidification power
Note:
The setting can only be made if the device is equipped with a heated humidification
feature.
The heating power value can be set between 0 and 10 incrementing by 1 each time. Select
the value (5 in this example) in the "Humidifier Settings" section by clicking the
corresponding box.
Sandman Therapy user manual
US – 37
Version B
c) Reminders
See the Clinician and Home Care Provider Manual for definitions of the reminders.
For each type of reminder you can set the frequency with which the device will set a
reminder activation date for the patient. This frequency can be set in increments of 1 month.
• Filter: recalls how often the filter should be changed.
• Mask: recalls how often the mask should be changed.
• Service: recalls how often the device pressure should be checked.
• Memory Card: recalls how often the patient should download data to the memory card
and return the card to you.
This window allows you to choose a new setting for each reminder. Select the reminder by
clicking on the box opposite this reminder and then enter the desired frequency in months in
the box opposite "Months". The frequency can be adjusted by 1 month increments between
1 and 60 months. To suppress the reminder feature, just uncheck the box opposite the
reminder in question.
CAUTION
When a reminder is enabled, the reminder expiration date is recalculated whenever the
memory card is inserted into the device.
d) Pressure unit
Select a pressure unit option by clicking on either cmH2O or hPa. Confirm your choice by
clicking on OK or click on Cancel to cancel your selection. The selected unit (cmH2O in the
example) will be displayed when changes are made to the pressure setting.
Note:
Changing the pressure unit of measure does not affect the pressure settings in the
device. It only changes the way they display (the values are calculated automatically
according to the selected unit of measure).
e) LCD contrast
The contrast is set to 5 by default, but it can be set between 0 and 10 by increments of 1.
The value can be increased by moving the curser to the right and reduced by moving it to the
left.
Click on OK to validate all settings in the window or on Cancel to cancel them. A dialog box
warns you that you have made changes and asks if you wish to continue.
Click on OK to confirm or Cancel to cancel.
US – 38
Sandman Therapy user manual
Version B
5. Date and time
You can access the Sandman Info or Sandman Auto device clock via the software by
.
clicking on
If the device is on, the following dialog box is displayed showing the date and time in the
device, but it cannot be modified.
However, if the device is in standby, the following dialog box is displayed allowing the date
and time to be modified.
Date and time on the device
Allows time in the device to
be synchronized with that of
the computer
Scrolls through the months
To modify the date, click on the desired day. If necessary, scroll through the months using
the buttons located at the bottom right-hand corner of the dialog box.
To change the hour and/or the minutes, place the curser on the hh and/or mn boxes and
change the values using the keyboard.
Use the PC hour button to synchronize the device time with that of the PC.
CAUTION
Before synchronizing the date and time of the device with that of the PC, ensure that your
computer settings are correct.
Click on OK to validate the changes or on Cancel to keep the original date and time.
Sandman Therapy user manual
US – 39
Version B
6. Settings
CAUTION
Check the date and time in the computer before programming the device and ensure that the
time in the machine is correct.
You can access the device settings by clicking on
The dialog box displays all the settings parameters and programming of 4 automatic settings
changes.
The windows are different according to whether the device is set to constant CPAP mode or
automatic AutoCPAP mode.
When the machine is used for the first time, or if it is reconfigured, the default settings are
programmed. Otherwise the settings displayed correspond to the last settings made.
The parameter values are displayed to the left of the settings cursors. You can make the
settings either by clicking on the right and left arrows or by moving the cursor while keeping
the left mouse button depressed. The settings ranges are the same as those which can be
adjusted on the devices.
The Default Settings button displays the original device parameters.
The settings window also allows you to program 4 settings by clicking on the Programming
Settings function as explained in paragraph "Programming automatic settings changes" on
page 43.
Once the settings have been made, you can click on Save to confirm your choices or on
Cancel if you wish to keep the initial parameters.
A dialog box warns you that the settings have been changed.
Click on OK to confirm the settings changes.
US – 40
Sandman Therapy user manual
Version B
a. CPAP mode
The Sandman Info™ only operates in CPAP mode. However, the Sandman Auto™ can
operate in CPAP or AutoCPAP mode. The CPAP button in the top left-hand corner of the
settings window allows you to configure the Sandman Auto™ device in constant pressure
mode.
If you click on this button, the following settings window is displayed:
The settings window is divided into two sections:
• Ramp contains the pressure/time curve and is used to set the ramp parameters.
• Pressure is used to set the pressure applied at the end of ramp time.
The following parameters can be set in the Ramp section:
• Comfort Pressure can be set to a value between 3 cmH2O and the prescribed
pressure.
• Max Ramp Time can be set in 5 minute increments between 0 and 45 minutes.
• Ramp Time can be set in 5 minute increments between 0 and maximum ramp time.
The following parameters can be set in the Pressure section:
• You can adjust the pressure settings increments to 0.5 cmH2O or 1.0 cmH2O. The
settings are always made with the last settings increment selected.
• As pressure is constant you can only set the value of the set Pressure between 3
cmH2O and 20 cmH2O.
• The Pressure Alter function allows the patient to modify the prescribed pressure by±1
cmH2O within the limits of 3 to 20cmH2O. On the Sandman Auto™ device, this function
is only available in CPAP mode.
You can configure the Sandman Auto device in automatic mode by clicking on the
AutoCPAP button.
Sandman Therapy user manual
US – 41
Version B
b. AutoCPAP mode
The AutoCPAP mode only exists on the Sandman Auto™ device.
The AutoCPAP button in the top right-hand corner of the settings window allows you to
configure the device in AutoCPAP mode. If you click on it, a new window will appear:
The settings window is divided into three sections:
• Ramp Latency contains the pressure/time curve and is used to set the ramp
parameters.
• Pressure is used to the minimum and maximum pressure levels applied in AutoCPAP
mode at the end of ramp latency.
• AutoCPAP parameters.
The following parameters can be set in the Ramp Latency section:
• Comfort Pressure can be set to a value between minimum and maximum Pressure.
• Max Ramp Latency can be set in 5 minute increments between 0 and 45 minutes.
• Ramp Latency can be set in 5 minute increments between 0 and maximum latency
time.
The following parameters can be set in the Pressure section:
• Min Pressure can be set between 3 cmH2O and 20 cmH2O (i.e. maximum Pressure).
• Max Pressure can be set between 3 cmH2O (i.e. minimum Pressure) and 20 cmH2O.
• You can adjust the pressure settings increments to 0.5 cmH2O or 1.0 cmH2O. The
settings are always made with the last settings increment selected. Therefore, if the
maximum set pressure is 16.5 cmH2O and you choose an increment of 1 cmH2O, the
pressure values will remain in half units.
You can access the following parameters in the AutoCPAP parameters section:
• Speed of pressure decrease. You can select a Fast or Slow speed.
• Command on Inspiratory Flow Limitation. This function can be enabled by clicking on
the box opposite it.
US – 42
Sandman Therapy user manual
Version B
•
Max pressure for command on Apnea.
The value of this parameter can be set to a value between Minimum Pressure and
Maximum Pressure using the cursor. If an Apnea is detected, no pressure increase will
occur if pressure is at the maximum pressure for command on Apnea.
c. Programming automatic settings changes
Programming the 4 settings in the device memory is done by clicking on the Programming
Settings button in the Settings window. A dialog box appears if you have made any changes
and asks if you want to save them in the machine. Click OK to confirm.
The next window shows the current settings and allows you to program 4 changes numbered
1 to 4.
On the example, the device is operating in CPAP mode, the ramp time, maximum ramp time,
comfort pressure and prescribed pressure settings are shown, and the Pressure Alter
function is not enabled.
Sandman Therapy user manual
US – 43
Version B
If you click on the Modification button in the bottom left of the window, the dialog box
changes as follows:
By clicking on the New set button in the bottom left of the window, a new window appears
where you can select the day and time of the setting change.
Settings change date and time
Scrolls through the months
The set to PC hour button allows you to synchronize the time on the Sandman Info™ or
Sandman Auto™ device with that of the computer.
To program the date you just need to click on the desired date which is then surrounded in
red, and enter the hours and minutes values in the hh and mn boxes. Click OK. The settings
window appears again. Change the settings as you wish and click on OK.
The settings window appears again. Change the settings as you wish and click Save. You
then return to the Current settings window, which is shown modified.
US – 44
Sandman Therapy user manual
Version B
New settings
The date and time of programming are displayed on the right of Modification settings N°1
and the selected settings configuration appears below it. You can then modify the
programmed settings again by clicking on the Modification settings N°1 button.
To program settings N°2 to N°4, follow the same procedure as for setting N°1.
You can delete the last setting programmed by clicking the Delete set button.
Click on OK to confirm the settings programming. A window confirms that the changes have
been programmed.
The settings changes will take place one after the other at the programmed dates and times.
Note:
− When a settings change occurs at the programmed date and time, a new
settings change can then be programmed. Therefore if you have
programmed 4 settings changes, a new change can be programmed once
settings change N°1 has taken place.
− The programmed settings changes will occur whether the device is on or in
standby. If a settings change is programmed to take place when the
machine is not switched on, the settings change will become effective
approximately one minute after the device is switched on.
Sandman Therapy user manual
US – 45
Version B
Other functionalities
1. Information concerning the current session
The compliance data are only available as from when the machine begins to store them,
i.e. at the end of ramp time or after 5 minutes of operation if ramp time is less than 5
minutes.
Click on the
button on the connection screen.
A window appears with the all the data for an on/off session.
The window summarizes all the data relating to the current session. The session is identified
by a number in the title of the dialog box, which corresponds to the chronological number
since the last configuration.
Compliance ON is displayed next to the session number and the data displayed relates to
the session currently being recorded. If no session is in progress, Compliance OFF is
displayed at the top of the window, which does not contain any curves or values.
The data given on the left is, from top to bottom:
•
•
•
•
•
•
Date and Time: data concerning session memorization.
Duration: operating time during which the device has delivered pressure over the whole
session.
Compliance: Usage time during which the patient has breathed in the mask.
Disconnected Mask Duration: time spent with the mask disconnected
Time in Ramp in CPAP mode or Ramp Latency in AutoCPAP mode.
Average pressure: average pressure measured in the mask during the session.
US – 46
Sandman Therapy user manual
Version B
•
•
Average leak : average leak flow in l/s
Detected events: number of respiratory events.
The upper central Settings section concerns the last settings used during the session and
the number of settings changes during the session is given in brackets. The settings data is
as follows:
• Mode: mode programmed during the last settings change. In AutoCPAP mode only, the
type of events which were used to control the device are as follows:
A
Apneas
SNG
Snoring
H
Hypopneas
FL
Flow limitation cycles
• Pressure level in CPAP mode or Min. Pressure and Max. Pressure authorized in
AutoCPAP mode.
• Max. press. for command on Apnea.
• Pressure decrease: Fast or Slow.
• Command on Flow Limitation Run: enabled or disabled.
• Ramp duration in CPAP mode with maximum ramp time and comfort pressure given in
brackets or Ramp Latency in AutoCPAP mode with maximum ramp latency and comfort
pressure given in brackets.
• Comfort pressure whatever mode is set.
The four curves in the Current Session window are as follows:
• Session total duration %: percentage of the total duration of the session according to
the pressure.
• Average Leak per hour: average leak diagram per hour.
• Average pressure per hour: average pressure diagram per hour.
• Raw signal at 1 min representing the measured Pressure (PR), measured leak (Lk) and
detected events in the same color as in the Detected Events list.
You can exit the window by clicking on the
Sandman Therapy user manual
icon.
US – 47
Version B
2. Data for all the sessions
You can access all the recorded sessions by clicking on the
window appears with the all the data for the last on/off session.
button. A
This functionality allows you to display data relating to each session by using the
scroll to the left and the
key to scroll to the right.
key to
The session will be identified by its number shown in the title of the dialog box and will show
the compliance data and curves described in paragraph "Information concerning the current
session" on page 46.
You can exit the window by clicking on the
0459
US – 48
icon.
Sandman™ Therapy complies with the requirements of European Directive
93/42/EC on medical devices.
Sandman Therapy user manual
Version B
GLOSSARY
Comfort pressure
Level of pressure produced by the device when the ramp feature starts up so
that the patient can go to sleep comfortably.
For the Sandman Auto device only, in AutoCPAP mode, this is the pressure at
which treatment starts, even if ramp latency has not been set. Pressure comes
back to comfort pressure when no breathing cycles are detected for more than
two minutes.
Compliance counter
Length of time during which the patient actually breathed with the mask.
Hour counter
Time during which the machine was in use.
IFL
Inspiratory Flow Limitation
Max. Pressure
Maximum level of pressure which the Sandman Auto device can deliver in
AutoCPAP mode.
Max Pressure for command on Apnea.
Maximum pressure on the Sandman Auto™ above which no pressure increase
will be applied if a pause is detected in breathing in AutoCPAP mode.
Max Ramp Time
It allows the Home Care Provider to restrict the maximum ramp time value
which can be set by the patient if the ramp function is used in CPAP mode.
Min. Pressure
Maximum level of pressure which the Sandman Auto™ device can deliver in
AutoCPAP mode.
Mode
CPAP or AutoCPAP operating mode on Sandman Auto™ only.
Patient Reference
Reference assigned to the patient.
Prescribed Pressure
Level of pressure prescribed for the patient.
Sandman Therapy user manual
US – 49
Version B
Pressure Alter
The Pressure Alter function allows the patient to modify the prescribed
pressure by±1 cmH2O within the limit of 3 to 20 cmH2O. On the Sandman
Auto™ device, this function is only available in CPAP mode.
Ramp Time
If a ramp time has been selected in CPAP mode, this is the time taken by the
device after the first 5 minutes to reach the prescribed pressure starting from
comfort pressure.
Ramp Latency
On Sandman Auto™ in AutoCPAP mode only, this is the waiting time after the
first 5 minutes of operation with the device set to CPAP mode at comfort
pressure before AutoCPAP mode is activated.
Reminder
The Sandman CPAP series has a patient reminder function to help the patient
remember key events such as changing the filter or the mask, checking the
device or retrieving the compliance data on the memory card.
Session
Period during which the data is saved in the memory between device start-up
and shut down. A session is recorded if the device is switched on continuously
for more than 5 minutes.
Total Usage Time
Length of time during which the patient actually breathed with the mask.
US – 50
Sandman Therapy user manual
Corporate Headquarters:
Manufacturer:
Covidien
Mallinckrodt Développement France
10, Allée Pelletier-Doisy
F – 54600 VILLERS-LES-NANCY
France
Telephone : (33) 3.83.44.85.00
Fax : (33) 3.83.44.85.01
6135 Gunbarrel Ave.
0459
Boulder, CO 80301-3214
Customer Service:
+1.800.635.5267
Technical Support
+1.800.255.6774