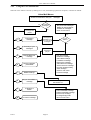
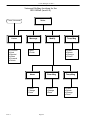
1
VOICE MANAGER
Versions
4.6 & 4.7
Voice Mail User's
Manual
Voice Mail User’s Manual
Site Specific Details
The Voice Manager system installed at ____________________________________
Site Serial No.:
____________________________________
The following internal extension numbers are used for Voice Mail functions:
Ext Number
Function
_______ (551)
Set Your Unavailable Message
_______ (552)
Cancel Your Unavailable Message
_______ (553)
General Voice Mail Access
_______ (555)
Personal Voice Mail Access
The following external numbers have special functions:
Number
Function
______________
Direct Voice Mail Access
______________
Direct Internal Dialling
Issue 1
Page 1
Voice Manager 4.6 & 4.7
Issue 1
Page 2
Voice Mail User’s Manual
LIST OF CONTENTS
1. Introduction
5
1.1 About Voice Manager
5
1.2 Overview
6
2. Using Voice Mail
7
2.1 Directory Search facility
8
2.2 How to answer calls on a system with Voice Mail
9
2.3 How to transfer a caller to leave a message in someone's mailbox
9
2.4 Leaving messages
2.4.1 Leaving a message for someone
2.4.2 Leaving more than one message at a time
2.4.3 Using the Leave Message menu
2.4.4 Leaving the same message for a number of people
2.4.5 Postponing the delivery of a message you have left
2.4.6 Indicating that a message is Urgent and/or Private
2.4.7 Ensuring you receive a reply to a message you have left
2.4.8 Ensuring you receive notification of delivery of a message
10
10
10
11
12
13
13
13
13
2.5 Reading messages
2.5.1 Reading your messages
2.5.2 Using the Voice Mail Menus
2.5.3 Deleting your old messages
2.5.4 Saving a message for a specific period of time
2.5.5 Copying a message to another mailbox
2.5.6 Replying to a message
2.5.7 Adding a Comment to a message
14
14
15
16
16
17
17
18
2.6 Setting and clearing your temporary 'Unavailable Message'
19
2.7 Changing your Voice Mailbox Settings
2.7.1 Setting a security password for your voice mailbox
2.7.2 Setting a temporary number to call you on with your messages or calls
2.7.3 Setting up and changing Mailing Lists
2.7.4 How to change your Personal Greetings
2.7.5 Dealing with unread messages left for you when you are not available
2.7.6 Changing your Advanced Voice Mail Settings
20
22
23
25
27
28
29
2.8 The Follow-Me facility
2.8.1 Changing your Advanced Follow-Me Settings
30
31
2.9 How to use Voice Mail from an External phone
36
2.10 Setting up your extension for Voice Mail use
37
3. Using the Auto Operator
38
3.1 How Auto Operator is used from an Internal phone
38
3.2 How Auto Operator is used from an External phone
39
4. Using Soft Keys on INDeX Display Phones
40
4.1 Functions and Operation of Soft Keys
4.1.1 Listen
4.1.2 Message
4.1.3 Modify
4.1.4 Temp Msg
40
43
44
45
46
4.2 Message Follow-Me
46
Issue 1
Page 3
Voice Mail User’s Manual
1.
Introduction
This manual is aimed at the ordinary phone user in a company where Voice Manager is installed. A full explanation
of how the system can be used and programmed is covered in the System Programming Manual.
It sets out to give a brief explanation as to what Voice Manager is and what it can do. This is followed by a full
explanation of how to use the facilities available to the company's phone users. It expands on the information given in
the Voicemail User's Quick Reference card and also gives details of all of the functions not covered in the Quick
Reference card.
1.1
About Voice Manager
What is Voice Manager?
Voice Manager is an advanced automatic telephone answering and message handling system able to handle up to
20 calls simultaneously.
Unlike a simple answering machine the Voice Manager offers many facilities other than just answering. It is
extremely flexible in operation, and is able to be programmed to cover many of the communication needs of a
company. It is able to handle incoming calls in a variety of ways, depending on which number the caller dialled.
The Voice Manager is directly connected to the company's internal telephone exchange. The names of all the
people who have an extension are recorded, and details of which recorded name belongs to which extension
number are stored in the Voice Manager. This allows the system to recognise which extension has been called
and by whom, thus enabling personalised greetings to be given, and messages to be directed to the correct voice
mailbox.
What can it do?
It can answer a call and offer the caller options to leave a message or wait for an operator.
It can carry out many of the repetitive operations performed by a company's telephone operator, such as giving
out information, taking and giving messages, transferring external calls from company employees directly to
internal extensions.
Each company employee can have their own voice mailbox in which messages can be left when they are busy or
unavailable. They do not need to have a personal extension to be able to use this facility. These messages can be
left and played back using an internal or an external phone. They can also be protected by a pass number so that
mailbox users can only read messages left for them.
When can it be used?
It can be used to take messages when operators are busy or unavailable.
When an operator is unavailable it can be used to Broadcast the name of the person to whom the caller wishes to
speak. A group of secretaries, anyone of which, can then directly transfer the caller to the correct extension.
Any extension can be set up, by the phone user, to be diverted to the Voice Manager when they have to go out or
attend a meeting. A personal message can be recorded which could inform the caller when the user will next be
available. The caller is then offered the facility to leave a message. Alternatively they could be offered the choice
of having the system try to call you on another number.
When a message has been left for someone the Voice Manager can be set to call their extension at predetermined
intervals to play back the message. This will continue until they have received the message. This facility, called
Message Follow-Me, can also be arranged to call back to different phone numbers at varying times of the day or
week.
Issue 1
Page 5
Voice Manager 4.6 & 4.7
1.2
Overview
The Voice Manager provides three main functional areas for the phone user which are:
Announcements and information services
This can be used to give you pre-recorded information about your company. It can include a menu of subjects
which can be selected by pressing one of the number keys on your phone. This service could be available 24
hours a day.
There are no special instructions needed to use this facility other than dialling a special number which should
be supplied by your System Manager. It will not be mentioned again in this manual.
Voice Mail
This can be used by you to leave or receive messages. Messages can be left for you by internal and external
callers. You can leave messages for other people and play back your messages from either an internal or an
external phone.
Auto Operator
Incoming callers can be connected to you by the Voice Manager, without speaking to an operator. This is
achieved by offering the caller direct dialling to your phone, or by using the telephone system’s Broadcast
feature.
It also gives you the ability to directly dial an internal extension if you are phoning from outside your
company.
Follow-Me
The Follow-Me facility allows you to have a list of personal telephone numbers attached to your voice
mailbox which can be used to call you back on with your unread messages. They can also be used by the Auto
Operator to transfer your calls to, in case you are not working in the office.
These areas are dealt with separately on the pages following.
Note:
Issue 1
The system installed in your company may not have all the facilities available as described above.
Details of your company's system should be noted at the beginning of this manual, otherwise consult
your Systems Manager for details.
Page 6
Voice Mail User’s Manual
2.
Using Voice Mail
The main facilities available to you are:
a)
Transferring a caller to someone's mailbox to leave a message
b)
Leaving a message for someone
c)
Leaving more than one message at a time
d)
Leaving a message for a number of people
e)
Postponing the delivery of a message you have left
f)
Indicate that a message is Urgent and/or Private
g)
Ensuring you receive a reply to, or notification of delivery, of a message
h)
Reading your messages
i)
Deleting your old messages
j)
Saving a message for a specific period of time
k)
Copying a message, with a comment, to someone else's mailbox
l)
Setting and clearing your personal 'Unavailable Message'
m)
Changing your Voice Mail settings
n)
Setting a security password for your voice mailbox
o)
Setting numbers for the Voice Manager to call you on with messages and calls
p)
Setting up and changing Mailing Lists
q)
Changing your personal greetings
r)
Dealing with messages left for you when you are not available
Mailbox Numbers
Mailbox numbers are usually the same as a person’s extension number. Your Systems Manager should issue
you with a list of mailbox numbers which do not match the extension numbers. These would usually be for
people who do not have a personal extension.
Mailing List numbers
A Mailing List is a permanent list of mailboxes to which messages can be sent. This enables the same
message to be sent to a number of mailboxes simultaneously. Each Voice Mail user can have up to nine
personal mailing lists. These will be numbered 01 to 09. In addition there are 90 system mailing lists which
can be used by everyone. These are numbered 10 to 99. When dialling a mailing list to leave a message the
two digit number is preceded by a '#'.
Short cuts through the menus
Once you are familiar with Voice Mail operations that are used frequently you may find waiting for the
required menu option slow and tedious. This process can be speeded up.
When using the Voice Mail system via the menus it is not necessary to wait until the option that you require
is announced. Once the menu has started the required number key can be pressed straight away and that
option will be selected immediately.
It is also possible to select any of the options in the Other Options menu directly from the Initial menu by
pressing the required key. It is not necessary to dial the '0' to select Other Options first. For example to
change your Auto Delivery setting you could call the Voice Mail system then as soon as the Voice Manager
answers dial 761.
Issue 1
Page 7
Voice Manager 4.6 & 4.7
2.1
Directory Search facility
The Directory Search facility enables you to find someone’s mailbox, or extension number, when you only know their
name. The facility is most easily used by phones which have an alphanumeric keypad. A standard keypad can also be
used by referring to the diagram below or on the Quick Reference Card. You are able to enter the first few letters of
the person’s first or second name. It will then give you a list of names which match. It operates as follows:
1a)
From an Auto Operator prompt or when leaving a message using 553
When you are requested for a mailbox or extension number which you do not know you can dial a number,
usually ‘9’ to use the directory search facility. (Note: this may not be setup on your system)
1b)
From a Voicemail prompt
If you are requested for a mailbox number from the Leave Message menu after leaving a message, or when
you are logged into your mailbox, Directory Search is invoked
by dialling ‘999’ (see note below).
2)
If your phone has an alphanumeric keypad, or you know the
keys to dial as shown in the adjacent diagram, you can make
full use of this facility. Dial the first few letters of the name of
the person you wish to leave a message for followed by ‘#’. You
will then be given a list of names starting with those letters.
Alternatively dialling ‘#’ on its own will play a complete list of
all mailbox names and numbers.
3)
When you hear the name of the person you want dial ‘#’. You
will then be able to leave them a message or be connected to
their extension as appropriate.
If you decide not to continue with the list of names you may
dial ‘∗’ at any point to stop and return to the previous menu or
operation.
ABC
DEF
1
2
3
GHI
JKL
MNO
4
5
6
PRS
TUV
WXY
7
8
9
∗
Note:
Accessing Directory Search when you are logged into your
mailbox, or from the Leave Message menu, is achieved by the following:
If your system uses two digit extension numbers dial ‘99’.
If your system uses three digit extension numbers dial ‘999’.
If your system uses four digit extension numbers you will need to dial ‘9999’
Issue 1
Page 8
QZ
0
#
Voice Mail User’s Manual
2.2
How to answer calls on a system with Voice Mail
Now that your telephone system has a Voice Mail system installed you may find that calls which appear to be coming
from an internal extension are in fact external calls being transferred to you by the Voice Manager. Consequently it is
suggested that all calls should be answered as if they were external calls.
2.3
How to transfer a caller to leave a message in someone's mailbox
If you answer a call for someone, who you know is unavailable, you can transfer the caller to that person’s mailbox so
they can leave a message. The method used is similar to that used to leave a message described above.
a)
Put the caller on hold. Dial 553.
b)
When you hear the announcement "Please dial the mailbox number". Dial the mailbox number of the person
the caller wants to leave a message for.
c)
As soon as you start to hear the announcement "Please leave your message for <name of person> now" hang
up. The caller will then be connected to the mailbox.
Issue 1
Page 9
Voice Manager 4.6 & 4.7
2.4
Leaving messages
2.4.1
Leaving a message for someone
Messages are usually left because the extension you are calling has been diverted to the Voice Manager because it is
engaged, unanswered or the person is unavailable. In this case follow the spoken instructions and give your message.
Then either hang up, or dial ‘∗‘ for the Leave Message menu.
You may wish to leave a message for someone who is busy or unavailable and does not have their phone diverted to
the Voice Manager. In this case proceed as follows:
a)
Dial 553
b)
You will hear the announcement "To leave a message dial the mailbox number"
c)
Dial the mailbox number of the person you want to leave the message for. The mailbox number is usually the
same as their extension number. Alternatively if you do not know the mailbox number and you have an
alphanumeric keypad you may be able to dial ‘9’ to use Directory Search.
d)
Once you have selected the mailbox you will hear the announcement "Please leave your message for <name of
person> now". Give your message and either hang up, or dial ‘∗‘ for the Leave Message menu.
Once you have finished leaving a message you can dial ‘∗‘ to access the Leave Message menu. When you first dial ‘∗‘
after leaving a message you will hear the following:
“To hear the full list of Options
to Review your message
to Discard your message
to Re-Record your message
or hit the ‘∗‘ key to send the message and continue”
dial 0
dial 1
dial 2
dial 3
These functions enable you to check the message and re-record it if necessary or send the same message to a number of
people. It also allows you to do a number of other things with the message. These are fully described in the following
sections.
2.4.2
Leaving more than one message at a time
Sometimes you may require to leave a number of different messages to different people without having to hang-up and
dial in for each message. This can be done as follows:
a)
Once you have finished leaving a message dial ‘∗’, this will give you the Leave Message menu.
b)
Dial ‘∗’ again to Send and Continue, this will return you to the previous operation which will either:
• give the prompt “If you wish to leave another message dial the mailbox number",
• or return you to the Auto Operator greeting at which point you have to dial ‘#’ to leave a message.
c)
Dial the mailbox of the next person and leave another message.
d)
Steps a) - c) can be repeated for as many messages as you require to leave.
Issue 1
Page 10
Voice Mail User’s Manual
2.4.3
Using the Leave Message menu
Once you have finished leaving a message you can dial ‘∗‘ to access the Leave Message menu. This enables you to
check the message and re-record it if necessary or send the same message to a number of people. It also allows you to
do many other things with the message.
Leave Message menu
After Leaving a message remain silent or dial∗
1
Review message
to hear the message you
have just left
2
Discard message
to cancel the message you
have just left
3
Re-Record message
to re-record the message
you have just left
Change Recipients
to send the message to
more than one person
(section 2.4.4)
Postpone Delivery
to delay delivery of the
message to a specified
time & date
(section 2.4.5)
6
mark as Urgent
to have the message heard
before the recipients other
messages
(section 2.4.6)
7
mark as Private
to warn the recipient that the
message is confidential
before they listen to it
(section 2.4.6)
8
Force a Reply
to ensure that the recipient
has to give a reply to your
message
(section 2.4.7)
9
Recorded Delivery
to notify you when the
recipient has either read
your message or has not
read it after a specified time
(section 2.4.8)
∗
Send message
and Continue
4
5
1
2
3
0
∗
Add a recipient
Remove a recipient
List of recipients
for Help
return to previous menu
to send the message and
return you to the previous
operation so you can leave
another message
Options 8 and 9 are only available if your mailbox number is known. This will only happen if you have logged into
your mailbox first before leaving the message.
Issue 1
Page 11
Voice Manager 4.6 & 4.7
2.4.4
Leaving the same message for a number of people
There are two ways to send the same message to more than one person.
.By setting a list of Recipients
A list of recipients is a temporary list of mailboxes to which a message can be sent. The list only lasts for the
message being sent. A new list has to be setup every time a message is required to be sent to more than one person.
This is achieved as follows:
a)
Once you have finished leaving your message dial ‘∗ 4‘ to access the Change Recipients option in the
Leave Message menu.
b)
You will be given the following menu:
To Add a recipient
to Remove a recipient
to hear the List of recipients
or for more Help
dial 1
dial 2
dial 3
dial 0
c)
Dial 1 and then enter the mailbox number of the next person you wish to send the message to. If you do not
know the mailbox number you may dial 999 at this point to use the directory search facility. Then by
referring to the alphanumeric keypad on the Quick Reference Card you can dial the first few letters of the
name followed by #. Otherwise dial # to hear a complete list of mailbox names and numbers.
d)
Repeat the previous step for each additional recipient.
e)
Once all recipients have been entered in to the list either hang up or dial ‘∗‘ to return to the Leave message
menu to make other settings to the message.
.By using a Mailing List
A Mailing List is a permanent list of mailboxes to which messages can be sent. Each Voice Mail user can have up
to nine personal mailing lists, numbered 01 to 09. In addition there are 90 system mailing lists which can be used
by everyone, numbered 10 to 99.
To send a message to a personal mailing list Dial 555 from your own phone, or dial 553 followed by '∗' and your
mailbox number. After entering your password Dial '#' to leave a message followed by '#' and the two digit mailing
list number. When prompted, leave your message after the tone and hang up.
To send a message to a system mailing list Dial 553. When asked to dial the mailbox number dial '#' followed by
the two digit mailing list number. When prompted, leave your message after the tone and hang up.
To set up and change your personal mailing lists refer to section 2.7.3. System mailing lists are set up by your
Systems Manager, who should publish a list of available system mailing lists.
Issue 1
Page 12
Voice Mail User’s Manual
2.4.5
Postponing the delivery of a message you have left
This allows you to delay delivery of the message until a specified date and time. This can also be used as a personal
reminder system. To do this leave a message to yourself and postpone delivery until the time and date that you want to
be reminded. The procedure is as follows:
a)
Once you have finished leaving your message dial ‘∗ 5‘ to access the Postpone Delivery option in the Leave
Message menu.
b)
You will be asked to enter the date that you want the message to be delivered as 4 digits, in the form day
day month month.
c)
You will then be asked to enter the time that you want the message to be delivered as 4 digits, in the form
hour hour minute minute.
d)
The system will then confirm the date and time that you entered. If this is not correct then dial 5 to repeat
the process.
2.4.6
Indicating that a message is Urgent and/or Private
Marking a message as Urgent will ensure that the recipient will hear your message before their other messages. Also
specific message follow-me numbers can be set to only call you back with urgent messages. Marking a message as
Private will warn the recipient that the message is confidential before playing the message to them. This is particularly
useful when people listen to their messages ‘hands free’ using the speaker on the phone. To apply these options the
procedure is as follows:
a)
Once you have finished leaving your message dial ‘∗‘ to access the Leave Message menu. Then to mark the
message as Urgent dial ‘6’ and/or to mark it as Private dial ‘7’.
b)
The system will then confirm that the message is marked as Urgent or Private.
2.4.7
Ensuring you receive a reply to a message you have left
This ensures that the recipient of the message has to leave a message in reply, before your message is marked as read.
This option is only available if the system knows your mailbox number. The procedure is as follows:
a)
Once you have finished leaving your message dial ‘∗ 8‘ to access the Forced Reply option in the Leave
Message menu.
b)
The system will then confirm that the message is marked for forced reply.
2.4.8
Ensuring you receive notification of delivery of a message
This allows you to be automatically notified when the recipient has read your message. You can also be notified if your
message has not been read after a specified number of days. This option is only available if the system knows your
mailbox number. The procedure is as follows:
a)
Once you have finished leaving your message dial ‘∗ 9‘ to access the Recorded Delivery option in the Leave
Message menu.
b)
You will be asked to enter the number of days after which you will be notified, if the message has not been
read, as 2 digits.
c)
The system will confirm that your message will be sent recorded delivery.
The notification message will be placed in your voice mailbox at midnight on the morning that the notification
becomes due. For example if you wanted to be notified first thing tomorrow morning about a message you left today
then you would dial ‘01’ for the number of days.
Issue 1
Page 13
Voice Manager 4.6 & 4.7
2.5
Reading messages
2.5.1
Reading your messages
If you have new messages waiting to be read a Message Waiting Indicator may be displayed on your phone.
Alternatively you may be called back by the Voice Manager to deliver your messages to you, in which case proceed to
step b). Otherwise to read your messages proceed as follows:
a)
From your own phone dial 555, or if you have unread messages waiting for you the Message Waiting indicator
will be displayed on your phone. In this case press the Forward key and lift the handset. From another
extension dial 553 followed by '∗' and your mailbox number.
b)
You will be asked to enter your password. The password is initially set to '1234'.
c)
If your mailbox is set to Auto Deliver messages (default operation):
This is the quick and simple method. You will be told how many messages you have, then all your unread
messages will be played to you. Once you have heard your messages you will be given the Voicemail Main
menu as follows:
“To Process a message
for a Summary of your messages
for other Options
dial 1
dial 2
dial 0”
To listen to a message which has previously been read dial ‘1’ to Process a message. When requested for the
message number, key in the number of the message followed by ‘#’. Then dial ‘1’ to play it.
Individual messages are identified by a number. These numbers can be heard from the Summary of
your messages, listened to by dialling ‘2’ from the Main menu.
d)
If your mailbox is NOT set to Auto Deliver messages:
This method has the advantage of allowing you to deal with each message after you have heard it without
having to remember the message number. You will be told how many messages you have. You will then be
given the Voicemail Main menu as follows:
“To Process a message
for a Summary of your messages
for the Next new message
for other Options
dial 1
dial 2
dial 3
dial 0”
To play your oldest unread message Dial ‘3’. Once the message has been read you will be given the Process
Message menu as follows:
“To Play the message
to Delete it
for the Next message
or for other Options
dial
dial
dial
dial
1
2
3
0”
Dialling ‘1’ will re-play the message and return to this menu. Dialling ‘2’ will delete the current message and
then play the next message. Dialling ‘3’ will play the next message and then return to this menu. The Other
options are detailed in the following pages.
Message Playback Control
While listening to a message you can control its playback with the following keys:
to Rewind 5 seconds
to Pause or Resume
to Fast Forward 5 seconds
dial 7
dial 8
dial 9
A message is not marked as read until you have heard the end of the message. However pressing the '∗' key
while listening to the message will jump to the end and mark it as read.
Issue 1
Page 14
Voice Mail User’s Manual
2.5.2
Using the Voice Mail Menus
When the Voice Mail is accessed, by dialling 553 or 555, the following spoken list of options, or menus are offered:
Voice Mail Menus
Access to Voicemail to read your
No
All unread
messages are
played
Auto Deliver
messages ?
messages
1
2
4
∗
Yes
Play All unread messages
Delete All read messages
Forward All messages
return to main menu
Yes
1
To Process a
message
dial the
message No.
followed by '#'
or '#' only for all
messages
'#' only
dialled ?
No
2
3
Play the Next new
message
6
Recover message
just deleted
7
Mailbox Settings
8
set your Unavailable
message
9
to Speak to a
Person
#
Issue 1
Summary of your
messages
first new
message is
played
1
2
3
4
5
6
7
8
9
∗
#
Play the message
Delete the message
select Next message
Forward the message
Reply to the message
select Previous message
add Comment to message
hear the message History
Save message
return to main menu
Leave a message
Mailbox setting menu
see section 2.7
1
2
3
4
∗
to Leave a message
Page 15
Hear unavailable message
Delete unavailable message
Record new message
to change Expiry Date
return to main menu
Voice Manager 4.6 & 4.7
2.5.3
Deleting your old messages
A message cannot be deleted until it has been read, or marked as read by dialling ‘∗‘ while it is being listened to.
Usually read messages are deleted automatically at midnight two days after they were sent.
A messages can also be deleted by dialling '2' after you have finished listening to it. Otherwise proceed as follows:
a)
Dial 555 from your own phone, or dial 553 followed by '∗' and your mailbox number.
b)
You will be asked to dial your mailbox number. This will be followed by a request for your password. The
password is initially set to '1234'.
c)
From the Voice Mail menu dial '1’ to Process a message.
d)
When requested for the message number to be processed, key in the number of the message followed by ‘#’.
Then dial ‘2’ to delete it.
Individual messages are identified by a number. These numbers can be heard from the Summary of
your messages, listened to by dialling ‘2’ from the Main menu.
Alternatively you can dial '#' on its own followed by ‘2’ to delete all old messages.
2.5.4
Saving a message for a specific period of time
Old messages are normally deleted automatically at midnight two days after they were sent. However, you can specify
the number of days that you wish to keep a particular message.
Usually messages are given a deletion time by dialling ‘9’ when you have finished listening to the message. You will
then be taken to step e) below. Otherwise proceed as follows:
a)
Dial 555 from your own phone, or dial 553 followed by '∗' and your mailbox number.
b)
You will be asked to dial your mailbox number. This will be followed by a request for your password. The
password is initially set to '1234'.
c)
From the Voice Mail menu dial '1’ to Process a message.
d)
When requested for the message number to be processed, key in the number of the message followed by ‘#’.
Then dial ‘9’ to select the Save message option.
Individual messages are identified by a number. These numbers can be heard from the Summary of
your messages, listened to by dialling ‘2’ from the Main menu.
e)
You will be told the current deletion time for the message. Then you will be asked to key in the number of days
to retain the message as two digits. For example to keep the message for five days dial ‘05’.
To prevent the message from being automatically deleted dial ‘00’, or dial ‘∗‘ to leave the deletion time
unchanged.
Issue 1
Page 16
Voice Mail User’s Manual
2.5.5
Copying a message to another mailbox
This gives you the ability to copy, or forward, a single message, or all messages, from your mailbox to someone else's
mailbox. Copied messages are retained in your mailbox and are marked as unread in the mailbox to which they have
been sent.
Usually this is achieved by dialling '4' when you have finished listening to the message. You will then be taken to step
e) below. Otherwise proceed as follows:
a)
Dial 555 from your own phone, or dial 553 followed by '∗' and your mailbox number.
b)
You will be asked to dial your mailbox number. This will be followed by a request for your password. The
password is initially set to '1234'.
c)
From the Voice Mail menu dial '1’ to Process a message.
d)
When requested for the message number to be processed, key in the number of the message followed by ‘#’.
Then dial ‘4’ to select the Forward message option.
Individual messages are identified by a number. These numbers can be heard from the Summary of
your messages, listened to by dialling ‘2’ from the Main menu.
Alternatively you can dial '#' on its own followed by ‘4’ to forward all messages.
e)
You will be asked to key in the number of the mailbox to forward the message to. Alternatively if you do not
know the mailbox number and you have an alphanumeric keypad you can dial ‘999’ to use Directory Search.
Once you have selected the mailbox number you will be asked if you want to add a comment, which the
recipient will hear before listening the message. To add a comment just speak otherwise remain silent or dial
‘∗’ to send and continue.
The system will confirm that the message(s) have been forwarded and to whom.
2.5.6
Replying to a message
This gives you the ability to reply to a message without having to key in the sender’s mailbox number. Usually this is
achieved by dialling '5' when you have finished listening to the message. You will then be taken to step e) below.
Otherwise proceed as follows:
a)
Dial 555 from your own phone, or dial 553 followed by '∗' and your mailbox number.
b)
You will be asked to dial your mailbox number. This will be followed by a request for your password. The
password is initially set to '1234'.
c)
From the Voice Mail menu dial '1’ to Process a message.
d)
When requested for the message number to be processed, key in the number of the message followed by ‘#’.
Then dial ‘5’ to select the Reply to a message option.
Individual messages are identified by a number. These numbers can be heard from the Summary of
your messages, listened to by dialling ‘2’ from the Main menu.
e)
To reply to a message from an internal user you will be asked to leave your reply as a message in the sender’s
mailbox.
This function is only effective if the original caller left you the message from their personal extension
or left the message when they were logged into their mailbox.
To reply to a message from an external caller, for which the calling number was identified, you will be given
the option for that number to be rung.
Issue 1
Page 17
Voice Manager 4.6 & 4.7
2.5.7
Adding a Comment to a message
This gives the ability for you to record a message to add to the beginning of one of the messages left in your mailbox
prior to transferring it to someone else.
Usually a comment is added by dialling ‘7’ when you have finished listening to the message. You will then be taken to
step e) below. Otherwise proceed as follows:
a)
Dial 555 from your own phone, or dial 553 followed by '∗' and your mailbox number.
b)
You will be asked to dial your mailbox number. This will be followed by a request for your password. The
password is initially set to '1234'.
c)
From the Voice Mail menu dial '1’ to Process a message.
d)
When requested for the message number to be processed, key in the number of the message followed by ‘#’.
Then dial ‘7’ to select the Add Comment option.
Individual messages are identified by a number. These numbers can be heard from the Summary of
your messages, listened to by dialling ‘2’ from the Main menu.
e)
Issue 1
You are then requested to record your comment. Press the ‘∗‘ key to terminate the recording.
Page 18
Voice Mail User’s Manual
2.6
Setting and clearing your temporary 'Unavailable Message'
This allows you to record a temporary Unavailable Message which the caller will hear, instead of your normal
personal greeting, when a call is diverted to Voice Manager. This will occur when you have selected Divert, your
phone is engaged or is not answered.
To set up your Unavailable Message by the quick method:
a)
Dial 551 from your own phone. You will be prompted to leave your unavailable message after the tone. At the
tone give your message (it must be longer than 3 seconds) and hang-up.
b)
This message is automatically deleted at midnight, or earlier, by dialling 552 from your own phone.
If you are not at your own phone, or an unavailable message is required for a longer period a longer method must be
used. In this case the Expiry date may be specified. For example if you were going on holiday you could leave a
message such as:
"Hello, this is John Smith. I will not be returning to the office until July the second"
This would be followed by giving the caller the option of leaving a message for you.
To set up the Unavailable Message given in the example above proceed as follows:
a)
Dial 555 from your own phone, or dial 553 followed by '∗' and your mailbox number.
b)
You will be asked to dial your mailbox number. This will be followed by a request for your password. The
password is initially set to '1234'.
c)
From the Voice Mail menu dial '8' to change your unavailable message.
e)
You will be told if you already have an unavailable message active. This is followed by a menu of options:
to Hear your unavailable message
to Delete it
to Record a new message
to change the Expiry date
Dial 1
Dial 2
Dial 3
Dial 4
f)
Dial 3, then after the prompt give your Unavailable Message. Just give the reason why you are not answering
the phone. Do not give any instructions about leaving messages, this will be added automatically by Voice
Manager. Terminate the recording by dialling ‘∗‘.
g)
When the menu is replayed dial 4. You will hear the following:
"Enter the day, after which, the unavailable message is to expire as day day month month"
h)
Key in 0107, ie. the last day you will be away on.
If you wish to delete an unavailable message dial 552 from your own phone, or follow the procedure above but select
option 2.
Issue 1
Page 19
Voice Manager 4.6 & 4.7
2.7
Changing your Voice Mailbox Settings
To change your Voice Mailbox settings proceed as follows:
a)
Dial 555 from your phone, or 553 followed by '∗' and your mailbox number.
b)
You will be asked to dial your mailbox number. This will be followed by a request for your password. The
password is initially set to '1234'.
c)
From the Voice Mail menu dial '7' to change your Voice Mail settings.
d)
You will hear the following menu:
to change your Password
to change your Temporary Follow-Me numbers
to change your Mailing Lists
to change your Personal Greetings
to change your Unread message Forwarding settings
to change your Advanced settings
for Help
to return to the Main Menu
to Leave a message
Issue 1
Dial
Dial
Dial
Dial
Dial
Dial
Dial
Dial
Dial
1
2
3
4
5
6
0
∗
#
‘1’
To change your Password
see section 2.7.1
‘2’
To change your Temporary Follow-Me number
see section 2.7.2
‘3’
To change your Mailing Lists
see section 2.7.3
‘4’
To change your Personal Greetings
see section 2.7.4
‘5’
To change your Unread message Forwarding settings
see section 2.7.5
‘6’
To change your Advanced settings
see section 2.7.6
Page 20
Voice Mail User’s Manual
From the Main Menu dial 7
Change Voicemail Settings
1
Change Password
2
Temporary
Follow-Me number
3
4
Issue 1
1 Play Temp Follow-me No
2 Delete Temp Follow-me No
3 Summary of Follow-me Nos
4 Set Temp Follow-me No
∗ return to previous menu
1 Hear a Mailing List
2 Delete a Mailing List
3 Summary of Mailing Lists
4 Create a Mailing List
5 Add a Person to a List
6 Remove Person from List
∗ return to previous menu
Mailing Lists
Personal Greetings
5
Unread Message
Forwarding Settings
6
Advanced Settings
0
for Help
1 Hear Personal Greeting
2 Change Personal Greeting
3 Hear Leave Prompt
4 Change Leave Prompt
0 for Help
∗ return to previous menu
1 Hear Forwarding Settings
2 Set Forward To Mailbox
3 Set Forward When Time
4 Set Notify Mailbox
5 Set Notify When Time
0 for Help
∗ return to previous menu
1 Automatic Delivery mode
2 Brief mode
3 Expert mode
4 Retention Days
5 Call Screening
6 Advanced Follow-Me
0 for Help
∗ return to previous menu
Page 21
Voice Manager 4.6 & 4.7
2.7.1
Setting a security password for your voice mailbox
To enable your voice mailbox to be private so that other people cannot read your messages you should set a
confidential password from your own phone. This will also prevent other people from changing your various Voice
Mail settings such as message follow-me numbers. Your password will be requested in the following circumstances:
1)
When you dial into the Voice Mail system from any phone you will always be required to enter your password.
2)
The System Manager can program your mailbox not to require a password from you when you dial in from
your own extension.
3)
When you are called back with new messages by the Voice Mail service you will need to enter your password,
unless you have set any of your message follow-me numbers not to need a password.
Initially your password is set to 1234. This can be changed by you from a phone by carrying out the procedure detailed
below. Your password can be set to any number from 0 to 999999999. You are not allowed to reset it to ‘1234’. If you
should forget your password the System Manager has the ability to clear it so that you can re-enter another.
For the purpose of an example your password will be changed to 343.
a)
Dial 555 from your extension, or 553 followed by '∗' and your mailbox number from any other extension.
b)
You will be asked to dial your mailbox number. This will be followed by a request for your password. The
password is initially set to '1234'.
c)
From the Voice Mail menu dial '7' to select the 'Change Mailbox Settings' followed by dialling '1' to select the
Change Password option.
d)
You will hear the following: "Enter your new password terminated with a star".
e)
Dial in your new password '343∗'
f)
You will be asked to enter your new password in again for confirmation, so dial '343∗'.
g)
If both numbers were dialled correctly the Voice Manager will confirm that the password has been changed.
Extra Security measures:
For additional security it is strongly recommended that you change your password from time to time. The Voice
Manager can remind you to do this on a regular basis.
If the Voice Manager detects that a series of incorrect passwords have been used to try to gain access to your
mailbox it will Lock your mailbox. This will inhibit access to your mailbox, except from your own phone, until
the mailbox is Unlocked by the Voice Manager supervisor on the screen. Message follow-me will however
continue to operate normally when your mailbox is locked.
Issue 1
Page 22
Voice Mail User’s Manual
2.7.2
Setting a temporary number to call you on with your messages or calls
Follow-Me numbers are used to call you on with unread messages and/or calls which have been routed to you by the
Auto Operator. Follow-me numbers are a part of your voice mailbox settings. The standard setting is that follow-me
numbers for calls are not allowed. This is controlled by your system supervisor.
Message Follow-Me numbers are an important component of the Voice Mail system. Once set up they ensure that you
receive your messages even though you may forget to dial in and check your mailbox. You will be called back only if
you have new, or unread, messages waiting to be read. Initially your mailbox is given the Follow-Me number of your
extension which is set up to call you back every hour during normal office hours Monday to Friday.
This section deals with your Temporary Follow-Me number only. For details of follow-me settings in general see The
Follow-Me Facility section 2.8.
Your Temporary Follow-Me number can be set to be either an internal or an external number. It can be used either
instead of or as well as your extension number. You can either specify the number to use or select one from a list of
predefined numbers. The times during which the temporary number will be active are controlled by the systems default
follow-me times.
A predefined follow-me number is a number setup in your voice mailbox by your system supervisor. You may find that
you are not allowed to use some numbers. The standard setup will only allow internal numbers and external numbers
starting 01. This is controlled by your system supervisor.
To set your Temporary Follow-Me number proceed as follows:
a)
Dial 555 from your phone, or 553 followed by '∗' and your mailbox number.
b)
You will be asked to dial your mailbox number followed by your password.
c)
From the Voice Mail menu dial '7' to select 'Change Mailbox Settings' followed by dialling '2' to select the
Temporary Follow-Me number option.
d)
You will hear the following:
either:
“To Play your temporary follow me number
To Delete it
or for a Summary of all your follow me numbers
Dial 1 to play
this will give all the details of your temporary follow-me number.
Dial 2 to delete
this will delete your temporary follow-me number and confirm it.
Dial 3 for a Summary
this will give you a numbered list of all your follow-me numbers.
or:
“You have no temporary follow-me number
dial a 4 to set one
or ∗ to return to the previous menu”
(continued over page)
Issue 1
dial 1
dial 2
dial 3”
Page 23
Voice Manager 4.6 & 4.7
Setting your Temporary Follow-me number (continued)
Dial 4 to set a number
this allows you to select and activate your temporary follow-me number. You
are given the following options:
dial 1 to enter a new follow me number
“Enter the follow-me number terminated with a #, or ∗ to abort”
dial 2 to use a predefined one
this plays the list of available numbers, dial the number specified to select it
(only offered if you have predefined numbers)
dial 3 or to use the phone you are on
it gives an opportunity to confirm the use of this number
(only offered when the CLI No. is known)
Once your temporary follow-me number has been entered or selected you will hear the following:
“To use the No. for messages dial 1, for incoming calls dial 2 or for both dial 3.”
(You will be asked this only if both call and message follow-me are available for
the selected number)
You will then be asked for the following:
“Enter the number of hours to make the No. active for or zero for permanently.
You can enter from 1 to 9 hours after which the number will be automatically deleted. Entering
zero will prevent this.
If you wish the standard number to be called after this one then dial 1, otherwise dial 2.
If you dial 1 your extension number will be called if your temporary follow-me number is not
answered. If you dial 2 only your temporary follow-me number will be called.
The follow-me number has been set. Active from ....”
You will be told the times during which this number will be active. These are pre-set by the
system supervisor.
Issue 1
Page 24
Voice Mail User’s Manual
2.7.3
Setting up and changing Mailing Lists
A mailing list is a list of mailbox numbers. As a Voice Mail user you can have up to nine personal mailing lists. You
can use these to simultaneously send the same message to a number of other people’s Voice Mailboxes.
To Create or change your personal Mailing lists proceed as follows:
a)
Dial 555 from your phone, or 553 followed by '∗' and your mailbox number.
b)
You will be asked to dial your mailbox number. This will be followed by a request for your password. The
password is initially set to '1234'.
c)
From the Voice Mail menu dial '7' to select the 'Change Mailbox Settings' followed by dialling '3' to select the
Mailing List menu.
d)
You will hear the following menu:
to Hear a mailing list
to Delete a mailing list
to hear a Summary of your mailing list
to Create a mailing list
to Add a person to a mailing list
to Remove a person from a mailing list
or ‘∗‘ to take you back to the previous menu"
Dial
Dial
Dial
Dial
Dial
Dial
1
2
3
4
5
6
Dial 1 to Hear a mailing list
Dialling 1 will request you to dial the number of the Mailing List (01-09) whose details you wish to hear.
Once the Mailing List number has been dialled you will be given the name of the mailing list followed by the
names or extension numbers of the mailboxes included in the list.
Dial 2 to Delete a mailing list
Dialling 2 will request you to dial the number of the Mailing List which you wish to delete. Once the Mailing
List number has been dialled confirmation is given that the required mailing list has been deleted.
Dial 3 to hear a Summary of your mailing list
Dialling 3 will give you a summary of your mailing lists stating the number and name of each list.
Dial 4 to Create a mailing list
Dialling 4 will request you to dial the number of the Mailing List (01-09) you wish to create. Once the
Mailing List number has been dialled you will be asked to record a descriptive name for the mailbox.
Terminate the recording by pressing any key. This is followed by a request to dial the mailbox numbers that
you wish to be included in the mailing list. As each mailbox is dialled its existence is checked and confirmed
by giving the mailbox user’s name. When you have dialled the last mailbox number and it has been
confirmed, dial a '∗' to complete the process.
Issue 1
Page 25
Voice Manager 4.6 & 4.7
Dial 5 to Add a person to a mailing list
Dialling 5 will request you to dial the number of the Mailing List (01-09) to which wish to add mailboxes.
Once the Mailing List number has been dialled you will be asked to dial the mailbox numbers that you wish
to be added to the mailing list. Alternatively if you do not know the mailbox number and you can refer to the
alphanumeric keypad on the Quick Reference Card you can dial ‘999’ to use Directory Search.
As each mailbox is selected its existence is checked and confirmed by giving the mailbox user’s name. When
you have dialled the last mailbox number and it has been confirmed, dial a '∗' to complete the process.
Dial 6 to Delete a person from a mailing list
Dialling 6 will request you to dial the number of the Mailing List (01-09) from which you wish to delete
mailboxes. Once the Mailing List number has been dialled you will be asked to dial the mailbox numbers that
you wish to be deleted from the mailing list. Alternatively if you do not know the mailbox number and you
can refer to the alphanumeric keypad on the Quick Reference Card you can dial ‘999’ to use Directory
Search.
As each mailbox is selected its existence is checked and confirmed by giving the mailbox user’s name. When
you have dialled the last mailbox number and it has been confirmed, dial a '∗' to complete the process.
Issue 1
Page 26
Voice Mail User’s Manual
2.7.4
How to change your Personal Greetings
There are three speech files associated with your mailbox. The Mailbox Name, the Personal Greeting and the Leave
Prompt. All but the Name can be changed by you to give a more personal response to callers who have been diverted
to your mailbox or are leaving messages for you.
To change your personal greetings proceed as follows:
a)
Dial 555 from your phone, or 553 followed by '∗' and your mailbox number.
b)
You will be asked to dial your mailbox number. This will be followed by a request for your password. The
password is initially set to '1234'.
c)
From the Voice Mail menu dial '7' to select the 'Change Mailbox Settings' followed by dialling '4' to select the
Personal Greetings menu.
d)
You will hear the following menu:
“To hear your Personal Greeting
to change your Personal Greeting
to hear your Leave Prompt
to change your Leave Prompt
for Help
or ‘∗‘ to take you back to the previous menu"
Dial
Dial
Dial
Dial
Dial
1
2
3
4
0
Personal Greeting
This enables you to change the standard greeting given to callers when they are diverted to your voice
mailbox which says "You have been diverted to the messaging service because <mailbox name> is
unavailable".
To change your greeting dial ‘2’. You are asked to "Enter your personal greeting terminated by a star". This
is followed by a tone, at which point you record your new message leaving prompt. For example you could
say:
"Hello this is John Smith, I am sorry I cannot take your call at the moment but if you would like to
leave a message for me I'll see to it as soon as possible".
When you have finished recording your greeting press the '∗' key. This completes the recording and returns
you to the menu. To listen to your greeting dial ‘1’. If however you do not like the recording then dial ‘2’ and
start again.
Leave Prompt
This enables you to change the standard prompt given to callers when they are asked to leave a message for
you which says "Please leave your message for <mailbox name> now".
To change your leave prompt dial ‘4’. You are asked to "Enter your leave prompt terminated by a star". This
is followed by a tone, at which point you record your new message leaving prompt. For example you could
say:
"Please give your name and telephone number followed by your message, thank you for your call.
Speak after the tone".
When you have finished recording your leave prompt press the '∗' key. This completes the recording and
returns you to the menu. To listen to your leave prompt dial ‘3’. If however you do not like the recording then
dial ‘4’ and start again.
Issue 1
Page 27
Voice Manager 4.6 & 4.7
2.7.5
Dealing with unread messages left for you when you are not available
This facility allows you to arrange to have the Voice Mail system automatically forward copies of your unread
messages to someone else’s mailbox, after a period of time. It can also automatically leave a message in someone
else’s mailbox, after a period of time, to notify them that you have unread messages.
To change your unread message forwarding settings proceed as follows:
a)
Dial 555 from your phone, or 553 followed by '∗' and your mailbox number.
b)
You will be asked to dial your mailbox number. This will be followed by a request for your password. The
password is initially set to '1234'.
c)
From the Voice Mail menu dial '7' to select the 'Change Mailbox Settings' followed by dialling '5' to select the
Unread message Forwarding menu.
d)
You will hear the following menu:
To hear your unread message forwarding settings
to set an unread Forward mailbox
to set an unread Forward time
to set an unread Notify mailbox
to set an unread Notify time
for Help
to return to the previous Menu
Dial 1
Dial 2
Dial 3
Dial 4
Dial 5
Dial 0
Dial ∗
Setting up your Unread message Forward mailbox
This allows you to have your messages automatically forward copies, to someone else’s mailbox in the event
that you are unable to read your messages after a period of time. The default time after which messages are
forwarded is set to three days.
To setup your Unread message forward mailbox dial ‘2’. You will be asked to dial the number of the mailbox
which you want your messages forwarded to. Alternatively if you do not know the mailbox number and you
can refer to the alphanumeric keypad on the Quick Reference Card you can dial ‘999’ to use Directory
Search.
To change the time after which the message is forwarded dial ‘3’. You will be asked to “Enter the number of
days as two digits” ie if you want to set it to two days dial ‘02’.
If you want to cancel the Unread message forwarding arrangement then set the Unread message forward time
to ‘00’.
Setting up your Unread message Notify mailbox
This allows you to arrange to have someone else notified in the event that you are unable to read your
messages after a period of time. The default time after which they will be notified is set to three days.
To setup your Unread message notify mailbox dial ‘4’. You will be asked to dial the number of the mailbox of
the person you want to be notified. Alternatively if you do not know the mailbox number and you can refer to
the alphanumeric keypad on the Quick Reference Card you can dial ‘999’ to use Directory Search.
To change the time after which you want someone else to be notified dial ‘5’. You will be asked to “Enter the
number of days as two digits” ie if you want to set it to two days dial ‘02’.
If you want to cancel the Unread message notification arrangement then set the Unread message notify time
to ‘00’.
Issue 1
Page 28
Voice Mail User’s Manual
2.7.6
Changing your Advanced Voice Mail Settings
Dialling '6' from the Mailbox Setting menu gives the Advanced settings sub-menu:
to change your Automatic Delivery Mode
to change your Brief Mode
to change your Expert Mode
to change your Retention Days
to change your Call Screening
for Advanced Follow-Me settings
for Help
to return to the previous Menu
Dial 1
Dial 2
Dial 3
Dial 4
Dial 5
Dial 6
Dial 0
Dial ∗
To change your Automatic Delivery mode (dial 1)
This controls whether your unread messages are automatically played to you one after another without a break. It
also controls whether you are allowed to deal with each message after you have listened to it without having to
remember the message number. Initially this is set to ON. When this option is selected you will be told your
current setting. You will then be prompted to dial '1' to change it or '∗' to leave it as it is.
To change your Brief mode
(dial 2)
This controls whether or not you are given a personal welcome to your mailbox and information about who left
the message and when, which is played to you each time you read a message. Initially this is set to OFF. If your
Brief mode is set to ON this information will not be given, making the retrieval of messages that much quicker.
This option is aimed at frequent users of Voice Mail. When this option is selected you will be told your current
setting. You will then be prompted to dial '1' to change it or '∗' to leave it as it is.
To change your Expert mode
(dial 3)
This controls how the Voice Mail menus are given to you. Initially this is set to OFF so menus are given in the
form “To process a message dial 1, to delete a message dial 2” etc. If your Expert mode is set to ON menus will
be given in a short form eg. “1 process message, 2 delete” etc. When this option is selected you will be told your
current setting. You will then be prompted to dial '1' to change it or '∗' to leave it as it is.
To set your Retention Days
(dial 4)
This controls the number of days after which your old, read, messages will be automatically deleted. Initially this
is set to two days. When this option is selected you will be told your current delete time. Dial the number of days
required. The system expects a two digit number, if you require a time of less than 10 days then dial a leading
zero eg. 04. If you set the time to 00 messages will NOT be deleted automatically.
To change your Call Screening option
(dial 5)
This controls whether you wish external callers to identify themselves before being transferred to you. Initially
this is set to OFF. When this option is selected you will be told your current setting. You will be prompted to dial
'1' to change it or '∗' to leave it as it is.
For Advanced Follow-Me settings (dial 6)
For details refer to the next section 2.8.
Issue 1
Page 29
Voice Manager 4.6 & 4.7
2.8
The Follow-Me facility
Follow-Me numbers are used to call you on with unread messages and/or calls which have been routed to you by the
Auto Operator. Each number can have two functions referred to as Message Follow-Me and Call Follow-Me. They are
a part of your voice mailbox settings. The standard setting is that follow-me numbers for calls are not allowed. This is
controlled by your system supervisor.
Message Follow-Me
A follow-me number set for Message follow-me will call you back to deliver unread messages in your voice
mailbox. It will call you during the specified ‘Active Times’ and if not answered keep calling you every so
often as specified by the ‘Repeat Delay’ time. These times can be changed by you over the phone through
Advanced Follow-Me setting menus detailed below.
Call Follow-Me
A follow-me number set for Call follow-me will be used by the Auto Operator system to transfer your calls to.
It will call you during the specified ‘Active Times’ and if not answered it will try the next follow-me number,
if any, and then allow the caller to leave a message. These times can be changed by you over the phone
through the Advanced Follow-Me setting menus detailed below.
Follow-Me Security
A follow-me number can be an internal or external number. Because external numbers can be used it is
necessary for the system supervisor to be able to restrict which numbers can be used and what for.
Consequently you may find that some or all numbers are not available to you for transferring your calls to.
Temporary Follow-Me number
See section 2.7.2
The Default Follow-Me number and the significance of the Main Number setting
When a voicemail box is created, by your system supervisor, it is given a number of initial or default settings.
This includes a default follow-me number which is set to be the same as the mailbox number. This is
normally your extension number. It is set with both message and call follow-me enabled, to call you back with
your messages and to transfer calls to.
The default Follow-me number is also set to be your ‘Main’ follow-me number. It should not normally be
deleted. If you try to change or delete it you will be warned that it is your main number but you are not
prevented from making changes. It cannot be used as your temporary follow-me number. The active times
only control the message follow-me call back times. Call follow-me will always be operational.
Issue 1
Page 30
Voice Mail User’s Manual
2.8.1
Changing your Advanced Follow-Me Settings
Advanced Follow-Me menu
Dialling 66 from the Mailbox Setting Menu gives the Advanced Follow Me settings sub menu. You will be told how
many follow-me numbers you have, this is followed by the first of three sub-menus:
for Help
to Play a follow-me No
to Delete a follow-me No
for a Summary of your follow-me Nos
to Add a new follow-me No
to Edit a follow-me No
to Return to the previous menu
dial 0
dial 1
dial 2
dial 3
dial 4
dial 5 (to Follow-Me Edit menu)
dial *
Follow Me-Edit menu
On dialling 5 from the previous menu you will be asked to enter which Follow-me number you wish to edit by
“Enter which follow-me No and then dial #”. You can enter either the position of the number in the list or the
actual number itself, then dial ‘#’ to edit it. You will be given the following sub-menu:
for help
to change the follow-me Number
to change the Description
to change if it is used for messages or calls
to change the Ring time
to change the Repeat delay
to change the active Times
or for Advanced settings
to Return to the previous menu
dial 0
dial 1
dial 2
dial 3
dial 4
dial 5
dial 6
dial 7 (to Advanced Settings menu)
dial *
Advanced Settings menu
On dialling 7 from the previous menu you will be given the following sub-menu:
for help
to change the Urgent only setting
to change the Auto Delivery setting
to change the Password Required setting
to change the Pager No
to change the Digit to Accept setting
to change the Caller Message
to Return to the previous menu
Details of each menu option are given on the following pages.
Issue 1
Page 31
dial 0
dial 1
dial 2
dial 3
dial 4
dial 5
dial 6
dial *
Voice Manager 4.6 & 4.7
Advanced Follow-Me menu options
1 Play a number
Dialling 1 will request you to key in the number as defined in the summary of your
follow-me numbers (option 3). Once keyed in, you will be given all the details of
that follow-me number.
2 Delete a number
Dialling 2 will request you to key in the number as defined in the summary of your
follow-me numbers (option 3). Once keyed in that follow-me number will be
deleted.
3 Summary of numbers
Dialling 3 will give you a numbered list of your follow-me numbers.
The position in the list for two or more follow-me numbers which cover the same
time is significant. In this case the number which occurs earlier in the list will be
rung first. If there is no answer then the next number will be rung.
4 Add a new number
Dialling 4 allows you to add a new follow-me number together with how long that
follow-me number should be used for. The procedure is as follows:
a)
If you already have at least one follow-me number programmed you will be
asked which place in the list of follow-me numbers you wish to position the
new number. You simply dial the position you require. For details refer to
the previous option. Note: a number which is to be used as a predefined
number should be placed at the beginning of the list.
b)
You will then be asked to either:
Dial 1 to create a new follow-me number you will then be asked to dial
the new follow-me number terminated by a '#' or ‘∗’ to abort.
Dial 2 to use a predefined number. This plays the list of available
numbers, dial the number specified to select it. (only offered if you have
predefined numbers setup)
Dial 3 or to use the phone you are on. It gives an opportunity to confirm
the use of this number. (only offered when the CLI No. is known)
c)
If both call and message follow-me are available you will be offered: “To
use the number for messages dial 1, for incoming calls dial 2 or for both
dial 3.”
d)
Then you will be asked to “Enter the number of hours to make the number
active for or zero for permanently”. You can enter from 1 to 9 hours after
which the number will be automatically deleted. Entering zero will prevent
it being automatically deleted.
The setting of the new number will be confirmed. You will then be advised that
you can use option 5 to make advanced changes for this number.
Issue 1
Page 32
Voice Mail User’s Manual
Follow-Me Edit menu options
You are asked to select the Follow-Me number to be edited first. Once entered you will be able to use the
following options:
1 Follow-Me Number
Dialling 1 will play you the follow-me number and then ask you to change it by
dialling the new number to dial terminated by ‘#’. It should include the line access
codes where required, typically 9.
2 Description
Dialling 2 will allow you to record a name which will be used by you to verbally
identify the follow-me number.
3 Use for Messages or Calls
Dialling 3 will allow you to set whether the follow-me number is active for calls,
messages, both or none.
Setting this to none can be used to deactivate a number for later use. A number set
to none is also offered to you as a ‘pre-defined number’ when you are setting your
Temporary Follow-Me number (see section 2.7.2).
4 Ring Time
Dialling 4 will allow you to set the amount of time to ring the phone before
assuming it will not be answered.
When this option is selected you will be told your current ring time. Dial the
number of seconds required as a two digit number. If you need a time of less than
10 seconds then dial a leading zero eg. 08.
Note:
For call follow-me to your extension the ring time MUST be set to be less
than the Divert on No Answer time of your extension.
The default Ring Time for the extension number is 7 seconds and the
default ‘Divert on No Answer’ time on the extension is 10 seconds.
5 Repeat Delay
(messages only)
Dialling 5 will allow you to change the initial repeat delay of one hour. The repeat
delay controls how long the Voice Manager will wait before trying again if there
was no answer when attempting to deliver a message. Note that there is a fixed
repeat time of 3 minutes if the number was engaged.
The time should be dialled as a four digit number with the first two digits giving
the hours and the last two digits giving the minutes. For example, to set it so that
you are called every hour dial '0100'.
6 Active Times
Issue 1
see next page
Page 33
Voice Manager 4.6 & 4.7
6 Active Times
Dialling 6 will allow you to change the times during which the number can be
called and for how long that number will be active before it is deleted
automatically. Note that your main follow-me number (your extension) will always
be active for transferring calls.
You will be told the current active times and expiry time. Then you will be asked
to dial 1 to change the Active Times or dial 2 to change the Expiry time for this
follow-me number.
Dial 1 to Change the Active Times:
a)
You will be asked to give the time at which the follow-me number should
start being active. The time should be dialled as a four digit number with
the first two digits giving the hours and the last two digits giving the
minutes, eg. dial '1330' for half past one.
b)
You will be asked to give the time at which the follow-me number should
finish being active. The time should be dialled as a four digit number with
the first two digits giving the hours and the last two digits giving the
minutes, eg. dial '1430' for half past two.
c)
You will then be asked whether the follow-me number should be active
from Monday to Friday. Dial '0' for No or '1' for Yes.
d)
You will then be asked whether the follow-me number should be active on
Saturday. Dial '0' for No or '1' for Yes.
e)
You will then be asked whether the follow-me number should be active on
Sunday. Dial '0' for No or '1' for Yes.
f)
You will then be asked whether you want to set another time for the same
follow-me number. Dial '∗' for No, which will return you to the follow-me
menu. If you wish to add another time for this follow-me number you
should dial four digits to specify the time at which the follow-me number
should start to become active as covered in step a) above. This will then
repeat steps b) to e).
Dial 2 to Change the Expiry time:
This is the time after which the number will be automatically deleted.
You will be asked to enter the expiry date and time in the form day day
month month, or # for today, followed by hour hour minute minute . Dial
∗ to abort.
Advanced Settings menu options
1 Urgent
(messages only)
You will be asked whether you only want to be called back on this number with
Urgent messages or not.
When this option is selected you will be told your current setting. You will then be
prompted to dial '1' to change it or '∗' to leave it as it is.
2 Auto-Delivery
(messages only)
Auto-Delivery determines whether your messages are given to you without having
to request them.
When this option is selected you will be told your current setting. You will then be
prompted to dial '1' to change it or '∗' to leave it as it is.
Issue 1
Page 34
Voice Mail User’s Manual
3 Password Required
(messages only)
You will be asked whether you require your Password to be given before messages
can be heard.
When this option is selected you will be told your current setting. You will then be
prompted to dial '1' to change it or '∗' to leave it as it is.
The Password Required setting should normally be set to 'Yes'. If it is set to ‘No’
you will be called by the Voicemail system and told how many unread messages
you have. It then tells you to call back to read your messages and hangs up. This
prevents anyone, who answers the phone, being able to listen to your messages.
This method can be useful if the phone being called does not have a tone dialling
phone as the password could not be entered.
Your system supervisor can change the operation described above for your mailbox
so that with Password Required set to ‘No’ the system will play your messages
without your password having to be entered. This is not recommended as it is not
secure.
4 Pager
(messages only)
When the follow-me number has been called and has been answered these digits
are dialled by the Voice Manager. It is intended to work with an automatic tone
driven paging system.
When this option is selected you will be told your current setting. You will then be
prompted to dial '1' to change it or '∗' to leave it as it is. If you choose to change it
you will be asked to enter the digits to be dialled to the pager and then wait for 5
seconds.
5 Accept Digit
(calls only)
This determines whether the person answering a follow-me call is required to dial
a tone (any tone) before the call is considered as answered. This is to prevent
callers from being connected to mobile phone messaging services, answer-phones
etc.
When this option is selected you will be told your current setting. You will then be
prompted to dial '1' to change it or '∗' to leave it as it is.
6 Caller Message
(calls only)
This is used to record a message which is played to the caller before a transfer to
this follow-me number is attempted.
When this option is selected you will be told your current setting. You will then be
prompted to dial ‘0’ to clear it, dial '1' to change it or '∗' to leave it as it is. If you
choose to change it you will be asked to record the message, after the tone, and
then dial ‘#’ to finish. Dialling ‘∗’ will abort the recording.
Issue 1
Page 35
Voice Manager 4.6 & 4.7
2.9
How to use Voice Mail from an External phone
You will either be given a special number to dial which will connect you directly to Voicemail, or ask to be connected
by the operator who would connect you to extension 553. This should be followed by dialling '∗' and your mailbox
number.
Your company's system may have the Auto Operator facility installed and operating. This allows direct dialling of
internal numbers from an external line as well as direct access to the Voicemail system as follows:
a)
Access to your voice mailbox can be achieved by dialling '∗' and your mailbox number at the initial greeting of
the Auto Operator.
b)
It is also possible to leave a message in someone's mailbox if answered by the Auto Operator by dialling '#' and
their mailbox number at the initial greeting. Alternatively if you do not know the mailbox number and you can
refer to the alphanumeric keypad on the Quick Reference Card you can dial ‘999’ to use Directory Search.
When dialling into your mailbox from an outside line you will always be requested to give your password. This is
initially set to 1234. For details about passwords see earlier sub-section 'Setting a security password for your voice
mailbox' (2.7.1).
Once you have entered your password you can use the Voicemail system in just the same way as you can from an
internal extension.
NOTE:
Issue 1
To use Voicemail from an external line requires the phone you are calling from to be a tone dialling phone.
Phones in some companies with older PABX systems will not work with Voicemail as the tones are not
transmitted through to outside lines.
Page 36
Voice Mail User’s Manual
2.10
Setting up your extension for Voice Mail use
To take advantage of Voice Mail you should set up your phone so that calls are automatically diverted to the Voice
Manager. This will give you a personal answerphone service. Once the phone has been set up, calls to your extension
will be diverted to the Voice Manager when:
1)
You have pressed the Divert key.
This shows the divert symbol on your phone's display. You cancel it by pressing the Divert key
again.
2)
If you do Not Answer your phone.
After a preset time the caller is connected to the Voicemail, told that there is no answer and given
the opportunity to leave a message for you.
The ‘Divert on No Answer’ time must be at least 3 seconds greater than the Ring Time of the
Follow-Me number used by the Auto Operator to transfer calls to your extension. (see section 2.8.1)
3)
If your phone is Engaged.
The caller is connected to the Voicemail, told that the extension is busy and given the opportunity to
leave a message for you.
On an Index DT phone set the required diverts to divert to 555.
On an SDX FT phone you should set up your phone as follows:
Program the Divert key:
a)
b)
c)
d)
e)
Press the 'P' key
Press the Divert key, the display shows 'd---'
Press the '∗' key to cancel the previous number
Dial 555
Press the 'P' key to finish
Program the 'Divert When Not Answered' feature:
a)
b)
c)
d)
e)
Press the 'P' key
Press the Divert key followed by the '#' key
Press the '∗' key to cancel the previous number
Dial 555
Press the 'P' key to finish
Set the time the phone rings before being diverted:
a)
b)
c)
d)
e)
Press the 'P' key
Press the '#' key
Press the '∗' key to cancel the previous number
Enter the time in seconds
(this time must be at least 3 seconds greater than the Follow-Me number’s Ring Time)
Press the 'P' key to finish
Program the 'Divert When Engaged' feature:
a)
b)
c)
d)
e)
Issue 1
Press the 'P' key
Press the Divert key followed by pressing the '#' key twice
Press the '∗' key to cancel the previous number
Dial 555
Press the 'P' key to finish
Page 37
Voice Manager 4.6 & 4.7
3.
Using the Auto Operator
Facilities available to you are:
Direct Extension Dialling
Broadcasts
Tone Menus
Directory Name Search
3.1
How Auto Operator is used from an Internal phone
Answering a call which has been dialled directly from an outside line
Without call screening
When screening is not selected a call rings and is connected directly.
With call screening
If the screening option is set to On in your voicemail settings then a caller who has dialled your
extension will be asked, by the Voice Manager, to give their name and company. Your phone will
then be rung as an internal call, ie single interrupted rings. When you answer, the caller's name and
company will be replayed.
To accept the call dial '0'.
To reject the call dial 1, 2 or 3 which give to following messages:
Dialling '1' gives:"<your name> is unavailable".
Dialling '2' gives:
"<your name> is not in the office and is not expected back until
tomorrow".
Dialling '3' gives:"<your name> does not wish to speak to you".
Picking up a call Broadcast for you
A caller can be asked to give the name of a person or department that he wishes to speak to. The Voice
Manager will broadcast the message “Call for <name>, call for <name>". This should be answered in the
normal way by lifting the handset and pressing the Answer/Release button.
Alternatively the broadcast message may include the line number in which case the call should be answered
by dialling the line number.
Issue 1
Page 38
Voice Mail User’s Manual
3.2
How Auto Operator is used from an External phone
Dialling directly to an internal extension
If, when phoning your company, you are answered by the Auto Operator you will be prompted either to dial
an extension number, or give the name of the person or department to which you wish to speak. You can
directly dial the required extension from either of these prompts. Alternatively if you do not know the mailbox
number and you have an alphanumeric keypad you may be able to dial ‘9’ to use Directory Search.
If you only wish to leave a message for someone then dial '#' during the initial greeting. You will then be
asked to enter the person's mailbox number. Alternatively if you do not know the mailbox number and you
can refer to the alphanumeric keypad on the Quick Reference Card you can dial ‘999’ to use Directory
Search.
If you wish to access your mailbox, to read messages etc., then dial '∗' during the initial greeting. You will
then be asked to enter your mailbox number followed your password.
NOTE:
Issue 1
To use Auto Operator for direct internal dialling from an external line requires the phone you are calling
from to be a tone dialling phone.
Page 39
Voice Manager 4.6 & 4.7
4.
Using Soft Keys on INDeX Display Phones
The INDeX DT and TT phones offer an alternative method of access to some of the Voicemail features through the
soft keys associated with the LCD display on the phone. The soft keys work in addition to the normal dialling method
described in previous sections. They offer a simpler method of operation but give limited functionality. The display on
the phone will show one of the following screens depending on whether you have any new voicemail messages or not.
Note:
There are two versions of voicemail soft keys available in the Index system. The earlier version supplied on
SDX level 6.0 software had a slightly different arrangement and less functionality. The later version supplied
on SDX level 6.1 software is shown here. However, reference is made to features not available on level 6.0.
With No Messages Waiting
If there are no new messages waiting to be read the display shows the following:
• VOICE
INDEX
•
• PAGE
With Messages Waiting to be Read
If there are new or unread messages in your mailbox the display shows the following:
• From Voicemail
• LISTEN
CANCEL
•
If you select Listen the procedure is as described below for Listen. If you select Cancel it reverts to the original initial
display shown above.
4.1
Functions and Operation of Soft Keys
Selecting Voice takes you directly into Voicemail. The display then shows the following options:
• LISTEN
MODIFY
•
• MESSAGE
TEMP MSG
•
• DONE
Their functions are as follows:
Listen:
This is used to read and delete your messages.
Message:
This is used to leave messages.
Modify:
This is used to change your mailbox Password, Name, and Greeting.
Temp Msg:
This is used to set your Unavailable message.
Done:
Returns to the initial menu
Issue 1
Page 40
Voice Mail User’s Manual
Voicemail Softkey functions for the
SDX INDeX (level 6.1)
From Voicemail
Listen
• Rewind
• F-Forward
• Next
• Previous
• Delete
• When
• Copy
• Save
Voice
Message
Modify
• Review
• Rerecord
• Finish
• Send
• Next
• Listen
• Delete
• Change
• Finish
Name
Perm Msg
• Listen
• Change
• Finish
• Menu
Issue 1
Temp Msg
• Listen
• Change
• Finish
• Menu
Page 41
Password
• Menu
New Password
Voice Manager 4.6 & 4.7
Voicemail Softkey functions for the
SDX INDeX (level 6.0)
From Voicemail
Listen
• Previous
• Next
• Rewind
• When
• Forward
• Delete
Voice
Message
Modify
• Next
• Finish
• Listen
• Delete
• Change
• Finish
Name
Perm Msg
• Listen
• Change
• Done
Issue 1
Temp Msg
• Listen
• Change
• Done
Page 42
Temp Msg
• Listen
• Delete
• Change
• Done
Voice Mail User’s Manual
4.1.1
Listen
If you select Listen the display shows the following.
• CANCEL
Enter Passcode
To continue enter your password e.g. 1234. Otherwise select Cancel to return to the initial display. Once the correct
password has been entered the display shows the following:
• REWIND
FFWD
•
• NEXT
DELETE
•
• PREVIOUS
WHEN
•
• COPY
SAVE
•
(reached by pressing the scroll key)
You will then be told how many new messages you have waiting and the total number of messages in your mailbox.
Then if you have new messages they will be played to you. You can select one of the displayed options the purpose of
which is as follows:
Rewind:
This will Rewind the playback of a message by 5 seconds each time the key is pressed. This key is also
used to Re-Play the current message.
FFwd:
This will Fast Forward the playback of a message by 5 seconds each time the key is pressed.
Next:
This causes the next message to be read. If there are no more messages you are told.
Delete:
This deletes the current message. You have to select the message first, with one of the other functions.
If you do not then you are informed that no message is currently selected. Once a message has been
deleted the next message, if there is one, will be played automatically.
Previous:
This causes the previous message to be read. If there is no previous message you are told.
When:
This will tell you the message number, who the message was from, and the time and date that the
currently selected message was left. You have to select a message first. If you do not then you are
informed that no message is currently selected.
Copy:
This will copy the current message to another person’s mailbox. You will be prompted to dial the
person’s mailbox number. (not level 6.0)
Save:
Selecting this will set the message so that it will never automatically be deleted.
(not level 6.0)
Issue 1
Page 43
Voice Manager 4.6 & 4.7
4.1.2
Message
When you select Message the display asks for the number of the mailbox to which you wish to leave your message as
follows:
Dial Extension
Once you have dialled the mailbox number you will be prompted to leave your message. When you have finished
leaving your message the display is as follows.
• REVIEW
• RERECORD
FINISH •
SEND
•
• NEXT
These options have the following functions:
Review:
This will play your message back to you. (not level 6.0)
Rerecord:
This will enable you to re-record the complete message again. (not level 6.0)
Finish:
This will stop recording the current message.
Send:
This will send the message to the destination mailbox. (Optional) (not level 6.0)
Note: If Send is not pressed the message will still be sent when you hangup.
Next:
Issue 1
This allows you to leave another voicemail message. When the key is pressed you will be asked to dial
the mailbox number and then prompted to leave your message.
Page 44
Voice Mail User’s Manual
4.1.3
Modify
When you select Modify and have entered your password the display offers the following choice of functions.
• PASSWORD NAME •
• PERM MSG
These refer to the Password, Personal Greeting and mailbox Name of the user respectively. Each of these in turn give
further options described below.
Password
(not level 6.0)
To change or delete your password select Password to display the following:
• MENU
New Password
Enter the new password, the number of digits allowed is controlled by the setting of the telephone system. You will be
prompted to re-enter the password for confirmation.
Perm Msg
To check or change your greeting select Perm Msg to display the following.
• LISTEN
FINISH •
• CHANGE
MENU
•
The functions work as follows.
Listen:
This plays back your current personal greeting.
Change:
This prompts you to record your personal greeting.
Finish:
This stops recording the Personal Greeting.
Menu:
This returns you to the main Modify display. (not level 6.0)
Name
To check or change your mailbox’s name select Name to display the following.
• LISTEN
FINISH •
• CHANGE
MENU •
The functions work as follows.
Listen:
This plays back your current mailbox’s name
Change:
This prompts you to record your mailbox’s name.
Finish:
This stops recording your mailbox’s name.
Menu:
This returns you to the main Modify display. (not level 6.0)
Issue 1
Page 45
Voice Manager 4.6 & 4.7
4.1.4
Temp Msg
Selecting Temp Msg gives you immediate access to the Unavailable Message facility and the display changes to the
following.
• LISTEN
CHANGE
•
• DELETE
FINISH
•
The functions work as follows.
Listen:
This plays back your current unavailable message. If you do not have one it says so.
Delete:
This allows you to delete your unavailable message.
Change:
This prompts you to record your unavailable message.
Finish:
This stops recording your unavailable message.
4.2
Message Follow-Me
If you have an unread message you may receive a message follow-me call at your extension. If you do you will be
required to enter your password.
The display will then show the following.
• PARK
VOLUME
•
Selecting Park will terminate proceedings by hanging you up.
Issue 1
Page 46
Voice Mail User’s Manual
DOCUMENT HISTORY
Issue 1
Issue
Issue Date
Issue 1
04.Sept.97
Amendment details
Page 47
Voice Manager 4.6 & 4.7
End Page
Issue 1
Page 48