1
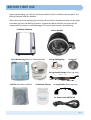
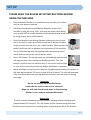
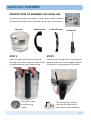
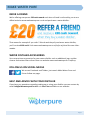
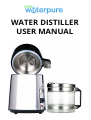
WATER DISTILLER
USER MANUAL
PRODUCT SAFETY
PLEASE READ THESE INSTRUCTIONS BEFORE OPERATING THE
APPLIANCE AND RETAIN THEM FOR FUTURE REFERENCE
⇒
This product is not suitable for use by children, and may not be suitable for persons requiring supervision unless they receive instrucon by a competent person
on how to safely use the product. Children should be supervised to ensure they do
not play with the product.
⇒
Never use this appliance for anything other than its intended use. This appliance is
for indoor use only. Do not use this appliance outdoors.
⇒
Always ensure that hands are dry before handling the plug, leads or switching on
the appliance.
⇒
Always use the appliance on a stable, secure, dry and level surface in a well
venlated area.
⇒
Ensure that the appliance is switched off and unplugged from the supply socket
before assembling or disassembling.
⇒
Never let the power cord hang over the edge of the worktop, touch hot surfaces or
become kno&ed, trapped or pinched.
⇒
Do not use this appliance if it has been dropped or if there are any signs of visible
damage.
⇒
This appliance must not be placed on or near any potenally hot surfaces.
(such as a gas or electric hob)
⇒
Never immerse any part of the appliance or power cord and plug in water or any
other liquid.
⇒
Keep the body of the unit dry – only fill with water using a jug.
⇒
Pressing the ‘ON’ bu&on will begin dislling cycle and unit will automacally turn
off when cycle is finished. To stop unit mid-cycle remove power cord from socket.
The ‘ON’ bu&on is not used to stop the machine mid-cycle.
⇒
Leave power cord unconnected when unit is not in use.
⇒
Do not remove Fan Module whilst unit is mid-cycle. Wait unl unit has cooled
down before removing Fan Module.
⇒
Do not place anything that will obstruct the top of the Fan Module.
Page 1
BEFORE FIRST USE
Open the packaging, you will see the water disller which is divided into two parts, the
Boiling Chamber and Fan Module.
Take them out of the packing box and then li7 up the Fan Module and take out the glass
collecon jug from the Boiling Chamber. Unpack the Water Disller and check all the
components are present and undamaged. The box should contain the following:
1x Boiling Chamber
1x Fan Module
1x Collec%on Jug (Glass or Polycarbonate)
1x Jug Guiding Cap
1x Jug Lid
2x Jug Handle Straps (Glass jug only)
1x Filter (Already installed)
1x Residue Cleaner
1x Jug Handle (Glass jug only)
1x Power Lead UK/EU/US
Page 2
Page 2
SETUP
PLEASE READ THE BELOW SETUP INSTRUCTIONS BEFORE
USING THE MACHINE
⇒
Place the Water Disller in a venlated room on a flat, dry surface,
such as your kitchen worktop.
⇒
Li7 off the Fan Module and fill Boiling Chamber inside of the
machine’s body up to the ‘FULL’ line using tap water while being
very careful NOT to overfill chamber. (me needed to disl water can be reduced
by using already hot or boiled water).
⇒
Place Fan Module onto Boiling Chamber making sure the silicone
seal is correctly in place around the enre rim of Boiling Chamber.
Check to make sure the unit is on a stable surface. Then connect the
power cord from the Fan Module into the bo&om of the machine.
⇒
Set up Collecon Jug with Guiding Cap underneath water outlet
nozzle and connect power cord to power outlet.
⇒
Press ‘ON’ Bu&on. The fan will come on automacally and the tank
will begin to heat, thus starng the dislling process. The ‘ON’
bu&on is used to start the machine only. It can not be used to stop
or turn off the machine prematurely before disllaon is complete.
⇒
Water will begin to drip into the Collecon Jug a7er approximately 30 minutes. It
will take approximately 3.5 hours to disl 4 litres of water. The unit will automacally shut down when the cycle has finished therefore you can leave it running
overnight.
Important
Do not use the first Jug of dis%lled water.
It will take one cycle for the unit to ‘self clean’.
Wipe out tank and rinse/discard water in Collec%on Jug.
Dis%ller is now ready to create dis%lled water.
Please note
The unit must be allowed to cool down before starng another dislling cycle
(Approximately 30 minutes). The ‘ON’ bu&on will be inacve during this me.
This will prevent injuries from scalding water and prolong the life of the Disller.
Page 3
CLEANING
REMOVING RESIDUE
Once Disller has cooled down, rinse and wipe out tank everyday using clean water. The
interior of the stainless steel vessel is smooth. Never use abrasive cleaners on your disller e.g. steel wool or steel soap pads. A7er each cycle, rinse the inside of the Boiling
Chamber with clean water and remove the lose scaling with a nylon dish brush.
Calcificaon and scale will build up on bo&om of the Boiling Chamber and should be removed every two weeks. Use following instrucons to do this:
⇒
Pour in enough hot water to cover scale in the tank (at least 1 litre).
⇒
Pour 1-4 teaspoons of Residue Cleaner into Boiling Chamber depending on the
amount of scale.
⇒
DISCONNECT AND REMOVE FAN MODULE and start a cycle by pushing ‘ON’
bu&on.
⇒
Let cycle run for 30 minutes only before turning the machine off at the wall, then
carefully pour out hot water and wash the inside of tank with clean water.
⇒
If scale is not completely removed then repeat the process.
IMPORTANT
Do not allow all water to fully boil and evaporate out of the chamber. This will happen if you forget the machine is on and leave it running over 30 minutes.
REPLACING ACTIVATED CARBON FILTER
⇒
Replace Filter in filter nozzle every 2-3 months.
⇒
Li7 Fan Module off from Boiling Chamber
⇒
Holding the metal nozzle, push the Fan Module away
from the nozzle unl it clips out (use force to do this
without worry of damaging as it can appear sff)
⇒
Remove and discard the used carbon filter and replace
with a new one. (You should rinse, soak and gently squeeze all new Carbon Filters
in a glass of water (preferably dislled) before using to help remove excess carbon.
Do this unl the majority of the excess carbon which will appear grey is greatly reduced in the glass of water).
Page 4
GLASS JUG ASSEMBLY
INSTRUCTIONS TO ASSEMBLE THE GLASS JUG
You will need the glass jug, handle, 2 metal straps and a screwdriver.
To remove the stainless steel top from the jug, twist an clockwise
Glass Jug
Plas%c Handle
2 x Metal Straps
Screwdriver
STEP 1
STEP 2
Align the jug handle adjacent to the jug
pouring outlet. Next, wrap one of the metal
straps around the jug as shown below.
Screw the bolt through the metal strap and
plasc handle unl it is fixed ghtly. Repeat
the process on the bo&om of the handle.
The jug lid is used
to keep the jug
sealed
The Guiding Cap is used to
help align the jug with the
filter nozzle during disllaon.
Page 5
TROUBLESHOOTING
NOT MAKING ANY DISTILLED WATER
⇒
`ON` bu&on has not been pressed in
⇒
Main power cord is not plugged into power point or Fan Module cord not plugged
into base of the disller
⇒
No power from electrical outlet
⇒
Fuse in power cable needs to be replaced
⇒
Power cable needs to be replaced
⇒
No water in Boiling Chamber
NOT MAKING ENOUGH DISTILLED WATER DURING CYCLE
⇒
Water not filled to maximum full mark
⇒
Water Collecon Jug not correctly lined up with disller via the Guiding Cap
⇒
Disller lid latex seal is not sealing properly and may need to be changed
⇒
Water outlet nozzle not inserted correctly. Please make sure it is placed underneath lower latex seal
⇒
Sediment in the water outlet nozzle and the tube needs to be rinsed
Please thoroughly read all direc%ons rela%ng to your dis%ller before opera%ng.
Proper use, care and maintenance will ensure a longer product life.
WARRANTY
The Make Water Pure Stainless Steel Water Disller comes with a
one year parts and labour warranty to the original customer only
(Unless you have purchase addional warranty cover).
Your warranty informaon is stored on our system therefore we
only require your order number or name and address.
Page 6
MAKE WATER PURE
REFER A FRIEND
We’re offering everyone a £20 cash reward each me a friend is referred by you to our
official website www.makewaterpure.co.uk and purchases a water disller.
That means for example if you refer 5 friends and they all purchase a water disller,
you'll receive £100 cash! Visit www.makewaterpure.co.uk/refer-a-friend for more informaon.
WATER DISTILLER ACCESSORIES
You can purchase accessories for your water disller such as addional jugs, residue
cleaner and carbon filters direct from our website www.makewaterpure.co.uk/buy
FOLLOW US ON SOCIAL MEDIA
We are on Facebook and Twi&er, just search Make Water Pure and
like or follow our page.
HELP AND ADVICE WITH YOUR DISTILLER
If you have any quesons regarding seMng up or using your disller you can contact by
email [email protected] or via Live Chat available on our website.
Page 7