1
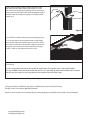
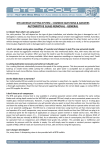
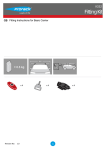
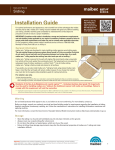
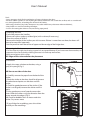
User’s Manual
Tools:
- Spray, sponge or cloth for the application of soapy solution to the door;
- Plastic or rubber spatula (or use anything else handy which does not scratch the surface, such as a credit card
or a driving licence) for smoothing the surface of the sticker;
- Mild soapy solution (Fairy, baby shampoo or any other mild foamy substance without additives);
- Sharp knife or a razor for trimming the edges;
- Scissors for cutting the sticker to size, measuring tape, pencil;
1) Preparing the Door
- If possible, remove the handles;
- Remove all stickers and any residual glue (with a solvent, if necessary);
- Clean the surface of all dirt;
- Measure the height of the surface you wish to cover. If there is more than one door, the doors will
have to be measured separately;
- Use the pencil to mark the centre of upper and lower edge of the fridge door.
2) Preparing the Sticker
- Cut the sticker to a right size, leaving a spare inch on top and bottom. If you have more than one door, cut
a separate sticker for each door, allowing for extra inch both top and bottom;
- Mark central points of the sticker.
NB! Edges will be trimmed after the placement
3) Placement
a) Apply the soapy solution to the door, using a
spray or a sponge (Fig. 1)
NB! Do not wet sides of the door
b) Carefully remove the paper from the back of the
sticker;
c) Place the sticker to the door, check for alignment
of marked central points on the door and the
sticker;
d) Check for good placement of the sticker. If the
sticker is misaligned, remove the sticker and fit it
again;
e) Using gentle pressure of spatula remove the
water under the sticker using the direction from the
centre towards the edges. (Fig. 2)
NB! Check for bubbles of air or water under the
sticker. Dry excess water.
figure 1
f ) If your fridge has mouldings, press the sticker
carefully on the mouldings.
figure 2
g) Press the remaining sticker against the sides of the
door and trim the sticker with a sharp knife or a razor.
Take care not to pierce the insulating seal. For maximum
cutting precision hold the knife under 90 degree angle in
relation to the door, keep the sticker taut with the other
hand (Fig. 3);
figure 3
h) Cut off extra material along the moulding edge (Fig. 4)
If it is not possible to remove the handles of the fridge,
measure the sticker for handle location and cut a hole in
the sticker (smaller than the handle). Without removing
the paper at the back of the sticker, check for the right
location. Place as described above, cut to size.
figure 4
4) Finishing
a) Use a sharp object to pierce the sticker to create holes for handle screws. Reinstall handles.
b) If any bubbles have remained under the stickers, it is possible to pierce the bubble with a needle
and remove the water by pushing towards the needle-hole from both sides.
Invite your family and friends, step back and admire your work and new kitchen.
Design stickers can also be applied elsewhere.
If you are not sure you can install the design sticker properly, use of professional help is recommended.
www.kodudesign.com
[email protected]