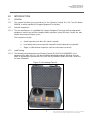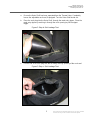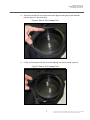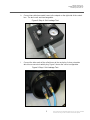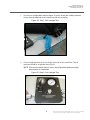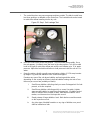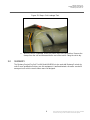
1
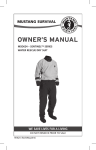
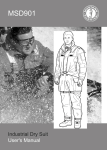
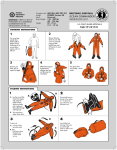
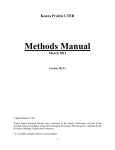
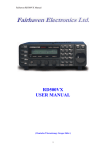
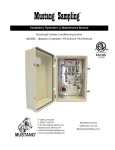
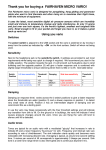
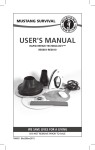
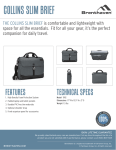
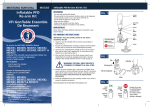
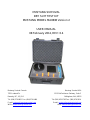
MUSTANG SURVIVAL
DRY SUIT TEST KIT
MUSTANG MODEL MA8836 Version 2
USER MANUAL
08 February 2012, REV: 0.4
Mustang Survival Canada
7525 Lowland Dr
Burnaby, BC, V5J 5L1
Tel: (604) 270-8631 Fax: (604) 270-0489
E-mail: [email protected]
WEB: www.mustangsurvival.com
Mustang Survival-USA
1215 Old Fairhaven Parkway, Suite C
Bellingham, WA, 98225
Tel: (360) 676-1782 Fax: (360) 676-5014
E-mail: [email protected]
WEB: www.mustangsurvival.com
Mustang Survival Corp.
MA8836 Version 2 User Manual
08 February 2012, Rev: 0.4
1.0
INTRODUCTION
1.1
GENERAL
1.1.1
This manual provides user procedures for the Mustang Survival Dry Suit Test Kit Model
MA8836, to assist qualified Life Support Equipment Technicians.
1.1.1
Periodic Inspection
1.1.1.1 The suit manufacturer, or a qualified Life Support Equipment Technician with the appropriate
equipment, should carry out the in-depth periodic inspection (every 180 days). Heavy use, may
require more frequent inspect cycles.
This inspection includes:
1.1.2
a.
Visual inspection (see the suit’s owner’s manual)
b.
Leak testing every second periodic inspection (unless damage is suspected)
c.
Zipper, or slide fastener inspection (see the suit’s owner’s manual)
Leak Testing
1.1.2.1 The following suit leakage test uses Mustang Survival Dry Suit Test Kit (MA8836). Your
equipment may differ and, if so, the test should be adjusted accordingly. Mustang Survival
offers an opportunity to purchase the Dry Suit Test Kit (MA8836) used in this test. Contact us
for more information.
Figure 1. Suit Leakage Test Kit
1
This document is for information purposes only. It is not a controlled
document and may not be considered current when printed.
Mustang Survival Corp.
MA8836 Version 2 User Manual
08 February 2012, Rev: 0.4
a.
Ensure the Outer Shell has been separated from the Thermal Liner. Completely
loosen the adjustable neck seal, if equipped. Turn the Outer Shell inside out.
b.
Place the neck plug into the Outer Shell, through the main entry zipper. Close the
main entry zipper by reaching in through the neck opening to pull the zipper
toggle.
Figure 2. Step b. Suit Leakage Test
c.
Pull the end of the neck plug with the air fittings through opening of the neck seal.
Figure 3. Step c. Suit Leakage Test
2
This document is for information purposes only. It is not a controlled
document and may not be considered current when printed.
Mustang Survival Corp.
MA8836 Version 2 User Manual
08 February 2012, Rev: 0.4
d.
Stretch neck seal to fit securely around neck plug ensuring top of seal extends
past the groove in the neck plug.
Figure 4. Step d. Suit Leakage Test
e.
Fit the cinching strap over the neck seal aligning it in the neck plug’s groove.
Figure 5. Step e. Suit Leakage Test
3
This document is for information purposes only. It is not a controlled
document and may not be considered current when printed.
Mustang Survival Corp.
MA8836 Version 2 User Manual
08 February 2012, Rev: 0.4
f.
Secure the cinching strap by pulling up the excess strap and fasten the Velcro
closure.
Figure 6. Step f. Suit Leakage Test
g.
Clamp both wrist seals with the clamps provided.
Figure 7. Step g. Suit Leakage Test
4
This document is for information purposes only. It is not a controlled
document and may not be considered current when printed.
Mustang Survival Corp.
MA8836 Version 2 User Manual
08 February 2012, Rev: 0.4
h.
Connect two coiled pneumatic hoses to the outputs on the right side of the control
box. The two hoses are interchangeable.
Figure 8. Step h. Suit Leakage Test
i.
Connect the other ends of the coiled hoses to the neck plug. It does not matter
which hose connects to which plug. Figure 9 shows the correct configuration.
Figure 9. Step i. Suit Leakage Test
5
This document is for information purposes only. It is not a controlled
document and may not be considered current when printed.
Mustang Survival Corp.
MA8836 Version 2 User Manual
08 February 2012, Rev: 0.4
j.
Ensure your configuration matches figure 10, which shows two coiled pneumatic
hoses correctly attached to the control box and the neck plug.
Figure 10. Step j. Suit Leakage Test
k.
Connect high-pressure air source to the input side of the control box. The air
pressure should be no greater than 150 psi.
NOTE: Ensure the control lever is set in the off position before the highpressure air is connected.
Figure 11. Step k. Suit Leakage Test
6
This document is for information purposes only. It is not a controlled
document and may not be considered current when printed.
Mustang Survival Corp.
MA8836 Version 2 User Manual
08 February 2012, Rev: 0.4
l.
The control box has one pressure gauge and two controls. The black control lever
has three positions as labeled on the control box. The knurled knob can be turned
to restrict the airflow traveling into the dry suit.
Figure 12. Step l. Suit Leakage Test
m. Move the control lever to the fast position. The suit should inflate rapidly. Once
the suit appears ¾ inflated, move the lever to the slow position. Turn the knurled
knob to the right to restrict the airflow rate until the suit inflates up to 12 in. water
pressure. Adjust the knurled knob further to hold pressure inside the suit at 12 in.
water.
n.
Spray the entire suit with a gentle soap and water solution of 0.5% soap to water
by weight. Pay particular attention to the seams and zippers.
Examine any area of the suit where bubbles are forming and take action
depending on the severity as follows (note that bubbles forming at a rate of less
than one per second are probably not leaks):
i.
Small foamy bubbles collecting slowly on seam: Entrapped air. No leak
present, no action required.
ii.
Small foamy bubbles collecting quickly on seam: Uncertain. Agitate
seam around bubbles to remove any entrapped air. If bubbles persist
after 10 minutes then consider as leak, mark leak area with a china
marker, and document on the inspection record.
iii.
Steady stream of larger bubbles: Leak. Mark leak area and document
on the inspection record.
iv.
Any other type of bubble formation or any sign of bubbles on a panel
shall be treated as a leak.
7
This document is for information purposes only. It is not a controlled
document and may not be considered current when printed.
Mustang Survival Corp.
MA8836 Version 2 User Manual
08 February 2012, Rev: 0.4
Figure 13. Step n. Suit Leakage Test
o.
2.0
When the test is completed, move the control lever to the off position. Remove the
clamps from the suit and disassemble the rest of the test kit. Hang the suit to dry.
SUMMARY
The Mustang Survival Dry Suit Test Kit Model MA8836 is to be used with Mustang Survival dry
suits. Ensure qualified technicians use this equipment. A well-maintained suit means survival in
emergencies for which normal clothes were not designed.
8
This document is for information purposes only. It is not a controlled
document and may not be considered current when printed.