1
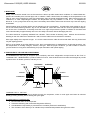
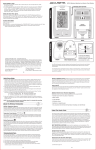
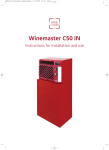
USER MANUAL C50S D E F Y I N G C O N V E N T I O N 1. Wine Care Page 1 2. Principles of cellar air-conditioning Page 1 3. Characteristics Page 2 3.1 Capacity Page 2 3.2 Temperature regulation Page 2 3.3 Humidity regulation Page 2 3.4 Defrosting Page 2 3.5 Vibration elimination Page 3 3.6 Security Page 3 4. Electronic control panel Page 3 5. Positioning the WINEMASTER Page 4 6. Creating a new cellar Page 5 6.1 Location Page 5 6.2 Insulation Page 5 6.3 Characteristics of insulation Page 6 6.4 Insulation of the wall and the ceiling Page 6 6.5 Insulation of the floor Page 7 6.6 The door Page 7 7. Wall installation Page 7 8. Connection Page 8 9. Care in use Page 8 10. Warranty Page 9 Winemaster C50S(SR) USER MANUAL 03/2009 GB 1. WINE CARE Ideally, wine should be stored in an environment that is able to provide certain basic conditions: a constant ideal temperature and humidity level, minimal light, and no vibration. Within certain limits, the stability of the temperature in the cellar is even more important for good wine preservation than the actual temperature itself. Many factors govern the conditions in a cellar. Depending the season, the temperature may vary between 11 and 18 °C. At temperatures above 25 °C, the young white wines may have a secondary fermentation while some red wines may have their ageing accelerated. Central heating pipes or boilers nearby can be damaging to wine conservation. An ideal cellar must neither be too dry nor too wet for the following reasons: Dry air can be insidious; it dries the corks and can cause a significant evaporation of the wine. Furthermore, a humidity level that is too high will promote the growth of mildew on the labels and corks. Ideal humidity is approximately 70% but it can safely rise to 90% without damaging the wine. The cellar should be completely sheltered from vibration. This includes all shelving units. Shelves should be freestanding on the floor rather than attached to a wall, since the walls are more sensitive to vibration. Wine ages rapidly when exposed to light. It is for this reason that the cellar should remain dark with only limited and very dim lighting periods. Wine is not as fragile as we often believe it to be, but it is essential that it is sheltered from its principal enemies: sudden temperature or humidity changes, vibration, and light. With the proper conditions, you will be able to conserve your fine wines for a long time while allowing for proper maturation and optimal ageing. 2. PRINCIPLES OF CELLAR AIR-CONDITIONING The WINEMASTER C50 (SR) is designed upon a relatively new basic refrigeration concept known as “No Frost” or “Ventilated Cold”. WINEMASTER, a product created in France, uses the latest most innovative technologies to provide a product which is reliable, practical, and easy to use. hot air EXTERIOR INTERIOR pressure reducer Ventilator Ventilator EVAPORATOR CONDENSOR COMPRESSOR cold air “Ventilated Cold” or “No Frost" Air circulates around the wine before passing through the evaporator, where it cools again and loses its moisture thereby providing humidity before starting the cycle again. The advantages of “ventilated cold” No frost other than on the evaporator Automatic defrosting and maximized refrigeration efficiency Cold distribution improved by a permanent air circulation (without air stratification) The circulation of air allows you to maintain the pre-selected temperature throughout the cellar 1 Winemaster C50S(SR) USER MANUAL 03/2009 WINEMASTER units primarily cool the air inside the cellar but they are also equipped with a heater which maintains an ideal temperature within the cellar even in the winter months. An integrated electronic thermostat pilots the functioning of the unit and maintains the specific temperature selected while the electronic control panel displays the current mode of operation. 3. WINE C50-S / (SR) CHARACTERISTICS Capacity Temperature Regulation Maximum exterior temperature Refrigeration Power Cellars of volumes up to 50 m³ Preset at 12 °C with possibility of adjusting the temperature between 4 to 25°C 35 °C 1200 W at 15 °C Power Supply 230 -240 V - 50 Hz with ground wire connection (3 meter of cable) Electric power 900 W Lighting Flourescent lamp with on/off switch on the unit 3.1. CAPACITY Subject to adequate insulation, the WINEMASTER will maintain an ideal temperature in cellars of up to a maximum volume of 50 m³. The chart on page 5 shows which types of insulation will provide the level of insulation necessary for your cellar. In order for the WINEMASTER to function efficiently, the cellar must be thoroughly insulated and the cellar volume must not be exceeded. 3.2 TEMPERATURE MAINTENANCE The thermostat is preset at 12 °C and is adjustable between 2 and 20 °C, but it is strongly advised that the temperature is not adjusted frequently. The thermostat will maintain the temperature inside cellar within ±2 °C accuracy. The thermal inertia of the wine and the glass is such that within this temperature range the temperature of the wine will only fluctuate between 0.2° and 0.3° C. It is important to appreciate that there is a difference between the air temperature inside the cellar and the actual temperature of the wine. The WINEMASTER creates perfect thermal stability. 3.3 HUMIDITY REGULATION The refrigeration unit creates a constant cycle of condensation-evaporation within the cellar. The humidity condensing on the evaporator is collected by the WINEMASTER. Then, some of this water is evaporated, thus stabilising the cellar humidity between 65% and 80%. The excess water is then routed into a drainage pipe which must be set into a container inside or outside of the cellar. It is important to understand that the humidity cannot be completely stabilized, because it depends on exterior conditions that vary widely according to the region, the season, and the weather. In particular cases of extremely dry air, it may not be possible to sufficiently humidify the air. IMPORTANT: In order for accurate humidity regulation and efficient functioning of the WINEMASTER unit, you will need: Complete insulation of the cellar (walls, floor, ceiling, door) with an airtight seal. Perfect continuity of the insulation (no gaps). 2 Winemaster C50S(SR) USER MANUAL 3.4. DEFROSTING 03/2009 The WINEMASTER C50-S/(SR) defrosts automatically by shutting down the compressor for 7 minutes each hour. 3.5. VIBRATION ELIMINATION The vibration of the compressor is controlled in two ways: The compressor sits on flexible rubber blocks (silent blocks). The Winemaster is surrounded in its frame by these silent blocks. Please note: In wooden frame cellars it is very important to store the wine bottles on shelves standing on the floor of the cellar, NOT on shelves fixed to the walls. 3.6. SECURITY The compressor is equipped with a safety thermostat which detects any irregular increases in the compressor temperature. In the case of a dangerous temperature, the compressor automatically shuts down. In the event of poor ventilation where the air inside the cellar becomes too warm, the C50-S automatically speeds up the ventilation and heat exchange system to obtain the desired temperature and air circulation. 4. ELECTRONIC CONTROL PANEL The setting of the targeted temperature is made on the thermostat - Press button 2 one second until the targeted temperature is blinking. - Use button 1 to increase the temperature - Use button 3 to lower the temperature. - When the right temperature is set, press again on button 1 Explanations of the main display symbols: 3 to confirm it. Winemaster C50S(SR) USER MANUAL 03/2009 Red light = cold mode engaged (compressor working) Red light = Not used Red light = defrost Red light = heat mode engaged (resistance) STANDBY MODE - Stanby mode : maintain a 3 seconds pressure on button 1. The compressor stops. - The thermostat indicates « OFF » and also the cellar temperature. - To come back, maintain again a 3 seconds pressure on button 1. - The thermostat indicates « ON » during 1 second. AUTOMATIC DEFROST The program of the thermostat from model C50S/SR will run an automatic defrost time several times a day. During this position, the compressor stops and only the fan in the cellar is functionning. The condensate water produced during this period will b evacuated through the tube. 5. POSITIONING OF THE WINEMASTER The WINEMASTER should be installed into a wall with one side of the unit facing the interior of the cellar and the other side facing the exterior of the cellar on the other side of the wall. This means that the exterior side of the unit must be accessible from outside of the cellar - see item 6 "WINEMASTER Wall Installation." This allows for the production of cool air within the cellar by keeping all warm components on the exterior side of the wall. SCHEMA DE PRINCIPE ceiling 10 cm minimum CELLAR WINEMASTER plancher 4 Winemaster C50S(SR) USER MANUAL 03/2009 The conditions for efficient functioning of the WINEMASTER: The "warm" side of the WINEMASTER should theoretically face the interior of another room inside a home. In particular cases where the "warm" side of the unit is on the exterior of a home, it must be sheltered from direct rays of the sun, rain, snow, etc. Please note: turning on the compressor in temperatures of below 0 °C can cause permanent damage. The room, into which the WINEMASTER transfers warm air, must be well ventilated so that its temperature does not exceed 30 °C. There must be a space of at least 10 cm (4 in) between the top of the WINEMASTER and the ceiling of the cellar to facilitate the removal of the cover if needed.. The wall, into which the WineMaster is installed, should not exceed a thickness of 30 cm. Otherwise, the wall must be bevel-edged (see diagram in item 7 "Installation") 6. CREATING A CELLAR 6.1. THE LOCATION For an Existing Cellar If you have an existing cellar or another available room that does not have the characteristics of a real cellar, you must well insulate the room before installing the WINEMASTER into one of the walls. Note: Do not use fibreglass or rock wool insulation. To Create a New Cellar In order to transform an unused space into a genuine wine cellar it is necessary to measure the area, mark the places where you will need to build walls and then implement one of the following building techniques: Masonry: build a wall of brick, cement blocks, plaster casts, or other appropriate materials. Then completely insulate it in the same manner as any other wall and seal all cracks. Wood: build a wooden frame and then attach wooden panels to create walls. Then attach insulation materials to the wooden panels and seal all cracks. "Sandwich" panels: purchase pre-insulated double-layer panels which come equipped with an internal layer of insulation. In this case you can accomplish the creation of the walls and the insulation in one step. 6.2. INSULATION Insulation is essential for efficient functioning of the WINEMASTER. A good insulation permits the WINEMASTER to maintain a stable temperature and humidity level. The chart on the next page will allow you to determine the type and the thickness of insulation needed in relation to the exterior volume of the cellar. Complete Insulation The insulating elements should preferably be “tongue and groove” type panels or panels fused together to ensure perfect continuity of the insulation. This is necessary to avoid the intrusion of heat and humidity which can alter the functioning of the WINEMASTER. IMPORTANT: The warranty is only valid if the insulation is in compliance with the "Minimum Thickness Requirements" for all walls, doors, floors, and ceilings with perfect continuity of insulation. 5 Winemaster C50S(SR) USER MANUAL 03/2009 INSULATION - MINIMUM THICKNESS REQUIREMENTS (mm) Minimum Thickness Requirements Volume of the Cellar (m3) Minimum thermal strength R = m². °C/W 14 16 18 20 22 24 26 28 30 32 34 36 38 40 42 46 50 0.94 1.08 1.21 1.35 1.48 1.62 1.75 1.88 2.02 2.15 2.29 2.42 2.56 2.69 2.82 2.96 3.23 Polystyrene expanded = 0.044W/m°C 50 50 60 60 70 80 80 90 90 100 110 110 120 120 130 130 150 Polystyrene extruded = 0.030W/m°C 30 40 40 40 50 50 60 60 60 70 70 80 80 90 90 90 100 Polyurethane = 0.025W/m°C 30 30 40 40 40 50 50 50 60 60 60 70 70 70 80 80 80 6.3. CHARACTERISTICS OF THE INSULATORS Thermal conductivity: Unit: W/m.°C - This is a characteristic of the insulating material itself. It qualifies the capacity of a material to conduct heat. The smaller the coefficient, the better the insulator. Thermal strength: R Unit:m². C/W - This is a characteristic of the insulated panel. It depends on the thickness coefficient of the insulator. R = thickness in meters The R value qualifies the ability of a material's thickness to stop the transmission of heat. The greater the coefficient, the better the insulator. 6.4. INSULATION OF THE WALLS AND THE CEILING When deciding on which type of insulation to use, there are three possibilities: Traditional insulation “Complex”insulation: insulation is covered with a facing (plaster, ore…etc.) "Sandwich" panels: insulation is covered on each side with a wooden panel or plasterboard. The covering of the panels is important; it protects the insulation against damage and guarantees its longevity. Please note: Do not use insulators composed of mineral fibres. Protection from rodents: Check whether the cellar shows the presence of mice or rats. Some insulating materials are damaged by rodents. If necessary, cover the insulation with a protective lining on the interior of the cellar. Polyurethane is an insulator that, due to its chemical composition, is not attacked by the rodents. 6.5. INSULATION OF THE FLOOR The floor of the cellar must be able to support the shelves and the stored wine Thus it is necessary to choose an insulation with an adequate compression strength. The load capacity of each insulating material should be noted on the manufacturer's label. Another possibility is to cover the insulation with an insulating material designed specifically for floors such as quality chipboard. Improve the load capacity of the insulation (particularly under the shelf legs) by: Using “complex” insulating panels covered by panels of higher load capacity. Covering the floor insulator with quality chipboard (with a thickness of 15 mm) or with an other appropriate material. 6 Winemaster C50S(SR) USER MANUAL 03/2009 6.6. THE DOOR An adequately insulated door can be obtained in one of two ways: Insulate an existing door with the same insulating materials used for the walls of the cellar. Provide a tight seal between the door frame and all sides of the door with a strip of foam rubber, for example. Use a specially designed Isothermic door containing polyurethane. In this case you are assured to have a tight seal on all sides of the door which is equipped with a magnetic joint. 7. WINEMASTER WALL INSTALLATION - Install the wooden frame into the wall. The space between the wood frame and the insulation must be filled and sealed (with polyurethane for example), in order to ensure a complete insulation. Please note: exterior of the wooden frame must be even with the warm side of the wall or slightly past the wall so that the WINEMASTER does not come in contact with the wall see diagram below: Center the WINEMASTER correctly in its frame. Contact between the sheet metal and the wood frame could cause vibrations which could spread throughout the cellar. - Secure the WINEMASTER with the 3 wood screws and washers. 8. CONNECTION -Insert the plug into the socket 7 Winemaster C50S(SR) USER MANUAL 03/2009 -Set the drainage pipe into a container . The pipe has to be straight and its end must not dip into the water -Set the on/off button IOII (reference 1 in the diagram) onto the desired level of ventilation within the cellar. -The electronic thermostat now shows the current temperature witin the cellar. In order to change the temperature setting refer to pint 4 “Electronic Control Panel” of this guide -Be patient for some minutes until the compressor starts working. It only starts if temerature of the cellar requires it. After electricity connection or after having completely stopped the compressor, it will not start again until after a few minutes. During the first connection, and for larger cellar volumes, it is recommended that you use the booster position I to well ventilate the interior of the cellar. After a few hours, you can return the ventilation to the normal level by moving the switch marked IOII into the lower position marked I . 9. CARE IN USE It is essential that the dust filter is replaced at least one time per year to ensure optimum performance. If the filter is full of dust, the WINEMASTER will automatically function at the highest ventilation speed. 10. WARRANTY Legal and contractual warranties As a supplement to the legal warranty provided under the laws of the purchaser's country, Wine Corner offers an additional 2 year contractual warranty with each WINEMASTER product. s s s s During the two year period of the contractual warranty, Wine Corner will replace any parts that have a manufacturer's defect. In case of electric failure, Wine Corner reserves the right to send an expert technician to inspect the appliance before replacing any defective parts. In case of refrigeration faliure, Wine Corner may require that the appliance be returned to the factory for repair. Any interventions will take place according to the guidelines set in the "Service After Sale" document. Conditions of the warranty The contractual warranty applies to all appliances installed and used in conformity with this “User Manual.” His application is conditionned by the presentation of the invoice of purshace or for lack of its copy. Exclusions and limitations of the warranty The warranty can be refused in the following cases: - Insulation of the cellar or Installation of the appliance not in compliance with the instructions of this guide. - Damage due to negligence, lack of maintenance, or incorrect use of the WINEMASTER . The exchange or repairing of parts under warranty will not extend the 2 year warranty period. Wine Corner S.A. cannot, in any case, be held liable for any direct or indirect damages resulting from the failure of the WINEMASTER unit. This warranty is exclusively limited to the product itself. 8 Winemaster C50S(SR) USER MANUAL 03/2009 The European Community attaching a great importance to the environment and the waste processing, set up Directive 2002/96/CE relating to the Electric and Electronic Component Waste. In accordance with this standard, the presence of the logo "barred dustbin" is obligatory. This logo means that this product cannot be to in no case thrown in the household refuse. It must be given to a suitable collection point for the treatment, valorization, recycling of Electric and Electronic Components. Acting like that you make a gesture for the environment and you contribute to the safeguarding of the natural resources as well as to the protection of human health. 9 Unit 4 Brunel Close, Harworth, Doncaster DN11 8QA Tel: 01302 744916 Fax: 01302 751233 E-mail: [email protected] www.winecorner.co.uk © Wine Corner Limited 2012. We reserve the right to change product specifications and prices without prior notice. Wine Corner Limited does not accept any responsibility for any loss, which may arise as a consequence of reliance on information contained in this document.