1
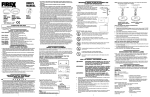
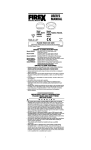
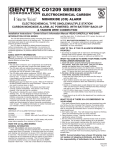
1280-7201-00(KS-1280UK)_R1:_
2009.10.22
5:49 PM
Page 1
E
OV
M
RE
R'S MANUAL FOR OPERA
TING
WNE
TO O
INS
FER
TR
RE
UC
TIO
NS
DO
TU
RN
T
AIN
TP
NO
TO
USER’S
MANUAL
H TO HUS
H
PUS
KL
Y
HO
LD
T O TEST WEE
EN: 14604:2005
LICENSE NO. KM 524754
SLIDE TO OPEN DOOR
Model FADC230 Ionisation
0086-CPD-535595
PLEASE READ AND SAVE
INSTALLER: Please leave this manual with the product.
• Interconnected smoke alarms installed in every room and on every level of
the household offers maximum protection. We recommend interconnecting
smoke alarms so that when one smoke alarm senses smoke and sounds its alarm,
all others will sound as well. Do not interconnect smoke alarms from one individual
family living unit to another. Do not connect this smoke alarm to any other type of
alarm or auxiliary device.
• Smoke alarms may not alert every household member every time. The
alarm horn is loud in order to alert individuals of a potential danger. However,
there may be limiting circumstances where a household member may not hear
the alarm (i.e. outdoor or indoor noise, sound sleepers, drug or alcohol usage,
the hearing impaired, etc.). If you suspect that this smoke alarm may not alert a
household member, install and maintain specialty smoke alarms. Household
members must hear the alarm’s warning sound and quickly respond to it to
reduce the risk of damage, injury, or death that may result from fire. If a household member is hearing impaired, install special smoke alarms with lights or
vibrating devices to alert occupants.
• Smoke alarms can only sound their alarms when they detect smoke.
Smoke alarms detect combustion particles in the air. They do not sense heat,
flame, or gas. This smoke alarm is designed to give audible warning of a developing fire. However, many fires are fast-burning, explosive, or intentional.
Others are caused by carelessness or safety hazards. Smoke may not reach
the smoke alarm QUICKLY ENOUGH to ensure safe escape.
• Smoke alarms have limitations. This smoke alarm is not fool-proof and is not
warranted to protect lives or property from fire. Smoke alarms are not a substitute
for insurance. Homeowners and renters should insure their lives and property. In
addition, it is possible for the smoke alarm to fail at any time. For this reason,
you must test the smoke alarm weekly and replace every 10 years.
• Install a smoke alarm as close to the centre of the ceiling as possible. If this is not
practical, mount no closer than 10 cm
(4 inches) from a wall or corner. Also, if local codes
allow, install smoke alarms on walls, between 10 and
30 cm (4 and 12 inches) from ceiling/wall intersections.
Ionisation 230V AC smoke alarm
with Easy Access Battery Door and
False Alarm Control
SMOKE ALARM FEATURES
• Interconnects with up to 24 alarms . Unique power connector prevents interconnection
with incompatible smoke alarms or security systems.
• Tamper-resist bracket quickly snaps into place and serves as a safeguard against
tampering.
• Multi-purpose green and red LEDs indicate that the smoke alarm is receiving AC
power, working under normal operation, in alarm, or under False Alarm Control.
• Loud alarm horn—85 decibels at 3 metres (10 feet)—sounds to alert you of an
emergency.
• Test button checks smoke alarm operation.
• Feature False Alarm Control, which, when activated, quiets unwanted alarms for up to 15
minutes.
• Features an easy acces front loading battery compartment. Battery door cannot be closed if battery is not properly installed.
• Model FADC230 features a latching LED which blinks the initiating alarm's red
LED 3 times each minute until manually reset.
• Model FADC230 has a ramp-up test horn feature which emits 2 reduced-volume beeps before reaching the full 85db level during testing.
IMPORTANT SAFETY INFORMATION
PLEASE READ AND SAVE THESE
INSTRUCTIONS
!
W
A
R
N
I
N
G
• AC smoke alarms require constant 230V AC, 50Hz power to operate properly.
Mains-powered smoke alarms WILL NOT work if AC power is not connected or has
failed or been interrupted for any reason. This alarm requires a working 9-volt battery
to operate properly in the event of a power failure. DO NOT use any other kind of
battery except as specified in this manual. DO NOT connect this smoke alarm to
any other type of smoke alarm or auxiliary device except those listed in this manual.
• DO NOT remove or disconnect battery or turn off AC power to quiet unwanted
alarms. This will remove your protection. Open windows or fan the air around smoke
alarm to silence it. This alarm features a False Alarm Control button which, when activated, will quiet unwanted alarms for up to 15 minutes.
• The Push-to-Test button accurately tests all smoke alarm functions. DO
NOT use any other test method. Test smoke alarm weekly to ensure proper
operation.
• This smoke alarm should be installed only by a qualified electrician.
• This smoke alarm is designed to be used inside a single family household
only. In multi-family buildings, each individual living unit should have its own smoke
alarms. Do not install in non-residential buildings or places which house many people like hotels, motels, dormitories, hospitals, nursing homes, or group homes of
any kind. This smoke alarm is not a substitute for a complete alarm system.
• Install a smoke alarm in every room and on every level of the home. Smoke
may not reach the smoke alarm for many reasons. For example, if a fire starts in
a remote part of the home, on another level, in a chimney, wall, roof, or on the
other side of a closed door, smoke may not reach the smoke alarm in time to
alert household members. A smoke alarm will not promptly detect a fire EXCEPT
in the area or room in which it is installed.
1
10cm
CEILING
10cm
MINIMUM
ACCEPTABLE HERE
NEVER HERE
• Install a minimum of two smoke alarms in every
30cm
MAXIMUM
home, no matter how small the home. Any size
home requires fitting a minimum of two smoke
alarms.
TOP OF DETECTOR
ACCEPTABLE HERE
SIDE
WALL
• Install a smoke alarm in each room that is divided by
a partial wall (either coming down from the ceiling at
least 60 cm (24 inches), or coming up from the floor).
SOFFIT
• Install smoke alarms on peaked, cathedral, or gabled
ceilings 1 m from the highest point (measured horizontally).
60cm
STUB WALL
• Install a smoke alarm in lived-in attics or attics which
house electrical equipment like furnaces, air conditioners, or heaters.
MODEL FADC230
DO NOT install smoke alarms:
1M
PEAKED CEILING
SMOKE ALARM DESCRIPTION
Model FADC230
5. If interconnection is desired, connect orange wire from connector to interconnect wire between smoke alarms. See section, “Interconnecting Smoke
Alarms.”
NOTE: If this will be a single-station smoke alarm, cover orange wire with electrical
tape and tuck into ceiling, wall, or pattress.
IMPORTANT SMOKE ALARM PLACEMENT AND
EXCEPTION INFORMATION:
It is recommended to achieve complete coverage protection by installing a
smoke alarm in every room of your home.
Near appliances or areas where normal combustion regularly occurs (kitchens, near boilers, hot water heaters). Use specialized
smoke alarms with unwanted alarm control
for these areas.
At a minimum, smoke alarms shall be installed outside of each separate sleeping
area in the immediate vicinity of the bedrooms and on each additional storey of the
family living unit including basements and excluding crawl spaces and unfinished
attics. Any home requires a minimum of two smoke alarms.
In areas with high humidity, like bathrooms or areas
near dishwashers or washing machines. Install at least 3 metres
away from these areas.
SMOKE ALARM PLACEMENT
FOR BEST PROTECTION, IT IS RECOMMENDED THAT YOU
INSTALL A SMOKE ALARM IN EVERY ROOM
Near air returns or heating and cooling supply vents. The air could
blow smoke away from the detector, interrupting its alarm.
In addition, it is recommended that all smoke alarms be interconnected.
Typical Efficiency
Home (Apartment)
• Install a smoke alarm on the ceiling or wall
closest to the sleeping area. Install a smoke
alarm with False Alarm Control in the
kitchen/living area.
KITCHEN
LIVING
AREA
SLEEPING
AREA
inside each bedroom and in the hallway outside
each separate sleeping area. If a bedroom area
hallway is more than 9 m long, install a smoke
alarm at each end.
In extremely dusty, dirty, or insect-infested areas.
Loose particles interfere with smoke alarm operation.
Typical Two-Storey Home
• Install a smoke alarm on the ceiling or wall
inside each bedroom and in the hallway outside
each separate sleeping area.
If a bedroom area hallway is more than 9 m
long, install a smoke alarm at each end.
• Install a smoke alarm at the top
DINING ROOM KITCHEN BEDROOMBEDROOM
Do not site this alarm in area where water or other liquids may enter
the alarm.
HOW TO INSTALL THIS SMOKE ALARM
BEDROOM
LIVING ROOM
! DANGER:
ELECTRICAL SHOCK HAZARD. Turn off power at
the main fuse box or circuit breaker by removing the fuse or switching the circuit breaker to
the OFF position and securing it.
! WARNING:
Mains operated smoke alarms should be installed
by a qualified electrician in accordance with the
Regulations for Electrical Installations published
by the Institution of Electrical Engineers (BS).
Failure to install this smoke alarm correctly may
expose the user to shock or fire hazards.
FAMILY ROOM KITCHEN DINING
ROOM BEDROOM
FIREPLACE
BEDROOM
BEDROOM
of a first-to-second floor stairwell.
! WARNING:
BEDROOM
Key
• Smoke Alarm
△ Smoke Alarm with False Alarm Control
BEDROOM
BEDROOM
LIVING
ROOM
KITCHEN
•
GARAGE
1.
2.
3.
4.
2
13. Remove arrow tab and close battery door. Smoke alarm may beep briefly as
door is closed.
14. Test smoke alarm. See “TESTING THE SMOKE ALARM”.
In rooms where temperatures may fall below 5˚C (41˚F) or rise above
45˚C (113˚F).
Typical Single Storey Home
• Install a smoke alarm on the ceiling or wall
6. Lift open battery pocket door.
7. Connect new 9-volt battery to battery connector inside battery pocket. BE SURE
BATTERY IS SECURELY CONNECTED. Smoke alarm may beep briefly when battery is installed.
8. Close battery pocket door, snapping it into place.
9. Push button and hold button on front cover of smoke alarm for three (3) seconds. Smoke alarm should sound its alarm horn if battery is fitted correctly.
10. Attach connector plug to pins on back of smoke alarm. Plug will only fit one
way and will snap into place.
11. Gently tug connector to be sure it is attached securely.
12. Position smoke alarm to mounting plate so that keyslot on side of smoke
alarm is to left of tab on mounting plate. Turn clockwise to lock into place.
The smoke alarm, its associated supply, and
interconnect wiring must be installed in accordance with BS 7671 published by the institution
of Electrical Engineers.
Install smoke alarm on a wall, ceiling, standard electrical box, or surface mounting pattress.
Align mounting plate with mounting holes of standard electrical box or surface
mounting pattress. For siting on wall or ceiling, use mounting plate as template to
mark holes. Drill holes (for wall or ceiling only) and insert supplied screw plugs into
holes until flush with wall or ceiling.
Secure mounting plate to electrical box, pattress, wall, or ceiling. (Diagram illustrates fixing mounting plate to electrical box.)
Connect blue wire from connector plug of smoke alarm to neutral (black or
blue) mains power wire.
Connect brown wire from connector plug of smoke alarm to live (red or
brown) mains power wire .
3
INTERCONNECTING SMOKE ALARMS
• Use 1.5mm2 minimum solid or stranded wire with a rating of 230V. When2 inter•
•
connecting, maximum wire length between any two is 450 m for 1.5mm or
1200 m for 2.5mm2 (20 OHMS loop resistance).
This smoke alarm may be interconnected with as many as 24 other Models.
Connect smoke alarms to a single AC branch circuit. If local codes do not permit, be sure the neutral wire is common to both phases. Wiring must conform
to IEE Regulations for electrical installation.
RED AND GREEN LED INDICATORS
This smoke alarm features red and green LED indicators that can be seen through
the Push-to-Test button or the LED lens above the test button. The LEDs indicate
the following:
GREEN LED
ON — AC power is present.
OFF — AC power is not present.
RED LED
Blinks once a minute
Blinks once a second
— indicating normal operation.
— smoke alarm senses smoke and simultaneously sounds an audible alarm.
Blinks once every 10 seconds — smoke alarm is quieting an unwanted alarm.
(Interconnected system only):
OFF — another smoke alarm in the network has sensed
smoke and is signalling this alarm.
RED blinks 3 times
— indicates this unit initiated an
every minute
alarm in an inteconnected
system (press the test button
to reset).
RED blinks 4 times every
— indicates weak or improperly
minute preceded by an
connected battery.
audible chirp
4
1280-7201-00(KS-1280UK)_R1:_
2009.10.22
5:50 PM
Page 2
FALSE ALARM CONTROL
To use the False Alarm Control:
Press and release the test button during an unwanted alarm. The alarm should
stop within ten seconds. This means the smoke alarm is in False Alarm Control.
If the smoke alarm does not go into False Alarm Control and continues to sound
its loud alarm horn, or if it initially goes into False Alarm Control then resounds the
alarm, the smoke is too heavy and could be a dangerous situation— take emergency action.
TESTING THE SMOKE ALARM
!
W
A
R
N
I
N
3.
4.
5.
6.
CLEANING
Clean the smoke alarm at least once a month to remove
dust, dirt, or debris. Always turn off power to smoke alarm
before cleaning.
• Using the soft brush or wand attachment to a vacuum
flame to test this smoke alarm. You may ignite and damage the smoke alarm or
your home.
• Test smoke alarms weekly and upon returning from holiday or when no one has
loud to alert you to an emergency and can be harmful to hearing.
Test all smoke alarms weekly by doing the following:
1. Check Push-to-Test button. A constant green light indicates the smoke alarm is
receiving 230V AC, 50Hz power. A red flashing LED about once a minute verifies operation. The red flashing LED also verifies that a working battery is present.
2. Firmly depress the Push-to-Test button for at least five (5) seconds. The smoke
alarm will sound a loud beep about four (4) times a second. The alarm may
sound for up to 10 seconds after releasing the Push-to-Test button.
NOTE: If smoke alarms are interconnected, all smoke alarms should sound an
alarm within three seconds after any test button is pushed and the tested
smoke alarm sounds.
3. If smoke alarm does not sound, turn off power at main fuse box or circuit
breaker and check wiring. Retest smoke alarm.
! DANGER: If alarm horn sounds, and smoke alarm is not being
tested, the smoke alarm is sensing smoke. THE
SOUND OF THE ALARM HORN REQUIRES YOUR
IMMEDIATE ATTENTION AND ACTION.
MAINTENANCE AND CLEANING
In addition to weekly testing, this alarm also require periodic battery replacement.
Regularly clean smoke alarm to remove dust, dirt, and debris.
! WARNING: Alarm comes equipped with a dust cover, which
prevents dust and debris from damaging the unit
during construction or remodeling. Remove dust
cover before operation. Alarm will not operate
properly while covered.
! DANGER: ELECTRICAL SHOCK HAZARD. Turn off main power
at fuse box or consumer unit by removing fuse or
switching appropriate circuit breaker to OFF position
before replacing battery or cleaning smoke alarm.
BATTERY REPLACEMENT
! CAUTION: Danger of explosion if battery is incorrectly replaced.
Always turn off power to smoke alarm before replacing battery. Replace battery at
least once a year or immediately when the low battery signal sounds once a minute,
even though the smoke alarm is receiving AC power.
Use only the following batteries as replacements in this smoke alarm:
Eveready 216, 522, 1222; Duracell MN 1604; or Ultralife U9VL-J
! DANGER:
Always turn off power at main fuse box or consumer
unit before taking trouble- shooting action.
! WARNING:
DO NOT disconnect battery or mains power to
quiet an unwanted alarm. This will remove your
protection. Fan the air or open a window to
remove smoke or dust. You may also use the false
alarm control feature, you may also use the False
Alarm Control feature to quiet unwanted alarms.
• If necessary, turn off power and use a damp cloth to clean smoke alarm cover.
IMPORTANT: Do not attempt to remove the cover or clean inside the smoke alarm.
THIS WILL VOID YOUR GUARANTEE.
PROBLEM
SOLUTION
REPAIR
Smoke alarm does not
sound when tested.
1. Check that AC power
is turned on. Green LED
should be illuminated.
!
CAUTION: Do not attempt to repair this smoke alarm. Doing so will
void your guarantee.
been in the household for several days.
• Stand at arm’s length from the smoke alarm when testing. The alarm horn is
TROUBLESHOOTING
cleaner, vacuum all sides and cover of smoke alarm. Be sure all the vents are free
of debris.
G
• Test each smoke alarm to be sure it is installed correctly and operating properly.
• Test all smoke alarms in an interconnected system after installation.
• The Push-to-Test button accurately tests all functions. DO NOT use an open
Remove drained battery from compartment and discard.
Install a fresh 9-volt battery.
Slide battery door closed.
Turn on power and test smoke alarm using Pushto-Test button.
If smoke alarm is not operating properly, see “Troubleshooting”. If necessary and if
still under guarantee, return smoke alarm to Kidde. Pack it in a well-padded carton
and send, postage prepaid to Kidde address at the end of this manual.
If the smoke alarm is no longer under guarantee, have a licensed electrician
replace the smoke alarm immediately with a comparable Firex brand smoke alarm.
NOTE: Push test button for at least five (5)
seconds while testing!
2. Turn off power. Remove
smoke alarm from
mounting plate and:
a. check that connector
plug is securely
attached.
b. check that battery is
properly attached to
connector.
PRACTICE FIRE SAFETY
If the smoke alarm sounds its alarm horn, and you have not pushed the test
button, it is warning of a dangerous situation. Your immediate response is necessary. To prepare for such occurrences, develop family escape plans, discuss
them with ALL household members, and practice them regularly.
• Expose everyone to the sound of a smoke alarm and explain what the
sound means.
• Determine TWO exits from each room and an escape route to the outside
3. Clean smoke alarm.
Smoke alarm sounds
unwanted alarms when
residents are cooking,
taking showers, etc.
1. Hire an electrician to
move smoke alarm to a
new location. See
"SMOKE ALARM
PLACEMENT"
Interconnected smoke
alarms do not sound when
system is tested.
1. Press and hold test
button for at least
three seconds after the
first unit sounds.
from each exit.
• Teach all household members to touch the door and use an alternate exit if
the door is hot. INSTRUCT THEM NOT TO OPEN THE DOOR IF THE
DOOR IS HOT.
• Teach household members to crawl along the floor to stay below dangerous smoke, fumes, and gases.
WARRANTY
Kidde warrants to the original consumer purchaser each new smoke alarm to
be free from defects in material and workmanship under normal use and service for a period of six (6) years in the United Kingdom and Republic of Ireland
from date of purchase. Kidde agrees to repair or replace, at its option, any
defective smoke alarm, provided that it is returned with postage prepaid and
with proof of purchase date to Kidde. This warranty does not cover damage
resulting from accident, misuse or abuse or lack of reasonable care of the
product. This warranty is in lieu of all other express warranties, obligations or
liabilities. THE IMPLIED WARRANTIES OF MERCHANTABILITY AND FITNESS FOR A PARTICULAR PURPOSE ARE LIMITED TO A PERIOD OF SIX
(6) YEARS FROM PURCHASE DATE. Some states do not allow
limitations on how long an implied warranty lasts, so the above limitations may
not apply to you. IN NO CASE SHALL KIDDE BE LIABLE FOR ANY INCIDENTAL OR CONSEQUENTIAL DAMAGES FOR BREACH OF THIS OR ANY
OTHER WARRANTY, EXPRESS OR IMPLIED, WHATSOEVER, EVEN IF THE
LOSS OR DAMAGE IS CAUSED BY ITS NEGLIGENCE OR FAULT. Some
states do not allow the exclusion or limitation of incidental or consequential
damages, so the above limitation or exclusion may not apply to you. This
warranty gives you specific legal rights, and you may also have other legal
rights which vary from state to state.
Return units freight prepaid to your local reseller. For information on your local
reseller in the U.K. and Republic of Ireland, contact:
KIDDE SAFETY EUROPE LIMITED
Mathisen Way
Colnbrook, Berkshire SL3 0HB
United Kingdom
Tel.: +44 (0) 1753 685148
www.smoke-alarms.co.uk
Kidde strongly recommends that both ionization and photoelectric smoke
alarms be installed to insure maximum detection of the various types of fires
that can occur within the home. Ionization sensing alarms may detect invisible fire particles (associated with fast flaming fires) sooner than photoelectric alarms. Photoelectric sensing alarms may detect visible fire particles
(associated with slow smoldering fires) sooner than ionization alarms.
2. Hire an electrician to
ensure smoke alarms
are properly connected.
• Determine a safe meeting place for all members outside the building.
WHAT TO DO IN CASE OF A FIRE
1. Don’t panic; stay calm.
2. Leave the building as quickly as possible. Touch doors to feel if they
are hot before opening them. Use an alternate exit if necessary. Crawl
along the floor, and DO NOT stop to collect anything.
3. Meet at a pre-arranged meeting place outside the building.
4. Call the fire brigade from OUTSIDE the building.
5. DO NOT GO BACK INSIDE A BURNING BUILDING. Wait for the fire
brigade to arrive.
These guidelines will assist you in the event of a fire. However, to reduce the
chance that fires will start, practice fire safety rules and prevent hazardous
situations.
Replace only with the same or equivalent battery type recommended by the manufacturer. Discard used batteries safely according to manufacturer's instructions.
TEST THE ALARM FOR CORRECT OPERATION USING THE TEST BUTTON
WHENEVER THE BATTERY IS REPLACED.
! WARNING: DO NOT USE ANY OTHER TYPE OF
BATTERY, EXCEPT AS SPECIFIED IN THIS MANUAL.
DO NOT USE RECHARGEABLE BATTERIES.
1. Turn off power to smoke alarm at main service panel.
2. Slide battery door open as shown in the illustration.
1280-7201-00
5
6
7
8