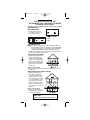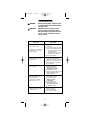
1
110-1082B
12/12/06
4:01 PM
Page 1
120V AC
Ionization
Smoke Alarm
with 9V Battery
Back-up
110-1082B
MODEL FADC
PLEASE READ AND
SAVE THIS MANUAL
Installer: Please leave this
manual with the product.
TIN
OF
O
CALIF
G
RN
AT
HA
ST
L
IA
STA
TE
IS
E
S
E
S
L
FIRE M A R
R V I C
E
The ionization type alarms are generally more effective at detecting fast, flaming
fires which consume combustible materials rapidly and spread quickly. Sources of
these fires may include flammable liquids or paper burning in a waste container.
The photoelectric type alarms are generally more effective at detecting slow,
smoldering fires which smolder for hours before bursting into flame. Sources of
these fires may include cigarettes burning in couches or bedding. However, both
types of alarms are designed to provide adequate detection of both types of fires. If
you desire the benefits of both systems, you should install smoke alarms that
combine in one alarm both photoelectric and ionization sensing technologies.
SMOKE ALARM FEATURES
• This smoke alarm is powered by 120V AC and a 9-volt battery back-up
source. AC/DC smoke alarms offer added protection in the event of a
power failure or a drained battery.
• Unique power connector prevents interconnection with incompatible
smoke alarms or security systems.
• This smoke alarm may be interconnected with as many as 11 other Firex
model FADC, AD, ADC, PAD or FX1218 smoke alarms, and as many as
6 Firex model ADH heat alarms for a total of not more than 18 interconnected devices.
• Optional tamper-resist feature can serve as a safeguard against tampering.
• The smoke alarm will sound a short beep about once a minute if the battery is weak or improperly connected. Item 4718 also blinks the red LED
4 times each minute to help identify the alarm.
• Green and red LED indicator(s) show when the smoke alarm is receiving
AC power, working under normal operation, in alarm, or under false
alarm control.
• Loud alarm horn—85 decibels at 10 feet—sounds to alert you to
an emergency.
• This alarm incorporates the internationally recognized horn signal for
evacuation. During alarm mode, the horn produces three short beeps followed by a 2 second pause and then repeats. This pattern is somewhat
different than the previous alarm sound, which continually beeped.
• Test button checks smoke alarm operation and activates False Alarm
Control feature which quiets unwanted alarms for up to 15 minutes.
• Item 4718 features a latching LED which blinks the initiating alarm’s red
LED 3 times each minute until manually reset.
• Item 4718 has a ramp-up test horn feature which emits 2 reduced-volume
beeps before reaching the full 85db level during testing.
1
110-1082B
12/12/06
4:01 PM
Page 2
IMPORTANT SAFETY INFORMATION
PLEASE READ AND SAVE
THESE INSTRUCTIONS
!
W A R N I N G
• This smoke alarm requires constant 120-volt, AC power AND a
working 9-volt battery to operate properly. This smoke alarm WILL
NOT work if AC power is not connected or has failed or been interrupted for any reason AND the battery is removed, drained or improperly
connected. DO NOT use any other kind of battery except as specified in
this manual. DO NOT connect this smoke alarm to any other type of
smoke alarm or auxiliary device, except those listed in this manual.
• DO NOT remove or disconnect battery or turn off AC power to
quiet unwanted alarms. This will remove your protection. Open
windows or fan the air around smoke alarm to silence it. This smoke
alarm features a False Alarm Control button which, when activated,
will quiet unwanted alarms for up to 15 minutes.
• The Push-to-Test button accurately tests all smoke alarm functions. DO NOT use any other test method. Test smoke alarm
weekly to ensure proper operation.
• This smoke alarm should be installed only by a licensed, qualified electrician. Observe and follow all local and national electrical
and building codes for installation.
• This smoke alarm is designed to be used inside a single family
household only. In multi-family buildings, each individual living unit
should have its own smoke alarms. Do not install in non-residential
buildings or places which house many people like hotels, motels,
dormitories, hospitals, nursing homes, or group homes of any kind.
This smoke alarm is not a substitute for a complete alarm system.
• Install a smoke alarm in every room and on every level of the
home. Smoke may not reach the smoke alarm for many reasons. For
example, if a fire starts in a remote part of the home, on another level,
in a chimney, wall, roof, or on the other side of a closed door, smoke
may not reach the smoke alarm in time to alert household members.
A smoke alarm will not promptly detect a fire EXCEPT in the area or
room in which it is installed.
• Interconnected smoke alarms installed in every room and on
every level of the household offer maximum protection. The
National Fire Protection Agency (NFPA) recommends interconnecting
smoke alarms so that when one smoke alarm senses smoke and
sounds its alarm, all others will sound as well. Do not interconnect
smoke alarms from one individual family living unit to another. Do not
connect this smoke alarm to any other type of alarm or auxiliary device.
• Smoke alarms may not alert every household member every
time. There may be limiting circumstances where a household
member may not hear the alarm (e.g., outdoor or indoor noise, sound
sleepers, drug or alcohol usage, the hard of hearing, etc.). If you
suspect that this smoke alarm may not alert a household member,
install and maintain specialty smoke alarms. Current studies have
shown smoke alarms may not awaken all sleeping individuals, and
that it is the responsibility of individuals in the household that are
capable of assisting others to provide assistance to those who may
not be awakened by the alarm sound, or to those who may be
incapable of safely evacuating the area unassisted.
• Smoke alarms can sound their alarms only when they detect
smoke. Smoke alarms detect combustion particles in the air. They
do not sense heat, flame, or gas. This smoke alarm is designed to
give audible warning of a developing fire. However, many fires are
2
110-1082B
12/12/06
4:01 PM
Page 3
fast-burning, explosive, or intentional. Others are caused by carelessness or safety hazards. Smoke may not reach the smoke alarm
QUICKLY ENOUGH to ensure safe escape.
• Smoke alarms have limitations. This smoke alarm is not foolproof
and is not warranted to protect lives or property from fire. Smoke
alarms are not a substitute for insurance. Homeowners and renters
should insure their life and property. In addition, it is possible for the
smoke alarm to fail at any time. For this reason, you must test the
smoke alarm weekly and replace every 10 years.
• Smoke alarms must not be used with detector guards unless
the combination of alarm and guard has been evaluated and found
suitable for that purpose.
SMOKE ALARM PLACEMENT
Invensys Controls Americas recommends complete coverage protection achieved by installing a smoke alarm in every room of your
home. The National Fire Protection Association’s (NFPA) minimum
requirement, as stated in Standard 72, Chapter 2, reads as follows:
“2-2.1.1.1 Smoke detectors shall be installed outside of each separate sleeping area in the immediate vicinity of the bedrooms and on
each additional story of the family living unit including basements
and excluding crawl spaces and unfinished attics. In new construction a smoke detector also shall be installed in each sleeping room.”
Chapter 2 also reads as follows:
DINING
KITCHEN
ROOM
“2-2.2.1 In new construction, where
more than one smoke detector is
required by 2-2.1, they shall be so
LIVING ROOM
arranged that operation of any smoke
detector shall cause the alarm in all smoke
detectors within the dwelling to sound.”
BEDROOM
BEDROOM
BEDROOM
The NFPA, 1993 Edition, Appendix A further
states:
BEDROOM
HALL BEDROOM
“The required number of smoke detectors
may not provide reliable early warning protection for those areas separated by a door
from the areas protected by the required
smoke detectors. For this reason, it is recommended that the householder
DINING
KITCHEN
BEDROOM
ROOM
consider the use of additional
TV ROOM
LIVING ROOM
smoke detectors for those areas
BEDROOM
for increased protection. The
BEDROOM
additional areas include: basement, bedrooms, dining room, furnace room, utility room, and hallways not protected by the required smoke detectors.”
LIVING
ROOM
DINING
ROOM
BASEMENT
Also, as required by the California State Fire Marshal:
“Early warning fire detection is best achieved by the installation of
fire detection equipment in all rooms and areas of the household as
follows: a smoke detector installed in each separate sleeping area
(in the vicinity, but outside the bedrooms), and heat or smoke detectors in the living rooms, dining rooms, bedrooms, kitchens, hallways,
attics, furnace rooms, closets, utility and storage rooms, basements
and attached garages.”
3
110-1082B
12/12/06
4:01 PM
Page 4
FOR BEST PROTECTION, WE
RECOMMEND THAT YOU INSTALL A SMOKE
ALARM IN EVERY ROOM.
In addition, we recommend that all smoke alarms be interconnected.
Typical Efficiency
Home (Apartment)
• Install a smoke alarm on
the ceiling or wall closest
to the sleeping area.
MOBILE
HOME
Typical Mobile Home
NOTE: For mobile homes built before 1978, install smoke alarms on
an inside wall between 4 and 12 inches from the ceiling. (Older
mobile homes have little or no insulation in the ceiling.) This is
especially important if the ceiling is unusually hot or cold.
Install
a smoke alarm inside each bedroom and in the hallway
•
outside each separate sleeping area.
Typical Single-Story Home
• Install a smoke alarm on the
ceiling or wall inside each
bedroom and in the hallway
outside each separate sleeping area. If a bedroom area
hallway is more than 30 feet
long, install a smoke alarm
at each end.
If there is a basement:
• Install a smoke alarm on the basement ceiling at the bottom of
the stairwell.
Typical Two-Story or Split Level Home
• Install a smoke alarm on
the ceiling or wall inside
each bedroom and in the
hallway outside each separate sleeping area. If a bedroom area hallway is more
than 30 feet long, install a
smoke alarm at each end.
• Install a smoke alarm at the
top of a first-to-second floor
stairwell.
If there is a basement:
• Install a smoke alarm on
the basement ceiling at the
bottom of the stairwell.
Key
• Smoke Alarm
Smoke Alarm with False Alarm Control
4
110-1082B
12/12/06
4:01 PM
Page 5
IMPORTANT SMOKE ALARM PLACEMENT AND
EXCEPTION INFORMATION
• Install a smoke alarm as close to
•
•
•
•
the center of the ceiling as possible. If this is not practical, mount
no closer than 4 inches from a wall
or corner. Also, if local codes allow,
install smoke alarms on walls,
between 4 and 12 inches from
ceiling/wall intersections.
Install a minimum of two smoke
alarms in every home, no matter how small the home. New construction codes require a minimum of two interconnected smoke
alarms in newly built homes.
Install a smoke alarm in each room
that is divided by a partial wall
(either coming down from the ceiling at least 24 inches, or coming up
from the floor).
Install smoke alarms on peaked,
cathedral, or gabled ceilings 3 feet
from the highest point (measured
horizontally).
Install a smoke alarm in lived-in
attics or attics which house electrical equipment like furnaces, air
conditioners, or heaters.
DO NOT install smoke alarm:
Near appliances or areas where normal combustion
regularly occurs (kitchens, near furnaces, hot water
heaters). Use specialized smoke alarms with unwanted
alarm control for these areas.
In areas with high humidity, like bathrooms or areas
near dishwashers or washing machines, install at least
10 feet (3 meters) away from these areas, if possible.
Within 3 ft. horizontally from heating and cooling supply vents and outside of the air flow from these registers. The air could blow smoke away from the
detector, interrupting its alarm.
In rooms where temperatures may fall below 40°F
(4°C) or rise above 100°F (38°C).
In extremely dusty, dirty, or insect-infested areas.
Loose particles interfere with smoke alarm operation.
5
110-1082B
12/12/06
4:01 PM
Page 6
HOW TO INSTALL
THIS SMOKE ALARM
! DANGER:
ELECTRICAL SHOCK HAZARD. Turn
off power at the main fuse box or
circuit breaker by removing the fuse
or switching the circuit breaker to
the OFF position.
! WARNING:
This smoke alarm should be installed
only by a qualified electrician. Smoke
alarm wiring to be used shall be in
accordance with the provisions of
Article 210 and 760 of the National
Electrical Code, ANSI/NFPA 70, and any
local codes that may apply.
Interconnect wire location shall be in
accordance with NEC Article 300.3b.
THIS SMOKE ALARM SHOULD BE INSTALLED IN ACCORDANCE WITH THE NATIONAL FIRE PROTECTION ASSOCIATION’S STANDARD 72 (National Fire Protection Association,
One Batterymarch Park, Quincy, MA 02269).
• Install smoke alarm on a 4-inch
octagon or single gang junction
box only.
1. From back of smoke alarm,
remove mounting plate. To later
engage tamper-resist feature,
twist out and set aside one of
the pins molded into the plate.
Both pins are exactly the same.
2. Align recessed slots on plate with
mounting holes of a 4-inch octagon or single gang junction box.
3. Gently pull household wires
through center hole of plate.
4. Secure plate to junction box using mounting screws.
5. With a small wire connector, connect white wire from connector plug to white household wire.
6. Connect black wire from connector plug to black household wire.
7. If interconnection is desired, connect yellow wire from connector to interconnect wire between smoke alarms. See section,
“INTERCONNECTING SMOKE ALARMS.”
NOTE: If this will be a single-station smoke alarm, cover yellow
wire with electrical tape and tuck into junction box.
8. Attach connector plug to pins on back of
smoke alarm. Plug will only fit one way
and will snap into place.
Battery
9. Gently tug connector to be sure it is
attached securely.
Battery Door
Remove thin
plastic
6
FADC
110-1082B
12/12/06
4:01 PM
Page 7
10. Position smoke alarm to mounting plate and turn clockwise to
lock into place. For tamper-resist, use long-nosed pliers to
remove thin plastic from notch on smoke alarm edge. Insert
pin into notch on edge of smoke alarm after smoke alarm is
positioned properly in base.
Insert pin here
Remove pin from here
11. Remove arrow tab and close battery door. Smoke alarm may
beep briefly as door is closed.
12. Turn on power at main fuse box or circuit breaker.
13. Test smoke alarm. See “TESTING THE SMOKE ALARM.”
WHITE
WHITE
YELLOW
YELLOW
BLACK
BLACK
WHITE
BLACK
TO GROUND
TO 120 VAC
INTERCONNECTING SMOKE ALARMS
• This smoke alarm may be interconnected with as many as 11
•
other Firex model FADC, AD, ADC, PAD or FX1218 smoke
alarms, and as many as 6 Firex model ADH heat alarms for a
total of not more than 18 interconnected devices. DO NOT connect to any other type or model smoke alarm.
Connect smoke alarms to a single AC branch circuit. If local codes
do not permit, be sure the neutral wire is common to both phases.
LED INDICATOR(S)
Model FADC features one combined LED indicator. The following
section explains what condition the LED indicator is describing:
• Constant GREEN on
• GREEN is off
• RED blinks once a minute
- AC power is present
- AC power is NOT present
- testing for presence of good
battery
• RED blinks once a second
- smoke alarm senses smoke
and simultaneously sounds
an alarm
• RED blinks once every 10
- smoke alarm is quieting an
seconds
unwanted alarm (Models
ADC and FADC only)
• RED is off and detector in alarm - another smoke alarm in the
(interconnected systems only) network has sensed smoke
and is signaling this alarm.
Item 4718 only
• RED blinks 3 times every minute - indicates this unit initiated an alarm
in an interconnected system
(press the test button to reset).
• RED blinks 4 times every minute - indicates weak or improperly
preceded by an audible chirp
connected battery.
7
110-1082B
12/12/06
4:01 PM
Page 8
FALSE ALARM CONTROL
Model FADC features a False Alarm Control that, when activated,
quiets unwanted alarms for up to 15 minutes.
To use the False Alarm Control:
Press and release the test button during an unwanted alarm.
The alarm should stop within ten seconds. The RED LED will blink
once every 10 seconds. This means the smoke alarm is in False
Alarm Control. For Item 4718, the initiating alarm RED LED in an
interconnected system will continue to blink until reset by pressing
the test button.
When there are multiple units interconnected, each alarm that is
sensing smoke must have its test button depressed in order to
silence the remaining alarms.
If the smoke alarm(s) does not go into False Alarm Control and
continues to sound its loud alarm horn, or if it initially goes into False
Alarm Control™ then resounds the alarm, the smoke is too heavy
and could be a dangerous situation — take emergency action.
TESTING THE
SMOKE ALARM
!
W A R N I N G
• Test each smoke alarm to be sure it is installed correctly and
operating properly.
• Test all smoke alarms in an interconnected system after installation.
• The Push-to-Test button accurately tests all functions. DO NOT
use an open flame to test this smoke alarm. You may ignite and
damage the smoke alarm or your home.
• Test smoke alarms weekly and upon returning from vacation or
when no one has been in the household for several days.
FIELD TESTING IMPORTANT NOTICE:
When testing is required in the field by local inspectors or other parties, it should be done using only the Smoke Detector Sensitivity
Analyzer model #501-1 manufactured by Gemini Scientific
Corporation. Follow the Gemini test and set-up instructions provided by the manufacturer, and use the obscuration limits provided on
the back of the smoke alarm. Refer to the smoke alarm’s instruction manual for maintenance and push-to-test operation.
Go / No-Go Testing
A functional Go / No-Go test can be performed on the unit by using
Smoke Detector Teste model #25S, manufactured for
Home Safeguard Industries, Inc. Follow the instructions included on
the tester.
Test all smoke alarms weekly by doing the following:
1. Observe the green LED. A constant green light indicates the
smoke alarm is receiving 120V AC power.
2. Firmly depress the Push-to-Test button for at least five (5)
seconds. On Item 4718, the smoke alarm will sound 2 short,
reduced-volume beeps, and then 1 short loud beep, followed by
a pause, then repeats. All other items will sound 3 short loud
beeps followed by a 2-second pause and then repeats. The
alarm may sound for up to 10 seconds after releasing the
Push-to-Test button.
8
110-1082B
12/12/06
4:01 PM
Page 9
NOTE: If smoke alarms are interconnected, all smoke alarms
should sound an alarm within three seconds after any test
button is pushed and the tested smoke alarm sounds.
3. If smoke alarm does not sound, turn off power at main fuse box
or circuit breaker and check wiring. Retest smoke alarm.
! DANGER: If alarm horn sounds, and smoke alarm
is not being tested, the smoke alarm is
sensing smoke. THE SOUND OF THE ALARM
HORN REQUIRES YOUR IMMEDIATE
ATTENTION AND ACTION.
MAINTENANCE AND CLEANING
In addition to weekly testing, this smoke alarm requires yearly battery
replacement and periodic cleaning to remove dust, dirt, and debris.
! DANGER: ELECTRICAL SHOCK HAZARD. Turn off
power at main service panel by removing
fuse or switching appropriate circuit
breaker to OFF position before replacing
battery or cleaning smoke alarm.
BATTERY REPLACEMENT
Always turn off power to smoke alarm before replacing battery.
Replace battery at least once a year or immediately when the low
battery chirp sounds once a minute, even though the smoke
alarm is receiving AC power. On item 4718 the red LED will also
blink 4 times every minute after each low battery chirp.
Use only the following batteries as replacements in this smoke alarm:
Eveready 522 or 1222, Duracell MN 1604 or Ultralife U9VL-J.
! WARNING: DO NOT USE ANY OTHER TYPE OF
BATTERY, EXCEPT AS SPECIFIED IN THIS
MANUAL. DO NOT USE RECHARGEABLE
BATTERIES.
1. Turn off power to smoke alarm at main service panel.
2. Slide battery door open as shown on page 6 in the installation
section.
3. Remove drained battery from compartment and discard.
4. Install a fresh 9-volt battery.
5. Slide battery door closed.
6. Turn on power and test smoke alarm using Push-to-Test button.
CLEANING
Clean the smoke alarm at least once a month to remove dust,
dirt, or debris. Always turn off power to smoke alarm before cleaning.
• Using the soft brush or wand attachment to a vacuum cleaner,
vacuum all sides and cover of smoke alarm. Be sure all the
vents are free of debris.
If
• necessary, turn off power and use a damp cloth to clean
smoke alarm cover.
IMPORTANT: Do not attempt to remove the cover or clean inside the
smoke alarm. THIS WILL VOID YOUR WARRANTY.
9
110-1082B
12/12/06
4:01 PM
Page 10
REPAIR
! CAUTION: Do not attempt to repair this smoke
alarm. Doing so will void your warranty.
If smoke alarm is not operating properly, see “TROUBLESHOOTING.”
If necessary and if still under warranty, return smoke alarm to
Invensys Controls Americas. Pack it in a well-padded carton, shipping
prepaid, to:
Invensys Controls Americas
Product Service Department
28C Leigh Fisher Blvd.
El Paso, TX 79906
If the smoke alarm is no longer under warranty, have a licensed
electrician replace the smoke alarm immediately with a comparable Firex brand smoke alarm.
PRACTICE FIRE SAFETY
If the smoke alarm sounds its alarm horn, and you have not
pushed the test button, it is warning of a dangerous situation.
Your immediate response is necessary. To prepare for such
occurrences, develop family escape plans, discuss them with
ALL household members, and practice them regularly.
• Expose everyone to the sound of a smoke alarm and explain
what the sound means.
• Determine TWO exits from each room and an escape route to
the outside from each exit.
• Teach all household members to touch the door and use an
alternate exit if the door is hot. INSTRUCT THEM NOT TO
OPEN THE DOOR IF THE DOOR IS HOT.
• Teach household members to crawl along the floor to stay below
dangerous smoke, fumes, and gases.
• Determine a safe meeting place for all members outside the
building.
WHAT TO DO IN CASE OF A FIRE
1. Don’t panic; stay calm.
2. Leave the building as quickly as possible. Touch doors to
feel if they are hot before opening them. Use an alternate
exit if necessary. Crawl along the floor, and DO NOT stop
to collect anything.
3. Meet at a pre-arranged meeting place outside the building.
4. Call the fire department from OUTSIDE the building.
5. DO NOT GO BACK INSIDE A BURNING BUILDING. Wait for
the fire department to arrive.
These guidelines will assist you in the event of a fire. However, to
reduce the chance that fires will start, practice fire safety rules
and prevent hazardous situations.
10
110-1082B
12/12/06
4:01 PM
Page 11
TROUBLESHOOTING
! DANGER:
Always turn off power at main fuse box
or circuit breaker before taking troubleshooting action.
! WARNING:
DO NOT disconnect battery or AC
power to quiet an unwanted alarm.
This will remove your protection. Fan
the air or open a window to remove
smoke or dust.
PROBLEM
Smoke alarm does not
sound when tested.
NOTE: Push test button for
at least five (5) seconds
while testing!
SOLUTION
1. Check that AC power
is turned on.
2. Turn off power. Remove smoke
alarm from mounting plate and:
a. check that connector plug is
securely attached.
b. check that battery is properly attached to connector.
3. Clean smoke alarm.
The horn makes 2 quiet
beeps and one loud beep
when tested.
1. The alarm is operating
correctly. Item 4718 has a
ramp-up test horn feature. This
allows you to release the test
button before the alarm emits
the loud beeps.
Smoke alarm beeps about
once a minute.
1. Turn off power and replace
battery. (See “Battery
Replacement” in the
“MAINTENANCE AND
CLEANING” section.)
2. On Item 4718 only. Be sure red
LED is extinguished after
replacing battery.
Smoke alarm sounds
unwanted alarms intermittently or when
residents are cooking,
taking showers, etc.
1. Hire an electrician to
move smoke alarm to
a new location. See
“SMOKE ALARM
PLACEMENT”
2. Clean smoke alarm.
See “Cleaning” in the
“MAINTENANCE AND
CLEANING” section.
Interconnected smoke
alarms do not sound when
system is tested.
1. Press and hold test
button for at least
three seconds after
the first unit sounds.
11
110-1082B
12/12/06
4:01 PM
Page 12
WARRANTY INFORMATION
5-YEAR LIMITED SMOKE ALARM WARRANTY AND
10-YEAR LIMITED ULTRALIFE U9VL-J LITHIUM BATTERY WARRANTY
(WHEN SOLD WITH INVENSYS CONTROLS AMERICAS SMOKE ALARM)
Invensys Controls Americas warrants to the original consumer purchaser each
new smoke alarm to be free from defects in material and workmanship under
normal use and service for a period of five (5) years from the date of purchase.
For Invensys Controls Americas smoke alarms sold with an Ultralife U9VL-J 9volt battery, Invensys Controls Americas warrants to the original consumer purchaser each new Ultralife U9VL-J 9-volt battery to be free from defects in
material and workmanship under normal use and service for a period of ten (10)
years from the date of purchase. Invensys Controls Americas agrees to repair
or replace, at its option, any defective smoke alarm or Ultralife U9VL-J 9-volt battery (when sold with Invensys Controls Americas smoke alarm) provided that it
is returned with postage prepaid and with proof of purchase date to Invensys
Controls Americas. This warranty does not cover damage resulting from accident, misuse or abuse or lack of reasonable care of the product. This warranty
is in lieu of all other express warranties, obligations or liabilities. THE IMPLIED
WARRANTIES OF MERCHANTABILITY AND FITNESS FOR A PARTICULAR PURPOSE ARE LIMITED TO A PERIOD OF FIVE (5) YEARS FOR THE SMOKE ALARM
AND TEN (10) YEARS FOR THE ULTRALIFE LITHIUM U9VL-J 9-VOLT BATTERY
(WHEN SOLD WITH INVENSYS CONTROLS AMERICAS SMOKE ALARM) FROM
PURCHASE DATE. Some states do not allow limitations on how long an implied
warranty lasts, so the above limitations may not apply to you. IN NO CASE
SHALL INVENSYS CONTROLS AMERICAS BE LIABLE FOR ANY INCIDENTAL OR
CONSEQUENTIAL DAMAGES FOR BREACH OF THIS OR ANY OTHER WARRANTY, EXPRESS OR IMPLIED, WHATSOEVER, EVEN IF THE LOSS OR DAMAGE
IS CAUSED BY ITS NEGLIGENCE OR FAULT. Some states do not allow the exclusion or limitation of incidental or consequential damages, so the above limitation
or exclusion may not apply to you. This warranty gives you specific legal rights,
and you may also have other legal rights which vary from state to state.
This smoke alarm’s manufacture and distribution are licensed by the U.S.
Nuclear Regulatory Commission.
This product meets all the requirements of U.L. Standard 217.
WHERE TO SEND YOUR SMOKE ALARM
FOR SERVICE
To return smoke alarms under warranty, send the smoke alarm with
postage prepaid, a note describing the nature of the difficulty, and proof
of date of purchase to:
Invensys Controls Americas
28C Leigh Fisher Blvd.
El Paso, TX 79906
United States of America
To return Ultralife 10-year lithium batteries under warranty, include the
lithium battery, a note describing the nature of the difficulty, with proof
of date of purchase, postage and return postage prepaid to:
ULTRALIFE BATTERIES, INC.
c/o INVENSYS CONTROLS AMERICAS
P.O. Box 622
1350 Route 88 South
Newark, NY 14513
191 E. North Avenue
Carol Stream, Illinois 60188 USA
www.invensyscontrols.com
©2006 Invensys Controls
110-1028B
12