1
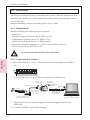
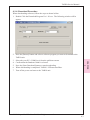
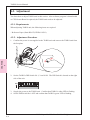
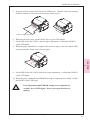
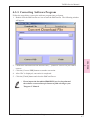
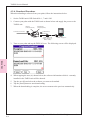
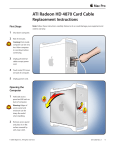
TAIKO Service Manual
4
Chapter
Download
& Adjustment
4-1.
4-2.
4-3.
4-4.
Download
Adjustment
Palm
Cloning
Issue: 06/2006
TAIKO Service Manual
4-1. Download
The software download procedure is described in this section. When the software has been
upgraded or the TAIKO unit’s CPU board has been replaced, please download the software
to the TAIKO unit.
When downloading a software from Palm, please refer 4-2. Palm.
4-1-1. Requirements
When downloading, the following items are required.
- TAIKO Unit
- JCM Power Supply Unit (Part#.VM-30, EDP#.116125)
- TAIKO Harness A (Part#.3280-05-51, EDP#.121797)
- TAIKO Harness B (Part#.3280-03-11, EDP#.116488)
- Downloader (Download Program Ver. 1.20.exe, wba_download_config.txt)
- Software Programe (Ex. P07X3102.G_S)
- Save the two Downloader files in the same folder.
CHAPTER
4
4-1-2. Connecting Procecedure
1. Set the DIP Switch No.1, 7 and 8. DIP Switch is located on the right side of TAIKO
unit.
ON
1
2
3
4
5
6
7
8
2. Connect TAIKO unit, PC and JCM Power Supply unit as shown below.
Interface
Connector(10 Pin)
To Maintenance
Connecotr
To Interface Connector
To AC Power
TAIKO Harness A
(Part#:3280-05-51,
EDP#: 121797)
JCM Power Supply Unit
(Part#: VM-30, EDP#:116125)
Maintenance
Connecotr(4 Pin)
TAIKO
To Serial
Port
TAIKO Harness B
(Part#: 3280-03-11,
EDP#:116488)
PC
(OS: Windows(R) 98 SE/2000/XP)
3. Turn the power of the JCM Power Supply Unit ON and supply the power to the
TAIKO unit.
4. Confirm the TAIKO’s green LED is flashing.
4-2
© 2006 Japan Cash Machine Co.Ltd. All rights reserved.
TAIKO Service Manual
4-1-4. Download Procedure
When downloading software, follow the steps as shown bellow.
1. Double Click the Download Program Ver. 1.20.exe. The following window will be
appear.
© 2006 Japan Cash Machine Co.Ltd. All rights reserved.
CHAPTER
4
2. Press the [Brouse] button and select a software program you want to download to the
TAIKO unit.
3. Select the your PC’s COM Port # from the pull down menu.
4. Confirm that the Buadrate 38400 is selected.
5. Press the [Start Download] button to start downloading.
6. When downloading is completed. TAIKO’s LED turn into Blue.
7. Turn off the power and remove the TAIKO unit.
4-3
TAIKO Service Manual
4-2. Adjustment
You learn how to adjust TAIKO unit in this section. After software program is downloaded
or CPU/Sensor Board is replaced, the TAIKO unit needs to be adjusted.
4-2-1. Requirements
When adjusting TAIKO unit, the following items are required.
- Reference Paper (Part#.KS-070, EDP#.119581)
4-2-2. Adjustment Procedure
CHAPTER
4
1. Confirm the power is not supplied to the TAIKO unit and remove the TAIKO unit from
the faceplate.
2. Set the TAIKO’s DIP Switch No.1, 2 and 8 ON. The DIP Switch is located on the right
side of the unit.
ON
1
2
3
4
5
6
7
8
3. Supply the power to the TAIKO unit. Confirm that TAIKO’s wihte LED is flashing.
4. Set the DIP Switch No.1 OFF and confirm that TAIKO’s green LED is flashing.
4-4
© 2006 Japan Cash Machine Co.Ltd. All rights reserved.
TAIKO Service Manual
5. Insert the reference paper (KS-070) to the TAIKO unit. Then the roller start rotating
and then continue to insert the reference paper all the way in.
Reference Paper (KS-070)
6. When the reference paper reaches all the way in, green LED flashes.
7. Set the DIP Switch No.8 OFF to satrt the paper adjustment. Confirm that TAIKO’s
yellow LED lights.
8. When the paper adjustment is completed, the reference paper come out of the TAIKO
unit automatically. Remove the reference paper.
CHAPTER
4
9. Set the DIP Switch No.8 ON to start the no paper adjustment. Confirm that TAIKO’s
yellow LED lights.
10. When the paper adjustment and EEPROM writing is completed successfully, confirm
that TAIKO’s blue LED lingts.
- If the adjustment and EEPROM writing is not completed successfully, the red LED lights. Please start again from the beginning.
© 2006 Japan Cash Machine Co.Ltd. All rights reserved.
4-5
TAIKO Service Manual
4-3. Palm
Download procedure using Palm is described in this section.
4-3-1. Requirement
When adjusting TAIKO unit, the following itmes are required.
- Palm (Palm(R)’s Tungsten C)
- TAIKO Harness B(Part#.3280-03-11, EDP#.116488)
- File Converter Installer (setup.exe/SETUP.LST/PdbConvEN.CAB)
- Download Program (ID003DWN.prc)
- Software Program (Ex. P07X3102.G_S )
4-3-2. Installing File Converter (PdbConvEN.exe)
CHAPTER
4
When downloading a software from palm, the file needs to be convert into prc format.
Follow the steps below to install the File Converter (PdbConvEN.exe).
1. Save the setup.exe/SETUP.LST/PdbConvEN.CAB to your PC.
2. Double click the setup.exe to start to install.
3. Follow the instruction on the screen and complete installing.
4. PdbConvEn.exe icon is created on your PC’s desktop.
4-6
© 2006 Japan Cash Machine Co.Ltd. All rights reserved.
TAIKO Service Manual
4-3-3. Converting Software Program
Follow the steps below, convert the software program into prc format.
1. Double click the PdbConvEn.exe icon to start the PdbConvEn. The following window
will appear.
CHAPTER
4
2. Confirm the Download File tab and click the [...] button to select a file you want to
convert.
3. Click the [Convert PDB] button to start the convertion.
4. After CRC is displayed, convertion is completed.
5. Click the [Finish] button and close the PdbConvEn.exe.
- Please import the downlader(ID003DWN.prc) for the palm and
the software converted into prc format to palm refering to your
Tungsten C Manual.
© 2006 Japan Cash Machine Co.Ltd. All rights reserved.
4-7
TAIKO Service Manual
4-3-4. Download Procedure
When downloading a software from your palm, follow the instructions below.
1. Set the TAIKO unit’s DIP Switch No. 1, 7 and 8 ON.
2. Connect your palm with the TAIKO unit as shown below and supply the power to the
TAIKO unit.
Maintenance
Connector(4 Pin)
Interface
Connector(10 Pin)
To Interface Connector
To Maintenace
Connector
TAIKO
TAIKO Harness B
(Part#: 3280-03-11,
EDP#:116488)
Palm(R) Tungsten C
CHAPTER
4
3. Turn on your palm and tap the DWN-03 icon. The following screen will be displayed.
4. When tapping the area (A) shown below, the software information which is currently
installed in the TAIKO unit will be showed.
5. Tap the area (B) and select the software you want to download.
6. Tap the [Send] button to start downloading.
7. When the downloading is complete, the screen returns to the previous automaticaly.
4-8
© 2006 Japan Cash Machine Co.Ltd. All rights reserved.
TAIKO Service Manual
4-4. Cloning
Using the Clone Harness, the software can be copied from the Master TAIKO unit to Salve
TAIKO unit. (Cloning)
4-4-1. Required Items
When cloning, the following items are required.
- TAIKO unit installed the cloning feature applicable software (Master)
- TAIKO unit to copy the software (Slave)
- Clone Harness (Part#: 3280-05-52, EDP#: 124528)
- Power Supply Unit (Part#: VM-30, EDP#: 116125)
- For the cloning features applicable software, refer to the Software Information Sheet.
- If the master TAIKO unit is connected with the host machine, the power
supply unit is not required.
4-4-2. Cloning Procedures
Follow the steps below to clone.
CHAPTER
4
1. Connect the master TAIKO unit and the slave TAIKO unit as shown below.
Interface
Connector
Maintenace
Connector
Clone Harness
(Part#:3280-05-52
EDP#:124528)
Host Machine
OR
AC Power
Maintenace
Connector
Interface
Connector
Maintenace
Connector
Master TAIKO
Maintenace
Connector
Slave TAIKO
TAIKO Harness A
(Part#.3280-05-51,
EDP#.121797)
JCM Power Supply Unit
(Part#. VM-30, EDP#.116125)
2. Set the DIP Switch of the master TAIKO unit No. 1, 2, 7 and 8 ON and the DIP Switch
of the Slave TAIKO unit No. 1, 7 and 8 ON.
3. Confirm the LED of the master TAIKO unit is flashing withe, the LED of the slave
TAIKO unit is flashing green.
© 2006 Japan Cash Machine Co.Ltd. All rights reserved.
4-9
TAIKO Service Manual
CHAPTER
4
4. Set the DIP Switch of the master TAIKO unit No. 1 OFF to start cloning.
5. When starting cloning, the LED of the master TAIKO unit lights pink, the LED of the
slave TAIKO unit lights yellow.
6. When the LED of the slave TAIKO unit lights blue (or flashes green), the cloning is
complete. (Approx. 15 minutes)
7. Set the DIP Switch of the master TAIKO unit No.1 ON.
8. When producing another clone TAIKO, turn off the power, connect another slave
TAIKO unit and perform from the step 2.
4-10
© 2006 Japan Cash Machine Co.Ltd. All rights reserved.