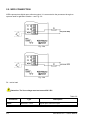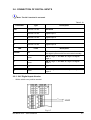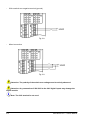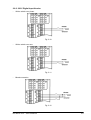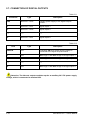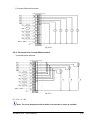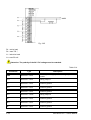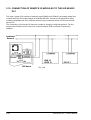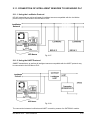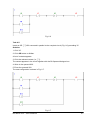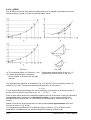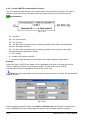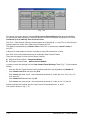
1
KID NEURO PLC User’s Manual Version 2 Revision November 2001 Industrial Software Co. 45, Lokorska Str. 1225, Sofia, BULGARIA Phone/Fax: (+359 2) 975 11 80/1/2/3/4 E-mail: [email protected] www.indsoft.bg KID Neuro PLC – User’s Manual Contents CHAPTER 1. KID NEURO PLC STRUCTURE 1.1. KID NEURO PLC TECHNICAL CHARACTERISTICS ............................................. 1-1 1.2. DESCRIPTION OF THE KID NEURO PLC MODULES............................................. 1-4 1.2.1. Motherboard .............................................................................................................. 1-4 1.2.2. Processor Module ...................................................................................................... 1-4 1.2.3. Power Supply Module ................................................................................................ 1-4 1.2.4. Communication Module ............................................................................................. 1-4 1.2.5. Input / Output Modules............................................................................................... 1-4 1.2.5.1. Digital Inputs Module ................................................................................................. 1-5 1.2.5.2. Digital Outputs Module............................................................................................... 1-5 1.2.5.3. Analog Inputs Module ................................................................................................ 1-5 1.2.5.4. Analog Outputs Module ............................................................................................. 1-5 1.3. KID NEURO PLC ASSEMBLY .................................................................................. 1-6 1.4. KID NEURO PLC DIMENSIONS ............................................................................... 1-7 1.5. PACKAGING............................................................................................................. 1-7 CHAPTER 2. KID NEURO PLC MODULES’ CONNECTIONS 2.1. KID NEURO PLC POWER SUPPLY ......................................................................... 2-1 2.2. KID NEURO PLC TO PERSONAL COMPUTER CONNECTION .............................. 2-2 2.3. CONNECTION OF THE KID NEURO PLC TO A LONWORKS NETWORK ............. 2-3 2.4. CONNECTION OF HIGH-SPEED COUNTER INPUTS.............................................. 2-4 2.5. WDO CONNECTION ................................................................................................. 2-6 2.6. CONNECTION OF DIGITAL INPUTS........................................................................ 2-7 2.6.1. 24 V Digital Inputs Version......................................................................................... 2-7 2.6.2. 220 V Digital Input Version......................................................................................... 2-9 2.7. CONNECTION OF DIGITAL OUTPUTS.................................................................. 2-10 2.7.1. Dry Contact Digital Outputs Version......................................................................... 2-11 2.7.2. MOSFET Switch Digital Outputs Version ................................................................. 2-13 2.8. CONNECTION OF ANALOG INPUTS..................................................................... 2-14 2.8.1. Connection for Voltage Measurement...................................................................... 2-14 2.8.2. Connection for Current Measurement ...................................................................... 2-15 KID Neuro PLC – User’s Manual i 2.8.3. Connection for Resistance Measurement ................................................................ 2-16 2.8.4. Mixed Connection.................................................................................................... 2-17 2.9. CONNECTION OF ANALOG OUTPUTS ................................................................ 2-17 2.10. CONNECTION OF REMOTE I/O MODULES TO THE KID NEURO PLC ............... 2-20 2.11. CONNECTION OF INTELLIGENT SENSORS TO KID NEURO PLC ..................... 2-21 2.11.1. Using the LonWorks Protocol .................................................................................. 2-21 2.11.2. Using the HART Protocol ........................................................................................ 2-21 2.12. CONNECTION OF OTHER PLC COMPATIBLE WITH RS485 INTERFACE TO KID NEURO PLC .................................................................................................... 2-22 CHAPTER 3. KID NEURO PLC OPERATION MODES 3.1. KID NEURO PLC OPERATIONAL MODES.............................................................. 3-1 3.1.1. Program Mode........................................................................................................... 3-1 3.1.2. Work Mode................................................................................................................ 3-1 3.1.3. Force Mode ............................................................................................................... 3-1 3.1.4. Debug Mode.............................................................................................................. 3-1 3.1.5. ForceD Mode............................................................................................................. 3-2 3.2. RESETTING THE KID NEURO PLC......................................................................... 3-2 3.3. KID NEURO PLC CYCLE ......................................................................................... 3-3 3.4. SPECIFIC FEATURES OF THE KID NEURO PLC OPERATION ............................. 3-5 CHAPTER 4. KID NEURO PLC PROGRAMMER 4.1. KID SERIES PLC’S PROGRAMMER ....................................................................... 4-1 4.2. HARDWARE CONFIGURATION AND SOFTWARE REQUIREMENTS ................... 4-1 4.3. SET UP OF KID SERIES PLC’S PROGRAMMER.................................................... 4-1 CHAPTER 5. KID NEURO PLC OPERANDS, COMMANDS, FUNCTIONS AND DATA ENTRY 5.1. USER PROGRAM..................................................................................................... 5-1 5.2. FAST PROGRAM UNDER INTERRUPT................................................................... 5-1 5.3. OPERANDS .............................................................................................................. 5-2 5.4. SCOPE AND LIMITATIONS ..................................................................................... 5-3 5.5. SEQUENTIAL LOGIC COMMANDS ......................................................................... 5-3 5.5.1. Ladder Logic Commands .......................................................................................... 5-3 5.5.2. Functional Block Commands. Logic and Arithmetic Operations................................. 5-4 ii KID Neuro PLC – User’s Manual 5.6. SEQUENTIAL LOGIC SYMBOLS ............................................................................. 5-5 5.7. FUNCTIONS.............................................................................................................. 5-5 5.8. USED KEYS .............................................................................................................. 5-6 5.9. USER PROGRAM SCANNING ................................................................................. 5-6 5.10. NUMERICAL DATA ENTRY ..................................................................................... 5-7 5.11. SERVICE INTEGER VARIABLES (V-CELLS) .......................................................... 5-9 5.12. NUMERICAL IDENTIFICATION OF THE KID NEURO PLC I/O.............................. 5-10 5.13. FLASH MEMORY SUPPORTED V-CELLS............................................................. 5-11 5.14. BINARY ARITHMETIC ............................................................................................ 5-12 CHAPTER 6. GENERATION OF USER PROGRAMS 6.1. GENERATION OF USER PROGRAMS .................................................................... 6-1 6.2. GENERATION OF LADDER LOGIC CIRCUITS ....................................................... 6-2 6.2.1. Entering Simple Circuits............................................................................................. 6-3 6.2.2. Entering of Complex Circuits...................................................................................... 6-8 6.3. ENTERING OF CIRCUITS CONTAINING FUNCTIONAL BLOCKS........................ 6-13 6.3.1. TIMER ..................................................................................................................... 6-15 6.3.2. COUNTER............................................................................................................... 6-22 6.3.3. COMPARE .............................................................................................................. 6-25 6.3.4. MOVE ...................................................................................................................... 6-27 6.3.5. BLOCK MOVE ......................................................................................................... 6-29 6.3.6. Bit-by-Bit SHIFT....................................................................................................... 6-33 6.3.7. ADD......................................................................................................................... 6-35 6.3.8. SUBTRACT ............................................................................................................. 6-38 6.3.9. MULTIPLY ............................................................................................................... 6-41 6.3.10. DIVIDE..................................................................................................................... 6-43 6.3.11. DRUM...................................................................................................................... 6-46 6.3.12. APPROX.................................................................................................................. 6-54 6.3.13. MCR (Master Reset Relay) ...................................................................................... 6-58 6.4. ENTERING AND EDITING OF FUNCTIONS........................................................... 6-60 6.4.1. Mathematical Functions ........................................................................................... 6-63 6.4.2. PID Controller .......................................................................................................... 6-72 6.4.2.1 PID Algorithms......................................................................................................... 6-72 6.4.2.2. Entering PID Data.................................................................................................... 6-73 6.4.2.3. Practical Considerations .......................................................................................... 6-80 6.4.3. Communication Functions – CF............................................................................... 6-90 6.4.3.1. Comm. WRITE Communication Function................................................................. 6-92 KID Neuro PLC – User’s Manual iii 6.4.3.2. Comm READ Communication Function................................................................... 6-94 6.5. ENTRY OF COMMENTARIES ................................................................................ 6-96 6.6. USER NAMES ........................................................................................................ 6-96 6.7. PID SMOOTH MANUAL-TO AUTO MODE TRANSITION .................................... 6-101 6.8. SPECIFICS OF PROGRAMMING IN CASE OF POWER SUPPLY FAILURE ...... 6-102 CHAPTER 7. MENU FILES 7.1. FILE MENU COMMANDS......................................................................................... 7-1 7.2. EDIT MENU COMMANDS ........................................................................................ 7-4 7.3. VIEW MENU COMMANDS ....................................................................................... 7-5 7.4. PLC SERVICES MENU COMMAND ......................................................................... 7-6 7.5. INTERFACE MENU COMMANDS ............................................................................ 7-6 7.6. EDIT TYPE MENU COMMANDS .............................................................................. 7-7 7.7. EDIT COMMENTARY MENU COMMANDS............................................................ 7-11 7.8. TABLES MENU COMMANDS ................................................................................ 7-11 7.9. WINDOW MENU COMMAND ................................................................................. 7-14 7.10. HELP MENU COMMAND ....................................................................................... 7-14 7.11. BUTTONS TOLL BAR MENU COMMANDS........................................................... 7-14 7.12. MAIN BUTTONS STRIP.......................................................................................... 7-14 7.13. LADDER COMMANDS QUICK ENTRY KEYS ....................................................... 7-15 CHAPTER 8. CONFIGURATION & DIAGNOSTIC OF KID NEURO PLC GENERAL................................................................................................................. 8-1 8.1. CHANGING KID NEURO PLC NUMBER ................................................................. 8-1 8.2. CONNECTING KID NEURO PLC TO KID BUS NETWORK..................................... 8-2 8.3. CHECK KID NEURO PLC HARDWARE................................................................... 8-2 8.4. SELECTING OF ANALOG INPUT RANGES AND OF LINERIZATION TABLES..... 8-4 8.5. SETTING OF ASTRONOMICAL CLOCK OF KID NEURO PLC............................... 8-6 8.6. SETTING OF TIME AFTER FAST PROGRAM ......................................................... 8-7 CHAPTER 9. DEBUGGING OF KID NEURO PLC PROGRAMS 9.1. GENERAL................................................................................................................. 9-1 9.2. THE X Y R V LOGBOOK .......................................................................................... 9-1 9.3. DOWNLOADING OF USER PROGRAMS TO PLC .................................................. 9-1 9.4. READING OF PROGRAMS FROM PLC................................................................... 9-3 iv KID Neuro PLC – User’s Manual 9.5. MONITORING ........................................................................................................... 9-4 9.5.1. The Programs ............................................................................................................ 9-4 9.5.2. The Hardware Configuration ...................................................................................... 9-4 9.5.3. The View Control Panel Settings ............................................................................... 9-4 9.5.4. The ADC Settings ...................................................................................................... 9-4 9.5.5. The PID Screen ......................................................................................................... 9-4 9.5.6. The Operands............................................................................................................ 9-4 9.6. PLC DEBUG SCREEN.............................................................................................. 9-5 9.6.1. The Network View Field ............................................................................................. 9-5 9.6.2. The PLC General View Field...................................................................................... 9-5 9.6.3. The Digital Inputs (X) Field......................................................................................... 9-7 9.6.4. The Digital Outputs (Y) Field...................................................................................... 9-7 9.6.5. The Internal Relays (R) Field ..................................................................................... 9-7 9.6.6. The V-cells Field ........................................................................................................ 9-8 9.6.7. V-cells Integer Format Representation....................................................................... 9-8 9.6.8. The PLC Mode of Operation Field............................................................................ 9-12 9.7. POWER CUT OFF – POWER ON CONSIDERATIONS .......................................... 9-14 KID Neuro PLC – User’s Manual v CHAPTER 1 KID NEURO PLC STRUCTURE 1.1. KID NEURO PLC TECHNICAL CHARACTERISTICS 1.2. DESCRIPTION OF THE KID NEURO PLC MODULES 1.2.1. 1.2.2. Motherboard Processor Module 1.2.3. Power Supply Module 1.2.4. Communication Module 1.2.5. Input / Output Modules 1.2.5.1. Digital Inputs Module 1.2.5.2. Digital Outputs Module 1.2.5.3. Analog Inputs Module 1.2.5.4. Analog Outputs Module 1.3. KID NEURO PLC ASSEMBLY 1.4. KID NEURO PLC DIMENSIONS 1.5. PACKAGING KID Neuro PLC – User’s Manual 1.1. KID NEURO PLC TECHNICAL CHARACTERISTICS Table1.1 PARAMETER RANGE (SPEC’S) DESCRIPTION Power Supply Voltage - Nominal power supply voltage 24 V DC (rectified, filtered, with maximum ripples 300 mV peak-to-peak) - Power supply voltage range 18 to 35 V DC - Current consumption (processor only) 120 mA - Connector Terminal 1.5 mm2 Inputs on Processor Board Number of Inputs 2 high-speed counter inputs Open-collector digital output - Number of outputs 1 Digital Inputs 24-V Digital Inputs - Number of inputs 8 per module - Nominal input voltage 24 V DC - Input voltage range Up to 35 V DC - Input current 6 to 30 mA (according to IEC 1131) - Logic 0 0 to 5 V DC (according to IEC 1131) - Logic 1 11 to 35 V DC (according to IEC 1131) - Connector Terminal 1.5 mm2 220 V Digital Inputs - Number of inputs 8 digital inputs per module - Nominal input voltage 220 V AC - Input current 3 to 20 mA (according to IEC 1131) - Logic 0 0 to 30 V AC (according to IEC 1131) KID Neuro PLC – User’s Manual 1-1 Table 1.1 Cont. - Logic 1 Above 30 V AC (according to IEC1131) - Connector Terminal 1.5 mm2 Digital Outputs Relay Outputs - Number of outputs 8 digital outputs per module - Nominal supply voltage 24 V DC - Switch-over voltage Up to 220 V DC, 220 V AC - Max switch-over current 2A - Connector Terminal 1.5 mm2 MOSFET Switch Outputs - Number of outputs Max 8 digital outputs per module - Nominal supply voltage 24 V DC - Max switch-over current 1A - Protections Short-circuit protection, output voltage overshoot protection, thermal protection - Connector Terminal 1.5 mm2 Analog Inputs - Number of inputs - Measures and measurement ranges ! - voltage 5 analog inputs per module 0 to 2 mA (transmitter output) ± 80 mV (for measurement and transformation of J, K, R, B, S, L, M and T thermo-couples) ! - current 0 to 20 mA ! - resistance 0 to 300 Ω Pt100 connected in a 3- or 4-wire circuit with linearisation options - Digital filtering with cut-off frequency selection - Resolution 1-2 2 Hz, 10 Hz 15 bits (32767 units) at “22 Bits No Missing Codes ADC” KID Neuro PLC – User’s Manual Table 1.1 Cont. - Non-linearity error 0.002% for voltage and current measurement 0,006% for resistance measurement - Temperature error 0.5 µV/°C for voltage measurement 200 nA/°C for current measurement 10 mΩ/°C for resistance measurement - Gain drift 10 ppm/°C for voltage measurement 50 ppm/°C for current measurement 30 ppm/°C for resistance measurement - Connector Terminal 1.5 mm2 Analog Outputs - Number of outputs 4 analog outputs per module - Nominal supply voltage 24V DC - Output signals ! - voltage 0 to 5 V 0 to 10 V 0 to 20 mA ! - current 4 to 20 mA 0 to 24 mA - Resolution 15 bits (32767 units) at “16 Bits Resolution (DS) DAC” - Non-linearity error 0.01% - Temperature error - Current consumption 40 to 60 mA - Connector Terminal 1.5 mm2 Interfaces 150 µV/°C (voltage) 150 µA/°C (current) - LonWorks - RS 232 Protection IP20 Nominal temperature range -20°C to 85°C Electromagnetic compatibility IEC 1131 – 2, IEC 801 – Level 2 Dimensions 66mm x 126 mm x 150mm KID Neuro PLC – User’s Manual 1-3 Table 1.1 Cont. Weight Approx. 800g for KID Neuro PLC with 1 input / output sections (2 input / output modules) and approx. 400g for each additional input / output module 1.2. DESCRIPTION OF THE KID NEURO PLC MODULES 1.2.1. Motherboard The motherboard holds and connects all other modules. The length of the motherboard depends on the number of the input / output modules and may vary between 56 mm (KID Neuro PLC without input / output modules) and 7x56mm (KID Neuro PLC with 12 input / output modules). The motherboard incorporates connectors used to install the processor, power supply and input / output modules. 1.2.2. Processor Module The processor module is an obligatory component of the KID Neuro PLC and is installed by the manufacturer. It is located at the extreme left part of the motherboard. 1.2.3. Power Supply Module The power supply PCB is an obligatory component of the KID Neuro PLC and is installed by the manufacturer. It is located in the motherboard on the right part of the processor module. 1.2.4. Communication Module The communication module is designed to connect the KID Neuro PLC to the LonWorks network. The module is installed on the processor PCB. The communication module is optional to the basic KID Neuro PLC configuration. The connector and the LED indicators are located on the processor module. 1.2.5. Input / Output Modules The maximum number of input / output modules which can be installed on the KID Neuro PLC is 12. They are installed on the motherboard into slots numbered from 1 to 12. The modules may be arbitrarily arranged regardless of their type. The input / output module and the associated front sticker are shown on Fig. 1.1 1-4 KID Neuro PLC – User’s Manual Fig. 1.1 The images on the front sticker for all types of input / output modules are identical. A field is allocated at the bottom of the sticker which the user may use to indicate the type of the input / output module by checking the appropriate box: A for analog input, or D for digital input, respectively A/D for the outputs. 1.2.5.1. Digital Inputs Module The digital inputs module is used to connect local digital inputs to the KID Neuro PLC. Each module contains 8 digital inputs. 1.2.5.2. Digital Outputs Module The digital outputs module is designed to connect local outputs to the KID Neuro PLC. Each module contains 8 digital outputs. 1.2.5.3. Analog Inputs Module The analog inputs module is designed to connect local analog inputs to the KID Neuro PLC. Each module contains 5 analog inputs. 1.2.5.4. Analog Output Module The analog outputs module is designed to connect local analog outputs to the PLC Neuro. Each module contains 4 analog outputs. KID Neuro PLC – User’s Manual 1-5 1.3. KID NEURO PLC ASSEMBLY The processor and the power supply are attached to the motherboard by means of mechanical connectors. The unit is enclosed by means of panels which are attached to the motherboard by means of M3 screws. The side panels are fitted into their respective slots. An additional assembly is attached to the motherboard in order to serve as a lock to a DIN rail (not shown on the figure). Fig. 1.2 The front sticker of a KID Neuro PLC with four input / output modules is shown on Fig. 1.3. The front panel is mounted on the assembly by means of M3 screws. Fig. 1.3 1-6 KID Neuro PLC – User’s Manual 1.4. KID NEURO PLC DIMENSIONS The KID Neuro PLC is assembled on a DIN rail. The basic component of the KID Neuro PLC has the following dimensions: (Fig. 1.4): Width – 66 mm Height – 126 mm Length – 150 mm For each input / output component (containing 2 input / output modules) it is necessary to add 56 mm to the length of the basic KID Neuro PLC component. Fig. 1.4 1.5. PACKAGING KID Neuro PLC is delivered in a cardboard packaging. KID Neuro PLC – User’s Manual 1-7 CHAPTER 2 KID NEURO PLC MODULES’ CONNECTIONS 2.1. KID NEURO PLC POWER SUPPLY 2.2. KID NEURO PLC TO PERSONAL COMPUTER CONNECTION 2.3. CONNECTION OF THE KID NEURO PLC TO A LONWORKS NETWORK 2.4. CONNECTION OF HIGH-SPEED COUNTER INPUTS 2.5. WDO CONNECTION 2.6. CONNECTION OF DIGITAL INPUTS 2.6.1. 24 V Digital Inputs Version 2.6.2. 220 V Digital Input Version 2.7. CONNECTION OF DIGITAL OUTPUTS 2.7.1. Dry Contact Digital Outputs Version 2.7.2. MOSFET Switch Digital Outputs Version 2.8. CONNECTION OF ANALOG INPUTS 2.8.1. Connection for Voltage Measurement 2.8.2. Connection for Current Measurement KID Neuro PLC – User’s Manual 2.8.3. Connection for Resistance Measurement 2.8.4. Mixed Connection 2.9. CONNECTION OF ANALOG OUTPUTS 2.10. CONNECTION OF REMOTE I/O MODULES TO THE KID NEURO PLC 2.11. CONNECTION OF INTELLIGENT SENSORS TO KID NEURO PLC 2.11.1. Using the LonWorks Protocol 2.11.2. Using the HART Protocol 2.12. CONNECTION OF OTHER PLC COMPATIBLE WITH RS485 INTERFACE TO KID NEURO PLC KID Neuro PLC – User’s Manual 2.1. KID NEURO PLC POWER SUPPLY The KID Neuro PLC is powered by DC 24 V, whereas the power supply voltage is subject to the following requirements: - rectified; - filtered; - max. ripples 300 mV peak-to-peak Fig. 2.1 The power supply of the KID Neuro PLC is galvanically isolated from the power supply of the processor, communications, digital and analog modules. Table 2.1 Connector Type terminal 1.5 mm2 24V Description KID Neuro PLC power supply Table 2.2 LED 24V Type red KID Neuro PLC – User’s Manual Description LED ON shows that the power supply voltage is connected; LED OFF shows the absence of power supply voltage 2-1 2.2. KID NEURO PLC TO PERSONAL COMPUTER CONNECTION The KID Neuro PLC may be connected to a personal computer by means of a cable (included in the standard delivery set of KID Neuro PLC), fitted with a DB9 connector. Terminals 2,3, and 5 are connected respectively to Rx, Tx and GND at COM1 of the personal computer. The connecting cable should not be longer than 5 m. Fig. 2.2 2 – connected to Rx at COM1 of the personal computer 3 – connected to Tx at COM1 of the personal computer 5 – connected to GND at COM1 of the personal computer Table 2.3 Connector RS232 Type Phone jack Description Used to connect the KID Neuro PLC to a personal computer Table 2.4 RS232 LED Type Description Rx green Blinking when data is being received from the personal computer. Tx green Blinking when data is being transmitted to the personal computer. Ongoing communication between the KID Neuro PLC and the personal computer is indicated by means of the Rx and Tx LEDs. 2-2 KID Neuro PLC – User’s Manual 2.3. CONNECTION OF THE KID NEURO PLC TO A LONWORKS NETWORK Fig. 2.3 The KID Neuro PLC may be connected to a LonWorks network by means of two-wire line. The connection is polarity insensitive. Table 2.5 Connector LonWorks Type Terminal 1.5 mm2 Description Used to connect KID Neuro PLC to a LonWorks network. Used only in the presence of a communication module. Table 2.6 LonWorks LED Type Description Rx green Blinking when data is being received via LonWorks. Tx green Blinking when data is being transmitted via LonWorks. Service green Normal operation of KID Neuro PLC Off KID Neuro PLC not configured Blinking at 1 s intervals Reset Blinks once KID Neuro PLC – User’s Manual 2-3 Table 2.6 Cont. Wink Upon performing a Wink operation for the first time. Service remains constantly on; Upon performing a Wink operation for the second time – blinking; Upon performing a Wink operation for the third time – remains constantly on, etc. 2.4. CONNECTION OF HIGH-SPEED COUNTER INPUTS The high-speed counter inputs FI1 and FI2 represent digital inputs which are used for counting of pulses with frequency up to 100 kHz. The terminals, connected to these inputs are connected to the processor PCB. The signals fed to the high-speed counter inputs must have steep front edges. Recommended circuits (the signal to the high-speed counter inputs are fed from an NPN transistor) are shown in Fig. 2.4 and Fig. 2.5 below: Fig. 2.4 2-4 KID Neuro PLC – User’s Manual Fig. 2.5 Note: It is not recommended to feed a relay signal to the high-speed counter inputs. Relay actuation may generate stray pulses which may be registered by the counter input. A front edge at FI1 generates an interrupt which starts the implementation of a highspeed program (see 5.2). The high-speed counter inputs may be used also as normal digital inputs. Table 2.7 Connector Type Description FI1 terminal 1.5 mm2 High –speed counter input FI1 FI2 terminal 1.5 mm2 High –speed counter input FI2 Table 2.8 LED Type Description FI1 green ON at logic 1 and OFF at logic 0 FI2 green ON at logic 1 and OFF at logic 0 KID Neuro PLC – User’s Manual 2-5 2.5. WDO CONNECTION WDO represents a digital open-collector output. It is connected to the processor through an optrone used for galvanic isolation – see Fig. 2.6. Fig. 2.6a Fig. 2.6b Rt – active load Attention: The Vcc voltage must not exceed 50 V DC Table 2.9 Connector WDO 2-6 Type terminal 1.5 mm2 Description Digital open-collector output KID Neuro PLC – User’s Manual 2.6. CONNECTION OF DIGITAL INPUTS Note: The 24 V terminal is not used. Table 2.10 Connector Type Description 24V terminal 1.5 mm2 Not Used 1 terminal 1.5 mm2 Digital input 1 2 terminal 1.5 mm2 Digital input 2 --- ----- ----- 8 terminal 1.5 mm2 Digital input 8 LED TYPE Description 24V/OK red ON constantly while the processor module and the digital inputs module are connected normally 1 green ON at a logic 1, and OFF at a logic 0 at digital input 1 2 green ON at a logic 1, and OFF at a logic 0 at digital input 2 --- ----- ----- 8 green ON at a logic 1, and OFF at a logic 0 at digital input 8 2.6.1. 24 V Digital Inputs Version - With a switch-over positive terminal Fig. 2.7 KID Neuro PLC – User’s Manual 2-7 - With a switch-over negative terminal (ground) Fig. 2.8 - Mixed connection Fig. 2.9 Attention: The polarity of the switch-over voltage must be strictly observed. Attention: Any connection of 220/100V to the 24 V digital inputs may damage the digital module. Note: The 24 V terminal is not used. 2-8 KID Neuro PLC – User’s Manual 2.6.2. 220 V Digital Input Version - With a switch-over phase Fig. 2.10 - With a switch-over zero Fig. 2.11 - Mixed connection Fig. 2.12 KID Neuro PLC – User’s Manual 2-9 2.7. CONNECTION OF DIGITAL OUTPUTS Table 2.11 Connector Type Description 24V terminal 1.5 mm2 Auxiliary power supply to the digital outputs module 1 terminal 1.5 mm2 Digital output 1 2 terminal 1.5 mm2 Digital output 2 --- ----- ----- 8 terminal 1.5 mm2 Digital output 8 Table 2.12 LED Type Description 24V/OK red Constantly ON when power supply voltage is connected to the digital outputs module 1 red ON at logic 1 and OFF at logic 0 at logic output 1 2 red ON at logic 1 and OFF at logic 0 at logic output 2 --- ----- ----- 8 red ON at logic 1 and OFF at logic 0 at logic output 8 Attention: The discrete outputs modules require an auxiliary 24 V DC power supply voltage, which is connected to terminal 24V. 2-10 KID Neuro PLC – User’s Manual 2.7.1. Dry Contact Digital Outputs Version - Connecting an active load Fig. 2.13 - Rt – active load - Connection of an induction-type of load to a DC voltage source Fig. 2.14 - Lt – induction load - D – auxiliary damping diode Uout = max 220V DC Attention: The connection of the auxiliary damping diode (D) is obligatory. Note: The 24 V DC and Uout voltages may be supplied by separate sources or by single source. KID Neuro PLC – User’s Manual 2-11 - Connecting of an active load to an AC voltage source Fig. 2.15 Rt – active load - Connection of an induction load to an AC voltage source Fig. 2.16 Lt – induction load R = 100 Ω/1W C = (10-100) nF/600V Attention: The connection of a damping RC group is obligatory. 2-12 KID Neuro PLC – User’s Manual 2.7.2. MOSFET Switch Digital Outputs Version - Connection of an active load Fig. 2.17 Rt – active load Attention: It is necessary to match the polarity of Uout. - Connecting of an induction load Fig. 2.18 Lt – induction load D – auxiliary damping diode Attention: It is necessary to match the polarity of Uout. Attention: The connection of the auxiliary damping diode D is obligatory. Attention: For the MOSFET digital outputs version the connection of 220 V may damage the module. KID Neuro PLC – User’s Manual 2-13 2.8. CONNECTION OF ANALOG INPUTS Note: The 30 Ω R1 to R5 resistors represent internal analog inputs for the module. Table 2.13 LED Type Description 1 green ON at query from the processor to the analog-todigital converter (ADC) 2 green ON when ADC is ready to sample 3 red ON at supply voltage connected to the analog inputs module Note: LED’s 4 to 8 and 24 V/OK are not used 2.8.1. Connection for Voltage Measurement - Three differential channels Fig. 2.19 R = 10 kΩ to 1 MΩ 2-14 KID Neuro PLC – User’s Manual - Five quasi-differential channels Fig. 2.20 2.8.2. Connection for Current Measurement - Three differential channels Fig. 2.21 R = 10 kΩ to 1 MΩ Note: The wires designated with a thicker line must be as short as possible. KID Neuro PLC – User’s Manual 2-15 - Five quasi-differential channels Fig. 2.22 Note: The wires designated with a thicker line must be as short as possible. 2.8.3. Connection for Resistance Measurement A Pt100 resistor is measured by a four-wire circuit. Fig. 2.23 2-16 KID Neuro PLC – User’s Manual 8.2.4. Mixed Connection The circuit below illustrates the connection of various types of sensors. The first differential channel is used to measure and convert the signal from a J-type thermo couple. The second differential channel is used for current measurements (4 to 20 mA) using a two-line circuit. An auxiliary Pt100 thermoresistor is connected to the third differential channel for the purpose of offsetting the cold wires of the thermo-couple. Fig. 2.24 R = 10 kΩ to 1 MΩ RAI = max 200 Ω The RAI resistor is used to generate a signal to other analog inputs. Note: The wires designated with a thicker line must be as short as possible. 2.9. CONNECTION OF ANALOG OUTPUTS The circuit below illustrates the connection of the first analog output of the module. The remaining three analog outputs are connected in a similar way. KID Neuro PLC – User’s Manual 2-17 Fig. 2.25 Rt – active load Rt = max 750 Ω Lt – induction load Lt = max 50 mH Attention: The polarity of the 24 V DC voltage must be matched. Table 2.14 Connector Type Description 24V terminal 1.5 mm2 Auxiliary power supply to the analog outputs module 1+ terminal 1.5 mm2 Analog output 1 1- terminal 1.5 mm2 Common ground 2+ terminal 1.5 mm2 Common ground 2- terminal 1.5 mm2 Common ground 3+ terminal 1.5 mm2 Analog output 2 3- terminal 1.5 mm2 Common ground 4+ terminal 1.5 mm2 Common ground 4- terminal 1.5 mm2 Common ground 2-18 KID Neuro PLC – User’s Manual Table 2.14 Cont. 5+ terminal 1.5 mm2 Analog output 3 5- terminal 1.5 mm2 Common ground 6+ terminal 1.5 mm2 Common ground 6- terminal 1.5 mm2 Common ground 7+ terminal 1.5 mm2 Analog output 4 7- terminal 1.5 mm2 Common ground 8+ terminal 1.5 mm2 Common ground 8- terminal 1.5 mm2 Common ground Table 2.15 LED Type Description 24V/OK red Constantly ON at the presence of power supply voltage connected to the module 1 red ON at the presence of a load, OFF in case of error at analog output 1 2 red ON at the presence of a load, OFF in case of error at analog output 2 3 red ON at the presence of a load, OFF in case of error at analog output 3 4 red ON at the presence of a load, OFF in case of error at analog output 4 5 green The light intensity is proportional to the current through analog output 1 6 green The light intensity is proportional to the current through analog output 2 7 green The light intensity is proportional to the current through analog output 3 8 green The light intensity is proportional to the current through analog output 4 LED’s 1 to 4 are red and correspond respectively to analog output 1 to4. These LED’s are constantly ON in the presence of a load connected to the respective analog output. The LED’s are OFF in case of an error namely: a. no load is connected to the respective analog output; b. the digital-to-analog converter for the respective analog output is damaged. LED’s 5 to 8 are green and are connected in series to the current loop of the respective analog output 1 to 4. The light intensity depends on the current through the respective analog output. KID Neuro PLC – User’s Manual 2-19 2.10. CONNECTION OF REMOTE I/O MODULES TO THE KID NEURO PLC The input / output (I/O) sections of modules type LDIM16 and LDOM16, the analog inputs from modules KID AI3, the analog outputs of modules KID AO2, as well as I/O signals from other modules compatible with the LonWorks protocol may be used as remote I/O sources for KID Neuro PLC. The connection of the remote I/O sources is made by using the LonWorks protocol. For this purpose the KID Neuro PLC must have a communication PCB (LonWorks Transceiver) installed. Fig. 2.26 2-20 KID Neuro PLC – User’s Manual 2.11. CONNECTION OF INTELLIGENT SENSORS TO KID NEURO PLC 2.11.1. Using the LonWorks Protocol KID AI2 transmitter as well as all types of intelligent sensors compatible with the LonWorks protocol may be connected to the KID Neuro PLC. Fig. 2.27 2.11.2. Using the HART Protocol SMART transmitters, as well as all intelligent sensors compatible with the HART protocol may be connected to the KID Neuro PLC. Fig. 2.28 The connection between LonWorks and HART is made by means of a GATEWAY module. KID Neuro PLC – User’s Manual 2-21 2.12. CONNECTION OF OTHER PLC COMPATIBLE WITH RS485 INTERFACE TO KID NEURO PLC Fig. 2.29 2-22 KID Neuro PLC – User’s Manual CHAPTER 3 KID NEURO PLC OPERATION MODES 3.1. KID NEURO PLC OPERATIONAL MODES 3.1.1. Program Mode 3.1.2. Work Mode 3.1.3. Force Mode 3.1.4. Debug Mode 3.1.5. ForceD Mode 3.2. RESETTING THE KID NEURO PLC 3.3. KID NEURO PLC CYCLE 3.4. SPECIFIC FEATURES OF THE KID NEURO PLC OPERATION KID Neuro PLC – User’s Manual 3.1. KID NEURO PLC OPERATIONAL MODES The KID Neuro PLC maintains the following five operational modes: 3.1.1. Program Mode The Program mode is used for user programming of the KID Neuro PLC. The following operations may be executed in the Program mode: - creation and editing of user programs; - loading of user programs into the KID Neuro PLC memory; - reading of user programs from the KID Neuro PLC memory; - KID Neuro PLC hardware check; - change of the KID Neuro PLC ID number; - loading of linearization tables; - setting the range of the analog inputs; - setting of the KID Neuro PLC system clock; - setting the value of the Time after Fast Program. The user program and the fast program under interrupt (if loaded) are not executed while the KID Neuro PLC is in the Program mode. The outputs of the KID Neuro PLC are disconnected from their current sources, which means that no control signals are transmitted to the controlled equipment. 3.1.2. Work Mode While in Work mode, the KID Neuro PLC executes the user program in successive cycles. The following actions are executed for a single KID Neuro PLC cycle: - the state of the physical inputs is readed; - executes the set user program step by step in the order of loading; - generates control signals to the controlled equipment, which signals are calculated according to the settings in the user program. The Work mode may be initiated only in case there is a user program loaded. 3.1.3. Force Mode The Force mode allows the user to directly control the outputs of the KID Neuro PLC. This mode is used to check the connection from the KID Neuro PLC outputs and the controlled equipment. The user program and the fast program under interrupt (if loaded) are not executed. 3.1.4. Debug Mode The Debug mode is used to adjust and set the values in the user program. The user program is executed while the PLC is in the Debug mode, with any interference into program having a direct effect on the program execution. KID Neuro PLC – User’s Manual 3-1 3.1.5. ForceD Mode The ForceD mode is used to adjust and set the data in the user program. The difference between the ForceD and Debug mode is that in the ForceD mode the values at the inputs are set by the user. In the ForceD mode the user program is executed, with every interference having a direct effect on the program execution. The ForceD allows for the step-by-step execution of the user program, with pauses between each processing cycle. 3.2. RESETTING THE KID NEURO PLC (RESET) After the power supply voltage is switched on (RESET), the KID Neuro PLC executes a procedure for self-test as shown on Fig. 3.1. Fig. 3.1 3-2 KID Neuro PLC – User’s Manual The digital outputs of the KID Neuro PLC are reset to 0 after the power supply is switched on (no signals are generated to the controlled equipment). A RAM test is run. If the test is successful, the PLC proceeds with a configuration check. Depending on the set configuration, the state of the I/O modules and of the communication module is checked. The test results are stored into the internal variables V257 and V258. The operational mode is checked. Immediately reset the operational mode may be either Work or Program. In case the PLC is in the Work mode and there is a valid program loaded, the KID Neuro PLC is switched to the Program mode. The normal operation of the KID Neuro PLC is backed up by hardware means, using an in-built monitoring circuit of the WATCHDOG type with a monitoring cycle of 200 ms. The power supply to the controlled equipment is switched off by trapping the output relays in case of a controller failure or in case the maximum scanning time is exceeded. 3.3. KID NEURO PLC CYCLE The block diagram of the KID Neuro PLC software is shown on Fig. 3.2 and Fig. 3.3. The KID Neuro PLC checks the operational mode at the beginning of each scanning cycle. In case the PLC is in the Work or the Debug mode, then the validity of the user program is checked. After the validity of the user program is verified, the PLC proceeds with scanning the state of the physical inputs and with the execution of the user program. In case the time for the execution of the user program is less than 25 ms, 1 ms is dedicated to the execution of the mathematical functions and for PID controllers. The calculated results are stored at the outputs, which marks the end of the current cycle. In case there is no valid user program or in case the execution time excedes 25 ms, the PLC is switched to the Program mode. The state of the physical inputs is read when the PLC is in the Program mode. In case a query for loading of a user program had been made, it is stored into the KID Neuro PLC memory, after which the program validity is checked. The user program is deleted in case it is invalid. When in ForceD mode, the PLC checks the state of the digital inputs from Debug Screen, after which the user program is executed. The results from the execution are stored at the outputs. In case the PLC is in the Force mode, the PLC checks the state of the digital inputs. The user values stored in the programmer are moved to the digital outputs. In case no valid operational mode is established the KID Neuro PLC is switched to the Program mode. KID Neuro PLC – User’s Manual 3-3 Fig. 3.2 3-4 KID Neuro PLC – User’s Manual Fig. 3.3 3.4. SPECIFIC FEATURES OF THE KID NEURO PLC OPERATION The KID Neuro PLC executes the functions set in the user program after the sequential logic cycle due to the fact that the execution of these functions takes much longer, the execution of the user functions is practically impossible to be completed within a single controller cycle in case mathematical functions are performed. 1 ms is dedicated within each cycle for the executions of the functions. The results from the execution of the functions may be used by the user program only after the calculations are completed. No time is allocated in case no functions are queried. The KID Neuro PLC may execute also fast programs. It is executed under interrupt and is started by the positive edge at the high-speed counter input FI1. The sequence of loading of the commands has an effect on the execution of the user program. KID Neuro PLC – User’s Manual 3-5 Example: Fig. 3.4 The results are stored into internal variables during the execution of the user program. The Y1 digital output bit of the first loop will be set to 1, and the second loop – to 0. Only after the user program is completed the state of the internal variables is transferred to the outputs. The Y1 digital output will be reset to 0. 3-6 KID Neuro PLC – User’s Manual CHAPTER 4 KID NEURO PLC PROGRAMMER 4.1. KID SERIES PLC’S PROGRAMMER 4.2. HARDWARE CONFIGURATION AND SOFTWARE REQUIREMENTS 4.3. SET UP OF KID SERIES PLC’S PROGRAMMER KID Neuro PLC – User’s Manual 4.1. KID SERIES PLC’S PROGRAMMER KID Series PLC’s Programmer is a software product designed by Industrial Software as a programming tool for KID Neuro PLC. KID Series PLC’s Programmer provides the following services: - generation and editing of user programs for KID Neuro PLC; - configuration and diagnostics of KID Neuro PLC; - loading, reading and set-up of user programs. Note: The KID Series PLC’s Programmer is referred to as “the programmer” in this manual. 4.2. HARDWARE CONFIGURATION AND SOFTWARE REQUIREMENTS The following software and hardware assets are needed for the normal operation of the KID Series PLC’s Programmer: - an IBM/PC or compatible personal computer with a minimum configuration of 486DX/66, 16 MB RAM, 880 MB HDD, 3.5’’ FDD; - installed Windows 95, Windows 98 or Windows NT. 4.3. SET UP OF KID SERIES PLC’S PROGRAMMER The KID Neuro PLC Programmer is installed by means of a setup disk provided by the manufacturer. In order to install the KID Neuro PLC Programmer, insert the setup disk in the computer CD drive and select KID Neuro \ setup.exe. Follow the instructions of the setup program. The setup disk contains: - KID Neuro.exe – executable program file; - Communication Driver for data exchange between the programmer and the KID Neuro PLC. The driver may be: kidcom.exe – for communication via KID BUS. Used for the purposes of the programmer operation under Windows '95 and Windows '98. RS Driver.exe – for communication via NT KID BUS. Used for the purposes of the programmer operation under Windows NT, Windows '95 and Windows '98. - help – programmer help files KID Neuro PLC – User’s Manual 4-1 CHAPTER 5 KID NEURO PLC OPERANDS, COMMANDS, FUNCTIONS AND DATA ENTRY 5.1. USER PROGRAM 5.2. FAST PROGRAM UNDER INTERRUPT 5.3. OPERANDS 5.4. SCOPE AND LIMITATIONS 5.5. SEQUENTIAL LOGIC COMMANDS 5.5.1. Ladder Logic Commands 5.5.2. Functional Block Commands. Logic and Arithmetic Operations 5.6. SEQUENTIAL LOGIC SYMBOLS 5.7. FUNCTIONS 5.8. USED KEYS 5.9. USER PROGRAM SCANNING KID Neuro PLC – User’s Manual 5.10. NUMERICAL DATA ENTRY 5.11. SERVICE INTEGER VARIABLES (V-CELLS) 5.12. NUMERICAL IDENTIFICATION OF THE KID NEURO PLC I/O 5.13. FLASH MEMORY SUPPORTED V-CELLS 5.14. BINARY ARITHMETIC KID Neuro PLC – User’s Manual 5.1. USER PROGRAM A basic user program shall mean a user-generated sequence of relay-logic commands, functional blocks and functions. The user program may be provisionally separated into two parts: sequential logic and functions. The sequential logic consists of: - Ladder logic – a combination of contacts and coils, connected in a circuit designed by the user; - Functional blocks; - Arithmetic operations; - Logic operations. The sequential logic is loaded in the KID Neuro PLC memory as a series of commands, which are executed in the order they were loaded. The portion of the user program which is allocated to sequential logic, is subdivided into about 1200 sections called steps. Thus, each command is located at a specific step of the user program. Each series of commands is displayed on the screen as a circuit loop. A circuit loop shall mean an entity of ladder logic and functional blocks, situated between the left and the right bus, the left-hand bus being always considered as primary. Depending on the order of loading of the commands, one and the same loop may be represented in several ways. There are three types of functions: - Mathematical functions; - PID controller; - Communication functions. The functions are executed as a background program due to the long period of time needed for their execution. The KID Neuro PLC checks for function queries and may proceed with their execution only after the end of the sequential logic processing cycle. 1 ms of each controller cycle is allocated for function execution. Thus, the series of functions will be completed within several controller cycles. The functions are entered by filing data into specialized files. 5.2. FAST PROGRAM UNDER INTERRUPT A fast program under interrupt shall mean an user-generated series of relay-contact logic and functional blocks. Unlike the basic user program, the fast program under interrupt can not contain functions. The max. number of steps which may be entered into a fast program under interrupt is about 100. The execution of a fast program under interrupt is started by a positive edge at the high-speed counter inputs FI1 of the KID Neuro PLC. The Time after Fast Program parameter is related to the fast program under interrupt. This parameter represents the shortest interval between two successive executions of the fast program under interrupt (see subsection 8.6). The fast program under interrupt is loaded into the KID Neuro PLC simultaneously with the basic user program. KID Neuro PLC – User’s Manual 5-1 Unlike the basic user program, the fast program under interrupt is not an obligatory element of the KID Neuro PLC software. 5.3. OPERANDS The commands used to enter sequential logic into the KID Neuro PLC contain both logic and integer operands with the following identifiers: Integer operands: - Table 5.1 Identifier V Range V1 - V512 Description Internal integer operand (V-cell). The figure which may be stored in the operand may range between -32768 to 32767. V300 - V400 – when an user program is loaded the values are burned in a FLASH non-volatile memory. These values are read upon EACH KID Neuro PLC RESET. Constants Constant values within the range from –32768 to 32767. Logic operands: - Table 5.2 Identifier Range Description X X1 - X128 A logic variable, corresponding to a digital input. The digital inputs which are not actual physical inputs of the KID Neuro PLC, may be used as internal relays. Y Y1 - Y128 A logic variable, corresponding to a digital output. The digital output which are not actual physical outputs of the KID Neuro PLC, may be used as internal relays. R R1 - R256 A logic variable, corresponding to an internal relay. R1 - R40 – volatile internal relays, 0 on reset R41 - R256 – non-volatile internal relays which are stored in an RAM type non-volatile memory. ZZZ.TT Integer operand bits (V-cells), where: - ZZZ- V-cell number; - ТТ – bit number. The bit with the smallest number (bit 0) is assumed to be the least significant bit (LSB), and the bit with the largest number (bit 15) – as the most significant bit (MSB). 5-2 KID Neuro PLC – User’s Manual 5.4. SCOPE AND LIMITATIONS The KID Neuro PLC user programs are subject to the following limitations: Table 5.3 Parameter Limitation Volume of the basic user program About 1200 steps. Volume of the fast program under interrupt 500 bytes (about 60 steps). User program scanning cycle Depends on the volume of the user program, typically between 3 to 10 ms Timer Reverse counter Comparison Move Block move Addition The number of these functional blocks is limited by the number of V-cells accessible to the user. Subtraction Multiplication Division Bit shift Drum counter Approximation Mathematical functions, PID controllers Up to 8 5.5. SEQUENTIAL LOGIC COMMANDS 5.5.1. Ladder Logic Commands The commands used to enter ladder logic indicate the way in which the contacts and the coils are connected into circuits, or the manner in which separate circuits are connected. Logic operands are used to represent both the contacts and the coils. Table 5.4 Command Action Load Inserts a contact at the beginning of a simple circuit And Connects a contact in series to a circuit (logic AND) Or Connects a contact in parallel to a circuit (logic OR) KID Neuro PLC – User’s Manual 5-3 Table 5.4 Cont. Serial Connects two circuits in series (logic AND) Parallel Connects two circuits in parallel (logic OR) Coil Connects a coil to a circuit (store result) MCR Master Communication Relay The MCR, MCREND, Serial, Parallel, Load1 and NLoad1 commands have no operands. The other commands have a single operand each. 5.5.2. Functional Block Commands. Logic and Arithmetic Operations Table 5.5 Command Description Move Moves the contents of an integer operand to another integer operand Block Move Moves the contents of a block of integer operands to another block of integer operands Compare Compares the contents of two integer operands Timer Timer functional block (time relay) Counter Counter functional block (pulse counter) Drum DRUM functional block Approx APPROXIMATION functional block MCR, MCREND A functional block used to reset the outputs (the coils) of the user program within its functional area Table 5.6 Logic operations Shift Left / Right Description Executes bit-by-bit shift to the left or to the right of the contents of a block of integer operands Table 5.7 Arithmetic operations Description Add Sums up the contents of two integer operands and stores the result into a third integer operand Subtract Subtracts the contents of two integer operands and stores the result into a third integer operand Multiply Multiplies the contents of two integer operands and stores the result into a third integer operand Divide Divides the contents of two integer operands and stores the result into a third integer operand 5-4 KID Neuro PLC – User’s Manual 5.6. SEQUENTIAL LOGIC SYMBOLS The following symbols are used to represent the programmer ladder logic: Table 5.8 Symbol Description --] [-- A make contact. The contact is closed when the logic operand is equal to 1, and is opened when the logic operand is equal to 0 --]/[-- A brake contact (an inverted make contact) The contact is closed when the logic operand is equal to 0, and is opened when the logic operand is equal to 1 ├─────── Always ON contact ├─── Always OFF contact ── --] ↑ [-- Front-edge-triggered pulse contact (also referred to as leading edge) --] ↓ [-- Rear-edge-triggered pulse contact (also referred to as trailing edge) --( )-- Output (relay coil). Designates the storage of the result from the logic calculation of a circuit. The operand is set to 1 in case the result is equal to 1 --(/)-- Inverted output. The operand is set to 1 in case the result of the logic calculation is equal to 0 --(S)-- Digital operand setting – a SET trigger --(R)-- Digital operand resetting – a RESET trigger 5.7. FUNCTIONS The following functions may be used during generation of a user program: Table 5.9 Symbol Description Math A mathematical function PID PID controller Comm R/W Read / write communication functions The functions are entered by filing data into specialized files which accept integer and logic variables and constants. Due to the long time needed for execution, no functions may be entered into fast programs under interrupt. KID Neuro PLC – User’s Manual 5-5 5.8. USED KEYS User programs may be entered and edited using the standard PC keyboard by means of the following keys: Table 5.10 Keys Description <Enter> Enters the selected commands, operands, data etc. <Ctrl> + <Home> Moves the cursor together with the visible portion of the display to the first step of the user program <Ctrl> + <End> Moves the cursor together with the visible portion of the display to the last step of the user program <Pg Up> Moves the cursor one circuit up <Pg Dn> Moves the cursor one circuit down Left or Up ARROW Moves the cursor one step back in the user program Right or Down ARROW Moves the cursor one step forward in the user program <Back Space> Deletes the command situated immediately before the command indicated by the cursor <Delete> Deletes the command indicated by the cursor <X> Digital input logic operand identifier <Y> Digital output logic operand identifier <R> Internal relay logic operand identifier <V> Internal integer operand identifier (V-cell) <0>, <1>, ..., <9> Numerical keys <F2>, <F3>, ..., <F12> Functional keys used to enter commands and functions (see Items 7.11 and 7.12). The <F2> to <F12> keys are multi-functional. <F1> calls help information. 5.9. USER PROGRAM SCANNING The user program is scanned from top to bottom and from left to right, circuit by circuit in the order of entry of the commands. The functions are processed asynchronously as a background program. The execution of the function queries is slow and is practically impossible within a single scanning cycle. The controller initiates the execution of the functions only after it has completed the processing of the relay program, with 1 ms of each cycle allocated to function execution. Thus, the functions will be executed within several controller cycles. A functions is considered completed after the execution operand (R or Y) is set to a logic 1 – the execution results may be used by the user program only after the occurrence of this event. 5-6 KID Neuro PLC – User’s Manual 5.10. NUMERICAL DATA ENTRY The integers may be entered by the user as follows (refer to para 5.13): - as signed integers, namely: for positive signed integers within the range from 0 to +32767 for negative signed integers within the range from 0 to -32768 - as unsigned integers from 0 up to 65535 In case the numerical data are entered as unsigned integers, the largest number which may be stored into a V-cell is equal to 65535. The user may enter integers within the range from 0 to 65535, which corresponds to the actual negative and positive integers as follows (you may refer to para 5.13 also): 65535 = -1 65534 = -2 65533 = -3 ………….. ………….. 32769 = -32767 32768 = -32768 32767 = 32767 32766 = 32766 ………….. ………….. 1=1 0=0 The representation of the binary numbers by their complementary code allows the arithmetic operation to be performed on figures of arbitrary length using only the ADD operation. The sign registers of the negative and the positive figures are provisionally interpreted as numeric registers and are processed together with the rest of the actual numeric registers. The result is automatically assigned a sign. The integer operands used by the functional blocks for arithmetic operations represent 16-bit figures, the most significant bit is used as a sign bit: 15 14 13 12 11 10 09 08 07 06 05 04 03 02 01 00 - 15th bit is the Most Significant Bit (MSB) - 00th bit is the Least Significant Bit (LSB) Positive signed integers are represented with the sign bit set to 0, and the rest of the numerical registers set to the respective digits of the binary equivalent of the respective integer. The direct code of an integer is equal to the figure itself. The complementary code of a positive figure looks exactly as the direct code of the same figure (you may refer to para 5.13). The negative signed integers are represented always in complementary code. The inverted code of a negative figure is obtained by setting the sign bit to 1 (- sign), while the digits in the numerical register are inverted. The complementary code of a negative figure is obtained by adding a 1 to the least significant bit of the inverted code of the same figure (you may refer to para 5.13). KID Neuro PLC – User’s Manual 5-7 Example 5.1: Represent the integers 16385 resp. 1026 in a 16-bit V cell as follows: a. as unsigned integers in direct code (dc) b. as positive signed integers in direct code (dc) c. as negative signed integers in inversed (inverted) code (ic) d. as negative signed integers in complementary code (cc) Solution: a. Representation as unsigned integers in direct code: [16385]10 ≡ [0100000000000001]dc resp. [1026]10 ≡ [0000010000000010]dc b. Representation as positive signed integers in direct code: [+16385]10 ≡ [0’100000000000001]dc resp. [+1026]10 ≡ [0’000010000000010]dc c. Representation as negative signed integers in inverted code: [-16385]10 ≡ [1’011111111111110]ic resp. [-1026]10 ≡ [1’111101111111101]ic d. Representation as negative signed integers in supplementary code i.e. 1 bit is added to LBS of the above inverted code representation: [-16385]10 ≡ [1’01111111111111]cc resp. [-1026]10 ≡ [1’111101111111110]cc The ADD, SUBTRACT, MULTIPLY and DIVIDE functional blocks operate with figures represented in complementary code as signed integers. Some of the integer operands in the MULTIPLY and DIVIDE functional blocks are represented by 32-bit figures (incl. the sign bit). Such a figure may be stored in two V-cells with successive numbers. The first V-cell (for whose number the relevant operand is entered) is used to store the less significant portion of the figure. The more significant portion is automatically stored in the next V-cell, with the most significant bit used as the sign bit. Second V-cell First V-cell 15 14 13 12 11 10 9 8 7 6 5 4 3 2 1 0 15 14 13 12 11 10 9 8 7 6 5 4 3 2 1 0 15 bit of the second V-cell is the sign bit The figures which may be written in this manner, may range between -2147483648 to 2147483647. A 32-bit figure may be interpreted also as two 16-bit figures which actually represent the values stored in the two V-cells. It must be noted that the value of the operand interpreted as a 32-bit figure is different from the value of the operand stored as two 16-bit figures. Example 5.2: 1’111111111111110 ║ 1111111111111101≡ -[65539] - the numerical – 65539 interpreted as a 32 – bit integer. The same figure, interpreted as two 16 bit figures, will yield the following result: 1’111111111111110 = [-2]cc – the more significant portion of the 32-bit figure 1’111111111111101 = [-3]dc – the less significant portion of the 32-bit figure 5-8 KID Neuro PLC – User’s Manual 5.11. SERVICE INTEGER VARIABLES (V-CELLS) Table 5.11 V-cell Description V240 System clock seconds V241 System clock minutes V242 System clock hours V243 System clock date V244 System clock month V245 The day of the week according to the system clock where: V245 = 1 Monday V245 = 2 Tuesday V245 = 3 Wednesday V245 = 4 Thursday V245 = 5 Friday V245 = 6 Saturday V245 = 7 Sunday V246 System clock year V250 Bit 7 of V250 is set to logic 1 at an attempt by the DIVIDE functional block to divide by zero V251 KID Neuro PLC own number. Used also as the KID Neuro PLC address within the communication network V254 Time necessary for the execution of the basic user program V255 Pulses counted during one cycle of the execution of the basic user program by the high-speed counter input FI1 V256 Pulses counted during one cycle of the execution of the basic user program by the high-speed counter input FI2 V257 The status of the 12 slots allocated for I/O modules and for the communication module (LonWorks Transceiver). Each of the bits of V257 corresponds to the presence of: V257.0 I/O module at slot no. 1 V257.1 I/O module at slot no. 2 --------- ------------------------------ V257.10 I/O module at slot no. 11 V257.11 I/O module at slot no. 12 V257.12 Communication module (LonWorks Transceiver) KID Neuro PLC – User’s Manual 5-9 Table 5.11 Cont. V257.xx = 0 – the respective module is included in the KID Neuro PLC configuration and no error was established regarding this module (see Item 8.3) V257.xx = 1 - the respective module is not included in the KID Neuro PLC configuration or an error was established regarding this module (see Item 8.3) V258 The state of the auxiliary power supply to the I/O modules at the twelve slots. Each of the V258 bits indicates the presence of auxiliary power supply at: V258.0 I/O module at slot no. 1 V258.1 I/O module at slot no. 2 --------- ------------------------------ V258.10 I/O module at slot no. 11 V258.11 I/O module at slot no. 12 V258.xx = 0 – auxiliary voltage fed to the respective I/O module V258.xx = 1 – the respective, module is not included in the configuration of the KID Neuro PLC or does not require an auxiliary power supply; may indicate also the absence of auxiliary power supply 5.12. NUMERICAL IDENTIFICATION OF THE KID NEURO PLC I/O The numerical identification of the I/O is arranged from left to right for all slots and from the top downwards of each slot in compliance with the order of installation of the I/O modules. Table 5.12 Type Module 1 Module 2 Module 3 ----- Module 12 DI X1 - X8 X9 - X16 X17 - X24 ----- X89 - X96 DO Y1 - Y8 Y9 - Y16 Y17 - Y24 ----- Y89 - Y96 AI V201 - V205 V206 - V210 V211 - V215 ----- V256 - V260 AO V401 - V404 V405 - V408 V409 - V412 ----- V445 - V448 5-10 KID Neuro PLC – User’s Manual Example: Fig. 5.1 The following memory cells of the KID Neuro PLC are allocated to the high-speed counter inputs and for the WDO: X100 – high-speed counter input FI1. X101 - high-speed counter input FI2. Y100 - WDO. 5.13. FLASH MEMORY SUPPORTED V-CELLS The preservation of some operands or constants or initial values may be of vital importance. One hundred (100) V-cells, starting with V-300 are provided for such purposes. These 100 V-cells are “supported” by Flash memory as illustrated in Fig. 5.2. Fig. 5.2 KID Neuro PLC – User’s Manual 5-11 After the generation of a program is completed and is saved in your Hard Disk, the program must be saved in PLC. This is executed as follows: Case 1 – Save To Controller Procedure a. All V1 to V512 V-cells are loaded with the initial values entered during the generation of the program on Save to Controller command. b. Simultaneously, the initial values entered during the generation of the program are loaded and preserved into the Flash Memory section, designated to support V300 to V399 V-cells. Case 2 – Regular Operation The initial values and constants in all V1 to V512 V-cells may change substantially during the regular operation. Case 3 – POWER DOWN (POWER CUT - OFF) a. All V-cells contain current values, relevant to the moment of power cut – off. b. The Flash Memory section supporting V300-V399 cells still contains the initials values as per Case 1-b. c. The PLC processor stops the scanning the outputs and stops the generation of signals for the plant. Case 4 – POWER ON (RESTART Operation) The following procedures take place in a chronological sequence: First, the Flash Memory reloads the initial values into V300 to V399 cells. Therefore now: - The V-cells from V1 to V299 and from V400 to V512 contain the current values as per Case 3-a. - The V-cells from V300 to V399 are reloaded with the initial values as per Case 1. Second the execution of the logic program is initiated, but only after the transfer “Flash Memory – to – V300 – V399” is completed. 5.14. BINARY ARITHMETIC Basic information about the Binary Arithmetic is outlined in this para. The readers who are familiar with this subject can ignore this para. The binary addition operation is the fundamental arithmetic operation while the binary subtraction, multiplication and division can be essentially performed by repetitive sequences of binary addition. This is the reason to modify accordingly the presentation of the binary numbers. The procedure of this modification is described below. So far we have considered the binary numbers as an absolute value (magnitude), i.e. as unsigned binary numbers. In unsigned binary, the number is assumed simply as a number where the 1s carry the appropriate power of 2 weightings (in other words this is a “pure” binary presentation). In this case all bits of a cell are utilized for presentation of the unsigned binary 5-12 KID Neuro PLC – User’s Manual number. For example, the following 16-bit unsigned binary numbers represent the corresponding absolute value (magnitude): 1111111111111111 = 65535 1000000000000000 = 32768 1000000000000001 = 32769 0000000000110011 = 61 0000000000000000 = 0 Although for some applications simple unsigned binary is adequate, in almost all computer applications where arithmetic operations are involved, there is a need to represent both positive and negative numbers and produce the correct signed result. The simplest form of signed binary representation is where the sign of the number is indicated by the most significant bit (MSB). This bit is reserved not to denote any numerical value but simply to indicate the polarity (+ or -) sign of the number. The binary number possessing both polarity and magnitude presentation is referred to as sign-and-magnitude binary number. In the sign-and-magnitude representation: MSB is set to 0 to indicate a positive magnitude of the number. MSB is set to 1 to indicate a positive magnitude of the number. All other bits indicate the magnitude of the binary number. For example the sign-and-magnitude numbers can be represented in a 16-bit cell as follows: 0’111111111111111 = +32767 0’100000000000000 = +16384 0’000000000110011 = +51 0’000000000000000 = 0 1’111111111111111 = -32767 1’100000000000000 = -16384 1’000000000110011 = -51 1’000000000000000 = 0 Pay attention that there are two possible representations for zero. It is not possible to perform the basic arithmetic operation with signed-and-magnitude numbers and automatically provide the correct sign for the result. For this reason twos complement (or usually referred to as complement!) representation for binary numbers is preferred. The twos complement of a positive signed number is obtained as follows: a. The MSB is set to 0. b. The magnitude digits remain unchanged. So, the twos-complement of a positive binary number looks exactly as the sign-andmagnitude representation. KID Neuro PLC – User’s Manual 5-13 Here are some examples for twos complement presentation of a positive binary number in a 16 - bit cell. 0’111111111111111 = +32767 0’100000000000000 = +16384 0’000000000110011 = +51 0’000000000000000 = 0 The twos complement of a negative signed number is obtained in the following way: a. Write down the number as an twos complement positive binary number. b. Invert all digits (including MSB), i.e. change all 0s to 1s and all 1s to 0s. c. Increment, i.e. add 1 to the last significant bit (LSB) Example: Find the twos complement of -32767; -16384; of -51. Solution: For -32767 a. The twos complement positive presentation of +32767 is: 0’111111111111111 b. Now invert all 1s to 0s and all 0s to 1s: 1’000000000000000 c. Now add 1 to LSB of the above presentation, i.e. 1’000000000000000 + 1 1’000000000000001 – This is the twos complement representation of -32767. For -16384 a. The twos complement positive presentation of +16384 is: 0’100000000000000 b. The inverted presentation is: 1’011111111111111 c. The addition of 1 gives 1’011111111111111 + 1 1’100000000000000 – This is the twos complement representation of -16384. For -51 a. The twos complement positive representation of +51 is: 0’000000000110011 b. The inverted representation is: 1’111111111001100 5-14 KID Neuro PLC – User’s Manual c. The addition of 1 gives 1’111111111001100 + 1 1’111111111001101 – This is the twos complement representation of -51. A particular case is the formal representation of zero in twos complement form as a negative binary number. Following the above procedure we get: a. The twos complement of zero as a positive number is 0’000000000000000 b. The inverted representation is: 1’111111111111111 c. The addition of 1 gives 1’111111111111111 + 1 (1) 0’000000000000000 →* ↑ neglect the final carry * This is the same representation of zero as in the case of positive twos representation. As can be seen the twos-complement zero presentation is unique thus rejecting any error in its representation. It should be noted also, that the twos complement signed binary numbers (integers) which could be entered in a 16-bit V-cell vary from 0’111111111111111 = +32767 up to 0’000000000000001 = + 1 through 0’000000000000000 = 0 then from 1’111111111111111 = up to 1 1’000000000000000 = -32767 It should be noted also, that the unsigned numbers which could be entered in a 16-bit V-cell vary from 0 up to 65535 formally coded as shown in the table overleaf. The following explanations hold for the table below: * - bit No. of the integer ** - bit sequence No. in the V-cell *** - bit weight by power of two **** - the value of the corresponding power of two KID Neuro PLC – User’s Manual 5-15 ** 2 4 8 16 32 64 128 256 **** 512 1024 2048 4096 *** Signed 16-bit binary integer in complementary (twos complement) code integers 5-16 8192 16384 32768 Unsigned 0 0 2 1 1 2 1 3 2 4 2 5 2 6 3 7 2 8 4 9 2 10 5 11 2 12 6 13 2 14 7 15 2 * 8 1 2 2 9 3 2 4 10 5 2 6 11 7 2 8 12 9 2 10 13 11 2 12 14 13 2 14 15 15 2 16 integers 0∼ 0’ 0 0 0 0 0 0 0 0 0 0 0 0 0 0 0 =0 1∼ 0’ 0 0 0 0 0 0 0 0 0 0 0 0 0 0 1 =1 2∼ 0’ 0 0 0 0 0 0 0 0 0 0 0 0 0 1 0 =2 3∼ 0’ 0 0 0 0 0 0 0 0 0 0 0 0 0 1 1 =3 4∼ 0’ 0 0 0 0 0 0 0 0 0 0 0 0 1 0 0 =4 512 ∼ 0’ 0 0 0 0 0 1 0 0 0 0 0 0 0 0 0 = 512 16384 ∼ 0’ 1 0 0 0 0 0 0 0 0 0 0 0 0 0 0 = 16384 16385 ∼ 0’ 1 0 0 0 0 0 0 0 0 0 0 0 0 0 1 = 16385 16511 ∼ 0’ 1 0 0 0 0 0 0 0 1 1 1 1 1 1 1 = 16511 32766 ∼ 0’ 1 1 1 1 1 1 1 1 1 1 1 1 1 1 0 = 32766 32767 ∼ 0’ 1 1 1 1 1 1 1 1 1 1 1 1 1 1 1 = 32767 32768 ∼ 1’ 0 0 0 0 0 0 0 0 0 0 0 0 0 0 0 = -32768 32769 ∼ 1’ 0 0 0 0 0 0 0 0 0 0 0 0 0 0 1 = -32767 32770 ∼ 1’ 0 0 0 0 0 0 0 0 0 0 0 0 0 1 0 = -32766 32771 ∼ 1’ 0 0 0 0 0 0 0 0 0 0 0 0 0 1 1 = -32765 32772 ∼ 1’ 0 0 0 0 0 0 0 0 0 0 0 0 1 0 0 = -32764 49152 ∼ 1’ 1 0 0 0 0 0 0 0 0 0 0 0 0 0 0 = -16384 49153 ∼ 1’ 1 0 0 0 0 0 0 0 0 0 0 0 0 0 1 = -16383 57344 ∼ 1’ 1 0 0 0 0 0 1 0 0 0 0 0 0 0 0 = -16128 65553 ∼ 1’ 1 1 1 1 1 1 1 1 1 1 1 1 1 0 1 = -3 65534 ∼ 1’ 1 1 1 1 1 1 1 1 1 1 1 1 1 1 0 = -2 65535 ∼ 1’ 1 1 1 1 1 1 1 1 1 1 1 1 1 1 1 = -1 KID Neuro PLC – User’s Manual Finally let us show some examples of addition / subtraction of 1 to / from signed integer (performed in twos complement code in 16-bit V-cell). Example 5.3: Add 1 to the positive signed integer +16384 Solution: 0’100000000000000 = +16384 + 1 0’100000000000001 = +16385 Example 5.4: Add 1 to the positive signed integer +32767 Solution: 0’111111111111111 = +32767 + 1 1’000000000000000 = -32768 IMPORTANT NOTE: In this extreme case the V-cell is overflowed and the result +32768 will be read as –32768. Example 5.5: Subtract 1 from the positive signed integer +16385 Solution: Version a – Pure subtraction 0’100000000000001 = +16385 - 1 0’100000000000000 = +16384 Version b – Performing subtraction by adding of 1 represented as negative signed twos complement integer 0’100000000000001 = +16385 +1’111111111111111 = -1 as signed twos complement integer 0’100000000000000 = +16384 Example 5.6: Subtract 1 from the positive signed integer 0 Solution: Version a – Pure subtraction 0’000000000000000 = 0 - 1 1’111111111111111 = -1 – as signed twos complement integer KID Neuro PLC – User’s Manual 5-17 Version b – Performing subtraction by addition of 1 represented as negative signed twos complement integer 0’000000000000000 = 0 +1’111111111111111 = -1 as signed twos complement integer 1’111111111111111 = -1 Example 5.7: Add 1 to the negative signed integer –16384 Solution: 1’100000000000000 = -16384 represented as negative signed twos complement integer + 1 1’100000000000001 = -16383 represented as negative signed integer Example 5.8: Add 1 to the negative signed integer –1 1’111111111111111 = -1 as a negative signed twos complement integer + 1 0’000000000000000 = 0 Example 5.9: Subtract 1 from the negative signed integer –2 Solution: Version a – Pure subtraction 1’111111111111110 = -2 - 1 1’111111111111101 = -3 as negative signed twos complement integer Version b – Performing subtraction by addition of (-1) represented as negative signed twos complement integer. 1’111111111111110 = -2 as negative signed twos complement integer +1’111111111111111 = -1 as negative signed twos complement integer 1’111111111111101 = -3 as negative signed twos complement integer Example 5.10: Subtract 1 from the negative signed twos complement integer -32768 Solution: Version a – Pure subtraction 1’000000000000000 = -32768 as negative signed twos complement integer - 1 0’111111111111111 = +32767 IMPORTANT NOTE: In this extreme case the V-cell is overflowed, and the result -32769 will be read as +32767!!! 5-18 KID Neuro PLC – User’s Manual Version b – Performing subtraction by addition of (-1) represented as negative signed twos complement integer 1’000000000000000 = -32768 as negative signed twos complement integer +1’111111111111111 = 1 as negative signed twos complement integer 0’111111111111111 = +32767 (see the note above) KID Neuro PLC – User’s Manual 5-19 CHAPTER 6 GENERATION OF USER PROGRAMS 6.1. GENERATION OF USER PROGRAMS 6.2. GENERATION OF LADDER LOGIC CIRCUITS 6.2.1. Entering Simple Circuits 6.2.2. Entering of Complex Circuits 6.3. ENTERING OF CIRCUITS CONTAINING FUNCTIONAL BLOCKS 6.3.1. TIMER 6.3.2. COUNTER 6.3.3. COMPARE 6.3.4. MOVE 6.3.5. BLOCK MOVE 6.3.6. Bit-by-Bit SHIFT 6.3.7. ADD 6.3.8. SUBTRACT KID Neuro PLC – User’s Manual 6.3.9. MULTIPLY 6.3.10. DIVIDE 6.3.11. DRUM 6.3.12. APPROX 6.3.13. MCR (Master Reset Relay) 6.4. ENTERING AND EDITING OF FUNCTIONS 6.4.1. Mathematical Functions 6.4.2. PID Controller 6.4.2.1 PID Algorithms 6.4.2.2. Entering PID Data 6.4.2.3. Practical Considerations 6.4.3. Communication Functions – CF 6.4.3.1. Comm. WRITE Communication Function 6.4.3.2. Comm READ Communication Function 6.5. ENTRY OF COMMENTARIES 6.6. USER NAMES 6.7. PID SMOOTH MANUAL-TO AUTO MODE TRANSITION 6.8. SPECIFICS OF PROGRAMMING IN CASE OF POWER SUPPLY FAILURE KID Neuro PLC – User’s Manual 6.1. GENERATION OF USER PROGRAMS Important notes: a. The expression “Click” should read “Single click with the left-hand button” b. The expression “Double click” should read “Double click with the left-hand button” After the KID Neuro PLC Programmer is started, a box is displayed on the screen which box contains the following elements: - title line; - a strip, containing the main menu commands – Toolbar (see Chapter 7); - a strip, containing buttons used to enter commands and functions (further referred to as Kidbar); - a strip on the bottom indicating the state of various parameters – status bar. After selecting New File/New File (*.kpp) an window is displayed which is used to enter commands and functions into the user program. Commands and functions may be selected as follows (Fig. 6.1): - from Kidbar – by clicking on the selected item; - by pressing a functional key corresponding to the selected Kidbar command button, for example press functional key F2 for Load command. The Kidbar buttons indicate the groups of elements used in relay-contact logic. After a group is selected, a menu appears containing the relevant commands. For instance, a menu containing the functions Load, Load1, Load Not, Load IMP and Load IMP NOT appears after the Load button is pressed (a more detailed description of the programmer menus is included in Chapter 7 of this Manual). A fast program under interrupt can also be generated by using the File/New, and by selecting the NewFile Fast (*.kpf) sub-menu. Fig. 6.1 KID Neuro PLC – User’s Manual 6-1 The status line at the bottom of the screen provides information about the current position of the cursor within the program, about the length of the program (in number of bytes), the entry mode (replace or insert), as well as other standard displays. 6.2. GENERATION OF LADDER LOGIC CIRCUITS IMPORTANT NOTE: The edit mode OVR/INS can be changed in two ways: a. By alternatively pressing INS key on the keyboard. b. By clicking with the mouse and selecting the desired edit mode on the extreme right hand end of the status bar. c. The normal operation is in INS edit mode!!! The relay-contact logic circuits may be subdivided into: - simple circuits, consisting of the Load, And, Or and Coil commands; - complex circuits, which represent combinations of simple circuits, connected by means of the Serial and Parallel commands. Relay-logic commands are entered in the following way: A. For a completely new circuit 1. First click Load command from the Kidbar. A list of contacts appears. 2. Click the proper contact to be introduced in the circuit. The selected contact appears on the screen. 3. Enter the alpha-numeric number of the contact in the BitOperand window, for example X1. 4. Further select the respective command from Kidbar. This results in the display of a contact or a coil symbol on the screen. A separate field is opened which is used to enter an operand. 5. Enter the operand using the alpha-numerical keys. 6. Press <ENTER> to store the operand. Commands which have no operand are entered directly. B. For edition of an existing circuit Start directly from step 4. Note: In case a list of user names is generated in the program (see Item 6.6), these user names may be used instead of the standard operand symbols. An operand may be edited in the following way: 1. Select the command whose operand has to be changed. 2. Double click will open a dialog box. 3. Enter the new operand. 4. Confirm by pressing <ENTER>. A command is deleted in the following way: 1. Click the command to be deleted. 2. Press <Delete> to delete a command. 6-2 KID Neuro PLC – User’s Manual Deleting of a command without deleting the remaining portion of the circuit is not advisable as the command which remain undeleted will be connected to the preceding circuit. A new command is inserted as follows: 1. The programmer must be in the INS (Insert) mode (use the OVR/INS window on the STATUS BAR – ref. to Fig. 6.1). The change of the programmer mode is discussed in Chapter 7 of this Manual. 2. Select the command, before which a new command must be inserted. 3. Enter the new command and its operand (if any). A command may be replaced by another command in the following way: 1. Select the command before which the replacement will have to be made. 2. Insert the new command and its operand. - Delete the old (the replaced) command as described above. In case the selected command and the command which must be inserted are included in one and the same group, the replacement can be made by clicking on the selected command and by selecting a new command from the menu which is displayed. 6.2.1. Entering Simple Circuits A simple circuit shall mean a circuit consisting of a combination of the Load (contact), And, Or and Out (Output) commands. These commands are executed by the KID Neuro PLC in the order in which they were entered. The Load type command are obligatory in order to generate the beginning of a circuit. A command may be deleted, inserted or replaced using the procedures described above. Example 6.1: Fig. 6.2 The generation of the above circuit is made with the following sequence of operations (edit mode INS): Step 1: 1. Click Load button on the Kidbar. A list of contacts appears. 2. Click the contact symbol . The selected contact appears in the circuit together with a dialogue box for Bit Operands. KID Neuro PLC – User’s Manual 6-3 3. Type in the Bit Operand X1. 4. Enter the Bit Operand X1. NOTE: The operation No. 4 can be executed by a click outside the operand field. Step 2: 1. Click Or button on the Kidbar. A list of contacts appears. 2. Click the contact symbol . The selected contact appears in the circuit together with a dialogue box for Bit Operands. 3. Type in the Bit Operand R1. 4. Enter the Bit Operand R1. Step 3: 1. Click And button on the Kidbar. A list of contacts appears. 2. Click the contact symbol . The selected contact appears in the circuit together with a dialogue box for Bit Operands. 3. Type the Bit Operand V11.0 (i.e. V-cell No. 11, 0 bit). 4. Enter the Bit Operand V11.0. Step 4: 1. Click And button on the Kidbar. A list of contacts appears. . 2. Click the contact symbol The selected contact appears in the circuit together with a dialogue box for Bit Operands. 3. Type in the Bit Operand X8. 4. Enter the Bit Operand X8. Step 5: 1. Click Coil button on the Kidbar. A list of contacts appears. 2. Click the coil symbol . The selected coil appears in the circuit together with a dialogue box for Bit Operands. 3. Type in the Bit Operand Y5. 4. Enter the Bit Operand Y5. Important Note: The generation of the circuit can be executed by using the keyboard, for example: Step 1: 1. Enter F2 (The key symbol F2 exists on the Load button of the Kidbar). A list of contacts appears. 2. Allocate and enter the symbol 6-4 by key. KID Neuro PLC – User’s Manual The selected contact appears on the circuit together with a dialogue box for Bit Operands. 3. Type in the Bit Operand X1. 4. Enter the Bit Operand X1. The next steps are executed in the similar way (press F3 for And, F4 for Or, etc). Task 6.1. Change the operand V11.0 to Y1 in the circuit shown in Fig. 6.2. Solution: V11 command. 1. Double click 2. Type in the new operand Y1. 3. Enter the new operand Y1. Now you have the new edition of the circuit as shown in Fig. 6.3. Fig. 6.3 Task 6.2. X8 command from the circuit shown in Fig. 6.3. Delete the And Solution: 1. Click on X8. 2. Press <Delete> key. Now you have the new version of the circuit as shown in Fig. 6.4. Fig. 6.4 KID Neuro PLC – User’s Manual 6-5 Task 6.3. Insert And X7 command before Y5. Solution: 1. Click Y5. 2. Click And button on the Kidbar. A list of contacts appears. 3. Click the contact . The contact appears in the circuit, together with a dialogue box for Bit Operand. 4. Type in the Bit Operand X7. 5. Enter the Bit Operand X7. Now the revised circuit appears on the screen as shown in Fig. 6.5. Fig. 6.5 Task 6.4. Insert an OR R13 command parallel to X1 & R1. Solution: 1. Click Y1. 2. Click OR button on Kidbar. A list of contacts appears. 3. Click the relevant contact (i.e. ). The contact appears in the circuit together with the Bit Operand dialogue box. 4. Write in the operand R13. 5. Enter the Bit Operand R13. The new configuration of the circuit is shown in Fig. 6.6. 6-6 KID Neuro PLC – User’s Manual Fig. 6.6 Task 6.5. Insert an OR X22 command in parallel to the complete circuit (Fig. 6.6) preceding Y5. Solution: 1. Click Y5. 2. Click OR button on Kidbar. A list of contacts appears. 3. Click the relevant contact (i.e. ). The contact appears in the circuit together with the Bit Operand dialogue box. 4. Write in the operand X22. 5. Enter the operand X22. The new configuration is shown in Fig. 6.7. Fig. 6.7 KID Neuro PLC – User’s Manual 6-7 Task 6.6. Delete the commands R1, R13 and Y1 from the circuit shown in Fig. 6.7. Solution: Click and press <Delete> in a consecutive way each of the above commands (refer also to Example 6.3). The circuit is changed as shown in Fig. 6.8. Fig. 6.8 What Did You Learn? Reading carefully and appreciating all the explanations, examples and procedures in para 6.2.1. you have already the capability to: a. Choose OVR/INS edit mode. b. Generate simple logic circuits. c. Edit and/or change an operand. d. Delete a command. e. Insert a command. f. Replace an And command with Or command and vice versa. You also did learn all the relevant steps, instructions and sequences of actions required to generate a simple circuit. Therefore, from now on we shall shorten the detailed explanations for circuit generation assuming you gained the knowledge and experience relevant to the generation of such circuits. WARNING: In case you need some recollection, kindly refer to this subsection 6.2.1. for refreshing your memory and knowledge. 6.2.2. Entering of Complex Circuits A ladder logic complex circuit shall mean a combination of simple circuits connected in parallel and in series. Two simple circuits are connected in series by selecting the Serial [F5] command from Kidbar, and in parallel – by selecting the Parallel [F6] command. The Parallel and Serial commands have no operands. The Parallel and Serial commands each occupy one step of the user program. 6-8 KID Neuro PLC – User’s Manual Attention: The Parallel and Serial commands may not be used for connecting circuits in parallel or series in case the second circuit contains the Out command!!! Task 6.7. Generate the two simple circuits shown in Fig. 6.9 and than connect these two circuits in series. Fig. 6.9 Solution: 1. Generate the first simple circuit as already described in para 6.2.1. 2. Generate the second simple circuit as already described in para 6.2.1. 3. Click Serial button [F5] on the Kidbar. The result is the complex circuit shown in Fig. 6.10 Fig. 6.10 KID Neuro PLC – User’s Manual 6-9 Task 6.8. Generate the two simple circuits shown in Fig. 6.9 and than connect these two circuits in parallel. Solution: 1. Generate the first simple circuit as described in para 6.2.1. 2. Generate the second simple circuit as described in para 6.2.1. 3. Click Parallel button [F5] on Kidbar. The result is the complex circuit shown in Fig. 6.11. Fig. 6.11 Task 6.9. Change the parallel complex circuit shown in Fig. 6.11 into a series complex circuit shown in Fig. 6.10. Solution: 1. Position the cursor on Parallel button. 2. Press <Backspace> key. The complex circuit is separated into the two original simple circuits as shown in Fig. 6.9. 3. Click Serial button on the Kidbar. The result is the series complex circuit shown in Fig. 6.10. Task 6.10. Change the series complex circuit shown in Fig. 6.10 into a parallel complex circuit shown in Fig. 6.11. Solution: 1. Position the cursor on Serial button on the Kidbar. 6-10 KID Neuro PLC – User’s Manual 2. Press <Backspace> key. The complex circuit is separated into two original simple circuits (Fig. 6.9). 3. Click Parallel button on the Kidbar. The result is the parallel complex circuit shown in Fig. 6.11. Let us increase the complexity. For this reason we start with complex circuit shown in Fig. 6.11. Now we enter a third circuit – Fig. 6.12. Fig. 6.12 As already explained, the third simple circuit (X5; X6; Y6) can be connected in series or in parallel with the old circuit. In order to execute serial connection of the third circuit click Serial button on the Kidbar. The result is the complex circuit as shown in Fig. 6.13. KID Neuro PLC – User’s Manual 6-11 Fig. 6.13 Now we can restore the configuration as shown in Fig. 6.12 as follows: 1. Position the cursor on Serial button. 2. Press <Backspace> key. The circuit is separated again as shown in Fig. 6.12. In order to execute parallel connection of the third circuit click Parallel button on the Kidbar. The result is a complex circuit as shown in Fig. 6.14. Fig. 6.14 6-12 KID Neuro PLC – User’s Manual What Did You Learn? The practical knowledge gained by you after being through para 6.2.2. will help you generating complex logic circuits, including: a. Connecting in series two simple circuits. b. Connecting in parallel two simple circuits. c. Introducing a simple circuit in series or in parallel to a complex logic circuit. 6.3. ENTERING OF CIRCUITS CONTAINING FUNCTIONAL BLOKS The following functional blocks may be used in the generation of a user program: 1. Basic Functional Blocks: - TIMER; - COUNTER; - COMPARE; - MOVE; - BLOCK MOVE; - DRUM; - APROX (approximation); - MCR (main switch-over relay). 2. Logic Operations Functional Blocks: - Bit-by-bit shift – SHIFT. 3. Arithmetic Operations Functional Blocks: - Addition – ADD; - Subtraction – SUBTRACT; - Multiplication – MULTIPLY; - Division – DIVIDE. All functional blocks occupy a single step of the user program. The functional blocks are displayed on the screen as rectangles (Fig. 6.15), which contain data about: - the name of the functional block; - the operands; - inputs; - output. All functional blocks have one output and at least one control input. KID Neuro PLC – User’s Manual 6-13 Fig. 6.15 A circuit, containing a functional block, may be generated using the following sequence: 1. Enter the circuits to which the inputs of the block will be connected. The number of input circuits must be equal to the number of inputs; 2. Enter the functional block; 3. Enter the command(s) related to the block output. Attention: A functional block may not be entered in case the number of the input circuits is smaller than the number of the block inputs. A message is displayed on the screen to indicate that the relevant command may not be selected. Attention: In case the number of the input circuits is larger than the number of block inputs, the programmer connects to the block inputs the relevant number of input circuits which were entered last. A functional block is entered as follows: 1. Select the command for the relevant functional block. The programmer automatically connects the block inputs to the input circuits which were entered before. A dialog box is displayed on the screen in order to proceed with the entering of the operands. The cursor is positioned on the first operand field within the dialog box. 2. The operands are typed in using the alpha-numeric keys. The fields allocated to operands may be scrolled using the mouse (or the <Tab> key). Make sure you did enter all operands as necessary! 3. The functional block is entered by clicking the ОК button, or by pressing <ENTER>. The programmer displays an error message in case an operand had been entered improperly. An operand in a functional block may be changed using the mouse by the following sequence: 1. Position the cursor on the functional block. Open the dialog box by double-click. The cursor is automatically positioned on the field of the first operand. 2. Click in the field of the operand which will be changed. 3. Type in the new operand. 4. Click the OK button to complete the operation. An operand in a functional block may be changed by using both the mouse and the keyboard according to the sequence of operations as described above. Changes to a functional block can be made using the keyboard using the following sequence: 1. The cursor is positioned on the respective functional block, using the scroll keys. 6-14 KID Neuro PLC – User’s Manual 2. The dialog box of the functional block is opened by pressing <Enter>. The cursor is automatically positioned in the field used to enter the first operand. 3. In case no changes are to be made in the first operand field, the cursor is moved to the next field by pressing <Tab>. Otherwise the new operand is typed in. 4. Press <ENTER> to store the changes. The MCR functional block is entered and edited in a specific manner as described in Item 6.3.13. A functional block may be deleted by pressing <Backspace> after the cursor had been positioned at the next command, or by pressing <Delete> with the cursor positioned on the command. A functional block may be replaced or inserted using a sequence similar to the sequence used to insert and delete a simple circuit. Attention: When a functional block is replaced or inserted, the programmer automatically connects the inputs of the new block to the existing input circuits. It is possible to generate a redundant circuit in case the insert or replace operations were executed improperly. 6.3.1. TIMER The Timer is used for generation of time retardation (delay) of signals (commands) thus providing options for the program to control specifications after defined time retard. The time retardation is programmable by the operator in the frame of 0 to 327s (for Time base 10 ms), resp. 0 to 3276s (for Time base 100 ms). Representation: Fig. 6.16 - B1 – control input (Enable); - B2 – reset input (Reset); - Base – time base – 10ms or 100ms; - Set – set value integer operand – a V-cell with a number within the range from V1 to V512 or a constant value within the range from 0 to 32767; - Var – current value integer operand – a V-cell with a number within the range from V1 to V512. Characteristics: The number of TIMER functional blocks is restricted only by the number of V-cells used by the programmer. The two inputs are connected to circuits whose logic state controls the block operation. KID Neuro PLC – User’s Manual 6-15 Principle of operation: A time chart is shown on Fig. 6.17a to illustrate the timer operation. Fig. 6.17a The timer is enabled with a logic 1 at the reset input B2. With В1 and В2 set to a logic 1, the current value of the timer is incremented by 1 after each 10 ms or 100 ms (depending on the selected time base) – time interval t1. The current value remains unchanged during t2, as with setting B1 to a logic 0 the block is disabled. The current value is again incremented during t3. When the current value becomes equal to the set value, the timer output is set to a logic 1 – time interval t4. Setting the reset input to a logic 0 resets the current value and the block output is also set to 0. Entering: After the input circuits of the block are entered, select the F.Block button from Kidbar. Select the TIMER command from the menu. A dialog box is displayed (Fig. 6.17b) which contains the following fields: - Set Point - Initial S.P. value - Timer variable - Timer Base (selectable 10ms or 100ms) Fig. 6.17b 6-16 KID Neuro PLC – User’s Manual Set Point entry: a. An integer from 1 to 32767 in case the set value is a constant. b. Vi cell in case the operand is represented by the content of a Vi-cell, where “i” is the number of the V-cell. It is recommended the values to be assigned to internal variables from V300 to V400, as these V-cells are stored in nonvolatile memory (see item 5.3). Initial S.P. value entry: a. No entry is required in case the Set Point entry is an integer. b. An integer from 1 to 32767 in case the Set Point entry is assigned to a V-cell. Timer variable entry: The number of the V-cell is entered, to which the timer variable is assigned. Time Base selection: Normally 10ms time base is used, in order to obtain better accuracy. In case of a large user program the time for execution of one controller cycle may exceed 10ms. In this case the 100ms time base must be selected. Click the time base button to select the desired time base. Example 6.2: Fig. 6.18 The input circuits are entered using the procedure described in Item 6.2. The dialog window of the TIMER block may be filled in as shown on Fig 6.17b. A logic 1 at X1 enables the timer. The current value is incremented by 1 after each 100 ms. When the current value becomes equal to the set value, Y1 is set to a logic 1. This state is preserved while X1=1. A logic 0 at X1 resets the current value and the output Y1. Attention: The timer set value (Set Point) must be larger than the current value (Timer variable). Otherwise, the current value is automatically set as equal to the set value and the TIMER block is disabled. Attention: The MCR functional block has no effect on the operation of the timer. KID Neuro PLC – User’s Manual 6-17 Standard applications: 1. Timer “ON” by X1 Fig. 6.19 2. Timer “OFF” by X1 Fig. 6.20 3. Pulse generator at the output Y2 with pulse duration equal to one controller cycle and time interval between the pulses equal to 500ms (Fig. 6.21): Fig. 6.21 6-18 KID Neuro PLC – User’s Manual Fig. 6.22 We assume that at the beginning of first controller cycle: a. Enable is permanently set to logic 1 b. Reset input is at logic 1 c. Timer variable is at zero level d. Output Y2 is at logic 0 This process development is as follows: - The timer variable is incrementing by 1 after each 10ms (Time Base 10ms) and will reach the Set Point value (50) for 50 controller cycles (one controller cycle is approx. 10 ms), i.e. at the end of the 50th cycle. - At this moment the Output Y2 is set by the controller to a logic 1. - This status continuos for one controller cycle, i.e. from the beginning till the end of the 51st cycle when with the start of the 52nd cycle the controller executes the new status: a. Reset Input is set to logic 0 b. Therefore the Timer variable is set to zero level c. Consequently the Output Y2 is set to logic 0 Thus an output Y2 pulse is produced with a duration equal to one controller cycle. The 53rd cycle initiates a new similar process and the second pulse is produced. The interval between the pulses is 500ms (exactly 500ms + one controller cycle). KID Neuro PLC – User’s Manual 6-19 Important Note: The error due to the fraction “one controller cycle” is not cumulative and practically can be ignored. Actually the time interval between the pulses is defined by the Set Point operand and the selected Timer Base. Task 6.11. Select the Set Point value (Fig. 6.21) in order to generate the same 10ms duration pulses with interval between the pulses again 500ms if the Time Base is set to 100ms. Solution: The Set Point value = Interval between the pulses Time Base = 500ms 100ms =5 Task 6.12. Select the Set Point value for an interval between the pulses12s assuming: a. The Time Base is 10ms. b. The Time Base is 100ms. Solution: a. The Set Point value = 12s 10ms = 12000ms 10ms = 1200 b. The Set Point value = 12s 100ms = 12000ms 100ms = 120 Task 6.13. Select the Set Point value for an interval between the pulses 820ms assuming: a. The Time Base is 10ms. b. The Time Base is 100ms. Solution: a. The Set Point value = 820ms 10ms = 82 b. The Set Point value = 820ms 100ms = 8.2 !!! There is no solution: We can enter ONLY integers! The compromise solution can be the Set Point value 8. 6-20 KID Neuro PLC – User’s Manual 4. Multivibrator (Fig. 6.23) Fig. 6.23 Initially both outputs are set to a logic 0, while the two inputs of the first timer are set to a logic 1. After a specified period of time (10 x 100ms = 1s in this case) the Y1 output will be set to a logic 1. That means that both inputs of the second timer will be set to a logic 1. After 1s the Y2 output will be set to a logic 1 which will result in setting a logic 0 at the reset inputs of the two timers. This will reset the outputs of both timers to a logic 0. The sequence is repeated with the start of the next controller cycle. Thus a pulse rate is generated on Y1 output as shown in Fig. 6.24. Fig. 6.24 The pulse duration (Fig. 6.24) is defined by the operands of the first timer, in our case (Set Point) 10 x (Time Base) 100ms = 1s. The interval between the pulses is defined by the operands of the second timer, in our case (Set Point) 10 x (Time Base) 100ms = 1s By entering different operands we can generate the pulse rate as required. In case the Set Point is set in V-cell (process variable) we can obtain Pulse-Width Modulation. KID Neuro PLC – User’s Manual 6-21 6.3.2. COUNTER The Counter functional block allows for the direct (Up) and reverse (Down) counting of transitions from a logic 0 to a logic 1. Potentially this is a Bi-directional Counter. Representation: Fig. 6.25 - Set – set-value integer operand – a V-cell with a number within the range from V1 to V512 or a constant within the range from 0 to 32767; - Var – a current-value integer operand – a V-cell with a number within the range from V1 to V512. Characteristics: The number of counters in the ladder-logic program is limited only by the number of V-cells accessible to the user. The inputs of the block are connected to circuits whose logic state controls the block operation. Principle of operation: The following important features of the counter have to be remembered when programming the counter configuration: a. The counter input Count reacts to the pulse transition from logic 0 to logic 1. b. The pulse rate applied to the Count input can contain pulses with arbitrary duty cycle. c. The Up/Down logic state controls the mode of operation: - logic 0: Up (direct) counting - logic 1: Down (reverse) counting d. The Reset logic state influences the counter as follows: - - logic 0: • The current value is reset to logic 0 for Up-mode. • The current value is set to Set Point value for Down-mode. • The output is reset to logic 0 for both Up and Down modes of operation. logic 1: • The counter is enabled. In this case every transition from a logic 0 to a logic 1 at the input Count increments or decrements the current value by an unit depending on the Up/Down mode of operation. • The output is set to logic 1, if the current value (Var) is equal to Set Point value and the counter is in Up-mode. • The output is set to logic 1, if the current value is equal to zero and the counter is in Down-mode. 6-22 KID Neuro PLC – User’s Manual e. The current value cannot go beyond the Set Point limit. It cannot go beyond the zero value as well. f. The counter output is set to logic 1 when: - for Up mode: the Reset input is at logic 1 and the current value is equal to the Set Point value. - for Down mode: the Reset input is at logic 1 and the current value is equal to zero A time chart illustrating the operation of the counter functional block is shown in Fig. 6.26, assuming the Set Point value is equal to 5. This chart reflects the relationships among the counter inputs, the current value and the counter output in various combinations. The relationships reflect the definitions described above (from a to f) and are self-explanatory. Fig. 6.26 Entering: Press the F.Block button on Kidbar after the circuits controlling the inputs state of the block have been entered. Select Counter from the displayed menu. A dialog box is displayed on the screen (Fig. 6.28), which contains the following fields: - Set Point – set-value integer operand from 1 to 32767 or a Vi-cell; - Var SP – an integer from 1 to 32767 in case the Set Point entry is assigned to a Vi-cell. This is a initialization value; - C Var – The V-cell number, to which the counter current value is assigned. In case the SetPoint integer operand (the set value) is a constant, its value is typed in using the numeric keys. In case the integer operand is a V-cell, a Vi statement is entered into the SetPoint field, where “i” represents the number of the V-cell. The figure corresponding to the Set Point value is set in the Var SP field. It is recommended to use internal variables V300 to V400 as they are stored in a nonvolatile memory (see Item 5.3). KID Neuro PLC – User’s Manual 6-23 Example 6.3: Fig. 6.27 The input circuits of the block are generated as described in Item 6.2. The Counter dialog box must be filled in as shown in Fig. 6.28. Fig. 6.28 The Х1 contact (counter input) changes the current value by an unit at each transition from a logic 0 to a logic 1 (refer also to Fig. 6.26). The Х2 contact (up/down control input) determines the counter mode (direct counter at Х2 = 0, and reverse counter at Х2 = 1). The Х3 counter (reset) enables the block operation. The counter is enabled at Х3 = 1. The V1 operand stores the set value of the counter, and V2 contains the current value as changed during the counter operation. The Y1 output is set t o a logic 1 at Х3 = 1 and the current value equal to the set value at Х2 = 0, or equal to 0 at Х2 = 1 (refer also to Fig. 6.26). Attention: The set value (Set Point) must be larger than the current value (CVar), otherwise the current value is automatically set equal to the set target value. Attention: The MCR functional block does not have an effect on the counter operation. 6-24 KID Neuro PLC – User’s Manual 6.3.3. COMPARE The COMPARE functional block checks for the “equal to” or “larger than” relative state of the contents of two integer operands namely O1 and O2. The functional block provides the following logic operations: a. In case “equal to” mode is selected: The output is at logic 1 ONLY when O1 = O2 b. In case “larger than” mode is selected: The output is at logic 1 ONLY when O1 > O2 (i.e. O2 < O1) The above operations are enabled ONLY when the Input is at logic1! Representation: Fig. 6.29 - In – control input; - О1 – an integer operand – a V-cell within the range from V1 to V512, or a constant within the range from 1 to 32767, serving as initialization value; - О2 – an integer operand– a V-cell within the range from V1 to V512, or a constant within the range from 1 to 32767, serving as initialization value; - Т – type of comparison – “=” or “> “; - Out - Output. Characteristics: The number of COMPARE functional blocks is limited only by the number of V-cells accessible to the user. The control input of the block is connected to a circuit which enables or disables its operation. Principle of operation: The block is disabled with a logic 0 at the control input, and its output is set to a logic 0. A logic 1 at the control input enables the block and the value of the first operand is compared to the value of the second operand. Depending on the type of comparison the output is set to a logic 1 as described above, namely: a. In “equal to” mode: ONLY when O1 = O2 b. In “larger than” mode: ONLY when O1 > O2 (i.e. O2 < O1) Entering: Press the F.Block button on Kidbar after the circuits controlling the inputs state of the block have been entered. Select Compare from the displayed menu. A dialog box is displayed on the screen (Fig. 6.30), which contains the following fields: - integer operand О1; KID Neuro PLC – User’s Manual 6-25 - integer operand О2; - Button (= or >) to set the type of comparison Fig. 6.30 In case the SetPoint integer operand (the set value) is a constant, its value is typed in using the numeric keys. In case the integer operand is a Vi-cell (where “i” represents the number of the V-cell), a value may be assigned to this variable using the Value field. The integer operand is initiated with the respective value after the user program is started. It is recommended to use internal variables V300 to V400 as they are stored in a nonvolatile memory (see Item 5.3.). Task 6.14. Enter a Functional Block “Compare” to realize the Output Y1 ≡ logic 1 in case a variable O2 (with initial value of 9, being in V312-cell) is smaller than the constant O1 = 76 – see Fig. 6.31. Fig. 6.31 Solution: Step 1: - The input / output circuit is entered as described in item 6.2. Step 2: - Click Y1 (preparation for inserting of F.block) Step 3: - Click the F.block button on the Kidbar and select CMP (Compare) F.block. A dialogue window appears as shown in Fig. 6.32. 6-26 KID Neuro PLC – User’s Manual Fig. 6.32 Step 4: # Type in 76 in O1 window # Type in V312 in O2 window # Type in the value 9 underneath O2 window # Click T-button to select “>” mode # Click “OK” button to enter the operands. Now you have completed the circuit shown in Fig. 6.31. Attention: The MCR functional block does not have an effect on the type of comparison. 6.3.4. MOVE The MOVE functional block moves: - a constant or the content of a V-cell into the content of another V-cell; - 16 successive logic operands (X or Y or R) into the content of a V-cell; - the content of a V-cell into 16 successive integer operands (Y or R). Representation: Fig. 6.33 - In – control input; - О1 – an integer operand (V-cell) within the range from V1 to V512, a constant within the range from -32768 to 32767, or a logic operand (digital input X, digital output Y or an internal relay R) with a number which is equal to a multiple of 16 plus 1 (1, 17, 33 etc); KID Neuro PLC – User’s Manual 6-27 - О2 – an integer operand (V-cell) within the range from V1 to V512 or a logic operand (digital output Y or an internal relay R) with a number which is equal to a multiple of 16 plus 1 (1, 17, 33 etc); - Out – block output. Characteristics: The number of MOVE functional blocks is limited only by the number of V-cells accessible to the user. The control input is connected to a circuit which enables or disables the operation of the MOVE functional block. Principle of operation: The value of operand O1 is written into operand O2 after each cycle of processing of the user program when a logic 1 is set at the input In. The O1 operand does not change its value during this operation. The block is disabled by a logic 0 at the input. Attention: At least one of the two operands must be obligatorily a V-cell. Attention: When a logic operand is set as the first operand (for instance the Y1 logic operand is assigned to O1, and V1 is assigned to O2), the states of Y1, Y2, Y3, ..., Y16 will be stored after shifting the bits in V1, with Y1 assigned to the least significant bit of V1, and V16 assigned to the most significant bit of V1. In the reverse case (V1 is assigned to O1, and Y1 is assigned to O2), after the move operation is executed the V1 bits will be stored consecutively in Y1, Y2, Y3, ..., Y16, with Y1 assigned the least significant bit of V1, and Y16 assigned the most significant bit of V1. These specifics must be monitored very closely in order to avoid unwanted moves or other negative changes in the user program. Entering: Select the MOVE functional block command form Kidbar. A dialog box is displayed on the screen (Fig. 6.34a) which contains the following fields - Move From and Move To. In case a V-cell is entered into the Move From field, Y or R or a V- cell may be entered into the Move To field. In case X or Y or R or a constant is entered into the Move From field, only a V-cell may be entered into the Move To field. Fig. 6.34a In case V-cell is used in a block, the initial value is entered into the field located below the Move From resp. Move To fields. 6-28 KID Neuro PLC – User’s Manual It is recommended to store the values into internal variables V300 to V400, as they are stored on a nonvolatile memory (see Item 5.3). Example 6.4: Generate the following program: the integer 50 to be moved into V6-cell. Fig. 6.34b The input circuit of the block is generated as described in Item 6.2. Then click the MOVE block on the Kidbar. The dialog box used to set the values of the variables, must be filled in as shown in Fig. 6.34a. After the dialogue box is filled in, click OK button – Fig. 6.34b appears. With Х1 equal to a logic 1, the value 50 will be moved into V6 and the output will be set to a logic 1. No move will be executed in case X1 is set to a logic 0. The output of the block repeats the input logic state. This allows to connect in series (cascade connection) several MOVE blocks being enabled by the same input state – Fig. 6.35. Fig. 6.35 6.3.5. BLOCK MOVE The BLOCK Move functional block moves the contents of one block of operands into another block of operands. Terms and Definitions Assume the content of a set (also referred to as a Block) of a N – numbers of consecutive Vcells has to be moved (i.e. to become content of) to another set (Block) of a N-numbers of consecutive V-cells as shown in Fig. 6.36. KID Neuro PLC – User’s Manual 6-29 V11 V12 ↓ ↓ V100 V101 V13 V14 ↓ N=7 ↓ V102 V103 V15 V16 V17 Block 1. – Source Block ↓ ↓ ↓ The transfer is executed simultaneously!!! V104 V105 V106 Block 2. – Destination Block Fig. 6.36 The following terms and definitions have to be mentioned with reference to the example shown in Fig. 6.36: a. Each set of the V-cells is referred to as Block. b. The first Block (i.e. Block 1) is the set of V11 to V17 consecutive cells whose contents have to be MOVED FROM. This block is also referred to as Source Block. c. The V11 cell is referred to as the first (i.e. the initial) V-cell of Block 1. Its index is 11. d. The number N of the V-cells in Block 1 is 7 (seven). e. The second block (i.e. Block 2) is the set of V100 to V106 consecutive cells where the contents from Block 1 have to be MOVED TO. This block is also referred to as Destination Block. f. The V100 cell is referred to as the first (i.e. initial) V-cell of Block 2. Its index is 100. g. The number N of the V-cells in Block 2 is 7 (seven) obviously. h. The fundamental characteristics of Block 1 are: - The index of the first V-cell (in our example this is an integer 11) - The number N of the V-cells in Block 1 (for our example this is the integer 7) i. The fundamental characteristics of Block 2 are: - The index of the first V-cell (in our example this is an integer 100) - The same number N of the V-cells in Block 2 (for our example this is the same integer 7) Each integer, reflecting the index of the first V-cell has to become content of (to be memorized by) a specific V-cell. For our purpose this V-cell is referred to as INDEX HOLDER V-cell. It is clear that we shall use two Index Holder V-cells: one for each Block. Based on the above explanations it becomes clear that for the operation MOVE FROM / MOVE TO we have to enter the following information to be assigned to a BLOCK MOVE functional block: a. The Index Holder V-cell related to Block 1. b. The value for this Index Holder V-cell, i.e. an integer equal to the index of the first V-cell of Block 1. c. The Index Holder V-cell related to Block 2. d. The value for this Index Holder V-cell, i.e. an integer equal to the index of the first V-cell of Block 2. e. An integer, equal to the number of the V-cells in a Block (this integer is equal for the two blocks). 6-30 KID Neuro PLC – User’s Manual Representation: Fig. 6.37 - In – control input; - О1 – an integer operand used to allocate the number of the first V-cell of Block 1, from which the MOVE operation originates. Generally this could be any V-cell from V1 to V512, however a V-cell from V300 to V400 is recommended; - I1 – an integer equal to the index of the first V-cell of Block 1 (source block), from which the MOVE operation originates – a figure within the range from 1 to 512; - О2 – an integer operand used to allocate the number of the first V-cell of Block 2, which is the destination of the MOVE TO operation. Any of V1 to V512 can be used, preferably V300 to V400; - I2 – an integer equal to the index of the first V-cell of Block 2 (destination block) – a figure within the range from 1 to 512; - N – number of cells whose contents will be moved; - Out - output. Characteristics: The number of the BLOCK MOVE functional blocks is limited only by the number of V-cells accessible to the user. The functional block input is connected to a circuit whose state is used to enable or disable the block operation. The block output repeats the input state which allows several BLOCK MOVE functional blocks executing one and the same function to be connected in series (cascade connection). Principle of operation: When the control input In is set to a logic 1, the contents of N V-cells of Block 1 with an initial Vcell assigned the number I1 is moved after the execution of each cycle of the user program to the V-cells of Block 2 with an initial V-cell assigned the number I2. The index of the first V-cell of the Block 1, is assigned as value to O1. The index of the first Vcell of Block 2 is assigned as value to O2. In case the input is set to a logic 0, the block is disabled. Entering: Select the F.Block button from the Kidbar. Select the BLOCK MOVE command from the pulldown menu. A dialog box is displayed on the screen – Fig. 6.38. KID Neuro PLC – User’s Manual 6-31 Fig. 6.38 The operand V-cell related to Block 1 is entered into the Move From field. The index of the first V-cell of Block 1 is entered into the field below the Move From field. The operand V-cell related to Block 2 is entered into the Move To field. The index of the first V-cell of Block 2 is entered into the field below the Move To field. The number N of the V-cells in a block is entered in Number N field. Example 6.5: Generate a circuitry containing a Block Move functional block to realize the operation shown in Fig. 6.36. The functional block is enabled by a X1 relay. The output of the block is terminated to an Y1 coil. Solution: Generate the X1 network as already explained. Click the F.Block button on the Kidbar – a menu appears. Click Move Block command on the menu – a frame of the block appears on the circuit and simultaneously a Block Move dialogue box is displayed on the screen (Fig. 6.38). Enter the Integer Holder V-cell for Block 1 into the Move From field – we choose V-301. So enter V301. Enter the integer operand 11 i.e. the index of V11-cell in the value field below the Move From field – Fig. 6.36 shows that the first V-cell of Block 1 is V11. Enter the Index Holder V-cell for Block 2 into the Move To field – we choose V333. So enter V333. Enter the integer operand 100 i.e. the index of V100-cell in the value field below the Move To field – Fig. 6.36 shows that the first V-cell of Block 2 is V100. Enter the integer 7 into the Number N field – Fig. 6.36 shows that the number of V-cells in one set (Block) is seven. Click OK. Generate the output (coil) command as already explained. A circuit is displayed as shown in Fig. 6.39, which correctly reflects your entries and corresponds to the task as per Fig. 6.36. 6-32 KID Neuro PLC – User’s Manual Fig. 6.39 With X1 set to a logic 1, the contents of the cells V11, V12, V13, V14, V15, V16, V17 is moved to the cells respectively V100, V101, V102, V103, V104, V105, V106. With X1 set to a logic 0, the move operation will not be executed. The output Y1 repeats the state of the input X1. 6.3.6. Bit-by-Bit SHIFT The SHIFT functional block executes a bit-by-bit shift to the left (<<), or to the right (>>) of the contents of a set of operands (hereafter referred to as block of operands). The fundamental characteristics of the block are: - The first V-cell of the set (i.e. the start operand) - The number of the consecutive V-cells in the block (i.e. the count of operands) Representation: Fig. 6.40 - In – control input; - О1 – an integer operand indicating the beginning of the block which is subject to bit-by-bit shift i.e. the start operand – a V-cell with a number within the range from V1 to V512; - О2 – an integer operand indicating the end of the block which is subject to bit-by-bit shift – this appears automatically due to entering of the start operand and the count of operands; - Out - output. Characteristics: The number of the SHIFT functional bloc is limited only by the number of V-cell used in the KID Neuro PLC. The control input of the block is connected to a circuit whose state enables or disables the block operation. KID Neuro PLC – User’s Manual 6-33 Principle of operation: With the control input set to a logic 1, a bit-by-bit shift is executed at each cycle of the user program. The block is disabled by a logic 0 at the control input. At SHIFT LEFT the state of the most significant bit of the initial V-cell is transferred to the block output. The least significant bit is set to a logic 0. At SHIFT RIGHT the state of the least significant bit is transferred to the block output. The most significant bit is set to a logic 0. Entering: Generate the X1 network as already explained. Click the SHR/SHL button on Kidbar, after which click SHIFT from the pull-down menu. A dialog box is displayed on the screen (Fig. 6.42) which contains the following fields: - Operation – select the shift direction by clicking the Shift Left / Shift Right button; - Start operand – the first V-cell of the bit-by-bit shift block; - Counts of operands – the number of the consecutive V-cells in the block whose contents will be subjected to a bit-by-bit shift. Example 6.6: Generate a circuitry containing a SHIFT functional block and a block of operands V12, V13 and V14 – left shift direction. The functional block is enabled by a X1 operand. The output of the functional block is terminated to Y1 coil. Fig. 6.41 Solution: The input circuit of the block is generated as already explained. The dialog box used to set the values of the SHIFT block operands is filled in as shown on Fig. 6.42. - Click the operation button to select left shift direction; - Enter the start operand V12; - Enter the initial value of the start operand (say 15); - Enter the count of operands – in our example 3. - Click OK. 6-34 KID Neuro PLC – User’s Manual Fig. 6.42 A circuit appears as shown in Fig. 6.41, which reflects your entries. Let assume that the V12, V13 and V14 cells are assigned the following values: V12 = 1010101010101010 V13 = 1001001001001001 V14 = 0000000011111111 With X1 set to a logic 1, the contents of the V-cells with numbers V12, V13 and V14 will be shifted left bit by bit. For the current user program cycle, the Y1 output will be set to a logic 1 (the most significant bit of V12). After the shift operation is completed the contents of V12, V13 and V14 will be as follows: V12 = 0101010101010101 V13 = 0010010010010010 V14 = 0000000111111110 The least significant bit of V14 will be set to 0 after the shift. The shift operation is disabled by a logic 0 at X1. Important Notes: a. In case of X1 continuously at logic 1, the SHIFT operation is executed on each controller cycle. b. The input of the SHIFT functional block may be controlled by a specific event pulse. In this case the duration of this specific event pulse must be larger than the duration of one controller cycle. 6.3.7. ADD The ADD functional block adds the contents of two integer operands and stores the result into a third integer operand. If necessary you may read again subsection 5.10 and 5.14. Representation: Fig. 6.43 KID Neuro PLC – User’s Manual 6-35 - In – control input; - О1 and О2 –integer operands (addends) – V-cells with numbers between the range from V1 to V512 or constants within the range from -32768 to 32767; - О3 – an integer operand (sum) – V-cell with a number within the range from V1 to V512; - Out - output. Characteristics: The control input of the block is connected to a circuit whose state enables or disables the block operation. The ADD functional block operates with figures represented in complementary code (refer to subsection 5.10 and 5.14). Principle of operation: With the control input In set to a logic 1, the value in O1 is added to the value of O2 and the result is stored in O3 during each cycle of the user program. The integer operands О1, О2 and О3 represent 16-bit figures, with the most significant bit used as the sign bit. The integers which may be represented in this manner, are within the range from -32768 to 32767, which means that the result which will be stored in the O3 operand must also comply with this restriction. When this condition is complied with, the block output is set to a logic 0. The result from the addition of two positive figures or of two negative figures may exceed in absolute value the permissible limits, which will result in an overflow and to an improper result. In case of an overflow the output is set to a logic 1. Example 6.7: O1 O2 O3 31128 -31128 + + 01921 -01921 -------- -------- 33049 -33049 In both cases the result lies outside the permissible range, which will affect the sign bit in the result cell (the block output is equal to 1 which is an indication for the occurrence of an error). The overflow process may be illustrated by representing the signed integers by their complementary code. V1 [31128] = 0’111100110011000 [-31128] = + V2 [1921] = 0’000011110000001 + [-1921] = ---------------------------V3 [33049] = 1’000000100011001 1’000011001100111 1’111100001111111 ---------------------------- [-33049] = 0’111111011100111 ↓ ↓ overflow indication overflow indication The emergence of an overflow condition is indicated by the setting of the sign bit to 1 when adding positive figures, or to 0 when adding negative figures. The user is notified about the occurrence of overflow and that the ADD operation has been completed improperly by setting the ADD output to a logic 1. 6-36 KID Neuro PLC – User’s Manual Entering: Select the Arithmetic button from Kidbar (F9 key). Select ADD from the pull-down menu. A dialog box is opened (Fig. 6.44) which contains fields for the integer operands О1, О2 and О3, as well as for the initial values of the V-cells. Fig. 6.44 In case any of the operands O1 or O2 is a constant, its value is typed in using the numeric keys. The current value assigned to a V-cell operand is entered in the respective value field. The internal variable is initiated with this value when the user program is loaded. It is recommended to use internal variables from V300 to V400. Example 6.8: Generate a circuitry containing an ADD functional block in order to provide addition of the content of V-30 cell (initial value say 20) with the content of V31 cell (initial value say 0). The result to be stored in V6 cell. The input of the block is controlled by a X1 operand, while the output of the functional block is terminated to a R1 coil. Solution: The input circuit is entered as already described. Click Arithmetic button on Kidbar – a pull-down menu appears. Select and click Add function on the pull-down menu- a dialog box appears on the screen as shown in Fig. 6.44. Type in V30 in O1 field. Type in 20 in value field under the O1 field. Type in V31 in O2 field. Type in 0 in value field under the O2 field. Type in V6 in Result (O3) field. Click button OK and enter Y1 operand. A circuit appears as shown in Fig. 6.45 reflecting your entries. KID Neuro PLC – User’s Manual 6-37 Fig. 6.45 With Х1 set to a logic 1, V6 assumes a value which is equal to the sum of the values in V30 and V31. In case of an overflow the output Y1 is set to a logic 1. If the result complies with the imposed restrictions, the block output remains equal to a logic 0. Attention: The MCR functional block does not affect the operation of the ADD functional block. 6.3.8. SUBTRACT The SUBTRACT functional block subtracts the contents of two integer operands and stores the result in a third operand. If necessary you may read again subsection 5.10 and 5.14. Representation: Fig. 6.46 - In – control input; - О1 – an integer operand (minuend) – a V-cell with a number from V1 to V512 or a constant within the range from -32768 to 32767; - О2 – an integer operand (subtrahend) – a V-cell with a number from V1 to V512 or a constant within the range from -32768 to 32767; - О3 – an integer operand (the result) – a V-cell with a number within the range from V1 to V512; - Out – block output. Characteristics: The control input of the block is connected to a circuit whose state enables or disables the block operation. The SUBTRACT functional block operates with figures represented by their complementary code (refer to subsection 5.10 and 5.14). 6-38 KID Neuro PLC – User’s Manual Principle of operation: With the control input In set to a logic 1 the value of O2 is subtracted from the value of O1 during each cycle of the user program. The result is stored in O3. The integer operands О1, О2 and О3 represent 16-bit figures, with the most significant bit used as the sign bit. The integers which may be represented in this way, vary between -32768 to 32767. In order to complete the operation correctly, the results stored in O3 must be also within the same range. With all the conditions complied with the block output is set to a logic 0. The SUBTRACT operation actually sums up two figures by changing the sign of the subtrahend. Because of this the result from the subtraction of a positive figure from a negative figure may exceed the admissible range which will cause overflow and will yield an improper result. Example 6.9: V1 V2 V3 -31100 31100 - - 10021 -10021 ---------- ---------- -41121 41121 -31100 31100 + + -10021 10021 ---------- ---------- -41121 41121 Or V1 V2 V3 In both cases the result lies outside the permissible range, which will affect the state of both the sign bit of the V-cell used to store the result, and the state of the block output (the block output is set to a logic 1 which is an indication for the occurrence of an error). The setting of the sign bit of the result to 1 is an indication for the occurrence of an overflow condition when a negative subtrahend is subtracted from a positive minuend, whereas the setting of the sign bit of the result to 0 is an indication for the occurrence of an overflow condition when subtracting a positive subtrahend from a negative minuend. The user is notified by the occurrence of such a condition and that the obtained subtraction result is improper by setting the SUBTRACT functional block output to a logic 1. Entering: After the circuits controlling the state of the block inputs are entered, select the SUBTRACT functional block button from Kidbar, then select SUBTRACT. A dialog box is displayed on the screen which contains fields for the integer operands (Fig. 6.47) O1 (minuend), O2 (subtrahend) and O3 (the result), as well as for the initial values of the V-cells. Fig. 6.47 KID Neuro PLC – User’s Manual 6-39 If any of the O1 or O2 operands is a constant, its value is typed in using the numeric keys. In case any of the operands is a V-cell, the respective value is entered in the field below. The internal variable is initiated with this value when the user program is loaded into the KID Neuro PLC. It is recommended to use internal variables V300 to V400. Example 6.9: Generate a circuitry containing a SUBTRACT functional block in order to provide subtraction of the content of V24 cell from the content of V2 cell. The initial value of V2 is 20, whereas the initial value of V24 is zero. The result to be stored in V5 cell. The input control circuit as well as the output of the functional block to be arranged in an ordinary way (say X1, resp. Y1). Solution: The input / output attributes to be entered as already explained. To enter the SUBTRACT functional block proceed as follows: Click Arithmetic button on Kidbar – a pull-down menu appears. Click Sub function on the pull-down menu – a dialog box appears on the screen as shown in Fig. 6.47. Type inV2 as minuend in O1 field. Type 20 in value field under the O1 field. Type in V24 as subtrahend in O2 field. Type in 0 in value field under the O2 field. Type in V5 in Result (O3) field. Click OK. A circuit appears as shown in Fig. 6.48 reflecting correctly your entries. Fig. 6.48 With X1 set to a logic 1, V5 assumes a value which is equal to the difference between the values of V2 and V24. With X1 set to a logic 0 the functional block SUBTRACT is disabled. In case of an overflow the output Y1 is set to a logic 1. If the result complies with the imposed restrictions the functional block output remains set to logic 0. Attention: The MCR functional block does not affect the block operation. 6-40 KID Neuro PLC – User’s Manual 6.3.9. MULTIPLY The MULTIPLY functional block multiplies the contents of two integer operands and stores the result into a third integer operand. Representation: Fig. 6.49 - In – control input; - О1 – an integer operand (multiplicand) – a V-cell with a number within the range from V1 to V512 or a constant within the range from -32768 to 32767; - О2 – an integer operand (multiplier) - a V-cell with a number within the range from V1 to V512 or a constant within the range from -32768 to 32767; - О3 – an integer operand (result, product) which represents a 32-bit figure and is located in two V-cells with successive numbers within the range from V1 to V512; - Out – Output of the functional block. Characteristics: The control input of the block is connected to a circuit whose state enables or disables the block operation. The MULTIPLY functional block operates with figures represented by their supplementary code (see Item 5.10). The output logic state of the block repeats the logic state of the input which allows several MULTIPLY block complying with one and the same condition to be connected in series (cascade connection). Principle of operation: With the control input In set to a logic 1, the value of O1 is multiplied by the value of O2 during each cycle of the user program, and the result is stored in O3. The integer operands O1 and O2 represent 16-bit figures with the most significant bit used as the sign bit. The integer operand O3 represents a 32-bit figure. The result should not exceed the preset limits (i.e. the maximum content of two 16 bit V-cells, including the sign bit). The sign of the results is defined according to the laws for arithmetic multiplication. In case the result is a negative figure, the sign bit of its complementary code will be set to 1. In case the result is a positive figure, the sign bit will be set to 0. The output of the block repeats the input state. Entering: Select the Arithmetic button from Kidbar (F9 key). Select the MULTIPLY command from the pull-down menu. A dialog box is displayed on the screen (Fig. 6.50) containing three fields for the integer operands: O1 – multiplicand, О2 – multiplier, and О3 – the result (product), as well as for the initial values of the V-cells. KID Neuro PLC – User’s Manual 6-41 Fig. 6.50 The initial values of the О1 or О2, when set as V-cells, are entered unto the respective value fields located bellow O1, resp. O2 fields. In case any of the operands is a constant, its value is typed in directly in the O1 or O2 field. The internal variable is initiated with this value when the user program is loaded into the KID Neuro PLC. It is recommended to use initial variables from V300 to V400. Note: It must be taken into account that the result from the multiplication is stored into two V-cells with successive numbers. When entering the result operand, only the number of the first cell is entered, while the number of the second V-cell is not entered or indicated anywhere (although it is used). It is not allowed to set the second V-cell as an operand for some other functional block, relay circuit or function as this will result into an inadmissible interlink of values and results. Example 6.10: Generate a circuitry containing a MULTIPLY functional block in order to provide multiplication of the content of V2-cell (initial value say 5) by the content of V12-cell (initial value say 76). The result to be stored in the two consecutive V-cells, namely V5 and V6. The input control circuit as well as the output of the functional block to be arranged in an ordinary way (for example X1 and Y1). Solution: The input / output commands are entered as already explained. To enter the MULTIPLY functional block proceed as follows: Click Arithmetic button on Kidbar – a pull-down menu appears. Click Multiply function on the pull-down menu – a dialog box appears on the screen as shown in Fig. 6.50. Type in V2 as multiplicand in O1 field. Type in the initial value 5 in the value field under the O1 field. Type in V12 as multiplier in O2 field. Type in the initial value 76 in the field under the O2 field. Type in V5 in Result (O3) field. This means that we identify the set of two consecutive V5 and V6 cells only by the first member of this set, i.e. V5. Click OK. A circuit appears as shown in Fig. 6.51 reflecting correctly your entries. 6-42 KID Neuro PLC – User’s Manual Fig. 6.51 At Х1=1, V5 plus V6 assume a value which is equal to the result from the multiplication of the values in V2 and V12. As the result is a 32-bit figure, the result is stored automatically into the internal variables V5 and V6, with V5 assuming the less significant portion, and V6 – the more significant portion of the figure. Bit 15 of V6 is used as a sign bit. At Х1=0 the block is disabled. Attention: The MCR functional block does not affect the block operation. 6.3.10. DIVIDE The DIVIDE functional block divides the values of two integer operands and stores the result into a third operand. Representation: Fig. 6.52 - In – control input; - O1 – an integer operand (dividend) – an 32-bit integer. It is stored always in a set of two successive V-cells (in the range V1 to V511). The set is identified by the first V-cell. The first V-cell is used for the less significant portion of the variable whereas the second Vcell is used for the more significant portion of the variable (including the sign bit). When O1 is entered as a constant it should be in the range from –32768 to 32767. - O2 – an integer operand (divisor) – a V-cell within the range of V1 – V512, or a constant within the range from –32768 to 32767; - O3 – an integer operand (the result, the quotient), which occupies always a set of two Vcells: This set is identified by the first V-cell. The first V-cell contains the result of the division (i.e. an integer), whereas the second V-cell is used for storage of the remainder of the division (even in case this remainder is zero). KID Neuro PLC – User’s Manual 6-43 Important Note: Never use this second V-cell for other purposes. For example, when the remainder is zero, consider this V-cell as occupied with zero content, but not free for alternative use. - Out – the output of the functional block. Characteristics: The control input is connected to a circuit whose state enables or disables the operation. The DIVIDE functional block operates with figure represented by their complementary code (see Items 5.10 and 5.14). Principle of operation: With the control input set to a logic 1 the value of O1 is divided by the value of O2 during each cycle of the user program and the result is stored in O3. In case the integer operand O1 is entered as a V-cell, it represents a 32-bit figure and is stored in two successive V-cells. The first cell (whose number is entered into the O1 field) stores the less significant portion of the figure. The more significant portion of the figure is automatically stored in the next V-cell, with the most significant bit of the second V-cell used as a sign bit. In case the integer operand O1 is entered as a constant, it represents a 16-bit figure, with the most significant bit used as a sign bit. The integer operand O2 represents a 16-bit figure, whose most significant bit is used as a sign bit. In case O2 = 0 (division by zero), the cells allocated for the result and for the remainder are reset to zero, and bit 7 of V250 is set to a logic 1 (see Item 5.11). An ancient proverb: Only the devils are dividing by zero! The integer operand O3 is represented as two 16-bit figures. The first figure is equal to the result of the division of the two integers, with the most significant bit used as sign bit. The remainder is written into the second figure which again has a sign bit. The two 16-bit figures are stored in two V-cells with successive numbers, with the number of the first cell entered into the O3 operand field, while the number of the second is assigned automatically to the V-cell which is next in line. With the control input of the block set to a logic 1, and in case the values of the integer operand have been entered properly, the division function is executed and the output of the block is set to a logic 0. The occurrence of on overflow in the cell allocated for the result, is indicated by setting the block output to a logic 1. In this case the values which are stored in the cells allocated for the result of the division should be interpreted as being improper. Entering: Select the Arithmetic button from Kidbar (F9 key). Select DIVIDE from the pull-down menu. A dialog box is displayed on the screen (Fig. 6.53) which contains the following fields: - O1 – the dividend, an integer operand - O2 – the divisor, an integer operand - O3 – the result, an integer operand It also contains fields for the initial values of the corresponding V-cells. 6-44 KID Neuro PLC – User’s Manual Fig. 6.53 In case any of the two integer operands – O1 or O2 – is a constant, the respective value is typed in using the numeric keys. In case any of the integer operands O1 or O2 is a V-cell, the respective initial value of this variable is entered into the value field. The internal variable is initiated with this value during the loading of the user program into the KID Neuro PLC. It is recommended to use internal variables V300 to V400. Example 6.11: Generate a circuitry containing a DIVIDE functional block in order to provide the division of the content of V2-V3 cells (initial value, for example 54) by the content of V-4 cell (initial value, for example 2). The result to be stored in the two consecutive V-cells, namely V5 and V6. The input control circuit, as well as the output of the functional block to be arranged in an ordinary way (for example X1 and Y1). Solution: The input / output commands are entered as already explained. To enter the DIVIDE functional block follow the next steps: Click Arithmetic button on Kidbar – a pull-down menu appears. Click Divide function on the pull-down menu – a dialog box appears as shown in Fig. 6.53. Type in V2 in O1 field (the dividend). This means that we identify the set of two consecutive V2 and V3 cells only by the first member of this set, i.e. V2. Type in the initial value 54 below the O1 field. Type in V4 in O2 field (the divisor). Type in the initial value 2 in the field below O2 field. Type in V5 in Result (O3) field. This means that we identify the set of two consecutive V5 and V6 cells only by the first member of this set, namely V5. Click OK. A circuit appears as shown in Fig. 6.54 reflecting your entries. KID Neuro PLC – User’s Manual 6-45 Fig. 6.54 At Х1 = 1, V5 assumes a value which is equal to the result of the division of the two integers in cells V2 and V4. The remainder from the division is stored in V6. At X1 = 0 the block is disabled. Note: It must be always taken into account that the dividend consists of two successive Vcells. The number of the first V-cell is entered as an operand, while the number of the second is not entered or indicated anywhere (although the second V-cell is used). That is why it is not allowed to use the second V-cell as an operand in some other functional block, relay circuit or function as this will lead to an improper interlinking in values and results. The same applies to the result from the division, as it is allocated also in two V-cells with successive numbers. Attention: The MCR functional block does not affect the block operation. 6.3.11. DRUM The DRUM functional block is used for switching of user-defined combinations of the states of logic operands. Depending on the control impact the DRUM block stores one of these combinations into the respective integer operand. Representation: Fig. 6.55 - In – control input; - О (Vn) – start of the drum file – a V-cell with a number n within the range from 1 to 507 (V1 V507); - Out – functional block output. Important Note: In case of DRUM functional block the term output is referred to two different subjects, namely: a. The term Out (Fig. 6.55) is devoted to the functional block output, hereafter referred to as FB output in this subsection. 6-46 KID Neuro PLC – User’s Manual b. The DRUM combination output is stored in a V-cell (normally referred to as Vn-cell) whose 16-bit logic states manifest the corresponding combination of logic operands. Each bit of this Vn-cell acts as a contact: a closed contact is represented by logic 1 of the corresponding bit, whereas the open contact is represented by a logic 0 of the corresponding bit. Hereafter this combinations output is referred to as DRUM combinations output in this subsection. Characteristics: The number of the DRUM functional block is limited only by the number of V-cells accessible to the user. The maximum number N of the stored combinations is 32. Each combination is represented by a separate V-cell. Thus the maximum number of the consecutive V-cells for representation of maximum 32 combinations is 32 consecutive V-cells. Therefore the number of the V-cells required for presentation of the combinations is equal to the number of the combinations N. For historical reasons (related to mechanical drum programmers) the term position is used in order to define the index of particular combination – a combination is manifested by the drum position. Each position is defined by its index, the first position being Position 0. Now to summarize: The functional block can store N combinations (N max = 32). For this purpose N V-cells are required (N max = 32). The number of drum position is N (N max = 32). The index of the first position is 0. Therefore the index of the last position is N -1 (1st position has index 0!). As a matter of fact more than N V-cells are necessary for the normal operation of the DRUM functional block – four V-cells are occupied as service V-cells to secure the operation of the functional block. The designation of the V-cells occupied is explained in the next table. The complete set of V-cells required for the operation of Drum functional block are characterized by: a. The index of the first V-sell, also referred to as START V-cell. Actually this is also referred to as Vn-cell. b. The number of combinations N. So, if in the field 0 is introduced Vn cell, the following cells are occupied by the Drum Timer: Table 6.1 V-cell Designation Position Index Vn This is the START V-cell. Stores the current DRUM combination output content - Vn + 1 Stores the index of the current position (combination) - Vn + 2 Stores the number of combinations N (N max = 32) - Vn + 3 Reserved for future development - Vn + 4 Stores the combination of bits for Drum position 0 0 Vn + 5 Stores the combination of bits for Drum position 1 1 KID Neuro PLC – User’s Manual 6-47 Table 6.1 Cont. ……... ……... Vn + 4 + (N -1) Stores the combination of bits for the last Drum position N -1 Total number of the occupied V cell N+4 ……... RECAPITULATION Total number of Drum combination of bits, incl. combination 0 N –1 Total number of positions incl. Pos. 0 N N Principle of operation: The DRUM functional block operates in a manner similar to an electro-mechanical drum selector (Fig. 6.56). Fig. 6.56a - Electro-mechanical Drum selector Fig. 6.56b - DRUM Functional Block The electro-mechanic drum selector is a multi-position device (Fig. 6.56a). The arrangement of its contacts in each of the available drum positions determines the selected combination. The transition from one position to another is controlled by an external actuator. With the rotation of the drum the combination which sets the state of the outputs specific contacts close, and the successive change of the combination of the states of the contacts is used to control an automated system. 6-48 KID Neuro PLC – User’s Manual With the DRUM functional block (Fig. 6.56b) the role of the contacts is assumed by the logic operands – the bits in the respective V-cell. A closed contact is represented by a logic 1, and an open contact – with a logic 0. The current Drum combination is stored in the START V-cell, i.e. in Vn-cell. The Drum functional block may be controlled as follows: - successive – the transition from logic 0 to logic 1 (i.e. the leading edge) at the input In results in incrementing by 1 the number of the output combination. In fact at each leading edge a. The index of the successive position to become active is entered into Vn+1-cell. b. Based on the above the content of the V-cell corresponding to the relevant position is stored in the Vn-cell as current DRUM combination output. - forced – the index of a selected by the user position is entered into Vn +1-cell (by using MOVE functional block). Thus the content of the V-cell corresponding to this selected position appears in the Vn-cell as current DRUM combination output (refer to example 6.14). The Drum Functional Block Output is set to logic 0 when the combination 0 (i.e. position 0 – see the Table 6.1) is initiated. With the initiation of all other combinations the Functional Block Output is set to logic 1. Entering: Select the F. Block button from Kidbar. Select the DRUM functional block command from the pull-down menu. A dialog box appears on the screen (Fig. 6.57) with the following fields: Fig. 6.57 START V – We have to enter the start Vn-cell which will be used for Drum combinations output. Combinations – The number of DRUM combinations N is entered in this field. After the above two entries are effected the relevant combinations are displayed in the right lower half portion of the box – the respective position indexes as well as the corresponding Vcells. The bits of all combinations displayed initially are set to logic 0. The best explanations how to operate when entering the Drum functional block can be provided by the next example 6.12. KID Neuro PLC – User’s Manual 6-49 Example 6.12: Generate a circuitry containing a DRUM functional block with six combinations, starting with the starting V-cell being V10. The Drum combinations are as follows (MSB left!): Position 0 – 1000000000000000 Position 1 – 0100000000000000 Position 2 – 0000010000000000 Position 3 – 0000000100000000 Position 4 – 0000000000000001 Position 5 – 1111111111111111 The functional block input is controlled by a make contact X1 while the Functional Block Output is terminated to a Y1 coil. Solution: Click Load and enter leading edge-triggered X1 contacts as already explained. Click F.Block button on Kidbar, then click Drum function – a dialog box appears as shown in Fig. 6.57. Enter V10 in the START V field. Enter 6 in the Combinations field – the combinations are displayed as shown in Fig. 6.58. Six positions (incl. Pos. 0) are displayed with the corresponding 6 successive V-cells starting from V14 up to V19 (Remember: V10, V11, V12 and V13 are automatically reserved for Vn, Vn +1, Vn + 2 and Vn +3 respectively). Fig. 6.58 In order to enter the relevant combinations proceed as follows: Click Pos. 0 and then click the 16th bit on the top-bar – the combination relevant to position 0 appears automatically as shown in Fig. 6.59. This is actually the bit-by-bit state of V14-cell as was required. For user’s convenience the decimal equivalent of the content appears on the right hand column, namely –32768. 6-50 KID Neuro PLC – User’s Manual Fig. 6.59 To enter the position 1 combination: Click Pos. 1 and then click the 14th bit on the top-bar (0 ≡ logic 0; 0 ≡ logic 1). Further proceed in the similar way. The complete combination entries are shown in Fig. 6.59. Next, click OK button on the Drum dialog box and don’t forget to enter Y1 coil. The final circuit is shown in Fig. 6.60. Fig. 6.60 In order to edit an existing Drum functional block proceed as follows: Double-click on Drum Timer box (see Fig. 6.60) – the dialog box (Fig. 6.59) appears. For changing a specific combination click the corresponding position and enter the necessary changes by clicking relevant bit on the top-bar of the dialog box. For changes of the START V-cell and / or the number of combinations: position the cursor on the relevant field and enter the new data. After the changes are completed click OK button to enter the changes in the DRUM functional block. Example 6.13: Generate a program for execution of the following function: The DRUM combination outputs of the DRUM functional block as described in Example 6.12 (resp. Fig. 6.60) to be terminated (delivered) to the PLC physical outputs, say Y33 to Y48. KID Neuro PLC – User’s Manual 6-51 Solution: As shown in Example 6.12 the 6 combinations of the DRUM functional block are successively present at V10-cell which stores the current Drum combinations output content. So we have to transfer (to move) the bit-by-bit content of this V10-cell of Drum functional block to the PLC physical outputs Y33 to Y48 as shown in Fig. 6.61. Fig. 6.61 The presentation in Fig. 6.61 calls for an operation Move from V10 – Move to Y33. You may recollect that such operation can be executed by the MOVE functional block (subsection 6.3.5). Therefore we have to generate a Move functional block in addition to the Drum circuitry. The final circuit is shown in Fig. 6.62. Fig. 6.62 " The program shown in Fig. 6.62 is almost ready for your home washing machine! Example 6.14: Generate a program for execution of the following function: The Drum Timer (Fig. 6.60) to be forced on position 5 when a contact X2 becomes closed, i.e. logic 1. 6-52 KID Neuro PLC – User’s Manual Solution: We have to execute a forced control of the Drum functional block: when X2 is at logic 1 then the DRUM combinations output must be forced on position 5. This means that when X2 is at logic 1 the index 5 must be moved into V11-cell (remember Vn +1 cell!). Thus the combination of bits of V19-cell (refer to Fig. 6.59) will appear automatically as content of the V10-cell (serving as Vn cell of our Drum), i.e. will appear as DRNM combination output. The above function is performed by using a MOVE functional block whose entries have to be Move 5 - to V11. The final circuit is shown in Fig. 6.63. Fig. 6.63 An existing DRUM functional block within a user program may be edited as described in section 6.3 – editing of functional blocks. When the user program is displayed on a hard copy, the matrixes of the DRUM blocks are printed out automatically after the last circuit (operation) of the user program. Attention: The MCR functional block does not affect the block operation. KID Neuro PLC – User’s Manual 6-53 6.3.12. APROX The APPROX functional block performs approximation of an arbitrary selected user function determined by a number of points and their allocated values. Fig. 6.64 Fig. 6.65 a) The real presentation of a function y = f(x) Exaggerated representation of the On-1 - On region of the function shown in Fig. 6.64 b) A linear approximation of the same function based on N sets of the two X&Y numbers The approximation approach is illustrated in Fig. 6.64 and Fig. 6.65. An arbitrary function is shown in Fig. 6.64a. The general mathematical expression of a function is y = f(x) In real engineering system design the user is frequently in possession of a limited number of points only for a function, say N points (O1, O2, …, On, On+1, …., ON) Each of these points shows the relationship between two sets of numbers, namely x (referred to as argument) and y (referred to as dependant variable). In other words each O point is defined by specific x:y values (i.e. each cross point corresponds to a particular pair of x:y values). Based on the above limited information we can provide a linear approximation of the real function as shown in Fig. 6.64b An exaggerated representation of an arbitrary region is shown in Fig. 6.65 which is selfexplanatory. Considering the two similar triangles the following relation holds: 6-54 KID Neuro PLC – User’s Manual Yn – Yn-1 y – Yn-1 = Xn – Xn-1 (6.1) x – Xn-1 Thus, the output value y in respect of the input argument x based on the linear approximation is given by the equation y = Yn – Yn-1 Xn – Xn-1 (x – Xn-1) + Yn-1 (6.2) The absolute error of y (line x0) as a result of the approximation with respect to the true y value (line x0’) is given by the piece 0’0 – Fig. 6.65a. The entries to the APROXIMATION functional block must include: a. The number of 0-points, i.e. Count N. b. The x input V-cell (i.e. the input argument V-cell). This entry will reserve automatically N more successive V-cells for entry of the Xi – integers. c. The output y V-cell (i.e. the dependant variable V-cell). This entry will reserve automatically N more successive V-cells for entry of the Yi – integers. d. The value of each xi V-cell. e. The value of each yi V-cell. Representation: Fig. 6.66 - In – functional block input (the control input); - О1 – an integer operand (function input) – a V-cell with a number between V1 and V512; - О2 – an integer operand (function output) a V-cell with a number between V1 and V512; - N – number of points (an integer from 2 to 200); - Out – functional block output. Characteristics: The number of the APPROX functional blocks is limited only by the number of V-cells accessible to the user. The control input of the block is connected to a circuit whose logic state enables (logic 1) or disables (logic 0) the block operation. The points subject to approximation at the input and the output may be set as V-cells only. Principle of operation: A logic 1 at the control input (In) enables the block operation. An output value (y-coordinate) is obtained for each input value (x-coordinate) as a result of the block approximation operation. KID Neuro PLC – User’s Manual 6-55 Entering: Click the F.Block button on Kidbar. Click APPROX from the pull-down menu – a dialog box is displayed on the screen (Fig. 6.67) which is used to enter the block data. Fig. 6.67 The number N of the 0-points, determining the intervals for approximation is entered into the Count field. The V-cell used as a function input (i.e. the input V-cell) is entered into the Input field. This entry automatically reserves the next N more successive V-cells for entry of the corresponding table Xi – values (integers from –32768 up to 32767). These N successive V-cells appear in the box under the XPoint field – all of the sells set to 0. The V-cell used as function output is entered into the Output field. This entry automatically reserves the next the next N more successive V-cells for entry of the corresponding table Yi – values (integers from –32768 up to 32767). These N successive V-cells appear in the box under the YPoint field – all of the sells set to 0. The entry of the values of the corresponding Xi coordinates into the relevant Xi V-cells is executed in the following way: - The first XI V-cell (out of N) is called by the mouse in the XPoint field. The entry of the Xi value is typed in. - The second Xi V-cell (out of N) is called next by the mouse in the XPoint field. The entry of the Xi value is typed in. - … etc up to the last Xi V-cell. IMPORTANT NOTE: a. Prior to the entry of the user Xi Yi values, all V-cells in the XPoints and Ypoints field are set to 0. b. The Xi values must follow a monotone increasing sequence, namely: -32768 < X1 < X2 < X3 < … < Xn-1 < Xn < … < XN-1 < XN < 32767 The entry of the values of the corresponding Yi values into the relevant Yi V-cells is executed in the similar way. Example 6.15: Generate a circuitry containing an APROX functional block under the following conditions: - the number of the user table points N = 6 - the Xi input V-cell is V300 - the Xi values are: 0; 20; 50; 100; 200; 300 6-56 KID Neuro PLC – User’s Manual - the Yi output V-cell is V320 - the Yi values are: -10; 40; 90; 160; 200; 260 The functional block input is controlled by an X12 contact whereas the functional block output is terminated to an Y17 coil. Solution: Generate the X1 contact for control of the functional block as already explained. Click the F.Block button on Kidbar – a pull-down menu appears. Click Approx functional block – a dialog box appears as shown in Fig. 6.67. Enter 6 into the Count field. Enter V300 into Input field – the following N V-cells appear in the field below: V301 = 0 Click and enter 0 V302 = 0 Click and enter 20 V303 = 0 Click and enter 50 V304 = 0 Click and enter 100 V305 = 0 Click and enter 200 V306 = 0 Click and enter 300 Enter V320 into the Output field – the following N V-cells appear in the field below: V321 = 0 Click and enter -10 V322 = 0 Click and enter 40 V323 = 0 Click and enter 90 V324 = 0 Click and enter 160 V325 = 0 Click and enter 200 V326 = 0 Click and enter 250 The completed dialog box is shown in Fig. 6.68. Fig. 6.68 Click OK. Generate Y1 coil. The completed circuit is shown in Fig. 6.69. KID Neuro PLC – User’s Manual 6-57 Fig. 6.69 An APPROX functional block existing within an user program may be edited using the procedure described in section 6.3. 6.3.13. MCR (Master Reset Relay) The MCR (Master Reset Relay) functional block sets to 0 the Out command logic operands, located in its zone of impact. The switch used to disconnect the relay coils in the electro-mechanical relay-contact circuits from the power source may be interpreted as being the equivalent of the MCR functional block. Representation: Fig. 6.70 - In1 and In2 – functional block control inputs; - MCR – command indicating the beginning of the zone of MCR impact; - MCREND – command indicating the end of the zone of MCR impact. Characteristics: The control inputs of the block are connected to circuits whose logic state enables or disables the execution of the block. The circuits connected to In1 and In2 must be identical. The MCR impact zone incorporates a portion of the ladder logic of the user program which is limited by the MCR and MCREND commands. The MCREND command must not precede the MCR command, which means that the step where the MCREND is entered must have a higher number within the user program than the step in which the MCR is entered. 6-58 KID Neuro PLC – User’s Manual Principle of operation: The MCR functional block affects only the state of the logic operands in the Out commands located between the MCR and MCREND commands. With the In1 and In2 inputs set to a logic 0, the results from the processing of the respective circuits are stored in the logic operands of the Out commands. With In1 and In2 inputs set to a logic 1 the MCR block forcefully sets the logic operands of the Out command within the zone of impact to a logic 0 (the coils are disconnected from the power supply). Attention: It is not allowed to: - enter the MCREND command before the MCR command; - enter the MCR command without entering the MCREND command, and vice versa; - different input circuits for MCR and MCREND. Entering: The MCR functional block consists of two parts and is entered as follows: - Enter the MCR input command circuit as already explained. - Select the MCR command from Kidbar, select and enter MCR from the pull-down menu. - Enter the portion of the ladder logic in which the Out commands must be disabled, i.e. generate the ladder logic program included into the MCR zone of impact. - Enter the MCR input control circuit again. - Select the MCR command from Kidbar, select and enter MCR End from the pull-down menu. A sample of a circuitry using MCR functional block is shown in Fig. 6.71. KID Neuro PLC – User’s Manual 6-59 Fig. 6.71 With X1 = 1 the states of Y1; Y2; Y3 are at logic 0 regardless of the state of X2; R1 and X3 (Nevertheless Divide F.Block is executed with regard of X3 state!). With X1 = 0 the state of Y1; Y2 and Y3 is determined by the state of X2, resp. R1, resp. X3. 6.4. ENTERING AND EDITING OF FUNCTIONS There are three basic types of functions which may be included in a user program: - mathematical functions (MF); - PID controller; - communication functions (read / write). The functions are entered in compliance with a general principle, namely by creating firm files. The functions are entered by clicking Function button. A menu is displayed which is used to select the function. A dialog box – actually the file of the selected function - is displayed. The logic or integer operands are set depending on the specific features of the selected function. The programmer issues an error message in case an operand was entered improperly. The functions are edited in the same way as the functional blocks. 6-60 KID Neuro PLC – User’s Manual The KID Neuro PLC executes the functions included in the user program after the execution of the ladder logic due to the fact that the execution of the functions is much slower. Mathematical functions cannot practically be completed within one controller cycle. Regardless of these limitations the user may locate the functions at points of his choice while generating a user program. Attention: An user program may not start with a Function block! A complex circuit (Seria or Parallel) may not contain functions. When user programs stored on a disk are being read, the functions are placed in the positions as entered by the user. When an user program stored in the memory of the controller is being read (a service within the File/Load from Controller main menu), all functions are written after the ladder logic. A function may be deleted from the user program by clicking the function and then pressing the <Delete> key. Functions are queried for execution with the setting of a specific logic operand to logic 1. After the function is executed some other operand is set to 1. There is a specific feature about these two operands called Condition and R/Y Ready for Execution (Fig. 6.72). Fig. 6.72 The input condition and the execution condition are both set to 0 before the time interval t1. Setting the input condition to logic 1 indicates a request for execution. The function is executed during the t1 interval which practically continues for several controller cycles. This is indicated by setting the R/Y operand to logic 1. During the t2 period the operator may use the results from the execution of the function for further processing. After setting the execution operand to logic 1, the state must be maintained at least while the function request remains active, which means while the function is being executed (refer to Fig. 6.72). A function may be considered as completed after both the input and the output conditions are set to 1. Until that time it would be improper to use its operands for the purposes of other functions, functional blocks or ladder logic since this may lead to interlinking values and results and hence to undesirable changes in the user program. The Floating – Point Concept The KID Neuro PLC operates with integers and floating – point numbers. The floating point arithmetic involves specific representation and processing but fortunately we have prepare a very friendly custom oriented firmware in order to facilitate a simple and easy entry of function components. KID Neuro PLC – User’s Manual 6-61 Nevertheless a basic information is outlined to introduce the user to the floating – point numbers. The readers requiring more information are advised to refer to the specialized literature – a good readings for example are: - Douglas V. Hall, Microprocessors and Digital Systems, McGraw – Hill Book, ISBN 0-07025552-0 - R. Meadows, A. J. Parsons, Microprocessors: Essentials Components and Systems, Pitman, ISBN 0 27301904X The fixed point systems represent all numbers as integers or fractions. A floating – point system can represent numbers that contain both an integer part and a fraction part. Such numbers are called floating – point numbers. The floating – point number representation has the advantage of being able to accommodate a much wider range of numbers for a given number of bits than fixed – point. In general the floating – point representation of number of any base may be written in the form: n = ± mb± e where n is the number m is known as the mantissa b is known as the base e is known as the exponent When the mantissa m is a fraction, with no zeros immediately after the point, separating whole and fractional parts, the number is said to be in normalized floating – point form. In this case the mantissa lies within the range 0.12 ≤ m < 1 (i.e. 0’510 ≤ m <1) where 0.12 denotes a binary number 0’510 denote a denary number A typical illustration of a floating – point number using 32 bits (or two V-cells, each of 16 bits) is shown in Fig. 6.73. Fig. 6.73 A format with a 24-bit mantissa gives an accuracy of 1 part in 224, or about one part in seven decimal places. The 6-bit exponent with sign gives an exponent range of 2-63 to 263, or about 10-19 to 10+19 in decimal. 6-62 KID Neuro PLC – User’s Manual It should be remembered that one V-cell is used for integers and two consecutive V-cells are used for floating – point numbers. 6.4.1. Mathematical Functions The mathematical functions are used to generate equations involving integer operands and operands with floating – point numbers. Due to the long period of time needed for the execution of the mathematical functions the controller checks for any function requests and eventually initiates their execution only after it had completed processing the ladder program. 1 ms is allocated by the controller during each cycle for the execution of mathematical functions. Thus, mathematical functions will be executed over several controller cycles, the execution time depending on the volume of the ladder logic, on the number of the mathematical function requests and on the number of the mathematical operations which are to be executed within one mathematical function. Attention: The results from the execution of the mathematical function may be used in the user program only after the R/Y Ready execution condition is set to logic 1 (also refer to Fig. 6.72). The KID Neuro PLC may use up to 8 mathematical functions. Each equation may contain up to 6 operands, connected with any of the seven arithmetic operations: addition, subtraction, multiplication, division, square, square root and reciprocal value. The result may be an integer or a floating – point number. Intermediate results are stored internally in a floating – point format in order to improve accuracy. Limits may be set for the solution of the equation. The user is provided with the option to set the upper and the lower limit of the acceptable values of the result. In case the result obtained after the execution of the mathematical function falls within the preset range, the result is stored in the integer operand allocated for this purpose. If the result is beyond the acceptable limits, the limit value set by the user is stored in the allocated operand instead of the actual result. A logic operand (flag) with a number corresponding to the number of the fixed integer operand, is set to a logic 1 in order to signalize that the corresponding limit value is reached. The following V-cells and flags are allocated for entry of the upper and lower limits if this is the case (i.e. when we use the operation mode < = >): Limits V-cells and Flags Table 6.2 Upper limit Lower Limit MF No. Value Flag Value Flag MF1 V20 R20 V21 R21 MF2 V22 R22 V23 R23 MF3 V24 R24 V25 R25 MF4 V26 R26 V27 R27 MF5 V28 R28 V29 R29 MF6 V30 R30 V31 R31 MF7 V32 R32 V33 R33 MF8 V34 R34 V35 R35 KID Neuro PLC – User’s Manual 6-63 Entering: Select and click Function button on the Kidbar. A pull-down menu appears – Fig. 6.74. Fig. 6.74 Click the Mathematics (z = x + y) function – the Block configuration appears – Fig. 6.75. Fig. 6.75 The Combo box titled No. Math (Mathematical function number) is displayed on the left bottom side of the Block configuration. This Combo box provides selection of eight possible mathematical functions. By clicking you can select anyone of the functions. However it is recommended to enter the mathematical functions in a sequent order, starting with No. 1. After selecting and clicking the corresponding number of function a dialog box is displayed – Fig. 6.76. 6-64 KID Neuro PLC – User’s Manual Fig. 6.76 The fields titled 1 st, 2 nd, …6 th and Result are designated for entry of the equation operands (V-cell or a constant). The first operand in a mathematical function MUST be always an integer – operand Vcell! The fields NOP are designated for selection (and automatically entry) of the type of operation. A selection list of operations is provided, namely: + a sign for addition - a sign for subtraction x a sign for multiplication (multiplied by …) / a sign for division (divided by …) z (1/2) a sign for square root (radical sign) 1/z a sign for reciprocal value z (2) a sign for square (power of two) <=> a sign for setting upper and lower limits (equal to … but in the limits from … to …) = a sign for equal (equals to …) NOP is an abbreviation for “No Operation” and appears initially in all fields allocated for the type of operation. KID Neuro PLC – User’s Manual 6-65 The fields situated right – hand in respect to the 6 operand fields are designated for entry of the initial values of the operands if such. When the program is loaded, the internal variable is initiated with this value. It is recommended to use V300 to V400 for this purpose. As shown in Fig. 6.76 all initial values are set to zero at the beginning. The Integer buttons (Fig. 6.76) provide a selection of the type of operand preservation (the operand format): a. Integer – occupies one V-cell b. Floating point – occupies automatically two consecutive V-cells c. Constant WARNING: In case a V-cell (say V13) is entered as operand and floating – point mode of presentation is selected, the next V14 cell will be automatically occupied. Make sure that V14 has not been occupied already – this will create problems! The two right – top fields are designated: a. Condition for entry of the corresponding logic operand creating the condition for a request for execution (refer to Fig. 6.72): X1 to X128; Y1 to Y128; R1 to R256! b. R/Y Ready for entry of the corresponding logic operand showing that the operator may use the result from the execution of the function for further processing (refer to Fig. 6.72): Y1 to Y128; R1 to R256! In case the <=> operation sign is selected, then the table High limit & Low limit appears on the right – side of the dialog box (refer also to Limits V-cells and Flags Table 6.2). The upper and lower limits are entered in the corresponding fields. NOTE: In case <=> operation sign is selected then only an integer operand presentation for the Result can be used, since each limit is present in a single V-cell. The mathematical function executes the entered operations using the contents of the entered operands and not the operands themselves. The current result is stored into an internal variable allocated to the function. This internal variable consists of 4 bytes. This means that all operations are executed at a double accuracy (even if some of the operands are constants or integers). The operands which are entered in the floating – point format occupy 4 bytes of the data memory (two successive V-cells). Uniary operations (x2, reciprocal value, root) require one operand which means that the second operand is skipped, and the result of the uniary operation is interpreted as the second operand. The format of the second operand is of no consequence. The table used to set the acceptable margins for the result (MF Limits) may be accessed only if an operation requiring a result within a specified interval has been entered (<=>). The values of the upper and of the lower limit are typed into the fields marked as High Limit and Low Limit. The relevant integer and logic operands used to set the operation are displayed above these fields. After completing, the MF file is entered by clicking on the OK button. Following the above explanations let us continue the generation of the function with the relevant entries of equations by using the Dialog Box shown in Fig. 6.76. For simplification the exercises will include creation of equations only but ignoring the CONDITION and R/Y READY logic operands at this stage. Example 6.16: Enter the equation A + B – C = D: a. All operands as integers b. A, B, and C as integers but D in floating – point format 6-66 KID Neuro PLC – User’s Manual c. All operands in floating – point format Solution: a. Click No. 1 on the Combo box – Fig. 6.75 – The Dialog box appears as shown in Fig. 6.76. Click 1 st and enter say V1 for A (Integer, Initial value 10). Click NOP below, select and click “+”. Click 2 nd and enter say V10 for B (Integer, Initial value 0). Click NOP below, select and click “-”. Click 3 th and enter say V15 for C (Integer, Initial value 0). Click NOP below, select and click “=”. Click Result and enter say V18 (Integer, Initial value 0). All entries and the corresponding equation appear as shown in Fig. 6.77. b. Click Integer / Floating – point / Constant button relevant to the result and select the Float (Floating – point) format. The new entries and the corresponding equation appear as shown in Fig. 6.78 (Due to the floating – point format the result operand occupies two consecutive V-cells now, namely V18 and V19): c. Click each relevant Integer / Float / Constant button and select Float. You will realize that V1 operand cannot be changed in Floating – point format. Therefore REMEMBER: The first operand is always an integer operand! Due to the floating – point format all operands except V1 occupy two V-cells. The new entries and the corresponding equation are shown in Fig. 6.79a. KID Neuro PLC – User’s Manual 6-67 Fig. 6.77 Fig. 6.78 6-68 KID Neuro PLC – User’s Manual Fig. 6.79a Example 6.17: Generate the following mathematical function: 1 1300 + (V4) V8 2 <=> V12 High limit 2000 Low limit 600 The condition is given by X1. The R/Y Ready is provided by Y1. Solution: Call the dialog box (Fig. 6.76) as already explained. Start entry of the constant 1300 in the 1 st operand field. You will see that this entry is rejected! The reason? – Remember, the first operand must be an integer – operand V-cell! Therefore the equation must be rearranged as follows: 1 2 (V4) + 1300 V8 <=> V12 High limit 2000 Low limit 600 Now start again. - Enter V4 into the 1 st operand field. - Select from NOP field and enter the “z (2)” operation sign. - Skip over 2 nd operand, select from NOP field below and enter the “+” operation sign. - Enter the constant 1300 into the 3 rd operand field. - Select from NOP field and enter the “/” operation sign. - Enter V8 in the 4 th operand field. - Select from NOP field the “z (1/2)” operation sign. - Skip over 5 th operand field, select from NOP field below and enter the “1/z” operation sign. - Skip over 6 th operand field, select from NOP field below and enter the “<=>” operation sign – automatically the “High Limit” and “Low Limit” field appear an the Dialog Block. - Enter V12 into the Result operation field. - Enter the upper limit 2000 into the High Limit field. - Enter the lower limit 600 into the Low Limit field. - Enter X1 as condition operand. - Enter Y1 as R/Y Ready operand. The Dialog Box entries are illustrated in Fig. 6.79b. KID Neuro PLC – User’s Manual 6-69 Fig. 6.79b Now click OK on the Dialog Box to complete the function as shown in Fig. 6.80. Fig. 6.80 6-70 KID Neuro PLC – User’s Manual Example 6.18: Generate the following mathematical function: 2 V300 + V305 + = V 320 2 V310 1300 + (V4) V8 1 Solution: This equation cannot be generated by using only one function. Therefore two Mathematics have to be used: 1 Mathematics 1 for 2 (V4) + 1300 V8 = V12.V13 (floating – point!) 2 Mathematics 2 for V 300 + V305 + V12.V13 = V 320.V321 (floating – point!) V310 Important Note: Make sure, the R/Y Ready logic operand of Mathematics 1 must be used as Condition X/Y/R operand for Mathematics 2. The corresponding solution is illustrated in Fig. 6.81. Fig. 6.81 KID Neuro PLC – User’s Manual 6-71 6.4.2. PID Controller The KID Neuro PLC is supplied with the option to generate PID controllers. They are entered in a way similar to the entering of functions by filling in firm-format files. Up to 8 PID controllers may be included in an user program. As all other functions, the PID regulator is executed in background mode. The basic Plant – Controller configuration is shown in Fig. 6.82. Fig. 6.82 6.4.2.1. PID Algorithms The typical PID algorithm is expressed by the following equation: 1t dε( t ) u( t ) = k r ε( t ) + ∫ ε( t )dt + Td Ti 0 dt (6.3) where u(t) is the controller output kr is the gain, also known as proportional gain ε(t) = sp(t) – pv(t) is the system error, or also known as unbalance sp(t) is the Set Point value, also known as target pv(t) is the current value of the Process Variable Ti is the isodrom time. Important Note: In case Ti = 0 the integral component is automatically annulled! Td is the differentiation time – constant (advance time) In a digital discrete format the PID controller algorithm is given by the equation: T n T u n = k r ε n + s ∑ ε q + d ∆ε n Ti q=0 Ts (6.4) where 6-72 kr is the gain n is a number Ts is the duration of the PID controller cycle (Ts min = 300 ms!!!) un is the PID controller output at the moment n Ts εn = spn-pvn is the system error at the moment n Ts εn-1 = spn-1-pvn-1 is the system error at the moment (n-1) Ts εq = spq-pvq is the system error at the moment qTs (q varies from 0 to n) ∆εn = εn-εn-1 is the error difference KID Neuro PLC – User’s Manual Ti is the isodrom time Td is the differentiation time – constant (advance time) In order to secure a smooth switching ON (during Set Point changes) of the PID controller the following algorithm is used: T n T un = k r εn + s ∑ ε q − d ∆pv n Ti q=0 Ts (6.5) where ∆pvn = pvn-pvn-1 is the process variable difference pvn is the process variable at the moment n Ts pvn-1 is the process variable at the moment (n-1) Ts and the rest of the abbreviations are the same as in equation (6.4) The above particular form of PID algorithm is referred to as Enhanced Positional PID Controller. As can be seen from equation (6.5) the process variable difference is used (instead of the error difference) in the differential component of the equation (compare eq. 6.4 and eq. 6.5). In other words the tendency of the process variable is calculated in the differential component, but not the changes in the Set Point of the PID controller. The industry employs integrating control valves. For such purposes the so called Delta – PID algorithm is used. In fact this Delta – PID algorithm can be derived by differentiating of equation 6.5: T T ∆u n = k r ∆ε n + s ε n − d ( ∆pv n − ∆pv n−1 ) Ti Ts (6.6) where ∆pvn = pvn-pvn-1 is the process variable difference for moment n Ts ∆pvn-1 = pvn-1 - pvn-2 is the process variable difference for moment (n-1) Ts pvn is the process variable at the moment n Ts pvn-1 is the process variable at the moment (n-1) Ts pvn-2 is the process variable at the moment (n-2) Ts and the rest of the abbreviations are the same as above. This algorithm is referred to as Velocity PID algorithm. 6.4.2.2. Entering PID Data Each PID controller occupies 20 V-cells with consecutive numbers. If n is the number of the first V-cell (the Process Variable), the rest of the cells are arranged as shown in the Table below (also refer to Fig. 6.83): Table 6.3 V-cell Field Description Vn Process Variable Current value (pv) Vn+1 Set Point Target (sp) Vn+2 KID Neuro PLC – User’s Manual Unbalance, error 6-73 Table 6.3 Cont. Vn+3 UP Dev Upper deviation (upper dead band limit) or upper dead zone limit Vn+4 DN Dev Lower deviation (lower dead band limit) or lower dead zone limit Vn+5 UP Alarm Upper alarm Vn+6 DN Alarm Lower alarm Vn+7 Ts [x0,1s] Sampling time; the controller cycle Vn+8, Vn+9 Kr - float Controller gain (floating – point) Vn+10, Vn+11 Ti[s] - float Isodrome time (floating – point) Vn+12, Vn+13 Td[s] - float Advance time (floating – point) Vn+14 OUT Controller Output u Vn+15 dOUT Delta output (value at the output for one controller cycle), i.e. ∆u Vn+16 |dOUT| Absolute value of the delta output (no sign) Vn+17 Out UP Range Upper limit for OUT or dOUT Vn+18 Out DN Range Lower limit for OUT or dOUT Vn+19 Flags Flags After the PID controller is selected from the buttons bar, and after its number is entered, the PID Dialog box is displayed on the screen (Fig. 6.83). Fig.6.83 6-74 KID Neuro PLC – User’s Manual As shown in Fig. 6.83 the Dialog Box appears with the following default settings (subject to the edition to follow): - Set Point =0 - Ts = 0,3 s being the smallest controller cycle - Kr =0 - Ti =0 - Td =0 - Out VP Range = 32767 being the max upper range (also refer to Fig. 6.84) - Out DN Range = -32768 being the min low range (also refer to Fig. 6.84) - UP Alarm = 32767 being the max upper alarm (also refer to Fig. 6.85) - DN Alarm = -32768 being the min low alarm (also refer to Fig. 6.85) - UP Dev = 0 (also refer to Fig. 6.85) - DN Dev = 0 (also refer to Fig. 6.85) It is recommended to enter the PID controllers in series under the lowest possible number, say PID No. 1. The data into the first V-cell of the set of 20 V-cells allocated to the PID controller is entered into the field marked as Process Variable (refer to Fig. 6.83). This cell will store the current value of the variable which is subject to control. The value of the Set Point is set into the field marked as Set Point. This value must be within the range from -32768 to 32767. If the Analog mode is selected in the Output Mode field, the upper and the lower limits apply to the output (Flags. ∆U/U = 1). In case the Valve mode is selected, the upper and the lower limits apply to the delta output (Flags. ∆U/U = 0). Also refer to Table 6.4, which shows that this is bit 8 of Vn+19 cell. The PID controller constants are entered in the fields of the PID Constants table. The PID sampling time Ts is entered (unit: seconds) into the field marked as Ts[x 0.1 s]. This Vcell must be used as the Set Point integer operand of the Functional Block TIMER (refer to subsection 6.3.1. and Fig. 6.17). This TIMER with Time Base 100ms will be used to calculate the Controller. The value must be an integer within the range from 3 to 32767 which corresponds to a time value Ts from 0,3 s to 3276.7 s. The gain kr is entered into the field marked as Kr – float. It is entered as a number in floating – point format hence it occupies two V-cells with consecutive numbers. The isodrome time Ti is entered (units: seconds) in the field Ti [s] – float. It is entered as a number in floating – point format hence it occupies two V-cells with consecutive numbers. The differentiation time – constant (advance time) Td is entered (units: seconds) into the Td[s] – float field. It is entered in floating – point format hence it occupies two consecutive V-cells. The upper and the lower alarms are entered in the fields of the PID Alarms table (refer to Fig. 6.83). The upper alarm is entered into the UP Alarm field and must be within the range from –32768 to 32767. When the current value of the process variable becomes equal to the set upper alarm value, the only effect will be to set the upper alarm bit in the Flags V-cell to logic 1 (also refer to Fig. 6.85 and Table 6.4). The lower alarm is entered into the DN Alarm field and must be within the range from –32768 to 32767. When the current value of the process variable becomes equal to the set lower alarm value, the only effect will be to set the lower alarm bit in the Flags V-cell to logic 1. KID Neuro PLC – User’s Manual 6-75 The relationship Set Point / Deviation Limits / Alarm Limits is shown in Fig. 6.85. The upper and lower limits of the controller output or of the controller Delta output are entered into the fields of the PID Output Ranges table (bottom – left side in Fig. 6.83). The value of the upper limit of the output / delta output is entered into the Out UP Range field and must be within the range from -32768 to 32767. Out UP Range sets the upper limit of the acceptable range of the output / delta output values of the PID controller (Fig. 6.84.) The value of the lower limit of the output / delta output is entered into the Out DN Range field and must be within the range from -32768 to 32767. Out DN Range sets the lower limit of the acceptable range of the output / delta output values of the PID controller (Fig. 6.84). Fig. 6.84 Note: Do not forget to enter the values for the upper and the lower limit of the Output / Delta Output because the PID controller will not be able to operate! In case no such limits are necessary, leave the default settings 32767and –32768 respectively for the upper and the lower limit. The upper and lower deviation values are entered into the fields of the PID Deviations DEAD BAND fields (Fig. 6.83). The difference between the upper and the lower deviation values is referred to as DEAD BAND (Fig. 6.85). Fig. 6.85 When the difference between the target (Set Point) and the current value (Process Variable) is within the range defined by the upper and the lower deviation (Dead Band), the (output value of the) PID controller is not calculated, which means that dOUT = 0, and OUT does not change its value. 6-76 KID Neuro PLC – User’s Manual The value of the upper deviation is entered into the UP Dev field within the range from 0 to 32767 relevant to the target (Set Point). UP Dev limits from above the Dead Band in which the PID controller output remains unchanged, and in which the delta output is set to 0. When the current value (Process Variable) overshoots the target (Set Point) by a value equal to UP Dev, the upper deviation bit in the flags cell (Flags.UPDEV) is set to logic 1 and the calculation of the PID controller is started. The value of the lower deviation is entered into the DN Dev field within the range from 0 to 32767 relevant to the target (Set Point). DN Dev limits from below the Dead Band in which the PID controller output remains unchanged, and in which the delta output is set to 0. When the current value (Process Variable) falls below the target (Set Point) by a value equal to DN Dev, the lower deviation bit in the flags cell (Flags.DNDEV) is set to logic 1 and the calculation of the PID controller is started. IMPORTANT NOTES: a. The setting value of UP Dev limit must be always in accordance with the following relationship (see Fig. 6.85): Set Point + UP Dev < 32767 b. The setting value of DN Dev limit must be always in accordance with the following relationship (see Fig. 6.85): Set Point – DN Dev > -32768 It is important to remember that when the current value of the process variable is within the DEAD BAND limits the PID controller is not calculated and - Flags.bit UPDEV = logic 0 (refer to Table 6.4 and Table 6.5) - Flags.bit DNDEV = logic 0 (refer to Table 6.4 and Table 6.5) - dOUT = 0 (refer to equation 6.5) - OUT (the controller output) does not change its value (refer to equation 6.5) - The accumulated value of the integral component of the equation remains unchanged. After the file of the PID controller is filled in, click on the OK button in order to enter the file. The programmer will display an error message in case an improper constant or value had been entered and the file will not be accepted. A sample of a file is shown in Fig. 6.86. Fig. 6.86 KID Neuro PLC – User’s Manual 6-77 The bits of the Flags V-cell (i.e. Vn+19 cell – see Table 6.3) are allocated as shown in Table 6.4. Table 6.4 15 14 MNAUT AUTUN W/R W/R 13 12 * * 11 10 9 8 DFMOD READY START ∆u or u W/R R W/R W/R 7 ∆u < 0 R 6 5 4 3 2 1 0 ∆u > 0 DNRNG UPRNG DNALM UPALM DNDEV UPDEV R R R R R R R * unused bit; R – read – only bit; W/R – write/read bit The detailed description of each Flags.bit is outlined as follows: Bit No. 0. This bit is at logic 1 when the current value of the process variable has overshoot the Set Point value by a margin larger than the upper deviation value set in the UP Dev V-cell (also refer to Fig. 6.85). Bit No. 1. The bit is at logic 1 when the current value of the process variable has fallen below the Set Point value by a margin larger than the lower deviation value set in the DN Dev V-cell (also refer to Fig. 6.85). Bit No. 2. This bit is at logic 1 when the current value of the process variable is above the value set in the UP Alarm V-cell (also refer to Fig. 6.85). Bit No.3. This bit is at logic 1 when the current value of the process variable is below the value set in the DN Alarm V-cell (also refer to Fig. 6.85). Bit No. 4. This bit is at logic 1 when the value of the output / delta – output is above the value set in the OUT UP Range V-cell (also refer to Fig. 6.84). Bit No. 5. This bit is at logic 1 when the value of the output / delta – output is below the value set in the OUT DN Range V-cell (also refer to Fig. 6.84). Bit No. 6. This bit is at logic 1 when the value of the delta – output is positive. Bit No. 7. This bit is at logic 1 when the value of the delta – output is negative. Bit No. 8. When this bit is at logic 1: the upper and the lower Range limits apply to the output u. When this bit is at logic 0: the upper and the lower Range limits apply to the delta – output ∆u. Bit No. 9. A single calculation of the PID controller is executed when this bit is changed from logic 0 to logic 1. Typically this bit is used as output of the TIMER functional block. Bit No. 10. The PID Controller is ready with the output / delta – output calculation when this bit is changed from logic 0 to logic 1. This bit must be used for control of the control valve circuits. 6-78 KID Neuro PLC – User’s Manual Bit No. 11. a. When the bit is at logic 0: The differential component of the equation (6.6) is calculated in an ordinary way, i.e. the differential part An = Td [∆pv n − ∆pv n−1 ] Ts (6.7) where An is the value of the differential part for the moment n Ts ∆pvn = pvn - pvn-1 ∆pvn-1 = pvn-1 - pvn-2 Therefore the delta – output of the PID controller is calculated in accordance with equation (6.6). b. When the bit is at logic 1: The differential component of the equation (6.6) is calculated as follows: the differential part Bn = A n + B n−1 2 (6.8) where Bn is the B value calculated according eq. (6.8) for the moment n Ts An is the A value calculated according eq. (6.7) for the moment n Ts Bn-1 is the B value calculated according eq. (6.8) for the moment (n-1) Ts The above calculation (eq. 6.8) is referred to as sliding average calculation and the PID controller delta – output will be given by the following equation: T ∆u n = k r ∆ε n + s ε n − B n Ti (6.9) Bit No. 12. – unused Bit No. 13. – unused Bit No. 14. – Auto – Tune procedure a. When the bit is entered as logic 1: The Auto – Tune procedure is initiated – if beforehand the bit No. 15 is raised to logic 1. Note: There is an additional Auto – Tune Limitation Tool in the programmer, i.e. this tool has to be used when Auto – Tune procedure must be initiated. When the Auto – Tune procedure is completed this bit is set to logic 0. b. When the bit is entered as logic 0: The Auto – Tune procedure is seized. Bit No. 15. a. When the bit is entered as logic 1: Manual mode of Plant control b. When the bit is entered as logic 0: Automatic Plant control KID Neuro PLC – User’s Manual 6-79 As opposed to the fixed control reference used in the positional algorithm, here, the calculation of current control uses the previous control value as reference. In fact, the control is calculated as a change, hence the term velocity form. 6.4.2.3. Practical Considerations The equation 6.4 is normally called a textbook PID algorithm and many experienced engineers dislike it. This is because the differential component contains set – point and changes in set – point may cause an unwanted change in the PID controller output. So by removing the set – point from the differential component we get the enhanced positional PID algorithm in discrete form as shown in equation (6.5). The most sophisticated algorithm we are using is the so-called enhanced velocity algorithm as shown in equation (6.6). This is a still better PID algorithm. This algorithm is referred to as Delta algorithm. Whenever possible the Delta algorithm should be used. With this velocity PID algorithm, because it does not make use of a sum of errors to generate integral action, the problem of integral windup will not occur. One important aspect is the choice of the sampling intervals Ts. There are many textbooks dealing with this problem. Some rough guidelines regarding the choice of the sampling times are as follows: - for flow and pressure loops 0.3 s to 1 s - for level loops 1 s to 5 s - for temperature loops 3 s to 10 mins The next example will show the practical steps for generation and tuning of a PID controller program. Example 6.19: Generate and tune a PID controller program for the temperature loop of a Temperature Oven for heat – treating as shown in Fig. 6.87. The oven is heated by an electrical heater, controlled by an Electronic Control Circuit with a 0-20 mA control input signal. The temperature is measured by a transmitter with 0 to 1000 °C range and 4 to 20 mA output. Fig. 6.87 6-80 KID Neuro PLC – User’s Manual Solution: The above configuration may be simplified as follows: Fig. 6.88 Step 1. The transmitter output signal Ix must be digitized, therefore this signal is applied to the KID Neuro PLC’s ADC (Analog-to-Digital Converter) – Fig. 6.89. Fig. 6.89 The value N201 allocated in the V201 cell is illustrated in Fig. 6.90. The V201 cell is assigned to the ADC 1 output. Fig. 6.90 Obviously certain scaling procedures are necessary. Actually they are not absolutely required at this stage, since this scaling can be accomplished by a specialized Industrial Software package at the Control Operator’s Station (Industrial Software KID VIEW 32 HUMAN / MACHINE INTERFACE). However, for training purposes we will show how the scaling can be accomplished at this stage. KID Neuro PLC – User’s Manual 6-81 Step 2. The graph shown in Fig. 6.90 should be translated as shown in Fig. 6.91. This translation can be accomplished by using the Subtract Functional Block (refer to subsection 6.3.8.). The value N1 allocated in V1 cell is illustrated in Fig. 6.91. Fig. 6.91 Step 3. For easy man – machine communication the coefficient of proportionality K in the equation N1 = K θx must be “1” or denary multiple of “1”, i.e. 10 or 100, etc. From Fig. 6.91 follows, that this coefficient is K1 = 26213 = 26.213 1000 Consequently, by dividing N1 by 26.213 we can obtain the value of this coefficient to be “1”, but division by floating – point number requires implementation of Mathematical Functions, which are designated for more complex calculations. For such simple operation it is preferable to use DIVIDE Functional Block, but it operates with integers only. Therefore we first multiply N1 by 1000 (integer!) using MULTIPLY Functional Block. Fig. 6.92 and then divide the content of V2 cell by 26213 (integer!): 6-82 KID Neuro PLC – User’s Manual Fig. 6.93 Thus the complete process information flow – chart will appear as shown in Fig. 6.94. Fig. 6.94 The scaled process variable value is moved from V4 cell to Vn-cell, which is the PID controller input V-cell (refer to Table 6.3). A MOVE Functional Block is used for this purpose. The Vn+14 cell contains the information about the PID controller output value – refer again to Table 6.3. This information must be moved to V401 cell, which is assigned to DAC1 (Digital-toAnalog Converter) input. A MOVE Functional Block is used for this purpose. NOTE: The operation “MOVE Vn+14 → V401” must be executed only after the PID controller is ready with the output. Therefore the control input of the MOVE functional block is enabled by 10th bit of V-cell Vn+19 – refer to Table 6.4. KID Neuro PLC – User’s Manual 6-83 Step 4. As seen from Fig. 6.94 we refer already to some V-cells which are assigned to the PID controller. Therefore we have to decide about the PID controller’s Vn cell. With reference to reliability let us choose V300 as the first PID controller V-cell. According to Table 6.3 automatically 20 V-cells will be occupied for the PID controller (V300 to V319), each V-cell assigned to a particular PID controller function / designation as described in Table 6.3. Step 5. As already explained the calculation of the PID controller is executed by the START (logic 1) signal (9-th bit of Vn+19 cell – refer to Table 6.4). Therefore this 9-th bit must be activated by a time sequence unit, i.e. by a sampling time generation unit. Such unit is the TIMER functional block (subsection 6.3.1.) acting as a Pulse Generator as explained in Fig. 6.21 and Fig. 6.22. The Set Point operand of the Timer will be entered in Vn+7 (i.e. V307) when programming the PID controller – refer to Fig. 6.86 and Table 6.3. The TIMER output will control the 9-th bit of Vn+19 cell assigned to the PID controller. Step 6. In case the bit No. 11 of Vn+19 (i.e. V319) cell is not activated (i.e. it is at logic 0) the PID controller will calculate the differential component in an ordinary way as per equation (6.7). If we want to work in average sliding calculation format (i.e. according equation (6.8)), then the bit No. 11 of V319 cell must be activated (i.e. at logic 1). Thus the initial supporting program for the PID controller may be generated as shown in Fig. 6.95. 6-84 KID Neuro PLC – User’s Manual Fig. 6.95 First thing now is to save the above program in your Hard Disk! Now we can start with the generation of PID controller function in addition to the program in Fig. 6.95. Step 7. 7.1. Click Function button on Kidbar – the menu of functions appears. 7.2. Click Pid function – the PID Regulator No. window appears with the option of selection of 6 PID controllers. Select and click No.1 – the Dialog Box appears as shown in Fig. 6.83. 7.3. Enter V300 in Process Variable field – automatically all V-cells (V300 through V319) appear in the relevant fields in accordance with Table 6.3. The following V-cells do not appear: V9, V11, V13 and V16. Why? – In order to answer refer to Table 6.3! The next entries are subject to specific requirements of the process, the philosophy of the regulation and the experience of the programming operator. There are many textbooks dedicated to this subject, so the programming operator is referred to such technical literature. KID Neuro PLC – User’s Manual 6-85 For the example shown in Fig. 6.87 we proceed as follows: 7.4. Enter 500 in the Set Point field, i.e. 500°C target. 7.5. Select Analog in the Output Mode field since the process output is 4 - 20 mA. 7.6. Enter 30 in the Ts field for 3 s sampling time. 7.7. Enter 200 in the Kr – float field for the gain. 7.8.Enter 30 in the Ti – float field for 30 s isodrome time. 7.9. Enter 7.8 in the Td – float field for 7.8 s differential time-constant. 7.10. Enter 32000 in the Out UP Range for upper limit of the PID controller output (refer to Fig. 6.84). 7.11. Enter 6554 in the Out DN Range for lower limit of the PID controller output (refer to Fig. 6.84). 7.12. Enter 900 in the UP Alarm field for 900°C upper alarm level (refer to Fig. 6.85). 7.13. Enter 300 in the DN Alarm field for 300°C lower alarm level (refer to Fig. 6.85). Now we have to determine the DEAD BAND of the PID controller (refer to Fig. 6.85). Taking into account that the PID Controller is not calculated when the process variable is inside the Dead Band we choose ± 1°C Dead Band. Therefore 7.14. Enter 1 in the UP Dev field. 7.15. Enter 1 in the DN Dev field. Thus the Dialog Box is completed – Fig. 6.96. Fig. 6.96 Now click OK button to enter the program – the complete circuit appears as shown in Fig. 6.97. 6-86 KID Neuro PLC – User’s Manual Fig. 6.97 So, you have a complete program for the temperature control of a heat – treating oven. This program has been designed based on your knowledge about the process. This is the Design Version of the program. This is the program you are going to save to KID Neuro PLC. But before saving to KID Neuro PLC the program MUST be saved in your Hard Disk!!! Therefore, next step MUST be Step 8. SAVE THE DESIGN VERSION OF THE PROGRAM IN YOUR HARD DISK! The reason for doing this can be explained in short as follows: During the tuning and debug procedures, as well as during the regular execution of the program certain changes in the initially set values and constants may take place. Therefore when re – loading the program from the PLC it may differ drastically from the original Design Version. Now you can save (load) the program to the PLC: Step 9. KID Neuro PLC – User’s Manual 6-87 Click File and select Save to Controller option – the Save to PLC Dialog Box appears as shown in Fig. 6.98. Fig. 6.98 Click PLC Mode and select Program mode. Click Save to PLC button – wait some time, necessary for loading: Writ in flash Window appears. Click OK to execute saving to PLC. Delete the Save to PLC window. Click PLC Services and select PID Screen – the Dialog screen appears with the graphs of: process variable PV; set point SP; PID output OUT and PID delta output dOUT. Now select the colours, the scaling and the timing of the graph according your convenience and preference. Select PLC WORK mode – MANUAL CONTROL. By entering proper values for PID output into the Manual Control PID Out field trail smoothly the process variable value towards the set – point value. 6-88 KID Neuro PLC – User’s Manual IMPORTANT: You will see, that the constants and ranges, which appear on the right-hand side of the Dialog Box are equal to those saved to the PLC according the program shown in Fig. 6.96. However these constants may be not necessarily the most adequate constants for our temperature loop (the Plant), i.e. your Plant Identification was not completely perfect. The tuning of a controller for a new plant can be tedious and time consuming. Don’t worry! Industrial Software has supplied you with an extraordinary intelligent tool for tuning. This is the Auto Tuning Tool! Step 10. After you did trail (by Manual mode) smoothly the process variable close to the Set Point value Click Start Auto Tuning (Manual mode of operation). Your intelligent Auto Tuning Tool will “sense” the Plant (the process) and will provide you automatically with the relevant constants. This “sensing” of the process is accomplished by six oscillations as shown in Fig. 6.99. Due to the scale factors, the graphs shown in Fig. 6.99 are as follows: - the lowest graph is the set – point - the second graph is dOUT - the process variable is represented by the third graph - the most upper graph represents the PID controller output value. The process of auto tuning is indicated by floating strips in the field below the Start button. After six oscillations the auto – tuning procedure is completed, new constants appear in the relevant fields at the right-hand side of the Dialog Box. Step 11. After the Auto Tuning procedure is completed click Auto / Manual Toggle Switch to turn to Auto mode of operation. In order to save the new constants as a result of the Auto Tuning it is advisable to follow the procedures: a. In case the PID Function Program involves some of V300-V400 cells - Save Design Program to Hard Disk - Save Design Program to PLC - Accomplish Auto Tuning procedure !!! Don’t reset the PLC - Load the Design Program from the Hard Disk - Enter in the Design Program the actual Auto Tuning constants (This is the Execution Program now!). - Save the Execution Program to Hard Disk - Save the Execution Program to PLC b. In case the PID Function Program doesn’t involve V300-V400 cells - Save the Design Program to Hard Disk - Save the Design Program to PLC KID Neuro PLC – User’s Manual 6-89 - Accomplish Auto Tuning procedure - Load the Design Program from the Hard Disk - Enter into Design Program the Auto Tuning constants - Save the Execution Program to Hard Disk Fig. 6.99 6.4.3. Communication Functions (CF) The communications between the local network subscribers are based on the principle known as TOKEN PASING and are entirely democratic. Each PLC is provided with access for a specified period of time for executing the communication functions as requested in the program – EVENT DRIVEN communication. The execution of the CF is completely asynchronous in terms of the logic program and is synchronised by the Execution conditions and by the R/Y for execution. The communication between two PLCs is executed via the network – Fig. 6.100. 6-90 KID Neuro PLC – User’s Manual Fig. 6.100 For the example shown in Fig. 6.70 the data are transferred from PLCp (referred to as Source PLC) to PLCq (referred to as Target PLC). A. The communication can be initiated by PLCp – i.e. the PLCp is acting as INITIATOR, while the Target PLCq is acting as RESPONDER. In this case the Communication Function generated for the Initiator tells: - What kind of information (logic or integer operands) available in the memory of the Source PLCp - Under what conditions (Event Driven!) - To be transferred, i.e. to be written - Into the memory of the Target PLCq In this case CF WRITE is utilized. IMPORTANT: After the CF is executed the Responder replies by a confirmation execution signal, or an error signal takes place. B. The communication can be initiated by PLCq – i.e. the PLCq is acting as INITIATOR, while the Source PLCp is acting as a RESPONDER. In this case the CF generated for the Initiator tells: - What kind of information (logic or integer operands) available in the memory of the Source PLCp - Under what conditions (Event Driven!) - To be obtained, i.e. to be read by PLCq - From the memory of the Source PLCp In this case CF READ is utilized. IMPORTANT: After the CF is executed the Responder replies by a confirmation execution signal, or an error signal takes place. The communication functions allow for the data exchange between the local network subscribers. Up to 8 communication functions may be included in an user program. The highest number of integers which may be transferred from one controller to another with a single communication function is 25, and the maximum number of logic operands is 400. The communication functions are as follows: - Comm. Write - Comm. READ KID Neuro PLC – User’s Manual 6-91 6.4.3.1. Comm. WRITE Communication Function The CF transfer the data stored in the memory of the source controller where the CF itself is resident, into the memory of the target controller whose number is set in the function file. Representation: Fig. 6.101 - О1 - condition; - О2 - R/Y for execution; - О3 - R/Y for error; - О4 – the first of the successive logic or integer operands which will be transferred and stored in the target controller; - О5 – the first of the successive logic or integer operands in the memory of the target controller where the data will be stored; - C – CF number; - N – number of the target controller; - L – number of logic operands (or the number of the bytes) subject to the transfer. Entering: Select the Comm. WRITE from Кidbar. A list is displayed from which to choose the function number. Position the cursor on the desired number. The file of the Comm. WRITE communication function is displayed on the screen (Fig.6.102). Note: Its is recommended to enter the communication functions in series with the smallest possible number. Fig. 6.102 Enter the target controller number in the Write to Controller No. field. Select a number from 1 to 32 or BROADCAST (the relevant data are stored in all controllers within the network). 6-92 KID Neuro PLC – User’s Manual The execution condition (logic operand X, Y or R) is entered into the Condition field. The first of the series of logic or integer operands which must be transferred to the target controller is entered into the Start Read from (X/Y/R/V) field. A logic operand is entered in the Info Err: (R, Y) field, which operand is set to 1 in case of an improper execution of the CF. The number of logic operands (in case X, Y or R are read) or the number of the bytes (if read from V-cell) subject to the transfer operation is set into the Length field. Select the type of the Length field by clicking on the Operands / Bytes button – number of operands or number of bytes. The button is toggled by clicking. The R/Y for execution (logic operand R or Y) is entered in the Result (R/Y) field. In case the CF will operate with integer operands, the starting V-cell of the target memory block is entered into the Start Write from field. In case the CF will operate with logic operands (X, Y or R), the first logic operand of the target memory block is entered into the Start Write from field. After entering the data click ОК button to enter the communication function. In case of errors (for instance an integer operand has been entered into a field allocated to logic operands, in case the number of the operands (or of bytes) is larger than the highest permissible number, and others) the CF file will not be entered and error messages are displayed on the screen to indicate the improper entries. Example 6.20: Enter a Comm. Write function under No. 1. Complying with condition R77, the function must write the status of 16 internal relays (R1 - R16) into the user memory of controller No. 27 (Y17 Y32). The logic operand for execution is R40. The error message is R41. Solution: The file of the CF must be filled in as shown on Fig. 6.103. Fig. 6.103 KID Neuro PLC – User’s Manual 6-93 6.4.3.2. Comm. READ Communication Function The function reads from a source controller whose number is set in the function file, and stores the data in the memory of the controller by which the execution of the function was requested. Representation: Fig. 6.104 - О1 - condition; - О2 - R/Y for execution; - О3 - R/Y for error; - О4 – the first of a series of logic or integer operands whose contents will be read from the source controller; - О5 – the first of a series of logic or integer operands in the memory of the controller by which the function was requested and in which the data as read will be stored; - C – CF number; - N – number of the source controller; - L – number of logic operands (or number of bytes) slated for data exchange. Entering: Select the Comm. Read function from the buttons bar. A sample of the communication function is displayed with a field located to the right of it which is used to enter the function number. Click on this field with the mouse to open a list with the 8 possible communication function numbers. Position the cursor and click on the desired CF number. The file of the Comm. Read function is displayed on the screen (Fig.6.105). Note: It is recommended to enter the communication function in series with the smallest possible free number. Fig. 6.105 6-94 KID Neuro PLC – User’s Manual The number of the source controller is entered into the Read from Controller No. field. The numbers from 1 to 32 are available. The condition for execution (logic operand X, Y or R) is entered into the Condition (X, Y or R) field. The first of the series of logic or integer operands whose contents will be read from the source controller, is entered into the Start Read from (X/Y/R/V) field. The R/Y for error (a logic operand which is set to 1 in case of an improper execution of the CF) is entered into the Info Err: (R, Y) field. The number of logic operands (if read from X, Y or R) or the number of bytes (if read from V-cell) subject to transfer operation is entered into the Length field. Click the Operands / Bytes button to select the type of the Length field – number of operands or number of bytes. The status of the button is toggled clicking. The R/Y for execution (logic operand R or Y) is entered into the Result (R or Y) field. The first of the series of the logic or integer operands in the memory of the target controller (from which the function was requested) is entered into the Start Write to (X/Y/R/V) field. After the file is filled in press <Enter> or click on the ОК button. In case of errors (for instance an integer operand has been entered into a field allocated to logic operands, in case the number of the operands (or of bytes) is larger than the highest permissible number, and others) the CF file will not be entered and error messages are displayed on the screen to indicate the improper entries. Example 6.21: Enter a Comm. Read function under No. 1. Complying with condition X12, the function must read the contents of 4 V-cells with numbers from V66 to V69 from controller No. 1 (V66 – V69). The logic operand for execution is Y5. The error message is Y6. The data to be entered in V9 – V12. Solution: The file of the CF must be filled in as shown on Fig. 6.106. Fig. 6.106 KID Neuro PLC – User’s Manual 6-95 6.5. ENTRY OF COMMENTARIES A commentary may be entered in the following manner: - Click with the left mouse button on the number of a step of the user program to open a dialog box used to enter the commentary. - Type in the text using the alphanumeric keys. - Press <ENTER> or click OK to attach the commentary to the respective circuit. Editing of commentaries: - Double-click with the left mouse button on the commentary to open a dialog box. - Edit or delete the whole text, as desired. - Press <ENTER> or click on ОК to confirm the changes. Commentaries are illustrated in Fig. 6.97. 6.6. USER NAMES The user names represent identifiers of logic or integer operands or V-cell bits. Entering of user names Click Tables and select Cross Reference Table menu to open a dialog box (Fig. 6.76) with the following TAB CONTROL files: - Integer Variables – enter user names for V-cells. - Long Variables – enter the name of two adjacent V-cells used to store a 32-bit figure (for instance the result of the execution of the DIVIDE block). The first cell only is set into the file. - Float Variables – enter the name of two adjacent V-cells. The names may be used for instance in a PID controller. - Bit Variables – enter the names of V-cell bits. - Constant – enter user names to mark fractional figures or figures within the following intervals: From 0 to 65535 – figures without a sign; From -32768 to 32767 – figures with sign; 6-96 KID Neuro PLC – User’s Manual Fig. 6.107 By clicking the right mouse button in the field for editing the following menu is displayed: ADD – add name; Delete – delete selected name. The standard name of the operand (for instance V1, R2 etc) or a figure (when using constants) is entered in the Standard name field. Enter the respective user name in the User name field. The fields used to enter user names are displayed by clicking the left mouse button with the cursor positioned over the icon indicating the current line. The user names may be visualized by using the View \ View by User names menu. The list of user names may be used when entering ladder circuits from the fields allocated for operands. The list of the entered names is displayed by selecting the arrow button located to the right of the respective field. Example 6.22: Generate the program shown in Fig. 6.95 by using user names for some of the operands. KID Neuro PLC – User’s Manual 6-97 Solution: Step 1. Prepare your draft table for the abbreviations to be used for the user names, for example (refer to Fig. 6.95): a. For integer variables - V1 SCL1 pV - V2 no user name - V4 pv 1000°°C for pv from 0°C to 1000°C - V6 TMR VAR for TIMER variable - V201 ADC 1 for ADC 1 output - V300 PID IN for PID input - V307 SMPL TIME for PID Sampling Time - V314 PID OUT for PID output - V401 DAC IN for DAC input for scaling procedure 1 for pV b. For Bit variables - V319.9 PID START for 9 th bit of V319 cell - V319.10 PID READY for 10 th bit of V319 cell - V319.11 AVR.SLD.CAL for Average Sliding Calculation c. For Constants - 6553 4 mA for offset of 4 mA (see Fig. 6.90 and 6.91) - 26213 FULL RANGE for the range as per Fig. 6.93 Step 2. Now you can start to fill in the Cross Reference Table. A. Select Integer variables - Click the table field with the right mouse button – the menu ADD / Delete appears. - Click ADD option – the Undefined fields appear on the top, below Standard Name title and below User Name title. - Click Undef below Standard Name and enter V1. - Click Undef below User Name and enter SCL1 pv. - Click again the right mouse button and click ADD - Enter V4, respectively pV 1000°C as above. Proceed similarly up to V401 – the entries are illustrated in Fig. 6.108. 6-98 KID Neuro PLC – User’s Manual Fig. 6.108 B. Select and click Bit Variables Enter the corresponding standard names and user names according your table (Step 1.b). C. Select and click Constants Enter the corresponding standard names and user names according your table (Step 1.c). Now click OK to complete the Cross Reference Table. Step 3. Generation of the ladder program - Click Load and call Subtract functional block. - Click O1 field and then click the arrow to see a list of operands similar to your entries into the Cross Reference Table. - Select and Click V1 – SCL1 pV – it appears in the field. - Click O2 field and then click the arrow to see the relevant choice of operands as per your Cross Reference Table. - Select and Click 6553 – 4 mA constant – it appears is the field. - Click O3 field and proceed in the similar way. KID Neuro PLC – User’s Manual 6-99 IMPORTANT NOTE: After entering the functional block the mode of representation of the operands will depend on the View mode. Click the View menu – a list of options appears. By selecting View by Standard names or View by User names the presentation of the operands in the functional block will appear by standard names or by user names. Proceed similarly to complete the generation of the program – see Fig. 6.109. Fig. 6.109 6-100 KID Neuro PLC – User’s Manual 6.7. PID SMOOTH MANUAL-TO-AUTO MODE TRANSITION Consider the following case: The process Set-Point value is 1000°C. For some reason the process variable has been pulled down to 500° by using MANUAL control mode. After switching – on AUTO mode the process variable will become subject to abrupt pull-up ahead 1000°C. Some processes can not afford or can not tolerate or can not sustain such sharp changes of the process variable. There are two ways to tackle the problem. Option 1 Being on MANUAL mode pull up smoothly the process variable towards the Set Point value 1000°C by entering reasonable values for PID OUTPUT (refer to Fig. 6.99, the field PID Out). When the process variable reaches the Set Point value 1000° switch on AUTO mode. Option 2 Before starting the MANUAL control mode manipulation arrange the logic “When MANUAL make SP = pv”, i.e. to “tie up” the Set Point to the process variable. With this arrangement during the MANUAL mode operation the Set Point value will follow strictly the process variable, therefore any moment you switch on AUTO mode there will be no abrupt change of the process variable value. When switching on AUTO mode the Set Point value will remain constant and equal to the SP value at the moment of switching AUTO. In order to restore the SP = 1000°C value smoothly pull up the SP value by entering reasonable value for Set Point (refer to Fig. 6.99, the extreme top right field). The logic “When MANUAL make SP = pv” can be accomplished if the program shown in Fig. 6.110 is added to the program of Fig. 6.97. Fig. 6.110 KID Neuro PLC – User’s Manual 6-101 6.8. SPECIFICS OF PROGRAMMING IN CASE OF POWER SUPPLY FAILURE In case of a power supply failure the controller processor stops the scanning of the outputs and the generation of signals to the external system. The preservation of the important data in case of a power supply failure is a major problem which has to be resolved by the user. Most of the technological processes allow the operation to be continued without any operator interference after the power supply is restored. Sometimes however it is possible that the beginning of the new scanning cycle of the controller will result in an unwanted operation. In order to avoid the occurrence of unwanted operations and out of safety considerations, the user program must be designed to perform processing of major parameters in case of a power supply failure. In all cases however it is necessary to store the more important information on a protected RAM-type memory. With the KID NEURO PLC, the user program and the data may be stored permanently due to the presence of an emergency battery back-up and 256 internal relays (R1 - R40 - volatile, R41 - R256 - nonvolatile) used for the storage of intermediate results. In case of power supply failure the state of the non-volatile relays is preserved in the RAM internal memory. The volatile relays are reset when the controller is restarted. Thus the user is provided with the option not only to preserve the important data, but also to obtain information about the absence of power supply by monitoring the state of specific internal volatile variables – an example is shown in Fig.6.111. Fig. 6.111 The external fluctuations of the power supply and its setting time do not affect the operation of the controller. After the power supply is restored, the controller initiates a new scanning cycle only after the power supply voltage has reached its nominal ratings, which means at least 19 V. 6-102 KID Neuro PLC – User’s Manual CHAPTER 7 MENU FILES 7.1. FILE MENU COMMANDS 7.2. EDIT MENU COMMANDS 7.3. VIEW MENU COMMANDS 7.4. PLC SERVICES MENU COMMAND 7.5. INTERFACE MENU COMMANDS 7.6. EDIT TYPE MENU COMMANDS 7.7. EDIT COMMENTARY MENU COMMANDS 7.8. TABLES MENU COMMANDS 7.9. WINDOW MENU COMMAND 7.10. HELP MENU COMMAND 7.11. BUTTONS TOLL BAR MENU COMMANDS 7.12. MAIN BUTTONS STRIP 7.13. LADDER COMMANDS QUICK ENTRY KEYS KID Neuro PLC – User’s Manual BASIC MENU COMMANDS The strip with the main menu commands is situated on the upper part of the main programmer window (Fig. 7.1). The commands included in these menus are similar in terms of their functional description as all other applications operating in a windows environment. The present chapter deals specially with those commands, which have a more specific description. Fig. 7.1 7.1. FILE MENU COMMANDS The File menu options are illustrated in Fig. 7.2. New Creates a new file. Contains the following submenus: - New File (*.kpp) – opens a new file for the creation of a user program for KID Neuro PLC. - New File (*.kpf) – opens a new file for the creation of a quick interrupt program for KID Neuro PLC. - New File (*.mkp) – enclosed for future developments. KID Neuro PLC – User’s Manual 7-1 Fig 7.2 Open Opens a hard disk file containing an user program or a quick interrupt program. The user program files for KID Neuro PLC have an extension .kpp while the quick interrupt program files have the extension .kpf. After selecting a File/Open command a dialog box is displayed containing the following fields: - Look in – selects the path of the file to be opened. - File name – contains the name of the file to be opened. - Files of type – selects the type of the file (extension). Save Saves the last active file (with an already selected name) on the current drive under the same name and the same directory. Save as Saves a new file or a new version on the last active file with a name, drive and directory selected by the user. After selecting the File/Save or File/Save as command a dialog box is displayed containing the following fields: - Save in – selects the directory where the new file is to be saved - File name – contains the new name of the file as selected by the user - Save as type – selects the file type (extension) Close Closes a current file. 7-2 KID Neuro PLC – User’s Manual In case changes has been made to the active file, a message “Save changes to…?” appears with the following buttons: Yes – Current changes are saved and the file is closed. No – The file is closed without saving the current changes. Cancel – Cancels the File/Close command. When an attempt is made to close an unsaved file, the File/Save is called automatically. Load From Controller Decompiles and loads an user program and a quick interrupt program from the KID Neuro PLC memory. The command requires an active connection between the personal computer and the programmable controller. The command is executed after setting: - The ID number within the communication network of the controller from which the data will be downloaded; - Controller mode (data exchange may be executed in the Program Mode only). Data are read by pressing the Load From PLC button. In case of a communication failure an ERROR COMMUNICATION is displayed on the screen. The contents of the user program and the quick interrupt are written into two separate files. Save To Controller Compiles an user program and a quick interrupt program and stores them into the memory of a KID Neuro PLC selected by the user. The command requires an active connection between the personal computer and the programmable controller. The command is executed after selecting: - The user program; - The quick interrupt program (may be omitted); - ID number in the communication network where the data is to be stored; - Controller mode (data exchange may be executed in the Program Mode only). Print Prints out the active file (an user program or quick interrupt program). Print Preview - Displays the file layout before initiating actual print-out. Print Setup – selects and set-up the printer. Check Print Font … - Displays a dialog box with alternatives for Small or Medium or Large size font selection. Print Cross Ref. Table – Prints cross-reference variables table. Print Connection Table – Prints the LonWorks network connection table for KIDD Neuro PLC. Print Indicator Table – Prints the LonWorks networks connections between the KID Neuro PLC and the View Control Panel. Convertible – Converts the current Ladder program, Connection Table and Indicator Table into the format suitable for the operation of KID Neuro PLC with LCA (LonWorks Component Architecture). The conversion file is stored into directory of the respective Ladder file and has the same name but the extension is set to .cla. KID Neuro PLC – User’s Manual 7-3 7.2. EDIT MENU COMMANDS Clicking Edit menu displays the following box: Fig. 7.3 Undo – reverses the execution of the last command. Select – shows the mode of operation for execution of a Cut, Copy or Paste command (for details see Edit Type menu). Find Operand – the command executes a successive search of a ladder program operand starting at the current step downwards towards the end of the file. The dialog box shown in Fig. 7.4 is used. Fig. 7.4 Operands info … - displays information about all operands used in the current program. Dell All commentary Alt + Del – the command deletes all commentaries in the current programs. Go To Step – the command executes a jump of the cursor within the current program by setting the step in the dialog box shown in Fig. 7.5. 7-4 KID Neuro PLC – User’s Manual Fig. 7.5 You have notice that while Select menu is not activated the following menus have been disabled: Cut, Copy, Paste and Clear Selection. After Selection is activated and a certain section of the program is selected by dragging the following menus are enabled: Cut, Copy, Paste and Clear Selection, thus you can select and then Cut or Copy or Paste the selected sector. Cut – deletes the selected portion of the ladder program and stores the selected data for use by a Copy, Paste or a new Cut command. Copy – copies the selected portion of the program. Prepares for the execution of a Paste program. Paste – displays the copied portion of the program at the point specified by the user. Clear Selection - clears the selected portion of the ladder program. IMPORTANT NOTE: The same commands can be activated by right click as explained in Edit Type menu para. 7.3. VIEW MENU COMMANDS By clicking View menu the following dialog box appears Fig. 7.6 The View menu commands hide or display the button strips. Tool bar – the buttons on this strip perform the same functions as the commands in the Standard Menu. KID Bar – buttons for entry of ladder components. Status Bar – a data line at the bottom of the screen. It indicates the size of the ladder program, the programmer mode, the current operation, etc. KID Neuro PLC – User’s Manual 7-5 The following commands are added to the View Menus when a ladder file is opened: View by Standard names – displays the program operands by using standard names: X, Y…etc. (refer also to subsection 6.6). View by User names – displays the program operands by using user names read from the menu Tables/Cross-reference Table (refer also to subsection 6.6). Output – displays information about all operands used by the current program. 7.4. PLC SERVICES MENU COMMANDS Fig. 7.7 Debug Screen – displays a window used to debug the user program. Check New Hardware – displays a window used to check the hardware of the KID Neuro PLC. PID Screen – displays a window used to set up the PID controller (refer also to Fig. 6.83). ADC Settings – displays a window used to set up linearization tables and to adjust the settings of the analog inputs. 7.5. INTERFACE MENU COMMANDS Only short descriptions of the menu items are outlined in this section. For more details related to interfacing KID Neuro PLC the user is referred to Industrial Software Manual “LonWorks Connections”. When clicking the Interface button the following menu list appears: Fig. 7.8 KIDBUS – the KIDCOM.exe is started in case KIDBUS protocol is selected. 7-6 KID Neuro PLC – User’s Manual Modem – the vsok.exe is used in case MODEM connection is established. NT KIDBUS – the RS Driver.exe in case this menu item is selected. Local Connect to LonWorks … - connect locally to LonWorks Server. Remote IP Connect to LonWorks … - connect remotely to LonWorks Server via IP (Internet Protocol). Remote NSI Connect to LonWorks… - connect remotely to LonWorks Server via NSI (Network Service Interface). 7.6. EDIT TYPE MENU COMMANDS By clicking the Edit Type menu button the following menu list appears: Fig. 7.9 There are two basic edit types: Selection and Commentary. Let’s start with COMMENTARY Edit Type First click Commentary – the sign “!” shows that Commentary edit mode is selected (and the Selection edit mode is disabled). The following edition procedures can be executed: A. Write in commentaries Generate the program shown in Fig. 7.10. Fig. 7.10 KID Neuro PLC – User’s Manual 7-7 In order to enter commentary to the first chain: Click on “1” – a Load Commentary dialog box appears. Type in the commentary, for example “input circuit” and Click OK. The commentary appears around “1” ready for accurate positioning. Position the cursor on the commentary and drag (left mouse button) the text on the relevant position, then click outside the text – the entry of commentary is completed – Fig. 7.11. For the second chain proceed in the similar way. Fig. 7.11 B. Edition of existing commentary Double click on the existing commentary displays the Load Commentary dialog box. Enter the necessary changes and click OK to complete the edition. C. Cut, Copy, Paste, Delete commentary There are two options to execute the above procedures: Option 1 – Using Edit Commentary button Click the commentary text to be processed. Click Edit Commentary button – a menu appears as shown in Fig. 7.12. Fig. 7.12 7-8 KID Neuro PLC – User’s Manual The menu items provide the following opportunities: Cut menu item – deletes the beforehand positioned (clicked) commentary and sends the deleted text into Clipboard. Copy menu item – sends the beforehand positioned (clicked) commentary into Clipboard only. Del. Commentary menu item - deletes the beforehand positioned (clicked) commentary without sending into Clipboard. Paste menu item – this menu item is activated only in case there is something available in the Clipboard, i.e. if Cut or Copy have been used beforehand. Each time Paste menu item is clicked the last Clipboard entry appears on the logic program and can be positioned by dragging on the desired place. Delete all commentary – deletes all commentaries on the logic program. !!! IMPORTANT NOTE: Each time Cut or Copy menu items are used for some commentary text, it is a MUST to copy this text somewhere in your logic program! Option 2 – Using Alternative Menu List Right click the commentary text to be processed – a menu list appears near the commentary text containing the following menu items: Cut Commentary Copy Commentary Paste Commentary Delete Commentary The above functions are similar to the description outlined in Option 1. D. Shifting commentary on new position in the same chain Click the commentary text, then press the left mouse button and drag the text at the desired place on the same logic chain. Click outside the text – the shifting is completed. E. Shifting a commentary from the chain to another chain Click the commentary text to be shifted. Press the left mouse button and drag the text (Chain A) at the desired place on the other logic chain (Chain B). Click outside the text: - The shifted commentary text appears on the “other” chain B, but it also remains on the original chain A place. - In case there was a commentary on chain B it is replaced by the shifted commentary text. The second basic edit type is SELECTION Edit Type This menu provides capability for Copy, Cut, and Paste of selected “area” of the logic program. It also provides Undo operation for error recovery. The selection of an “area” of the logic program is accomplished by dragging from topleft to bottom-right or from bottom-left to top-right. There are two options for execution of Cut, Copy and Paste edit operations. KID Neuro PLC – User’s Manual 7-9 Option 1 – Using Edit menu button. Cut command Select the corresponding “area” of operands and/or functions and/or functional blocks. Click Edit menu button – the menu list appears as shown in Fig. 7.3. Click Cut menu item – the selected “area” is deleted and is sent to the Clipboard. Important Note: Always using Cut Command inspect carefully the resulting effect on your logic program! In case the result is unsatisfactory – reject the command by using Undo and try alternative approach! Copy command Select the corresponding “area” of operands and/or functions and/or functional blocks. Click Edit menu button – the menu list appears as shown in Fig. 7.3. Click Copy menu item – the selected “area” is sent to the Clipboard but is not deleted from its original place. Paste command As already explained both Cut and Copy commands send the selected “area” into the Clipboard. The Clipboard memorizes the LAST ENTRY ONLY! Therefore the Paste command processes the last entry selection existing in the Clipboard. The Paste procedure is executed as follows: Case 1 – Paste what is available in the clipboard - Click the logic program element (operand) before which the last content of the Clipboard is to be introduced - Click Edit menu program, then - Click the Paste menu item – the content of the Clipboard appears before the marked element (operand). Case 2 – Cut and Paste an “area” First select by dragging an “area” to be pasted. Cut the selected “area” as explained. Then paste the selected “area” as explained. Case 3 – Copy and Paste an “area” First select by dragging an “area” to be pasted. Copy the selected “area” as explained. Then paste the selected “area” as explained. Undo command If the executed Cut, or Copy or Paste operations must be cancelled the Undo command is used: Click Edit menu button. Click Undo menu item – the last Cut, Copy or Paste operation is cancelled, but the last entry into the Clipboard is still memorized! So, remember it! 7-10 KID Neuro PLC – User’s Manual Option 2 – Using Alternative Menu List Select the corresponding “area”. Right-click on the screen – an alternative Menu List appears containing the following menu items: Undo Cut Copy Paste Delete Commentary Paste commentary The above menu items are similar to the menu items of Edit menu button; therefore the operations with this Menu List are the same as described for Option 1. As shown in Fig. 7.9 there are two more menu items: Standard Names and User Names. When Standard Names item is selected – the operands into the logic program are shown by their standard names - refer also to subsection 6.6. When User Names item is selected – the operands into the logic program are shown by their user names – refer also to subsection 6.6. 7.7. EDIT COMMENTARY MENU COMMANDS This Menu List is activated when Commentary item list is activated on Edit Type menu command (see subsection 7.6) and a commentary text is clicked. All details related to this Edit Commentary Menu are outlined already in subsection 7.6. 7.8. TABLES MENU COMMAND Clicking this menu button a menu list appears as shown in Fig. 7.13. Fig. 7.13 Indicator Configuration – When clicking this option the following dialog box appears (Fig. 7.14): KID Neuro PLC – User’s Manual 7-11 Fig. 7.14 The above menu item and the relevant View Control Panel Settings table provide capability for entering the data relating to LonWorks network connection between a KID Neuro PLC and maximum up to 4 arbitrary View Control Panels. The PLC – View Control Panel(s) communication is bi-directional, i.e. from PLC to View Control Panel(s) and vice versa, from View Control Panel(s) to PLC. The data are transmitted by a block V-cells of the PLC or received by a block V-cells of the PLC. A block of V-cells means a number of maximum up to 40 consecutive V-cells. One PLC can be connected maximum to 4 arbitrary View Control Panels. There are two types of View Control Panels, namely: A. KID View Control Panel – Graphical Module. B. KID Alpha Control Panel – Alphanumeric Module. In order to enter the settings into the View Control Panel Settings Table (Fig. 7.13) proceed as follows: - Click the first line (View Control Panel Number) and enter (by keyboard) say Number 2. - Click VStart from PLC and enter say V14. - Click Count and enter say 6 – this means that the block of V-cells are V14, V15, V16, V17, V18, and V19. - Click VStart to PLC and enter say V2. - Click Count and enter say 3 – this means that the block of V-cells is V2, V3, and V4. Further proceed in the same way for View Control Panels Numbers 3, 4, and 7. The result is shown in Fig. 7.15. 7-12 KID Neuro PLC – User’s Manual Fig.7.15 After the table is completed click OK to save the settings into the PLC. The table can be recalled by the command Load from Controller. Network Connections - When clicking this option the following dialog box appears (Fig.7.16): Fig. 7.16 The above menu command and the relevant Network Settings table provide capability for entering the data relating to LonWorks network connections between the KID Neuro PLCs. KID Neuro PLC can be used as a regular LonWorks Module. It can be connected to other LonWorks modules using standard LonWorks philosophy (network variables, network connections, etc.). This requires solid knowledge about network techniques and experience on system integration approach for such systems. Therefore this section is subject to a separate technical document referred to as KID Neuro PLC Interoperable LonWorks System Manual. Cross Reference Table – This option is used to assign user names to operands in the logic programs (Fig. 7.17). KID Neuro PLC – User’s Manual 7-13 Fig. 7.17 The detailed description of this command has been outlined already in subsection 6.6 – User Names. 7.9. WINDOW MENU COMMAND This command is similar to all Microsoft Windows based tools. 7.10. HELP MENU COMMAND This command is similar to all Microsoft Windows based tools. 7.11. BUTTONS TOOL BAR MENU COMMANDS The relevant Tool Bar menu buttons duplicate the majority of the above menus for facilitation of the user. 7.12. MAIN BUTTONS STRIP The main buttons strip is located at the top of the main window of the programmer. The buttons are used to enter commands into the user program. Each of the buttons has a functional key assigned to it. 7-14 KID Neuro PLC – User’s Manual Button Functional Key Description F2 Displays a floating menu for selecting the Load type commands. F3 Displays a floating menu for selecting the AND type commands. F4 Displays a floating menu for selecting the OR type commands. F5 Inserts a Series command into the user program. F6 Inserts a Parallel command into the user program. F7 Displays a floating menu for selecting the Coil type commands. F8 Displays a floating menu for selecting the MCR MCR_END functional block. F9 Displays a floating menu for selecting the Arithmetic type commands. F10 Displays a floating menu for selecting functional blocks. F11 Displays a floating menu for selecting functions. F12 Inserts a SHIFT logic operation. 7.13. LADDER COMMANDS QUICK ENTRY KEYS Command Function Key Command Function Key Load Alt + F2 Coil Reset Ctrl + R Load NOT Ctrl + A MCR Alt + F8 Load IMP Ctrl + I MCR_END Alt + E Load IMP NOT Ctrl + L ADD Shift + A Load0 Ctrl + 0 SUB Shift + S Load1 Ctrl + 1 Multiply Shift + M AND Alt + F3 Divide Shift + D AND IMP Alt + I Move Shift + V AND NOT Alt + O Move Block Shift + B KID Neuro PLC – User’s Manual 7-15 Cont. AND IMP NOT Alt + N Timer Shift + T OR Alt + F4 Counter Shift + P OR NOT Shift + N Approx Shift + X OR IMP Shift + I Drum Timer Shift + R OR IMP NOT Shift + O CMP Shift + C Serial F5 Comm. Read Alt + R Parallel F6 Comm. Write Alt + W Coil Alt + F7 Mathematics Ctrl + M Coil NOT Ctrl + T Pid Shift + L Coil Set Ctrl + E Shift Shift + K 7-16 KID Neuro PLC – User’s Manual CHAPTER 8 CONFIGURATION & DIAGNOSTIC OF KID NEURO PLC GENERAL 8.1. CHANGING KID NEURO PLC NUMBER 8.2. CONNECTING KID NEURO PLC TO KID BUS NETWORK 8.3. CHECK KID NEURO PLC HARDWARE 8.4. SELECTING OF ANALOG INPUT RANGES AND OF LINERIZATION TABLES 8.5. SETTING OF ASTRONOMICAL CLOCK OF KID NEURO PLC 8.6. SETTING OF TIME AFTER FAST PROGRAM KID Neuro PLC – User’s Manual GENERAL All members of the network (PLCs, View Control Panels, computers and others as applicable) have their own address. The address is defined by the Identification Number. The identification numbers must not be duplicated, i.e. each number has its own identification number. Before connecting a KID Neuro PLC (more than one) to the network it is a MUST to attach to this PLC its identification number. This is accomplished by connecting the PLC to the computer (programmer) and designation an identification number by the user. This number can be monitored in V251 cell of the PLC. This procedure is carried out by using PLC Debug Screen – Fig. 8.1. IMPORTANT NOTES: a. The above procedure is carried out using Program Mode of operation of the PLC. b. The default number of each PLC is “1”. c. The identification number No. 32 is reserved and is tight to the computer. 8.1. CHANGING KID NEURO PLC NUMBER Changing KID Neuro PLC number is accomplished by clicking PLC Service menu and then clicking Debug Screen menu item – the PLC Debug Screen appears as shown in Fig. 8.1. Fig. 8.1 KID Neuro PLC – User’s Manual 8-1 As can be seen on the PLC Debug Screen dialog box, the Network View window appears on the top-right side. Each KID Neuro has its own number. There are 30 places for PLC (from 1 to 30). Each PLC is displayed on its place, corresponding to its identification number. The change of the number of a PLC is executed as follows: a. Establish the Program mode of operation of the PLC. b. Click the icon of the PLC (say No.1) whose number is to be changed. c. Drag the icon (left button of the mouse) and drop it on one of the grey (i.e. free) icons, whose number is to be reattached to the PLC (say No.7). d. Release the button and wait for several seconds required for the change of the number. This time is signalled by a warning “Change the Number! Please Wait!”. After the change of the number is completed the above warning is replaced by regular “Computer-to-PLC Communication” picture. The new number of the PLC is “7”. 8.2. CONNECTING KID NEURO PLC TO KIDBUS NETWORK To connect KID Neuro PLC to KIDBUS network, just connect it electrically to network. Icon with the number (as already assigned) of the KID Neuro PLC will appear on Network View window (Fig. 8.1). Note: One number can be assigned to only one PLC. 8.3. CHECK KID NEURO PLC HARDWARE Checking the PLC hardware is carried out by using dialog window titled Check PLC Hardware. Click PLC Services menu. Select and click Check New Hardware menu item – the Check PLC Hardware window is displayed as shown in Fig. 8.2. Normally the communication with the PLC No.1 is established when opening the Check PLC Hardware window. Click the icon of the PLC number in order to establish communication with the corresponding KID Neuro PLC number. The current configuration of the approached PLC is displayed when opening the Check PLC Hardware window. A sample case is shown in Fig. 8.2. An image of the PLC is displayed on the upper part of the window. The table below the PLC image contains information about: a. Versions of hardware and software set by Industrial Software. b. Program name, program length and Check Sum. c. LonWorks board spec’s. 8-2 KID Neuro PLC – User’s Manual The lower table contains information about: a. Number of the slots. b. Type of the I/O modules. c. The ladder logic operands attached (involved) to the respective I/O module. d. Fast column provide information whether an I/O module is used in the Fast Program mode. e. Existing problems if such, otherwise OK flag is displayed, based on the result of verification (check) of the modules. The right-top table contains information about the network modules. The PLC Mode window shows the mode of operation of the approached PLC. It also provides options for changing the mode of operation of the approached PLC. The above explanations have been related to the current configuration. In case some changes into the configuration take place (in terms of slots in a PLC or in terms of the number of the PLC’s into the network) click Check PLC Hardware button to refresh the information reflecting the corresponding changes. Fig. 8.2 KID Neuro PLC – User’s Manual 8-3 8.4. SELECTING OF ANALOG INPUT RANGES AND LINEARIZATION TABLES The selection of analog input ranges and of linearization tables is carried out by using the dialog box named ADC Settings, as shown in Fig. 8.3. Fig. 8.3 The procedures are as follows: First click the Interface menu and click the corresponding menu item for your interface – say KID Bus. Click PLC Service menu and select by clicking the ADC Settings menu item – the dialog box ADC Settings appears on the screen as shown in Fig. 8.3. Click the PLC number to establish communication with the PLC whose analog inputs are to be set – say PLC No.1. In case the selected mode of operation is not Programming, an Mode Error window will notify you to change the mode of operation. The change of mode of operation is accomplished by clicking the Mode window (Fig. 8.3) and selection of the Program mode. Now we have to read the settings from the PLC. To execute this reading click Read from PLC button – an Reading ADC Settings window appears showing that the reading of the ADC Settings from the PLC is completed – Fig. 8.4. Fig. 8.4 If the mode of operation has been set to Program, the Reading of ADC Settings appears automatically. To continue click the OK button – the current settings (if such) appear as shown in Fig. 8.5. 8-4 KID Neuro PLC – User’s Manual Fig. 8.5 The image shown in Fig. 8.5 shows or can be used for settings as follows: - Slot field shows which slots of the selected PLC contain analog input PCB’s (analog modules). In case some changes / additions / reductions of the analog input modules take place during the programming procedures, the above table must be refreshed by a new “Read from PLC” procedure! - State field shows whether or not valid ranges are set for the ADC channels. - Start-End field shows which V-cells are used for storage of the measurement results – one V-cell is used for storage of the one channel measurement result. Since 5 channels maximum are available, 5 V-cells are occupied. For the example shown in Fig. 8.5 these 5 V-cells are V201 to V205. The next slots (if such) will occupy next V206 to V210 cells, etc. - Freq field shows the reciprocal value of filter notch frequency. The measurement time of measurement cycle is 3 x Freq value. The drop-down list box provides two options: 40 ms and 200 ms. - Count field shows the number of analog inputs (channels). Two numbers are available (click the Count field to open an 3/5 selection list!): ! 3 Channels – three differential channels ! 5 Channels – five channels with common ground. If 5 Channels option is selected the following specifics must be taken into account: - Pt 100 (resistance range 0 to 300 Ohms) can be measured only by first and second channel. - Third, Fourth, and Fifth channels measure values in one and same range only. Note: Before setting the analog inputs set up the Linearization Tables! The maximum number of Linearization Tables in KID Neuro PLC is two. Following types are available for each of the two linearization tables: Pt 100, [°C x 10] TC J, [°C x 10] TC K, [°C x 10] IMPORTANT NOTE: The unit of the measurement result is degree Celsius x 10! The setting of each of the two linearization tables is accomplished as follows: KID Neuro PLC – User’s Manual 8-5 Click the table button – a drop-down list box appears, containing: None Pt 100, °C x 10 TC J, °C x 10 TC K, °C x 10 Click the corresponding item to enter it into the linearization table. After the linearization tables are set accordingly proceed with setting the channels. - For First and Second Channels Click the channel field – a drop-down list box appears, containing the following list: ± 80 mV 0–2V 0 – 20 mA 300 Ohms Pt 100 and / or TC J and / or TC K depending on the settings of the linearization tables. Click the relevant option to enter it in the window. - For Third, Fourth, and Fifth Channels Click the channel field – a drop-down list box appears, containing the following list: ± 80 mV 0–2V 0 – 20 mA TC J and / or TC K depending upon the settings of the linearization tables. Click the relevant option to enter it into window. Remember! The third, fourth, and fifth channels must have one and the same range! IMPORTANT! If no linearization table is selected, the measurement result will be in the range of 0 to 32767! After the settings of the range are completed click Write to PLC button to download the PLC with the corresponding configuration of the analog inputs. Finally close the ADC Settings dialog box. 8.5. SETTING OF ASTRONOMICAL CLOCK OF KID NEURO PLC The astronomical clock of the PLC is contained in V240 to V246 cells as shown in Table 5.11 section 5.11. The setting of the PLC astronomical clock according to the Computer clock is accomplished as follows: Call the PLC Debug Screen (Fig. 8.1) as described in subsection 8.1. The current state of the PLC clock can be monitored by selecting V240 to V246 cells. 8-6 KID Neuro PLC – User’s Manual If setting is necessary click the Set Clock button on the PLC Debug Screen – thus the PLC astronomical clock will be automatically set according to the computer clock. 8.6. SETTING OF TIME AFTER FAST PROGRAM The Fast Program is used for special purposes in case of high-speed operations / synchronizations at some batch production processes (refer also to section 5.2!). The Fast Program deals with limited number of Digital Inputs and Digital Outputs, so this is actually a Fast Logic Program. The number of the Digital Inputs can be 0 or 8 or 16, which corresponds to their X1 to X8 or X1 to X16 operands. The number of the Digital Outputs can be 0 or 8 or 16, which corresponds to their Y1 to Y8 or Y1 to Y16 operands. It is forbidden to use the Fast Program operands into the regular logic program!!! The Fast Program is a comparatively short program – it occupies not more than 100 elements. The execution of the Fast Program has priority – during the time the Fast Program is executed, the execution of the regular logic program is temporary interrupted, therefore it is known also as Fast Program under interrupt. The Fast Program is started by the leading edge of a pulse applied to FI 1 (Fast Input One) input of the PLC (refer to subsection 5.2). It is executed as a single cycle and takes Tfast time – Fig. 8.6. The Fast Input One (FI 1) is affiliated with X100 operand! Fig. 8.6 The following case needs special consideration: Let’s consider the case when many consecutive Fast Input signals are arriving at the FI input (this could be caused by mechanical vibration of a relay for example). This will initiate uninterrupted many Fast Program cycles, which could take a considerable time period. During this period the execution of the regular logic program will be interrupted, which can be crucial for the production process. In order to provide enough time for execution of the regular logic program after each Fast Program cycle, a certain Time after Fast Program must be envisaged – Fig. 8.6. During this time no execution of the fast program can be initiated. The Time after Fast Program is set considering the length of the regular logic program and the specifics of the process. This time is set by opening of Save to PLC dialog box – see Fig. 6.98. The Fast Program is generated in the way already explained for the regular ladder logic program. KID Neuro PLC – User’s Manual 8-7 To download the Fast Program proceed as follows: - Click File and select by clicking Save to Controller item – the Dialog Box Save to PLC appears as shown in Fig. 6.98. - Click Enable Fast Program window. - Enter the Time after Fast Program as required – the default Time after Fast Program is 100 µs. - Call the Fast Program (from Document or from Disk saved as KPF extension file) together with the regular logic program. - Double click the Fast Program name – its name appears automatically on the KID Fast Ladder Program field. - Double click the regular logic program - its name appears automatically on the KID Ladder Program field. - Click Save to PLC to download. 8-8 KID Neuro PLC – User’s Manual CHAPTER 9 DEBUGGING OF KID NEURO PLC PROGRAMS 9.1. GENERAL 9.2. THE X Y R V LOGBOOK 9.3. DOWNLOADING OF USER PROGRAMS TO PLC 9.4. READING OF PROGRAMS FROM PLC 9.5. MONITORING 9.5.1. The Programs 9.5.2. The Hardware Configuration 9.5.3. The View Control Panel Settings 9.5.4. The ADC Settings 9.5.5. The PID Screen 9.5.6. The Operands 9.6. PLC DEBUG SCREEN 9.6.1. The Network View Field KID Neuro PLC – User’s Manual 9.6.2. The PLC General View Field 9.6.3. The Digital Inputs (X) Field 9.6.4. The Digital Outputs (Y) Field 9.6.5. The Internal Relays (R) Field 9.6.6. The V-cells Field 9.6.7. V-cells Integer Format Representation 9.6.8. The PLC Mode of Operation Field 9.7. POWER CUT OFF – POWER ON CONSIDERATIONS KID Neuro PLC – User’s Manual 9.1. GENARAL Before starting this chapter the user is advised to read again subsection 3.1.1. dealing with different PLC modes of operation, namely: Work, Program, Force, Debug and Force D. The term PLC Programs is referred to User Programs (also called Logic Programs) as well as to Fast Programs. The goal of the Debug procedure can be expressed generally as a set of activities for monitoring, survey, interpretation, analysis, evaluation of the user program(s), of their impact on the process’ (plant) behavior, combined with certain changes / improvements into the programs in order to obtain the most adequate management of the process (plant) under control. This procedure is of great importance and requires patience, responsibility, good process control background, adequate knowledge about the process (plant) and of course excellent appreciation of the broad range of capabilities, tools and options provided by the KID Neuro PLC system configuration. As a matter of fact KID Neuro PLC offers so many extra capabilities that its usefulness is practically limited only by the user’s ability and ingenuity. Since the debug procedures can be of any nature it is not possible to provide an unified approach to serve as a recipe. Instead, basic general rules and useful recommendations will be outlined only. The basic debug process normally includes the following procedures: Monitoring → Interpretation → Assessment → Debug (if necessary!) 9.2. THE X Y R V LOGBOOK A great number of operands besides many functional blocks, functions and mathematics are involved in a logic program: 128 X-inputs, 128 Y-inputs, 256 R-relays, 512 V-cells, 1024 operands altogether. Some of the V-cells have special designation (for instance see Table 5.11 and subsection 9.3.4.); even some bits of certain V-cell have special designation (refer to Table 6.3 and Table 6.4). Therefore it is strongly recommended before starting to design a program to prepare separate sheets for X, Y, R, V operands: number of operand and its designation. If this was not done, DO IT NOW! It will save you time, will cut drastically the errors during design and will be of great help during debug procedures. 9.3. DOWNLOADING OF USER PROGRAMS TO PLC Before reading this subsection the user may recollect the downloading subjects already discussed in subsections 6.4.2. and 8.6. The programs generated to serve the process control have been discussed already in Chapter 5 and Chapter 6. These programs are referred to as User Programs. KID Neuro PLC – User’s Manual 9-1 The specialized, comparatively short programs dealing with limited number of operands (see also subsection 8.6) are referred to as Fast Programs Under Interrupt or simply Fast Programs. The User Program and the Fast Program are loaded into KID Neuro PLC by using Save to PLC dialog box, shown in Fig. 9.1. To call the Save to PLC dialog box proceed as follows: - Click File menu - Click Save to Controller item from the download menu items – The dialog box appears – Fig. 9.1. Fig.9.1 A PLC is selected from the relevant icon. The names of the currently open programs are displayed in the Load from Document field. The Fast Program is saved normally in Fast [*kpf] file. When the program is loaded from a disk, use Load from Disk group to select the program. The program, which must be loaded to the PLC, is selected by double clicking on the respective program name. The KID Fast Program contains information about the fast program which is to be loaded to the PLC. 9-2 KID Neuro PLC – User’s Manual The Enable Fast Program option enables the fields used with fast program under interrupt. The shortest time interval between the successive executions of two fast programs is set in the Time After Fast Program field. The time interval is set in microseconds. If pulses are fed to the fast counter input FI 1 during the Time-After-Fast Program interval, the execution of the Fast Program is not initiated (see also Fig. 8.6). Note: Programs may be loaded to the PLC only on Program mode. The selected User Program and Fast Program are saved to KID Neuro PLC memory by pressing (clicking) the Save to PLC button. The Fast Program may not be loaded independently (without loading an User Program)! 9.4. READING OF PROGRAMS FROM PLC The term Programs is referred to User Programs as well as to Fast Programs. The reading of programs from KID Neuro PLC is accomplished in the following way: - Click File menu - Click Load from Controller menu item – the dialog box Load from PLC appears as shown in Fig. 9.2. Fig. 9.2 Important: Reading of programs from KID Neuro PLC is possible only on Program mode. The controller mode is changed by using PLC Mode field. Pressing (clicking) the Load from PLC button starts the reading of the User Program and of the Fast Program (if present!) from the KID Neuro PLC memory. The contents of the two programs is visualized in two separate windows on the screen. KID Neuro PLC – User’s Manual 9-3 9.5. MONITORING 9.5.1. The Programs The programs can be called from your hard disk (Design Version) or from the PLC (Execution Version). 9.5.2. The Hardware Configuration The actual Hardware Configuration can be called and monitored as follows (refer also to subsection 8.3. and Fig. 8.2): - PLC Services / Check PLC Hardware 9.5.3. The View Control Panel Settings The View Control Panel Settings can be called and monitored as follows (refer also to subsection 7.8.): - Tables Menu / Indicator Configuration 9.5.4. The ADC Settings The ADC Settings can be called and monitored as follows (refer also to subsection 8.4.): - PLC Services / ADC Settings / Read from PLC. 9.5.5. The PID Screen The PID Screen can be called and monitored as follows (refer also to subsection 6.4.2. and Fig. 6.99): - PLC Services / PLC Screen. 9.5.6. The Operands The operational status of the operands can be monitored by calling the PLC Debug Screen (Fig. 9.3): - 9-4 PLC Services / PLC Debug Screen. KID Neuro PLC – User’s Manual Fig. 9.3 9.6. PLC DEBUG SCREEN The PLC Debug Screen dialog box (Fig. 9.3) provides extremely valuable information about the PLCs and View Control Panels configurations as well as about the operand status. 9.6.1. The Network View Field The icons of the PLCs and View Control Panels are displayed on this field. To approach a PLC or a View Control Panel, i.e. to establish communication click to select a particular PLC or View Control Panel. 9.6.2. The PLC General View Field The current configuration of the selected KID Neuro PLC is displayed on the right bottom part of the PLC Debug Screen (Fig. 9.3) showing which slots are occupied. The PLC slots contain data about the modules in the respective slots. The data about the slot content is displayed by positioning the mouse cursor on the respective slot: ∗ For the controller slot the following information is displayed: - Name of the program, which is loaded to PLC KID Neuro PLC – User’s Manual 9-5 - Length of the program - Version of the Firmware (for example S13) - Version of Hardware (for example H4) - Availability of LonWorks Transceiver ∗ For the 1 to 12 slots the following information is displayed: - The slot Number - The type of the module (for example Analog Inputs or Analog Outputs) - The V-cells affiliated to the respective module (for example Analog Inputs V201 – V205) - In case the slot is empty the message “Slot No…. Empty” appears - In case the module is not powered a red color “24 V” image is displayed on the respective module. Each of the existing modules is checked for proper operation, namely: - existence of a connection between the processor and the module - existence of power supply at the digital and analog modules. In addition to the information displayed by positioning the cursor on the respective slot the bits of V257 cell indicate the presence or absence of modules in respective slots and presence or absence of errors related to the respective module: A logic 0 at the respective bit indicates the existence of a module and the absence of errors. A logic 1 at the respective bit indicates the absence of a module or the presence of an error. The allotment of the V257-bits is as follows: Bit V257.0 is allowed for slot 1 Bit V257.1 is allowed for slot 2 . . . Bit V257.11 is allowed for slot 12 Bit V257.12 is allowed for LonWorks Transceiver Furthermore, the bits of V258 cell indicate the presence of power supply to the respective digital and analog outputs modules: A logic 0 at the respective bit indicates the existence of power supply at the corresponding module (in respect of slot number). A logic 1 at the respective bit indicates the absence of power supply at the corresponding module (in respect of slot number). The allotment of the V258-bits is as follows: Bit V258.0 is allowed for slot 1 Bit V258.1 is allowed for slot 2 . . . Bit V258.11 is allowed for slot 12 The bits corresponding to slots where the modules do not require power supply are not used. 9-6 KID Neuro PLC – User’s Manual 9.6.3. The Digital Inputs (X) Field The digital inputs from X1 to X128 are displayed on the left-top field of the screen – Fig. 9.3 and Fig. 9.4a. Fig. 9.4a Normal presentation Fig. 9.4b Raw-in-8 presentation in pellets form The quick search of inputs can be accomplished by the Scroll bar. Each X input is present with its number and the relevant logic 1 or logic 0 state as per the logic program. Click on Raw x 8 displays the inputs in groups of eight (Fig. 9.4b) - the zero logic state is shown by grey pellets, while the logic 1 state is represented by green pellets. Placing the cursor on a pellet displays the number of the input. The digital inputs, which are not recognized as actual physical inputs, may be used as internal variables. 9.6.4. The Digital Outputs (Y) Field The digital outputs from Y1 to Y128 are displayed in the field adjacent to the X1 – X128 field (Fig. 9.3). The explanations outlined in the above subsection 9.3.5. are valid for this subsection with one only exception: the colour used for this field is red. 9.6.5. The internal Relays (R) Field The internal relays from R1 to R256 are displayed in the field adjacent to the Y1 – Y128 field (Fig. 9.3). The explanations outlined in the Digital Inputs (X1 – X128) subsection are valid for this subsection but the colour is blue. KID Neuro PLC – User’s Manual 9-7 9.6.6. The V-cell Field The integer variables from V1 to V512 (V-cells) are listed in two lists (Fig. 9.3), which allows the user to monitor different sets simultaneously. The quick search of the V-cells can be accomplished by using the respective Scroll bar. The quick search of a specific V-cell can be accomplished as follows: - Click on the top Value field. - Type in the number of the specific V-cell you are after. - Click outside – the corresponding V-cell appears on the top of the list. The V-cells, which are of current interest for the user, may be monitored in the Watch Window field. The field is filled in with variables by a drag-and-drop operation, namely: - Click the V-cell of the respective field. - Drag the V-cell and drop it in the Watch Window field. Up to 17 different variables can be monitored on the Watch Window field. One variable can be displayed not only on one place but also on several places on the Watch Window field (for example to monitor it in different integer formats (see the text below). The V-cells may be deleted from the Watch Window by drag-and-drop procedure again: the selected V-cell is moved out of the Watch Window – after releasing the mouse button the V-cell image disappears. The content of the Watch Window field can be cleared by clicking the Clear All button. 9.6.7. V-cells Integer Format Representation The V-cells may be monitored in the following formats: - as signed integers within the range from –32768 to 32767 - as unsigned integers within the range from 0 to 65535 - as real numbers within the range from -1 x 1038 to 1 x 1038 - as hexadecimal numbers within the range from 0 to FFFF - as long integers (double accuracy) within the range from –2147483648 to 2147483647 - as binary numbers - as split V-cell bits, namely the right 8 bits of the V-cell as Low V Bits the left 8 bits of the V-cell as High V Bits The above Low V Bits respectively High V Bits are represented again as pellets. IMPORTANT NOTE: Before reading the rest of this subsection you may recollect again the information outlined in subsection 5.14. – Binary Arithmetic. The V-cell content is displayed in signed integer format by default on the PLC Debug Screen – Fig. 9.3. There are two options to display the respective integer in other format. 9-8 KID Neuro PLC – User’s Manual OPTION 1 – Using Watch Window Field To use Watch Window field for monitoring the V-cells content proceed as follows: - Drag-and-Drop a V-cell on the Watch Window field. - Right-Click the - Click to select the respective format of representation – the format is changed in accordance with your selection, but it does not affect the format presentation in the respective V-cells field. icon of the V-cell – a drop-down list box appears with a selection list. # Signed integer representation of the V-cell content. The content of the V-cell is represented as a signed integer from –32768 up to 32767 (remember the twos complement concept!): 1’000000000000000 = -32768 1’000000000000001 = -32767 . . 1’111111111111111 = -1 0’000000000000000 = 0 0’000000000000001 = 1 . . 0’111111111111111 = 32767 # Unsigned integer representation of a V-cell content. The content of the V-cell is represented as an unsigned integer from 0 to 65535 namely: 0’000000000000000 = 0 0’000000000000001 = 1 . . 0’111111111111111 = 32767 1’000000000000000 = 32768 1’000000000000001 = 32769 . . 1’111111111111111 = 65535 # Real number representation of the V-cell content. The content of the V-cell is represented as a real number as explained in subsection 6.4., respectively in The Floating-Point Concept para. KID Neuro PLC – User’s Manual 9-9 # Hexadecimal number representation of the V-cell content. The content of the V-cell is represented as a hexadecimal number from 0 to FFFF: 0000000000000000 = 0000 0000000000000001 = 0001 . . 0000000000000111 = 0007 0000000000001111 = 000F . . 0000000011111111 = 00FF 0000000111111111 = 01FF . . 1000000111111111 = 81FF . . 1111111111111111 = FFFF # Long number representation of the V-cell content. In this case the V-cell content is regarded as a part of a 32-bits signed integer, also referred to as long number (remember the twos complement concept – subsection 5.14!). The content of a Vn cell is considered as the second part of a 32-bit signed integer whose first part is represented by Vn+1 cell – Fig. 9.5. Fig. 9.5 A 32-bit signed integer represented by the content of two 16-bit V-cells. The most significant bit of Vn+1 cell is used as a sign bit of the signed integer. 9-10 KID Neuro PLC – User’s Manual Since the content of the Vn cell is integral part of an integer, the interpretation of its content depends on the content of the preceding Vn+1 cell. This holds for the logic state of each bit of the preceeding Vn+1 cell, including of the most significant bit, which is used as sign bit: Vn+1 cell Vn cell 1’000000000000000 0000000000000000 = -2147483648 1’000000000000000 0000000000000001 = -2147483647 . . . . 1’111111111111111 1111111111111110 = -2 1’111111111111111 1111111111111111 = -1 0’000000000000000 0000000000000000 = 0 0’000000000000000 0000000000000001 = 1 . . . . 0’000000000000000 1111111111111111 = 65535 0’000000000000001 1111111111111111 = 131071 . . 0’111111111111111 1111111111111111 = 2147483647 # Binary format representation of the V-cell content. The logic state of each of the 16 bits is represented: 0 for logic 0 state and 1 for logic 1 state. # Low V Bits and High V Bits representation of the V-cell content. In this case the 16-bits of the V-cells are divided (split) in two parts: - Low V Bits part, containing the 0 to 7 bit - High V Bits part, containing the 8 to 15 bit as shown in Fig. 9.6. Fig. 9.6 KID Neuro PLC – User’s Manual 9-11 The bits are represented in pellets form. Each part can be called separately. In case the user needs both parts to be displayed simultaneously, then drag-and-drop twice the same V-cell and call for the first image the High V Bits format and for the second image – the Low V Bits format or vice versa. The grey pellet colour reflects logic 0 state for both parts. The red pellet colour reflects logic 1 state for High V Bits part. The blue pellet colour reflects logic 1 state for Low V Bits. IMPORTANT NOTE: The V-cell content may be monitored in different formats simultaneously on the Watch Window field – simply drag-and-drop as many times as required the respective Vcell and attach to each of its icons the respective format. OPTION 2 – using V-cells Fields The V-cells content is displayed as signed integers by default on the V-cells fields of PLC Debug Screen. In case presentation in other format is required, proceed as follows: - - Right-Click the respective V-cell – a drop-down list box appears: • Signed integer • Unsigned integer • Real • Hexadecimal • Long integer • Binary Click to select the respective format – the format is changed in accordance to your selection. Simultaneously your selection is reflected in the Type column. Note: For long-tailed representations, such as binary format click once more to display the whole image of the integer. 9.6.8 The PLC Mode of Operation Field A drop-down list box can be called from the Mode of Operation field: - Work - Program - Debug - Force - Force D Click an item to select the relevant mode. Subsection 3.1.1. to 3.1.5 provides substantial information about the scope and designation of each of the above PLC operational modes. The user may find it useful to read subsection from 3.1.1 to 3.1.5. Additional information is outlined in tabular form in Table 9.1. 9-12 KID Neuro PLC – User’s Manual Table 9.1 MODE OF PLC FORCE D EDITING, ADJUSTMENTS DEBUG FOR CHANGES, FORCE WORK OPTIONS PROGRAM OPERATION Yes Logic Program (LP) Execution Yes No No Yes stepwise or continuous Digital Outputs are controlled Yes by LP No Yes Yes Yes by LP Designer by LP by LP No No Yes Yes Yes Yes Changes are allowed for X No Changes are allowed for R No Changes are allowed for Y No No Yes Yes Yes Changes are allowed for V-cells No Yes Yes Yes Yes No The following basic information must be taken also into account during the monitoring – interpretation – debug process: Work Mode - The process is controlled in an arbitrary way, the programs are executed normally. - All operands can be monitored, including the state of the physical inputs. - No changes of variables are allowed. - Any attempt to change the value of an operand displays a Warning to change the mode of operation. - This is the typical final mode of operation of PLC, which prevents incidental changes of internal variables. Program Mode - The Programs (Fast and Normal) are not executed - All digital outputs are set to “0” (OFF) - The analog outputs maintain the status at the moment of transition to Program mode - All operations on PLC are allowed! Debug Mode - The Debug mode is used to adjust and set the values in the user program. - This mode is identical to Work mode, but changes in operands are allowed. - The user program is executed. - Any changes in operands / variables have a direct effect on the program execution. - The generation of a Special Debug program may be required, for example to “provoke” some operand for which otherwise extremely long period for activation may be expected. KID Neuro PLC – User’s Manual 9-13 Force Mode - This mode is used to check the connections of the PLC outputs with the controlled equipment (process) plant. - Allows the user to control directly the PLC outputs. - The programs are not executed. Force D Mode - The values of the physical inputs are note read from the PLC input boards but can be changed by the designer in the Debug Screen in order to test the execution of the program. - This mode is used to adjust and set the data in the user programs. - The programs are executed stepwise or continuous. - The values of the X operands are set by the user. - Any intervention into program has a direct effect on the program execution. - After the PLC KID Neuro is set in the Force D mode, the Step-by-Step may be selected, and the PLC is switched to a step-by-step mode of program execution. A single cycle of the program is executed after clicking of the Run button. This mode is very useful for testing of pulse-edge controlled ladder programs. 9.7. POWER CUT OFF – POWER ON CONSIDERATIONS The PLC power supply cut-off and the PLC power supply restoration may have considerable impact on both processor safety and operator’s safety, therefore it needs special consideration. The designer of the user program(s) must stipulate and reflect the relevant preventive measures into the user program(s) in order to meet the adequate safety requirements of the technology process to be controlled and of the local legal safety standards. In respect to safety considerations, the PLC behaviour after power supply restoration is very important. For easy reference let us accept the following denotations: TOFF – denotes the moment of PLC power supply cut-off. TON - denotes the moment of PLC power supply restoration. Table 9.2 illustrates the PLC Mode of Operation behaviour in respect to power supply restoration. Table 9.2 The PLC Mode of Operation The PLC Mode of Operation at moment TOFF at moment TON WORK WORK PROGRAM PROGRAM DEBUG DEBUG FORCE (WORK OR PROGRAM)* FORCE D (WORK OR PROGRAM)* 9-14 KID Neuro PLC – User’s Manual Table 9.2 Cont. * One of the two modes (Work or Program) will be established, namely this one which is the Last of BOTH used before TOFF. The other (Debug, Force, Force D), eventually used before TOFF are of no significance for such selection. The examples below explain the above Table 9.2: TOFF TON a. Work - Program - Force - Debug - WORK WORK b. Work - Force - Force D - Work - PROGRAM PROGRAM c. Program - Force - Work - Program - DEBUG DEBUG d. Program - WORK - Force D - Debug - Force WORK e. Work - Debug - PROGRAM - Force D - Force PROGRAM f. - Debug - WORK - Debug - Force D WORK - PROGRAM - Force - Debug - Force D PROGRAM Program g. Work IMPORTANT NOTE: After the restoration of the PLC power supply the KID Neuro PLC conducts the following tests: a. The validity of the program(s) (Cyclic Redundancy Check). b. The validity of the PLC Mode of Operation. c. The RAM, Rom and I/O operational capability. If the result of one of the above tests is not OK, then the PLC is set to PROGRAM mode of operation. KID Neuro PLC – User’s Manual 9-15