1
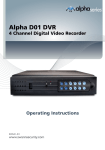
1. Precautions
LCD Colour Digital Television Receiver
User's manual
1. Storage
Keep this product away from extremely hot or cold places. The storage
temperature ranges from -20 to 60 and the working temperature from
0 to 40 .
Do not use this product at damp environment like bathtubs, wash basins,
kitchens, washtubs, as well as basements, swimming pools or similar places.
Do not expose your TV set to high humidity, dust or oil smoke.
Do not throw or drop this product.
Do not subject this device to the inside of a case or strong vibrations, avoiding
strong collision.
Do not push on or scrub this product with sharp objects.
2. Maintenance
Disconnect all cables of this device at first before cleaning.
Wipe the enclosure, screen and keys using soft cloth with a little soft detergent
on.
Do not use polishing cloth, abstergent, and all types of propellants or chemical
detergents like alcohol and benzene to clean your device.
Warning!
Do not watch television programs or turn your TV set on for your own and others'
safety.
It is very dangerous to watch television programs or operate the TV set while
driving.
Special Notice
Bright spots or dark spots may appear on the screen. This is a normal phenomenon
associated with the active matrix display technology and is not a sign of malfunction.
Do not attempt to maintain. For any failures, please turn off your TV set immediately
and contact us or your dealer. This device integrates a great deal of fine electronic
components. Disassembly or alternation may result in damages or breaks.
3. Battery Recharging Ways
The unit is available for battery recharging on standby mode or power on mode.
Please use AC adapter or car adapter to recharge battery. Disconnect those
tools, internal battery is also available for power supply once built-in battery is
full charged.
When internal battery suffers from a power shortage, the battery voltage will get
down to specific one, and then the unit will shut down automatically. Please
connect adapter for recharging.
4. Notes about battery usage
To protect battery, please never charge any full charged battery against any
damages caused by overcharge.
Battery will get hot after charged, which is a normal phenomenon. But if the
temperature is over 60 while charging, it means abnormality happened.
Please plug off the power cord and take to professional for check.
If the battery is charged under high temperature, it will not be charged fully.
Suggest to charge under 15 -25 for the best effect.
Charge: Charging for 4-6 hours can play more than 60 minutes
(depending on different screen brightness).
Tip: The above is the approximate time; actual time depends on working
conditions.
For long period in storage (over 3-6 month), please charge and discharge at
least 3 times for full capacity and normal life reserved.
Notes: Internal battery is an optional function, the above description is only
for products with internal battery function.
2. Accessories
4. Remote control
1. Car power adapter
5. AV cable
2. AC power adapter
6. Telescopic antenna
3. 75- antenna cable
Open the package and make sure all the items are included.
3. Appearance
1
5. Connection of Main Interfaces
6. DVB-T Installation Guide
1. : Standby/power-on key.
2. MODE: Press to switch between DTV/TV/AV.
3. SEARCH: Automatic search channel when press the key more 3 seconds
4. : Mute key.
5. 0-9: Digit keys. Press the key to enter channel directly.
6. : Return key.
7. FAV: ON/OFF my favor channel function. (only available under DTV mode)
8. LIST: Display program list. (only available under DTV mode)
9. INFO: Display current Channel information.
10. EPG: press to display electronic program guide (only available under DTV mode).
11. OK: Confirm key.
12. CH+
: Channel selection/upward key.
13. CH: Channel selection/downward key.
14. VOL+ : Volume up/rightward key.
15. VOL: Volume down/leftward key.
16. AUDIO: Sound track switch key.
17. MENU: Menu key.
18. EXIT: return key; press to exit current menu and return to previous menu.
19. TV/RADIO: TV channel and radio channel switch key.
20. "RED" key: Corresponding menu red function key.
21. "GREEN" key: Corresponding menu green function key.
22. "YELLOW" key: Corresponding menu yellow function key.(Under DTV mode,
press this key to switch aspect ratio)
23. "BLUE" key: Corresponding menu blue function key.(Under DTV mode,press
1. Connection of Power Supply:
Align the power supply plug on AC
adapter with the jack on the machine
rear cover marked with DC.
Follow the installation guide to enjoy your high definition digital TV world. Follow the
help information that at the bottom of the window to select preference menu
language and suitable country (Region) and start channel search.
If no channel is found during the channel searching process, the user may adjust
the antenna position to obtain optimal TV signal.
Press upward/downward key to select item,
press leftward/rightward key to switch selected
items. In Channel Search item, press OK to
auto-search channels, press EXIT to return
main menu.
the key for timing burn function)
24. P. ADJ: Picture adjustment key (only available under DTV mode).
Note: Under Menu surface, press this key will not have function..
25. PICT: Picture mode key, press for "STANDARD", "SOFT", "VIVID", "LIGHT",
"PERSONAL".
26. SLEEP: sleep turn off time setting key.
27. SUBTITLE: Press to turn ON/OFF subtitles.
28. TEXT: Turn teletext function.
29.
: Fast Backward.
30.
: Fast Forward.
31.
: Last key.
32.
: Next key.
33.
: Stop key.
4
34.
: Play/Pause button.
75ohm antenna
conversion line
Align one end of the attached antenna cable
plug in the antenna jack on TV set and the
other end plug in the external antenna jack.
3. Connection of AV cable
AV conversion cable
(1) AV input: Insert the external video
cable into the yellow end of AV cable.
Insert the audio left channel cable into the
white end and the audio right channel cable
into the red end. Then, insert the AV cable
into "AV IN" jack.
(2) AV output: Insert the external video
cable into the yellow end of AV cable. Insert
the audio left channel cable into the white
end and the audio right channel cable into
the red end. Then, insert the AV cable into
"AV OUT" jack.
Note: AV OUT is only available in DTV mode.
5
3
2
4. Description of Buttons on Remote Control
2. Connection of Antenna Cable:
1. Telescopic antenna
2. PICT: Long press for 3 seconds as Picture mode under TV/AV mode, under
picture switch mode as "STANDARD", "SOFT", "VIVID", "LIGHT", "PERSONAL",
Press for Picture adjust/panel display mode/reset selection key under DTV mode,
able to choose brightness, contrast, chroma, hue (only available with NTSC
system), panel disply mode and reset.
Note: keep pressing for 3 seconds have no functions under OSD menu in DTV
mode.
3. MUTE: Press to switch between MUTE and sound under all mode.
4. EXIT: Return key: press to exit current menu and return to previous menu.
5. MENU: menu key.
6. /MODE(Standby/Operation mode shift button): Press to switch modes between
DTV/TV/AV, press and hold over 3 seconds for turning off TV.
7. TFT-LCD screen
8. CH+/ : Channel selection/upward key.
9. CH-/ : Channel selection/downward key.
10. OK: Confirm key.
11. VOL+/ : Volume up/rightward key.
12. VOL-/ : Volume down/leftward key.
13. Power indicator
Without internal battery:
Red light: standby / Green light: power on
With built-in battery:
Standby: red light / Power on: no operation lights
Charging in power on mode: Green light flashs / Full charge: green light on
Charging in standby mode: orange light flashs / Full charge: orange light on
Note: Charging function is not available in power off mod
14. Remote-control receive window
15. Antenna input Jack
16. Power on/off
17. AV Output
18. AV Input
19. Headphone jack
20. DC Input
21. USB connect Jack
22. Speaker
7. DVB-T MENU Operation Guide
7.1 Program
Four sub-menus (Program Edit, EPG, Sort, LCN)
are included in Program item, press OK key to enter,
press upward/downward key to select item, press
leftward/rightward key to switch selected items, press
EXIT to return main menu.
7.1.1 Program Edit
Before entering Program Edit item, enter factory
password 888888.
Before entering Program Edit interface, press red/
green/yellow/blue key on the remote to Move/Skip/
Lock/Delete/FAV all TV channels. Press EXIT key
to exit.
6
7.1.2 Sort
Program ordering
You can sort the programs according to your flavor. Optional choices:
By LCN, By ONID , By Service Name , By Service ID etc.
7.1.3 LCN
LCN: ON/OFF for logical program list.
7.2 Picture
Set the following items under Picture menu:
1)Aspect ratio: Under this item, it is enable to switch
between Auto/16:9 Wide screen/4:3 Full/4:3
Pan&Scan/4:3 Letter Box.
2)TV Format: Under this item, it is enable to switch
between PAL/NTSC system.
Once setting finished, press EXIT to return main menu.
7.3 Channel Search
Under Channel Search item, the following operations
Are available:
1)Auto Search: Select this item, and press OK to auto
search TV channels.
2)Manual Search: Select this item, press OK to manual
search TV channels.
3)Country: Setup your country according to your location.
4)Antenna Power: Start or exit the active antenna
output function.
7.3.1 Manual Search
Under Frequency Channel item, press digital number
on the remote to input channel number directly, press
OK to manual search TV channels.
7
7.4 Time
Setup the following items under Time menu:
1)Time Offset: Adjust time zone to Auto or Manual.
2)Country Region: Setup your capital of the Country
under this item.
3)Time Zone: Setup your time zone according to
your location.
7.5 Option
OSD Language, Subtitle Language, Audio Language,
are available to setup in Option menu, press upward/
downward key to select the above items, press
leftward/rightward key to switch the selected item. Once
7.6 System
The following operations are available in System
interface:
1)Parental Guidance: Setup Lock function according
to audiences' ages.
2)Set Password: Change factory password in this
item. Input old password and new one orderly, and
then confirm. The default password is 888888.
Please remember the new password after
modifying.
3)Restore Factory Default: Press OK key to restore to
factory default setting.
4)Information: Press OK key to check system information.
5)Software Update: Upgrade is needed, select this item
for relative operation.
7.7 USB
Under USB interface, the following operations are available:
1)Multimedia: Press OK key to enter USB playing main interface.
2)Photo Configure: Press OK key to setup pictures
playing.
3)Movie Configure: Press OK key to setup movie
playing.
4)PVR Configure: Press OK key to setup program record.
7.7.1 Multimedia
Insert U disk, select Multimedia item, press leftward
/rightward key to select the followings(Music, Photo,
Movie, PVR)to play, then press OK key to play from
selected file.
Multimedia player feature also has been integrated
on the receiver. Press PVR key to display multimedia
player window. You could show your preference photo,
playing music and movie on multimedia player. Known supported file were
illustration below. NTFS, FAT32 file system could be supported at the moment.
Player
Supported file
Photo
JPEG, BMP, PNG
*.wma, *.mp3, *.m4a
*.avi, *.mpg, *.dat, *.ts etc
Music
Movie
7.7.3 Movie Configure
1) Aspect Ratio:You can set up Keep or Discard.
2) Subtitle Specific: You can set up NORMAL, BIG or SMALL
3) Subtitle Background : You can set up Transparent, Gray, Yellow green, white
4) Subtitle Font color: You can set up Red, Blue, Green, white , Black
7.7.4 PVR Configure
1) Record Device: Check the stored information
2) Format: Clear information
9
8.2 SYSTEM
: Allows you to select the OSD language
SYSTEM
you want.
ENGLISH
CLOCK: Allows you to set the time for auto
CLOCK
OFF
shutdown(such as it will. Shutdown 30
16:9
minutes later).
: Screen mode, press to shift the screen
1
mode between 16:9 and 4:3.
BLUE BACK
ON
: Allows you to revolve the image.
BLUE BACK: Allows you to activate or deactivate this function when there are no
signals.
Note:
1)SOUND-SYS description: "I" refers to 6.0 M, "DK" 6.5 M and "BG" 5.5 M. Please
set the system to the local SOUND-SYS.
2)COLOR-SYS description:
A. For your selection of "I" mode, the COLOR-SYS refers to PAL-I;
B. For "DK", the system refers to PAL-DK or SECAM-DK;
C. For "BG", it refers to PAL-BG or SECAM-BG;
D. For "L", it refers to SECAM-L.
3)For images without audio or with noise, check whether the audio system is set
properly.
COLOR-SYS: Press the VOL-/VOL+ button to switch among PAL, NTSC and
SECAM in turn.
Note:
If the signal intensity is very poor or too weak, ill images would still occur with strong
noise, swing and bad audio effect no matter how you adjust the antenna. This is not
the failure of your TV. Try an open antenna or a cable TV if the telescopic antenna
does not work.
12
8.8.1 Instant recording
Press REC. key to start instant recording during watch TV and the recording symbol
would be display on the left top of the screen. Press INFO. key to get further more
information of instant recording. Press STOP key to stop instant recording.
8. ATV Menu
Press the MENU button to pop up the
following menu:
Press CH- or CH+ to select one of the
three entries above. Press VOL- or VOL+
to open the submenu.
9. Trouble shooting
The following phenomenon does not indicate failures. Before you contact us for
repair, please check your device according to the approaches below.
Problems
No picture or sound
Causes
The AC adapter does not connect to the vehicle
adapter properly; Non-permissible power is applied;
The power is off.
13
Base information bar
Further more information bar.
8.1 PICTURE
Press CH- or CH+ to select BRIGHT and
press VOL- or VOL+ to adjust its analog.
Press CH- or CH+ to select CONTRAST
or COLOUR in turn and adjust the analog
in the same way. Press CH- or CH+ to select
RESET. Then, press VOL- or VOL+ to have
the analog you have set return to "50".
7.10 SUBTITLE KEY
The programs might have multilingual subtitle
information. All available subtitle languages
would display on the subtitle information window
while you press SUBTITLE key. The screenshot
is illustrated below. Follow the help information
on the subtitle windows to select preference
subtitle.
10
8.4 Proper Receiving
8.4.1 Access the setting entries of the "Language" in the System to choose your
required OSD language.
8.4.2 Access the setting entries of the "AUTO-SEARCH" and "SEARCH" and make
sure whether the systems are set according to the responding transmitting
requirements. Refer to Part 8.3 for specific instructions.
8.4.3 Access the setting entries of the "SOUND-SYS" and "COLOR-SYS" and start
searching channels according to specific instructions in Part 8.3.
8.4.4 To achieve the best effect for receiving channels, please adjust the direction
and angle of your antenna.
7.11 UPDATE THE RECEIVER BY USB INTERFACE
1)Plug the USB drive that with the update file to the USB interface of the receiver.
2)Go to main menu and press to start upgrade process. While the upgrade progress
showing 100% and update finish, remove the USB flash drive and power on the
receiver again.
3)Please set the receiver to the factory settings after reboot the receiver.
NOTE: Please do not remove the USB drive from the receiver and power off the
receiver during upgrading process. Otherwise the receiver may not work properly.
7.9 INFO. KEY
Press "INFO" key to displaying base information bar during watching TV programs.
Press "INFO" key twice to displaying further more program information during
watching TV.
7.7.2 Photo configure
The number of parameters when set the picture in slide show mode:
1) Slide Time:the play time of slide show
2) Slide Mode: the style of slide show
3) Aspect Ratio: you can set up Keep or Discard
8
8.3 PRESET
POSITION: Allows you to select a certain
PRESET
channel and activate SWAP, FINE,
SEARCH, SOUND-SYS and COLOR-SYS.
POSITION
1
REMEMBER
ON
REMEMBER: Press VOL-/VOL+ to select
AUTO-SEARCH
OFF. Thus, this channel does not display
SWAP
1
when you change channels. If it is set to
FINE
0
be ON, this channel would display on
SEARCH
551MHZ
changing channels.
SOUND-SYS
DK
AUTO-SEARCH: Press VOL-/VOL+ to
COLOR-SYS
PAL
start AUTO-SEARCH function. After
AUTO-SEARCH, the system will save the channels automatically. After selections
of channels, the system will return to the channel number "0".
Note:
Before you start the AUTO-SEARCH, please set the SOUND/COLOR as the
corresponding local systems. Or, the channel program may have no audio or have
cacophony while the image may have no colour.
SWAP: Press CH- or CH+ to select this entry. Press VOL+/VOL- to change it to
your required channel. To confirm, press CH- or CH+.
FINE: Use this entry to adjust the channel for perfect signal quality when the
signal quality is poor.
SEARCH: This entry is used to control the current channel. When you SEARCH
a signal in this way the receiving indication frequency will stop. This indicates that
a perfect position for you to save a channel. If the channel features a poor signal
quality, the system will identify it as no signal.
SOUND-SYS: Press VOL-/VOL+ to switch among "I", "DK" and "BG" in turn.
7.8 PVR FUNCTION
Base on USB PVR function you could record the preference program and playback.
Instant recording, EPG recording and timer recording were available.
Problems
PICTURE
SYSTEM
PRESET
PICTURE
BRIGHT
50
CONTRAST
50
COLOUR
50
RESET
11
Causes
No signal
Check whether the antenna is located well;
Check the parameter of image or region is set
correctly; if not, please set or search again.
No sound
Check whether the volume is minimized; Check
whether the headset is connected; The signal quality
is poor; The sound attenuation function is activated;
Check whether the audio system in ATV mode is set
correctly.
Mosaic images
Check whether the antenna is adjusted properly;
The signal strength is too weak.
Signal search failure
Check whether the country and region is set right;
Maybe the signal intensity is too poor.
Too-dark images
Check whether the brightness and contrast of your
display is adjusted well; if not, readjust it.
Mosaic images or slack images
/sound occur when the car is
moving
May the signal intensity in this region is too weak.
Please try a vehicle digital TV antenna.
10. Specifications
DTV system:
Input frequency: VHF 177.5 MHz - 226.5 MHz
UHF 474 MHz - 858 MHz
Modulate: QPSK/16-QAM/64-QAM
Decode standard:
MPEG1, MPEG2 MP@HL, MPEG4 ASP@L5, HD:DivX(4.x-6.x),
HD: H.264 HD:1080i, JPEG(support 422/411/420/444/440 support)
Audio decode standard: MPEG-1, MPEG-2(layer I/II), AAC, HE-AAC level 2 &level4,
Mp3 demode.
ATV system
Analog receive frequency: DK/I 49.75MHz - 847.25MHz
BG 48.25MHz - 847.25MHz
Analog color system: PAL/SECAM
Analog audio system: DK
I
BG
L
General characteristic
Display: Colour TFT-LCD
MAIN MENU
Screen size: 9 inches
Resolution: 800(H) 3(RGB)
480(V)
Speaker: two 4.0cm round loudspeaker
Connector: Input jack for external antenna; stereo headset jack; audio/video (AV)
input jack; DVB-T(AV) output jack, USB jack
Supported power: Three options:
1. Alternating current power supply - AC adapter
2. Vehicle battery (12V) - vehicle adapter
3. Build-in battery 7.4V/1700mAh(Optional)
Power Consumption:
Without recharging function, the power consumption is 12W around
With recharging function, the power consumption is 15W around
Dimension: 258
156
39 (mm)
Weight: about 706g
Working temperature: 0 -40
Storage temperature: -20 -60
Warning
This manual is for your reference only. The information in the Manual is subject to
change without prior notice. The company reserves the right to explain for any
unknowns, errors or omissions.
No elements are recoverable inside your device. Do not attempt to open it to
improve your TV set. The high-tension supply inside may cause dangers. The
maintenance and adjustment of your TV set must be operated by professionals.
Warning
To prevent injury, this apparatus must be securely attached to the floor/wall in
accordance with the installation instructions.
The mains plug is used as the disconnect device, the disconnect device shall
remain readily operable, and it shall be disconnected from the mains completely.
The plug is used as disconnect device form the mains supply, the plug shall
remain readily operable.
The apparatus should not be exposed to dripping or splashing and that no
objects filled with liquids, such as vases, shall be placed on the apparatus.
No naked flame sources, such as lighted candles, should be placed on the
apparatus.
Batteries (battery pack or batteries installed) shall not be exposed to excessive
heat such as sunshine, fire or the like.
Danger of explosion if battery is incorrectly replaced. Replaced only with the same
or equivalent type.
after some items in this manual means it is available with this function.
14
15