1
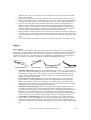
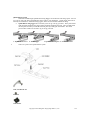
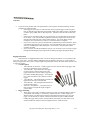
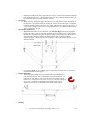
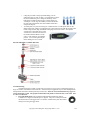
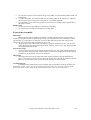
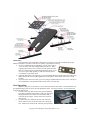
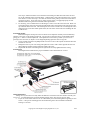
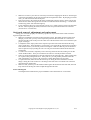
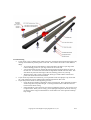
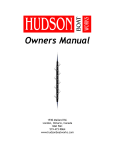
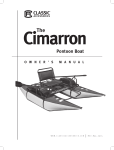
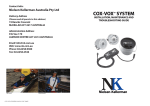
OWNER’S MANUAL
WinTech Racing
Copyright © 2014 Hangzhou Flying Eagle Boat Co., Ltd
Introduction
Thank you for choosing WinTech Racing as your rowing equipment source. Please take a
little time a read this manual, as it is intended to be a useful tool to you in having a trouble free
rowing experience. With some simple guidelines laid out in this booklet, you should be able to avoid
or reduce the chances of damage to your equipment and experience years of trouble free rowing.
Boat Preparation
Before loading your boats for transportation it is important to properly prepare your boat against
damage and lost parts
•
•
•
•
•
•
•
Riggers should always be removed for transportation as they could damage your car, trailer or
other boats around them. If riggers overhang the side of the vehicle, they can also catch on
stationary objects and break
Rigger nuts, bolts and washer should stay on the boat
in their original position. If the bolts are stored on the
rigger, they can scratch other riggers or punch holes in
your rigger bag.
Seats should be fastened to the seat tracks with the
provided bungee cord to ensure it does not fall out
during transportation. Holes are drilled in the track
flange for this purpose.
The wing nuts and tube nuts should be tightened on the footstretcher track and foot plate to
prevent the loss during transportation. These 6 nuts frequently loosen while rowing and
vibrations of traveling can cause them to fall off.
The Velcro straps on the shoes should be attached to keep them from unnecessary fraying during
transportation.
Wiring harness for voice, rate and speed should be secured to the boat to avoid being damaged or
damaging the boat or surrounding boats during transportation.
Every boat comes with a stern flag loop, be sure to use this even if
it is within the legal overhang. A stern flag can be instrumental in
avoiding serious accidents by making sure you and others know
where the stern is.
Trailer Transportation
Trailering boats is a necessary but dangerous part of rowing, which many coaches are not formally
trained or prepared for. Nothing should be taken lightly in this process as you can easily find yourself in a
situation where improperly loaded boats and rigging can become damaged or cause accidents on the road.
•
•
•
When loading boats on a trailer, make sure
that neither the bow nor stern overhang is
extreme. Secondly, make sure that the
boats near the towing vehicle are far
enough away as not to hit it during tight
turns or sharp inclines.
For 8’s and 4’s, make sure that there are 3
and 2 trailer arms on the flange
respectively where straps will be placed.
For 2x/-‘s and 1x’s, try and have both
trailer arms on the boat flange. If this is
not possible, rest at least one flange on the
crossbar and the other on the deck. Make
sure to thoroughly pad the bar and not over
Copyright © 2014 Hangzhou Flying Eagle Boat Co., Ltd
1/12
•
•
•
•
tighten the strap. The bow and stern deck are not designed for a heavy load and can be dented
with too much pressure.
If you have a full load and strap a single or double on the underside of the trailer arm, be aware
that the cockpit will catch any water from the rain or road spray. A full cockpit suspended from 2
boat straps can weigh enough to seriously damage the boat – please take caution in this respect.
Never use a boat strap that is frayed or brittle, a broken $5 boat strap can cause thousands of
dollars in damage. Make sure that the strap is always flat against the hull and that the metal
buckle is not near or on the hull as it can chip the paint during transportation. Enough tension
should be applied to the boat strap as to keep the boat from moving side to side when tugged on.
The loose end of the strap should be secured on the trailer arm to avoid fraying.
Riggers should be stored in the trailer closer to the axles to avoid more movement or in the bed of
the towing vehicle. Outstay riggers can be nested by sideand tied together for safer transportation.
The most damaging part of the rigger is the pin and top nut, which can scratch and puncture other
riggers.
Always double check that all boats are tied down correctly and the load is secure before driving.
Riggers
Rigger Options
There are many different rigger styles to choose from, each with their own set of advantages.
Wing riggers vs Outstay riggers would be the choice to start with first as this determines the cockpit shape.
Then the second option would be to go with Carbon or Aluminum construction, which determines the
performance level and cost. Aluminum riggers are the standard rigger included in the cost of WinTech
boats, so if you choose to purchase carbon riggers, then there will be additional charges.
Aluminum Outstay
•
•
•
•
Carbon Outstay
Aluminum Foil Wing
Carbon Foil Wing
Aluminum Tube Outstay riggers are the most traditional rigger option. Four bolts connect the
rigger to the saxboard and each rigger can be adjusted vertically +/- 1.5cm though the extra set of
holes drilled on the rigger foot. These holes give you a greater range of height adjustment if
needed. WinTech Aluminum Riggers are Hard Coated to give you extremely durable riggers
resistant to scratching and corrosion.
Carbon Fiber Tube Outstay riggers are for elite crews looking to save weight and transfer
power efficiently. These riggers are designed with a Bow mounted tube and a C-shaped pin
holder. This will allow you to fine tune the rigger to your desired pitch. The uni-directional
prepreg carbon fiber construction is extremely light and stiff, but is susceptible to damage during
transportation, so please store the riggers in the provided bag.
Aluminum Aerofoil Wing riggers mount on top of the cockpit flange through four hex-bolts.
The height of the saxboard for a wing boat has been reduced from that of the outstay boats to
provide proper hand clearance over the wing during the stroke. Wing Riggers strengthen the boat
through the cross bar spanning the cockpit. The wing riggers also provide more space in the
cockpit due to the absence of rigger bolts and ribs in the saxboard. WinTech Aluminum Riggers
are Hard Coated to give you extremely durable riggers resistant to scratching and corrosion.
Carbon Fiber Aerofoil Wing riggers are for elite crews looking to save weight and transfer
power efficiently. The Carbon Wing riggers are made with High Modulus Prepreg Carbon fiber
and a Nomex core sandwich construction. The carbon fiber construction is extremely light and
stiff, but is susceptible to damage during transportation, so please store the riggers in the provided
bag.
Copyright © 2014 Hangzhou Flying Eagle Boat Co., Ltd
2/12
Quick Release System
WinTech's breakthrough Quick Release Wing Rigger saves both time and storage space. You can
rig or de-rig your boat faster and double the storage room in your boathouse. Quick release hard ware is
currently on available for Aluminum Wing riggers, which are also standard Aluminum Wing.
• Quick Release wing riggers do not need any tools to rig or de-rig your boat. This system works
with cam bolts attached to the rigger and keyed plates attached to the boat. The Cam bolts slide
into the plates and then you lock the bolt into place by rotating the cam handle. The whole
process takes a matter of seconds to rig or de-rig your boat.
1. Tighten the set screw 2. Set the rigger
•
3. Open cam and depress 4. Close cam to lock
There are 6 parts to the Quick Release system
Cam, Cam Bolt & Nut
Set Screw
Cam Washer
Copyright © 2014 Hangzhou Flying Eagle Boat Co., Ltd
3/12
Cam Plate
•
If you are having trouble with your Quick Release system, please check the following common
problems for simple remedies.
o If the rigger is hard to put on, make sure that when you put the rigger on the cam plate
that you hold the rigger flat with one hand and with the other make sure the cam handles
are in the open position and are fully depressed. Otherwise the bolts will not slide into
place.
o If the rigger is not locking tight or is too tight to lock, use a 2.5mm allen key and loosen
the set screw. Then you can either lengthen or shorten the length of the cam bolt to the
desired tension when the cam is in the locked position. You can do this by simply
turning the cam bolt clockwise to shorten or counterclockwise to lengthen.
o If you row in salt water, you may find that salt crystals build up in the mechanism, which
can make the rigger hard to get on and off. It is recommended to wash your rigger after
each row and thoroughly clean all the parts to each season to keep the quick release
operating smoothly.
o If you no longer want the Quick Release system, you can always revert to a bolt on rigger
through disassembling the QR components and bolting the rigger through the flange.
Rigging Instructions
WinTech boats are supplied with the basic set of tools and spare hardware in a convenient pouch
to get you on the water. You may find that additional tools and hardware will aide you. Each rigger has
been pre-rigged at the factory to the average height and spread/span noted on the charts below as well as set
to 4 degrees of pitch.
• Tool description
o 10mm Wrench or nut driver– Outstay riggers need one wrench, while wing riggers will
need two to tighten the rigger to the boat.
o 13mm Wrench – Top nuts on Euro slot riggers
use this wrench as well as all the nuts on the
rigger heads for the Carbon Outstay rigger and
the Carbon Sculling Wing Rigger. You will need
two 13mm wrenches for the C holders on these
riggers.
o 17mm Wrench – This will hold the pin while you
tighten the bottom nut on the Euroslot
o 19mm Wrench – This will tighten the bottom nut
on the Euroslot riggers
o 25mm or 1 inch Wrench – you will need two of
these wrenches to adjust the length or tighten
your backstay.
• Rigger Mounting
o Wing riggers come with 3 mounting positions to provide you with the ability to achieve
your desired work-through, or if necessary, trim the boat for a variable weight crew.
With all 4 bolts, put a flat washer in between the bolt head and wing rigger, place the
rigger over the desired set of holes, and depress the bolts into place. With one hand
holding the rigger firmly in place, starting with the stern bolts, put a flat washer, lock
washer and M6 nut onto the bottom and tighten with two 10mm wrenches.
Copyright © 2014 Hangzhou Flying Eagle Boat Co., Ltd
4/12
Backstays should be put on the rigger after the wing or A-frame of the aluminum tube has
been fastened to the boat. A large fender washer goes above and beneath the backstay on
the pin and the then nylock nut will fasten it down.
De-rigging
o When removing Aluminum riggers from the boat, it is important to loosen the top nut on
the back stay ½ turn before taking it off the boat. When you store the rigger, you should
rotate the backstay parallel to the stern stay, which will allow the riggers to nest easier. If
you do not loosen the top nut and try to rotate the backstay, you could bend the backstay
where it connects to the pin.
Spread/Span Adjustment
o Spread (Sweep Boats) can be adjusted on your Euroslot Rigger head by loosening the
bottom nut with a 19mm wrench and holding the pin from turning with a 17mm wrench.
Measure the spread from the center of the boat. Start by measuring across the saxboard,
from the inside, divide that number in half and put the tape on flange using the
determined figure. This will put the end of the tape at the center of the boat and you can
determine spread.
o
•
•
For adjusting Span on your sculling riggers, follow the procedures above to loosen the
Euroslot and Carbon Tube riggers.
Height Adjustment
o WinTech Racing outfits each pin assembly with a full compliment of
snap on height spacers, with a combination of 5m and 10mm tall. To
adjust the oar lock higher, remove spacers above the oarlock and put
below (note: if doing this on the water, the spacers will float if dropped
in the water). Measure the height from the middle of the seat top,
while at the stern stops, to the middle of the inside of the oarlock.
o
•
•
Pitching
Copyright © 2014 Hangzhou Flying Eagle Boat Co., Ltd
5/12
o
o
Using the provided Concept 2 pitch bushings you can
change the angle of your oar lock. You will need to remove
the oar lock from the pin to change the bushings. Each
bushing has 2 numbers that will give you that pitch on a
vertical pin. On the top, the number you want should face
the gate and on the bottom, the same number should face
away from the gate.
To check pitch, set you boat in slings on a stable location. Put the pitch meter on the
flange of the boat, which is constructed level to the water line and with the needle on the
lower 0 degree mark, align the bubble in the gauge to be in the center. Next put the
vertical face of the pitch meter on the
vertical face of the oar lock and move
the needle until the bubble is in the
center. This will show you what the
pitch is. You can also pitch the pin
itself, making sure it is vertical.
Euroslot Pin Holder Assembly Diagrams
Trouble Shooting
The following ideas can help you fine tune your riggers to your rowers or adapt the rigging to a
larger or smaller crew than the boat is built for. Some times your equipment may be come damaged from
transportation and misuse and the pitch may become bad. Please do not bend aluminum wing riggers to
change the height or pitch. The profile will kink which will further weaken the tube or the welds. This
is a last resort measure.
• Euro Slot Pitch inserts can be purchased through WinTech Racing and are
available in 0.5 degree increments up to 2 degrees. They fit over the pin and lock
into the Euroslot on the rigger head. Use them to counteract the pitch from either
raising or lowering the rigger head.
Copyright © 2014 Hangzhou Flying Eagle Boat Co., Ltd
6/12
•
Wing Shimming can be accomplished through using larger plastic fender washers in between the
rigger foot and the flange. The sweep wings cam be shimmed on one side to raise and lower the
rigger head, while sculling wings needs can be shimmed under the bow or stern bolts to change
the height of the rigger heads. The aforementioned methods of pitch adjustment will be needed to
get the pin back to 0 degrees.
Rigger Maintenance
There are many simple steps to increase the life of your riggers from common sense practices to
seasonal cleaning. This will also allow you to see what parts need replacing and repairing before the start
of the next season.
• When transporting riggers, make sure to use a bag when available, this is especially important for
wing and carbon riggers. When storing the riggers in the trailer, make sure that they are nested in
a way that they will not damage each other and lash them down to the trailer bed to eliminate
movement.
• If you row in a saltwater environment, use BoeShield on all the Stainless Steel parts to protect
against corrosion. This can be purchased at WinTech’s online store. It is also highly
recommended that you wash down your riggers after each row. The growth of the salt crystals in
the rigger components can cause damage from increased friction and crystal expansion.
• After each season, disassemble the rigger head to clean any grit in the pin or any build up of salt.
Use a brass brush and WD40 to clean off this buildup. Check the Concept 2 oar lock bushings for
wear. These can become worn and will not hold your pitch consistently.
• Oarlocks are the softest part of the rigger. Make sure that the collars of your oars and oarlocks are
free of grit before rowing. If not, each feathering motion with grind away at the plastic, leading to
worn oarlocks, which will need to be replaced.
• The threaded inserts on the back stays can become dry and hard to operate. Over time it may be
necessary to grease the threads. Use Lithium grease to lubricate and preserve the life of the nuts
and insert.
Steering
Fins
•
•
The fins on all WinTech boats are fixed to the boat using a fin box, which is bonded into the boat.
If a fin is damaged or broken, you can remove it or the remnants by pushing it forward and then
lifting up the stern end. This will release the flange of the fin from the slot.
To replace the fin, make sure to clean out the slot of the fin box first. Then insert the tip into the
fin box and slide towards the bow. Then set the stern end in the fin box and then slide all the way
to the stern. Place a dab of silicone over the bow end of the fin box to secure it in place.
Rudder
• To remove the rudder from an integrated fin, you will first need to remove the fin. Please follow
the instructions above.
Copyright © 2014 Hangzhou Flying Eagle Boat Co., Ltd
7/12
•
Once the fin is removed, remove the nut on top of the rudder cross bar and then pull the rudder out
from the hull.
• To replace the rudder, you will notice that there is a rubber gasket on the rudder post – make sure
this is in place and use some grease on the post for a good water tight seal.
• Once the rudder is back in the boat, put the cross bar on the post, seating it in the squared hole of
the rudder cross bar.
Rudder Wires
• For foot steered boats, the rudder wires should cross each other.
• For coxed boats, the rudder wire should not cross each other.
Footretcher Assembly
Heel Straps
Heels straps may seem insignificant and useless, but their introduction to the rowing world as a
mandatory item was the result of a fatal rowing incident. The strap allows the shoe to articulate 3 inches,
but no further, so if a boat tips over, the rower can remove their feet from the shoe and swim to safety.
Please make sure to have these fully operational for every row.
• WinTech shoes come with a plastic clip which can easily be fastened to the shoe. Tie the loose
end of the string to the hole on the footplate under each heel. Be sure not to loop the string under
the footplate from Heel to Heel
Footstretcher Angle
• The angle of the foot board can be change through the heel clip. The central red hexagonal insert
can be rotated to change the angle, when the hole is on the top the footboard is around 45 degrees
and when it is on the bottom, it is close to 42 degrees.
Shoe Height
• The height of the shoes can be changed by taking off the cylindrical wing nuts inbetween the
shoes. Once removed, you can move the shoes on the shoe plate vertically to another set of holes.
Make sure to replace the washer, split-lock washer and wing nut when finished.
Assembly Diagram
The diagram below illustrates the proper assembly order and hardware needed to complete your
footstretcher system. Please note that for wooden plate footstretchers, the cross tube is attached to the
footstretcher plate via tube clamps on the back side of the footstretcher (parts 263 and 266).
Copyright © 2014 Hangzhou Flying Eagle Boat Co., Ltd
8/12
Maintenance
The footstretcher system should be checked every season for wear and tear and that the proper
hardware assembly is present to assure that everything is operational for racing.
• In case of a footstretcher track breaking, you can remove the 4
screws from the deck with a Philips head screw driver. When
replacing the track be sure to reset the screws by hand, because
there is a stainless steel nut plate bonded under the deck. If you
use a screw gun at high speeds, it could cause the nut plate to
cross thread, or pop off the deck.
• If the nut plate needs to be replaced, you can reach inside the deck and glue it back on with epoxy.
Make sure that the screw is fully tightened to the nut plate to ensure that it cures in the correct
position.
• If your shoes become loose often, you can try using a liquid thread lock on the screws. Be sure to
use a brand that is semi-permanent like Loctite Tite’n or Loctite 242.
Seat Operation
When traveling it is not necessary to remove the seats from the boat, but is it recommended to use
the supplied bungee cords to secure the seats against the tracks. For longer journeys, you can remove the
seat to keep them cleaner.
• To remove the seat, slide it to the stern stops and pull the
stern edge towards the footstretcher. With your free hand
sharply hit the bow end of the seat towards the stern to
overcome the stern stops. Do not remove the seat from
the bow end.
• To replace the seat, starting at the stern end of the seat
tracks, make sure the curved end of the seat is facing the
bow. Put the bow wheels in the seat track just beyond the
Copyright © 2014 Hangzhou Flying Eagle Boat Co., Ltd
9/12
•
stern stops. And then slide the seat towards the bow making sure that the hooks of the seat riser
are on the underside of the seat track flange. Sharply hit the stern end towards the bow to get the
stern wheels over the stern stops. Once the seat is in the track, pull up on the seat to make sure it
is properly in place. If one side pops up, remove and try again. If engaged properly, the seat
should be able to hang from the seat tracks while upside down.
For traveling, it is recommended to use the bungee cords to secure the seat to the boat. Hook one
end of the bungee cord to the stern hole and thread the other end in between the seat axle and seat
top and hook on the bow hole. This will keep the seat secure if it falls out. Even though the seat is
designed to stay in the boat when upside down, the seat tracks could come loose enabling the seat
to vibrate free.
Seat Height Setting
WinTech racing has developed a seat riser which can be adjusted vertically to biomechanically
optimize your rower’s body position in the boat. The seat arrives from the factory in the middle setting
giving you +/- 8mm of vertical adjustment. This adjustment can be used to position your crew more
precisely to the water line, or adjust a rowers height depending upon their torso to leg ratio.
• Using an 8mm wrench and #2 phillips head screw driver remove the nylock nut and bolt from the
seat riser on one side.
• Realign the holes to your new setting and replace the screws with a washer against the riser and
then tighten the washer and nut against the inside of the riser.
• Repeat with the other side making sure the nylock nuts are fully tightened before rowing.
Seat Diagram
The diagram below illustrates the proper installation order of hardware for our seat.
Wheel Maintenance
Taking care of you wheels can really make the difference in how the boat feels and how smooth your
recovery is. A well maintained set of wheels should roll back to the stern stops by gravity alone.
• If you row in salt water make sure to oil or Boesheild your wheel bearing at the beginning of each
season. A drop of oil will help protect the metal bearing from salt accumulation within the
bearing or corrosion.
Copyright © 2014 Hangzhou Flying Eagle Boat Co., Ltd
10/12
•
•
•
Make sure to remove your shoes or clean off your feet before stepping into the boat. Sand and grit
in the tracks will damage the wheels and seat tracks throughout the stroke. By keeping your slides
clean, you will increase the life of both parts
Each season remove the seats from the tracks and manually clean the wheels. Debris can become
caked onto the wheels from general use and this can make the wheels feel bumpy. A scrub brush
and hot soapy water will clean them right up.
If your wheels become worn or the bearings seize up, use a 10mm wrench to remove the bolt from
the axle. When replacing the wheel, make sure to use semi permanent thread lock on the bolt
(Loctite Tite’n or Loctite 242).
Seat track removal, adjustment and replacement
Setting your seat tracks properly can affect the proper travel of your slide and the catch and release
angles throughout the stroke.
• Make sure to adjust the seat tracks in the boat before rowing. Depending upon how much work
through you row with, you may need to adjust the position of the seat tracks. It is common to
measure from the center of the pin to the center line of the bone holes in the seat to determine your
proper catch angle.
• To adjust the tracks, simply unscrew the inspection port and reach inside and unwind the wing
nuts a couple turns. There should be 2 on each track. Once loose lift up on the track to loosen the
bolts and then slide to your desired position and retighten. Make sure that the port and starboard
track are placed evenly by sliding the seat to an end, port and starboard wheel should touch the
end together.
• To remove the seat tracks, completely remove the wing nuts from the bolts, making sure to take
out the bonded washer. Then you can lift the track and riser vertically from the seat deck.
• There are compression bushings set into the seat deck for the seat track bolts – make sure that they
are in place before putting the track in. If they fall out, you will probably find them inside the
deck compartment, you can use a dab of silicone to attach them back to the seat deck.
• To replace the track, make sure that the stern stops are facing the stern and that the seat track
flange is facing the center of the boat. The flange of the seat track is to hold the seat in the boat
when the boat is upside down.
• Make sure that you always use the bonded washer against the underside of the seat deck; this will
keep water from entering the sealed cockpit through the bolt holes.
Seat Track Diagram
The diagram below illustrates the proper installation order of hardware for our seat track.
Copyright © 2014 Hangzhou Flying Eagle Boat Co., Ltd
11/12
Trouble Shooting
• If your rower’s legs are falling asleep while rowing, the circulation of blood from their upper body
is being constricted from pressure points on the seat. This could be the result of a few different
things.
o Try lowering the seat to heel distance, which will reduce the angle of your legs at the
release reducing pressure on your legs at the stern end of the seat.
o You can also tilt the seat top towards the stern through lowering the bolts one space on
the seat riser. Just remove the stern bolts and align them with the next hole down. This
will effectively lower the stern edge of the seat, reducing pressure on your legs.
o WinTech racing sells a variety of seat pads, which give a little cushion at these hard
points and can increase blood circulation.
• If your rowers slip off the seat at the start, you can purchase some non-slip tape to up on the seat
top. This will grip the rowers clothing better and help keep them on their seats.
• If you find your seat tracks are moving during your row:
o Check the proper assembly of hardware on the seat track bolt. There should be a bonded
washer wing nut to keep the bolt tight. A missing bonded washer could allow the seat
track to loosen while rowing.
o If the assembly is correct, then use more force to tighten the wing nut. You can use a tool
to tighten them. When you are rowing, your bodyweight compresses the deck, removing
the tension on the wing nut which allows it vibrate and loosen. More pressure will help
keep it tight.
Copyright © 2014 Hangzhou Flying Eagle Boat Co., Ltd
12/12