1
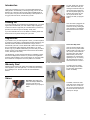
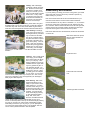
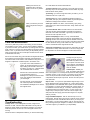
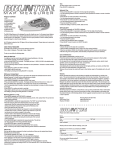
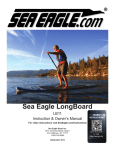
Motormount Fishing Boats
Instructions and Owner’s Manual
SE-6
SE-8
October 2003
1
SE-9
To close, tightly pinch the pipe
section of the valve with your
forefinger and thumb while you
remove the pump nozzle from
the valve. Squeeze tightly, and
hold the valve at the very bottom to prevent the air from
seeping out while you plug the
valve.
Introduction
Thank you for deciding to buy one of our Sea Eagle Motormount
Fishing Boats. We think that you should get many years of use and
pleasure out of this boat. We have been selling inflatable boats for
over 30 years, and your boat is the beneficiary of this experience. It
is rugged, safe and secure, and will serve you well.
Packing list
Once the valve is plugged it can
be pushed down into the floor
and out of the way. Getting this
right might take a few attempts,
but it becomes second nature
quickly.
If you have ordered your boat directly from SeaEagle.com, your packing list will be included with your order. Please verify everything is
correct and contact us right away at 1-800-852-0925 if you have any
questions. Our office is open 9-5 Monday- Friday, EST.
If you have ordered from one of our dealers or resellers, please call
them if there are any items missing from your order.
Registration
If you intend to use your Sea Eagle with a motor, you will be required
to register it in most states. The Department of Motor Vehicles in your
state will need the Manufacturer’s Statement of Origin, which is
included with your boat. In some states a Bill of Sale is also required,
and it is included for orders shipped to those states. If you need
another copy of your MSO or Bill of Sale, just call us with your hull ID
number. (This is on the starboard side of the boat near the chamber
3 valve, and begins with “LES” )
Deluxe One-Way Valve:
Used on the three larger chambers, this one-way valve makes
inflation easier. The outer cap of
the one-way valves makes the
permanent seal, and must be
fastened firmly. Be sure the
threads are not crossed when
tightening the cap or screwing
the valve base. Also check to
make sure there is no sand or
Your State Dept. of Motor Vehicles will assign a registration number
that must be displayed near the bow of your boat. Your registration
numbers must be affixed to your hull to be legal. You can apply adhesive numbers to a small piece of wood or plastic for a neat look.
dirt that could break the seal.
Warranty Card
To inflate your boat, simply
place the large round nozzle
into the valve. (See Inflation
section for details)
Please fill out and mail in the yellow colored Warranty Registration
Card supplied in your order right away. You will void your warranty
by not mailing it to us. Be sure to enter the Hull Identification
Number.
Valves
Pipe Valve: Sea Eagle pipe
valves are simple, reliable and
compact. Insert the cone
shaped nozzle on your pump to
inflate.
To deflate, unscrew the inner
valve and remove. Most of the
air will rush out in a minute or
two, and any remaining air will
be forced out when the boat is
rolled up for storage.
2
Pumps
Inflation Monitor
A-4 bellows pump - This pump is included
in the Startup Packages of our Sea Eagle
6, 8 and 9 Motormount boats. Attach the
hose to the valve on the left side of the
pump (as shown in the picture) to inflate.
The two piece nozzle adapters allow you to
either inflate our small pipe valves on the
floor and seats or deluxe one-way valve on
the main chambers. We firmly recommend
Chambers 1 and 3 feature an
inflation monitor diagram to
help you gauge the correct
pressure.
As you inflate your boat, the
hull material will stretch so that
the printed diagram will expand
to match the clear plastic strip
included with your boat.
you to carry your A-4 on board for safety.
Hold the clear plastic strip over
A-41 large bellows pump - This pump is
included in the Fisherman’s Dream and
Daytrip Packages of our Sea Eagle 6, 8
and 9 Motormount boats and is one of the
best on the market today. Attach the hose
to the valve on the right side of the pump
(as shown in the picture) to inflate. The
three piece nozzle adapters allow you to
either inflate our small pipe valves on the
floor and seats or the deluxe one-way valves on our main chambers.
We firmly recommend you always carry your A-41 on board for safety.
the boat so the patterns match.
Inflation
Hull material and working pressure: The Motormount Boats are
designed to have a moderate working pressure of approximately 0.75
psi. When properly inflated, you should be able to push your thumb
into the hull about 3/4” with moderate pressure. The PolyKrylar hull
material is thick and highly resistant to puncture and abrasion.
Using an air compressor designed for tires at 50 PSI can harm a
boat designed to work at a far lower working pressure, so we recommend only using Sea Eagle pumps.
MB-50 electric pump - The MB-50 electric
pump works with a cigarette lighter plug to
inflate your Sea Eagle. The star shaped
valve set and the blue deflation cap are not
needed for our boats.
Before starting, locate a relatively flat, clean space to unpack your
boat. Unroll the boat so it is laid out flat, and locate your pump.
First inflate the floor chambers using the small nozzle with either
pump (See Pumps and Valves for details)
Next, inflate chamber 1, the upper safety chamber. Be certain to
inflate this before chambers 2 and 3. This pushes the interchamber
bulkhead down into chamber 3 and guarantees that chamber 1 will
be fully inflated in the unlikely event that the main chamber loses air.
Using the inflation monitor, inflate chamber 1 until the pattern on the
clear plastic strip matches the pattern on the boat. This is slightly
below the maximum pressure as depicted above. Later when you
inflate chamber 3 it will add pressure to chamber one so that the
chamber gauge on the clear plastic strip is about one centimeter over
the gauge on the hull.
Make sure your pump is off, and insert the
cigarette lighter adapter into your car’s cigarette lighter. If your battery is weak you
might want to keep your engine running.
Proceed to inflate chamber 2. If you are installing floorboards on your
boat, inflate chamber 3 to about 75% of its final size.
The MB-50 needs no extra nozzles to
inflate the main air chambers of your boat.
Just insert the pump into the valve and
switch it on.
After the floorboards are completed, inflate chamber 3 so
that the inflation monitor matches the pattern on the printed
gauge. (see photo above) This
will add pressure to chamber 1
and cause the pattern on the
hull to stretch so that the pattern on the boat is one centimeter beyond the pattern on the
plastic sheet. This will not harm
your boat, but do not exceed
Do not drop your pump or move it suddenly while it is on.
Use the plastic extender tube (not pictured
in setup shot above but shown at left) and
the large nozzle to inflate the floor and
seats.
this pressure.
You should use your A-41 to top off each
chamber to reach it’s proper working pressure.
3
Floorboard Assembly
Motormount Assembly
1. Inflate both chambers in the
inflatable floor fully. If the inflatable floor is not fully inflated the
floorboards will have a small
gap on either side. Inflate
chambers 1 & 3 to 60-75% of
maximum pressure. You should
be able to push 4 to 5 inches
into the hull.
Your boat should be about 75%
inflated to install the motormount correctly. This gives the
boat some structure but keeps
it pliable. The MM-3 (left), has
motormount rods which are
bent inward to transfer pressure
into the lower section of the
hull. The MM-2, which fits the
Sea Eagle 6, has motormount
rods which Are shaped like a
letter J.
2. Place floorboards inside the
boat. The boards will overlap
when laid flat over the floor. Lift
both boards and place them in
the aluminum H-bar connector.
The boards should be in an
inverted V.
First insert closure caps into the
four ends of the tubular rods.
3. Push down on the center of
the inverted V. Be careful that
your fingers don’t get caught in
the floorboards.
Insert the longer end of each
rod through the two motormount grommets on the top
stern section. Insert the shorter
ends through the bottom grommets.
4. Put the aluminum side struts
into place. They should slide
neatly into place. If you are
having difficulty getting access
to the floorboards, you might
need to let a bit more air out of
chamber #3.
For the Sea Eagle 6, insert a
clevis pin through the holes on
the long top tubes to lock in
place with retainer rings. The
bottom rods are secured as follows: from the inside of the
tube, push clevis pins through
the holes and thread the retainer rings through them.
The Sea Eagle 8 and 9 motormounts have pop-up buttons to
secure the motormount.
5. If you are not installing a
motormount, reinflate your boat
by first pumping up chamber 1
and then chambers 2 & 3. Your
floorboards should fit tightly to
the hull of your boat and provide excellent stability.
Holding the wood motormount
block to the back of the rods,
place the U shaped clamps on
the inside of the tubes. Insert a
bolt through the clamp on each
side and fasten with a knurled
nut & washer behind the board.
Make sure the motormount
block is mounted at the highest
position.
If you are installing a motormount, proceed to the next section before reinflating your boat.
Make sure to inflate the boat in
the proper sequence.
4
5) Clip the front strap of the
canopy to the rope lacing going
through the 2 grommets just
above the handle as shown in the
picture at the right. Attach the two
back straps to roping behind the
blue grommet on the motormount
inflatable chamber.
Motormount Support Bench
The Motormount Support
Bench is a comfortable seat
that improves support for heavier outboard motors. It also
transmits the rotational force of
the engine and reduces transom flexion under power.
6) Tighten straps so the canopy is
level and tightly fitted.
Slide it under the upper tubes
of the motormount before fully
inflating the boat. Fasten the
two velcro straps to the motor
mount tubes to secure the seat.
Safety
In addition to properly registering your Sea Eagle, it is your responsibility to be aware of and to comply with all relevant safety regulations. In all water sports you should have reasonable swimming ability. Just as swimmers have a cardinal rule about not swimming
alone, you should never go boating alone.
Canopy Installation
The next point to consider is having a personal floatation device
(PFD). Not only is it the law, but from our point of view, it is just plain
foolish not to have PFD's for everyone aboard. You can use U.S.
Coast Guard approved flotation cushions or Coast Guard approved
life jackets. The type of water conditions you are going in should
determine which is safer for you. Depending on the circumstance
and the type of boating you enjoy, you should consider other safety
measures (i.e. if you're white water rafting, it might be wise to wear a
wet suit, gloves, and even some sort of protective helmet).
In a manual of this type it is impossible to give adequate space to the
topic of water safety. We strongly suggest, however, that you enroll
in one of the excellent water safety courses offered by the Power
Squadron or Coast Guard Auxiliary in your area.
Operating your Sea Eagle
Rowing: You will be surprised
how easy it is to row your boat.
It is best to sit in the bow on the
blue SED seat for a low rowing
position with back support.
Place the oars through the oarlocks and row in unison.
You should have all these parts, but you
only need the 2 aluminum plates, 2 long
screws, 2 brass inserts and two knurled
nuts for the SE 8 & 9. The other parts
are for our Sport Boats.
1) Insert aluminum rods so that aluminum tubing is all connected as shown
in the picture above.
2) Place canopy rods on inside of the
front oarlocks. Make sure that the single
nylon strap on the canopy is pointed towards the front and the two straps are pointed towards the back of
the boat.
Motoring: Sea Eagle fishing
boats are very light compared
to similar sized hardhull boats,
so they perform well with small
outboard motors. As with any
boat, you need to be keenly
aware of the wind and water
conditions around you. Since
these boats take small engines,
you won’t always be able to
motor past every current. You
don’t want to be caught with a 4
knot boat trying to fight a 5 knot tidal current. As with all boating, a little planning goes a long way.
3) Place aluminum panel on the
outside of the oarlocks as shown
at left.
4) Thread one long screw through
one of the aluminum plates, put
the brass insert into the inside of
the plastic tab at the end of bottom aluminum tubing. Push the
screw (now threaded through the
aluminum plate) through the open
space of the oarlock into the plastic tab with the insert in it as shown and tighten the knurled nut to
secure the canopy to the oarlock. Repeat for other side.
5
Fishing: With a Sea Eagle,
most kinds of fishing are possible. Because it can be easily
car-topped or packed conveniently in a car trunk, you can
take your boat almost anywhere
there is fish. In many cases,
you will have a big edge over
other fishermen because you
can launch your boat where
there are no boat ramps.
Disassembly and deflation
If you are planning on storing your boat for a long period, you should
wipe it down with a towel to remove any moisture to prevent any
mildew forming on your boat.
First remove the knurled nuts and the curved brackets from your
motormount and store the motormount block and all hardware.
Unscrew the deluxe one way valves on chambers 1, 2, & 3, and then
remove the motormount by depressing the push buttons at the bottom of the tube. Pull the motormount tubes out of the lower grommet,
and then the top two grommets. Rotating the tube from left to right
helps with removing the motormount from the top tubes.
This allows you to work productive fishing areas others can't get to.
Small lakes that may not have a boat ramp or inland bays without a
road all the way down to the water, these difficult to get to fishing
areas often have the largest fish that other fishermen dream about.
Yacht Tending: Increasingly,
yacht owners are choosing our
Sea Eagle boats for yacht tending. The reason is that when
they get to a particular harbor,
they want to be able to explore
other parts of the harbor and
get to shore quickly. In this situation, you'll come to appreciate the handy towing grommet.
Please note: we never recommend towing your Sea Eagle
above 3 m.p.h. in calm waters. *****DO NOT ATTEMPT TO TOW
PEOPLE.
Remove the side struts from the floorboards, and then lift the boards
out of the hull.
After all the valves are opened,
allow the boat to deflate for a
minute or two.
Flip the boat over.
Camping: This is a really great
way to enjoy your Sea Eagle
and to add a whole new dimension to your camping. A Sea
Eagle is capable of carrying an
incredible amount of gear, making it very practical to get to a
truly secluded campsite. You
can car-top your boat or carry it
deflated in a car trunk. When
you finally get to the campsite
of your choice, you can motor
for hours around nearby lakes, bays or bayous, etc. And, if it happens to be a large lake or bay you'll appreciate your Sea Eagle's
ability to get to difficult places.
Fold the left side of the boat
over.
River Running: With a Sea
Eagle Fishing Boat you can
safely run up to class III white
water (based on a 1-6 scale).
However, before doing so, you
should read some books on the
basics of white water rafting. In
particular, you must become
aware of the danger posed by
up and downstream eddies,
drops, falls, rocks, trees,
branches, shredded aluminum
canoes, broken glass and other obstacles that you may come
across. It is also important to read up and know the danger posed by
any river you choose to run. With a basic understanding of white
water rafting and the river you are going on, you can participate in
one of the most exciting water sports in your Sea Eagle. One last
note of caution, please remember to wear life jackets!
Fold the right side over the left.
6
for a leak. Below are the three best methods
Starting from the bow, roll
toward the stern of the boat
tightly to force out any remaining air.
1) Visual inspection. Get a good look at your boat from just a few
feet away. Flip it over and closely check over the outside. Any large
leaks should be clearly visible.
2) Listening. If you have a rough idea where your leak is, you can
sometimes hear it in a quiet room.
3) Soapy water. Use a mix of dishwashing liquid and water in a
spray bottle, and spray over suspicious areas. Any leak will produce
bubbles that will pinpoint the location of the leak.
When you are done your boat
will be compact and ready for
storage.
Check your valves: Look, listen, and if necessary, spray soapy
water around your valve and the valve base. Leaky valves have several causes:
1) Crossed threads. Make sure that both the inner valve and the
outer cap are firmly screwed together. If threads are crossed on
either item a slow leak could result. A good way to avoid this is to
first turn the outer cap back 1/4 turn.
2) Sand in Diaphragm, threads, or O-ring. Check the black
diaphragm at the bottom of the inner valve for sand between the
diaphragm and the inner valve. Also check the threads on the inner
valve, boat hull, and outer cap for any dirt or sand which might break
the seal. Check the O-ring on the inside of the outer cap for any
sand or contaminants which might break the seal.
Care and Maintenance
There is very little that you have to do to keep your boat in almost
new condition for many years. You may store it inflated or deflated.
If you leave it outside, you should raise it up off the ground and cover
it with a tarp if it is going to be in direct sunlight or exposed to leaves,
berries or rain. If you leave it in the water, you will probably have to
empty out the water every time it rains (this will also harm the wooden floorboards over time).
3) Extreme overtightening of inner valve into valve base can cause
a depression in the top of the valve base. In this case, simply sand
the depression out with fine sandpaper to create a flush surface.
Repairs
We do not recommend using your boat below 30 degrees fahrenheit.
PVC material can become brittle in extremely cold temperatures.
This will not harm a boat stored in cold conditions as long as it is not
dropped or subjected to a sudden impact in the extreme cold.
Through use you may occasionally puncture your boat.
Most leaks only take a few minutes to repair. Your boat comes
with a repair kit, and additional
repair supplies can be ordered
from our website.
If you store it in a closet, basement or
garage, we recommend picking a cool, dry
spot, making sure the boat is clean and
dry before you pack it up - otherwise mold
can accumulate while it is stored.
Small Repairs: Deflate your
boat. Thoroughly clean and dry
area to be repaired. For a small puncture (less than 1/8th") apply a
small drop of glue. Let dry 12 hours. If you need to get on the water
sooner, let dry 30 minutes and then inflate the boat, inflating the
compartment with the repair only 3/4 full. Be sure to make a permanent repair later.
Periodic use of 303 Protectorant, available
in the Accessories section of
SeaEagle.com, will improve the UV resistance of the PolyKrylar hull material of
your Sea Eagle.
For stain removal, we reccommend the
use of 3M Vinly Cleaner and Restorer,
also available at SeaEagle.com to remove
the toughest stains.
Rips or Tears: Cut a piece of repair material large enough to overlap the damaged area by approximately 1/2". Round off the edges.
Apply adhesive to the underneath side of patch and around the area
to be repaired. Too much glue will interfere with a proper repair. Allow adhesive to become tacky (2 - 4 minutes). Place the patch on
the damaged area and press down firmly. You may want to use a
weight on top to keep it in place. Allow 12 hours for repair to dry.
After patch has dried, apply glue around the edges for a complete
seal (dry 4 hours).
Large and Difficult Repairs: Call our office for help on how to
make repairs. We will repair your boat for a minimum of $75, but this
is not always the most cost effective solution since you must pay for
return freight. If you are having problems, call our office and we will
talk you through the repair. Freight to our facility in Port Jefferson, NY
and return freight to your address is your responsibility.
Troubleshooting
Leakage of air: If your boat appears a bit soft, it might not be
because of a leak. If the boat was inflated late in the day with 90
degree air, that air might cool 20 degrees overnight. The cooler air
exerts less pressure on the hull, so it could appear soft the next
morning.
If there has been no temperature variation, you need to start looking
7
19 N. Columbia St.
Port Jefferson, NY 11777
Phone #: (631) 473-7308
Fax#: (631) 473-7398
[email protected]
8