1
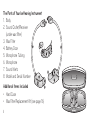
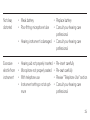
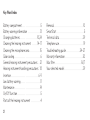
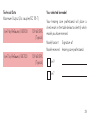
User Guide - be 9 by ReSound - be 7 by ReSound Congratulations on the purchase of your new fully digital be by ReSound hearing instrument! ReSound’s innovative technology and design, as well as the customized set-up selected by your hearing care professional, will make hearing again an enjoyable experience. You will be able to hear much better in many areas of your life, including family, social, and professional. Your be by ReSound has been adjusted according to your individual hearing loss and needs. In order for you to obtain maximum benefit from your hearing instrument, please familiarize yourself with this booklet and follow the advice that is found inside. be by ReSoundTM is a trademark of GN ReSound A/S. 2 Contents Page Cover . . . . . . . . . . . . . . . . . . . . . . . . . . . . . . . 1 Introduction . . . . . . . . . . . . . . . . . . . . . . . . 2 Contents . . . . . . . . . . . . . . . . . . . . . . . . . . . 3 The parts of Your Hearing Instrument . . . 4 Additional Items Included . . . . . . . . . . . . . 4 On/Off Function . . . . . . . . . . . . . . . . . . . . . 5 SmartStart . . . . . . . . . . . . . . . . . . . . . . . . . 5 Inserting and Removing the Instrument 6-10 Changing the Battery . . . . . . . . . . . . . . . . 10 Additional Battery Information . . . . . . . . . 12 Battery Warning Information . . . . . . . . . . 13 Daily Maintenance (Cleaning) . . . . . . . . . . 14 Additional Maintenance . . . . . . . . . . . 15-17 Handling Precautions . . . . . . . . . . . . . . . . 18 Telephone Use . . . . . . . . . . . . . . . . . . . . . . 19 Repairs and Warranty . . . . . . . . . . . . . . . 20 General Precautions . . . . . . . . . . . . . . . . . 21 Warnings . . . . . . . . . . . . . . . . . . . . . . . 22-23 Troubleshooting Guide . . . . . . . . . . . 24-27 Key Word Index . . . . . . . . . . . . . . . . . . . . 28 Technical Data . . . . . . . . . . . . . . . . . . . . . 29 Your Selected Model . . . . . . . . . . . . . . . . 29 Hearing Instrument Disposal Precaution . 31 GN ReSound Contact Information . . . . . 32 3 The Parts of Your be Hearing Instrument 1. Body 6 2. Sound Outlet/Receiver (under wax filter) 3.Wax Filter 3 5 4.Battery Door 2 5.Microphone Tubing 6.Microphone 7. Sound Inlets 1 8.Model and Serial Number 8 7 5 8 1 3 3 Additional Items Included 2 • Hard Case • Wax Filter Replacement Kit (see page 16) 4 6 7 4 1 On/Off Function Your hearing instrument is equipped with an on/off switch that is integrated into the battery compartment. It has two positions: • On, when the battery door is fully closed. Note: the battery door may not appear fully closed when a battery is not in the battery compartment. • Off, when the battery door is open. To turn your instrument off, grasp the battery compartment door with a fingernail and gently pull downward. When you are not wearing the hearing instrument, remember to turn it off to reduce battery consumption. SmartStart The SmartStart delays the switch-on time of your hearing instrument 10 seconds after you have closed the battery compartment. As you insert the instrument in your ear, you may hear beeps at one second intervals. After the instrument beeps ten times, it will turn on. This feature has been turned on for your comfort while inserting your instrument. However, if you find you do not like this feature, your hearing care professional can turn it off. 5 Insertion and Removal of Your Hearing Instrument Insertion: 1. Determine if you have a left or right instrument in your hand. With the battery compartment open, you will see either a RED or BLUE marker: • The hearing instrument with the RED marker is always for the RIGHT ear. • The hearing instrument with the BLUE marker is always for the LEFT ear. 6 LEFT (BLUE) RIGHT (RED) Insertion continued… 2. Check that the body of the hearing instrument feels smooth before insert ing into your ear canal. If the surface feels spiky or rough, contact your hearing care professional. Notice that the battery door is pointing up. This is the correct way to insert the instrument. 3.Grasp the instrument near the base, where the tubing connects to the battery compartment, with your index finger on top and your thumb on bottom. 7 Insertion continued… 4.When properly lined up, gently push the hearing instrument into the ear canal until it is flush with the opening of the ear canal. 5.After the hearing instrument has been properly seated in the ear canal, locate microphone and tubing. 6.Gently push the microphone into the creased area of the ear that is located above the ear canal entrance. 8 7. After the microphone is in place, push the tubing into place. Insertion continued… 8.This drawing shows how the hearing instrument should look when inserted properly into the ear canal. It is important that the microphone tube fits correctly in your ear. If the microphone tube irritates your ear, please contact your hearing care professional. 9 Removal: 1. Find the microphone and tubing in the crease of the ear that is located above the ear canal entrance. 2. Once you have located the tubing, GENTLY grasp and pull, and the hear ing instrument should come out of the ear. 3.Each time the hearing instrument is removed from the ear canal, make sure that the wax filter is still attached to the instrument. If not, contact your hearing care professional immediately. Changing the Battery Your be by ReSound hearing instrument comes with a low battery warning: 10 • When the battery voltage/power gets too low: The hearing instrument will reduce amplification and emit a beeping signal. This signal will recur every five minutes until the hearing instrument automatically switches off. • Open the battery compartment by grasping the battery compartment door with a fingernail and gently pull downward. • If the door is not opening, check to make sure you have correctly located the battery compartment. • After removing the used battery, insert a new battery with the flat side up (the side of the battery where a “+” can be seen). • A new battery should be inserted into the battery compartment with the microphone tubing pointed up. 11 Additional Battery Information • The correct battery size for your be hearing instrument is 10A with a yellow tab. It will be labeled on the battery packaging. This is a standard-sized zinc air battery. • The battery should be inserted flat side up. The flat side has a “+” on it, and it is located under the yellow sticker. • Make sure to remove the sticker before closing the battery compartment door. If the door does not close, take the battery out and try again. 12 • When the hearing instrument is not in use, please remove the battery. This will help to prevent corrosion from occurring inside the battery compartment, and it will also ensure that battery life is not shortened. Battery Warning Information Batteries, although very small, contain dangerous substances and should be disposed of carefully. This is for the safety of you and the environment. Please note: • DO NOT attempt to recharge standard zinc air batteries. They may leak or explode. • DO NOT attempt to dispose of batteries by burning them. • DO NOT place batteries in your mouth. Consult a physician immediately if a battery has been swallowed, as they can be harmful to your health. • Keep batteries away from children, mentally challenged persons and pets. • Replace dead batteries, and do not leave them in the hearing instrument for a prolonged period, as they may leak. If your hearing instrument is equipped with a low battery indicator, replace the battery immediately after you hear the low battery warning signal. • Used batteries can be harmful to the environment. Please dispose of them according to local regulations or return them to your hearing care professional. 13 Daily Maintenance It is important to keep your hearing instrument clean and dry. Failing to do so will likely shorten the life of the instrument and cause more repairs than is necessary. Begin by wiping the hearing instrument with a dry soft cloth/tissue after each use. This helps to remove any oil, moisture, or cerumen (wax) from the instrument. Inspect the end that fits into your ear canal for debris, and replace the wax filter as needed. 14 Also inspect the microphone for debris and the receiver for wax. Clean as necessary. Microphone and receiver maintenance are covered in the next sections. Each night, the hearing instrument should be stored in a dry place, such as in the hard case you were provided, with the battery door open and the battery preferably taken out. This helps to ensure that any moisture that has gotten into the instrument has a chance to escape. Optionally, you can purchase a container that contains a drying agent (a desiccant). Some containers are electric, and in addition to drying the hearing instrument, they help to sanitize. Check with your hearing care professional for options. The Microphone Tube The microphone tip and tubing can be cleaned by gently wiping them with a soft dry cloth. This will help to ensure that the ports stay open and allow sound to get into the microphone. Additional Maintenance In addition to daily cleaning of your hear ing instrument, you should periodically check and clean the microphone and receiver: Note that the tube may wear out or become discolored over time with usage of the hearing instrument. Should the tubing become discolored or should the hearing instrument fail to produce sound, contact your hearing care professional to have the tubing replaced. 15 Wax Filter The wax filter is located at the receiver end of the hearing instrument. This filter is designed to decrease the likelihood that wax will get into the instrument’s sound outlet and cause decreased performance or damage. 16 To replace the wax filter: 6.Slide the instrument forward. 1. Hold the hearing instrument with the sound outlet pointing down. 7. The new wax filter should now be in place. 2. Slide the prong of the wax filter tool under the wax filter. 8.Check that the new wax filter is in place. It may be necessary to give the filter an extra push to ensure that it is securely attached. 3.Lift to remove the wax filter. Dispose of the old wax filter. 4.Hold the instrument’s sound outlet over a new wax filter. 5.Push the instrument onto the new wax filter. Note: It is not recommended that wax filters be reused, as wax filters may not reattach securely. 17 Handling Precautions with Your Hearing Instrument • Protect the instrument from rough In addition to daily maintenance and handling. in order to avoid unwanted repairs, it is recommended that you take certain • Avoid dropping it on hard surfaces or precautions while handling your hearing floors. instrument: • Do not leave the instrument in or near • Avoid exposing your instrument directly direct heat or sunlight. Excessive heat to moisture such as heavy rain or water can damage the instrument or deform from a shower. the casing or the microphone tube. • Never immerse the instrument into • You should never attempt to modify the water or other liquids, as this may cause shape of the microphone tube yourself. permanent damage to the circuitry • Never force the battery door closed, and/or internal components. as this may damage the hearing instrument. 18 Telephone Use Should you experience any feedback or whistling while trying to talk on the telephone, you can avoid feedback by taking the following precautions: • Hold the phone lightly to the ear. • Slowly move the phone to different positions around or away from your ear until the feedback decreases. By employing these techniques while using the instrument on the telephone, you will be able to minimize feedback and keep your listening experience enjoyable. • The best position to hold a telephone may be determined by the shape of telephone you are using. 19 Repairs and Warranty If your hearing instrument malfunctions, you should contact your hearing care professional. While still under warranty, your hearing instrument can be sent to the manufacturer for repair if it cannot be repaired locally. 20 Do not attempt to open the hearing instrument, as this would invalidate the warranty. If your hearing instrument requires service, please contact your hearing care professional for assistance. General Precautions • Do not leave your hearing instrument in the sun, near open fire or in a hot, parked car. • Do not wear your instrument while showering, swimming, in heavy rain or in a moist atmosphere such as steam bath or sauna. • Should your instrument become moist, place it in a closed container with a drying agent. Your hearing care professional can provide a specially designed container, a so called desiccator for this purpose. • Remove your hearing instrument when applying such things as cosmetics, perfume, aftershave, hair spray, and suntan lotion. These might get into the instrument and cause damage. 21 Warnings • Consult a physician if you discover a foreign object in your ear canal, if you experience skin irritations or if excessive ear wax accumulates with the use of the hearing instrument. • Different types of radiation, e.g. from NMR, MRI or CT scanners, may damage the hearing instrument. Therefore, do not wear the hearing instrument during these or other corresponding scanning procedures. • If your ear canal has been altered in any way by surgery, the potential that the hearing instrument can be inserted too deeply exists. In this case, consult a physician before wearing the instrument. • Other types of radiation (burglar alarms, room surveillance systems, radio equipment, mobile telephones, etc.) contain less energy and will not damage the hearing instrument. They could, however, momentarily affect the sound quality or create strange sounds from the hearing instrument. 22 • Do not wear the hearing instrument in mines, oil fields or other explosive areas, unless those areas are certified for hearing instrument use. Do not allow others to use your hearing instrument. It may cause permanent damage to the hearing instruments as well as to the hearing. • Hearing instruments should be used only as prescribed by your hearing care professional. Incorrect use may result in sudden and permanent hearing loss. • Hearing instrument usage by children or mentally challenged persons should be supervised at any time. • Due to choking hazard, keep hearing instruments away from children under the age of three, and usage by mentally challenged persons should be supervised at all times. 23 Troubleshooting Guide SYMPTOM CAUSE POSSIBLE REMEDY Hearing instrument is dead • • • • • • • • Not turned on Battery is dead Battery improperly inserted Blocked wax filter • Broken receiver • Broken microphone or microphone tube 24 Turn on Replace battery Reinsert battery properly Consult your hearing care professional or, if you have been instructed to do so, change the wax filter • Consult your hearing care professional • Consult your hearing care professional Not clear, distorted • Weak battery • Poor fitting microphone tube • Hearing instrument is damaged Excessive whistle from instrument • • • • Hearing aid not properly inserted Microphone not properly seated With telephone use Instrument settings not at optimum • Replace battery • Consult your hearing care professional • Consult your hearing care professional • • • • Re-insert carefully Re-seat carefully Review ”Telephone Use” section Consult your hearing care professional 25 Troubleshooting Guide POSSIBLE REMEDY SYMPTOM CAUSE Not loud enough • Hearing aid not properly inserted • Re-insert carefully • Microphone not properly seated • Re-seat carefully • Blocked wax filter • Consult your hearing care professional or, if you have been instructed to do so, change the wax filter • Consult your hearing care • Instrument settings not at professional optimum • Excessive ear wax • Consult your physician • Consult your hearing care • Change in hearing professional 26 If there are any other problems not mentioned in this guide, or should questions arise, please contact your hearing care professional. 27 Key Word Index Battery compartment . . . . . . . . . . . . . . . . . . 5 Battery warning information . . . . . . . . . . . . . 13 Changing batteries . . . . . . . . . . . . . . . . . 10,24 Cleaning the hearing instrument . . . . . . 14-17 Cleaning the microphone area . . . . . . . . . . 15 Color coding . . . . . . . . . . . . . . . . . . . . . . . . . . 6 General hearing instrument precautions . . 21 Hearing instrument handling precautions 18 Insertion . . . . . . . . . . . . . . . . . . . . . . . . . . . 6-9 Low battery warning . . . . . . . . . . . . . . . . . . . 11 Maintenance . . . . . . . . . . . . . . . . . . . . . . . . . 14 On/Off function . . . . . . . . . . . . . . . . . . . . . . . 5 Parts of the hearing instrument . . . . . . . . . . 4 28 Removal . . . . . . . . . . . . . . . . . . . . . . . . . . . . 10 SmartStart . . . . . . . . . . . . . . . . . . . . . . . . . . . 5 Technical data . . . . . . . . . . . . . . . . . . . . . . . 29 Telephone use . . . . . . . . . . . . . . . . . . . . . . . 19 Troubleshooting guide . . . . . . . . . . . . . 24-27 Warranty information . . . . . . . . . . . . . . . . . . 20 Wax filter . . . . . . . . . . . . . . . . . . . . . . . . . . 16,17 Your selected model . . . . . . . . . . . . . . . . . . 29 Technical Data Maximum Output (2cc coupler/IEC 118-7) be 9 by ReSound / BE900 109 dB SPL (Typical) be 7 by ReSound / BE700 109 dB SPL (Typical) Your selected be model Your hearing care professional will place a check mark in the table below to identify which model you have received. Model/variant Model received be 9 be 7 Signature of hearing care professional 29 30 31 16647700-GB 08.12 Rev. D Worldwide Headquarters GN ReSound A/S Lautrupbjerg 9 DK-2750 Ballerup, Denmark Tel.: +45 45 75 11 11 Fax: +45 45 75 11 19 www.resound.com www.bebyresound.com Australia GN ReSound Pty. Ltd. Unit R1 Regent Park Estate 391 Park Road Regent Park NSW 2143 Tel.: 02 9743 9707 Fax: 02 9743 7472 www.gnresound.com.au United Kingdom GN ReSound Ltd. 1 Landscape Close Weston Business Park Weston-on-the-Green Oxon OX25 3SX Tel.: 0 1869 343 500 Fax: 0 1869 343 466 www.gnresound.co.uk New Zealand GN ReSound (NZ) Ltd. 12 Parkway Drive Mairangi Bay Auckland Tel.: (free) 0800 900 126 Fax: (free) 0800 007 695 www.gnresound.co.nz Any issues relating to the EU Medical Device Directive 93/42/EEC should be directed to GN ReSound A/S