1
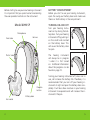
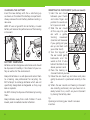
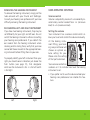
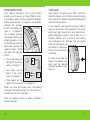
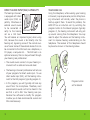
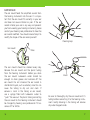
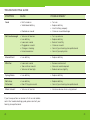
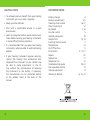
LEIÐBEININGAR UM NOTKUN user guide Danalogic 6 6090 SP Congratulations on your new hearing instrument. The Danalogic 6 6090 SP hearing instrument is a completely new and advanced piece of technology specifically designed for individuals with a severe to profound hearing loss. Please familiarize yourself with the contents of this booklet in order to obtain the maximum benefit from your new hearing instrument. We congratulate you on your new instrument and wish you a pleasant listening experience! ReSound Contents Danalogic 6 6090 SP . . . . . . . . . . . . . . . . . . 4 Battery compartment . . . . . . . . . . . . . . . . . 5 Turning on and off . . . . . . . . . . . . . . . . . . . 5 Changing Battery . . . . . . . . . . . . . . . . . . . . 6 Battery Warnings . . . . . . . . . . . . . . . . . . . . 6 Inserting the instrument . . . . . . . . . . . . . . 7 Removing the Hearing Instrument . . . . . 8 Recognizing left & right instrument . . . 8 User Operated Controls . . . . . . . . . . . . . . . 9 Program Button . . . . . . . . . . . . . . . . . . . . 10 T-program . . . . . . . . . . . . . . . . . . . . . . . . . . 11 DAI capability . . . . . . . . . . . . . . . . . . . . . . . 12 Telephone Use . . . . . . . . . . . . . . . . . . . . . . . 13 Warning! Hearing instruments, their component parts and their batteries can be dangerous, if swallowed, or improperly used. Misuse of these instruments could result in severe injury or death. Daily maintenance . . . . . . . . . . . . 14-15 Ear mould . . . . . . . . . . . . . . . . . . . . . . . 16-17 General precautions & instructions 18-19 Troubleshooting guide . . . . . . . 20-21 Repairs & Technical data . . . . . . . . . . . . . 22 Warnings & notices . . . . . . . . . . . . . . . . . . 23 Danalogic 6 is a registered trademark of GN ReSound. Helpful hints . . . . . . . . . . . . . . . . . . . . . . . . 24 Before starting to use your new hearing instrument it is important that you spend some time learning the user operated controls on the instrument. Model 6090 SP Before you start to use your hearing instrument, open the swing-out battery door and make sure there is a fresh battery in the compartment. turning on and off Microphone Tone tube BATTERY COMPARTMENT Volume Turn your hearing instrument on by closing the battery door. Turn your hearing instrument off by pushing in on the small knob located on the battery door. This will cause the battery door to open. The hearing instrument will always be in program 1 when it is first turned on. Additional information about the programs can be found on page 10. Plastic tube Program button Battery door off Turning your hearing instrument off, when not in use, will increase the battery life. Therefore, it is recommended that you turn off your hearing instrument at night and open the battery door completely. It will also allow moisture in your hearing instrument to evaporate and will increase the instrument’s lifespan. Ear mould CHANGING THE BATTERY Insert the new battery with the + side facing up as shown on the side of the battery compartment. Always remove the old battery before inserting a new one. 6090 SP uses a type 675 zinc-air battery. A weak battery will reduce the performance of the hearing instrument. BATTERY WARNINGS Batteries contain dangerous substances and should be disposed of carefully in the interest of your safety as well as for the environment. Keep old batteries in a safe place and return them to a hearing care professional for recycling. Do NOT attempt to recharge batteries which are not specifically designated rechargeable as they may leak or explode. Do NOT attempt to dispose of batteries by burning them. Keep batteries away from small children. If swallowed, seek immediate medical attention. Inserting the Instrument (with ear mould) 1)Hold the ear mould between your thumb and index finger and position its sound outlet in your ear canal 2)Slide the ear mould all the way into your ear with a gentle, twisting movement (insertion will be easier if you gently pull your ear up and back with your other hand) 3) Turn the top-part of the ear mould gently backwards and forwards so that it tucks behind the fold of skin above your ear canal 4) Place the hearing instrument behind your ear 5)Move the ear mould up and down and press gently to ensure it is positioned correctly in the ear 6) When the ear mould and hearing instrument are correctly positioned, and you have not already turned it on, switch on your instrument by closing the battery door Tip Opening and closing your mouth can ease insertion. Removing the Hearing Instrument To remove the hearing instrument, simply pull the tube outward with your thumb and forefinger. Consult your hearing care professional if you have difficulty removing the hearing instrument. Recognizing left and right instrument If you have two hearing instruments, they may be set differently for your right and left ears. Do not switch the hearing instruments without consulting your hearing care professional. If you detach the ear moulds from the hearing instruments when cleaning and/or storing them, verify that you have connected the ear moulds to the appropriate hear ing instrument before fitting them to your ears. To properly identify your left instrument from your right you should see an indication just above the Push button (see page 10), that designates which ear the instrument is for. L is for Left and R is for Right. USER-OPERATED CONTROLS Volume control Volume is adjusted by means of a conveniently located rotary control marked from »1« (minimum level) to »4« (maximum level). Setting the volume Your instrument has a volume control which allows you to set and control the volume manually. At the hearing instrument fitting, your hear ing care practitioner will choose an optimal volume setting for you. Please note the setting of that particular level. Your volume control has numbers on it to indicate how loud the hearing instrument is set. •If you prefer not to use the volume wheel your hearing care professional can disable this feature. Left Right Program Button Your hearing instrument has a push button enabling you to use up to three different listen ing programs, each of them suitable for different listening environments. If program 1 was enabled, pressing the program Indication button will enable program 2. If program 2 was enabled, pressing the program button, will enable program 3 etc. An audible signal will be heard after pressing the program button. When Program button you press the program button: •One single beep will be heard if the instrument is in program 1 • Two beeps will be heard if the instrument is in program 2 T-program Your hearing instrument has a built in function called the telecoil, which offers improved hearing when used with a telecoil compatible telephone or assistive listening device. In this program, you typically will not be able to hear any sound from the microphone, but will be able to get direct sound input via a telecoil com patible telephone and/or a loop system, e.g. in churches, theatres, etc., or at home. Your hearing care professional has software that will enable both the microphone and the telecoil to be operational at the same time, if so desired. In order to activate the telecoil, the telecoil program must be selected (typically available in program 3). • Three beeps will be heard if the instrument is in program 3 When you close the battery door, the hearing instrument will automatically turn on and the instrument will be set for program 1. Press the program button to select a different listening program. 10 11 DIRECT AUDIO INPUT(DAI) CAPABILITY This hearing instrument is equipped with direct audio input (DAI) capability. DAI allows an external sound source to be connected directly to the hearing DAI-boot aid via a DAI boot. You will receive an improved signal, when using DAI, because the sound is fed directly into the hearing aid, bypassing some of the normal sources of noise. Some of the external devices that can be connected to the DAI boot are a telephone, a CD player, a computer etc… The DAI boot is an optional accessory that can be purchased through your hearing care professional. TELEPHONE USE Using the telephone, while wearing your hearing instrument, may require some practice. Many hear ing instruments will whistle, when the phone is held up against them. To avoid this problem, the 6090 SP has an induction coil. By switching the program button to the telecoil program (typically program 3), the hearing instrument will only pick up sounds coming from the telephone. You may need to adjust the volume on the hearing instrument to improve hearing understanding on the telephone. The receiver of the telephone should be placed as shown in the drawing below. • The sound source connects to your hearing instrument with a cable and an audio boot. • The hearing instrument professional will set one of your programs for direct audio input. To use direct audio input (DAI), set the hearing instrument to the DAI program (typically program 3). •In this program, you will typically not hear any sound from the microphone. Therefore, most environmental sounds will not be heard in the ear that is set to DAI. Your hearing care professional has software to modify this program to allow you to hear environmental sounds and DAI simultaneously. 12 Program button set for telecoil 13 DAILY MAINTENANCE Keep your hearing instrument clean. Wipe it with a soft cloth or tissue after use to remove oil and moisture. Remove any accumulated ear wax from the sound outlet, for example with a small brush as shown in the illustration, but never immerse the instrument in water or other liquids since this may cause permanent damage to the circuitry. Protect your hearing instrument from rough handling. Avoid dropping it on hard surfaces or floors. Do not leave the instrument near direct heat or sunlight. Excessive heat can damage the instrument or casing. Use fresh batteries. Remove the battery from the hearing instrument when it is not in use to prevent corrosion of the battery contacts. Keep your hearing instrument dry. If the instrument has been exposed to high humidity or perspiration, enclose it in a sealed container (desiccator) together with a drying agent overnight. Consult your hearing care professional concerning which drying agent to use. Remove your hearing instrument before going to sleep. In addition, open the battery compartment to turn off the aid and allow it to aerate. Never attempt to dry it with a hair dryer, in the microwave oven, etc. The operating temperature range is from -10°C (14°F) up to +50°C (122°F). 14 15 Ear mould The ear mould feeds the amplified sounds from the hearing instrument into the ear. It is important that the ear mould fits correctly in your ear and does not cause irritation or pain. If the ear mould irritates your ear in any way and prevents you from wearing your hearing instrument, please contact your hearing care professional to have the ear mould modified. You should never attempt to modify the shape of the ear mould yourself. Cleaning loop Ear mould Tube The ear mould should be cleaned every day. Remove the ear mould and the plastic tubing from the hearing instrument before you clean the ear mould. Lukewarm water should be enough to clean grease and moisture off the ear mould. Do not immerse the ear mould in disinfectant liquids, such as alcohol, since this can cause the tubing to dry out and crack. If earwax is stuck in the tubing or ear mould, use a syringe filled with lukewarm water to “push” the wax out. The plastic tubing connecting the ear mould to the hearing instrument should be changed by hearing care professional if it becomes stiff or brittle. 16 Brush Be sure to thoroughly dry the ear mould and it’s tubing before connecting it to the hearing instrument. Gently blowing in the tubing will remove dry water trapped inside. 17 General Precautions • Consult a physician if you find a foreign object in your ear canal, if you experience skin irritation or if excessive ear wax accumulates with the use of the hearing instrument. •Different types of radiation, e.g. from NMR or CT scanners, may damage the hearing instrument. Therefore, do not wear the hearing instrument during these or other corresponding scanning procedures. Other types of radiation (burglary alarms, room surveillance systems, radio equipment, mobile telephones, etc) contain less energy and will not damage the hearing instrument. They could, however, momentarily affect the sound quality, or cause the hearing aids to emit an unexpected sound. Instructions to the hearing Care Professional • Thorough medical/audiometric evaluation is recommended prior to fitting a child with this hearing instrument. • Please instruct the end-user very carefully in how to use and maintain the hearing instrument. • Please store the hearing instrument in a dry place at temperatures between 0°C (32°F) and +40°C (104°F) • Please dispose of the hearing instrument and batteries in accordance with the proper regulations • Warning: Do not wear the hearing instrument in mines or other explosive areas, unless those areas are certified for hearing instrument use. • Warning to hearing aid dispenser: Special care should be exercised in selecting and fitting a hearing aid whose maximum sound pressure level exceeds 132 dB as measured with an IEC 711 Ear simulator because there may be a risk of impairing the remaining hearing of the hearing aid user. 18 19 TROUBLESHOOTING GUIDE SYMPTOM CAUSE POSSIBLE REMEDY Dead • Not turned on • Weak/dead battery • Blocked ear mould • Turn on •Replace battery •Insert battery properly • Clean ear mould blockage Not loud enough •Volume set too low •Low battery •Loose ear mould • Plugged ear mould • Change in hearing •Excessive earwax • Turn up volume •Replace battery •Reinsert carefully • Clean ear mould • Consult your hearing care professional • Consult your physician Intermittent •Low battery •Replace battery Whistles •Loose ear mould • Too small ear mould •Volume set too high •Remove and reinsert • New ear mould required •Reduce volume slightly Frying Noise •Low battery •Replace battery Not clear, Distorted •Low battery • Poor fitting ear mould •Replace battery • Consult your hearing care professional Weak telecoil •Volume set too low •Increase volume when using telecoil If you have questions or concerns that are not addressed in the troubleshooting guide, please contact your hearing care professional. 20 21 Repairs WARNINGS AND NOTICES If your hearing instrument malfunctions, it must be repaired by a qualified technician. Do not attempt to open the case of the hearing instrument since this will invalidate the warranty. If your hearing instrument requires service, please contact your hearing care professional for assistance. TECHNICAL DATA Maximum output (2cc coupler/ IEC 60118-7) 22 141 dB SPL (Typical) A hearing aid will not restore your hearing to normal. However, when fitted properly and used regularly, it will improve your ability to communicate. Your hearing instrument is only one component of your hearing rehabilitation. For further information, please contact your hearing care professional. Children with hearing loss In addition to seeing a physician for a medical evaluation, a child with a hearing loss should be directed to an audiologist. An audiologist can provide further auditory evaluation and re habilitation to help minimize problems with language development. 23 HELPFUL HINTS KEYWORD INDEX • To achieve maximum benefit from your hearing instrument, you must wear it regularly. Battery change 6 Battery compartment 4,5 Cleaning of ear mould 16-17 Direct Audio Input 12 Ear Mould 7, 16 Function switch 5 General precautions 18 Helpful hints 15, 19 Inserting the instrument 7 Maintenance 14 On/Off function 5 Push Button 5, 10-11 Repairs22 Telecoil Use 11 Telephone Use 13 Troubleshooting guide20-21 User-operated controls 9 Volume adjustment 9 Warning & Notices 6, 15, 23 • Keep a positive attitude. • Start with a comfortable volume in a quiet environment. • Learn to recognize familiar sounds around your home before wearing your hearing instruments in more difficult listening situations. • It is recommended that you wear two hearing instruments, when possible, to optimize hearing abilities. • If your hearing instrument requires servicing, contact the hearing care professional who dispensed the instrument to you. He/she may be able to make adjustments in the office, without the inconvenience of returning the instrument to the factory. If necessary, the manufacturer can be contacted directly at the address listed at the back of this manual. 24 25 26 27 Australia GN ReSound Pty. Ltd. Unit R1 Regent Park Estate 391 Park Road Regent Park NXW 2143 Tel.: 02 9743 9707 Fax: 02 9743 7472 www.gnresound.com.au United Kingdom GN ReSound Ltd. 1 Landscape Close Weston Business Park Weston-on-the-Green Oxon OX25 3SX Tel.: 0 1869 343 500 Fax: 0 1869 343 466 www.gnresound.co.uk New Zealand GN ReSound (NZ) Ltd. 12 Parkway Drive Mairangi Bay Auckland Tel.: (free) 0800 900 126 Fax: (free) 0800 007 695 www.gnresound.co.nz Any issues relating to the EU Medical Device Directive 93/42/EEC should be directed to GN ReSound A/S. 16499581-GB-08.02 Rev. A Worldwide Headquarters GN ReSound A/S Lautrupbjerg 9, P.O. Box 130 DK-2750 Ballerup, Denmark Tel.: +45 45 75 11 11 Fax: +45 45 75 11 19 www.gnresound-group.com