1
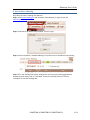
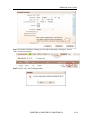
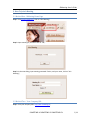
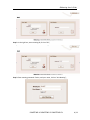
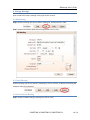
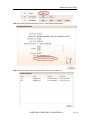
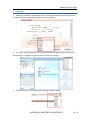
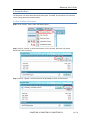
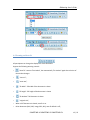
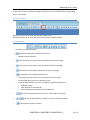
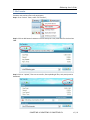
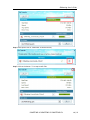
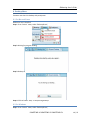
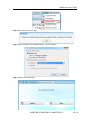
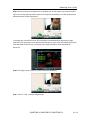
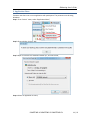
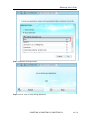
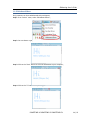
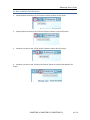
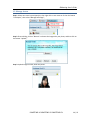
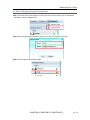
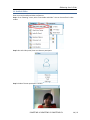
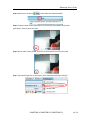
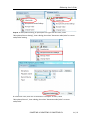
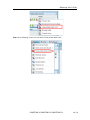
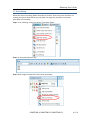
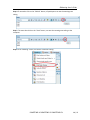
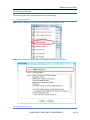
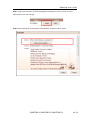
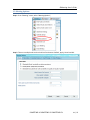
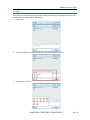
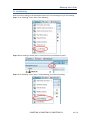
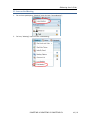
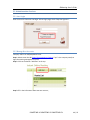
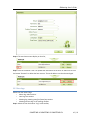
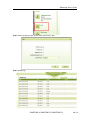
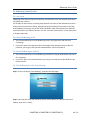
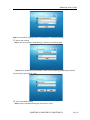
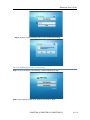
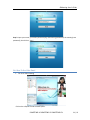
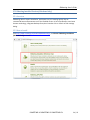
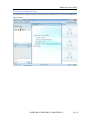
IOMeeting User’s Guide V 2.1 2012.6 IOMeeting User’s Guide Contents 1. System Structure & User Roles ............................................................................................. 4 1.1 Administration Services (AS) ....................................................................................... 4 1.2 Meeting Services (MS) ................................................................................................ 4 2. How to Start a Meeting......................................................................................................... 5 3. How To Join A Meeting ......................................................................................................... 7 3.1 Method One - IOMeeting Home Page ........................................................................ 7 3.2 Method Two - Your Company URL.............................................................................. 7 3.3 Method Three - Meeting URL ..................................................................................... 9 3.4 Method Four – From Host Account ............................................................................ 9 4. Manage Meetings ............................................................................................................... 10 4.1 Edit Meeting.............................................................................................................. 10 4.2 Cancel Meeting ......................................................................................................... 10 4.3 Check Previous Meeting ........................................................................................... 10 5. Languages ........................................................................................................................... 12 6. Document Share ................................................................................................................. 13 6.1 How To Share A Document ....................................................................................... 13 6.2 Document Download Status ..................................................................................... 14 6.3 Document Pagination ............................................................................................... 14 6.4 Zooming and Auto-fit ................................................................................................ 15 6.5 Laser Pointer ............................................................................................................. 16 6.6 Annotation ................................................................................................................ 16 7. File Transfer ........................................................................................................................ 17 8. Desktop Share ..................................................................................................................... 19 8.1 For Mac and Linux ..................................................................................................... 19 8.2 For Windows ............................................................................................................. 19 9. Application Share ................................................................................................................ 22 10. Whiteboard Share ............................................................................................................. 24 11. How to Switch To Full screen ............................................................................................ 25 12. Manage Avatar .................................................................................................................. 26 13. How to Change Participant Information ........................................................................... 27 14. Audio & Video ................................................................................................................... 28 15. Video Wall ......................................................................................................................... 33 16. Private Audio Room .......................................................................................................... 35 17. Note Taking ....................................................................................................................... 37 18. Meeting Invitation ............................................................................................................ 39 18.1 In Meeting Invite ..................................................................................................... 39 18.2 From Host Account ................................................................................................. 39 19. Meeting Options ............................................................................................................... 41 20. Chat ................................................................................................................................... 42 21. Lock Meeting ..................................................................................................................... 44 IOMEETING.US IOMEETING.JP IOMEETING.CN 2 / 55 IOMeeting User’s Guide 22. Leave or End Meeting ....................................................................................................... 45 23. Administration Services .................................................................................................... 46 23.1 Auto Login ............................................................................................................... 46 23.2 Manage Host Accounts ........................................................................................... 46 23.3 View Logs ................................................................................................................ 47 24. IOMeeting Touch Version ................................................................................................. 49 24.1 Overview ................................................................................................................. 49 24.2 Install IOMeeting on iOS ......................................................................................... 49 24.3 Install IOMeeting on Android.................................................................................. 49 24.4 Use IOMeeting Touch to Start Meeting .................................................................. 49 24.5 Use IOMeeting Touch to Join Meeting ................................................................... 51 24.6 How To Use Video Panel ......................................................................................... 52 25 IOMeeting Installed Version (Windows Only) ................................................................... 54 25.1 Overview ................................................................................................................. 54 25.2 How to Install .......................................................................................................... 54 25.3 How to Start/Join Meeting...................................................................................... 55 IOMEETING.US IOMEETING.JP IOMEETING.CN 3 / 55 IOMeeting User’s Guide 1. System Structure & User Roles IOMeeting services are divided into two groups: Administration Services (AS) and Meeting Services (MS). All services are provided through a browser. 1.1 Administration Services (AS) AS is for admin to manage hosts. Admin can create, edit and delete hosts. Company URL: IOMeeting create a different sub-domain for every customer in the format of: http://abc.iomeeting.us. It is your company’s home page on IOMeeting, through which admin can login, host can start, participants can join meetings. Roles: • Admin: Each company has one admin. Admin can change the settings of company, set language and time zone, create, edit and delete hosts, etc. • Host: Hosts are created by admin. Hosts can log in, schedule meeting, start meeting, invite participants to join meeting, check previous meeting participants, etc. 1.2 Meeting Services (MS) MS is for hosts to conduct meetings. Host can assign different roles to different participants, share documents, transfer files, start video conference, etc. Roles: • Host: The person who schedules and starts the meeting. In meeting, host can assign a participant to be host or presenter, invite/expel participants and end meeting. There is only one host in a meeting at any time. • Presenter: The person who currently controls the meeting. Presenter can upload and share documents, transfer files, share desktop. At the beginning of a meeting, the host is also the presenter. Current presenter can assign another participant to be presenter. There is just only one presenter at any time. • Participants: All the participants of a meeting, including host, presenter and other attendees. IOMEETING.US IOMEETING.JP IOMEETING.CN 4 / 55 IOMeeting User’s Guide 2. How to Start a Meeting Only hosts can start a meeting, the steps are: Step 1: Visit www.iomeeting.us, click on button “Host Meeting” or login to your site https://xyz.iomeeting.us; Step 2: Input the Email address and password, click on “Login” Step 3: Click on the button “Schedule Meeting” at top-left corner to schedule a new meeting; Step 4: Fill in the meeting information, meeting title can’t be empty, meeting agenda and password can be empty; click on “Start Now” to start the meeting at once; or click on “Schedule” to start the meeting later. IOMEETING.US IOMEETING.JP IOMEETING.CN 5 / 55 IOMeeting User’s Guide Step 5: If you have scheduled a meeting, you can find the meeting in meeting list, click on “Start” to start the meeting. Step 6: Click on “Yes”, start meeting succeed. IOMEETING.US IOMEETING.JP IOMEETING.CN 6 / 55 IOMeeting User’s Guide 3. How To Join A Meeting 3.1 Method One - IOMeeting Home Page Step 1: Visit www.iomeeting.us, click on “Join Meeting”; Step 2: Input meeting ID, and then click on “OK”; Step 3: In the new dialog, input meeting password if exists, and your name, click on “Join Meeting”; 3.2 Method Two - Your Company URL Step 1: Visit your company URL: http://abc.iomeeting.us; IOMEETING.US IOMEETING.JP IOMEETING.CN 7 / 55 IOMeeting User’s Guide Step 2: In the right box, enter meeting ID, click on “OK”; Step 3: Enter meeting password if exists, and your name, click on “Join Meeting”; IOMEETING.US IOMEETING.JP IOMEETING.CN 8 / 55 IOMeeting User’s Guide 3.3 Method Three - Meeting URL Step 1: Visit the meeting URL that the host gave you, e.g.: Step 2: Enter meeting password if exists, and your name, then click on “Join Meeting”; 3.4 Method Four – From Host Account Step 1: Login as host, find the meeting you want to join in the meeting list, then click on “Join”; Step 2: Input meeting password if exists, click on “Yes”; if the meeting doesn’t have password, host can join the meeting directly; IOMEETING.US IOMEETING.JP IOMEETING.CN 9 / 55 IOMeeting User’s Guide 4. Manage Meetings Host can edit and cancel a meeting. Firstly login to host account. 4.1 Edit Meeting Step 1: Find the meeting you want to edit in meeting list, and then click on “Edit”; Step 2: Update information about the meeting and then click on “OK”; 4.2 Cancel Meeting Find the meeting you want to cancel in meeting list; click on “Cancel”, and then the meeting will disappear from the meeting list. 4.3 Check Previous Meeting Step 1: Find the ended meeting in meeting list, click on “Info”; IOMEETING.US IOMEETING.JP IOMEETING.CN 10 / 55 IOMeeting User’s Guide Step 2: On meeting information dialog, click on “Show Meeting Participants”; Step 3: Show the name, email of each participant, and join and leave time. IOMEETING.US IOMEETING.JP IOMEETING.CN 11 / 55 IOMeeting User’s Guide 5. Languages 1. When host schedules a new meeting, host can choose a language for the meeting, which is the default display language when participants join the meeting. 2. In meeting, when participants want to change the display language, they can click on the drop-down box “Language” at right up corner to switch the language. 3. Admin and host also can change display language for Admin System. IOMEETING.US IOMEETING.JP IOMEETING.CN 12 / 55 IOMeeting User’s Guide 6. Document Share The presenter can share documents with participants. If needed, all participants can annotate on the sharing document simultaneously. 6.1 How To Share A Document Step 1: From “Action” menu, select “Document Share”; Step 2: Click on “Choose” to select a document. For Pro account, presenter can choose documents from File Library; Step 3: Click on “Upload”. The document will be uploaded to server and converted. IOMEETING.US IOMEETING.JP IOMEETING.CN 13 / 55 IOMeeting User’s Guide Step 4: All participants view the document: Step 5: To stop sharing a document, click on the “×” button. 6.2 Document Download Status After document sharing succeeds, host can see the document download status of all participants. 6.3 Document Pagination At the left of tool bar is document pagination. Only presenter can change page, all participants see the same page as the presenter does. Presenter can go to next page, go to previous page, or jump to a page and presenter can start/stop auto play document. IOMEETING.US IOMEETING.JP IOMEETING.CN 14 / 55 IOMeeting User’s Guide 6.4 Zooming and Auto-fit All participants can change the display size of the document. Support the following zooming controls: • “Auto fit”: same as “fit window”, but automatically “fit window” again when the size of the window changes. • “zoom in”; • “zoom out”; • “fit width”: full width of the document is shown • “fit height”: full height of the document is shown • “fit window”: full document is shown • “original size”; • • When a PPT document is shared, auto-fit is on. Other document (DOC, PDF, image, DES, APS), auto-fit default is off; IOMEETING.US IOMEETING.JP IOMEETING.CN 15 / 55 IOMeeting User’s Guide If user clicks on any of the other zooming controls, auto-fit is turned off and the corresponding action is performed. 6.5 Laser Pointer Operator can turn laser pointer ON and OFF. Default is OFF. When laser pointer is on, every participant sees operator’s mouse position. 6.6 Annotation • Presenter can always annotate. Presenter can allow all participants to annotate. • o Observer cannot annotate • Every participant can erase all own annotations on the current page. • Every participant can erase his last annotation on the current page. • Presenter can also erase all annotations on the current page. • All participants can change annotation color o o o • • • On participant panel, each row shows participant’s current color. On each DOS tab, there is color selection control If user changes the color, the color is changed on the following locations: Participant panel Color selection in each DOS tab All the participant’s annotations on each DOS tab. For lines, all participants can choose size: small, medium and large. For text, all participants can choose size: small, medium and large. All participants can mark his name. IOMEETING.US IOMEETING.JP IOMEETING.CN 16 / 55 IOMeeting User’s Guide 7. File Transfer Presenter can send any files to all participants. Step 1: From “Action” menu, select “File Transfer”; Step 2: Click on add button to add files. You can add up to 5 files, with total file size less than 20M. Step 3: Click on “Upload”, files start to transfer, after uploading all files, wait participants to download; IOMEETING.US IOMEETING.JP IOMEETING.CN 17 / 55 IOMeeting User’s Guide Step 4: Participants click on “Download” to download files; Step 5: Click on the button “×” to stop transfer files. IOMEETING.US IOMEETING.JP IOMEETING.CN 18 / 55 IOMeeting User’s Guide 8. Desktop Share Presenter can share his desktop with participants. 8.1 For Mac and Linux Make sure Java is installed. Step 1: From “Action” menu, select “Desktop Share”; Step 2: Waiting for program loading; Step 3: Desktop share succeed; Step 4: Click on button “Stop” to stop sharing desktop. 8.2 For Windows Step 1: From “Action” menu, select “Desktop Share”; IOMEETING.US IOMEETING.JP IOMEETING.CN 19 / 55 IOMeeting User’s Guide Step 2: Show a dialog, click on “OK”; Step 3: Open or save the file “desktopShare.zip” and run program; Step 4: Desktop sharing succeed; IOMEETING.US IOMEETING.JP IOMEETING.CN 20 / 55 IOMeeting User’s Guide Step 5: When presenter share application or desktop, click on the system tray icon at the lower right corner of the desktop, show a quarter of transparent preview box, can view the document download status of other participants. In preview box, red mean less than 35% participants have download the document; orange mean 35%~65% participants have download the document; green mean 65%~100% participants have download the document; transparent mean 100% participants have download the document. Step 6: Click again on the system tray icon, preview box disappear; Step 7: Click on “stop” to stop sharing desktop. IOMEETING.US IOMEETING.JP IOMEETING.CN 21 / 55 IOMeeting User’s Guide 9. Application Share Presenter can share one or more application with participants. The presenter must be using Windows. Step 1: From “Action” menu, select “Application Share”; Step 2: Show a dialog, click on “OK”; Step 3: Open or save the file “deskshare-viewer.zip”, and run the file; Step 4: Select an application to share; IOMEETING.US IOMEETING.JP IOMEETING.CN 22 / 55 IOMeeting User’s Guide Step 5: Application sharing succeed; Step 6: Click on “Stop” to stop sharing application. IOMEETING.US IOMEETING.JP IOMEETING.CN 23 / 55 IOMeeting User’s Guide 10. Whiteboard Share Only presenter can share whiteboards with participants. Step 1: From “Action” menu, select “Whiteboard Share”; Step 2: You can draw or type; Step 3: Click on the “Save” button to save the whiteboard to your computer; Step 4: Click on the “x” button to stop sharing whiteboard. IOMEETING.US IOMEETING.JP IOMEETING.CN 24 / 55 IOMeeting User’s Guide 11. How to Switch To Full screen 1. All participants can click on the “Full Screen” button to switch to full screen. 2. All participants can click on the “Cancel Full Screen” button to cancel full screen. 3. Presenter can click on the “All Full Screen” button to switch all to full screen. 4. Presenter can click on the “All Cancel Full Screen” button to cancel all participants’ full screen. IOMEETING.US IOMEETING.JP IOMEETING.CN 25 / 55 IOMeeting User’s Guide 12. Manage Avatar Step 1: Select own name in participant list, then right click on own name or click on the button “Participant”, then select “Manage Self Image”; Step 2: Show a dialog, click on “Browse” to choose the image to be your photo, and then click on the button “Upload”; Step 3: Upload image succeed, show new photo. IOMEETING.US IOMEETING.JP IOMEETING.CN 26 / 55 IOMeeting User’s Guide 13. How to Change Participant Information Step 1: Find own name in participant list, then right click on own name or click on the button “Participant”, select “Change Name”; Step 2: After changing name and Email, then click on “OK” to complete the change; Step 3: All participants see updated image. IOMEETING.US IOMEETING.JP IOMEETING.CN 27 / 55 IOMeeting User’s Guide 14. Audio & Video Host can start the audio and video conference. Step 1: From “Meeting” menu, select “Start Audio and Video”. You can choose from 3 video modes. Step 2: On each video panel, host can choose a participant. Step 3: Video of chosen participant is shown. IOMEETING.US IOMEETING.JP IOMEETING.CN 28 / 55 IOMeeting User’s Guide Step 4: Mouse over the button , show audio and video bandwidth; Step 5: Video has been started; participants can click on the pause button under other participants’ video to pause the video. Step 6: When video is been paused, click on the resume button to resume the video. Step 7: Participants right click on own name, select “Microphone/Camera Settings”; IOMEETING.US IOMEETING.JP IOMEETING.CN 29 / 55 IOMeeting User’s Guide Step 8: Participants can open/close own camera/microphone. Step 9: Host or presenter right click a participant’s name, select “Forbid to talk”. IOMEETING.US IOMEETING.JP IOMEETING.CN 30 / 55 IOMeeting User’s Guide Step 10: In audio/video meeting, all participants can right click own name, select “Microphone/Camera Setting”; show a dialog, then select “Reconnect audio/video” to restart audio/video meeting. Or select own name, then click on the button “Participant” at menu, select “Microphone/Camera”, show a dialog, then select “Reconnect audio/video” to restart audio/video. IOMEETING.US IOMEETING.JP IOMEETING.CN 31 / 55 IOMeeting User’s Guide Step 11: Click on the button “Meeting” at menu, select “End Audio and Video” to stop audio/video meeting. IOMEETING.US IOMEETING.JP IOMEETING.CN 32 / 55 IOMeeting User’s Guide 15. Video Wall Step 1: From “Meeting” menu, host selects “Start Audio and Video” and then “Video Wall”; Step 2: Host can click on the button “Layout” to choose a layout. Step 3: There is a tool bar to zoom in/out the video box. Step 4: Host click on the button “Meeting” at menu, select “End Audio and Video” to stop audio/video meeting. IOMEETING.US IOMEETING.JP IOMEETING.CN 33 / 55 IOMeeting User’s Guide IOMEETING.US IOMEETING.JP IOMEETING.CN 34 / 55 IOMeeting User’s Guide 16. Private Audio Room At private audio room, participants only can hear the audio of the participants in the private audio room. Only host can choose a participant to enter or leave the private audio room. Step 1: After start audio or video conference, from “Meeting” menu, host can selects “Open private audio room” Step 2: Host can right click on the participant’s name in participant list, select “Enter private audio room”; Step 3: After participant entering the private audio room, host can right click on the name of participant, select “Leave private audio room”. IOMEETING.US IOMEETING.JP IOMEETING.CN 35 / 55 IOMeeting User’s Guide Step 4: From “Meeting” menu, host can select “Close private audio room”. IOMEETING.US IOMEETING.JP IOMEETING.CN 36 / 55 IOMeeting User’s Guide 17. Note Taking When host starts note taking, default note taker is the host. There is only one note taker in a meeting at any time. Host and current note taker can assign the note taker role to other participant in the meeting. Step 1: From “Meeting” menu, host selects “Start Note Taking” Step 2: A note panel shows on host Step 3: Host assigns the note taker role to other participant; IOMEETING.US IOMEETING.JP IOMEETING.CN 37 / 55 IOMeeting User’s Guide Step 4: If note taker click on the “Publish” button, all participants can see the meeting note taking; Step 5: The note taker click on the “Save” button, can save the meeting note taking to the computer. Step 6: From “Meeting” menu, host selects “End Note Taking” IOMEETING.US IOMEETING.JP IOMEETING.CN 38 / 55 IOMeeting User’s Guide 18. Meeting Invitation There two ways for host to invite participants to join the meeting. 18.1 In Meeting Invite Step 1: While in meeting, host selects “Invite By Email” from “Meeting” menu: Step 2: Show a dialog, fill in participants’ email address, and then click on “Send”. 18.2 From Host Account IOMEETING.US IOMEETING.JP IOMEETING.CN 39 / 55 IOMeeting User’s Guide Step 1: Login to host account, find the meeting from meeting list, click on “Invite” to invite participants to join the meeting. Step 2: Show a dialog, fill in participants’ email address, and then click on “Send”. IOMEETING.US IOMEETING.JP IOMEETING.CN 40 / 55 IOMeeting User’s Guide 19. Meeting Options Step 1: From “Meeting” menu, select “Meeting Options”; Step 2: There are multiple tabs and each tab has four buttons: Default, Apply, Cancel and OK. IOMEETING.US IOMEETING.JP IOMEETING.CN 41 / 55 IOMeeting User’s Guide 20. Chat Participants can chat with other participants publicly or privately. The participants who join the meeting later can see the public chat history. 1.Type in text; 2. Choose the person you want to chat with, then click on the Send button: 3. You can use emoticon: IOMEETING.US IOMEETING.JP IOMEETING.CN 42 / 55 IOMeeting User’s Guide 4 Click on the “unpin” button to flow the chat panel: 5. Then you can click on the “pin” button to dock the chat panel: 6. Click on the “save” button to save the chat history to your computer. IOMEETING.US IOMEETING.JP IOMEETING.CN 43 / 55 IOMeeting User’s Guide 21. Lock Meeting Host can lock a meeting, so the participants who aren’t in the meeting can’t join the meeting. Step 1: From “Meeting” menu, select “Lock Meeting”; Step 2: When meeting is locked, there is a lock icon on the participant list panel: Step 3: From “Meeting” menu, select “Unlock Meeting” to unlock the meeting. IOMEETING.US IOMEETING.JP IOMEETING.CN 44 / 55 IOMeeting User’s Guide 22. Leave or End Meeting 1. For non-host participants, “Meeting” menu has item “Leave Meeting”; 2. For host, “Meeting” menu has item “End Meeting”. IOMEETING.US IOMEETING.JP IOMEETING.CN 45 / 55 IOMeeting User’s Guide 23. Administration Services 23.1 Auto Login Host account can choose to auto login: At host login page, check “Keep me signed in”. 23.2 Manage Host Accounts Company admin can add/edit/delete hosts. Step 1: Admin enter the URL https://xyz.iomeeting.us/admin (“xyz” is the company name) to login the meeting management system. Step 2: Click on the button “Add Host” at the top. Step 3: Fill in the information about the host account; IOMEETING.US IOMEETING.JP IOMEETING.CN 46 / 55 IOMeeting User’s Guide Step 4: The new host account display on host list; Step 5: Click on the button “Edit” can update the information of the host. Or admin can click on the button “Remove” to delete the host account. The email address can then be used again. 23.3 View Logs Admin can view several logs: • Admin log: admin actions. • Host log: Host actions. • Meeting log: meeting start/join/leave/stop actions. • Meeting minutes log: list of meeting minutes. Step 1: Admin click on the button “Log” at left toolbar; IOMEETING.US IOMEETING.JP IOMEETING.CN 47 / 55 IOMeeting User’s Guide Step 2: Select the log type you want to view, then click on “OK”; Step 3: Display log. IOMEETING.US IOMEETING.JP IOMEETING.CN 48 / 55 IOMeeting User’s Guide 24. IOMeeting Touch Version 24.1 Overview IOMeeting Touch Version supports iOS (iPhone, iPad and iPod Touch) and Android (both phone and tablet) with same UI. You already can start and join a meeting using the built-in browser of iOS and Android, and use features like chat, document sharing, desktop sharing (PC's desktop) with remote control. But with IOMeeting Touch app, you can use iOS and Android’s video camera (both front and back) and microphone to join video conference. You can view 3-point video panel, 7-point video panel or 30-point video wall. 24.2 Install IOMeeting on iOS • • The recommended way to install IOMeeting on iOS is using App Store and search for “iomeeting”. If you don’t want to use App Store (don’t have Apple ID for example) and your device is jail-break, you can go to our web site to download the .ipa file and install it. 24.3 Install IOMeeting on Android • • The recommended way to install IOMeeting on Android is using Android Market and search for “iomeeting”. If you don’t want to use Android Market, you can go to our web site to download the .apk file and install it. 24.4 Use IOMeeting Touch to Start Meeting Step 1: click on the button “Start Meeting”, show the host login page; Step 2: input the host email and password, select a server address or input your own server address, then click on “Next”; IOMEETING.US IOMEETING.JP IOMEETING.CN 49 / 55 IOMeeting User’s Guide Step 3: choose which meeting to start, new meeting or a scheduled meeting; ① Start a new meeting Step 1: click on the button “New Meeting”, show the new Meeting page; Step 2: input the Meeting Topic (default is <host’s name> Meeting) and Meeting Password (can be empty), then click on “Start”; ② Start a scheduled meeting Step 1: input a scheduled meeting ID, then click on “Start”; IOMEETING.US IOMEETING.JP IOMEETING.CN 50 / 55 IOMeeting User’s Guide Step 2: popup a confirmed dialog, click on “Yes” to start the meeting; 24.5 Use IOMeeting Touch to Join Meeting Step 1: click on the button “Join Meeting”, show the Meeting ID page; Step 2: input meeting ID and server address, then click on “Next”; IOMEETING.US IOMEETING.JP IOMEETING.CN 51 / 55 IOMeeting User’s Guide Step 3: input your name, your email (can be empty) and meeting password (if the meeting have password), then click on “Join”; 24.6 How To Use Video Panel 1 For three video meeting Click on the collapse to hide the video panel: IOMEETING.US IOMEETING.JP IOMEETING.CN 52 / 55 IOMeeting User’s Guide 2 For video wall meeting Click on the collapse to hide the video panel: IOMEETING.US IOMEETING.JP IOMEETING.CN 53 / 55 IOMeeting User’s Guide 25 IOMeeting Installed Version (Windows Only) 25.1 Overview IOMeeting doesn't require installation, participants can join meeting quickly. But we recommend hosts and presenters to use the installed version. It has a few benefits: uses latest browser technology; integrates Desktop Share; don't need to click on 'allow' on flash settings dialog. 25.2 How to Install Visit http://www.iomeeting.us/Download/download.jsp, and choose IOMeeting Installation (Windows Only) to install. IOMEETING.US IOMEETING.JP IOMEETING.CN 54 / 55 IOMeeting User’s Guide 25.3 How to Start/Join Meeting The method of starting or joining a meeting using the installed version is the same as IOMeeting Touch Version. IOMEETING.US IOMEETING.JP IOMEETING.CN 55 / 55