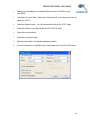
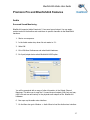
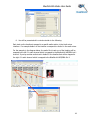
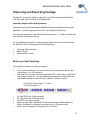
1
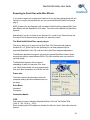
Bluefish444 Adobe User Guide
Adobe Premiere Pro 1.5
Adobe After Effects 6.5
Adobe Photoshop CS
Wednesday, February 09, 2005
1
Bluefish444 Adobe User Guide
Introduction. ....................................................................................................................... 4
About Bluefish444. ........................................................................................................... 4
About this Manual............................................................................................................. 4
Bluefish444 and Adobe Supported Features ........................................................................ 5
Adobe After Effects 6.5.................................................................................................. 5
Adobe Photoshop 7/CS .................................................................................................. 5
Adobe Supported Bluefish444 hardware. ............................................................................ 6
Installation Guide. ................................................................................................................ 7
System Requirements. ...................................................................................................... 7
Recommended.............................................................................................................. 7
Media Arrays. ................................................................................................................... 8
For Standard Definition.................................................................................................. 8
For High Definition. ....................................................................................................... 8
Installation Guide. .............................................................................................................. 10
Installation Check List. ................................................................................................ 10
Installation Steps. ....................................................................................................... 10
Adobe Premiere Pro 1.5 & Bluefish444 SD|HD ...................................................................... 11
Introduction. .................................................................................................................. 11
Supported Features. ....................................................................................................... 11
Advanced Playback Options. ............................................................................................ 12
Support for Extended YUV/RGB CGR and SMPTE matrix color range. ............................... 12
P/Psf mode. ............................................................................................................... 12
Supported Broadcast modes. ....................................................................................... 13
Setting up Premiere Pro 1.X with Bluefish444 ....................................................................... 14
Scratch Disks. ................................................................................................................ 14
Bluefish444 ASIO Audio Support. ..................................................................................... 14
Enabling the Audio driver............................................................................................. 14
Using other sound card devices.................................................................................... 15
Deck Control Support...................................................................................................... 15
Setting up the Pro VTR Deck Control Plug in.................................................................. 15
Premiere Pro and Bluefish444 Features ................................................................................ 17
Audio
Surround Sound Monitoring. ........................................................................................ 17
Multiple Audio Channel Output. .................................................................................... 19
Capturing and Exporting Footage. ....................................................................................... 20
Importing Captured files with Symmetry. ...................................................................... 20
Before you Start Capturing .............................................................................................. 20
Performing a capture ...................................................................................................... 21
Exporting to Tape .............................................................................................................. 22
Exporting to a Movie. ......................................................................................................... 24
Adobe After Effects 6.5 & Bluefish444 SD|HD ....................................................................... 25
Introduction. .................................................................................................................. 25
Supported Features ........................................................................................................ 25
Setting up Adobe After Effects. ........................................................................................ 26
Supported Broadcast Output modes ............................................................................. 26
Changing Bit depths ....................................................................................................... 27
Via the interface. ........................................................................................................ 27
Via project Settings. .................................................................................................... 27
Real Time Playback......................................................................................................... 28
Exporting to QuickTime with After Effects. ........................................................................ 29
The Bluefish444 QuickTime export plug-in. ................................................................... 29
Frame rate. ................................................................................................................ 29
2
Bluefish444 Adobe User Guide
Scan Mode. ................................................................................................................ 29
CGR........................................................................................................................... 29
SMPTE. ...................................................................................................................... 30
Rendering with Bluefish444 QuickTime Export plug-in; ................................................... 30
Adobe Photoshop 7/CS ....................................................................................................... 32
Features ........................................................................................................................ 32
Using Actions with the Bluefish444 exporter...................................................................... 32
To load and assign shortcuts the Bluefish444 actions. .................................................... 32
Appendices........................................................................................................................ 34
Typical Premiere Pro workflow with the QuickTime v210 file format. ............................... 35
After Effects 6.5, 8 and 10 bit frame buffer process work flow. ...................................... 36
Typical Bluefish444 and After Effects Workflow.............................................................. 37
Installing plug-ins Manually ............................................................................................. 38
Support............................................................................................................................. 40
Contact ............................................................................................................................. 41
3
Bluefish444 Adobe User Guide
Introduction.
About Bluefish444.
Bluefish444 is a division and brand name of Digital Voodoo (Australia) Pty Ltd. based in
South Melbourne, Australia. It is a leading supplier of uncompressed video cards for the
Windows operating systems. The video cards are used by a number of OEMs specializing
in broadcast solutions. By continuing to work with workstation vendors and resellers,
Bluefish444 has made it easier for end-users to purchase off the shelf Windows based
editing, animation and compositing solutions making sure that the hardware is optimized
for SD and HD solutions. For more information on Bluefish444, its products, resellers,
press images and press releases, please visit the Bluefish444 web site at
www.Bluefish444.com
About this Manual.
This manual will cover the following topics
•
•
•
Adobe Premiere Pro 1.5
Adobe After Effects 6.5
Adobe Photoshop 7/CS
For information and features on specific application please refer to the respected
manuals by application type or the applications user manual or contact your vendor.
For information on installing the Bluefish444 Drivers and hardware see the Bluefish444
installation Manual and the Bluefish444 website.
If you solution is provided by a Bluefish4444 integrator please contact that vendor
before contacting Bluefish444 technical support.
4
Bluefish444 Adobe User Guide
Bluefish444 and Adobe Supported Features
Adobe Premiere Pro 1.5
HDTV and SDTV 10 bit uncompressed editing with the multiplatform QuickTime v210 file
format
•
•
•
•
•
•
•
•
•
Provide Standard Definition and High Definition capture and playback in High
Definition and Standard Definition SMPTE modes in 10 bit uncompressed YUV
QuickTime v210 file format.
Supports real time playback of imported QuickTime v210 files generated from 3rd
party QuickTime supported applications with our 10 bit YUV QuickTime v210
codec.
Preview in capture, playback and monitor windows.
Adds multiple audio channel output support and management features.
Adds support for 5.1 surround sound.
Adds CGR and Non CGR editing modes.
Extended support for optional P and Psf output option
Full support for SD and HD color matrix conversion.
Premiere Pro and After Effects dual mode support.
Adobe After Effects 6.5.
HDTV and SDTV real time broadcast monitoring and playback for the most widely used
effects and motion graphics compositing software.
•
•
•
•
Provides 10 bit RGB and 8 bit RGB video output frame buffer support.
Adds support for 8 bit and 16 bit project modes avoiding 8 bit down conversions
for projects working with 10 bit RGB file formats.
Real time SD and HD playback via RAM player in 8 and 16 bit project modes.
Import DPX and Cineon files generated captured from Symmetry.
Adobe Photoshop 7/CS
Bluefish444 Photoshop Exporter adds an important plug in for broadcast graphic
designers by allowing you to quickly see your Photoshop images through any
Bluefish444 video card. This is important for checking color, positioning, line width, and
other graphic issues that can change when moving images from a VGA to a broadcast
monitor.
5
Bluefish444 Adobe User Guide
Features
•
Support for NTSC, PAL, HD720p, and HD1080i.
•
Pre built actions for hotkey updates.
•
Plug-in outputs both the image and the alpha channel on dual-link cards.
•
Support for 8-bit and 16-bit images.
•
Automatic YUV conversion.
•
Support for all Bluefish444 cards.
Adobe Supported Bluefish444 hardware.
The Bluefish444 and Adobe applications support the following Bluefish444 hardware.
High Definition Product Range
HD|Lust
HD|Fury
Premiere Pro 1.5
After Effects 6.5
Photoshop 7/CS
•
•
•
•
•
•
•
•
HD|IridiumXP
Standard Definition Product Range
SD|Envy
SD|Pride
Wildblue|AV
•
•
•
•
•
•
•
•
Note; OEM solutions and integrators may have installed a different Bluefish444 card.
Please contact your integrator for any further information.
6
Bluefish444 Adobe User Guide
Installation Guide.
System Requirements.
Recommended
Adobe Premiere Pro 1.5
•
•
•
•
Windows XP service pack 1a.
Dual Processor Mother board
1 GB RAM
SCSI or SATA controller card that can support capture and playback of 10 bit
uncompressed YUV HD or SD footage. See hardware compatibility section on the
bluefish444 website or Appendices. C. Storage Arrays and Configurations in the
Bluefish444 Installation Manual v 4
Adobe After Effects 6.5
•
•
•
•
Windows XP service pack 1a.
Dual Processor Mother board
4 GB RAM
SCSI or SATA controller card that can support capture and playback of 10 bit
uncompressed RGB/YUV HD or SD footage. See hardware compatibility section on
the bluefish444 website or Appendices. C. Storage Arrays and Configurations in
the Bluefish444 Installation Manual v 4
7
Bluefish444 Adobe User Guide
Media Arrays.
The following information is a guide. Since the Blueifhs444 solutions work with a range
of applications at different resolutions and different formats. It is best to consult with
the application vendor or your reseller before committing to a RAID array configuration.
For further information see the hardware configuration guide fro a range of controller
and RAID array configurations.
For Standard Definition.
Standard definition footage requires fewer resources than the High definition video.
The average transfer and data rate required is approximate 30 MB per second.
So for 1 minute of captured footage will require a storage array of 1800 MB or 1.8 GB,
for 1 hour will require 180 GB of storage space. (See drive capacities section)
Minimum specifications.
•
•
•
Single channel SCSI or 8 port SATA
2 Ultra 160 drives at 7.2K, 10K RPM or 15K RPM
Striped configuration software RAID 0
For performance.
•
•
4 or more Ultra 160/320 drives with dual channel card with even number of
hard drives per channel.
Striped configuration in software RAID.
For High Definition.
High definition 1920 by 1080 and 1280 by 720 capture and editing is very resource
intensive and requires a considerably high transfer data rates and sustained hard drive
performance than for standard definition editing.
The average transfer rate required for 1 minute of high definition editing without audio
at the highest resolution is approximately 165MB per second. Even higher for 10 bit RGB
file formats.
Therefore 1 minute of captured high definition footage will require a storage array of
9900 MB or 9 GB. 1 hour will require 594 GB of storage space.
8
Bluefish444 Adobe User Guide
10 bit YUV, QuickTime V210
•
•
•
•
•
Dual channel Ultra 320 SCSI card.
8 Port SATA Controller Card.
Minimum 8 Ultra 320 drives at 10K RPM or 15K RPM or SCSI to SATA
external.
Storage Device (JBOD).
Striped configuration RAID O.
10 bit RGB, Cineon , DPX ( not supported by Premiere Pro)
•
•
•
•
Dual channel Ultra 320 SCSI card or Fiber Channel.
Minimum 8 Ultra 320 drives at 10K RPM or 15K RPM.
Dual channel SCSI card with minimum 4 drives per channel.
Striped configuration RAID O.
9
Bluefish444 Adobe User Guide
Installation Guide.
Installation Check List.
Make sure you have the following prior to installation.
1.
Certified system with suitable RAM and storage certified for the solution, file
format and resolution you will be using.
2.
Correct operating system installed with latest service packs (e.g. Adobe Premiere
Pro 1.X will not support Windows 2000 only Windows XP).
3.
QuickTime 6.5.1 as a minimum installed.
Installation Steps.
1. Install bluefish444 hardware.
2. Install Bluefish444 supported 3rd party applications.
a. Install QuickTime version 6.5.1 or greater
b. Install 3rd part application plug-ins, e.g. Deck control software
3. Installing the Bluefish444 driver installer. (see Bluefish444 installation manual)
4. Connect your SDI and audio cables.
10
Bluefish444 Adobe User Guide
Adobe Premiere Pro 1.5 & Bluefish444 SD|HD
Introduction.
Bluefish444, the first to introduce 10 bit uncompressed SD and HD support for one of
the worlds most popular Windows based editing applications.
Supported Features.
•
•
•
•
•
•
•
•
•
•
•
•
•
Real-time SD and HD editing modes supported.
Real Time Preview of timeline and capture window with simultaneous SDI output
monitoring to either SD or HD editing modes.
Support for importing QuickTime files rendered with our high quality 64 bit
uncompressed v210 QuickTime 10 bit YUV codec from supported popular 3rd party
applications. Now you can render from your application and import your
Bluefish444 QuickTime v210 movies straight into the Premiere Pro timeline.
Import QuickTime v210 file created from other capture solutions on the Apple MAC
(It is recommended to use the Digital Voodoo (Mac) or Bluefish444 (Windows)
QuickTime codec for quality and playback stability)
Extended Support for 5.1 surround sound output feature and Multi channel output.
Support for CGR and SMPTE color space modes.
Extended support for P/PSF playback mode switching for HDTV 1080 modes
Embedded time code support.
720p 60 /59.94. ( alpha support )
SD and HD NLE support in one software and hardware solution with HD to SD
simultaneous independent real-time down conversion. Now you can edit in HD in
Premiere Pro and output/monitor to HDTV and SDTV at the same time.
Export to tape feature now supported with the Pro VTR deck control plug-in with
expanded deck control features and support.
Support for Premiere Pro 1.5 project manager.
Take advantage of EDL and AAF support and, capture and edit in SD modes then
export to an EDL for HD mastering.
11
Bluefish444 Adobe User Guide
Advanced Playback Options.
Bluefish444 has added two professional features to Premiere Pro 1.5 accessed in the
Playback settings in the General Preferences of the Project Settings.
Support for Extended YUV/RGB CGR and SMPTE matrix color range.
This feature enables Premiere Pro 1.5 to work in CGR and SMPTE color range during
playback.
If your source data contains super white or super black i.e. the full RGB color range of 0
to 1024 you may wish to maintain these values through out the editing process. this can
be achieved by using the “CGR Matrix Range”.
If your source does not contain super whites and super blacks i.e. color range of 64 to
960, then you may wish to use the “SMPTE Matrix Range”.
CGR Matrix Range = maintains super blacks and whites, 0 to 1024
SMPTE Matrix Range = maintains SMPTE color range , 0 to 960
P/Psf mode.
When editing in HD modes Bluefish444 enables Premiere PRO 1.5 to capture and
playback 1080P (Progressive scan) modes. 1080p 23.976, 24, 25 and 30 frame per
second progressive footage cannot be monitored on broadcast monitors because the
vertical refresh rate would be too low. To get around this problem and allow progressive
material to view on a standard broadcast monitor “psf” was devised. This sends the
progressive frames down the cable odd lines first then even lines, i.e. like two ‘pseudo
fields’ as if it were an interlaced signal. The material is, of course, really progressive (i.e.
all lines in the frame were captured at the same instance in time. Therefore, to avoid
possible confusion the ‘progressive fields’ are referred to as “segments”. Consequently,
we use the abbreviation “psf” for “Progressive Segmented Frame”.
12
Bluefish444 Adobe User Guide
720p 59.94 and 60 video modes do not need a psf option because the vertical
refresh rate is already fast enough to display on a standard broadcast monitor.
Bluefish444 provides two presets, both defaults to psf mode when opened.
Bluefish444 HD 1080 23.967
Bluefish444 HD 1080 24
If you wish to change the video mode on the cable to P (progressive) you can do so by
opening up the project settings, selecting general and then the playback options tab
next to the time base drop down list.
Supported Broadcast modes.
High Definition.
1080i 25fps, 1080i 29.97fps, 1080i 30fps.
1080p 23.98fps, 1080p 24fps, 1080p 25fps, 1080p 29.97fps, 1080p 30fps.
1080psf 23.98fps, 1080psf 24fps
720p 59.97fps, 60fps.
Standard Definition.
NTSC 720h 486 29.97fps.
PAL 720h 576 25fps.
13
Bluefish444 Adobe User Guide
Setting up Premiere Pro 1.X with Bluefish444
Launch Adobe Premier Pro and you will be presented with an option to load a new
preset, go ahead and load with a HD or SD preset in the Bluefish444 options folder
Please note that depending on your Bluefish444 card installed will depend on what
mode is available to you. For HD products and HD and SD modes are available. For SD
cards PAL and NTSC modes are only available
Scratch Disks.
The first thing you are required to do is set up your scratch disk.
This should be your fastest drive configured to support the video and file format you
intend to capture and playback your footage from.
For further information on storage solutions see Appendix C Storage Arrays and
Configurations.
Ensure that the preferences settings are correctly setup for you scratch disks and the
paths are directed at a valid Media Disk array that can sustain the data rate for real time
playback for HD or SD modes.
You can do this via selecting Edit -> Preferences -> Scratch disks.
Ensure all paths point to your Media array.
Bluefish444 ASIO Audio Support.
Bluefish444 provides support for 48 KHz uncompressed multi channel audio support via
the audio interface of the Bluefish444 HD and SD product range. All audio playback is
output via the Bluefish444 hardware through Balanced Digital AES/EBU 6 channel audio
via XLR or 8 channel BNC cables. Support for SPDIF unbalance can also be provided
with the correct cable support for the HD product range.
Bluefish444 provides full support of Multi channel and surround sound 5.1 audio editing
Provides full audio routing support providing support for channel to track routing.
Output single track to 6 or 8 channel output ( depending on Bluefish444 card used)
Enabling the Audio driver.
1.
2.
In the Adobe Premiere Pro menu bar select EDIT -> PREFERENCES -> AUDIO
HARDWARE.
In Audio Hardware section, select the input/output drop down list and select
“Bluefish444 ASIO”
14
Bluefish444 Adobe User Guide
3.
4.
Set latency to short.
Select OK.
Using other sound card devices.
Monitoring through other 3rd party sound cards or devices is not supported, video and
audio sync is not guaranteed and you may experience audio delays and in consistencies
in audio playback.
Deck Control Support.
Deck control is provided by the Pro VTR deck control plug-in.
We have tested for both SD and HD editing modes the version 7.1 Deck control plug-in
and Serial cable (RS 232 to RS 422), available at Digital Pipeline;
http://www.thepipe.com/.
Alternatively you can use the Serial cable provided in your Bluefish444 product box
Setting up the Pro VTR Deck Control Plug in.
Device control calibration is extremely important the first time you connect to your
Broadcast deck. Calibration needs to be performed in two sections of the device control
for accurate capture and layoff. For information on calibrating and adjusting the Pro
VTR device control software please refer to the Pro VTR 7.0 manual.
1.
Make sure your Deck control software is installed correctly. We have tested and
recommend the Digital Pipe Pro VTR version 7.1 or above for Premiere Pro 1.5 and
1.0.
15
Bluefish444 Adobe User Guide
2.
Attach your serial cable to an available COM port and to the RS232 port of
your DECK.
3.
In Premiere Pro go to Edit - Preferences, Device Control. In the drop down list and
select Pro VTR 7.1.
4.
Select the Options button. You will be presented with the Pro VTR 7 setup.
5.
Select the COM port you attached the RS 422 to RS 232 cable.
6.
Select the correct protocol.
7.
Select the correct time base.
8.
Add time code offset in the Digitize adjustment section.
9.
For more information on calibrating your deck please refer to the Pro VTR manual.
16
Bluefish444 Adobe User Guide
Premiere Pro and Bluefish444 Features
Audio
Surround Sound Monitoring.
Bluefish444 supports Adobe Premiere’s 5.1 surround sound output. You can assign
certain tracks on the timeline and route them to specific channels via the Bluefish444
hardware.
1. Start a new sequence.
2. In the Audio master drop down list set master to 5.1.
3. Select OK.
4. Go to Edit then Preferences and select Audio Hardware.
5. For Input/output device select Bluefish444 ASIO option.
You will be presented with a range of other information in the Output Channel
Mappings. This allow you to map the 5.1 sound channel outputs (Left front and rear,
right front and rear and centre) to the physical audio outputs of the Bluefish444
hardware.
6. Now open up the audio mixer interface.
7. On the Menu bar go to Window -> Audio Mixer to load the Audio mixer interface.
17
Bluefish444 Adobe User Guide
8. You will be presented with a window similar to the following.
Each track on the timeline is mapped to a specific audio section in the Audio mixer
interface. For example Audio1 on the timeline corresponds to Audio1 in the audio mixer.
For the example in the diagram below, the audio file in track one of the timeline will be
mapped to the left 5.1 audio channel which is mapped to the Bluefish444 AES/EBU out 1
channel. If you lay another audio track in Audio2 in the timeline that will be mapped to
the right 5.1 audio channel which is mapped to the Bluefish444 AES/EBU Out 2.
18
Bluefish444 Adobe User Guide
Multiple Audio Channel Output.
Alternatively you can assign one track to output to all audio channels of the Bluefish444
card.
This is done by simply centering Audio 1 section which is linked to the Audio 1 track on
the timeline. By centering the control point in the center you are effectively telling
Premiere to route the audio on track 1 in the timeline to all available Bluefish444 audio
channels
For further more detailed information on the Audio features and controls for Adobe
Premiere Pro 1.5 please refer to the manual
19
Bluefish444 Adobe User Guide
Capturing and Exporting Footage.
Premiere Pro now has the ability to capture to 10 bit YUV uncompressed QuickTime
v210 file format with 2 channels of embedded audio.
Importing Captured files with Symmetry.
Alternatively you can take advantage of Bluefish444 Symmetry Capture and playback
application. Symmetry captures to the 10 bit v210 QuickTime file format.
Symmetry also captures to multi channel audio supporting 2, 4 , 6 and 8 channels pairs
as a separate multi channel wav file .
For more detailed information on capturing media please refer to the Adobe Premiere
Pro manual for further information on the following topics.
•
•
•
Capturing Video and Audio
Batch Capture
Capture video or Audio
Before you Start Capturing
A few things to be aware of before you capture.
•
•
Know your time base from your deck and make sure you match it with the deck
control plug in Pro VTR time base.
Take note of your source time code and confirm if DF ( Drop Frame) or NDF (Non
Drop Frame) is been use. You can determine this buy looking at the Deck Time
code and the separators used for Hours ; Minutes ; Seconds ; Frames
For NDF (Non Drop Frame) “:” is used
For DF (Drop Fame) “;”
•
•
•
•
•
For 1080 23.97 use 24 fps time base.
For 720p 59.94 use 30 fps time base.
For NTSC use 30 fps time base.
Make sure your deck is calibrated correctly with the correct offsets added. For
further information in calibrating your deck with Pro VTR device control
Ensure you are using the correct protocol for your deck.
20
Bluefish444 Adobe User Guide
•
•
Make sure Poll VTR while digitizing is always on.
Ensure your scratch disks/ media array are fast enough to sustain read and
write data rates.
Performing a capture
1.
2.
Launch the capture tool by pressing F5 on your keyboard or select File -> Capture.
If you have not selected the Device control as Pro VTR 7.1 you can do so in the
settings TAB of the capture window.
3.
In the Device Control section of the Capture Window select Device drop down list
to select Pro VTR 7.1.
4.
Select the options button to configure your Device Control.
5.
Begin to capture footage by pressing play and then record.
6.
Alternatively you perform batch capture process by selecting In and OUT points
then selecting Log clips. Once the Clips are logged select then select a batch
capture by right clicking the selections then selecting batch capture.
7.
Support for Video or Audio only capture is also supported.
For more detailed information on the capture process please refer to the Adobe
Premiere manual.
ProVTR 7.1
21
Bluefish444 Adobe User Guide
Exporting to Tape
Exporting to tape is performed by the Pro VTR Deck control plug-in.
Before you start a few things to be aware of before exporting to tape with Premier Pro
and the Pro VTR plug-in.
•
•
•
•
Make sure your deck is calibrated, you will require the deck to be set to output
Time Code
Make sure that the tape you are using is striped with the correct time code.
Make sure the Deck is set in the correct format and video mode.
Make sure that the Deck has been calibrated for exporting to tape with the Pro.
VTR plug-in. this can be done in the settings dialog shown below. Please note that
calibration settings for exporting to tape are different for the capture process. You
must calibrate the Pro TR plug-in for the export to tape process by adjusting Edit
Timing and Play Timing.
We have provided a few basic steps on the export to tape process. It is assumed that
the Deck is accurately calibrated for the export to tape process. If the Pro VTR plug in
has not been calibrated you may experience play delays and repeated first frames which
is a common occurrence.
1.
Select the Sequence in the BIN or footage on the timeline to be exported.
2.
Select File -> Export -> Export to Tape, the Pro VTR dialogue will open.
3.
Type in your IN point e.g. 00010000. You can ignore adding the Semi colon (:).
4.
Select this as your IN POINT, so select IN.
22
Bluefish444 Adobe User Guide
5.
Enter the duration for example 20 seconds, so type in 00002000.
6.
Select DUR, duration will be set to 20 seconds the end point will be set to
00:01:20.00.
7.
Do not enter the OUT point, this has already been calculated by entering duration.
8.
So the values will be IN 00:01:00:00, OUT 00:01:20:00, DUR 00:00:20:00.
9.
Select V, A1 and A2.
10.
Select CNTRL + EDIT to start the export to tape process.
Export to tape is done
23
Bluefish444 Adobe User Guide
Exporting to a Movie.
In some cases you may wish to export your sequence to other media such as Windows
media 9 or MPEG 2. or you may wish to export your movie to another Bluefish444 and
Adobe Premier Pro solutions
If you wish to export to Bluefish444 QuickTime v210 you will need to select the File type
to Bluefish444.
1.
Select File -> Export -> Export to Movie.
2.
Here you will have an option to name a file and choose a location.
3.
Select the settings button.
4.
In the file type drop down box select Bluefish as the file type.
5.
Click on OK to start the process.
Alliteratively you have the option to export your movie to a variety of file formats and
even encode to Windows Media 9 and MPEG 2 for DVD media production and
distribution.
24
Bluefish444 Adobe User Guide
Adobe After Effects 6.5 & Bluefish444 SD|HD
Introduction.
Bluefish444 provides continued support for one of the worlds most popular compositing
and effects application.
This current release provides new advance features and enhancements in maintaining
quality, performance, speed, real time HD playback and higher color depth support
providing the highest quality broadcast monitoring output than any other After Effects
solution available.
Supported Features
•
•
•
•
•
•
•
•
SD and HD modes supported including 720p support.
8 and 10 bit RGB frame buffer output
8 and 16 bit project mode, Bluefish444 maintains your color space integrity when
using 10 bit RGB file formats in 16 bit project modes.
Real-time SD and HD color space conversion.
Real-time Time playback via the RAM player feature for SD and HD modes in 8
and 16 bit project modes.
Import QuickTime files captured from Premiere Pro.
Take advantage of After Effects distributed rendering ability and render to
Bluefish444 QuickTime v210 file format using the traditional QuickTime Movie and
the Bluefish444 QuickTime codec or the Bluefish444 QuickTime exporter feature
supporting an range of selectable 601 and 709 RGB to YUV color matrices.
Import Cineon and DPX file captured from Symmetry or Quick Clip Pro and
maintain the your 10 bit RGB workflow with any 8 bit down conversion for farm
buffer outputs.
25
Bluefish444 Adobe User Guide
Setting up Adobe After Effects.
Adobe After Effects requires no settings to enable Frame buffer support. This feature will
automatically be enabled with the installation of the plug-in and with an installed
Bluefish444 Video output card.
Video output will be initialized once a valid composition has been setup.
Video Output (Broadcast Monitoring)
All that is required o achieve Video output is a valid supported broadcast resolution as
your composite and a valid frame rate outlined in the Supported Broadcast Output
Modes table
Supported Broadcast Output modes
HD 1080
HDTV 1920 x 1080
HD 720
HDTV, 1280 x 720
1080i 25fps, 1080i 29.97fps, 1080i 30fps.1080p
23.98fps, 1080p 24fps, 1080p 25fps, 1080p
29.97fps, 1080p 30fps.1080psf 23.98fps, 1080psf
24fps, 1080psf 25fps.
720p 60fps, 59.97fps.
SD PAL
PAL D1/DV, 720 x 576
PAL 720h 576 25fps
SD NTSC
NTSC D1, 720 x 576
NTSC 720h 486 29.97fps
26
Bluefish444 Adobe User Guide
To achieve Video output you must have the composite resolutions settings in the
Composite window set to full. Anything less than full will disable the frame buffer
output. This provides the highest quality output though the Bluefish444 card, ideal for
performing accurate color corrections, Painting and high quality previews.
If you wish to utilize more memory for animation and
motion effects then you can reduce the composite
resolution to half or a quarter. This will free up
how much RAM you can use for the RAM player, As
quality is not a major requirement for animation,
masking and rotoscoping, you can maximize your
RAM assets an load a lot more of the timeline to RAM
for real time playback.
Changing Bit depths.
After Effects can now take advantage of 10 bit RGB frame buffer modes when in 16 bit
project modes. When in 16 bit project mode After Effects will provide a 10 bit RGB
frame for output and defining on the card type and mode the Bluefish444 card will
output a 10 bit YUV SDI output converting 10 bit RGB to YUV in hardware.
To change project modes ( Bit Depths);
Via the interface.
1.
Hold down the Left ALT key on your keyboard and at
the same time select the 8 bpc text in the After Effects
project Bin.
2.
Each click will switch between 8 and 16 bit project
modes.
Via project Settings.
1.
go to the menu bar and select File -> Project Settings
2.
Select the color depth of your choice in the color depth
drop down box.
27
Bluefish444 Adobe User Guide
Real Time Playback
You can achieve real time playback of your timeline using
After Effects RAM player feature.
Adobe After Effects utilizes how much ram you have on
your system. So the golden rule of thumb for compositing
especially in HD is more the better.
Make sure you select the frame rate that corresponds to
the frame of your composite settings.
Depending on the resolutions size of your Desktop preview
window in After Effects can affect playback performances
as a larger frame has to be written to the desktop.
28
Bluefish444 Adobe User Guide
Exporting to QuickTime with After Effects.
If you wish to export your projects into Premiere Pro for real time playback and with out
having to re render you imported files you can use the Bluefish444 QuickTime Exporter
plug in
NOTE, Premiere Pro and Symmetry will not support QuickTime files rendered ONLY from
After Effects with the Bluefish444 v210 codec. You must use the Bluefish444 QuickTime
Exporter.
Alternatively if you do not intend to use Premiere Pro, render to the Cineon format and
then import fro file sequence into Symmetry for exporting to tape.
The Bluefish444 QuickTime export plug-in.
This plug-in allows you to export to the QuickTime v210 file format that supports
Premiere Pro 1.5, Quick Clip Pro and Symmetry for real time playback with the
supported Bluefish444 video I/O cards and other QuickTime supported applications.
The difference between the exporter and using the general QuickTime codec is that it
supports the ability to select different RGB to YUV color matrices when you render for
you final output.
The Bluefish444 exporter will not support
embedding of audio, the exporter is for video
only. Simply export audio only as a separate pass
from your same composition to a 48 KHz wav file.
Frame rate.
The frame rate here should always match the
composite settings and the broadcast mode you
are using.
Scan Mode.
Interlaced
Progressive.
Conversion Matrix.
CGR.
Color space conversion between Standard Definition YUV and “Full Scaled” RGB
(8 bit: 0 - 255, 10 bit: 0 - 1023).
When rendering with CGR enable you maintain the full color levels. Video safe colors are
ignored.
29
Bluefish444 Adobe User Guide
SMPTE.
Color space conversion between YUV and “SMPTE Scaled” RGB
(8bit: 16 - 235, 10bit: 64 - 940).
When rendering with SMPTE enabled, video safe colors are supplied.
Rendering with Bluefish444 QuickTime Export plug-in;
1.
In the After Effects menu bar
2.
Select Composition -> Make Movie
3.
Go to the Current Render Details section of the Render Queue Dialog Box.
4.
In the Output Module section, select the “Lossless” option text and it will open the
“Output module.
5.
Select Bluefish444 QuickTime in the Format drop down list
6.
A Dialog box called Bluefish v210 Encoder will open.
7.
In the Video output sections select Format options button.
8.
Enter your frame rate equal to that of the composition you are exporting.
9.
Select the scan type as either Interlaced or Progressive
10.
Select the RGB/YUV matrix you wish to use.
30
Bluefish444 Adobe User Guide
11.
Select the X to close the dialog box.
12.
In the Output To section select the *.MOV option text and enter a file name and
path to render you QuickTime movie to.
13.
Select Render to begin the render process.
31
Bluefish444 Adobe User Guide
Adobe Photoshop 7/CS
Bluefish444 Photoshop Exporter adds an important plug in for broadcast graphic
designers by allowing you to quickly see your Photoshop images through any
Bluefish444 video card. This is important for checking color, positioning, line width, and
other graphic issues that can change when moving images from a VGA to a broadcast
monitor.
Features
•
•
•
•
•
•
Support for NTSC, PAL, HD720p, and HD1080i.
Pre built actions for hotkey updates.
Plug-in outputs both the image and the alpha channel on dual-link cards.
Support for 8-bit and 16-bit images.
Automatic YUV conversion.
Support for ALL Bluefish444 cards.
Using Actions with the Bluefish444 exporter
Bluefish444 exporter plug-ins includes an Action preset file called Bluefish444.atn which
is loaded to the Photoshop actions folder in the installed folder.
Actions can be can be linked to the Bluefish444 export plug ins by assigning keyboard
shortcuts
To load and assign shortcuts the Bluefish444 actions.
1. Open up the Actions dialog box and select the Options arrow button.
2. Select the Bluefish444 option. this will load the Bluefish444 pre defined actions to
the Actions Pallet.
3. Select an Action, say “TFT - Bluefish444 NTSC Export”, select the options arrow
button. this will option the dialog side bar as before.
4. This time select the Action Options The action dialog box will open.
5. In the function key drop down list, assign a function Key of your choice.
32
Bluefish444 Adobe User Guide
6. Click on OK.
7. Now open up a project in NTSC then select F5 and you will see the project
window output to the Bluefish444 SDI/Analog output on your broadcast monitor.
33
Bluefish444 Adobe User Guide
Appendices.
•
Typical Premiere Pro workflow with the QuickTime v210 file format.
•
After Effects 6.5, 8 and 10 bit frame buffer process work flow.
•
Typical Bluefish444 and After Effects workflow.
34
Bluefish444 Adobe User Guide
Typical Premiere Pro workflow with the QuickTime v210 file format.
With Bluefish444, Premiere Pro can support real time playback of QuickTime 210 file
formats generated from various sources using the Bluefish444 v210 QuickTime codec
including Digital Voodoo on the Apple Mac platform. Support for other non Bluefish444/
Digital Voodoo solutions using the V210 QuickTime file formats can also be imported but
there is no guarantee of frame accurate playback and quality.
Single link
4:2:2 or 4:4:4
HD/SD SDI
Single link
4:2:2
HD/SD SDI
HD/SD-SDI
Monitoring
QuickTime
uncompressed
Storage Array
Network, Fibre,
SCSI
Digital Production
CGI / Animation
Render farms
Editing Suite
Switcher
archive
Media Storage
Bluefish444
QuickTime
V210 Codec
Pro VTR Deck Control
QuickClip Pro/VTR
Apple MAC Platform
Digital Voodoo
QuickTime V210 File
Format
Support for 3rd party v210
QuickTime file format
35
Bluefish444 Adobe User Guide
After Effects 6.5, 8 and 10 bit frame buffer process work flow.
After Effects 6.5 can now take advantage of true 10 bit RGB frame buffer support with
the Bluefish444 SD and HD supported product range. Removes unnecessary down
conversions of composites and 16 bit project modes when using higher than 8 bit RGB
file formats.
Provides accurate, high quality output for detailed color corrections and effects within
After effects while maintaining the data integrity with file formats such as Cineon and
DPX thought out the
Bluefish444 SD and HD frame buffer
After Effects
Imported 8
bit and
10 bit
RGB
Cineon or
DPX files
16 bit
Project
mode
10 bit RGB
8 bit
Project
mode
8 bit RGB
10 bit RGB
frame buffer
mode
8 bit RGB
frame buffer
mode
*
10 bit YUV
Dual link
10 bit RGB
* 8 or 10 bit RGB to YUV real-time hardware color space conversion
36
Bluefish444 Adobe User Guide
Typical Bluefish444 and After Effects Workflow.
This example utilizes Bluefish444 hardware, Symmetry and After effects to capture
footage form a deck or DDR source such as Quick Clip Pro. Importing straight into the
After effects project with either the QuickTime 10 bit YUV, Cineon or DPX 10 bit RGB file
formats. Then export to tape via Symmetry or SAN environment.
Single link 4:2:2
or 4:4:4 HD/SD
SDI Analog I/O
Single link 4:2:2
HD/SD SDI
Analog
HD/SD-SDI
Monitoring
10 bit RGB
Cineon or DPX
File Format.
QuickTime
V210
10 bit YUV from
Symmetry
Import and export supported After
Effects files
Storage Array
Network,
Fibre,
SCSI
Digital Production
CGI / Animation
Render farms
Editing Suite
Switcher
archive
M di St
37
Bluefish444 Adobe User Guide
Installing plug-ins Manually
Installation process is as simple as running the Bluefish444 installer and selecting all of
the plug-ins and preset options (default install method).
The Bluefish444 installer will automatically copy the plug-in’s and presets to their correct
places.
Alternatively you can manually copy the plug-in’s from the Bluefish444 folder in Program
files.
Premiere Pro 1.5
1.
Copy the content of the C:\Program Files\Bluefish444\Premiere Pro
1.5\Plugins
2.
There will be five (5) plug-in’s in total.
3.
Go to Premiere Pro Plug-ins folder and make a new folder called
Bluefish444
4.
Paste the plug in’s into this new folder.
5.
Copy the content of the C:\Program Files\Bluefish444\Premiere Pro
1.5\Presets
6.
Create another folder in Premier Pro system folder called Bluefish444.
7.
Paste the presets into this new folder.
After Effects 6.5\6.0
1.
Go to C:\Program Files\Bluefish444\After Effects.
2.
Copy bluefishemp.aex and Bluefish444IO.aex ( not Bluefish444io.aex be
aware or the “io” this is support for RDV file format for Premiere 6.5 and
After Effects 5.5 only )
3.
Navigate to folder C:\Program Files\Adobe\After Effects 6.5(6.0)\Support
Files\Plug-ins\Standard.
4.
Paste the plug in s into this folder
After Effects 5.5
1.
For After Effects 5.5 copy the entire folder contents
2.
Make a folder called Bluefish444 in C:\Program Files\Adobe\After Effects
5.5\Support Files\Plug-ins\Standard and paste the plugns into the new
Bluefish444 folder.
Photoshop 7/CS
1.
Go to C:\Program Files\Bluefish444\Photoshop.
2.
Copy the Bluefish444.atn to he following directory this is the action file you
link keyboard shortcuts for updating you broadcast output
38
Bluefish444 Adobe User Guide
3.
4.
5.
6.
7.
Navigate to folder C:\Program Files\Adobe\Photoshop
7.0\Presets\Photoshop Actions
Paste the Bluefish444.atn file into this folder
Copy the following plug ins, (4) four in total.
TFT - Bluefish HD720P, TFT - Bluefish HD1080i, TFT - Bluefish NTSC, TFT Bluefish PAL
Navigate to folder C:\Program Files\Adobe\Photoshop 7.0\Plug-Ins\ImportExport, paste the plugins into this folder.
39
Bluefish444 Adobe User Guide
Support.
Bluefish444 provide unlimited email support to all customers for the life of the product
warranty.
FAQ’s
A list of frequently ask questions listed by application type.
Link http:\\www.Bluefish444.com\support\FAQ.
Hardware compatibility Guide.
This site has detailed information on tested and certified hardware categorized by
motherboards, systems and integrators.
Link http:\\www.Bluefish444.com\support\compatability.
Software compatibility guide.
Current list of released retail software that is compatible with the Bluefish444 product
range. Refer to this site often as new supported products a frequently released.
Link http:\\www.Bluefish444.com\support\compatability.
For phone support you must register your product online at the Bluefish444 web site.
Tech Support
If you have any questions please contact support at [email protected].
Email Support is free for the life of the warranty.
For phone support you must register your product at
http://www.bluefish444.com/support/techsupport.
In order to speed the resolution of your problem please ensure that you provide the
following information when contacting support.
•
•
•
•
•
•
•
•
•
System configuration and manufacture, Mother board type and Devices installed.
SCSI or RAID controller card type.
Storage array configuration,
OS version.
Applications installed
Bluefish444 Serial number and product type.
Installer version.
Contact number
Company name
40
Bluefish444 Adobe User Guide
Contact
Bluefish444 Australia
Phone + 61 (3) 9682 9477
Tech Support 9am to 5pm (GMT+10 hours)
Fax: + 61 (3) 9682 9466
Web: http://www.Bluefish444.com
Email: [email protected]
17B Market Street South Melbourne
Victoria Australia 3205
Bluefish444 Europe
Joel Street Farm,
Joel Street, Pinner,
Middlesex, HA5 2PD.
United Kingdom,
t. +44 (0)20 8429 8345,
f.+44 (0)20 8866 8207,
Tech Support +44 (0)20 8868 2575
USA Tech Support.
ph 775-727-6950
9am to 5pm (GMT -5 hours)
41