1
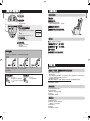
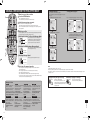
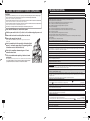
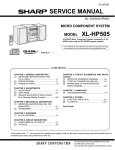
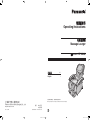
使用说明书 Operating Instructions 电动按摩椅 Massage Lounger 型号 /Model No. http://www.panasonic.net/ No. 1 CH, EN C1 English 1 在使用本按摩椅之前,请仔细阅读使用说明书。 上海松下电工有限公司 Panasonic Electric Works (Shanghai) Co., Ltd. 简体中文 EP-MA02 Before operating this unit, please read these instructions completely. 发行: 2010年7月 中国印刷 P9310MA02491 Printed in China 1 17 2010/07/09 11:16:40 1 2010/07/09 11:16:27 简体中文 使用该电器设备时,一定要遵守包括下列项目在内的基本预防措施。 使用该按摩椅之前,须阅读全部说明。 危险 ─ 为了减少触电危险: 1. 使用之后,一定要拔掉本机的插头。 2. 清洁之前,一定要拔掉本机的插头。 警告 ─ 为了减少灼伤、火灾、触电或人员伤害的危险: 1. 当插头插在插座上时,绝对勿丢下本机不管。不用时,一定要拔掉本机的插头。 2. 当行动不便或沟通能力不足的人使用本机时,必须要有严密和持续不断的看护。 3. 只能将本机用于本说明书中阐明的用途。 4. 勿站立在本机上。 5. 勿使用制造商所推荐以外的任何辅助装置。 6. 儿童不宜使用本机。请让儿童远离本机。拔出锁匙,保管在儿童无法触及的地方。 7. 如果电源线或插头已损坏,则绝对勿使用本机。如果本机运转不正常、已摔落或损坏、已落入水中,请将其送到 附近指定的维修中心。 8. 使用本机之前,一定要掀开中央靠垫,以检查本机的面料有没有破裂。并请检查其他部位,确认一下面料是否开 裂。如果您发现了裂口,无论裂口多么小,都要立即停止使用本机,拔掉电源线,并将本机送交指定的维修中心 进行修理。 9. 让电源线远离热表面。勿拉扯电源线来移动本机。小心勿让插头接触针头、垃圾或湿气。 10.勿在加热设备,如电热地毯等的上面使用本机。请勿在毛毯或枕头下面使用本机。否则,将导致过热,并可能引 发火灾、触电或人身伤害。 11.在操作期间,千万勿堵塞气孔,必须让所有的气孔避开棉绒或头发等物质。勿将任何异物落入或塞入本机的开口 之内。 12.勿在浴室或其他潮湿的地方使用本机,否则,可能会导致触电或本机功能失常。勿将水等溅洒在操作器上。 13.勿在室外使用本机。 14.请勿正在使用气溶胶喷射产品或正在实施供氧的地方使用本机。 15.当拔出本机插头时,应在从电源插座上拔掉插头之前,关闭所有的控制开关。请勿用变压器来使用本机,否则, 可能会导致触电或功能失常。 16.只能将本机连接至合适的接地插座。请参看接地说明。 17.请勿擅自打开或分解本机部件以免引起触电或人员伤害。 请保管好说明书。 警告: 简体中文 重要的安全说明 1. 具有下列任何状况或正在接受医疗处理的人,在使用本机之前,应咨询医师。 a)孕妇、病人或体质虚弱的人。 b)背部、颈部、肩部或臀部存在疾患的人。 c)佩带起博器、去纤颤器或其他易受电子干扰的个人医疗装置的人。 d)心脏病人。 e)因患血栓症或动脉瘤、急性静脉曲张或其他循环系统紊乱疾病而被医生禁止接受按摩的人。 f)脊椎异常弯曲的人。 2. 确保勿将身体的任何部位放入按摩轮之间,否则,按摩轮的挤压动作可能会导致受伤。勿将您的手指或脚,伸入 靠背和椅座、靠背和扶手、椅座和扶手下的盖子或脚靠与脚踏之间的间隙中。同样,勿将您身体的任何部位,包 括手指或伸入脚靠下的机械或脚靠和脚踏之间。 3. 请勿紧贴裸露的皮肤使用本机。虽然薄的衣服可以增强治疗效果,但是,按摩器直接接触皮肤可能刺激皮肤。 头部佩戴任何硬质饰物(如发卡等)时请勿使用本机。 请避免过重地按摩后颈部。 4. 每次同一部位均不得超过5分钟。 过度的按摩可能会过分刺激肌肉和神经,造成相反效果和伤害。 为防止过度按摩,每次使用的时间不能超过15分钟。 5. 在使用本机期间,如果您开始感到恶心或按摩好像有痛感,请立即停止使用。 6. 勿在使用本机时入睡。请勿在喝酒之后使用本机。 7. 当靠背处于倾斜位置时,请勿坐在其上或坐在上面将双脚跷在头枕上。请勿坐在脚靠上,否则,本机可能会翻 倒。 8. 若是第一次使用按摩椅,必须用轻度按摩程式开始。 9. 如果本机功能失常,请立即关闭电源,并委托指定的维修中心进行本机检查。 10.勿擅自修理本机。 11.倾斜靠背之前,应确认椅子后面无障碍物。若椅背碰到墙壁或柱子,则可能会造成按摩椅功能失常。椅子后面一 定要留有足够的空间。 12.每次按摩后,应将电源开关滑到“off(关)”位置,并将其锁定开关拨到“lock(锁)”位置。 13.确认本机部件之间不存在任何异物后方可坐到本机上。(检查靠背、脚部/足底按摩部分或者座椅下部有无异 物。) 如果未能遵守该注意事项,将可能导致事故或受伤。 14.移动本机前应将置脚台恢复至原来位置。 若未能遵循该注意事项,可能会导致受伤,因为在移动本机时置脚台会恢复至原来位置。 15.取下的固定螺丝应妥善保管,不要随意弃置。 否则有可能导致儿童意外吞咽。 接地说明 该产品必须接地。如果本机发生功能失常,接地将为电流提供阻力最小的通道,以减少触电危险。 该产品装备了具有设备接地导体和接地插头的电线。必须将该插头插入已完全依照当地代码和法令进行正确安装和接地的、合适 的插座。 危险 若设备接地导体连接不当,将会导致触电危险。如果您对该产品的接地是否正确存有疑问,请委托专业电工进行检查。即使该产 品附带的插头与插座不配,也不能对其进行改造。请委托专业电工安装合适的插座。 该产品具有接地插头。请确认该产品连接至具有与该插头形状一样的插座。 该产品不能使用转接插座。 C 1-2 C 2010/07/09 11:16:27 各部分的名称和作用 简体中文 护盖关闭状态 按摩椅主体 1 11 6 2 12 3 7 20 14 8 5 9 10 15 16 17 18 19 9 粘扣(用于固定操作绳) 19 电源插头 2 扶手 10 足底指压板 • 背侧设有停止装置。 • 位置可以进行微调。 • 足底指压板可取下。 3 操作器架 • 左右两边均配备。 4 置脚台 11 背部靠垫拉链 • 可安装或拆除背部靠垫。 26 重点部位钮 • 用于选择按摩的重点部位。 3 28 4 29 5 30 35 31 36 5 脚部/足底按摩部分 • 利用空气对脚肚子进行按摩。 12 把手 6 枕头 • 便于看电视时等放松身体使用。 • 高度可以调节。(参看第C8页) • 枕头可安装或拆除。 13 背面罩 14 靠背止动器 21 轮子 8 按摩轮的缩回位置 • 通常情况下,按摩轮藏在靠背的最 下部,左右分散。 37 手动控制钮 • 用于选择手动控制。 (参看第C12页) 28 肩部位置调节钮 38 速度钮 • 可以分5级调节上半身手动控制的 按摩速度。 29 肩部位置调节指示灯 39 速度指示灯 30 脚部按摩强度指示灯 40 位置调节钮 • 可以调节上半身手动控制的位置。 (参看第C11页) 27 敲打关/开钮 31 脚部伸展钮 • 用于关/开脚部伸展器。 32 停止钮 • 用于即刻停止按摩。 足底指压板 足底指压板可取下。 37 打开 安装足底指压板 确保足底指压板的安装方向及安装面正确,将其 插入开口处。 38 突起位于上端。 左脚 15 安全注意标牌(贴纸) 7 背部靠垫 36 脚部按摩钮 • 用于关/开脚部气压袋并且分3级调 节按摩强度。 33 倾斜钮 • 用于调节靠背和置脚台的角度。 20 电源开关部分 34 24 置脚台钮 • 只调节置脚台的角度。 26 27 1电源开关 (打 • 出厂前锁定开关设定为“open” 开),电源开关设定为“on”(开)。 2锁 3加锁匙 4设备电源输入插口 5加锁匙标签 • 防止小孩误吞加锁匙。 35 护盖 25 自动程序钮 护盖打开状态 1 枕头粘扣 23 剩余时间指示灯 • 显示按摩的剩余时间。 25 2 21 33 23 1 4 34 自动程序/手动控制状态指示灯 • 显示动作状态。 32 24 13 22 关/开钮 • 接通或切断操作器的电源。 22 简体中文 操作器 16 规格标签 39 17 接口 40 右脚 脚趾 18 电源线 脚跟 规格 电源: 消耗电力: 上半身按摩 可治疗范围(上下方向): 可治疗范围(左右方向): 上下运动速度: 按摩速度: C 3-4 AC 220 V 50 Hz 120 W 下半身按摩 空气压力: 约 67.5 cm 按摩动作时的按摩轮间隔 约 6.0 cm - 18.0 cm 约 20 - 35 秒/1往复 揉按: 约 20 次/分钟 - 30 次/分钟 揉抚: 约 30 次/分钟 - 50 次/分钟 推压: 约 20 次/分钟 -30 次/分钟 放松回旋: 约 30 次/分钟 - 50 次/分钟 柔和指压: 约 150 次/分钟 - 210 次/分钟 敲打: 约 230 次/分钟- 350 次/分钟 背部滚动: 约 20 秒/次 - 35 秒/次 (动作范围:约 53.5 cm) 局部滚动: 约 7 秒/次 - 9 秒/次 (动作范围:约 12 cm) 倾斜角度: 定时: 大小 未倾斜时 (H×W×D): 倾斜时 (H×W×D): 重量: 包装尺寸 (H×W×D): 包装重量: 使用者最大体重: 与墙壁的最小距离: 执行标准: 弱: 约 11.0 kPa 强: 约 27.0 kPa 约 20.0 kPa 中: 靠背: 约 120°- 170° 置脚台:约 0°- 80° 上半身和下半身均为 15 分钟左右(对于速按程序,约 5 分钟后自动关闭) 约 110 cm × 80 cm × 120 cm 约 61 cm × 80 cm × 168 cm 约 62 kg 84 cm × 77 cm × 121cm 约 77 kg 约 120 kg 40 cm GB4706.1 GB4706.10 对于体重100 kg或以上的人士,产品操作可能产生更大的噪声而且面料外罩可能磨损得更快。 C 2010/07/09 11:16:29 设置 简体中文 确定放置场所 • 请避免放置在每天有长时间日光直射的地方或供暖器具附近等 高温场所。 - 否则可能引起合成皮革的变色或变质。 • 建议您在按摩椅主体的下面铺设垫子等,以防止损伤地板,垫 子需足够大(至少 120 cm × 70 cm)以覆盖本机及脚靠接触 区域。 • 请于靠近出口处放置本机。 警告第10、12条见第C1页。 请与墙保持 10 cm 的距离。 约 195 cm 约 30 cm 宽度约为 80 cm 约 35 cm 用轮子移动时 抬起来搬运时 • 抬起置脚台,用轮子进行移动。 • 使按摩轮处于缩回状态,并且事先抬起靠背,便于移动。 *因可能会划伤地板,请铺设垫子等缓慢地移动。 • 两人前后抓住置脚台两侧的筒管部、后面护盖的把手移动。 *如果按摩椅主体跌落,可能会划伤地板,所以请牢牢地抓住 把手和置脚台。 简体中文 3 搬动商品 缓慢地移动 置脚台 手指请放在把手处 轮子 垫子 4 将扶手安装于本机上 后 置脚台接触地板的面积 本机接触地板的面积 前 拉链 1完全拉开扶手拉链。 1 打开包装箱抬起靠背 2确定选择正确的扶手(左或右),同时确定扶手方向是否正 确。(前或后)。 图示为左侧扶手。右侧扶手上标明了“Front(前)”, “Right(右)”和“Back(后)”。 *左扶手应安装于椅子左侧。 左 注意 • 抬起靠背时,请勿将手或脚伸入靠背和靠背止动器之间或者靠背和扶手之间。 - 否则可能被挟入而造成事故或伤害。 扶手安装。 1(当心以免损坏表层布料。) 3将凸面嵌入圆孔,安装好扶手。不要夹住扶手的表层布料。 若不慎夹住,请将其拉出且注意不要损坏表层面料。 凸面 1•打开包装箱的外壳。 在包装状态下,靠背是折叠的。 2拿掉缓冲材料和包装袋,取出附件等。 圆孔 前 3抬起靠背。 靠背止动器 后 • 在抬起靠背时,请勿将电源插头插入插座。 • 用双手扶着靠背按箭头方向抬起,直到靠背完全到位停止。 • 小心勿夹住电源线或操作绳。 提起 请确认椅子主体周围是否有人 或宠物,或者是否放置有物。 以螺钉固定 六角扳手 2 确认按摩椅主体和附件 主体 枕头 前 背部靠垫 六角扳手 — 1 固定螺丝 — 8 加锁匙 — 1 后 以装合螺钉固定扶手。 2(单侧扶手需于共4个位置固定) 掀开扶手两侧的表层面料后,用内六角扳手将装合螺钉嵌入圆 孔,而后旋紧。 (将扶手处的4处螺钉轻轻旋紧后,拧紧所有螺钉以完全固定。) *若螺钉与圆孔并不吻合,请从顶部推动扶手,将螺钉固定。 *拧紧1和3的固定螺丝时,一边用拇指将扶手的外罩布和里面 的尿烷泡沫塑料向上推一边插入固定螺丝,即可容易拧紧。 *拧紧2的固定螺丝时,将靠背放倒,即可容易拧紧。 合上扶手上部的拉链。 3合上拉链时,注意勿使拉链端纠结。 1扣上拉链。 2拉上拉链。 扶手 — 2 C 5-6 • 出厂时,加锁匙已预先 插入锁中。 电源线 将拉链两端放入内侧。 4将拉链末端塞入内侧。 C 2010/07/09 11:16:30 5 操作绳的安装 简体中文 安装操作绳时,请用粘扣在右(或左)扶手上离操作器连接点约 45 cm 处将其加以固定。 * 确保在靠背倾斜时为操作绳留有足够空间。 (如图所示为右扶手上操作绳的固定情形。) 1 2 约 45 cm 3 简体中文 4 打开电源 1将电源插头插入电源插座。 2将锁定开关钥匙转到“open”(打开)的 位置。 3将电源开关滑到“on”(开)的位置。 6 安装背部靠垫和枕头 1拉上背部靠垫的拉链 2将枕头上的粘扣,粘于靠垫上 5 对椅子进行确认 3 1 7 将电源线连接到本机 设备电源输入插口 接口 电源开关部分 电源线 1检查电源开关部分的设备电源输入插口和电源 线的接口是否脏污和损坏。 按摩轮处在靠背最下部,左右分散的状态。 如果按摩轮不在缩回位置,按两次 便可返回。 4确认置脚台已经放下。 • 如果在置脚台抬起的状态下就坐,则可能因臀部碰到置脚台和椅座的 4 连接处,或者因椅子翻倒而造成伤害。 2将接口插入设备电源输入插口。 3务必将接口完全推入。 使用前 1确认布面有无破损。 2确保本机各部件之间无异物。 3确认按摩轮处在缩回位置。所谓的缩回位置是指 警告第8条见第C1页,第7、13条见第C2页。 6 正确调节枕头 1 确认周围情况 粘扣 调节枕头,使其下端与耳朵平齐。 确定本机周围没有人、宠物及其它物体。 • 枕头的位置过低会妨碍颈周边的按摩。 粘扣 2 检查电源线及电源插头 警告第7条见第C1页。 7 调节倾斜角度 按下 进行调节。 • 按钮被持续按住的时间内,按摩椅将持续工作。(直到发出“噼噼”声) • 置脚台的工作稍微滞后。 约120° 约80° 3 务必将接口完全推入设备电源输入插口。 约170° 约0° *倾斜操作功能用于调节靠背和脚靠,勿用于其它用途。如图所示,可上下连续调节。 C 7-8 C 2010/07/09 11:16:32 2•按下个人爱好的自动程序选择钮。 请从闪烁的钮内选择。 对于身高不足140 cm或者185 cm以上肩部位置不适合者,建议按以下方法使用。 身高不足140 cm左右 请放倒椅子靠背 身体向下移动使 用。 请在下面铺设坐 垫,贴着椅背坐。 • 按摩过程中按下其它方式钮时,即变更为该钮的方式。 • 在自动程序下,还会自动开始脚部按摩。 还可以中途改变脚部按摩的强度或者使其停止。(参看第C13页) • 按下自动程序选择钮,则进入自动按摩位置。 3贴着椅背深深地坐在椅子上,使头部轻松地置于枕头上。 4•对准肩部位置。 在肩部位置指示灯闪烁时间内进行调节,使按摩轮(上头)轻轻地接触到肩部。 2 身高超过185 cm左右 5随心所欲 A按照个人爱好选择重点部位 想重点对颈部和肩部进行按摩时 想重点对腰部进行按摩时 • 同时对背部和腰部适当地 按摩。 简体中文 简体中文 1 使用全身自动按摩方式和五分钟速按方式 1•按下关/开钮。 关/开指示灯亮。 • 同时对颈和肩部适当地按 摩。 过高的位置 按下 按摩轮的合理位置 • 轻轻地接触到肩部 B按照个人爱好删除自动程序中的敲打 过低的位置 想向上移动时 4 按下 *想解除重点时,请再次按下钮。 *再次按此钮,则在按摩方式中增加敲打功能。 想向下移动时 身高的基准 按下 185 cm 按下 C脚部按摩调整 160 cm 140 cm 按下 • 关于脚部按摩参看第C13页。 • 可分5级进行调节(上,下各约 10 cm)。 • 在按摩过程中也可以调节肩部的按摩位置。 • 肩部位置不合适时,请移动身体进行调节。 调整脚靠以适合放置脚部。 • 要停止脚部动作回到原始位置时,关闭脚部伸展动作。 按下 对于体形较小的人士 • 如果升起置脚台,则更易于 让足底与置脚台进行接触。 对于体形较大的人士 • 您可以降低脚靠以放松。 关于剩余时间的显示 剩余时间 约15分钟 • 以指示灯的闪烁显示按摩的剩余时间。 • 从15分钟开始,约以3分标度单位进行递减计数。 • 剩余时间为1分钟时,闪烁速度加快。 约9分钟 约3分钟 • 通过转动足底台,可对脚部进行全面按摩。 6•按摩自动结束。 开始按摩后,约15分钟后自动结束。 • 按摩轮移动至下部,在缩回状态下停止。 • 脚靠可自动降低。 • 在移动过程中,动作指示灯闪烁,停止后熄灭。 • 当再次使用时,请按下关/开钮。继续使用时,建议您休息10分钟以上。 全身自动程序和五分钟速按方式的特征 酸痛改善 以柔和指压、敲打和揉按动 作为主,缓慢地将发硬酸痛 的肌肉推拿揉开。 建议肌肉发硬酸疼严重者或 喜欢强烈刺激者选用。 C 9-10 消除疲劳 以揉抚、放松回旋和揉按动 作为主,无遗漏地对全身进 行轻柔按摩。 建议早期肌肉发硬酸疼者或 喜欢轻柔刺激者选用。 背部鬆弛 采用背部滚动,推压和脚部 伸展程式放松全身肌肉。揉 按僵硬的背部和关节,助您 改变姿势,从疲劳中恢复。 推荐疲劳者,或因不正确姿 势伏案工作和家务劳动而感 到僵硬者采用。 五分钟速按 在5分钟时间内,对全身进行 各种动作的按摩。 建议想在短时间内使全身舒 展时选用。 想在中途停止时 按下 • 按下关/开钮。 • 按摩轮会移动到缩回状态,靠背和脚靠 会自动回到原始位置。 想立即停止时 按下 • 按下停止钮。 • 此时,所有的动作都停止。 C10 2010/07/09 11:16:33 进行动作组合时 切换动作时 • 可将多种动作组合起来使用。 • 对于推拿和指压的组合等框内的动作不能进行组合。 例1)在选中揉按的状态下,组合敲打时 例1)切换到框内的动作时 (在选中揉按的状态下切换到放松回旋时) 例2)再组合背部滚动时 例2)切换到框外的动作时 (在选中揉按的状态下切换到敲打时) • 揉按组合敲打后,如删除揉按则只有敲打动作。 简体中文 简体中文 上半身的手动控制动作 1打开护盖。 2 2•按下关/开钮。 关/开指示灯亮。 • 所有手动控制钮闪烁。 3•选择手动控制。 选中的钮点亮,开始工作。(参看第C12页) • 自动地倾斜,从通常位置变成按摩位置。舒适调整参看第C8页。 随意调节 4您可以调整按摩轮的位置和速度,当到达界限点时,会发出“噼噼”声响。 A想调节按摩轮的上下位置时 向上 3 • 按一次按钮可轻微调节位置(约15mm)。按住 不放可一直调节,直至松开按钮停止调节。 向下 B想调节按摩头的宽度时 • 可以分3级调节敲打、柔和指压、背部滚动和局 部滚动。 扩大 缩小 例3)删除背部滚动时 C想调节速度时 • 可以分5级进行调节。 增速 减速 5•按摩自动结束。 开始按摩后,约15分钟后按摩自动结束。 • 按摩轮移动到下部,在缩回状态下停止。 • 脚靠可自动降低。 • 移动过程中,动作指示灯闪烁,停止后指示灯熄灭。 • 再次使用时,请按下关/开钮。继续使用时,建议您休息10分钟以上。 信息: • 为防止使用过度,按摩椅内置有定时器。 • 在使用手动控制等情况下,按下动作钮后,过了约15分钟以后,定时器会启动,按摩自动地停止。 *继续使用时,建议您休息10分钟以上。 想在中途停止时 按下 • 按下关/开钮。 • 按摩轮会移动到缩回状态,靠背和脚靠 会自动回到原始位置。 想立即停止时 按下 • 按下停止钮。 • 此时,所有的动作都停止。 基本动作的种类和作用 C11 11-12 揉按 以揉搓的感觉,细致地揉 开,仿佛被夹入其中。 建议从脖颈揉开肩部发硬肌 肉时使用。 揉抚 以在肌肤上滑动的感觉,有 节奏地按摩。 建议大范围地揉开背部发硬 肌肉时使用。 柔和指压 以大拇指的感觉,细致地左 右交替按压。 建议按压肌肉发硬部位时使 用。 背部滚动 从颈部到腰部全面地上下滚 动按摩,范围达67.5cm。 建议整体伸展脊背时使用。 推压 平缓地左右交替挤压,好象 向外侧挤出。 建议对全身揉开时使用。 放松回旋 在脊背上双手划圆,有节奏 地揉开。 建议揉开腰背时使用。 敲打 以拳头一样的感觉,“咚 咚”有节奏地敲打。 建议想细致地推展肌肉时使 用。 局部滚动 部分地上下按摩脊背,范围 达10cm。 建议集中伸展脊背时使用。 C1 2010/07/09 11:16:34 脚部的手动控制动作 简体中文 在进行按摩前,先调节好置脚台的角度或滑杆。(参看第C8页) 使椅子恢复原状 1•按下关/开钮。 关/开指示灯亮。 1 1确认安全。 2•按两次关/开钮。 靠背和置脚台自动回到原来的位置。 2•按脚部按摩钮。 开始空气按摩。 • 以指示灯显示按摩强度。 2 按动倾斜钮,靠背和置脚台返回原位。(参看第C8页) 3随心所欲 3将操作器放入操作器袋中。 4使背部靠垫和枕头恢复到原来的位置。 A根据个人爱好调节按摩强度 • 可以分3级调节按摩强度。 • 每按1次钮,强度依次以中→强→停→弱的顺序进行切 换。 • 初始设置是“中”。 *如果只开启了脚部按摩,则跳过OFF(关闭)一步。 简体中文 按摩结束后 1 2 3 弱 中 强 B按下脚部伸展钮 off* 切断电源 • 再次按下后,脚部伸展动作停止。 警告第1、6条见第C1页,第12条见第C2页。 4按摩自动结束。 1将电源开关置“off”(关)的位置。 2加锁匙转动到“lock”(锁)的位置。 3拔下电源插头。 4加锁匙需放于儿童无法触及的地方。 • 开始按摩后,约15分钟后自动结束。 • 脚靠可自动降低。 • 再次使用时,请按下关/开钮。 脚部按摩的特征 脚部按摩 从脚部底端向上捏,细致地推拿揉开,令人心情舒畅地缓解易浮肿而疲乏的脚部。 脚部伸展 约降低15° 气压袋抓住脚部后,置脚台将下降至与 按摩位置成15°角的位置,轻柔地对脚 部进行伸展按摩。 置脚台约上升到30°后,重新约降低 20°,有力地进行伸展按摩。 想中途停止按摩时 按下 约上升30° 约降低20° • 按下关/开钮。 • 要完全排出空气时,会稍微花费些时 间。(按下关/开钮后,也会发出排出空 气的声音。) 置脚台重新上升至30°角处。 危险第2条请见第C1页。 背部靠垫、中央靠垫、按摩椅主体和扶手的合成皮革部分 想立即停止时 按下 维护方法 • 按下停止钮。 • 此时,所有的动作都停止。 • 日常维护时,请用柔软的干布轻轻擦拭。 (请勿使用化纤抹布等。) • 一旦弄脏时,请用温水将中性洗涤剂稀释到3-5%左右,浸湿柔软的布,彻底拧干,敲打清洁表面。然后,将用水浸过的布彻底 拧干,挤去洗涤剂,再用柔软的干布轻轻擦拭后,使其自然干燥。 (请勿用电吹风机等使其迅速干燥。) • 使用本按摩椅时,请勿穿着丁尼布、色彩鲜艳、带图案或其它易于褪色的衣物,否则会导致椅身的合成皮革褪色。 • 请注意,如果长时间与塑料制品接触,会使其变色。 • 绝对不要使用稀释剂、汽油和酒精。 筒管和塑料类 1 将含有中性洗涤剂的布彻底拧干后擦拭。 2 最终拧干含水的布后擦拭。 *维护操作器时,请将布拧得特别干后再擦拭。 3 使其自然干燥。 • 绝对不要使用稀释剂、汽油和酒精。 弹性面部分 1 用含有中性洗涤剂的布擦拭。 2 脏得特别严重时,用刷子蘸中性洗涤剂清洗干净。 (如果擦拭过度,则可能会损伤弹性面。) 3 用含水的布擦拭干净。 4 使其自然干燥。 • 绝对不要使用稀释剂、汽油和酒精。 C13 13-14 C14 2010/07/09 11:16:35 故障检修 简体中文 问题 注意 原因和处理方法 • 在进行折叠时,请勿在座椅和扶手之间坐人或放置物品。 否则,可能会因被挟入而造成伤害。 • 靠背向前折叠时,勿开动或操作本机。 未按本指示操作会造成挤压伤。 • 靠背向前折叠时,勿爬上本机或置物于其上。 未按本指示操作会损伤机器。 • 为确保安全,在折叠靠背时,请务必由两人进行作业。 1按下关/开钮,切断电源。 2将电源置于“off”(关),加锁之后从电源插座拔下插头。 3将背部靠垫和枕头卸下。 将扶手拆下。 4具体操作请参照第C6页所述“将扶手安装于本机上”部分,逆向操作即可。 5将螺丝起子插入靠背闩的开口上端约 简体中文 将靠背折叠起来(重新包装) 电机噪声 • 听起来像是按摩轮正在挤压布料,令其产生褶皱。 • 当电机启动时发出嘎吱声。 • 在进行敲打过程中噪声太大。(按摩椅顶部的噪声较大。) • 按摩轮在工作时发出咯吱声。 • 按摩轮上移或下移时发出咔哒声。 • 可听到传动带正在转动的声音。 • 当按摩轮在座椅面料上按擦时发出摩擦声音。 • 当背部靠垫在座椅倾斜时向扶手处移动时发出噪声。 • 当坐下时发出噪声。 • 按摩轮向里及向外移动时发出奇怪的声音。 • 接通电源开关时的待机状态声。 • 空气按摩中的加压动作声音。空气按摩中的排气声。充气泵发出嗡嗡声。 • 置脚台发出咔哒声。 • 座椅下的阀门发出工作噪声。 • 在进行脚部伸展过程中释放气体时发出不稳定的声音。 7 4 cm(直至接触靠背 这些声音很正常,不会对本机的使用有任何影响。 闩)。 6将螺丝刀的刀尖向下按约 2.5 cm,就能脱开靠背止动器。 靠背开始向下倒时,拔出螺丝刀。 7*注意勿将操作器或绳夹入靠背和座椅间。 *建议您移动本机后再折叠靠背(直立位置)。因为在折叠状态时移动可能会发生因靠背的 未完全固定而引起不安全。 5 6 按摩轮中途停止。 (操作器的动作显示部或钮全部闪烁熄灭) 在使用中施加外力不适当时,为了确保安全,按摩轮会停止运动。 一旦动作显示部或钮全部闪烁,按摩机停止工作时,请暂时切断椅子的电源开关,约10秒钟之后,重新置于“开”,再进行 操作。若再次停止时,请起身谨慎使用。 按摩轮不能到达肩部或颈部的位置。 肩部位置不适当。 (参看第C10页) 左右两端的按摩轮高度不等。 因采用交互式敲打法,不可避免产生这种情况,并非故障。 不能倾斜。 置脚台不能上下活动。 (操作器的动作显示部或钮全部闪烁熄灭) 在使用中,如碰到障碍物等施加了不适当的外力时,为了确保安全,有时会停止动作。 一旦动作显示部或钮全部闪烁,置脚台停止活动时,请暂时切断椅子的电源开关,约10秒钟之后,重新置于“开”,再进行 操作。 自动程序下启动按摩时不能倾斜。 (不能自动倾斜) 有时不能利用靠背或置脚台的位置(角度)自动地倾斜。 当按摩方式在靠背放平,置脚台上升的状态时自动躺椅模式不起作用。 仅下半身按摩时自动躺椅模式不起作用。 倾斜后不能自动复位。 当防止过度使用的定时器启动或者按下了 钮时,不能自动复位。 (要复位时,请按两次 钮。) 动作不能由揉抚、揉按动作切换到放松回旋、推压。 (参看第C14页) 当体重未加在按摩轮上时,有时动作难以进行切换。请将体重加在按摩轮上。 置脚台不能向下活动。 在置脚台的滑杆向前伸出状态下,往下扳置脚台时,则会碰到地板,因此在使用中途可能无法往下活动。这时,请拉回脚滑 杆后使用。 不进行按摩动作。 (参看第C7和C8页) • 电源插头脱落。 (参看第C8页) • 椅子的电源开关处于“关”的位置。 • 按下操作器的 钮后,未按方式钮或动作选择钮。 (参看第C9、C11和C13页) 已经破损。 请立即停止使用。 电源线和插头异常发热。 请立即停止使用。 警告第17条见第C1页,第9、10条见第C2页。 制造商:上海松下电工有限公司 上海市松江工业区江田东路258号 原产地:中国 C15 15-16 C16 2010/07/09 11:16:35 IMPORTANT SAFETY INSTRUCTIONS Basic precautions should always be followed when using an electrical unit, including the following. Please ensure that you read all instructions before using the Massage Lounger. DANGER – To reduce the risk of electric shock: 1. Always unplug the unit immediately after use. 2. Always unplug the unit before cleaning. WARNING – To reduce the risk of burns, fire, electric shock, or injury to persons: 1. The unit should never be left unattended when plugged in. Always unplug the unit when not in use. 2. Close and continuous supervision is necessary when the unit is used by people who are limited in their ability to move or communicate. 3. Only use the unit for the purpose described in these instructions. 4. Do not stand on the unit. 5. Do not use any accessories other than those recommended by the manufacturer. 6. This unit should not be used by children. Keep children away from the unit. Remove key when not in use and store out of reach of children. 7. Never operate the unit if it has a damaged power cord or plug. Return the unit to the nearest authorized service center if it is not working properly, if it has been dropped or damaged, or if it has been immersed in water. 8. Always raise the back cushion to check that the fabric of the unit itself has not been ripped before using the unit. Please also check other areas to ensure that the fabric has not been ripped. No matter how small the rip, if you find one then immediately stop using the unit, unplug the power cord and have the unit repaired at an authorized service center. 9. Keep power cords away from heated surfaces. Do not carry the unit by the power cord. Take care that pins, garbage and moisture do not come into contact with the plug. 10.The unit should not be used on top of heating appliances, such as electric carpets, etc. Do not operate the unit under blanket or pillow. Excessive heating can occur and cause fire, electric shock, or injury to persons. 11.Never block the air openings during operation and make sure that all air openings are kept free of lint and hair, etc. Do not drop or insert anything into any of the openings of the unit. 12.The unit should not be used in bathrooms or other damp or humid places as this may cause electric shock or the unit to malfunction. Water, etc. should not be spilled on the controller. 13.Do not use the unit outdoors. 14.Do not use the unit in places where aerosol spray products are in use or where oxygen is being used. 15.When unplugging the unit, turn off all controls before removing the plug from power outlet. A transformer should not be used as this may cause an electric shock or the unit to malfunction. 16.Connect this unit to a properly grounded outlet only. See Grounding Instructions. 17.The unit contains no user-serviceable parts and opening or disassembling any parts of it may cause an electric shock or injury. SAVE THESE INSTRUCTIONS WARNING: 1. Persons with any of the conditions listed below or who are undergoing medical treatment should consult with their physicians before using the unit: a)Pregnant women, people who are ill, in poor physical shape. b)People suffering from back, neck, shoulder, or hip pain. c)People who have a pacemaker, defibrillator, or other personal medical devices prone to electronic interference. d)People suffering from heart disease. e)People who are prohibited from receiving massage by a physician due to thrombosis or aneurism, acute varicose veins, or other circulatory disorders. f) People with irregular curvatures of the spine. 2. Make sure that no part of your body is between the massage heads as their squeezing action may cause injury. Your fingers and your feet should not be put in the gap between the backrest and the seat, the backrest and the armrest, the seat and the cover under the armrest and the gap between the legrest and the footrest. Also, no part of your body, including your fingers, should be put in the mechanism below the legrest or between the legrest and the footrest. 3. The unit should not be used against bare skin. While thin clothing may increase effectiveness, exposing the skin directly to the unit may irritate the skin. Avoid wearing anything hard on your head like a hair accessory, etc. when using this unit. Excessively strong massage action should be avoided on the back of the neck. 4. Avoid massaging any one part of your body for more than 5 minutes at a time. Excessive massaging can overstimulate the muscles and nerves and result in an adverse effect or injury. The unit should not be used for more than a total of 15 minutes each session to avoid excessive massaging. 5. While using the unit, if you start feeling sick or if the massage seems painful, stop using it immediately. 6. You should not fall asleep while using the unit or use the unit after drinking alcohol. 7. Avoid sitting on the unit, or sitting with your legs resting on the headrest, when the seat back is in a reclined position. Sitting on the legrest may cause the unit to fall over. 8. Be sure to start on the gentle massage program if using the unit for the first time. 9. If the unit functions abnormally, immediately turn off the power and have the unit checked by an authorized service center. 10.Avoid attempting to repair the unit yourself. 11.Make sure there are no obstacles behind the unit before reclining it. If the back hits a wall or pillar, the unit may malfunction. Be sure to have ample space behind the unit. 12.After each massage, slide the power switch, to the “off” position and turn its lock switch to the “lock” position. 13.Sit on the unit after confirming there is no foreign matter between the parts of the unit. (Confirm that there are no foreign objects stuck in the back cushion, leg/sole massage section, or under the seat.) Failure to observe this precaution may result in accident or injury. 14.Always return the legrest to its original position before moving the unit. Failure to observe this precaution may result in injury due to the legrest returning to its original position when the unit is being moved. 15.Do not leave the removed attachment screws lying unattended. Accidental ingestion may occur. GROUNDING INSTRUCTIONS The unit must be properly grounded. If it should malfunction or break down, grounding provides a path of least resistance for electric current in order to reduce the risk of electric shock. This unit is equipped with a cord with an equipment-grounding conductor and a grounding plug. The plug must be plugged into an appropriate outlet that has been properly installed in accordance with all local codes and ordinances. DANGER Improper connection of the equipment-grounding conductor may lead to electric shock. Check with a qualified electrician if you are in doubt as to whether or not the unit is properly grounded. Do not modify the plug provided with the unit if it will not fit the power outlet. Instead, have a proper outlet installed by a qualified electrician. English English This unit has a grounding plug. Make sure that the product is connected to a power outlet with the same configuration as the plug. Do not use an adaptor with this unit. 1-2 2010/07/09 11:16:36 PART NAMES AND FUNCTIONS CONTROLLER MASSAGE LOUNGER Cover Closed 1 11 6 2 12 7 8 9 10 23 33 34 25 20 14 26 15 16 17 18 19 35 9 Fastener for securing the controller cord 3 Controller Holder • On both the left and right side. 4 Legrest 5 Leg/Sole massage section • Includes an air massage function. 6 Pillow • For use when watching TV or just relaxing. • The pillow has a height adjustment. (See Page 8) • The pillow is detachable, and can also be flipped over. 10 Sole Shiatsu Sheet • “Stopper” is provided on the back side. • Fine adjustment of position is possible. • The sole shiatsu sheet is detachable. 28 27 Tapping OFF/ON button 4 29 28 Neck Roller Position button 5 30 29 Neck Roller Position Indicator 30 Leg Massage Intensity Indicator 31 36 18 Power Cord 13 Back Cover 14 Backrest Latch 21 Wheels 12 Handle 7 Back Cushion 15 Safety Precaution Label 8 Retracted Position of Massage Heads • The massage heads are normally retracted to the left and right in the upper part of the backrest. 16 Specification Label Up-Down Movement Speed: Massage Speed: English 3-4 37 38 35 Cover 36 Leg Massage button • Turns airbags on and off and adjusts intensity of leg massage in 3 steps. 37 Manual Operation buttons • This allows you to select the massage action you desire. (See Page 12) 38 Speed Adjustment button • Adjusts speed of upper body massage in 5 steps during manual operation. 39 Speed Indicator 40 Massage Position Adjustment button • Adjusts position of massage heads during manual operation. (See Page 11) SOLE SHIATSU SHEET The sole shiatsu sheet is detachable. Opening To attach the sole shiatsu sheet Be sure of the proper direction and sides of the sole shiatsu sheet and insert it into the opening. Projections are on the upper side. 39 For the left foot For the right foot 40 Toe 17 Connector SPECIFICATIONS Power Supply: Power Consumption: Upper Body Massage Massage Area (Up-Down): Massage Area (Left-Right): 31 Leg Stretch button • Used for turning leg stretch on and off. 32 Quick Stop button • Used to stop the massage immediately. 19 Power Plug 20 Power Switch Section 1Power Switch • Lock switch is set to “open” and power switch is set to “on” prior to leaving the factory. 2Lock Switch 3Lock Switch Key 4Appliance Inlet 5Lock Switch Key Tag • To prevent children from accidentally swallowing the lock switch key. 11 Back Cushion Zipper • The back cushion is detachable. 26 Massage Focus buttons • Used to select focus of massage. 3 21 34 Operation Indicator • Displays operational status. 24 Ottoman button • Use this button to adjust the angle of the legrest. 27 33 Reclining button • Use this button to adjust the angle of the backrest and legrest. AC 220 V 50 Hz 120 W Approx. 67.5 cm Distance between Massage Heads during Operation Approx. 6.0 cm – 18.0 cm Approx. 20 – 35 sec. return. Knead: Approx. 20 cycles/min. – 30 cycles/min. Swedish: Approx. 30 cycles/min. – 50 cycles/min. Compression: Approx. 20 cycles/min. – 30 cycles/min. Hawaiian: Approx. 30 cycles/min. – 50 cycles/min. Soft Shiatsu: Approx. 150 cycles/min. – 210 cycles/min. Tap: Approx. 230 cycles/min. – 350 cycles/min. Full Roll: Approx. 20 sec./cycle – 35 sec./cycle (Movement range: Approx. 53.5 cm) Regional Roll:Approx. 7 sec./cycle – 9 sec./cycle (Movement range: Approx. 12 cm) Heel Lower Body Massage Air Pressure: Reclining Angle: Automatic Shut-Off: Dimensions When not reclined. (H × W × D): When reclined. (H × W × D): Weight of Unit: Dimensions of Box (H × W × D): Weight in Box: Maximum User Weight: Minimum Distance from Wall: Weak: Strong: Approx. 27.0 kPa Medium: Approx. 20.0 kPa Backrest: Approx. 120° – 170° Legrest: Approx. 0° – 80° Approx. 15 min. for both upper and lower body (Approx. 5 minutes for the quick massage) Approx. 11.0 kPa Approx. 110 cm × 80 cm × 120 cm Approx. 61 cm × 80 cm × 168 cm Approx. 62 kg 84 cm × 77 cm × 121 cm Approx. 77 kg Approx. 120 kg 40 cm English 2 Armrest 23 Time Indicator • Displays time remaining before end of massage. 2 Cover Opened 1 Pillow Fasteners 22 OFF/ON button • Switches the controller on and off. 25 Pre-Programs buttons 1 4 5 32 24 13 3 22 For those who weighing 100 kg or more, the product operations may make more noise and the fabric cover may wear faster. 2010/07/09 11:16:36 SETTING UP THE UNIT 3 HOW TO MOVE THE UNIT Using the wheels to move the unit WHERE TO USE THE UNIT Keep at least 10 cm away from the wall. • Avoid places where the unit will be exposed to direct sunlight for long periods of time or places where it will be exposed to high temperatures, such as in front of a heater, etc., as this can cause discoloration or hardening of the synthetic leather. • Placing a mat or cloth under the unit is recommended to prevent floor damage. The size of the mat should be sufficient (at least 120 cm × 70 cm) to cover the areas where the unit touches and where the legrest could touch the floor. • Set the unit near the outlet. See Warning No. 10 and 12 on page 1. Approx. 195 cm Approx. 30 cm Width approx. 80 cm Approx. 35 cm • Grasp the legrest to move the unit when using the wheels. • It is easier to move the unit with the massage heads retracted and the backrest in the upright position. *Place a mat or cloth on the floor and move the unit slowly to prevent floor damage. Move it slowly Legrest Place your fingers to the handle Mat Area where legrest could touch the floor Wheels 4 INSTALL THE ARMRESTS ON THE UNIT Area where unit touches the floor Back Front 1 UNPACK THE UNIT AND RAISE THE BACKREST Zipper 2 Check the side (right or left) of the armrest. Check the direction (front or back) of the armrest as well. The illustration shows the left armrest. The right armrest is stamped “Front”, “Right” and “Back”. *The left armrest must be installed on the left hand side of the unit. CAUTION • When raising the backrest, do not allow hands or feet to become caught between the backrest and the backrest latch or the backrest and the armrests. Failure to follow this precaution may result in pinching, which may lead to injury. Convex 3 Align the convex portion of the armrest with the round hole on the unit, and embed the armrest on the unit. Avoid catching the coated fabric between them. If it is caught, pull it out without damaging the fabric. 1 • When packed for shipping the backrest is folded forward. Remove the top of the shipping container. the packing and cushioning 2 Remove materials and take out the accessories. Round hole Front Rear the backrest. 3 •Raise Do not connect the power cord to an electrical outlet during setup. Check that there is nothing around the unit. Lift up • Hold the backrest with both hands and lift in the direction of the arrow until it comes to a stop. • Be careful to avoid catching the power cord or the controller cord. Secure with screws Allen key 2 INSPECT CONTENTS OF SHIPPING CONTAINER Massage Lounger Pillow Back Cushion Allen Key — 1 Attachment Screws — 8 Lock Switch Key — 1 Front Armrests — 2 • The lock switch key has been inserted in the lock switch prior to leaving the factory. Power cord Rear the armrests with attachment screws. 2 Secure (Total of 4 positions for a single armrest) Lift the coated fabric on the side of the armrest and insert the attachment screw onto the end of the Allen key, and then tighten. (Tighten the screws in the 4 positions lightly at first, and then tighten all screws firmly.) *If the screw does not enter into the hole, tighten the screw by pushing the armrest from the top. *When tightening attachment screws 1 and 3, inserting the screws while pushing the covering and inside urethane of the armrest up with your thumb will make them easier to tighten. *When tightening attachment screw 2, reclining the backrest will make it easier to tighten. the zipper at the bottom side of the 3 Close armrests. When closing the zipper, be careful not to twist the end of the zipper. 1 Set the zipper. 2 Fasten the zipper. English English both ends of the zipper into the inside. 4 Put Turn in the edge of the zipper. 5-6 the armrests. 1 Install (Be careful to avoid damaging the coated fabric.) 1 Unfasten the zipper of the armrest completely. Left Backrest latch Lifting the Unit • Move the unit by having one person hold the legrest and another person use the handles on the back. *Please hold the handles and legrest securely to avoid dropping the unit as it may damage your floor. 2010/07/09 11:16:37 5 FIX THE CONTROLLER CORD Approx. 45 cm 4 SWITCHING ON THE POWER SUPPLY Fix the controller cord with the fastener for securing the controller cord at a position about 45 cm from the connected part of the controller on either the right or left side of the armrest. * Confirm that there is a margin for the controller cord length when the backrest is reclined. (The illustration shows that the cord is attached to the right armrest.) 1Insert the power plug into an electrical 1 outlet. 2 3 2Turn the lock switch key to the “open” position. 3Slide the power switch to the “on” position. 6 ATTACHING THE BACK CUSHION AND PILLOW 1Attach the back cushion using the zipper. 2Attach the pillow using the fasteners. 5 CHECK THE UNIT 3 Appliance inlet Power switch section Power cord Connector 1Check for dirt and damage on appliance inlet of the power switch section and the connector of the power cord. the parts of the unit. 1 7 CONNECT THE POWER CORD TO THE UNIT 3Make sure the massage heads are in the retracted position, i.e. they are parked to the left and right in the upper part of the backrest. 4 If not retracted, press retracted position. 1 CHECK THE SURROUNDING AREA twice to return the massage heads to the sure the legrest is lowered. 4Make • Do not sit on the legrest when it is raised. Doing so may cause it to 2Insert the connector into the appliance inlet. 3Be sure to push the connector in all the way. BEFORE USING THE UNIT 1Make sure the covering is free of rips or tears. 2Make sure there are no obstacles between collapse down or bend the legrest. The legrest is not meant to support full body weight. See Warning No. 8 on page 1 and No. 7 and 13 on page 2. 6 ADJUSTING FOR CORRECT PILLOW HEIGHT Fasteners Make sure there are no objects, people, or pets in the vicinity of the unit. Adjust the pillow height so that the bottom edge of the pillow is at ear level. • If positioned too low, the pillow can lessen the effect of massage around the neck area. Fasteners 2 CHECK THE POWER CORD AND THE POWER PLUG See Warning No. 7 on page 1. 7 ADJUSTING THE RECLINING ANGLE Press and to adjust the angle of the backrest and legrest. • With either button held down, movement will continue until a “beep-beep-beep” sound indicates the legrest or backrest has been raised or lowered as far as possible. • The legrest will start to move shortly after the backrest. Approx. 120˚ Approx. 80˚ 3 BE SURE TO PUSH THE CONNECTOR ALL THE WAY INTO THE APPLIANCE INLET Approx. 170˚ English *The reclining operation is a function that adjusts the angle of the backrest and legrest. Avoid using it for any other purposes, such as continuous up/down operation etc. 7-8 English Approx. 0˚ 2010/07/09 11:16:38 1 USING PRE-PROGRAMS AND QUICK MASSAGE the OFF/ON button. 1Press • The OFF/ON indicator will come on. the pre-program you want. 2Select • Please press one of the flashing buttons. • If you press another Pre-Program button or a manual operation button during your selected pre-program massage, the massage will switch to the newly selected massage. • In pre-programs, the leg massage begins at the same time. It is possible to stop or change the intensity of the leg massage during the program. (See Page 13) • Pressing a Pre-Program button automatically moves the backrest and legrest into massage position. 2 3Sit as far back in the seat as possible with your head on the pillow. shoulder position 4Adjusting • When the shoulder position indicator is flashing, adjust the position of the Persons whose height is less than 140 cm or more than 185 cm are recommended to use the unit in the manner described below when the massage heads do not touch their shoulders. Height is around 140 cm or less Use by placing a cushion on the seat and sitting as far back as possible. Use by reclining the backrest and sliding your body downward. 5As you like ASelecting an area for a focused massage Massaging the Neck and Shoulders Massaging the Lower Back • The upper and lower back will also be massaged slightly. Press massage heads (upper heads) so that they lightly touch the shoulders. Height is around 185 cm or more • The neck and shoulders will also be massaged slightly. Press *Press the button again to toggle it off. BRemoving tapping from pre-programs Too high 4 *Press the button again to restore tapping to the program. Correct position • Lightly touching the shoulder. Too low Up Press Down Approximate Height CAdjusting leg massage • Please see page 13 for details regarding leg massage. 185 cm Press Press 160 cm 140 cm • 5-Stage adjustment (up and down approx. 10 cm) • It is possible to change the position of the massage heads during the massage. • When it is not possible to correctly adjust the shoulder position, you may have to slide your body and adjust it again. Adjust the legrest so your sole fits on it. • Switch off the leg stretch function to stop the legrest from returning to the original position. Press For a person with small body dimensions • If the legrest is raised, it is easier to fit your sole on it. For a person with large body dimensions • You can relax by lowering the legrest. About the Time Indicator Time Remaining Approx. 15 min. Approx. 9 min. • Displays remaining massage time via flashing LED. • Starts counting down from 15 minutes in increments of approximately 3 minutes. • Flashing speeds up one minute before end of massage. • It is possible to massage your leg completely by rotating the sole section. Approx. 3 min. English Shiatsu Uses mainly Soft Shiatsu, Tap and Knead actions to comfortably loosen and provide relief from tension held at pressure points. Recommended for those with severe stiffness or who prefer a stimulating massage. 9-10 Swedish Uses mainly Swedish, Hawaiian and Knead actions to evenly apply musclerelaxing strokes all over. Recommended for those who are just starting out or prefer a gentle massage. Chiro Uses Full Roll, Compression and Leg Stretch to stretch all your muscles. A kneading action is applied to a stiff back and joints to refresh the posture and strengthen you against fatigue. Recommended for those who are tired and stiff from working in a bad posture doing office work and house work. Quick Covers all areas using a variety of massage actions, all in a span of just five minutes. Recommended for those who want to relax quickly. shut-off in pre-programs 6Auto • The massage will end after approximately 15 minutes and the unit will automatically shut off. • The massage heads will move to the retracted position and stop. • The legrest will automatically lower. • The OFF/ON indicator will flash until the heads have stopped moving. • If you want to continue using the unit, press the OFF/ON button. Please rest at least 10 minutes between massages. Stopping a pre-program Press • Press the OFF/ON button. • The massage heads will move to the retracted position, and the backrest and legrest will automatically return to their original position. Immediately stopping the massage Press • Press the Quick Stop button. • All movement will stop immediately. English Pre-Program and Quick Massage Characteristics 10 2010/07/09 11:16:38 MANUAL OPERATION FOR THE UPPER BODY 1 Open the cover of the controller. the OFF/ON button. 2 2 •Press The OFF/ON indicator will come on. Combining Massages Changing Massage Types E.g. 1 Adding Tap when Knead is selected. E.g. 1 Changing massage types in the same category. (Changing to Hawaiian when Knead is selected.) E.g. Adding Full Roll to the selection. E.g. Changing to a massage type outside the category. (Changing to Tap when Knead is selected.) • When Knead is combined with Tap, deselecting Knead will leave only Tap. • It is possible to combine massage types. • It is not possible to combine massage types in the same category. • All of the Manual Operation buttons will start to flash. the massage type you want. 3 •Select Press the button of the massage you require. The button will light up and the massage will begin (See Page 1). • The unit will automatically recline to the massage position. See Page 8 for a fine adjustment. Adjust as you like 4 You can adjust the position or speed of the massage heads, and you will hear a “beep-beep-beep” sound when it reaches its limit. A Adjusting the Vertical Position of the Massage Heads 3 Up Down • Press the button once to move the position slightly (approx. 15 mm). Press and hold the button to move the position continuously; release the button to stop the movement. B Adjusting the Width between Massage Heads • Tap, Soft Shiatsu, Full Roll, and Regional Roll can be adjusted in steps. E.g. Deselecting Full Roll. Increasing Decreasing C Adjusting Massage Speed • Massage speed is adjustable in 5 steps. Increasing Decreasing automatically shut off. • The massage heads will move to the retracted position and stop. • The legrest will automatically lower. • The OFF/ON indicator will flash until the heads have stopped moving. • If you want to continue using the unit, please press the OFF/ON button. Please rest at least 10 minutes between massages. NOTE: • A built-in timer prevents overuse of the unit. • When using manual operation, the timer automatically stops operation after 15 minutes. *If you want to continue to use the unit, we recommend that you have a break of at least 10 minutes between massages to allow your body to rest. Stopping mid-way through a massage Press Massage Actions English 11 11-12 Knead Feels like the fingers and thumbs of two hands squeezing in unison as they carefully work their way upwards to loosen stiffness. Recommended for the area of the neck and shoulders. Swedish Feels like a two palms gliding over the skin as they rhythmically knead the muscles beneath. Recommended for loosening up large areas of the back. Soft Shiatsu Feels like a pair of thumbs carefully alternating between the right and left sides as they zero in on their target. Recommended for loosening up knots of tension. Full Roll From lower back to neck, you can feel it move 67.5 cm up and down the whole of the upper body. Recommended for overall stretching of the back muscles. Compression Applies fluent alternating strokes to the left and right sides as if drawing stiffness to the outside. Recommended for relaxation of the whole body. Hawaiian Feels like two hands moving rhythmically in a circular pattern to relax and refresh the back. Recommended for relieving tension in the lower back. Tap Feels like the edges of two hands rhythmically tapping to penetrate into the body and relax muscles. Recommended for use on the fine muscles of the neck or as a finishing massage. Regional Roll You can feel it travel up and down working on 10 cm localized areas of the back. Recommended for focused rolling out of back muscles. • Press the OFF/ON button. • The massage heads will move to the retracted position, and the backrest and legrest will automatically return to their original position. Immediately stopping the massage Press • Press the Quick Stop button. • All movement will stop immediately. English shut-off in manual operation 5 •Auto The massage will end after approximately 15 minutes and the unit will 1 2010/07/09 11:16:39 MANUAL OPERATION FOR THE LEG AFTER COMPLETING THE MASSAGE Adjust the angle and length of the legrest before starting a massage. (See Page 8) RETURN THE SEAT TO THE ORIGINAL POSITION the OFF/ON button. 1Press • The OFF/ON indicator will come on. 1 1Check that there is nothing in the vicinity of 2Press the Leg Massage button. the backrest or the legrest. • The air massage will begin. • Leg massage intensity is displayed by the indicator. 2 the OFF/ON button twice. 2Press • The backrest and legrest will automatically return to their original 3As you like positions. The backrest and the legrest can be returned with the reclining button. (See Page 8) AAdjusting the massage intensity • The intensity is adjustable in 3 steps. • The intensity will move 1 step each time the button is pushed, moving in order of medium, strong, off and weak. • Default is level 2. * If only the Leg Massage is used, OFF is omitted. 1 2 3 off* weak medium strong BPress the Leg Stretch button. • Press again to stop the leg stretch. shut-off in leg massage/stretch 4Auto • The massage will end after approximately 15 minutes and the unit will automatically shut off. • The legrest will automatically lower. • If you want to continue using the unit press the OFF/ON button. 3Place the controller in its holder. 4Return the pillow and the back cushion to their original positions. DISCONNECT THE POWER See Warning No. 1 and 6 on page 1, and No. 12 on page 2. 1Slide the power switch to the “off” position. 2Turn the lock switch key to the “lock” position. 3Unplug the power cord. 4The lock switch key must be stored out of the reach of children. Description of Leg Massage/Stretch Leg massage A bottom-to-top squeezing action slowly relaxes and softens to comfortably alleviate tired, swollen legs. Leg stretch CLEANING AND MAINTENANCE See Danger No. 2 on page 1. LEATHER COVERING ON THE PILLOW, THE BACK CUSHION AND THE UNIT Lowered to approx. 15˚ After the legs have been grasped by the airbags, they are slowly stretched as the legrest lowers to a 15° angle from the massage position. The legrest then rises to a 30° angle, after which it lowers once again to a 20° angle for a deep stretch. Stopping mid-way through a massage Press Raised to approx. 30˚ Lowered to approx. 20˚ • Press the OFF/ON button. • It will take some time before the air is completely evacuated. (The sound of air escaping may be audible after pressing the OFF/ON button.) The legrest rises again and returns to a 30° angle. Immediately stopping the massage Press • Press the Quick Stop button. • All movement will stop immediately. • Wipe these areas with a soft, dry cloth. (Do NOT use cloths containing any kind of chemical, etc.) • If the synthetic leather is particularly dirty, soak a soft cloth in water or a 3–5 % solution of mild detergent, wring it out thoroughly and tap the surface with it. Next, rinse the cloth in water, wring it out thoroughly and then wipe any remaining detergent from the surface, wipe the surfaces with a soft dry cloth and allow them to dry naturally. (Do NOT use a hair dryer to try to dry the surfaces more quickly.) • Wearing of denim, colored, patterned or other clothing with a tendency to fade should be avoided during use, as it could lead to discoloration of the synthetic leather. • Do not allow these areas to come in contact with plastic for extended periods of time as this may lead to discoloration. • Please do NOT use thinners, benzine or alcohol. PIPE AND PLASTIC AREAS 1 Wipe the unit with a cloth that has been soaked in a mild detergent and then thoroughly wrung out. 2 Next wipe the unit with a cloth that has been moistened with just water and thoroughly wrung out. *Make sure you thoroughly wring out the cloth first when cleaning the controller. 3 Allow the unit to dry naturally. • Please do NOT use thinners, benzine or alcohol. COATED FABRIC 13-14 English English 13 1 Wipe the seat fabric with a cloth that has been soaked in a mild detergent solution and then thoroughly wrung out. 2 Use a brush to apply a mild detergent to areas where the coated fabric has become particularly soiled. Be careful not to brush the fabric too much as this may damage it. 3 Next wipe the fabric with a cloth that has been moistened with just water and then thoroughly wrung out. 4 Allow the fabric to dry naturally. • Please do NOT use thinners, benzine or alcohol. 14 2010/07/09 11:16:40 FOLDING THE BACKREST FORWARD (REPACKING) CAUTION • Keep hands, feet, children, objects, etc., clear of openings on the unit, including seat, armrests and legrest; gaps between the unit and the floor; and the backrest’s range of movement when being folded forward. Failure to do so could result in injury due to pinching. • The unit should not be turned on and the controls should not be operated on when the backrest is folded forward. Failure to follow these instructions could result in injury due to pinching. • The unit should not be climbed on and objects should not be placed on the unit when the backrest is folded forward. Failure to follow these instructions could result in damage to the unit. • In the interests of safety, the backrest should always be folded forward by two persons. 1Press the OFF/ON button to switch off the power. 2Slide the power switch to the “off” position, lock it, and then unplug the power cord. 3Remove the back cushion and the pillow from the unit. the armrest from the unit. 4Remove Refer to “INSTALL THE ARMRESTS ON THE UNIT” on page 6 and remove them in reverse order. 7 5Insert a screwdriver into the opening for the backrest latch approx. 4 cm from the upper edge of the opening (until the screwdriver contacts the backrest latch). 6Push tip of screwdriver downward approx. 2.5 cm to 5 release backrest latch. 7Pull out screwdriver when pushing of backrest toward seat begins. *Be careful to avoid catching the controller or the cord between the backrest and the seat. *It is recommended that you move the unit before folding the backrest (upright position). When the backrest is folded, it is not fixed and is unstable. 6 TROUBLESHOOTING Problem Cause and Remedy Motor Noises • It sounds and feels like the massage heads are straining to get over wrinkles in the cloth. • The motor groans when it comes under load. • There is excessive noise during Tapping. (The noise is greater at the top of the unit.) • There is a creaking noise when the massage heads are in operation. • There is a rattling sound when the massage heads move up or down. • The belt can be heard rotating. • There is a rubbing sound produced by the massage heads rubbing on the seat fabric. • There is a noise when the backrest cushion moves over the armrest when the seat is reclining. • There is a noise when I sit down. • There is a strange sound when the massage heads move in and out. • When the power switch is turned on there is a humming sound. • Air massage-related sounds. There is a hissing sound of air escaping. There is a humming sound from the pump. • The legrest rattles. • There is operational noise of valves under the seat. • There is an unstable sound when air escapes during the leg stretch. These sounds are perfectly normal and will not have any effect on the operation of the unit. The massage heads stop during operation. When excessive force is applied to the massage heads during operation, in the interests of safety the massage heads may stop moving. If all markings and buttons on the controller start to flash, which is extremely unusual, turn off the power switch, wait for approximately 10 seconds and then turn the power switch on again. If the massage heads stop again, position yourself so that your back is not completely in contact with the backrest. The massage heads do not come up to the shoulder or neck. The position of the massage heads is incorrect. (See Page 10) The height of the left and right massage heads is different. An alternating tapping method is employed, which means that this phenomenon will naturally occur. There is nothing wrong with the unit. It is not possible to recline the unit. The legrest cannot be raised or lowered. If the unit encounters an obstacle or if excessive force is exerted on it during operation, in the interests of safety the unit will come to a stop. If all markings and buttons on the controller start to flash, which is extremely unusual, turn off the power switch, wait for approximately 10 seconds and then turn the power switch on again. Reclining does not take place even though a massage is started in pre-programs. (The seat does not automatically recline.) In some cases the seat may not automatically recline depending on the position (angle) of the backrest or the legrest. Automatic reclining will not activate when the backrest is reclined to flat position more than massage position and legrest is in upper position. When you use the manual operation only for legs, automatic reclining will not activate. The backrest does not return to the upright position. English English The backrest will not return to the upright position if the timer is activated or the button is pressed. (Pressing twice will return the backrest to its original position.) (See Page 14) It is not possible to switch from Swedish and Knead to Hawaiian and Compression. Switching can be hindered when the user’s body weight is not resting on the massage heads. Shift your weight so that your body is contact with the massage heads. The legrest will not return to its original position. If the length of the legrest has been extended, the legrest will strike the floor, preventing from returning to its original position. Try again after retracting it to its original length. The unit will not operate at all. (See Pages 7 and 8) • The power cord has been disconnected. (See Page 8) • The power switch on the unit has not been turned on. • A Pre-Program button or Manual Operation button hasn’t been pressed after pressing . (See Pages 9, 11 and 13) The unit has been damaged. Stop using the unit immediately. The power cord or power plug is abnormally hot. Stop using the unit immediately. See Warning No. 17 on page 1, and No. 9 and 10 on page 2. 15 15-16 16 2010/07/09 11:16:40