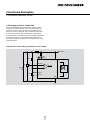
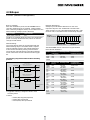
1
Operating Instructions MCLM 3003/06 C Table of Contents 1 Overview 1.1 General description 1.2 Quick start 1.2.1 Operation using FAULHABER Motion Manager 1.2.2 Operation using a custom interface 5 6 7 8 2 Installation 2.1 Connections and wiring 2.1.1 Installation instructions 2.1.2 Maintenance 2.1.3 Specialised staff 2.2 CAN wiring 2.3Servomotor connection 2.4 Baud rate and node ID 2.5 Basic settings 9 10 10 10 11 11 12 12 3 Functional Description 3.1 Position control 3.2 Homing and limit switches 3.3 Extended operating modes 3.3.1 Stepper motor mode 3.3.2 Gearing mode (electronic gearing) 3.3.3 Analog positioning mode 3.3.4 Dual-loop PID control mode 3.3.5 Analog control of current limit 3.4 Special functions of the error connection 3.5 Technical information 3.5.1 Sinusoidal commutation 3.5.2 Current controller and l2t current limitation 3.5.3 Over-temperature protection 3.5.4 Undervoltage monitoring 3.5.5 Overvoltage regulation 3.5.6 Adjustment of controller parameters 14 15 17 17 18 19 19 20 21 22 22 22 22 23 23 23 4 CANopen 24 25 27 29 30 32 34 4.1 Introduction 4.2 PDOs (Process Data Objects) 4.3 SDO (Service Data Object) 4.4 Emergency Object (Error Message) 4.5 NMT (Network Management) 4.6 Entries in the object dictionary 4.7 Drive control (Device control) 5 Extended CAN Functions 5.1 The FAULHABER channel 5.2 Trace 36 36 6 Parameter Description 6.1 Communication objects according to DS301 37 6.2 Manufacturer-specific objects 49 6.3 Objects of the DSP402 drive profile 45 6.3.1 Device Control 45 6.3.2 Factor Group 47 6.3.3 Profile Position Mode 48 6.3.4 Homing Mode 51 6.3.5 Position Control Function 53 6.3.6 Profile Velocity Mode 54 6.3.7 Common Entries 55 6.4 FAULHABER commands 56 6.4.1 Basic setting commands 57 6.4.1.1 Commands for special FAULHABER operating modes 57 6.4.1.2 Parameters for basic settings 57 6.4.1.3 General parameters 58 6.4.1.4 Configuration of the fault pin and digital inputs 59 6.4.1.5 Configuration of homing and limit switches in FAULHABER mode 59 6.4.2 Query commands for basic settings 60 6.4.2.1 Operating modes and general parameters 60 6.4.2.2 Configuration of fault pin and digital inputs 62 6.4.2.3 Configuration of homing in FAULHABER mode 62 6.4.3 Miscellaneous commands 63 6.4.4 Motion control commands 63 6.4.5 General query commands 64 7 Appendix 7.1 EC Directive/National legislation 7.2 Declaration of Conformity and CE marking 7.3 Electromagnetic compatibility (EMC) 7.3.1 Definition 7.3.2 EMC Directives and Standards 7.3.3 Information on use as intended 7.4 Configuration at delivery 65 65 65 65 65 66 66 Version: 2 edition, 1.10.2008 Firmware version: MCLM 3006 C - 3150.55B Copyright by: ©FAULHABER Group All rights reserved, including translation rights. No part of this description may be duplicated, reproduced, stored in an information system or processed or transferred in any other form without prior express written permission of FAULHABER Group. Although all due care has been taken in the compilation of this description, FAULHABER Group cannot accept any liability for any errors in this description or for the consequences of such errors. Equally, no liability can be accepted for direct or consequential damages resulting from misuse of the equipment. The pertinent regulations regarding safety engineering and interference suppression must be complied with. Subject to modifications. 1 Overview 1.1 General description This document describes the functionality and operation of the following equipment with CANopen interface: Error output(Open Collector). Can also be reprogrammed as direction, digital or reference mark input, and as pulse or digital output. MCLM 3003/06 C The MCLM 3003/06 C is an external motion controller for linear DC servomotors with linear Hall sensors, which can be operated without additional encoders. 1 additional digital input. CANopen interface for integration in a CAN network with transfer rates up to 1Mbit/s. The CANopen communication profile according to DS301 V4.02 and DSP402 V2.0 according to CiA specification for slave equipment with the following services is also supported: All of the motion controllers are based on a high performance digital signal processor (DSP), which enables tight control, precise positioning and very low speeds. The following drive tasks can be performed: 1 server SDO 3 transmit PDOs, 3 receive PDOs Static PDO mapping NMT with Node Guarding Emergency object elocity control with tight requirements on synchronous V operation and minimal force fluctuations. A PI controller maintains target velocities. elocity profiles such as ramp, triangular or V trapezoidal movements can be realised. Gentle starting or deceleration can easily be implemented. Transfer rates and node number are set using the network in accordance with the LSS protocol as per DSP305 V1.1, and automatic baud rate detection is also implemented. ositioning mode: Starting from defined positions P with high resolution (1/3000 of polar pitch using linear Hall sensors of LM motors). In addition, all functions and parameters of the drive unit can be activated very easily using a special FAULHABER PDO channel. For each FAULHABER command a corresponding CAN message frame is available on the PDO channel, which enables the CAN unit to be operated similarly to the serial version. Drive parameters can be analysed very quickly with the integrated Trace function. The FAULHABER Motion Manager software is available for Windows 95/98/ME/ NT/2K/XP; this also considerably simplifies the operation and configuration of units using the CAN interface, and in addition offers a graphic online analysis function. Acquisition of reference marks and limit switches. xtended operating modes: Stepper mode, Analog E positioning mode, Electronic gear, operation with external incremental encoder. Force control with adjustable current limitation. Storage of the set configurations. Various inputs and outputs are available for the implementation of these tasks: et value input for target velocity. S Analog or PWM signals can be used. The input can also be used as digital or reference input. A frequency signal or an external incremental encoder can also be connected here. Fields of application Thanks to the compact design, the units can be integrated into diverse applications with minimal wiring. The flexible connection options open up a broad field of application in all areas, for example in decentralized automation technology systems, as well as in handling devices and machine tools. Options A separate supply for motor and control electronics is optionally available (important for safety-critical applications), in which case the 3rd input is omitted. Special preconfiguration of modes and parameters is possible on request. The Motion Manager software can be downloaded free of charge from www.faulhaber-group.com. 1 Overview 1.2 Quick start 6. In the next dialogue, select the desired transfer rate or “Auto” and enter the desired node address. To facilitate introduction, this section highlights the initial steps for commissioning and operation of FAULHABER motion controllers with CANopen interface. 7. Press “Send” button. 8. The settings are transferred and permanently stored in the controller. The Motion Manager then recalls the Scan function and the node should now be displayed with the correct node number in Node Explorer. After switching off and on again, the drive will operate with the set configuration. However, the detailed documentation must always be read and adhered to, particularly section 2.5 Basic Settings. The units are delivered as standard without a valid node address (node ID = 0xFF) and with automatic baud rate detection set. A CANopen node is always in “Pre-Operational” status after being switched on and must be transferred to “Operational” status before it is fully operational. No PDO communication is possible in “Pre-Operational” status, therefore no FAULHABER commands are available in this status either. In addition to the Network Management functions, only the setting of parameters in the object dictionary by means of SDO transfer is possible here (see section 4 CANopen). In order to set the baud rate and node address, the unit must first be configured for CAN using an appropriate configuration tool, which supports the LSS protocol according to CiA DSP305. FAULHABER Motion Manager 3, installed on a PC with supported CAN interface, can also be used for this purpose. The node address and baud rate can be set using the LSS-compatible configuration tool either in Global mode, if only one drive is connected, or in Selective mode with the serial number, if a drive is to be configured on the network (see section 2.4 Baud rate and Node ID). If the FAULHABER Motion Manager is to be used as a configuration tool, proceed as follows: 1. Connect drive unit to the CAN interface of the PC and switch on or connect PC to the CAN network. 2. Start FAULHABER Motion Manager. 3. Activate CAN interface as communication interface and configure with the menu item “Terminal – Connections…”. 4. Select menu item “Configuration – Connection parameters…”. 5. Select Configuration mode: a. Globally configure individual drive (LSS Switch Mode Global) if only one LSS node is connected and you do not wish to input further data. b. Selectively configure specified node (LSS Switch Mode Selective) if a node is to be configured in the network. If the node has not been found in Node Explorer, the serial number of the drive node to be configured must be entered, otherwise the data fields are already correctly preconfigured. 1 Overview 1.2 Quick start 1.2.1 Operation using FAULHABER Motion Manager 3. Activate drive: The FAULHABER Motion Manager offers easy access to the CANopen state machines using menus, which can either be called up using the Node Explorer context menu (right mouse button) or using the “Commands – CANopen” menu. The desired node must have been activated beforehand by double clicking in Node Explorer. The current statuses are always displayed in the status line at the bottom of the screen. a.) FAULHABER Mode (OPMOD–1): 1. “EN” command. Input in command input field and press “Send” button or select in “Commands – Motion control – Enable drive” menu and press “Send” button. b.) Modes of Operation / OPMOD > 0: The FAULHABER commands described below can be entered directly in the command input line or selected from the Commands menu. After sending the command, a command interpreter is activated, which converts the command into a corresponding CAN message frame on PDO2. 1. Shutdown Select entry “Device Control – Shutdown” using the context menu in Node Explorer or using the “Commands – CANopen” menu. 2. Switch On Select entry “Device Control – Switch On” using the context menu in Node Explorer or using the “Commands – CANopen” menu. 4. Drive motor (examples): Move motor relatively by 1000 increments In order to drive a motor using the Motion Manager, follow the procedure below (assuming a valid node number and matching baud rate): c.) FAULHABER Mode (OPMOD–1): “LR1000” command to load the relative target position, “M” command to move to loaded target position. 1. Start network node (Start Remote Node): The right mouse button in Node Explorer opens a context menu, then select the entry “CANopen Network Management NMT - Start Remote Node” (or use menu “Commands – CANopen”). ➔ FAULHABER commands are now available! d.) Profile Position Mode (OPMOD1): Set Target Position to the value 1000 (Object 0x607A). Move to Target Position (“New set-point” and set “rel” in statusword). 2. Configure drive functions: A user-friendly dialog that enables the desired settings to be made is available under the menu item “Configuration – Drive functions…” For external motion controllers MCLM 3003/06 C, you must check that the correct basic settings have been made for the connected motor (see section 2.5 Basic settings). Depending on whether you wish to operate the drive using the standard CANopen objects or the simpler FAULHABER commands, go into the desired mode (Modes of Operation / OPMOD 1,3,6 or –1). If the settings are to be permanently stored, press the “EEPSAV” button. 1 Overview 1.2 Quick start 1.2.2 Operation using a custom interface The drive can be configured both by means of SDO transfer using the objects of the object dictionary and using PDO2 with the commands of the FAULHABER channel. Not all configuration options are accessible using the object dictionary; many extended operating modes are only accessible using the FAULHABER channel (see section 6 Parameter Description). Start of CANopen node: Either an individual node or the entire network is started and set to “Operational” status using the broadcast command “Start Remote Node”: 11 bit identifier 0x000 2 bytes user data 01 00 All features of the drive can also be operated without in-depth CANopen knowledge, such as Device Control, SDO protocol and object dictionary. The FAULHABER channel on PDO2 provides an easy means of executing all supported commands. For drive control using the FAULHABER channel you must first set the operating mode to Modes of Operation = –1 by using the following FAULHABER command and argument: The first data byte contains the start command “Start Remote Node”, the second data byte contains the node address or 0 for the entire network. After the node has been started, all functions can be activated. The drive can now be activated and operated using the Device Control functions according to CiA DSP402 or using the FAULHABER message frames on PDO2. RxPDO2: FAULHABER command “OPMOD-1” The identifiers of the individual objects are allocated according to the Predefined Connection Set and are dependent on the node number (see section 4.5 NMT Network Management). These are the most important objects: Object Function Identifier TxPDO1 Statusword 0x180 + node no. RxPDO1 Controlword 0x200 + node no. TxPDO2 FAULHABER data 0x280 + node no. RxPDO2 FAULHABER command 0x300 + node no. TxSDO Read object 0x580 + node no. RxSDO Write object 0x600 + node no. 11 bit identifier 5 bytes user data 0x300 (768D) + Node-ID 0xFD 0xFF 0xFF 0xFF 0xFF All FAULHABER commands can then be used for drive control in accordance with the following protocol: RxPDO2: FAULHABER command 11 bit identifier 5 bytes user data 0x300 (768D) + Node-ID Command LLB LHB HLB HHB Example: Set speed of node 1 at 50 mm/s (command “SP50”): ID 301: 8F 32 00 00 00 In delivery status, the drives are in the operating mode Modes of operation = 1 (Profile Position Mode) when switched on. In this operating mode, the drive control is performed using the Device Control state machine, which is operated using the controlword (Object 0x6040 or RxPDO1) and queried using the statusword (Object 0x6041 or TxPDO1). The following command sequence is prescribed to activate the power output stage: All available commands are listed in section 6.4 FAULHABER Commands. 1. Shutdown: Controlword = 0x06 2. Switch on / Enable Operation: Controlword = 0x0F The drive is then in “Operation Enabled” status, in which it can be operated using the corresponding objects of the Profile Position Mode (see section 4.7 Device Control Drive Control and section 6.3.3 Profile Position Mode). 2 Installation 2.1 Connections and wiring MCLM 3003/06 C: The connections are indicated on the terminal strips and are assigned as follows: Supply side: Connection Meaning CAN_H CAN-High / RS232 TxD* CAN_L CAN-Low / RS232 RxD* AGND Analog GND Fault Error output AnIn Analog input +24V +24 V GND GND 3.In 3rd input/optional electronics supply Motor side: Connection Meaning Ph A Servomotor phase A (brown) PH B Servomotor phase B (orange) Hall C Hall sensor C (grey) Hall B Hall sensor B (blue) SGND GND signal (black) +5V VCC (red) Hall A Hall sensor A (green) PH C Servomotor phase C (yellow) In addition, a 9-pin SUB-D connector is attached, with the following assignment: Pin Meaning 2 CAN_L / RS232 RxD* 3 GND 7 CAN_H / RS232 TxD* * only for software update available 2 Installation 2.1 Connections and wiring Power supply (+24 V, GND) The error output connection can also be reconfigured for other functions: The power supply should provide suitable current for the connected motor. Please pay attention to the polarity, as inverting the connection will destroy the internal fuse. The fuse can only be replaced at the factory! Encoder pulse output Digital output Limit switch input Direction input Analog input (analog input, analog GND = AGND) The analog input is executed as a differential input. In order to prevent a voltage drop in the supply cable, connect the analog GND to the power supply GND. 3rd input This connection can be used as reference or digital input. The unit is also available with a separate logic and output stage power sections. During an emergency situation, disconnecting the supply voltage will shut down the output stage de-powering the motor. Supplying voltage independently to the third input will keep the logic section powered (only available with option - 3085). The analog input has various uses, depending on the configuration: Current limitation value via analog voltage Presetting of target position via analog voltage Digital input for reference and limit switches onnection for an external encoder C (Analog input to GND: Channel A / Analog GND to GND: Channel B) in gearing or encoder mode. 2.1.1 Installation instructions The place of installation must be selected so that clean and dry cooling air is available for cooling the unit. The units are intended for indoor operation. Large amounts of dust and high concentrations of chemical pollutants must be avoided. Cooling of the unit must be guaranteed, especially when installing in housings and cabinets. As the unit cools passively with surface heat sinks, case temperatures up to 85 °C may occur. Operation is only guaranteed if the supply voltage lies within the defined tolerance ranges. Wiring should only be altered with no voltage applied to the unit. CAN connections The CAN wiring is established using the connections CAN-H, CAN-L and the supply GND. A serial PC interface can also be connected with the same connections, in order to perform a firmware update. Error output The error output has the following characteristics: In the absence of an error, the output pulls the output to GND (Open Collector) 2.1.2 Maintenance The units are maintenance-free in principle. The air filters of cabinet units must be regularly checked and cleaned if required, depending on the quantity of dust. In the event of heavy soiling, the units themselves must be cleaned with halogen-free agents. In the event of an error, the output has a 100 k path to GND he output current is limited to roughly 30 mA, as the T applied voltage should not exceed the power supply voltage (maximum UB) 2.1.3 Specialised staff Short-circuit proof Only trained specialised staff and instructed persons with knowledge in the field of automation technology and standards and regulations such as The error output is activated in the following situations: Current limiting activates ver-voltage protection activates (internal power bus O exceeds 32 V) EMC Directive, Low Voltage Directive, Machinery Directive, VDE Regulations (such as DIN VDE 0100, DIN VDE 0113/EN 0204, DIN VDE 0160/EN 50178), Accident Prevention Regulations Power stage shuts down due to over temperature he actual velocity differs from the target by an amount T greater than the set acceptable deviation (DEV) may install and commission the units. This description should be carefully read and heeded prior to commissioning. 10 2 Installation 2.2 CAN wiring CAN is a 2-wire bus system, to which all nodes are connect in parallel. A terminal resistance of 120 must be connected to each end of the bus line. In addition to the two signal lines CAN_H and CAN_L, the nodes must be connected together by a common GND line. The maximum line length is limited by the transfer rate and the signal propagation time: Baud rate Max. line length 1000 kBit/s 25 m 500 kBit/s 100 m 250 kBit/s 250 m 125 kBit/s 500 m 50 kBit/s 1000 m 20 kBit/s 2500 m 10 kBit/s 5000 m 2.3 Servomotor connection 1.) MCLM 3003/06 C: The signal lines are susceptible to interference, therefore a maximum cable length can not be specified. For cable lengths > 300 mm the use of shielded wires is recommended. MCLM connection Ph A brown Phase A Ph B orange Phase B Ph C yellow Phase C Housing Linear DC-Servomotor SGND black +5V red Hall A green Hall sensor A Hall B blue Hall sensor B Hall C grey Hall sensor C Housing 11 2 Installation 2.4 Baud rate and Node ID Node address and transfer rate are set using the network in accordance with the LSS protocol as per CiA DSP305 (Layer Setting Services and Protocol). A configuration tool which supports the LSS protocol – such as FAULHABER Motion Manager – is required. Vendor ID: 327 Product code: 3150 For a detailed description of the LSS protocol, please see CiA document DSP 305. If automatic baud rate detection is activated, the drive can be used in a network with any transfer rate in accordance with the above table; the network baud rate is detected after 3 message frames on the bus line at the most, and the drive adjusts accordingly. Please note that the first message frames may be lost and booting will take a little longer. The configuration tool is the LSS Master, and the drives act as LSS slaves. LSS slaves can be configured in two ways: 1. “Switch Mode Global” switches all connected LSS slaves into configuration mode. However, only one LSS slave may be connected to set baud rate and node ID. 2. “Switch Mode Selective” switches just one LSS slave in the network into configuration mode. Vendor ID, product code, revision number, and serial number of the relevant node must be known. 2.5 Basic settings During initial set-up of MCLM motion controllers, a number of basic settings must be made to configure the controller for the connected motor. Use the FAULHABER Motion Manager for easy execution of these adjustments! The following baud rates (Bit Timing Parameters) can be set: Baud rate Index 1000 kBit 0 800 kBit 1 500 kBit 2 250 kBit 3 125 kBit 4 50 kBit 6 20 kBit 7 10 kBit 8 Failure to observe these basic settings can result in destruction of components! At delivery, the MCLM 3003/06 C is set to the linear DC-Servomotor LM 1247-020-01 as standard. If you wish to connect another motor, you must configure the motion controller for the connected motor. The FAULHABER Motion Manager then enables the Hall sensor signals to be synchronised for smooth starting and the phase angle to be optimised for best efficiency. This process should also be carried out whenever the motor is replaced and during initial set-up (“Optimization for connected motor” in the “Configuration – Drive functions” menu). In addition, an automatic baud rate detection can be activated by sending the index value 0xFF. The following node numbers can be set: 1 – 255. The controller parameters and current limitation values must also be adapted to the connected motor and the application. Node ID 255 (0xFF) indicates that the node has yet to be configured, in which case the node remains in LSS-Init status until it receives a valid node number. Only then may the NMT initialization continue. The values set with the MOTTYP command can be individually changed later. With the RN command, the default parameters are set according to the set motor type. If you wish to connect a motor that is not specified in the motor type list, select motor type 0 (MOTTYP0) and set the parameters kn (speed constant) and Rm (motor resistance) in accordance with the specifications in the data sheet using the commands KN and RM. The LSS protocol also supports the reading out of LSS addresses, comprising vendor ID, product code, revision number and serial number of connected units, as well as reading out of the set node ID. The identifiers 0x7E5 (Master) and 0x7E4 (Slave), on which the protocol is processed, are used for the LSS communication. Use the command ENCRES or the Drive Parameters dialogue in the Motion Manager (“Configuration – Drive functions” menu) to configure the post-quadrature encoder reso-lution, which is four times the resolution of one channel per revolution. After configuration the set parameters are stored in the Flash memory, so that they are available again after power cycling the drive. For activation of “Switch Mode Selective”, FAULHABER controllers only use vendor ID, product code and serial number. The value 0.0 can always be assigned for revision number, as this value is ignored in the protocol. If using the Fault Pin as an input (REFIN, DIRIN), the desired function must be programmed before applying external voltage to prevent destroying the input/output. 12 3 Functional Description The motion controllers can be configured for different operating modes. The FAULHABER Motion Manager enables simple setting of the configuration parameters and operating modes using corresponding dialog windows. The specified commands can be entered in plain text or selected from the Commands menu. The CANopen state machines can be conveniently operated using menu selections. The current statuses are automatically displayed in the status line. The drive unit is delivered as standard as servomotor in “Profile Position Mode” according to CiA DSP402. The drive can be reconfigured by means of the corresponding configuration commands. If the settings are to be permanently stored, the command SAVE (formerly EEPSAV) must be executed after the configuration; this saves the current settings in the flash memory, from where they will be reloaded when the unit is next switched on. Please note that the FAULHABER commands can only be received in “Operational” status (Motion Manager menu “Commands – CANopen – Network Management NMT – Start Remote Node”). The prerequisite for operation of the drive in one of the operating modes specified here is that the unit is in “Operational” NMT status, and the power stage is activated (“Switched On” or EN). All commands and objects listed below are summarized and explained in section 6 Parameter Description. The FAULHABER commands, which are transferred as CAN message frames – as described in section 6.4 FAULHABER commands – to PDO2, are specified for each operating mode. Circuit example: MCLM 3006 C with reference switch on analog input and fault pin set as digital output + 24 V DC 2.7k LED pink white UB Error output Protective functions: 10k Overtemperature Overcurrent Overvoltage 3 phase MOSFET Power output stage PWM Target position red Input 3 brown Analog grey input CAN-Bus CAN_L CAN_H GND AGND yellow CAN_L green CAN_H Position controller Evaluation input 3 Vtarget PI velocity controller V actual sinusoidal commutator Velocity calculation + _ Ua Evaluation reference mark CANopen communication and configuration module Phase B Phase C Hall sensor A (t) Shaft position calculation I2 t current limitation Hall sensor B Hall sensor C Iactual controller RS Microcontroller GND blue 13 Phase A Motor 3 Functional description 3.1 Position control In this operating mode, target positions can be loaded with the CAN interface. Positioning can be performed in two different ways: a.) In “Profile Position Mode” according to DSP402: Modes of operation or OPMOD must be set to 1. Target Position, profile and controller parameters are set using the object dictionary or using FAULHABER commands. In particular the acceleration values AC (0x6083) and DEC (0x6084), the maximum speed SP (0x607F), the current limitation values LPC and LCC, as well as the controller parameters POR, I, PP and PD (0x60FB and 0x60F9), must be configured for the respective application. The positioning range limits can be set using the command LL or object 0x607D. Positioning is started with the controlword and checked with the statusword (see section 6.3.3 Profile Position Mode). b.) In FAULHABER mode: Modes of operation or OPMOD must be set to –1. FAULHABER operating mode CONTMOD or ENCMOD and SOR0 must be set. Profile and controller parameters are configured using the FAULHABER basic setting commands (General Parameters). In particular, the acceleration values AC and DEC, the maximum speed SP, the current limitation values LPC and LCC, as well as the controller parameters POR, I, PP and PD must be configured for the respective application. The positioning range limits can be set using the command LL and activated with APL. Position moves are made using the FAULHABER commands for motion control: Command Function Description LA Load Absolute Position Load new absolute target position Value range: –1.8 · 109 …1.8 · 109 LR Load Relative Position Load new relative target position, in relation to last started target position. The resulting absolute target position must lie between –2.14 · 109 and 2.14 · 109. M Initiate Motion Activate position control and start positioning Example: 1.) Load target position: LA400 2.) Start positioning: M Attainment of the target position is indicated in both operating modes by the statusword on TxPDO1 (Bit 10 “Target reached”), provided that the transmission type for RxPDO1 is set to 255. (Object 0x1800). The linear Hall sensors used as position transducers on the LM servomotors effectively produce 3000 pulses per magnetic pitch. 14 3 Functional Description 3.2 Homing and limit switches Available inputs for homing and limit switches: Homing can be performed in two different ways: a.) In “Homing mode” according to DSP402: Modes of operation or OPMOD must be set to 6. Homing Method, Homing Offset, Homing Speed and Homing Acceleration are set using the object dictionary (objects 0x6098, 0x607C, 0x6099 and 0x609A). The homing sequence is started with the controlword and checked with the statusword (see section 6.3.4 Homing Mode). The function of the inputs is set using object 0x2310 (see section 6.2 Manufacturer-specific Objects). AnIn Fault 3. In In the linear DC-Servomotor the zero crossing of the Hall sensor signals is also available as index pulse, appearing once per magnetic pitch. The index pulse of an external encoder can also be connected to the fault pin; this allows for a very repeatable system. The AnIn and Fault connections are designed as interrupt inputs, which means that they are edge-triggered. All other inputs are not edge-triggered, so that the signal should last at least 500 μs long to be reliably detected. The maximum reaction time to level changes at all inputs is 500 μs. b.) In FAULHABER Mode: Modes of operation or OPMOD must be set to –1. The function of the inputs and the homing behaviour is set with the FAULHABER commands described below. A previously stored homing sequence is then started with the following FAULHABER commands: Set levels of digital inputs: Command Function Description SETPLC Set PLC-Inputs Digital inputs PLC-compatible (24 V level) SETTTL Set TTL-Inputs Digital inputs TTL-compatible (5 V level) Command Function Description GOHOSEQ Go Homing Sequence Execute FAULHABER homing sequence. A homing sequence is executed (if programmed) irrespective of the current mode. The signal level of the digital inputs can be set using the above commands: GOHIX Go Hall Index Move motor to Hall zero point (Hall index) and set actual position value to 0. PLC (Default): Low: 0...7.0 V / High: 12.5 V...UB TTL: Low: 0...0.5 V / High: 3.5 V...UB GOIX Go Encoder Index Move to the encoder index at the fault pin and set actual position value to 0. Configure fault pin as reference or limit switch input: Command Function Description REFIN Reference Input Fault pin as reference or limit switch input The limit switch functions for the fault pin are only accepted if REFIN is activated (setting must be saved with SAVE or EEPSAV)! Important: Configure the fault pin as an input before applying external voltage! 15 3 Functional Description 3.2 Homing and limit switches Configuration of homing and limit switches in FAULHABER mode: GOHOSEQ is called, it attempts to move out of the switch. As the speed defined in HOSP would only drive the mechanics further into the switch, the same velocity as set in HOSP is used, but in the opposite direction. The following commands use the following bit mask for configuration of the limit switch functions: 7 6 5 4 3 2 1 Example: 0 The following commands configure the drive to stop the motor, set the actual position to 0, and notify the Master when input 3 transitions to a high state. Analog input Fault pin 3rd input HP4 SHA4 SHL4 SHN4 Set or delete the bit at the position of the required input for each command. Polarity and limit switch function: Command Function Description HP Hard Polarity Define effective edge and polarity of respective limit switches: 1: Rising edge and high level effective. 0: Falling edge and low level effective. HB Hard Blocking Activate Hard-Blocking function for relevant limit switch. HD Hard Direction Presetting of direction which is blocked by HB of the respective limit switch. 1: Forward direction blocked 0: Backward direction blocked Homing Speed: Command Function Description HOSP Load Homing Speed Load speed and direction for homing (GOHOSEQ, GOHIX). Unit: mm/s Example: HOSP-100 Direct programming using HA, HL and HN commands: The Hard-Blocking function provides reliable protection against overshooting of the range limit switch. If the HB limit switch is activated, then the direction set with HD will be blocked, i.e. the drive can only move out of the limit switch. The speed stays at 0 mm/s if target velocities are in the wrong direction. Command Function Description HA Home Arming Set the position value to 0 and delete corresponding HA bit at edge of respective limit switch. Setting is not saved. HL Hard Limit Stop motor and delete corresponding HL bit at edge of respective limit switch. Setting is not saved. HN Hard Notify Send message to Master (statusword bit 14=1) and delete corresponding HN bit at edge of respective limit switch. Setting is not saved. Example: Setting of the Hard-Blocking function for fault pin and 3th input: 21 + 22 = 2 + 4 = 6 Ë HB6 Definition of homing behaviour: Command Function Description SHA Set Home Arming for Homing Sequence Homing behaviour (GOHOSEQ): Set position value to 0 at edge of respective limit switch. SHL Set Hard Limit for Homing Sequence Homing behaviour (GOHOSEQ): Stop motor at edge of respective limit switch. SHN Set Hard Notify for Homing Sequence Homing behaviour (GOHOSEQ): Send message to Master (statusword bit 14=1) at edge of respective limit switch. These special commands can be used to define actions that are to be triggered at an edge of the relevant input, independently of a homing sequence. A programmed limit switch function will remain effective until the preselected edge occurs. The programming can be changed with a new command before an edge occurs. The settings are not saved with the SAVE command, so all limit switches are inactive again after power cycling. In order to be able to execute a homing sequence with the command GOHOSEQ, a homing sequence must be defined for a specific limit switch! HL/SHL command: Positioning mode: When the edge occurs, the motor positions itself on the reference mark with maximum acceleration. If the drive is already located in the limit switch when 16 3 Functional Description 3.3 Extended operating modes The extended operating modes are only available in FAULHABER mode: Displacement ...Displacement commanded of the motor Modes of Operation or OPMOD must be set to –1. Pulses...Number of pulses at the frequency input (= number of steps) Use the CONTMOD command to revert from an extended operating mode to normal mode. STW...Step width (step width factor = number of steps per pulse at frequency input) 3.3.1 Stepper motor mode STN...Step number (number of steps = number of steps per magnetic pitch) Command Function Description STEPMOD Stepper Motor Mode Change to stepper motor mode Value range of STN and STW: 0 to 65535 In stepper motor mode, the analog input acts as frequency input. The error output must be configured as direction input if the direction is to be changed using a digital signal. Alternatively, the direction can also be preset using the commands ADL and ADR. Command Function Description DIRIN Direction Input Fault pin as rotational direction input Load step width for step motor and gearing mode STN Load Step Number Load number of steps per magnetic for step motor and gearing mode The acceleration and speed parameters (AC, DEC, SP) are effective in stepper motor mode. These permit gentle starting and stopping. The position range limits set using LL must also be activated with the APL1 command in order to prevent the exit of the shaft. The individual step is easily configurable There is no detent force The full dynamics of the motor can be used The servomotor is very quiet ecause of the encoder, there is no loss of steps B even under extreme loads here is no current draw when the motor T reaches position The system only consumes the energy it needs Input: Maximum input frequency: 400 kHz Level: 5 V TTL or 24 V PLC-compatible, depending on configuration. Stepper mode enables position-accurate velocity control; any rational ratios can be set for input frequency to motor speed using step width and step number, in accordance with the following formula: STN Description Load Step Width The direction can be predefined with the commands ADL and ADR, or using an external signal at the fault pin (DIRIN command). he number of steps per magnetic pitch is easily T programmable and is only limited by the resolution of the encoder STW Function STW Example: Motor should move 1/1000th of magnetic pitch for each input pulse: STW1 STN1000 The drive moves a configurable number of steps for each pulse at the analog input. Displacement = pulses · Command · polar pitch τm 17 3 Functional Description 3.3 Extended operating modes 3.3.2 Gearing mode (electronic gearing) Value range of STN and STW: 0 to 65535 Using gearing mode forces the attached motor to follow an external encoder. Command Function Description GEARMOD Gearing Mode Change to gearing mode The two channels of an external encoder are connected to AnIn and AGND, which may need to be connected to the 5 V encoder supply using a 2.7 k pull-up resistor. Command Function Description STW Load Step Width Load step width for stepper motor and gearing mode STN Load Step Number Load number of steps per magnetic pitch for stepper motor and gearing mode Example: Motor has to move for the magnetic pitch at 1000 pulses of the external encoder: STW1 STN1000 The gear ratio can be set in accordance with the following formula: STW Displacement = pulses · · polar pitch τm STN Displacement ...Displacement commanded of the motor The direction can be predefined with the commands ADL and ADR, or using an external signal at the fault pin (DIRIN command). The acceleration and speed parameters (AC, DEC, SP) are effective in gearing mode. These permit gentle starting and deceleration. The position range limits set via LL must also be activated with the APL1 command, in order to prevent the exit of the shaft. Pulses...Post-quadrature encoder pulses STW...Step width (step width factor = number of steps per encoder pulse) STN...Step number (number of steps = number of steps per magnetic pitch) Circuit example: Reference switch Circuit example gearing mode for MCLM 3003/06 C Error output Evaluation reference mark Protective functions: Overtemperature Overcurrent Overvoltage . Set-point encoder . Analog input Input 3 CAN bus Interface Target position calculation Evaluation input 3 Position controller vtarget PI velocity controller vactual Velocity calculation brown orange MOSFET Power output stage 3 phase PWM sinusoidal commutator yellow green Shaft position calculation CANopen communication and configuration module I2t current limitation controller Iactual Microcontroller 18 blue grey 5V controller red black Motor 3 Functional Description 3.3 Extended operating modes 3.3.3 Analog positioning mode 3.3.4 Dual-loop PID control mode In analog positioning mode, the position can be commanded using a potentiometer or an external analog voltage. For high-precision applications, an external encoder on the end effector may be used to accurately control the system. A word of caution is in order. Any backlash in the system may lead to an unstable system causing damage to mechanical components! Command Function Description APCMOD Analog Position Control Mode Change to position control via analog voltage he resolution of the system is dependent upon the T resolution of the external encoder. The full-scale deflection at 10 V is set using the LL command. At –10 V the drive will move the motor an equal distance, but in the opposite direction. Command Function Description LL Load Position Range Limits Load limit positions (the drive does not move out of these limits in positioning mode, positive values specify the upper limit and negative values specify the lower limit). APCMOD: Position value at 10 V he position limits must be adjusted when the external T encoder is used. he Servomotor velocity may be controlled by using the T Hall sensors or the external encoder. he external encoder on the end effector will realize T even more significant benefits like higher precision. Hall sensors are still used for commutation. Irrespective of the preset LL value, the maximum position is limited to 3 000 000 in APCMOD. Note: The resolution of the analog input is limited to 12 bit (4096 steps). Command Function Description ENCMOD Encoder Mode Change to encoder signals mode An external encoder signal serves as position transducer The direction can be predefined with the commands ADL and ADR. The acceleration and speed paramaters (AC, DEC, SP) are effective in APCMOD. These permit gentle starting and stopping. HALLSPEED Hall sensor as speed sensor Hall sensors used to control motor speed Velocity control using a pulse width modulated (PWM) signal: ENCSPEED Encoder as speed sensor External encoder used to control motor speed (the current position value is set to 0) If SOR2 is set in APCMOD, the pulse duty factor of a PWM signal can be used as command position. The two channels of the external encoder signals are connected to AnIn and AGND, which may need to be connected to the 5 V encoder supply using a 2.7 k pull-up resistor. Default duty cycle at the analog input: Greater than 50 % commands a positive position Equal to 50 % commands target position = 0 The maximum limit position (value preset with the LL command) covers the value range from 0 to 1800000000 for the positive and 0 to –1800000000 for the negative limit position. Less than 50 % commands a negative position Absolute positioning within one magnetic pitch: Thanks to the linear Hall sensors, the absolute position can be recorded within one magnetic pitch on Linear DCServomotors. This means that even if the power supply is disconnected, the position determination supplies the correct position value after restarting (if the shaft has only been moved within one magnetic pitch). Input: Maximum input frequency: 400 kHz Level: low 0...0.5 V / high 3.5 V… UB Set encoder resolution: The following commands enable the drive to be accurately positioned in the voltage range 0 V to 10 V within one magnetic pitch and to return to the correct position even after the power has been cycled, without homing: APCMOD ...change to analog positioning LL3000 ...fix maximum position at 1 magnetic pitch Command Function Description ENCRES Load Encoder Resolution Load resolution of external encoder. Value range: 0 to 65535 (4 times pulse/mm) Example: External encoder with 1000 pulses/mm: ENCRES4000 Set ENCRES to the post-quadrature value of the encoder resolution, which is four times the resolution of one channel per revolution. Note on input circuit: The circuit for the analog input is designed as a differential amplifier. If the analog input is open, an unexpected displacement may be possible. The input must be set to the voltage level of AGND or rather be connected to AGND with low-impedance. 19 3 Functional Description 3.3 Extended operating modes 3.3.5 Analog control of current limit The command SOR3 allows the drive to change current limiting by using the analog input. A 10 V signal allows the drive to induce as much current as is limited by the setting for LPC. In this mode, the I2t calculation stops and the LCC setting has no effect. Setting LPC beyond what the Servomotor can sustain may cause permanent damage! The motion controller only measures the magnitude of the input voltage. A negative input voltage will not cause reverse direction. Simple position control using a potentiometer, circuit example: +24 V DC 1k 2.7k LED white 4.7k UB Analog input 10k + ptarget M – 20V AGND 4.7 k CAN L CAN H GND 20 3 Functional Description 3.4 Special functions of the error connection The fault output pin can be configured to act as an input or an output. Use the appropriate command found in the following table to configure the pin for the desired functionality. Fault pin as pulse output: In the ENCOUT mode the fault pin is used as pulse output, which outputs an adjustable number of pulses per magnetic pitch. The pulses are derived from the Hall sensor signals of the LM motors and are limited to 4000 pulses per second. Command Function Description ERROUT Error Output Fault pin as error output ENCOUT Encoder Output Fault pin as pulse output Command Function Description DIGOUT Digital Output Fault pin as digital output. The output initializes to low logic (pulled to GND) LPN Load Pulse Number Preset pulse number for ENCOUT. Value range: 1 to 255 DIRIN Direction Input Fault pin as direction input REFIN Reference Input Fault pin as reference or limit switch input Example: Output 100 pulses per magnetic pitch at the fault pin: LPN100 In the case of 18 mm/s = 100 pulses per second are output. The REFIN and DIRIN functions have already been explained in the relevant sections. – One of the set current limitation values (LPC, LCC) is exceeded For speeds that would generate more than the maximum possible pulse number at the set LPN value, the maximum number is output. The set pulses are precisely achieved, but the timing does not necessarily have to exactly agree (delays possible). Position determination via pulse counting is therefore possible, provided that no change occurs in the direction and the maximum possible pulse number is not exceeded. – Set maximum permissible speed deviation (DEV) is exceeded Fault pin as digital output: Fault pin as error output: In ERROUT mode the output is set as soon as one of the following errors occurs: − Overvoltage detected In DIGOUT mode, the error connection can be used as universal digital output. The digital output can be set or deleted via the following commands. − Maximum coil or MOSFET temperature exceeded In order to hide the transient occurrence of errors during the acceleration phase, for example, an error delay can be set which specifies how long an error must be present before it is displayed at the error output: Command Function Description DCE Delayed Current Error Delayed error output for ERROUT in 1/100 sec. Example: Only display error after 2 seconds: DCE200 If one of the above errors occurs, a corresponding Emergency Object is sent to the CAN network! Please consider the error mask in object 0x2320. Only it is set at 1, the error status will be send. See also chapter 6.2 Manufacturer-specific objects under FAULHABER fault register. 21 Command Function Description CO Clear Output Set digital output DIGOUT to low level SO Set Output Set digital output DIGOUT to high level TO Toggle Output Switch digital output DIGOUT 3 Functional Description 3.5 Technical information 3.5.1 Sinusoidal commutation Mode of operation of the current controller: The MCLM 3003/06 C are characterised by a so-called sinus commutation. This means that the preset magnetic field is always ideally positioned in relation to the shaft. As a result, force fluctuations can be reduced to a minimum, even at very low speeds. In addition, the servomotor moves particularly quietly. When the servomotor starts, the peak current is preset as the set-point for the current controller. As the load increases, the current in the motor constantly increases until it finally reaches the peak current. The current controller then comes into operation and limits the current to this set-point. In the current version, the sinus commutation has been extended by a so-called flat-top modulation, which enables 15 % more modulation. As a result, higher no-load speeds are possible. With the SIN0 command, the system can even be set so that over 30 % more modulation is possible. In this mode, the sinus commutation in the upper speed range switches over to a block commutation. This full modulation enables the complete speed range of the Servomotor to be utilised. A thermal current model operating in parallel calculates a model temperature from the actually flowing current. If this model temperature exceeds a critical value, continuous current is switched to and the motor current is regulated to this. Only when the load becomes so small that the temperature falls below the critical model temperature is peak current permitted again. Command Function Description SIN Sinus Commutation 1: Only sinusoidal commutation 0: Block commutation in the upper speed range (full modulation possible) The aim of this so-called l2t current limitation is to prevent heating of the motor beyond the thermally permissible temperature through appropriate selection of the continuous current. On the other hand, a high load should be temporarily possible in order to enable very dynamic movements. Functioning of the I2t current limitation: 3.5.2 Current controller and I2t current limitation The FAULHABER motion controllers are equipped with an integral current controller, which enables implementation of a moment limitation. I I Duration The following parameters can be set: Command Function Description LPC Load Peak Current Limit Load peak current Value range: 0 to 12000 mA LCC Load Continuous Current Limit Load continuous current Value range: 0 to 12000 mA CI Load Current Integral Term Load integral term for current controller Value range: 1…255 I max. I Limitation T Model I Motor Tcritical Load variation Time Time 1.) Peak current FAULHABER command: LPC1500 Ë set peak current to 1500 mA 3.5.3 Overtemperature protection If the MOSFET temperature of the external controllers exceeds a preset limit value, the motor is switched off. The following conditions must be fulfilled in order to reactivate the motor: The current is limited to the peak current, provided that the thermal current model calculates a non-critical temperature. 2.) Continuous current Temperature below a preset limit value FAULHABER command: LCC600 Ë set continuous current to 600 mA Target velocity set to 0 mm/s Note on determination of the coil temperature: The housing temperature is measured and the power loss concluded from the current measurement. The MOSFET or coil temperature is calculated from these values via a thermal model. In most applications, this method represents a thermal servomotor protection device. If the thermal current model reaches a critical temperature, limit is set to continuous current. 22 3 Functional Description 3.5 Technical information 3.5.4 Undervoltage monitoring Possible procedure If the supply voltage falls below the lower voltage threshold, the power stage is switched off. The motion controller remains active. When the voltage returns within the permissible range, the power stage is switched on again immediately. Set parameters of position controller: 1.) Set initial configuration Default value for P term: 80; PP80 3.5.5 Overvoltage regulation If the motor is operated as a generator, it produces energy. Usually power supply units are not able to feed this energy back into the power line. Consequently, the supply voltage at the motor increases, and depending on the speed, the permissible maximum voltage may be exceeded. In order to avoid severe damage to components, the MCLM 3003/06 C contain a controller which adjusts the shaft displacement if a limit voltage (32 V) is exceeded. As a result, the energy generated in the motor is converted, and the voltage of the electronics remains limited to 32 V. This method protects the drive during generating operation and rapid braking. Default value for D term: 10; PD10 2.) Motion profiles appropriate for the application must now be run. If the system does not function stably with these settings, stability can be achieved by reducing the I term of the velocity controller or reducing the P term of the position controller. 3.) The P term of the position controller can now be increased until the system becomes unstable, in order to optimise the motion profile. 4.) The stability can then be restored through the following measures: Increasing the D term of the position controller (example: PD20) Reducing the I term of the velocity controller 3.5.6 Adjustment of the controller parameters Positioning parameters tuning examples: The controller parameters are already preset for common applications. However, in order to optimally adapt the controller to the respective application, the controller parameters must be optimized. Various theoretical and practical adjustment rules exist, but these will not be described in more detail here. A simple, practical method of adjusting the controller is explained below. 1. Positioning via analogue Hall sensor (CONTMOD) a) very strong and fast position control with minimal overshot POR70, I3, PP220, PD10, SR10, AC30000, DEC4000, SP1000 b) soft and fast position control (only parameters changed) POR25, DEC3000 The digital controller operates at a sampling rate of 100 μs. When needed the sampling rate can be increased up to 2 ms. The following controller parameters are available: Command Function Description POR Load Velocity Proportional Term Load velocity controller amplification. Value range: 1 – 255. Corresponds to object 0x60F9 I Load Velocity Integral Term Load velocity controller integral term. Value range: 1 – 255. Corresponds to object 0x60F9 PP Load Position Proportional Term Load position controller amplification. Value range: 1 – 255. Corresponds to object 0x60FB PD Load Position D-Term Load position controller D-term. Value range: 1 – 255. Corresponds to object 0x60FB SR Load Sampling Rate Load sampling rate of the velocity controller as a multiplier of 100 µs. Value Range: 1...20 ms/10 c) soft and slow positioning SP10, POR38, I80, SR10 2. Positioning via linear encoder with 200 Inc/mm (ENCMOD with ENCSPEED) a) very strong and fast position control with minimal overshot POR190, I20, PP220, PD10, SR1, AC30000, DEC10000, SP1000 b) soft and fast position control (only parameters changed) POR28, DEC3000, c) soft and slow positioning SP10, POR38, I60, SR10, 23 4 CANopen 4.1 Introduction ANopen is a standard software protocol based on CAN C hardware (Controller Area Network). The FAULHABER motion controllers support the CANopen communication profile according to CiA DS301 V4. The following communication objects are supported: he international CAN organisation CAN in Automation T e.V. (CiA) defines the communication profile in DS301 (description of the communication structure and the methods for parameter access, control and monitoring functions). – 3 transmit PDOs − 3 receive PDOs − 1 server SDO − 1 emergency object − NMT with node guarding (no heartbeat) − No SYNC, no time stamp object evice profiles are specified for the various devices, D such as DSP402 for drives and DS401 for I/O devices (general device description from the user’s viewpoint). The identifier configuration of the CANopen objects is defined according to the “Predefined Connection Set” (see section 4.5 NMT Network Management). The data assignment of the PDOs is permanently preset (static PDO Mapping). ublic data are managed via the object dictionary P (parameter table, access to entries via index and subindex). here are two data communication objects: T – PDOs (process data objects for control and monitoring) – SDOs (service data objects for access to the object dictionary) Many manufacturers offer CANopen libraries for PC and PLC systems through which the individual objects can be easily accessed, without having to deal with the internal structure. F urther objects are available for network management, node guarding and synchronisation. FAULHABER Motion Manager also enables easy access to the individual objects via a graphic user interface. ANopen supports up to 127 nodes per network C segment with transfer rates up to 1 MBit/s. he communication is message-related; each T communication object receives its own 11 bit identifier. 24 4 CANopen 4.2 PDOs (Process Data Objects) PDOs correspond to a CAN message frame with up to 8 bytes and are used for the transfer of process data, i.e. control and monitoring of the device behaviour. The PDOs are designated from the viewpoint of the field device. Receive PDOs (RxPDOs) are received by the field device and contain e.g. control data, while Transmit PDOs (TxPDOs) are sent by the field device and contain e.g. monitoring data. RxPDO1: Controlword 11 bit identifier 2 bytes user data 0x200 (512D) + Node-ID LB HB Contains the 16 bit controlword according to CiA DSP402, which controls the state machine of the drive unit. The PDO refers to the object index 0x6040 in the object dictionary. The bit division is described in section 6.3.1 Device Control. PDOs can only be transmitted if the device is in “Operational” status (see section 4.5 NMT (Network Management)). TxPDO1: Statusword PDO communication modes: – Event-controlled: Data are sent by the device automatically after a change. 11 bit identifier 2 bytes user data 0x180 (384D) + Node-ID LB HB Contains the 16 bit statusword according to CiA DSP402, which displays the status of the drive unit. The PDO refers to the object index 0x6041 in the object dictionary. The bit division is described in section 6.3.1 Device Control. – Remote Request (RTR): Data are sent after a request message frame. – Synchronised (not supported): Data are sent after receipt of a SYNC object. FAULHABER motion controllers provide the following PDOs: – Receive PDO1: controlword according to DSP402 – Transmit PDO1: statusword according to DSP402 – Receive PDO2: FAULHABER command – Transmit PDO2: FAULHABER request data (RTR) – Receive PDO3: FAULHABER trace configuration – Transmit PDO3: FAULHABER trace data (RTR) 25 4 CANopen 4.2 PDOs (Process Data Objects) RxPDO2: FAULHABER command 11 bit identifier 5 bytes user data 0x300 (768D) + Node-ID Command LLB LHB HLB HHB Provides the FAULHABER channel for the transmission of manufacturer-specific commands. All parameters and control commands of the drive unit can be transmitted using this PDO. 5 bytes are always transferred: the first byte specifies the command and the following 4 bytes specify the argument as a Long Integer value. A description of the commands is given in section 6.4 FAULHABER Commands. TxPDO2: FAULHABER data 11 bit identifier 6 bytes user data 0x280 (640D) + Node-ID Command LLB LHB HLB HHB Error FAULHABER channel for request commands. A request (RTR) on this PDO provides the data requested with the previously sent command. 6 bytes are always transferred: the first byte specifies the command and the following 4 bytes the desired value as a Long Integer, followed by an error code. The Error byte can also be used to check whether a Transmit command has been successfully executed (1 = command successfully executed, for further error codes see section 6.4 FAULHABER Commands). RxPDO3: Trace configuration 11 bit identifier 5 bytes user data 0x400 (1024D) + Node-ID Mode1 Mode2 TC Packets Period This PDO serves for setting Trace mode, which allows internal parameters to be read out quickly. The data configuration looks like this: Byte 0: Mode for Parameter 1 Byte 1: Mode for Parameter 2 Byte 2: Transfer with time code [1/0] Byte 3: Number of packets to be transmitted per request (default:1) Byte 4: Time interval between packets (default: 1 ms) The possible operating modes for parameters 1 and 2 are described in section 5.2 Trace. TxPDO3: Trace data 11 bit identifier 3 to 8 bytes user data 0x380 (896D) + Node-ID Data0 Data1 Data2 Data3 Data4 Data5 Data6 Data7 A request (RTR) on this provides the Trace data according to the setting made via RxPDO3 (see section 5.2 Trace). 26 4 CANopen 4.3 SDO (Service Data Object) The Service Data Object allows parameters to be read and written in the object dictionary (OD). Access occurs via the 16 bit index and the 8 bit subindex. The motion controller acts as server in this case, i.e. it provides data at the client’s (PC, PLC) request (upload) and receives data from the client (download). Byte0 Byte1-2 Byte3 Byte4-7 Command Specifier 16 bit index 8 bit subindex 1-4 byte parameter data Ë Entry in the object dictionary There are 2 different SDO transfer modes: – Expedited Transfer: Transfer of maximum 4 bytes – Segmented Transfer: Transfer of more than 4 bytes As a maximum of 4 data bytes are transferred with FAULHABER motion controllers except for version and device name requests, only Expedited Transfer is described here. The message frames are always 8 bytes and structured as follows: Reading OD entries: Client Ë Server, Upload Request 11 bit identifier 8 bytes user data 0x600 (1536D) + Node-ID 0x40 Index LB Index HB Subindex 0 0 0 0 Index HB Subindex LLB (D0) LHB (D1) HLB (D2) HHB (D3) Server Ë Client, Upload Response 11 bit identifier 8 bytes user data 0x580 (1408D) + Node-ID 0x4x Index LB Byte0 (0x4x) specifies the number of valid data bytes in D0-D3 and the transfer type and is coded as follows for Expedited Transfer (≤ 4 data bytes): – 1 data byte in D0: Byte0 = 0x4F – 3 data bytes in D0-D2: Byte0 = 0x47 – 2 data bytes in D0-D1: Byte0 = 0x4B – 4 data bytes in D0-D3: Byte0 = 0x43 Writing OD entries: Client -> Server, Download Request 11 bit identifier 8 bytes user data 0x600 (1536D) + Node-ID 0x2x Index LB Index HB Subindex LLB (D0) LHB (D1) HLB (D2) HHB (D3) Byte0 (0x2x) specifies the number of valid data bytes in D0-D3 and the transfer type and is coded as follows for Expedited Transfer (≤ 4 data bytes): – 1 data byte in D0: Byte0 = 0x2F – 3 data bytes in D0-D2: Byte0 = 0x27 – 2 data bytes in D0-D1: Byte0 = 0x2B – 4 data bytes in D0-D3: Byte0 = 0x23 If no specification of the number of data bytes is necessary: Byte0 = 0x22 Server Ë Client, Download Response 11 bit identifier 8 bytes user data 0x580 (1408D) + Node-ID 0x60 Index LB Index HB Subindex 0 0 0 0 Index HB Subindex Error0 Error1 Error2 Error3 Index HB Subindex Error0 Error1 Error2 Error3 Termination of the SDO protocol in the event of error: Client Ë Server 11 bit identifier 8 bytes user data 0x600 (1536D) + Node-ID 0x80 Index LB Server Ë Client 11 bit identifier 8 bytes user data 0x580 (1408D) + Node-ID 0x80 Index LB Error3: Error class Error2: Error code Error1: Additional error code HB Error0: Additional error code LB 27 4 CANopen 4.3 SDO (Service Data Object) Error class Error code Additional code Description 0x05 0x03 0x0000 Toggle bit unchanged 0x05 0x04 0x0001 SDO Command Specifier invalid or unknown 0x06 0x01 0x0000 Access to this object is not supported 0x06 0x01 0x0002 Attempt to write to a Read_Only parameter 0x06 0x02 0x0000 Object not present in the object dictionary 0x06 0x04 0x0041 Object cannot be mapped in PDO 0x06 0x04 0x0042 Number and/or length of mapped objects would exceed PDO length 0x06 0x04 0x0043 General parameter incompatibility 0x06 0x04 0x0047 General internal error in device 0x06 0x06 0x0000 Access terminated due to hardware error 0x06 0x07 0x0010 Data type or parameter length do not agree or are unknown 0x06 0x07 0x0012 Data type does not agree, parameter length too large 0x06 0x07 0x0013 Data type does not agree, parameter length too small 0x06 0x09 0x0011 Subindex not available 0x06 0x09 0x0030 General value range error 0x06 0x09 0x0031 Value range error: Parameter value too large 0x06 0x09 0x0032 Value range error: Parameter value too small 0x06 0x0A 0x0023 Resource not available 0x08 0x00 0x0021 Access not possible due to local application 0x08 0x00 0x0022 Access not possible due to current device status 28 4 CANopen 4.4 Emergency Object (Error Message) The Emergency Object informs other bus subscribers of errors that have occurred. The Emergency Object is always 8 bytes in size and structured as follows: 11 bit identifier 8 bytes user data 0x80 (128D) + Node-ID Error0 (LB) Error1 (HB) Error-Reg. 0 0 0 0 0 The first two bytes contain the 16 bit error code, the third byte contains the error register, the following 5 bytes can contain a manufacturer-specific additional code. The error register identifies the error type. The possible error Types are described in the OD under Index 0x1001 (e.g. Bit 4 = Communication Error). The general errors are listed in the following error code table (e.g. Error0=0x10, Error1=0x82: Error 0x8210: PDO not processed due to length error): Emergency Error Codes Error Code (hex) Meaning 0000 no error 1000 generic error 2000 current 2300 2310 3000 3200 3210 4000 4200 4210 5000 5500 5530 6000 6100 8000 8100 current, device output side continuous over current voltage voltage inside the device over voltage temperature device temperature over temperature device hardware data storage flash memory error device software internal software monitoring communication 8110 CAN overrun (objects lost) 8120 CAN in error passive mode 8130 life guard error or heartbeat error 8140 recovered from bus off 8150 8200 8210 8220 transmit COB-ID collision protocol error PDO not processed due to length error PDO length exceeded 8400 velocity speed controller (deviation) 8600 positioning controller 8611 following error 29 4 CANopen 4.5 NMT (Network Management) After power-on and successful initialisation, the FAULHABER motion controllers are automatically in “Pre-Operational” state. In this state, communication with the device can only occur via service data objects (SDOs) – as well as NMT messages – in order to make or request parameter settings. The FAULHABER motion controllers are supplied with sensible default settings for all objects, so that as a rule no further parameterisation is necessary at system start. Usually, any necessary parameter settings are performed once, e.g. with the help of the FAULHABER Motion Manager, and then stored permanently in the data flash memory. These settings are then available immediately after system start. A single CAN message is sufficient to start a CANopen device: Start Remote Node: 11 bit identifier 2 bytes user data 0x000 0x01 Node-ID Or, to start the entire network: Start All Remote Nodes: 11 bit identifier 2 bytes user data 0x000 0x01 0x00 The devices are then in “Operational” state. The device is now fully functional and can be operated via PDOs. The status diagram is shown below: Power on or Hardware Reset (1) Initialisation (2) (14) (11) Pre-Operational (7) (13) Stopped (6) (3) (12) (10) (5) (4) Operational (8) (9) (1) At Power on the initialisation state is entered autonomously (2) Initialisation finished – enter PRE-OPERATIONAL automatically (3),(6) Start_Remote_Node indication (4),(7) Enter PRE-OPERATIONAL_State indication (5),(8) Stop_Remote_Node indication (9),(10),(11) Reset_Node indication (12),(13),(14) Reset_Communication indication In “Stopped” (“Prepared”) state, the device is in error status and can no longer be operated via SDO and PDOs. Only NMT messages are received, in order to produce a status change. Status changes can be performed with the help of the NMT services: An NMT message frame always consists of 2 bytes on the identifier 0x000: 11 bit identifier 2 bytes user data 0x000 CS Node-ID CS: Command Specifier Node ID: Node address (0 = all nodes) The possible values for the Command Specifier CS are listed in the following table: State transition Command specifier cs Explanation (1) – The initialisation state is entered autonomously at power on. (2) – The Pre-Operational state is entered automatically after initialisation, and the boot-up message is sent. (3), (6) cs = 0x01 (1D) Start_Remote_Node. Starts the device and releases PDO transmission. (4), (7) cs = 0x80 (128D) Enter_Pre-Operational. Stops PDO transmission, SDO still active. (5), (8) cs = 0x02 (2D) Stop_Remote_Node. Device goes into error state, SDO and PDO switched off. (9), (10), (11) cs = 0x81 (129D) Reset_Node. Performs a reset. All objects are reset to Power-On defaults. (12), (13), (14) cs = 0x82 (130D) Reset_Communication. Performs a reset of the communication functions. 30 4 CANopen 4.5 NMT (Network Management) Boot-Up message: After the initialisation phase, the FAULHABER motion controller sends the boot-up message, a CAN message with one data byte (Byte0 = 0x00), on the identifier of the Node-Guarding message (0x700 + Node ID): 11 bit identifier 1 byte user data 0x700 (1792D) + Node-ID 0x00 Identifier distribution: CANopen provides default identifiers for the most important objects in the “Predefined Connection Set”. These consist of a 7-bit node address (Node ID) and a 4-bit function code, in accordance with the following diagram: Bit-No.: 10 COB identifier The Boot-Up message signals the end of the initialisation phase of a newly activated module, which can then be configured and started. Node Guarding: The current device status can be requested with the Node-Guarding Object. The Master sends a request (request message frame) to the Guarding Identifier of the monitored node by setting a remote frame. The node then responds with the Guarding message, which contains the current node status and a toggle bit. Function Code Object Function code (binary) Resulting COB-ID Communication Parameters at Index NMT 0000 0 – SYNC 0001 128 (80h) 1005h TIME STAMP 0010 256 (100h) 1012h Object Function code (binary) Resulting COB-ID Communication Parameters at Index EMERGENCY 0001 129 (81h) – 255 (FFh) 1014h, 1015h indication PDO1 (tx) 0011 385 (181h) – 511 (1FFh) 1800h response PDO1 (rx) 0100 513 (201h) – 639 (27Fh) 1400h PDO2 (tx) 0101 641 (281h) – 767 (2FFh) 1801h PDO2 (rx) 0110 769 (301h) – 895 (37Fh) 1401h PDO3 (tx) 0111 897 (381h) – 1023 (3FFh) 1802h PDO3 (rx) 1000 1025 (401h) – 1151 (47Fh) 1402h SDO (tx) 1011 1409 (581h) – 1535 (5FFh) 1200h SDO (rx) 1100 1537 (601h) – 1663 (67Fh) 1200h NMT Error Control 1110 1793 (701h) – 1919 (77Fh) Node/Life Guarding request Node Guard Time COB-ID = 1792 + Node-ID Remote transmit request 0 1 7 t confirm 6…0 s NMT Slave COB-ID = 1792 + Node-ID Remote transmit request request Node Life Time confirm 0 1 7 t 6…0 s Node Guarding Event* indication indication response Life Guarding Event* indication *if guarding error t: Toggle Bit. Initially 0, changes its value in each Guarding frame. s: Status: s = 0x04 (4D): Stopped (Prepared) s = 0x05 (5D): Operational s = 0x7F (127D): Pre-Operational Node ID The FAULHABER motion controllers only operate with these default identifiers! The following diagram describes the Node-Guarding protocol: NMT Master 0 31 4 CANopen 4.6 Entries in the object dictionary The configuration parameters are managed in the CANopen Object dictionary. The Object dictionary is divided into three areas: 1. Communication parameters (Index 0x1000 – 0x1FFF) 2. Manufacturer-specific area (Index 0x2000 – 0x5FFF) 3. Standardised device profiles (0x6000 – 0x9FFF) The 1st area contains the objects according to DS301, the 2nd area is reserved for manufacturer-specific objects, and the 3rd area contains the objects according to DSP402 supported by the FAULHABER motion controllers. Each object can be referenced via its index and sub-index (SDO protocol). Overview of the available objects: a.) Communication objects according to DS301: Index Object (Symbolic Name) Name Type Attrb. 0x1000 VAR device type UNSIGNED32 ro 0x1001 VAR error register UNSIGNED8 ro 0x1003 ARRAY pre-defined error field UNSIGNED32 ro 0x1008 VAR manufacturer device name Vis-String const 0x1009 VAR manufacturer hardware version Vis-String const 0x100A VAR manufacturer software version Vis-String const 0x100C VAR guard time UNSIGNED16 rw 0x100D VAR life time factor UNSIGNED8 rw 0x1010 ARRAY store parameters UNSIGNED32 rw 0x1011 ARRAY restore default parameters UNSIGNED32 rw 0x1014 VAR COB-ID EMCY UNSIGNED32 ro 0x1018 RECORD Identity Object Identity (23h) ro Parameter (22h) ro Server SDO Parameter 0x1200 RECORD 1st Server SDO parameter SDO Receive PDO Communication Parameter 0x1400 RECORD 1st receive PDO Parameter PDO CommPar (20h) rw 0x1401 RECORD 2nd receive PDO Parameter PDO CommPar (20h) rw 0x1402 RECORD 3rd receive PDO Parameter PDO CommPar (20h) rw Receive PDO Mapping Parameter 0x1600 RECORD 1st receive PDO mapping PDO Mapping (21h) ro 0x1601 RECORD 2nd receive PDO mapping PDO Mapping (21h) ro 0x1602 RECORD 3rd receive PDO mapping PDO Mapping (21h) ro Transmit PDO Communication Parameter 0x1800 RECORD 1st transmit PDO Parameter PDO CommPar (20h) rw 0x1801 RECORD 2nd transmit PDO Parameter PDO CommPar (20h) rw 0x1802 RECORD 3rd transmit PDO Parameter PDO CommPar (20h) rw Transmit PDO Mapping Parameter 0x1A00 RECORD 1st transmit PDO mapping PDO Mapping (21h) ro 0x1A01 RECORD 2nd transmit PDO mapping PDO Mapping (21h) ro 0x1A02 RECORD 3rd transmit PDO mapping PDO Mapping (21h) ro 32 4 CANopen 4.6 Entries in the object dictionary b.) Drive profile objects according to DSP402: Index Name Type Attrb. Meaning 0x6040 controlword Unsigned16 rw Drive control 0x6041 statusword Unsigned16 ro Status display 0x6060 modes of operation Integer8 wo Operating mode changeover 0x6061 modes of operation display Integer8 ro Set operating mode 0x6062 position demand value Integer32 ro Last target position 0x6063 position actual value Integer32 ro Actual position in increments 0x6064 position actual value Integer32 ro Actual position scaled 0x6067 position window Unsigned32 rw Target position window 0x6068 position window time Unsigned16 rw Time in target position window 0x6069 velocity actual sensor value Integer32 ro Current speed value 0x606B velocity demand value Integer32 ro Target speed 0x606C velocity actual value Integer32 ro Current speed value 0x606D velocity window Unsigned16 rw End speed window 0x606E velocity window time Unsigned16 rw Time in end speed window 0x606F velocity threshold Unsigned16 rw Speed threshold value 0x6070 velocity threshold time Unsigned16 rw Time below speed threshold value 0x607A target position Integer32 rw Target position 0x607C homing offset Integer32 rw Reference point offset 0x607D software position limit ARRAY rw Area limits 0x607E polarity Unsigned8 rw Polarity (direction of rotation) 0x607F max profile velocity Unsigned32 rw Maximum speed 0x6081 profile velocity unsigned32 rw Maximum speed 0x6083 profile acceleration Unsigned32 rw Acceleration value 0x6084 profile deceleration Unsigned32 rw Braking ramp value 0x6085 quick stop deceleration Unsigned32 rw Quick stop braking ramp value 0x6086 motion profile type Integer16 ro Motion profile 0x6093 position factor ARRAY rw Position factor 0x6096 velocity factor ARRAY rw Speed factor 0x6097 acceleration factor ARRAY rw Acceleration factor 0x6098 homing method Integer8 rw Homing method 0x6099 homing speed ARRAY rw Homing speed 0x609A homing acceleration Unsigned32 rw Homing acceleration 0x60F9 velocity control parameter set ARRAY rw Parameters for speed controller 0x60FA control effort Integer32 ro Controller output 0x60FB position control parameter set ARRAY rw Parameters for position controller 0x60FF target velocity Integer32 rw Target speed 0x6510 drive data RECORD rw Drive information A detailed description of the individual objects is provided in section 6 Parameter Description. 33 4 CANopen 4.7 Drive control (Device control) The FAULHABER motion controllers support drive control according to CiA DSP402. This device profile for drives is based on the CiA DS301 communication profile and provides standardised objects for drive control and configuration. The drive behaviour is mapped in CANopen via a state machine. The states can be controlled with the controlword and displayed with the statusword: Power Disabled In addition to “Device Control”, the operating modes “Profile Position Mode”, “Profile Velocity Mode” and “Homing Mode” are also supported. Fault 13 Fault Reaction Active Start 14 0 Not Ready to Switch On CAN network Fault CAN node 15 1 Switch On Disabled 2 Application layer and communication profile DS 301 Ready to Switch On 3 Power Enabled Drive Profile 402 6 Switched On 8 4 5 Operation Enable Modes of operation 10 12 9 Device Control state machine Homing Profile Mode Position Mode 7 11 16 Quick Stop Active After switch on and successful initialisation, the FAULHABER drive is immediately in “Switch On Disabled” state. Profile Velocity Mode A state change can only be performed when the device is in “Operational” state (see section 4.5 NMT (Network Management)). The “Shutdown” command puts the drive in the “Ready to Switch On” state (transition 2). Servomotor The “Switch On” command then switches on the power stage. The drive is now enabled and is in “Switched On” state (transition 3). The “Enable Operation” commands puts the drive in the “Operation Enabled” state, the drive’s normal operating mode (transition 4). The “Disable Operation” command returns the drive to the “Switched On” state and serves e.g. to terminate a running operation (transition 5). 34 4 CANopen 4.7 Drive control (Device control) The state changes shown in the diagram are executed by the following commands: Command Transitions Shutdown 2,6,8 Switch on 3 Disable Voltage 7,9,10,12 Quick Stop 7,10,11 Disable Operation 5 Enable Operation 4,16 Fault Reset 15 The commands for executing state changes are executed through a special bit combination in the controlword. The controlword is located in the Object dictionary under Index 0x6040 and is generally transmitted with PDO1. The meaning of the individual bits of the controlword is explained in section 6.3.1 Device Control. In the event of state changes, the FAULHABER motion controller in its default setting automatically sends the current statusword on PDO1. The current state can also be requested at any time via a remote request on PDO1. The statusword is located in the Object dictionary under Index 0x6041. The meaning of the individual bits of the statusword is explained in section 6.3.1 Device Control. 35 5 Extended CAN Functions 5.1 The FAULHABER channel A special FAULHABER channel is available on PDO2, via which all commands of the motion controller can be simply executed. Data request: Depending on the mode set for parameters 1 and 2, 3 to 8 bytes are sent back on TxPDO3 after a request (RTR) on TxPDO3: For each FAULHABER command there is a corresponding CAN frame with which the CAN unit can be operated, similarly to the serial variant. All functions and parameters of this drive unit can be accessed via this channel. 1.) Mode1 between 0 and 15, Mode2 at 255 (inactive) Ë 3 byte ... Section 6.4 FAULHABER Commands contains a complete description of the FAULHABER commands. 1st byte: Low byte data 2nd byte: High byte data 3rd byte: Time code The data are in Integer16 format. 5.2 Trace 2.) Mode1 between 16 and 199, Mode2 at 255 (inactive) It is possible to trace operating data via PDO3, i.e. to read data out online in a resolution of up to 1 ms. After setting the desired trace type via RxPDO3, the values can be requested in succession by means of requests to TxPDO3 (see section 4.2 PDOs (Process Data Objects)). Ë 3 byte ... Coding as in 1.) The data are in Unsigned16 format. 3.) Mode1 between 200 and 255, Mode2 at 255 (inactive) Byte Function Ë 5 byte ... 0 Mode for parameter 1 The data are in Integer32 format. 1 Mode for parameter 2 255 = No second parameter 2 Transmission with time code 1 = With time code 0 = Without time code 3 Number of data packets to be transmitted per request Default: 1 4 Time interval between packets [ms] Default: 1ms Trace configuration: RxPDO3: 1st byte: Lowest byte data 2nd byte: Second byte data 3rd byte: Third byte data 4th byte: Highest byte data 5th byte: Time code 4.) Mode1 corresponding to 1.), 2.) or 3.) and Mode2 less than 255: Ë 5 to 8 byte ... Byte 1 to 2 (4): Data bytes of Mode1 Byte 3 (5) to 4 (6) (8): Data bytes of Mode2 Byte 5 (7): Time code The data bytes of Mode2 are coded as for Mode1. The following values are available for parameters 1 and 2: The time code corresponds to a multiple of the time basis of 1 ms and defines the time interval to the last transmission. If 2 Integer32 parameters are requested, there is no more space for the time code in the CAN frame, and configuration parameter 2 must therefore be set to 0 (transfer without time code). The time measurement must then occur in the Master. 0: Actual speed [Integer16, mm/s] 1: Target speed [Integer16, mm/s] 2: Controller output [Integer16] 4: Motor current [Integer16, mA] 44: Housing temperature [Unsigned16, °C] 46: Coil temperature [Unsigned16, °C] 200: Actual position [Integer32, Inc] 201: Target position [Integer32, Inc] 36 6 Parameter Description 6.1 Communication Objects according to DS301 Device Type Index Subindex Name Type Attrb. Default value Meaning 0x1000 0 device type Unsigned32 ro No Specification of the device type Contains information on the device type, divided into two 16-bit fields: Byte: MSB LSB Additional Information Device Profile Number Device Profile Number = 0x192 (402D) Error Register Index Subindex Name Type Attrb. Default value Meaning 0x1001 0 error register Unsigned8 ro No Error register Internal device errors are displayed in this byte as follows: Bit M/O Meaning 0 M generic error 1 O current 2 O voltage 3 O temperature 4 O communication error (overrun, error state) 5 O device profile specific 6 O reserved (always 0) 7 O manufacturer specific Pre-defined Error Field (error memory) Index Subindex Name Type Attrb. Default value Meaning 0x1003 0 number of errors Unsigned8 ro No No. of stored errors 1 standard error field Unsigned32 ro No Last error 2 standard error field Unsigned32 ro No Further error… The error memory contains the description of the last occurring error. The standard error field is divided into two 16-bit fields: Byte: MSB Additional Information LSB Error Code Errors are reported by the Emergency Object. The meaning of the individual error codes is described in section 4.4 Emergency Object (Error Message). The error memory is deleted by writing a “0” to Subindex 0. If no error has occurred since switch on, then the object only consists of Subindex 0 with the entry 0. 37 6 Parameter Description 6.1 Communication Objects according to DS301 Manufacturer Device Name Index Subindex Name Type Attrb. Default value Meaning 0x1008 0 manufacturer device name Vis-String const. No Device name Use the Segmented SDO protocol to read out the device name, as it can be larger than 4 bytes. Manufacturer Hardware Version Index Subindex Name Type Attrb. Default value Meaning 0x1009 0 manufacturer hardware version Vis-String const. No Hardware version Use the Segmented SDO protocol to read out the hardware version, as it can be larger than 4 bytes. Manufacturer Software Version Index Subindex Name Type Attrb. Default value Meaning 0x100A 0 manufacturer software version Vis-String const. No Software version Use the Segmented SDO protocol to read out the software version, as it can be larger than 4 bytes. Guard Time Index Subindex Name Type Attrb. Default value Meaning 0x100C 0 guard time Unsigned16 rw 0 Monitoring time for Node Guarding Specification of Guard Time in milliseconds, 0 switches the monitoring off. Life Time Factor Index Subindex Name Type Attrb. Default value Meaning 0x100D 0 Life time factor Unsigned8 rw 0 Time factor for lifeguarding The Life Time Factor multiplied by the Guard Time gives the Life Time for the Node Guarding Protocol (see section 4.5 NMT (Network Management)). 0 switches Lifeguarding off. Store Parameters Index Subindex Name Type Attrb. Default value Meaning 0x1010 0 largest subindex supported Unsigned8 ro 3 Number of storage options 1 save all parameters Unsigned32 rw 1 Saves all parameters 2 save communication parameters Unsigned32 rw 1 Only save communication parameters 3 save application parameters Unsigned32 rw 1 Only save application parameters This object stores configuration parameters in the non-volatile flash memory. A read access provides information on the storage options. 38 6 Parameter Description 6.1 Communication Objects according to DS301 The storage process is triggered by writing the signature “save” to the relevant subindex: Signature MSB ISO 8859 LSB e v a s 65h 76h 61h 73h (“ASCII”) hex The object corresponds to the FAULHABER command SAVE. Attention: The command may not be executed more than 10,000 times, as otherwise the function of the Flash memory can no longer be guaranteed. Restore Default Parameters Index Subindex Name Type Attrb. Default value Meaning 0x1011 0 largest subindex supported Unsigned8 ro 3 Number of restore options 1 restore all default parameters Unsigned32 rw 1 Loads all default parameters 2 restore default communication parameters Unsigned32 rw 1 Only load default communication parameters 3 restore default application parameters Unsigned32 rw 1 Only load default application parameters This object loads the default configuration parameters (status at delivery). A read access provides information on the restore options. The restore process is triggered by writing the signature “load” to the relevant subindex: Signature MSB LSB ASCII d a o I hex 64h 61h 6Fh 6Ch The parameters are only set to the default values at the next boot-up (reset). If the default parameters are to be definitively saved, a save command must be executed after the reset. COB-ID Emergency Message Index Subindex Name Type Attrb. Default value Meaning 0x1014 0 COB-ID EMCY Unsigned32 ro 0x80 + Node-ID CAN Object Identifier of the Emergency Object Identity Object Index Subindex Name Type Attrb. Default value Meaning 0x1018 0 Number of entries Unsigned8 ro 4 Number of object entries 1 Vendor ID Unsigned32 ro 327 Manufacturer ID number (Faulhaber: 327) 2 Product code Unsigned32 ro 3150 Product ID number 3 Revision number Unsigned32 ro Version number 4 Serial number Unsigned32 ro Serial no. 39 6 Parameter Description 6.1 Communication Objects according to DS301 Server SDO Parameters Index Subindex Name Type Attrb. Default value Meaning 0x1200 0 Number of entries Unsigned8 ro 2 Number of object entries 1 COB-ID Client Ë Server (rx) Unsigned32 ro 0x600 + Node-ID CAN Object Identifier for Server RxSDO 2 COB-ID Server Ë Client (tx) Unsigned32 ro 0x580 + Node-ID CAN Object Identifier for Server TxSDO Receive PDO1 Communication Parameters Index Subindex Name Type Attrb. Default value Meaning 0x1400 0 Number of entries Unsigned8 ro 2 Number of object entries 1 COB-ID Unsigned32 ro 0x200 + Node-ID CAN Object Identifier for RxPDO1 2 transmission type Unsigned8 ro 255 PDO transmission type Receive PDO2 Communication Parameters Index Subindex Name Type Attrb. Default value Meaning 0x1401 0 Number of entries Unsigned8 ro 2 Number of object entries 1 COB-ID Unsigned32 ro 0x300 + Node-ID CAN Object Identifier for RxPDO2 2 transmission type Unsigned8 ro 255 PDO transmission type Receive PDO3 Communication Parameters Index Subindex Name Type Attrb. Default value Meaning 0x1402 0 Number of entries Unsigned8 ro 2 Number of object entries 1 COB-ID Unsigned32 ro 0x400 + Node-ID CAN Object Identifier for RxPDO3 2 transmission type Unsigned8 ro 255 PDO transmission type Receive PDO1 Mapping Parameters Index Subindex Name Type Attrb. Default value Meaning 0x1600 0 Number of entries Unsigned8 ro 1 Number of object entries 1 1st object to be mapped Unsigned32 ro 0x60400010 Reference to 16-bit controlword (0x6040) Receive PDO2 Mapping Parameters Index Subindex Name Type Attrb. Default value Meaning 0x1601 0 Number of entries Unsigned8 ro 2 Number of object entries 1 1st object to be mapped Unsigned32 ro 0x23010108 Reference to 8-bit FAULHABER command 2 2nd object to be mapped Unsigned32 ro 0x23010220 Reference to 32-bit command argument 40 6 Parameter Description 6.1 Communication Objects according to DS301 Receive PDO3 Mapping Parameters Index Subindex Name Type Attrb. Default value Meaning 0x1602 0 Number of entries Unsigned8 ro 5 Number of object entries 1 1st object to be mapped Unsigned32 ro 0x23030108 Reference to 8-bit Trace Mode for Parameter 1 2 2nd object to be mapped Unsigned32 ro 0x23030208 Reference to 8-bit Trace Mode for Parameter 2 3 3rd object to be mapped Unsigned32 ro 0x23030308 Reference to 8-bit Trace time code setting 4 4th object to be mapped Unsigned32 ro 0x23030408 Reference to 8-bit Trace value “Number of packets” 5 5th object to be mapped Unsigned32 ro 0x23030508 Reference to 8-bit Trace value “Time interval” Transmit PDO1 Communication Parameters Index Subindex Name Type Attrb. Default value Meaning 0x1800 0 Number of entries Unsigned8 ro 2 Number of object entries 1 COB-ID Unsigned32 ro 0x180 + Node-ID CAN Object Identifier for TxPDO1 2 transmission type Unsigned8 rw 255 PDO transmission type: asynchronous Transmit PDO2 Communication Parameters Index Subindex Name Type Attrb. Default value Meaning 0x1801 0 Number of entries Unsigned8 ro 2 Number of object entries 1 COB-ID Unsigned32 ro 0x280 + Node-ID CAN Object Identifier for TxPDO2 2 transmission type Unsigned8 rw 253 PDO transmission type: asynchronous, only on request (RTR) Transmit PDO3 Communication Parameters Index Subindex Name Type Attrb. Default value Meaning 0x1802 0 Number of entries Unsigned8 ro 2 Number of object entries 1 COB-ID Unsigned32 ro 0x380 + Node-ID CAN Object Identifier for TxPDO3 2 transmission type Unsigned8 ro 253 PDO transmission type: asynchronous, only on request (RTR) 41 6 Parameter Description 6.1 Communication Objects according to DS301 Transmit PDO1 Mapping Parameters Index Subindex Name Type Attrb. Default value Meaning 0x1A00 0 Number of entries Unsigned8 ro 1 Number of object entries 1 1st object to be mapped Unsigned32 ro 0x60410010 Reference to 16-bit statusword (0x6041) Transmit PDO2 Mapping Parameters Index Subindex Name Type Attrb. Default value Meaning 0x1A01 0 Number of entries Unsigned8 ro 3 Number of object entries 1 1st object to be mapped Unsigned32 ro 0x23010108 Reference to 8-bit FAULHABER command 2 2nd object to be mapped Unsigned32 ro 0x23020120 Reference to 32-bit value 3 2nd object to be mapped Unsigned8 ro 0x23020208 Reference to 8-bit error code Transmit PDO3 Mapping Parameters Index Subindex Name Type Attrb. Default value Meaning 0x1A02 0 Number of entries Unsigned8 ro 3 Number of object entries 1 1st object to be mapped Unsigned32 ro 0x23040120 Reference to 32-bit Trace value of Parameter 1 2 2nd object to be mapped Unsigned32 ro 0x23040220 Reference to 32-bit Trace value of Parameter 2 3 3rd object to be mapped Unsigned32 ro 0x23040308 Reference to 8-bit time code 42 6 Parameter Description 6.2 Manufacturer-specific objects FAULHABER command Index Subindex Name Type Attrb. Default value Meaning 0x2301 0 Number of entries Unsigned8 ro 2 Number of object entries 1 command Unsigned8 rw 0 Command byte for FAULHABER channel 2 argument Unsigned32 rw 0 Argument for FAULHABER command This object is written via RxPDO2 and always contains the last transmitted FAULHABER command. Return value of FAULHABER command Index Subindex Name Type Attrb. Default value Meaning 0x2302 0 Number of entries Unsigned8 ro 2 Number of object entries 1 value Unsigned32 ro 0 Return value of FAULHABER command 2 error Unsigned8 ro 0 Error code: 1=OK, for further errors see FAULHABER Commands The content of this object is requested by means of a Request (RTR) on TxPDO2 and supplies the return value for commands on the FAULHABER channel. Trace configuration Index Subindex Name Type Attrb. Default value Meaning 0x2303 0 Number of entries Unsigned8 ro 5 Number of object entries 1 mode1 Unsigned8 rw 0 Trace mode for Parameter 1 2 mode2 Unsigned8 rw 0 Trace mode for Parameter 2 3 time code Unsigned8 rw 1 Data with time code 4 packets Unsigned8 rw 1 Number of packets to be transmitted per request 5 period Unsigned8 rw 1 Time interval between packets This object is written via RxPDO3 and always contains the last transmitted Trace setting. Trace data Index Subindex Name Type Attrb. Default value Meaning 0x2304 0 Number of entries Unsigned8 ro 3 Number of object entries 1 value1 Unsigned32 ro 0 Last value of Parameter 1 2 value2 Unsigned32 ro 0 Last value of Parameter 2 3 time code Unsigned8 ro 0 Last time code value The content of this object is requested by means of a Request (RTR) on TxPDO3 and supplies the Trace data for the set parameters. The last requested values are always temporarily stored. 43 6 Parameter Description 6.2 Manufacturer-specific objects Limit switch setting Index Subindex Name Type Attrb. Default value Meaning 0x2310 0 Number of entries Unsigned8 ro 5 Number of object entries 1 Negative Limit Unsigned8 rw 0 Lower limit switch 2 Positive Limit Unsigned8 rw 0 Upper limit switch 3 Homing Unsigned8 rw 0 Homing switch* 4 Notify Unsigned8 rw 0 Notify switch** 5 Polarity Unsigned8 rw 7 Polarity of switch 1: Pos. edge valid 0: Neg. edge valid The function of the digital inputs can be set according to the following bit mask: 7 6 5 4 3 2 1 0 Analog input Fault pin 3rd input Upon reaching the upper or lower limit switch, the drive is stopped and can only be moved out of the limit switch again in the opposite direction (Hard Blocking). * H oming switches are only active in DSP402 Homing Mode; Polarity and Notify are not taken into account here, and the position value is reset after execution of homing. ** Notify switches indicate activation with the statusword and setting of bit14. You can then query which switch has triggered with Object 0x2311. The settings of this object change simultaneously with the settings of the FAULHABER parameters HB, HD, HA, HN and HP! Notify switch Index Subindex Name Type Attrb. Default value Meaning 0x2311 0 Triggered switch Unsigned8 ro 0 Triggered switch This object can be used to query which switch has triggered in accordance with the above bit mask after receipt of a statusword message with bit14 set. Reading the object resets bit14 in the statusword again. FAULHABER fault register Index Subindex Name Type Attrb. Default value Meaning 0x2320 0 Number of entries Unsigned8 ro 3 Number of object entries 1 Internal fault register Unsigned16 ro 0 Current internal fault 0=No fault 2 Emergency mask Unsigned16 rw 0xFF Faults that trigger an emergency message frame 3 Fault mask Unsigned16 rw 0 Faults that are treated as DSP402 errors and influence the state machine (error state) 4 Errout mask Unsigned16 rw 0xFF Faults that set the error output This object describes the treatment of internal faults. The errors are coded as follows and can be masked by adding the required error Types: 0x1000 - Software overflow 0x0004 - Overvoltage 0x0001 - Current limit active 0x0100 - CAN error 0x0008 - Temperature error 0x0002 - Speed deviation 0x0010 - NVRAM error 44 6 Parameter Description 6.3 Objects of the DSP402 profile Set baud rate Index Subindex Name Type Attrb. Default value Meaning 0x2400 0 Baud rate Unsigned8 ro 0xFF Set baud rate You can use this object to query which baud rate is set. The index of the set baud rate or 0xFF is returned if AutoBaud is set: Baud rate Index Baud rate Index 1000 KBit 0 125 KBit 4 800 KBit 1 50 KBit 6 500 KBit 2 20 KBit 7 250 KBit 3 10 KBit 8 AutoBaud 0xFF 6.3.1 Device Control The objects in this range serve to control and display the drive behaviour. Controlword Index Subindex Name Type Attrb. Default value Meaning 0x6040 0 controlword Unsigned16 rw 0 Drive control X 1 1 X 0 1 1 1 X 2 Quick Stop 1 1 X 0 1 1 X 3 Enable Operation X X X X 0 1 X 4 New set-point / Homing operation start 5 Change set immediately 6 abs / rel 7 Fault reset 8 Halt 9 0 10 0 11 0 12 0 13 0 14 0 15 0 Fault Reset X 1 Operation 1 1 Enable 0 Enable Voltage Operation Switch on 1 Disable Disable 0 Stop Switch on Commands for Device Control State Machine Quick Function Voltage Bit Shutdown The controlword serves to control the drive state machine and is generally transmitted by means of RxPDO1. The individual bits of the controlword have the following meaning: 0->1 Function Description New set-point 0: Do not set new target position 1: Set new target position Change set immediately 0: Finish current positioning and start a new positioning 1: Interrupt current positioning and start a new positioning abs/rel 0: Target Position is an absolute value 1: Target Position is a relative value Fault reset 0->1: Reset fault Halt 0: Motion can be executed 1: Stop drive The necessary command sequence at the start of a positioning, a speed control operation or a homing sequence is explained subsequently in the section for the respective operating mode. 45 6 Parameter Description 6.3 Objects of the DSP402 profile Statusword Index Subindex Name Type Attrb. Default value Meaning 0x6041 0 Statusword Unsigned16 ro 0 Status display The statusword serves to display the current state of the drive state machine and is generally transmitted automatically in the event of status changes, by means of TxPDO1. Bit Function Not Ready to Switch On Switch On Disabled Ready to Switch On Switched On Operation Enabled Quick stop active Fault reaction active Fault The individual bits of the statusword have the following meaning: Commands for Device Control State Machine 0 Ready to Switch On 0 0 1 1 1 1 1 0 1 Switched On 0 0 0 1 1 1 1 0 2 Operation Enabled 0 0 0 0 1 1 1 0 3 Fault 0 0 0 0 0 0 1 1 4 Voltage Enabled X X X X X X X X 5 Quick Stop X X 1 1 1 0 X X 6 Switch On Disabled 0 1 0 0 0 0 0 0 7 Warning 8 0 9 Remote 10 Target Reached 11 Internal limit active 12 Set-point acknowledge/ Speed / Homing attained 13 Homing Error 14 Hard Notify 15 0 Function Description Warning not used Remote not used Target Reached 0: Target Position/Target Velocity not yet reached 1: Target Position/Target Velocity reached. (Halt = 1: Drive has reached speed 0) Set-point acknowledge 0: No new target position adopted yet (Profile Position Mode) 1: New target position adopted Homing attained 0: Homing sequence not yet complete 1: Homing sequence successfully completed Speed 0: Speed unequal to 0 (Profile Velocity Mode) 1: Speed 0 Homing Error 0: No error 1: Error Hard Notify 0: No limit switch has triggered 1: A Notify switch has triggered (see Object 0x2311 for which input has triggered) 46 6 Parameter Description 6.3 Objects of the DSP402 profile Bit 10 (Target Reached) is set when the drive has reached its target position in Profile Position Mode. Presetting a new set-point deletes the bit. Bit 11 (Internal Limit Active) indicates that a range limit has been reached (Position Range Limit or Limit Switch). Bit 12 (Set-point acknowledge/Speed) is set after receipt of a new positioning command (controlword with New Set-Point) and reset when New Set-Point is reset in the controlword (handshake for positioning command). The bit is set at velocity 0 in Profile Velocity Mode. Modes of operation Index Subindex Name Type Attrb. Default value Meaning 0x6060 0 Modes of operation Integer8 wo 1 Operating mode changeover The following values are available: 1 Profile Position Mode (Position Control) 6 Homing Mode (Homing) -1 FAULHABER Specific Operating Mode The individual operating modes are described in more detail later in this section. Modes 1 to 6 automatically switch the drive into Normal Mode (CONTMOD) with digital set-point presetting (SOR0). The object corresponds to the FAULHABER OPMOD command. Modes of operation display Index Subindex Name Type Attrb. Default value Meaning 0x6061 0 Modes of operation display Integer8 ro 1 Display of set operating mode The set operating mode can be queried here. The return value corresponds to the values of Object 0x6060. The object corresponds to the FAULHABER GOPMOD command. 6.3.2 Factor Group The objects in this range serve for conversion between internal values and user-defined physical values. Position Factor Index Subindex Name Type Attrb. Default value Meaning 0x6093 0 number of entries Unsigned8 ro 2 Number of object entries 1 numerator Unsigned32 rw 1 Dividend (numerator) of position factor 2 feed_constant Unsigned32 rw 1 Divisor (denominator) of position factor position_factor = position_encoder_resolution · gear_ratio feed_constant The desired position unit for Profile Position Mode can be set with this factor (default: encoder resolution). The internal position values are divided by the position_factor in order to produce the desired physical values. 47 6 Parameter Description 6.3 Objects of the DSP402 profile Velocity Factor Index Subindex Name Type Attrb. Default value Meaning 0x6096 0 number of entries Unsigned8 ro 2 Number of object entries 1 numerator Unsigend32 rw 1 Dividend (numerator) of velocity factor 2 divisor Unsigend32 rw 1 Divisor (denominator) of velocity factor velocity_factor = position_encoder_resolution velocity_encoder_resolution The desired velocity unit can be set with this factor (default: 1/s). The internal velocity values are divided by the velocity_factor in order to produce the desired physical values. Acceleration Factor Index Subindex Name Type Attrb. Default value Meaning 0x6097 0 number of entries Unsigned8 ro 2 Number of object entries 1 numerator Unsigend32 rw 1 Dividend (numerator) of acceleration factor 2 divisor Unsigend32 rw 1 Divisor (denominator) of acceleration factor acceleration_factor = velocity_units · velocity_encoder_factor acceleration_units · sec The desired acceleration unit can be set with this factor (default: 1/s²) Polarity Index Subindex Name Type Attrb. Default value Meaning 0x607E 0 polarity Unsigned8 rw 0 Polarity (direction of rotation) The direction of rotation can generally be changed with this object: Bit 7 = 1: Neg. direction in positioning mode Bit 6 = 1: Neg. direction in velocity mode 6.3.3 Profile Position Mode The objects in this range are available for Positioning Mode. Target Position Index Subindex Name Type Attrb. Default value Meaning 0x607A 0 target position Integer32 rw 0 Target position The Target Position is the position to which the drive is to move in Profile Position Mode. To do this, it uses the current settings for velocity, acceleration etc. The presetting occurs in user-defined units, according to the specified Position Factor. The Target Position can be interpreted relatively or absolutely, depending on the type of positioning that is preset via the controlword. The object corresponds to the FAULHABER command LA or LR. Software Position Limit Index Subindex Name Type Attrb. Default value Meaning 0x607D 0 number of entries Unsigned8 ro 2 Number of object entries 1 min position limit Integer32 rw -1666 Lower positioning range limit 2 max position limit Integer32 rw -1666 Upper positioning range limit The range limits specified here in relation to the reference position cannot be exceeded. The presetting occurs in user-defined units, according to the specified Position Factor. The object corresponds to the FAULHABER command LL. 48 6 Parameter Description 6.3 Objects of the DSP402 profile Max Profile Velocity Index Subindex Name Type Attrb. Default value Meaning 0x607F 0 max profile velocity Unsigned32 rw 500 Maximum velocity 0x6081 0 profile velocity Unsigned32 rw 500 Maximum velocity Maximum velocity during a positioning. The presetting occurs in user-defined units, according to the specified Velocity Factor. The object corresponds to the FAULHABER command SP. Profile Acceleration Index Subindex Name Type Attrb. Default value Meaning 0x6083 0 profile acceleration Unsigned32 rw see spec. Acceleration value The presetting occurs in user-defined units, according to the specified Acceleration Factor. The object corresponds to the FAULHABER command AC. Profile Deceleration Index Subindex Name Type Attrb. Default value Meaning 0x6084 0 profile deceleration Unsigned32 rw 4000 Braking ramp value The presetting occurs in user-defined units, according to the specified Acceleration Factor. The object corresponds to FAULHABER command DEC. Quick Stop Deceleration Index Subindex Name Type Attrb. Default value Meaning 0x6085 0 quick stop deceleration Unsigned32 rw 30000 Braking ramp value for Quick Stop The presetting occurs in user-defined units, according to the specified Acceleration Factor. Motion Profile Type Index Subindex Name Type Attrb. Default value Meaning 0x6086 0 motion profile type Integer16 ro 0 Type of motion profile Only Motion Profile type 0 is supported: Linear ramp (trapezoidal profile). Control Effort Index Subindex Name Type Attrb. Default value Meaning 0x60FA 0 control effort Integer32 ro 0 Controller output The object corresponds to FAULHABER command GRU. Position Control Parameter Set Index Subindex Name Type Attrb. Default value Meaning 0x60FB 0 number of entries Unsigned16 ro 2 Number of object entries 1 gain Unsigned16 rw 80 Position controller P-term 2 D constant Unsigned16 rw 10 Position controller D-term Position controller parameters. The object corresponds to FAULHABER commands PP and PD. Parameters P and I of the speed controller in object 0x60F9 (section Profile Velocity Mode) also influence the behaviour of the position controller! 49 6 Parameter Description 6.3 Objects of the DSP402 profile Two methods can be used to preset target positions: Individual set-points: After reaching the target position, the drive informs the Master that it has reached the target and can then move to a new target position. The speed is usually 0 before a new positioning is started. sequence of set-points: A After reaching one target position, the drive immediately moves to the next – previously assigned – target position. This results in a continuous movement, without the need to decelerate the drive to speed 0 in between. Both methods are controlled by the temporal sequence of bits 4 and 5 (New Set-point, Change Set immediately) of the controlword and bit 12 (Set-point acknowledge) of the statusword. These bits enable preparation of a new set-point while an old movement instruction is still being executed, via a handshake mechanism. Procedure for individual positionings: Prerequisite: NMT state “Operational”, drive state “Operation enabled” and Modes of Operation (0x6060) set to Profile Position Mode (1). 1. Set Target Position (0x607A) to the desired value. 2. In the controlword set bit 4 (New set-point) to “1”, bit 5 (Change set immediately) to “0”, and bit 6 (abs/rel) depending on whether absolute or relative positioning is required. 3. Drive responds with bit 12 (Set-point acknowledge) set in the statusword and commences positioning. 4. T he drive indicates that it has reached the target position via the statusword with bit 10 set (Target reached). An existing or new positioning instruction can now be started (New set-point). velocity v2 v1 t0 t1 t2 t3 time velocity Procedure for a sequence of set-points: v2 Prerequisite: NMT state “Operational”, drive state “Operation Enabled” and Modes of Operation (0x6060) set to Profile Position Mode v1 (1). 1. Set Target Position velocity (0x607A) to the desired value. 2. In the controlword set bit 4 (New set-point) and bit 5 (Change set immediately) to “1”, and bit 6 (abs/rel) v2 depending on whether absolute or relative positioning is required. t0 t1 t2 t3 time 3. Drive responds with bit 12 (Set-point acknowledge) set in the statusword and commences positioning. v1 4. A new positioning instruction can now be started (New set-point); with relative positionings, the new target position is added to the last target position. The drive then moves to the new target position immediately. 5. The end of positioning is indicated by the statusword with set bit 10 (Target reached). t0 t1 t2 time t0 t1 t2 time velocity v2 v1 50 6 Parameter Description 6.3 Objects of the DSP402 profile 6.3.4 Homing Mode The objects in this range are available for Homing Mode. After switch-on, a homing sequence must generally be executed in order to reset the position value on the homing limit switch. Homing Offset Index Subindex Name Type Attrb. Default value Meaning 0x607C 0 Homing Offset Integer32 rw 0 Zero point displacement from the reference position Homing Method Index Subindex Name Type Attrb. Default value Meaning 0x6098 0 Homing Method Integer8 rw 20 Homing Method All Homing Methods defined in DSP402 V2 are supported: 1 to 14: Homing with index pulse (if present) 17 to 30: Homing without index pulse 33, 34: Homing at index pulse (if present) 35: Homing at current position Methods 1 and 17: Homing at lower limit switch (Negative Limit Switch) If the limit switch is inactive, the drive initially moves in the direction of the lower limit switch until its positive edge is detected. If the limit switch is active, the drive moves up out of the limit switch until the negative edge is detected. With Method 1 the drive then moves to the next index pulse at which the Home position is set. Methods 2 and 18: Homing at upper limit switch (Positive Limit Switch) If the limit switch is inactive, the drive initially moves in the direction of the upper limit switch until its positive edge is detected. If the limit switch is active, the drive moves down out of the limit switch until the negative edge is detected. With Method 2 the drive then moves to the next index pulse at which the Home position is set. Methods 3, 4 and 19, 20: Homing at a positive Homing switch (Positive Home Switch) Depending on the status of the Homing switch, the drive moves in one or the other direction until it reaches the falling (3,19) or rising (4, 20) edge. The Homing switch only has one rising edge in the direction of the upper limit switch. The FAULHABER parameter HP for the limit switch used is simultaneously set to 1 (rising edge). 19 3 19 3 20 4 20 4 Index Pulse Home Switch Home Switch 51 6 Parameter Description 6.3 Objects of the DSP402 profile Methods 5, 6 and 21, 22 Homing at a negative Homing switch (Negative Home Switch) Depending on the status of the Homing switch, the drive moves in one or the other direction until it reaches the falling (5,21) or rising (6, 22) edge. The Homing switch only has one The 19 falling edge in the direction of the upper limit switch. 3 FAULHABER parameter HP for the limit switch used is simultaneously set to 0 (falling edge). 19 3 Methods 7 to 14 and 23 to 30: Homing at the Homing switch (Home Switch) 20 4 20 These methods use a limit switch that is only active within a defined path range. Switch to the two edges. A distinction is made in respect of theHome reaction With methods 7 to 14, after detection of the edge the drive continues until the index pulse at which the Homing position is set. 4 Index Pulse Home Switch Methods 7 and 23: Homing at bottom of falling edge. Start in positive direction if switch is inactive. Home Switch Positive Limit Switch Methode 8 and 24: Homing at the top of rising edge. Start in positive direction if switch is inactive. Methods 9 and 25: Homing at top of rising edge. Start always in positive direction. Methods 10 and 26: Homing at top of falling edge. Start always in positive direction. Methods 11 and 27: Homing at top of falling edge. Start in negative direction if switch is inactive. Methods 12 and 28: Homing at top of rising edge. Start in negative direction if switch is inactive. Methods 13 and 29: Homing at bottom of rising edge. Start always in negative direction. Methods 14 and 30: Homing at bottom of falling edge. Start always in negative direction. Methods 33 and 34: Homing at index pulse Drive moves in negative (33) or positive (34) direction until the index pulse. Method 35: The position counter is reset at the current position. 52 6 Parameter Description 6.3 Objects of the DSP402 profile Homing speed Index Subindex Name Type Attrb. Default value Meaning 0x6099 0 Number of entries Unsigned32 ro 2 Number of entries 1 Speed during search for switch Unsigned32 rw 40 Speed during search for switch 2 Speed during search for zero Unsigned32 rw 20 Speed during search for zero point The data are provided in user-defined units, according to the specified Velocity Factor. Homing acceleration Index Subindex Name Type Attrb. Default value Meaning 0x609A 0 Homing acceleration Unsigned32 rw 50 Acceleration during homing The presetting is made in user-defined units, according to the specified Acceleration Factor. Procedure for a homing sequence: Prerequisite: NMT state “Operational”, drive state “Operation enabled” and Modes of Operation (0x6060) set to Homing Mode (6). 1. Set Homing Mode (0x6098), Homing Speed (0x6099) and Homing Acceleration (0x609A) to the desired value. 2. In the controlword set bit 4 (Homing operation start) to “1” to start the homing sequence. 3. D rive responds with bit 12 (Homing attained) set in the statusword when the homing sequence is complete. If an error occurs during the homing sequence, bit 13 (Homing error) is set in the statusword. An in-progress homing sequence can be interrupted by writing a “0” to bit 4 in the controlword. 6.3.5 Position Control Function The objects in this range are used to monitor positioning operation. Position Demand Value Index Subindex Name Type Attrb. Default value Meaning 0x6062 0 position demand value Integer32 ro 0 Preset value for target position Position Actual Value Index Subindex Name Type Attrb. Default value Meaning 0x6063 0 position actual value Integer32 ro 0 Current actual position (increments) The internal encoder increments are output. The object corresponds to the FAULHABER command POS. 53 6 Parameter Description 6.3 Objects of the DSP402 profile Position Actual Value Index Subindex Name Type Attrb. Default value Meaning 0x6064 0 position actual value Integer32 ro 0 Current actual position (scaled) Output occurs in user-defined units, according to the specified position factor. Position Window Index Subindex Name Type Attrb. Default value Meaning 0x6067 0 position window Unsigned32 rw 20 Target position window Symmetrical area around the target position which is used for the “Target Reached” message. Presetting is in userdefined units, according to the specified Position Factor. The object corresponds to the FAULHABER command CORRIDOR. Position Window Time Index Subindex Name Type Attrb. Default value Meaning 0x6068 0 position window time Unsigned16 rw 200 Time in target position window If the drive stays within the range of the position window for at least the time set here in milliseconds, bit 10 is set in the statusword (Target Reached). 6.3.6 Profile Velocity Mode The objects in this range are available for speed control operation. Velocity sensor actual value Index Subindex Name Type Attrb. Default value Meaning 0x6069 0 velocity sensor actual value Integer32 ro 0 Current velocity value The output occurs in user-defined units, in accordance with the specified Velocity Factor. The object corresponds to the FAULHABER command GN. Velocity demand value Index Subindex Name Type Attrb. Default value Meaning 0x606B 0 velocity demand value Integer32 ro 0 Target velocity The output occurs in user-defined units, in accordance with the specified Velocity Factor. The object corresponds to the FAULHABER command GV. Velocity actual value Index Subindex Name Type Attrb. Default value Meaning 0x606C 0 velocity actual value Integer32 ro 0 Current velocity value Identical value to 0x6069, with use of the integrated analog Hall sensors for velocity recording. The output occurs in userdefined units, in accordance with the specified Velocity Factor. The object corresponds to the FAULHABER command GN. 54 6 Parameter Description 6.3 Objects of the DSP402 profile Velocity Window Index Subindex Name Type Attrb. Default value Meaning 0x606D 0 velocity window Unsigned16 rw 20 End velocity window Velocity range around the target speed, which is used to identify the attained end velocity. The presetting occurs in userdefined units, in accordance with the specified Velocity Factor. Velocity Window Time Index Subindex Name Type Attrb. Default value Meaning 0x606E 0 velocity window time Unsigned16 rw 200 Time in end velocity window If the drive stays within the velocity range of the Velocity Window for at least the time set here in milliseconds, bit 10 is set in the statusword (Target Reached). Velocity Threshold Index Subindex Name Type Attrb. Default value Meaning 0x606F 0 velocity threshold Unsigned16 rw 20 Velocity threshold value Velocity range around 0 which is used to detect standstill. Presetting occurs in user-defined units, in accordance with the specified Velocity Factor. Velocity Threshold Time Index Subindex Name Type Attrb. Default value Meaning 0x6070 0 velocity threshold time Unsigned16 rw 200 Time below velocity threshold value If the drive stays below the velocity threshold value for at least the time set here in milliseconds, bit 12 is set in the statusword (Speed = 0). Velocity Control Parameter Set Index Subindex Name Type Attrb. Default value Meaning 0x60F9 0 number of entries Unsigned16 ro 2 Number of object entries 1 gain Unsigned16 rw 20 Velocity controller P-term 2 integration time constant Unsigned16 rw 10 Velocity controller I-term Parameters of the velocity controller. The object corresponds to the FAULHABER commands POR and I. 6.3.7 Common Entries Drive Data Index Subindex Name Type Attrb. Default value Meaning 0x6510 0 1 2 3 number of entries motor type Unsigned8 Signed32 Unsigned16 Unsigned32 ro rw rw rw 1 8 635 13170 Number of object entries Set motor type Motor speed constant Motor terminal resistance The motor type to which the control is set can be queried or set here. The object corresponds to the FAULHABER command MOTTYP/GMOTTYP. 55 6 Parameter Description 6.4 FAULHABER commands The drive can be configured and controlled very easily with the FAULHABER commands. All supported ASCII commands of the serial variant are available as CAN message frames on PDO2. The first byte always contains the HEX value of the command, and the following 4 bytes can contain data: TxPDO2: FAULHABER data RxPDO2: FAULHABER command 11 bit identifier 5 bytes user data 0x300 (768D) + Node-ID Command LLB LHB HLB HHB To configure the drive via the FAULHABER channel the device must be in “Operational” NMT state. Some of the parameters can also be set via the object dictionary, but others only via the FAULHABER channel. 11 bit identifier 5 bytes user data 0x280 (640D) + Node-ID Command LLB LHB HLB Error Explanation 1 Command successfully executed -2 EEPROM writing done -4 Overtemperature – drive disabled -5 Invalid parameter -7 Unknown command -8 Command not available -13 Flash defect HHB Example: Certain parameters can only be set and used in the FAULHABER operating mode Modes of Operation = –1 (object 0x6060 or command OPMOD), as they have a direct influence on the drive behaviour. Query actual position of node 3 (Command “POS”): Transmit Id 303: 40 00 00 00 00 Request Id 283 Receive Id 283: 40 E8 03 00 00 01 The reaction to FAULHABER commands depends on the transmission type set for TxPDO2 (OD index 0x1801): Ë Actual position = 1000D a.) transmission type = 253 After sending the command on RxPDO2 a request (RTR) must be executed on TxPDO2 to get the answer of query commands or to check transmit commands. b.) transmission type = 255 The commands are immediately answered on TxPDO2. 6 bytes are always returned: the first byte specifies the command and the following 4 bytes the desired value as a Long Integer (for transmit commands: 0), followed by an error code: 56 Error 6 Parameter Description 6.4 FAULHABER commands 6.4.1 Basic setting commands The commands listed here are used for the configuration of basic setting parameters, which are stored in the Flash data memory with the SAVE / EEPSAV command and reloaded from here after switch-on. 6.4.1.1 Commands for special FAULHABER operating modes Only available in FAULHABER mode (Modes of operation = OPMOD = -1) Command Hex value Data Function Description OPMOD 0xFD 0 Operation Mode CANopen operating mode: -1: FAULHABER mode 1: Profile Position Mode 6: Homing Mode Corresponds to object 0x6060 (modes of operation) SOR 0x8E 0-3 Source For Velocity Source for velocity presetting 0: CAN interface (default) 1: Voltage at analog input 2: PWM signal at analog input 3: Current limitation value via analog input CONTMOD 0x06 0 Continuous Mode Switch back from an extended mode to normal mode STEPMOD 0x46 0 Stepper Motor Mode Switch to stepper motor mode APCMOD 0x02 0 Analog Position Control Mode Switch to position control via analog voltage ENCMOD 0x10 0 Encoder Mode Switch to encoder mode. An external encoder serves as position detector (the current position value is set to 0) HALLSPEED 0x3B 0 Hall Sensor as Speed Sensor Speed via Hall sensors in encoder mode ENCSPEED 0x12 0 Encoder as Speed Sensor Speed via encoder signals in encoder mode GEARMOD 0x1D 0 Gearing Mode Switch to gearing mode VOLTMOD 0x49 0 Set Voltage Mode Activate voltage regulator mode 6.4.1.2 Parameters for basic settings Command Hex value Data Function Description ENCRES 0x70 Value Load Encoder Resolution Load resolution from external encoder. Value range: 0 to 65535 (4 times pulse/mm) MOTTYP 0x84 0 LM Motor Type Setting for connected motor. KN 0x9E Value Load Speed Constant Load speed constant Kn according to specifications in data sheet. RM 0x9F Value Load Motor Resistance Load motor resistance RM according to specification in data sheet. Unit: mOhm. STW 0x77 Value Load Step Width Load step width for step motor and gearing mode Value range: 0…..65535 STN 0x64 Value Load Step Number Load number of steps per revolution for step motor and gearing mode Value range: 0…..65535 ADL 0x00 0 Analog Direction Left Positive voltages at the analog input result in left movement of the shaft (SOR1, SOR2) ADR 0x01 0 Analog Direction Right Positive voltages at the analog input result in right movement of the shaft (SOR1, SOR2) SIN 0xA0 0-1 Sinus Commutation 1: No block commutation in the upper velocity range (default) 0: Block commutation in the upper velocity range (full modulation) 0: LM special motor according to KN and RM 57 6 Parameter Description 6.4 FAULHABER commands 6.4.1.3 General parameters Command Hex value Data Function Description LL 0xB5 Value Load Position Range Limits Load limit positions (the drive cannot be moved out of these limits). Positive values specify the upper limit and negative values the lower. The range limits are only active if APL1 is set. Value range: -1.8 · 109…+1.8 · 109 Corresponds to object 0x607D APL 0x03 0-1 Activate / Deactivate Position Limits Activate range limits (LL) (valid for all operating modes). 1: Position limits activated 0: Position limits deactivated SP 0x8F Value Load Maximum Speed Load maximum speed. Value range: 0 to 10000 mm/s. Setting applies for all modes. Corresponds to object 0x607F AC 0x65 Value Load Command Acceleration Load acceleration value. Value range: 0 to 30000 mm/s2. Corresponds to object 0x6083 DEC 0x6D Value Load Command Deceleration Load deceleration value. Value range: 0 to 30000 mm/s2. Corresponds to object 0x6084 SR 0xA4 Value Sampling Rate Load sampling rate of the velocity controller as a multiplier of 100 µs. Value Range: 1...20 ms/10 POR 0x89 Value Load Velocity Proportional Term Load velocity controller amplification. Value range: 1…255. Corresponds to object 0x60F9 I 0x7B Value Load Velocity Integral Term Load velocity controller integral term. Value range: 1…255. Corresponds to object 0x60F9 PP 0x9B Value Load Position Proportional Term Load position controller amplification. Value range: 1…255. Corresponds to object 0x60FB PD 0x9C Value Load Position Differential Term Load position controller D-term. Value range: 1…255. Corresponds to object 0x60FB CI 0xA2 Value Load Current Integral Term Load integral term for current controller. Value range: 1…255 LPC 0x81 Value Load Peak Current Limit Load peak current. Value range: 0 to 12000 mA LCC 0x80 Value Load Continuous Current Limit Load continuous current. Value range: 0 to 12000 mA DEV 0x6F Value Load Deviation Load maximum permissible deviation of actual velocity from target velocity (deviation) Value range: 0…32767 CORRIDOR 0x9D Value Load Corridor Window around the target position. Value range: 0…65535 Corresponds to object 0x6067 58 6 Parameter Description 6.4 FAULHABER commands 6.4.1.4 Configuration of fault pin and digital inputs Command Hex value Data Function Description ERROUT 0x14 0 Error Output Fault pin as error output ENCOUT 0x11 0 Encoder Output Fault pin as pulse output DIGOUT 0x0A 0 Digital Output Fault pin as digital output. The output is set to low level. DIRIN 0x0C 0 Direction Input Fault pin as direction input REFIN 0x41 0 Reference Input Fault pin as reference or limit switch input DCE 0x6B Value Delayed Current Error Delayed error output for ERROUT in 1/100 sec. Value range: 1…65535 LPN 0x82 Value Load Pulse Number Preset pulse number for ENCOUT Value range: 1…255 CO 0x05 0 Clear Output Set digital output DIGOUT to low level SO 0x45 0 Set Output Set digital output DIGOUT to high level TO 0x55 0 Toggle Output Switch digital output DIGOUT SETPLC 0x51 0 Set PLC inputs Digital inputs PLC-compatible (24 V level) SETTTL 0x52 0 Set TTL inputs Digital inputs TTL-compatible (5 V level) 6.4.1.5 Configuration of homing and limit switches in FAULHABER mode Command Hex value Data Function Description HP 0x79 Value Hard Polarity Define valid edge and polarity of respective limit switches: 1: Rising edge or high level valid. 0: Falling edge or low level valid. HB 0x73 Value Hard Blocking Activate Hard Blocking function for relevant limit switch. HD 0x74 Value Hard Direction Presetting of direction that is blocked with HB of respective limit switch. 1: right movement blocked 0: left movement blocked SHA 0x8A Value Set Home Arming for Homing Sequence Homing behaviour (GOHOSEQ): Set position value to 0 at edge of respective limit switch. SHL 0x90 Value Set Hard Limit for Homing Sequence Homing behaviour (GOHOSEQ): Stop motor at edge of respective limit switch. SHN 0x9A Value Set Hard Notify for Homing Sequence Homing behaviour (GOHOSEQ): Send message to Master at edge of respective limit switch (statusword bit 14=1). HOSP 0x78 Value Load Homing Speed Load speed and direction for homing (GOHOSEQ, GOHIX, GOIX). Value range: -10000 to 10000 mm/s. HA 0x72 Value Home Arming Set position value to 0 and delete relevant HA bit at edge of respective limit switch. Setting is not stored. HL 0x75 Value Hard Limit Stop motor and delete relevant HL bit at edge of respective limit switch. Setting is not stored. HN 0x76 Value Hard Notify Send message to Master (statusword bit 14=1) and delete relevant HN bit at edge of respective limit switch. Setting is not stored. Limit switch bit mask: 7 6 5 4 3 2 1 0 Analog input Fault pin 3rd input 59 6 Parameter Description 6.4 FAULHABER commands 6.4.2 Query commands for basic settings 6.4.2.1 Operating modes and general parameters Command Hex value Data Function Description GOPMOD 0xFE 0 Get Operation Mode Display current CANopen operating mode: -1: FAULHABER mode 1: Profile Position Mode 6: Homing Mode Corresponds to object 0x6061 (modes of operation display) CST 0x58 0 Configuration Status Set operating mode. Return value binary coded (LSB=Bit 0): Bit 0-2, Reserved Bit 3-4, Velocity presetting: 0:SOR0 (CAN interface) 1:SOR1 (Analog voltage) 2:SOR2 (PWM signal) 3:SOR3 (current limitation value) Bit 5-6, reserved Bit 7-9, FAULHABER mode: 0:CONTMOD 1:STEPMOD 2:APCMOD 3:ENCMOD / HALLSPEED 4:ENCMOD / ENCSPEED 5:GEARMOD 6:VOLTMOD Bit 10, Power amplifier: 0:Disabled (DI) 1:Enabled (EN) Bit 11, Position controller: 0:Switched off 1: Switched on Bit 12, Analog direction: 0:ADL 1:ADR Bit 13, Position Limits APL: 0:Deactivated 1:Activated Bit 14, Sinus commutation SIN: 0:Permit block commutation 1:Do not permit block commutation 60 6 Parameter Description 6.4 FAULHABER commands Command Hex value Data Function Description GMOD 0x28 0 Get Mode Get FAULHABER mode: 0: CONTMOD 1: STEPMOD 2: APCMOD 3: ENCMOD / HALLSPEED 4: ENCMOD / ENCSPEED 5: GEARMOD 6: VOLTMOD GENCRES 0x1E 0 Get Encoder Resolution Get encoder resolution ENCRES GMOTTYP 0x29 0 Get Motor Type Get motor type 0 (MOTTYP) GKN 0x4D 0 Get Speed Constant Speed constant for MOTTYP0 GRM 0x4E 0 Get Motor Resistance Motor resistance for MOTTYP0 in mOhm GSTW 0x39 0 Get Step Width Get step width STW GSTN 0x38 0 Get Step Number Get step number per polar pitch STN GMV 0x2A 0 Get Minimum Velocity Get minimum speed MV in mm/s GMAV 0x27 0 Get Minimum Analog Voltage Get minimum start voltage value MAV in mV GPL 0x31 0 Get Positive Limit Get positive limit position LL Corresponds to object 0x607D GNL 0x2C 0 Get Negative Limit Get negative limit position LL Corresponds to object 0x607 GSP 0x36 0 Get Maximum Speed Get maximum speed SP in mm/s. Corresponds to object 0x6081 GAC 0x15 0 Get Acceleration Set acceleration value AC in mm/s2. Corresponds to object 0x6083 GDEC 0x1B 0 Get Deceleration Get deceleration value DEC in mm/s2. Corresponds to object 0x6084 GSR 0x56 0 Get Sampling Rate Get sampling rate of velocity controller in ms/10 GPOR 0x33 0 Get Velocity Prop. Term Get amplification value of velocity controller POR Corresponds to object 0x60F9 GI 0x26 0 Get Velocity Integral Term Get integral term of velocity controller I Corresponds to object 0x60F9 GPP 0x5D 0 Get Position Prop. Term Get amplification value of position controller PP Corresponds to object 0x60FB GPD 0x5E 0 Get Position D-Term Get D-term of position controller PD Corresponds to object 0x60FB GCI 0x63 0 Get Current Integral Term Get integral term of current controller CI GPC 0x30 0 Get Peak Current Get peak current PC in mA GCC 0x18 0 Get Continuous Current Get continuous current CC in mA GDEV 0x1C 0 Get Deviation Get deviation value DEV GCORRIDOR 0x62 0 Get Corridor Get window around target position Corresponds to object 0x6067 61 6 Parameter Description 6.4 FAULHABER commands 6.4.2.2 Configuration of fault pin and digital inputs Command Hex value Data Function Description IOC 0x5C 0 I/O Configuration Set input/output configuration. Return value binary coded (LSB=Bit 0): Bit 0-7, FAULHABER Hard Blocking: 0-7: Function active for input 1-3 Bit 8-15, FAULHABER Hard Polarity: 0-7: Rising edge at input 1-3 Bit 16-23, FAULHABER Hard Direction: 0-7: right movements stored at input 1-3 Bit 24, State of digital output: 0: Low 1: High Bit 25, Level of digital inputs: 0: TTL level (5V) 1: PLC level (24V) Bit 26-28, Function of fault pin: 0: ERROUT 1: ENCOUT 2: DIGOUT 3: DIRIN 4: REFIN GDCE 0x1A 0 Get Delayed Current Error Set value of error output delay DCE GPN 0x32 0 Get Pulse Number Set pulse number LPN 6.4.2.3 Configuration of homing in FAULHABER mode Command Hex value Data Function Description HOC 0x5B 0 Homing Configuration Set homing configuration. Return values binary coded (LSB = Bit 0): Bit 0-7, SHA setting for input 1-8 Bit 8-15, SHN setting for input 1-8 Bit 16-23, SHL setting for input 1-8 (input 6-8: Reserved) GHOSP 0x24 0 Get Homing Speed Set homing speed in mm/s 62 6 Parameter Description 6.4 FAULHABER commands 6.4.3 Miscellaneous commands Command Hex value Data Function Description SAVE 0x53 0 Save Parameters, (EEPSAV) Save current parameters and configuration setting to Flash memory. The drive will also start with these settings when next switched on. Corresponds to object 0x1010. Attention: Command must not be executed more than 10,000 times, as otherwise the function of the Flash memory can no longer be guaranteed. RESET 0x59 0 Reset Restart drive node. Corresponds to NMT Reset Node. RN 0x44 0 Reset Node Set parameters to original values (ROM values) (current, acceleration, controller parameters, maximum speed, limit positions…). FCONFIG 0xD0 0 Factory Configuration All configurations and values are reset to the delivery status. The drive is deactivated after this command. The drive is only reactivated (with the ROM values) when the supply is reconnected. 6.4.4 Motion control commands The commands executed here are only available in FAULHABER mode (Modes of operation = -1). Command Hex value Data Function Description DI 0x08 0 Disable Drive Deactivate drive EN 0x0F 0 Enable Drive Activate drive M 0x3C 0 Initiate Motion Activate position control and start positioning LA 0xB4 Value Load Absolute Position Load new absolute target position Value range: –1.8 · 109 ... 1.8 · 109 LR 0xB6 Value Load Relative Position Load new relative target position, in relation to last started target position. Resulting absolute target position must be between –2.14 · 109 and 2.14 · 109. U 0x92 Value Set Output Voltage Output PWM value in VOLTMOD Value range: –32767...32767 (corresponds to –Uv...+Uv ) GOHOSEQ 0x2F 0 Go Homing Sequence Execute FAULHABER homing sequence. A homing sequence is executed (if programmed) independently of the current mode GOHIX 0x2E 0 Go Hall Index Move Servomotor to Hall zero point (Hall index) and set actual position value to 0 GOIX 0xA3 0 Go Encoder Index Move to the Encoder Index at the fault pin and set actual position value to 0 (ext. encoder) HO 0xB8 0 / Value Define Home-Position Data = 0: Set actual position to 0. Otherwise: Set actual position to specified value. Value range: –1.8 · 109 ...1.8 · 109 63 6 Parameter Description 6.4 FAULHABER commands 6.4.5 General query commands Command Hex value Data Function Description POS 0x40 0 Get Actual Position Current actual position Corresponds to object 0x6063 TPOS 0x4B 0 Get Target Position Target position of last started positioning Corresponds to object 0x6062 GV 0x3A 0 Get Velocity Current target velocity in mm/s Corresponds to object 0x60FF GN 0x2B 0 Get N Current actual velocity in mm/s Corresponds to object 0x6069 GU 0x5F 0 Get PWM Voltage Set PWM value in VOLTMOD GRU 0x60 0 Get Real PWM Voltage Current controller output value GCL 0x10 0 Get Current Limit Current limitation current in mA GRC 0x34 0 Get Real Current Current actual current in mA TEM 0x47 0 Get Temperature Current housing temperature in °C OST 0x57 0 Operation Status Display current operating status. Return value binary coded (LSB = Bit 0): Bit 0: Homing running Bit 1-3: Reserved Bit 4: Current limitation active Bit 5: Deviation error Bit 6: Overvoltage Bit 7: Overtemperature Bit 8: Status input 1 Bit 9: Status input 2 Bit 10: Status input 3 Bit 11: Status input 4 Bit 12: Status input 5 Bit 13-15: Res. for further inputs Bit 16: Position attained SWS 0x5A 0 Switch Status Temporary limit switch settings. Return value binary coded (LSB = Bit 0): Bit 0-7: HA setting for input 1-8 Bit 8-15: HN setting for input 1-8 Bit 16-23: HL setting for input 1-8 Bit 24-31: Specifies which limit switch 1-8 has already switched (is reset again when the respective input is reset). 64 7 Appendix 7.1 EC Directive/National legislation 7.3. Electromagnetic compatibility (EMC) According to the EC Directive, all electrically driven machines, equipment and systems produced, imported and sold within the European Union must carry a CE mark. 7.3.1 Definition The EC Directive consists of the following individual Directives which are important for the users of electric motors. Electromagnetic compatibility is defined as the ability of a device, unit of equipment or system to function satisfactorily in its electromagnetic environment without introducing intolerable electromagnetic disturbances to anything in that environment. [EMC Directive]. Machinery Directive (98/37/EC): 7.3.2 EMC Directives and Standards It applies to independently functioning machines or a chain of machines forming whole plants or systems. For built in components, non-operational machines, a manufacturer‘s declaration is submitted according to Annex II B of the Machinery Directive 98/37/EC. Motion Controller MCLM 3006 C comply with the EMC Directive 2004/108/EG if used as intended. Proof of this has been furnished demonstrating compliance with the following Harmonised Standards: N 61000-6-4 (10/01): E Generic standards – Emission standard for industrial environments Low Voltage Directive (2006/95/EC): It applies to all drives with a nominal voltage from 75 to 1,500 V DC, or from 50 to 1,000 V AC. The drives described in this instruction manual do not fall within the scope of this Directive as they are designed for smaller voltages. N 61000-6-2 (10/01): E Generic standards – Immunity for industrial environments The aforesaid Generic Standards prescribe certain standardised tests for the emitted-interference and interference-immunity tests. The following tests are required due to the connections on the MCLM: EMC Directive (2004/108/EC): The Electromagnetic Compatibility (EMC) Directive applies to all electronic and electrical equipment, plant and systems, which are also sold to end users (consumers). These speed controllers therefore fall within the scope of this Directive. Generic Standard on Emitted Interference: N 55011, Class A: E Electromagnetic disturbance characteristics The CE mark indicates that the speed controllers listed in this instruction manual fulfil the requirements Generic Standard on Interference Immunity of the EMC Directive. N 61000-4-2: E Electrostatic discharge Compliance is documented by the Declaration of Conformity. N 61000-4-3: E Radiated, radio-frequency, electromagnetic field 7.2. Declaration of Conformity and CE marking N 61000-4-4: E Electrical fast transient / burst FAULHABER drive systems and components are parts manufactured and supplied exclusively for the purpose of further processing by persons who have the requisite level of expertise within the area of electromagnetic compatibility. Therefore, CE marking is not required. N 61000-4-5: E Surge immunity test EN 61000-4-6: Immunity to conducted disturbances, induced by radiofrequency fields The EC Directive (European Communities) governing CE marking applies solely to products which are brought onto the market. These products must comply with all relevant requirements, particularly the EMC Directive 2004/108/EC. N 61000-4-8: E Power frequency magnetic field immunity test Test certificates for individual motors, issued in accordance with EU standards, are available on request. All these tests have been conducted and passed. 65 7 Appendix 7.3.3 Information on use as intended 7.4 Configuration at delivery Please note the following for the devices (see also Chapter 2 Installation): The standard configuration parameters with which the units are delivered are listed below. These settings can also be reloaded at any time with the command FCONFIG, followed by a hardware reset. Preconditions for use as intended: peration in accordance with the technical data and O the User Manual. Restrictions: For the default values of the CANopen objects not listed here, please see the Parameter Description. Baud rate and Node ID are each set to 0xFF, i.e. automatic baud rate recognition and invalid node number. he device MCLM 3006 C is intended for use only in the T industrial sector. If the devices are used in the home, in business or in commerce or in a small business, appropriate measures must be taken to ensure that the emitted interference is below the permitted limits! MCLM 3003/06 C: FAULHABER command one of the connection leads, with the exception of N the power supply, may exceed a length of 3 m. CANopen object Description CONTMOD Normal operation APL1 Position limits activated SOR0 Velocity presetting via CAN MOTTYP0 Motor type LM1247-020-01 ERROUT Fault pin = Error output he power supply and motor supply leads must each T be routed directly on the device (MCLM 3006 S), each with two windings, through a suitable ferrite sleeve (e.g. Würth Elektronik No.: 742 700 90 or FAULHABER, Item No.: 6501.00068). HP7 All inputs react to rising edge HB0, HD0 No Hard Blocking limit switch defined HOSP20 Homing Speed = 20 mm/s he signal leads of the MCLM 3006 S must be routed T directly on the device with two windings through an interference-suppression ring (e.g. Würth Elektronik No.: 742 715 3, FAULHABER, Item No.: 6501.00069). SHA0, SHL0, SHN0 No FAULHABER homing sequence defined ADR Analog direction right LPC1440 Peak current limitation = 1440 mA LCC480 Continuous current limitation = 480 mA he connection leads between Motion Controller and T motor must be shielded as of a length of 30 cm on MCLM. Installation instructions: here is a risk that damage may occur as the result T of electrostatic discharges at the connection contacts (e.g. D-SUB connector and terminal strip). In order to avoid such discharges, these connectors should be covered by suitable protective caps. AC30000 0x6083 Acceleration = 30000 mm/s² DEC4000 0x6084 Deceleration ramp = 4000 mm/s² I10 0x60F9 I-term of velocity controller POR20 0x60F9 P-term of velocity controller PP80 0x60FB P-term of position controller PD10 0x60FB D-term of position controller SR1 Information on scope and frequency of maintenance: See Chapter 2.1.4 Maintenance Sampling rate = 100 µs CI40 I-term of current controller SP500 0x607F Limitation of maximum velocity to 500 mm/s LL1666 0x607D Upper positioning range limit LL-1666 0x607D Lower positioning range limit LPN16 Numeric value for pulse output STW1 Step width for special operation STN1000 Step number for special operation ENCRES2048 Resolution of external encoder DEV30000 Do not monitor deviation error DCE200 CORRIDOR20 Error delay 2 sec. 0x6067 SIN1 Do not permit block commutation SETPLC OPMOD1 66 Target corridor for positionings Digital inputs PLC-compatible 0x6060 Operating mode: “Profile Position Mode” DI Power stage deactivated LR0, M Nominal position displacement = 0 The FAULHABER Group Dr. Fritz Faulhaber GmbH & Co. KG Daimlerstraße 23/25 71101 Schönaich · Germany Tel.:+49(0)70 31/638-0 Fax:+49(0)70 31/638-100 Email: [email protected] www.faulhaber-group.com MINIMOTOR SA 6980 Croglio · Switzerland Tel.:+41(0)916113100 Fax:+41(0)916113110 Email: [email protected] www.minimotor.ch MicroMo Electronics, Inc. 14881 Evergreen Avenue Clearwater FL 33762-3008 · USA Phone: +1(727) 572-0131 Fax: +1(727) 573-5918 Toll-Free: (800) 807-9166 Email: [email protected] www.micromo.com More information? Go online! Feel free to browse through the latest product highlights, inspirational application reports, interesting press information and order our catalogues and documentations easily and conveniently at the click of a mouse button. ©FAULHABER Group MA_MCLM_3003/06_C_EN, 2. Edition, 1.10.2008 www.faulhaber-group.com