1
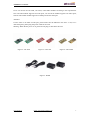
AXE800PN User Manual
ATCOM® GSM Card AXE800PN
User Manual
Version: 2.0
2013-12-31
AXE800PN User Manual
Release note
Version
Changed note
Editor
1.0
First Release
Robert
2.0
Release the User manual
Deniel
www.atcom.cn
Email: [email protected]
Date
2013-12-31
AXE800PN User Manual
Content
Chapter 1 the Introduction of AXE800PN..........................................................................................1
Chapter 2 Hardware Introduction........................................................................................................2
Chapter 3 Test Environment................................................................................................................4
Chapter 4 Software Installation...........................................................................................................5
Chapter 5 Software Configuration...................................................................................................... 6
Chapter 6 Reference............................................................................................................................ 9
www.atcom.cn
Email: [email protected]
AXE800PN User Manual
Contact ATCOM
The Introduction of ATCOM
ATCOM is the leading VoIP hardware manufacturer in global market. We have been keeping
innovating with customer’s needs oriented , working with partners to establish a total solution for
SMB VoIP with IP phone , IP PBX and Asterisk cards.
With over 10 years’ experience of R&D, manufacturing and service in network and VoIP filed;
mission of creating the biggest value for IP terminals, we commit ourselves in supplying the
competitive IP phone and other terminals for IP PBX, softswitch, IMS, NGN providers and
carriers; supplying the competitive total VoIP solution for SMB market. We keep improving the
customer’s experience and creating the bigger value with our reliable products. Until now , our
VoIP products has been sold to over 60 countries and used by millions of end users.
Contact sales:
Address
District C, east of 2nd floor, #3, Crown industry buildings, Chegongmiao
Industry area, Futian district, Shenzhen, China
Tel
+(86)755-23487618
Fax
+(86)755-23485319
E-mail
[email protected]
Contact Technical Support:
Tel
+(86)755-23481119
E-mail
[email protected]
Website address:
http://www.atcom.cn/
Download Center: http://www.atcom.cn/download.html
www.atcom.cn
Email: [email protected]
AXE800PN User Manual
Chapter 1 the Introduction of AXE800PN
Overview of the AXE800PN
AXE800PN Asterisk card is an analog card, which support 8 FXO/FXS ports. Using AXE800PN,
open source Asterisk PBX and stand alone PC, users can create their SOHO telephony solution
which includes all the sophisticated features of traditional PBX, and extended features in IP PBX,
such as voicemail, call transfer, call park, call pick up, call forward, bulk SMS sending, SMS
receiving and so on.
Features
Analog card for Asterisk PBX
Support Asterisk PBX, zaptel and dahdi driver
Support up to 8 FXO/FXS analog port
Suitable for SOHO PBX / VoiceMail / IVR.
Caller ID and Call waiting Caller ID
Conference
Support Elastix 2.4.0, Trixbox 2.8.0.4
Applications
IP PBX
IVR system
Traditional Calls/VoIP Calls Conference
Hardware Requirement
500-Mhz Pentium III
64MB RAM
3.3V or 5V PCI 2.2 slot
www.atcom.cn
Email: [email protected]
1
AXE800PN User Manual
Chapter 2 Hardware Introduction
Motherboard: AXE800PN
Dual ports FXS module: AX-210S
Dual ports FXO module: AX-210X
One FXS port and one FXO port module: AX-210XS
Splitter: SP400
Figure 1: AXE800P
AX210S: FXS module, it supports two FXS ports.
AX210X: FXO module, it supports two FXO ports.
CON1: 4 pin power connector.
SW100: the switch set in the “1-off, 2-on” state. It should plug the power supply extra.
RJ45-1: Used for connecting a splitter to the card, the splitter supports four RJ11 ports and one
RJ45 port. It’s used for module 1 and module 2.
RJ45-2: Used for connecting a splitter to the card, the splitter supports four RJ11 ports and one
RJ45 port. It’s used for module 3 and module 4.
LED: Used for checking if the FXS/FXO module is detected or not. When the FXS/FXO ports are
detected correctly, the LED will be on.
www.atcom.cn
Email: [email protected]
2
AXE800PN User Manual
Users can choose the AX-210S, AX-210X, AX-210XS modules according to the requirements.
One AX-210S module supports two FXS ports, one AX-210X module supports two FXO ports,
and one AX-210XS module supports one FXS port and one FXO port.
Attention:
If users want to use FXS or FXO port, please make sure the SW100 in the state: “1-off, 2-on”.
After doing that, please plug the power cable for the card.
Warning: When the PC power is on, please do not plug or take down the card.
Figure 2: AX-210S
Figure 3: AX-210X
Figure 4: AX-210XS
Figure 5: SP400
www.atcom.cn
Email: [email protected]
3
AXE800PN User Manual
Chapter 3 Test Environment
Test Environment:
dahdi-linux-complete-2.6.2+2.6.2
asterisk-1.8.7.0
Centos6.0
AXE800PN + 2*AX210S + 2*AX210X
www.atcom.cn
(download from ATCOM website)
(kernel version: 2.6.18-348.3.1.el5)
Email: [email protected]
4
AXE800PN User Manual
Chapter 4 Software Installation
After inserting the card into the PCI-E slot and boot the server, please run the “lspci” command to
check the PCI-E bus compatibility. From the correct output, users can get the following line:
---------------------------------------------------------------------------------------------------------------------02:00.0 Communication controller: Digium, Inc. Device b200 (rev 02)
---------------------------------------------------------------------------------------------------------------------If users can not get the above message, please power-off the server and try to another PCI-E slot.
If it does not help still, please try to contact with [email protected].
1.
To install asterisk and dahdi, we have to use “yum” command to install the following
prerequisite packages:
yum install -y bison bison-devel zlib zlib-devel openssl openssl-devel gnutls-devel gcc
gcc-c++ libxml2 libxml2-devel ncurses ncurses-devel
If users install the asterisk-11 or over versions, please check the following packages.
yum install -y update
yum install -y bison openssl gcc libxml2 libxml2-dev ncurses-dev gawk
yum install -y sqlite3 libsqlite3-dev
2.
Download the dahdi package from the link: http://www.atcom.cn/dl_ax4g.html
Attention: users need download dahdi package for AXE800PN card from ATCOM website
only.
3.
Install dahdi-linux-complete package
1) [root@localhost src]# tar -xvzf dahdi-linux-complete-2.6.2+2.6.2.tar.gz
2) [root@localhost dahdi-linux-complete-2.6.2+2.6.2]# make
3) [root@localhost dahdi-linux-complete-2.6.2+2.6.2]# make install
4) [root@localhost dahdi-linux-complete-2.6.2+2.6.2]# make config
4.
Install asterisk
1) [root@localhost src]# tar -xvzf asterisk-1.8.7.0.tar.gz
2) [root@localhost asterisk-11.2.0]# ./configure
3) [root@localhost asterisk-11.2.0]# make
4) [root@localhost asterisk-11.2.0]# make install
5) [root@localhost asterisk-11.2.0]# make samples
www.atcom.cn
Email: [email protected]
5
AXE800PN User Manual
Chapter 5 Software Configuration
1. Please check if the AXE800PN driver has been loaded successfully, try to run the command:
“cat /proc/interrupts”. And users should get one line with “axe4gn”:
16:
42079
467412 IO-APIC-fasteoi
axe4gn
If users can not get the “axe4gn”, please try to power-off the server and re-plug the card into
another PCI-E slot.
2. Please run the “dahdi_genconf” command to configure the “/etc/dahdi/system.conf” file and
generate “/etc/asterisk/dahdi-channels.conf” file.
[root@localhost ~]# dahdi_genconf
It will not show anything if the command runs successfully. After doing that, the
“/etc/dahdi/system.conf” file will be created as the following configuration.
# Autogenerated by /usr/sbin/dahdi_genconf on Thu Jul 1 11:33:13 2010
# If you edit this file and execute /usr/sbin/dahdi_genconf again,
# your manual changes will be LOST.
# Dahdi Configuration File
# This file is parsed by the Dahdi Configurator, dahdi_cfg
# Span 1: AXFXSO/0/1 "ATCOM GSM/WCDMA 0"
fxsks=1
echocanceller=mg2,1
fxsks=2
echocanceller=mg2,2
... ...
... ...
fxoks=7
echocanceller=mg2,7
fxoks=8
echocanceller=mg2,8
# Global data
loadzone
defaultzone
www.atcom.cn
= us
= us
Email: [email protected]
6
AXE800PN User Manual
After running dahdi_genconf successfully, the “dahdi-channels.conf” file will get the
following configuration:
; Span 1: AXFXSO/0/1 "ATCOM GSM/WCDMA 0"
;;; line="1 AXGCOM/0/1/1 FXSKS (EC: MG2 - INACTIVE)"
signalling=fxs_ks
callerid=asreceived
group=0
context=from-pstn
channel => 7
callerid=
group=
context=default
;;; line="2 AXGCOM/0/1/2 FXSKS (EC: MG2 - INACTIVE)"
signalling=fxs_ks
callerid=asreceived
group=0
context=from-pstn
channel => 8
callerid=
group=
context=default
... ...
... ...
;;; line="7 AXGCOM/0/1/7 FXOKS (EC: MG2 - INACTIVE)"
signalling=fxo_ks
callerid="Channel 7" <4007>
mailbox=4007
group=7
context=from-internal
channel => 7
callerid=
mailbox=
group=
context=default
;;; line="8 AXGCOM/0/1/8 FXOKS
signalling=fxo_ks
callerid="Channel 8" <4008>
mailbox=4008
group=5
context=from-internal
channel => 8
callerid=
www.atcom.cn
(EC: MG2 - INACTIVE)"
Email: [email protected]
7
AXE800PN User Manual
mailbox=
group=
context=default
3. Please run dahdi_cfg –vv command.
[root@localhost asterisk]# dahdi_cfg -vv
DAHDI Tools Version - 2.6.2
DAHDI Version: 2.6.2
Echo Canceller(s): HWEC, MG2
Configuration
======================
8 channels to configure.
Setting echocan for channel 1 to mg2
Setting echocan for channel 2 to none
... ...
... ...
Setting echocan for channel 7 to mg2
Setting echocan for channel 8 to mg2
4. Please check if the “#include dahdi-channels.conf” command line is at the bottom of the
“/etc/asterisk/chan_dahdi.conf” file. If not, users can run the following command to add it.
[root@localhost ~]# echo #include dahdi-channels.conf >>/etc/asterisk/chan_dahdi.conf
5. If users want to load the asterisk, users can run the following command:
[root@localhost ~]# asterisk –vvgc
6. Please run dahdi show channels command
You should see 4 channels as the following:
centos6*CLI> dahdi show channels
Chan Extension Context
Language MOH Interpret Blocked State
pseudo
default
default
In Service
centos6*CLI> dahdi show channels
Chan Extension Context
Language MOH Interpret Blocked State
pseudo
default
default
In Service
1
from-pstn
default
In Service
2
from-pstn
default
In Service
... ...
... ...
7
from-internal
default
In Service
8
from-internal
default
In Service
www.atcom.cn
Email: [email protected]
8
Chapter 6 Reference
http://www.asteriskguru.com/
http://www.asterisk.org/downloads
http://www.openippbx.org/index.php?title=Main_Page
http://www.atcom.cn/
www.atcom.cn
Email: [email protected]