1
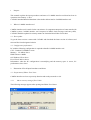
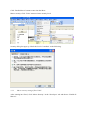
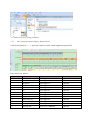
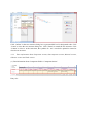
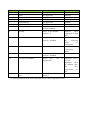
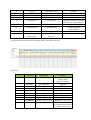
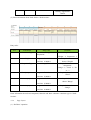
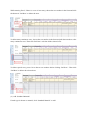
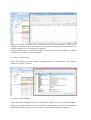
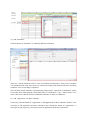
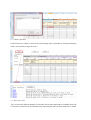
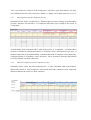
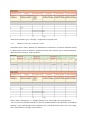
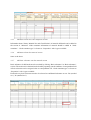
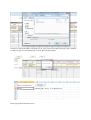
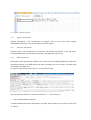
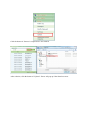
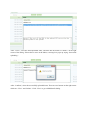
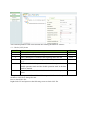
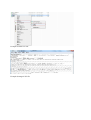
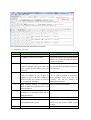
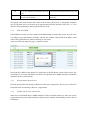
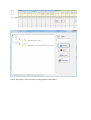
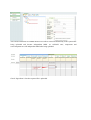
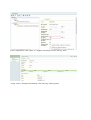
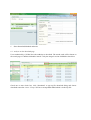
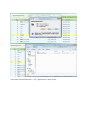
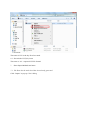
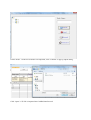
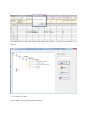
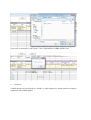
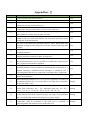
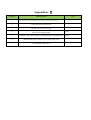
【All rights reserved】
CAMDS Auxiliary Input Tool (CIE)
User’s Manual
Version 2.3
China Automotive Material Data System
Management Center
S/N
Version
Revised Date
1
V1.0
2011/01/01
Established
2
V1.1
2011/05/01
Modify
3
V2.0
2011/11/04
Version upgrade (Add
functions such as batch
computing; Revise some
pictures in the manual
and so on.)
Modify
4
V2.3
2014/06/25
Version upgrade
(Maintenance about
measured recyclability
rate and measured
recoverability rate and
basic data update and so
on)
Modify
5
6
7
8
9
10
11
12
13
14
15
16
17
18
19
20
Note: this version releases the altered content.
Major Revised Content
Remarks
1
Purpose
This manual explains the input procedures and notes of CAMDS interface tool that has been in
operation since January 1, 2011.
CATARC Standard Material Datasheet is hereinafter abbreviated as CAMDS interface tool.
2
What is CAMDS interface tool
CAMDS interface tool is made for the convenience of component enterprises to better match with
CAMDS system. CAMDS interface tool Composed of MDS, check messages and entry skills,
CATARC should be updated in a timely manner to obtain the latest Editor Excel sheet.
2.1 Sheet update
To get the latest version: contact with CATARC and download the latest version of software and
relevant files from designated website.
2.2 Configuration performance
PC with the following configuration is required to handle CAMDS interface tool
CPU:Pentium II 350MHz or more
Memory:512 MB or above
HDD Volume: 100MB
OS: Windows XP or above
Excel: Excel 2003 or above
Information: when the PC configuration is unsatisfying and the memory space is scarce, PC
performance slows down.
3
Illustration of Excel Input Procedures and Notes
3.1 Preparation of Editor Excel sheet
CAMDS interface tool sets up security function and needs password to visit.
3.1.1
Macro security setting of Excel 2003
The following message appears after opening into Editor Excel sheet.
Click “Enable Macro” button to enter into the Sheet.
Macro security: Click “Tools” menu to choose security level.
Security dialog box pops up. Check the level of “medium” as the following:
3.1.2
Macro security setting of Excel 2007
After entering into Excel, click “Macro Security” in the “Developer” tab and choose “Enable all
Marcos”.
3.2 Editor Excel sheet entring procedures
3.2.1
Enter information about Supplier Recipient field.
Click the first button of “+、-” in the left column to extend or hide Supplier/Recipient field:
Entry rules are as follows:
S/N
Name of Field
1
Enterprise Name
2
Enterprise ID
3
DUNS No.
4
Address
5
MDS Creator
6
Tel.
7
Fax
8
Email
9
Supplier Code
10
MDS code (No.)
11
Name
12
Drawing No.
13
Drawing date
Entry rules
Text, digits: 50
Text, digits: 30
Text, digits: 11
Text, digits:100
Text, digits:60
Text, digits:40
Text, digits:40
Text, digits:80
Text, digits:20
Text, digits:20
Text, digits:100
Text, digits:20
Time,YYYY-MM-DD
Remarks
Optional
Optional
Optional
Optional
Optional
Optional
Optional
Optional
Optional
Optional
Optional
Optional
Optional
14
15
16
Drawing Change level
Report No.
Report date
17
18
19
20
21
Purchase order No
Bill of delivery No
Reason for detail
Forwarding is allowed
Remark
3.2.2
hh.mm.ss
Text, digits:20
Text, digits:20
Time,YYYY-MM-DD
hh.mm.ss
Text, digits:30
Text, digits:30
Text, digits:200
Choose “Yes” or “No”
Text, digits:100
Optional
Optional
Optional
Optional
Optional
Optional
Yes:1;No:0
Optional
Enter MDS types and level
Choose “Type” cell first to identify node as “Component” (Marked as 1), “Semi-Component”
(Marked as 2), “Material” (Marked as 3) or “Substance” (Marked as 4). Then, click the button of
“Build Tree” to create “Level”. MDS hierarchy is shown in tree structure: Root node is 1, and its
Child node is 1.1, 1.2. Following the same rule, the level number of all child nodes is generated by
parent node plus “.1”.
Click “Confirm” in the tree structure dialog box to generate MDS level in designated node. Click
“Cancel” to close the tree structure dialog box. Click “Extend” to extend the tree structure. Click
“Contract” to close it. At the same time, the symbols of“+ and -” can also be optional to extend or
close the tree structure.
3.2.3
Enter information about Component section, Semi-component section, Material section,
Substance section and Node section
(1) Enter information about Component field in “Component Section”
Entry rules:
S/N
1
2
3
4
5
6
7
Field Name
ID
Name
FR Name
Supplier
Component No.
Remark
Measured Mass per Item
Entry rules
Text, digits: 30
Text, digits:100
Text, digits:100
Text, digits:100
Text, digits:100
Text, digits:100
Range:0<X<1000000.
Precision:0.000001
Range:0<X<1000000
Precision:0
8
Quantity
9
Calculated Mass per Item
Range:0<X<1000000
Precision:0.000001
10
Deviation
Precision:0.000001
11
Tolerance
12
Polymeric part marked
Range:0≦X<100
Precision:0.000001
Choose “Yes”, “No”
“Inapplicable”
Remarks
Optional
Required
Optional
Optional
Optional
Optional
Required
Required
when
Component is child
node
Obtain by clicking
the
following
button
of
“Calculation”
Obtain by clicking
“Calculation”
button
Required
or Required: 1, Yes; 2,
No;3,Not
Applicable when
the material types
and
mass
requirements
are
met.
Optional
Creation 、 Check and Release Time,YYYY-MM-DD
date
hh.mm.ss
(2) Enter information about Semi-component field in “Semi-Component Section”
13
Entry rules
S/N
1
2
3
4
5
6
8
Field Name
ID
Name
FR Name
Supplier
Semi-component No.
Remark
Creation、Check and
Release date
Entry rules
Text, digits: 30
Text, digits:100
Text, digits: 100
Text, digits: 100
Text, digits: 100
Text, digits: 200
Time, YYYY-MM-DD
hh.mm.ss
Remarks
Optional
Required
Optional
Optional
Optional
Optional
Optional
(3) Enter information about Material field in “Material section”
Entry rules
S/N
1
2
3
Field Name
ID
Name
FR Name
Entry rules
Text, digits: 30
Text, digits:120
Text, digits:120
Remarks
Optional
Required
Optional
4
5
6
7
8
Supplier
Material No.
Remark
Trade Name
Classification
Text, digits:100
Text, digits:100
Text, digits:500
Text, digits:120
Text, digits:30
9
10
Material Code/Symbol
Norm/Standard
Text, digits:600
Text, digits:600
11
12
Test Report No.
Creation, Check and
Release date
Text, digits: 50
Time, YYYY-MM-DD
hh.mm.ss
Optional
Optional
Optional
Optional
Required. Choose by clicking
the button of “Classification”
Optional
Click the button of
“Norm/Standard”
Optional
Optional
(4) Enter information about Basic Substance field in “Substance Section”
Entry rules:
S/N
1
Field Name
ID
Entry rules
Text, digits:30
2
3
4
5
6
7
8
9
10
EN Name
CN Name
CAS No.
GADSL
EU Index
EC Index.
Synonym
Confidential
Application
Text, digits:480
Text, digits200
Text, digits 20
Enter D/P、D or P
Text, digits 30
Text, digits 20
Text, digits 300
Choose “Yes” or “No”
Text, digits 2
Remarks
Required and obtained by
clicking “Basic
substance” button.
Optional
Optional
Optional
Optional
Optional
Optional
Optional
Required: 1, Yes. 0: No
Required when Root node
is component and needs to
be added. Obtained by
clicking “Application”
button.
(5) Enter information about Node field in “Node Section”
Entry rules:
S/N
1
Field Name
Constitute Type
Entry rules
Choose
“Weight”
“Proportion”
or
2
Weight
3
Proportion Type
Range:0<X<1000000
Precision:0.000001
Choose Range, Fixed or Rest”
4
Fixed proportion
Range:0<X≦100
5
6
Minimum proportion
Precision:0.000001
Range:0≦X≦100
Maximum proportion
Precision:0.000001
Range:0<X≦100
Remarks
Required.
Weight:2;Proportion:3
Required when
choose“ Weight”
Required when choose
“Proportion”.
Range:1;Fixed:2;Re
st:3
Required when choose
“Fixed”
Required when
choose ”Range”
Required when choose
“Range”
Precision:0.000001
Enter information about Semi-component, Material and Basic substance constitute type in “Node
Section”
3.2.4
Page Layout
(1) “Del Row” operation
While entering Excel, if there is a row of error entry, choose the row number in the front and click
the button of “Del Row” to delete the error.
To delete many continuous rows, choose the row number in the front and pull downwards to select
many continuous rows. Then click "Del Row" to delete all the selected rows.
To delete spaced rows, press Ctrl to choose row numbers before clicking “Del Row”. Then click
"Del Row" to delete the selected rows.
(2) Add “Standard Material”
If node type is chosen as material, click “Standard Material” to add.
There are 6 search conditions such as “Material ID, Classification, ENName”. Entry of any
condition will find the desired result. The results are searched according to the intersection of the
searching condition. Fuzzy researching is supported.
Note: the Material field of “Standard material” is assigned value to correspondent cell. Manual
revision of some contents is not recommended.
(3) Choose “Classification”
Choose the material types to be added by clicking the button of “Classification”. Those include
“unselected” can not be chosen.
(4) Choose “Norm/Standard”
Choose the quoted standards and code of materials by clicking the button of “Norm/Standard”.
Multi-choice is supported. When choose many items of “Norm/Standard”, all the material standards
and numbers will be assigned value to the cell of “Norm/Standard” with the separation of “;”.
(5) Add “Substance”
Click the button of “Substance” to manually add basic substances.
There are 7 search conditions such as “CAS No, ENName and Synonym”. Entry of any condition
will find the desired result. The results are searched according to the intersection of the searching
condition. Fuzzy researching is supported.
Note: the field of basic substance is automatically assigned value. Apart from “Confidential”, please
do not alter other fields manually. The default field of “Confidential” is “No”. Please choose “Yes”
in the combo box under the field of confidential substance to make it confidential.
(6) Add “Application” for Basic substance
If necessary, click the button of “Application” to add application for Basic substance. When it is not
necessary to add application for Basic substance, after clicking the button of “Application”, a
message box pops up saying “No need to select an application for the basic substance”.
(7) “Check” operation
Click the button of “Check” to show errors and warnings of the current Sheet. Click the positioning
of lines and columns to target the errors:
3.3 Sheet entry rules
“ID” cell can not be filled in manually. To introduce the existing components in CAMDS, sheet with
CSV format is needed to be downloaded before importing the node positions needed to be added.
“ID” is not needed to be filled in if the component is self-built. (Apart from Material, for many
self-established materials of the same type, CAMDS + a number can be filled in ID cell, see 5.3.3).
3.3.1
Add component into the component section
Information about “Name, Component No., Measured Mass per Item, Quantity, Calculated Mass
per Item, Deviation and Tolerance” of component child node can be added in the section of
“Component ”.
All information about component node is filled in the section of “Component”. “Calculated Mass
per Item” is obtained by clicking the button of “Calculation” below. “Measured mass per Item” of
the node component can be added manually. Calculation deviation of component can be obtained by
clicking the button of “Calculation” under “Deviation”. Fill in “Tolerance” manually which should
not be less than the calculated “Deviation”.
3.3.2
Add semi-component into the component section
Information about “Name and Semi-component No.” of semi-component child node should be
added in the section of “Semi-component”. Information about node constitute of semi-component
should be added to the section of “Node constitute”.
When node constitute type is “Weight”, weight field is assigned value.
3.3.3
Add material into the component section
Information about “Name, Material No. and Material Classification” of material child node should
be added in the section of “Material”. Information about node constitute type of material should be
added under the section of “Node constitute”.
When “Node constitute type” is “Weight” (Marked as 2), and weight cell is assigned value.
“ID” cell can not be filled in manually. To introduce standard material, click the button of “Standard
material” to get result through search conditions. If it is self-built material, then “ID” cell is empty
and material names and types can be filled in.
When directly or indirectly adding material of 5.1.x, 5.4.x or 5.5.1 type that is over 100 g or adding
materials of 5.2 or 5.3 type that is over 200g into component section, polymeric part should be
marked as “Yes”.
3.3.4
Add semi-component into the semi-component section
Add “Name, Semi-component No.” of semi componet child node in the section of
“Semi-component”. And choose “Proportion” (marked as 3) in “Node constitute type”.
There are 3 types of proportions: “Range” (marked as 1), “Fixed” (marked as 2) and “Rest” (marked
as 3). When “Range” is chosen, the cells of max and min values should be assigned value. When
“Fixed” is chosen, fixed value cell should be assigned value. No value assigned when “Rest” is
chosen.
3.3.5
Add material into the semi-component section
Information about “Name, Material No. and Classification” of material child node can be added in
the section of “Material”. Node constitute information of material should be added in “Node
constitute”. “Node constitute type” is chosen as “Proportion” with 3 types available.
3.3.6
Add material into the material section
Same as the above
3.3.7
Add basic substance into the material section
Basic substance of child node must be searched by clicking “Basic substance” in “Basic substance”
section. The result can be obtained and selected by inputting search conditions. Correspondent field
of basic substance can be assigned value to correspondent cell. “Node constitute type” is chosen as
“Proportion” with 3 types available.
Each and every basic substance needs to be selected as confidential substance or not: Yes (marked
as 1), No (marked as 0).
3.3.8
Information about Suppliers
It is optional and based on the enterprises that own the login ID after being uploaded.
3.3.9
Information about Recipients
Recipients’ information will be shown in “Enterprise information” after being uploaded. It can be
seen after introducing recipients’ information. Note: only the first recipient’s information record can
be uploaded.
There are two pieces of recipient’s information records. After clicking “Add recipients” after
uploading, assign value to the column of “Enterprise information”.
Two options for “Forwarding is allowed”. Yes (marked as 1) and No (marked as 0).
Note: all the cells should be filled in with half-width English character.
4
Sheet Export Methods and Notes
4.1 Sheet export rules
Click the button of “Export” ,it will popups “It may take a long time to check this MDS. Do you
want to check it?” If you select yes,then it will check this MDS,if you select no,it will not check.
If you choose to check the MDS and the CSV meet the conditions of seven(see Appendix Ⅱ),then
the MDS export success.If you do not check the MDS, a file browsing dialog will pop up. Choose
save route, fill in CSV file name, click “Save” to export CSV file to selected route.
If choose to check the MDS, a message box of “CSV export succeeded” pops up. Click “Confirm”
to shift to a page of “Check Message” to show the warning contents.
Errors pop up if the sheet has errors.
4.2 Export CSV File Format
4.2.1
Supplier Information
Supplier Information is the identification of suppliers. One or more lines below supplier
identification shall be the relevant information about the supplier.
4.2.2
Recipient Information
Recipient Data is the identification of recipients. The detailed information of the line below
recipient identification and the fields correspond to the MDS data respectively.
4.2.3
MDS Information
Ingredients are the identification of MDS. One or more lines below MDS identification shall be the
detailed information of the MDS data put in order according to the level of nodes. The fields shall
correspond to the MDS data.
For specific information, please refer to 2.2.3 Excel File Format
Note: the file name should not contain the character of “.” in browsing box.
5
Sheet Upload Methods and Notes
CATARC authorized users have the authority to upload. There has the item of “Upload” in the menu
of “Others”.
Click the button of “Browse” to upload CSV files needed.
After selection, click the button of “Upload”. Errors will pop up if the Sheet has errors.
After “Close”, select the failed uploaded items, and there has the button of “Delete” on the right
corner of the dialog. If there has no error in the Sheet, a message box pops up saying “Successful
uploading.”
After “Confirm”, select the successfully uploaded items. There are two buttons on the right corner
which are “View” and “Delete”. Click “View” to go to MDS details dialog.
The selected uploaded record can be deleted after clicking the button of “Delete”.
5.1 Check of CSV format
Serial No
1
2
3
4
Checking rules
Type
One record takes up one line.
Error
Each field must be separated with[,]
Error
The [ ] blank space is omitted in the beginning and in the end.
Error
The embedded comma must be put in a double quotation mark like
Error
[","].
5
The embedded double quotation mark must be separated with a
Error
double quotation mark and the double quotation mark in the data
shall be doubled.
6
The embedded line feed field shall be included in a double quotation
Error
mark.
Note: please do not open CSV file with Excel. Please open CSV file with Wordpad to check whether
the data in CSV file is damaged or not.
How to check CSV file:
Right-click CSV and operate as the following screen to check CSV file:
Example: normal CSV file
Example: damaged CSV file.
Note: please do not alter the information in CSV file.
5.2 Uploading rule check
S/No
1
2
3
4
5
6
7
8
9
Rules
All the online system rules need to be met.
No filling in or error of CSV field
Content
See Appendix Ⅰ
Error in the check of the field data format
(Please do not alter the field information
of the CSV directly)
Unified error reporting of rules in Error in the upload information (Please
CAMDS interface tool (apart from the do not alter the field information of the
errors caused by the online rules and CSV directly)
characters)
Errors occur when the basic substance The basic substance which are defined as
which are defined as "D, P, D/P" in “D、P、D/P” in GADSL as well as the
GADSL as well as the basic substances basic substance whose CAS No. are
whose CAS No. are "System" are selected “system” can not be selected as
as “Confidential substance”.
confidential substance
MDS contains deleted or non-existed Error in the referenced MDS
MDS or MDS ID of uploaded CSV is not
in the enterprises.
CSV has no content, no Supplier Error in the format of CSV file.
Information, no Recipient Data and no
MDS information
If CSV has no MDS information
No MDS information in the upload CSV
The root of MDS in the upload CSV is the The root of the MDS in the upload CSV
existing MDS in the system
can not be the existing MDS in the
system.
ID of the basic substance does not exist
The basic substance does not exist
10
11
ID of the material classification does not The material classification does not exist
exist
The Norms/Standards of the material do Error in the Norms/Standards of the
not exist in the system
material
The upload check rules include: check rules of the on-line system (S/No 1), designated validation
rule of CIEsystem (No 4), errors that can be captured and caused by altering of CSV (No 2, 3, 5-10)
and rules about uploading in the Design Document of CIE.
5.2.1
Node ID of MDS
If ID of MDS is existed, it will be regarded as the MDS already existed in the system., the only work
is to judge its type and whether it matches with ID. If it matches, information about MDS’s child
node will be quoted directly without checking its correctness.
After successful uploading, the page is showed as below:
Root node ID of MDS in the upload CSV should not be the ID already existed in the system. The
download CSV can not be regarded as root node to be imported into CAMDS interface tool and then
uploaded into the system directly.
5.2.2
ID information about the user
ID of the upload CSV must belong to MDS list of the user's organization., that is to say, node ID of
the upload CSV must belong to the user’s organization.
5.2.3
Upload with the same material ID
When user's self-defined data (CAMDS+number) of ID of self-built material are same, the system
regards them as the same material and only checks the first material while building one-time system
information.
Check “Ingredients” after successful exporting uploaded information.
The self-built materials in CAMDS interface tool will be released automatically in the system after
being uploaded and become independent MDS. As self-build ones, component and
semi-component are still independent MDS after being uploaded.
Check “Ingredients” after the exported file is uploaded.
Fill in “Organization” and “Name” in “Supplier information” before clicking “Next”.
Assign value to “Enterprise information” after choosing “Add recipients”.
6
Sheet Download Methods and notes
6.1 Analysis on the download page
Users authorized by CATARC have the authority to download. The search result will be shown on
the search page of “MDSs & Modules Search”. Only the integral version of MDS has check box.
Check one or more check box, click “Download” to pop up file download dialog and choose
download route after “Save”. Every CSV has a correspondent MDS which is in the Zip file.
The format of downloaded file is “.Zip”. Right click to unzip the file.
The name of CSV is the key ID of root node.
6.2 Downloaded CSV file format
The same as “4.2 - exported CSV file format”
7
Sheet Import Methods and notes
7.1 The Sheet has the node which has been already generated
Click “Import” to pop up “Tree” dialog.
Choose node 1.1 in the tree structure to be imported; click “Confirm” to pop up import dialog.
Click “Open”. CSV file is imported into CAMDS interface tool.
The imported CSV root node becomes the child node of node 1.1, and the tree structure is as
follows:
7.2 No data in the sheet
Click “Import” to pop up browsing box directly.
Select CSV to be imported, click “Open”. CSV is imported into CAMDS interface tool.
8
Conclusion
CAMDS interface tool developed by CATARC, it will be updated in a timely manner according to
regulations and CAMDS updates.
Appendixes Ⅰ
Serial No
1
2
3
4
5
6
7
8
9
10
11
12
13
14
15
16
Checking Rules
All the required items must be filled in
The node checking rules shall be met
All the numeric fields shall be number and meet the corresponding
requirement of range and Precision level
The nodes on the same level in a MDS tree shall be of the same type.
Components and semi-components can not be at the same level
It is not allowed to introduce MDSs (component, semi-component, material,
basic substance) with the same ID under one node
The sum of the content of confidential substance and wildcard substance
cannot exceed 10% of the total material. The sum of the maximum cannot
exceed10% of the total material.
The sum of the child node proportion shall be 100%. When child node
proportion is filled in with a range, the sum of the average of the range shall
be 100%.
The deviation between the measured value and the calculated value cannot
exceed the tolerance.
In a MDS tree, on the same level, Only one semi-component, one material or
one basic substance could fill in “Rest" in proportion
When introducing material of 5.1.x, 5.4.x or 5.5.1 type that is over 100 g or
introducing materials of 5.2 or 5.3 type that is over 200g into a component, no
entry of polymer mark for the component.
An application must be selected for the material When: (1) a material
containing Nullable/restricted substance is introduced into a component; (2) a
material containing Nullable/restricted substance is introduced into a
semi-component, then the semi-component is introduced into a component.
Non-basic substance must be further decomposed. The lowest level of a MDS
must be basic substance.
When introducing material of 5.1.x, 5.4.x or 5.5.1 type that is over 100 g or
introducing materials of 5.2 or 5.3 type that is over 200g into a component,
the polymer mark is “No”.
The content of basic substance in a self-built material by a user exceeds the
control limit. Proportion: X% ~ Y% Maximum Value: M= Y%-X% ;
0<=X<=7.5 M<=3 ;7.5<X<=20 M<=5; 20<X<=100 M<=10
When introducing a material into a semi-component, the range of proportion
for the material exceeds the permissible range. (the range of the maximum
share of material shall meet the following rule 0≤X≤100, M≤20)
The nodes on the same level in a MDS tree shall be of the same type.
Components could be positioned as the same level as materials or
semi-components and materials can be at the same level
Type
Error
Error
Error
Error
Error
Error
Error
Error
Error
Error
Error
Error
Warning
Warning
Warning
Warning
Appendixes Ⅱ
Serial No
1
Checking Rules
The node of the same level has already existed
Type
Error
Error
2
The parent node doesn’t exist
3
The entry of "Level" is wrong
4
The level exceeds the limit
5
The node of the selected type is not allowed to be the parent node
Error
6
Nodes on the same level have to be of the same type
Error
7
No selection of the "type"
Error
Error
Error