1
VP-880 VOICE DEVELOPMENT SYSTEM
USER'S MANUAL
TABLE OF CONTENT
CHAPTER 1: INTRODUCTION.................................................... 3
CHAPTER 2: PACKING LIST........................................................ 7
CHAPTER 3: INSTALLATION AND TESTING............................ 9
CHAPTER 4: RUNNING THE SYSTEM PROGRAM.................. 13
CHAPTER 5: PROBLEMS & SOLUTIONS................................ 25
APPENDIX A: HARDWARE SPECIFICATIONS......................... 31
1
2
Chapter 1
INTRODUCTIONS
The VP-880 Voice development System is an IBM PC based voice
digitization system used to record and organize voice files for EPROMbased QuikVoice modules and ICs. Messages can be either directly
recorded from a microphone or downloaded from a cassette/tape
player. Here "messages" can be any sounds, including human voice,
animal sounds, special sound effects or even music. Messages are
actually digitized, not synthesized, so they sound as natural as the
original. Once recorded, these messages become "voice files" and are
usually stored on a hard disk in the host computer. These voice files can
then be downloaded into a standard EPROM programmer and used to
program EPROMs.
The VP-880 comes in a "kit" form consisting of a voice digitization board,
a speaker, a microphone and a system program. The voice digitization
board is an 8-bit add-on card to be installed into any available slot in the
host computer. Under proper software control, it basically turns the host
computer into a digital recorder. The recording procedure is very similar
to the way you use a tape recorder, except that the messages are stored
on a hard disk instead of a tape. There are two input jacks on the
digitization board: one for the supplied microphone and the other for a
line level output device such as a tape player. The supplied speaker
connects to the board's output jack for message reviewing purpose.
The system program, with menu-driven user interface, is very easy to use.
It provides the following functions:
3
n
n
n
n
n
Record and play messages
Test and display current sampling rate
On-screen message length counter (like a tape counter)
Save all or part of a message as a separate message
Combine messages together for multiple-message applications
Voice digitization is a way of turning real-life (analog) signals into
computer (digital) format. The process is very similar to filming a movie:
you take snap shots of a continuous motion at a fast, constant rate. When
the film is played back, the motion is re-constructed and seems to be
continuous again. The rate at which this process is done is called the
sampling rate. Basically, the sound quality gets better with a higher
sampling rate. However, a higher sampling rate generates more data for
storage, translating into higher memory cost. Therefore you should select
a sampling rate carefully in order to obtain the optimum quality/cost
trade-off. The VP-880 allows you to select any sampling rate from 12
Kbps to 64 Kbps by turning a adjustment knob.
There are many different encoding techniques for voice digitization. The
VP-880 uses one called CVSD, or Continuously Variable Slope Delta
modulation. This technique, encodes the direction of the signal waveform, one bit per sample. Since a bit can only have two possible states,
the signal is encoded to be either going up (bit = 1) or down (bit = 0). A
period of silence should, theoretically, be encoded as "01010101...". In
reality, however, it looks more like "00101110...".
There are both a ADC (Analog to Digital Converter) and a DAC (Digital
to Analog Converter) on VP-880. When VP-880 is in the record mode,
both ADC and DAC are put to work at the same time. The ADC converts
sound input into digital data (to be stored on a disk) while the DAC takes
that digital data and converts them back to sound simultaneously.
Therefore, when recording, the sound coming out of VP-880's speaker
has actually gone thru both ADC and DAC. The sound's quality (at a
particular sampling rate) will be very similar to what you will get when
it is played back from the actual playback unit.
4
The VP-880 also incorporates highly sophisticated input and output
filters. The input filter limits the input bandwidth (before signals enter the
ADC) in order to avoid signal aliasing. The output filter smooths out the
rough edges of the the DAC output. There are two sets of filters on VP880 for two different bandwidths. One set is used for the standard
bandwidth (300 to 3.4 KHz) and the other is used for the extended
bandwidth (100 to 5.4 KHz). Selection is made via a DIP switch.
5
6
Chapter 2
PACKING LIST & SYSTEM REQUIREMENTS
The VP-880 Voice development system comes with the following items
(one each):
n
n
n
n
n
n
(IBM AT compatible) voice processing board
system program diskette
microphone
speaker
line input adaptor cord
Users Manual
It requires a host computer (not included) with the following minimum
specifications:
n
n
n
n
n
n
IBM 386 compatible personal computer, 25 MHz or faster
minimum 512K system memory (EMS memory highly recommended)
a 3.5" or 5.25" floppy disk drive
a hard disk is highly recommended but not required
all video display types are supported
PC-DOS or MS-DOS, version 3.0 or higher
7
8
Chapter 3
INSTALLATION AND TESTING
The VP-880 digitization board can be installed into any available slot in
the host computer by following these easy steps:
INSTALLATION STEP 1:
VP-880 can use interrupt IRQ2 (default) 5 or 7, but it always uses I/O
address 238H to 23FH (eight bytes). Check all add-on boards in your
computer and make sure there are no conflicts. Pay special attention to
devices such as bus mouse, network interface card and VGA card, they
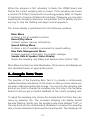
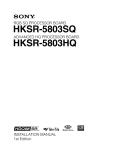
may use IRQ2 (same as IRQ9). If there is an IRQ conflict, change the VP880's IRQ setting by moving the IRQ jumper to another location. Please
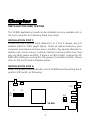
refer to the circuit board diagram below.
INSTALLATION STEP 2:
Select the proper filter bandwidth on the VP-880 board by setting the 6position DIP switch as following:
VOL SENS
ON
OFF
S1
CLK
S6
MIC
IRQ
5
7
9
VP-880
9
TAPE
SPK
DIP Switch Setting
Filter Bandwidth Suitable Sampling Rates
--------------------------------------------------------------------------------------------------------------------------------------S1=S2=ON, others=OFF 300 to 3.4 KHz
12 to 64 Kbps
S1=S2=OFF, others= ON 100 to 5.4 KHz
64 to 128 Kbps
This selection should be made based on your sampling rate and the
nature of your sound. If you select the extended bandwidth (100 to 5.4
KHz), you WILL have more background noise in your message, due to the
wider bandwidth. If you are not sure, you can always change it later.
INSTALLATION STEP 3:
Turn off the host computer. Install VP-880 board into any available slot
firmly but leave the cover open for now. You may need to make some
manual adjustment later.
INSTALLATION STEP 4:
Connect the microphone and the speaker to their respective jacks on the
VP-880 board. Refer to the following diagram for jack locations.
After the board is installed, turn on the host computer and install the
program with these steps:
INSTALLATION STEP 5:
Make a backup copy of the supplied diskette and put it in a safe place.
The diskette is not copy protected. Then use the DOS "COPY" command
to copy all files from the diskette to your hard disk. We recommend that
you create a subdirectory for storing VP-880 files only. For example:
MD VP880
XCOPY A:*.* VP880 /S
(create a subdirectory called VP880)
(copy all files from drive A to VP880)
The installation is now completed. The following steps are used to test
the board to see if the installation is OK.
10
TESTING STEP 1:
From the directory where the program is stored, enter "VP880 /IRQ=?"
where "?" is the IRQ setting (2, 5 or 7). If you followed the example in step
E above, you will have to change directory first:
CD VP880
(change to the VP880 subdirectory)
A menu should come up shortly. Look for a blinking sampling rate display
on the lower left part of the screen. If it shows 0.0 Kbps, then the board
is either defective or not installed properly (possibly IRQ or I/O conflict).
Otherwise, carefully turn the sampling rate knob (VR3) and change the
sampling rate to about 32 Kbps. It may be hard to reach exactly 32.0
Kbps, but anything within the +- 1 Kbps range is acceptable. Human ears
can hardly tell the (pitch) difference due to such a small deviation.
TESTING STEP 2:
Select the "Load" function from the on-screen menu. Follow the instructions and load the demo message file "880DEMO.VOC".
TESTING STEP 3:
Select the "Play" function. Follow the instructions to play the demo
message. If you can't hear the message, try adjusting the speaker volume
by tweaking the volume control knob labeled "VOL". It will also help if you
double-check the speaker cable and make sure it's firmly connected to
the board. If the message sounds OK, proceed to the next step.
TESTING STEP 4:
Select the "Record" function. Turn on the microphone (remember to put
in the battery first) and start speaking. You should hear voice of yourself
coming from the speaker clearly. If not, try adjusting the microphone
sensitivity by turning the sensitivity pot labeled VR1. If you still can't hear
anything, test the microphone elsewhere and make sure it's good. If you
can hear yourself but the sound quality is poor, it may be due to
(1) the microphone sensitivity needs adjustment, or
(2) the microphone needs a new battery, or
(3) the board is defective.
11
You may adjust the sampling rate while you are recording to hear the
sound quality at different sampling rates. If 32 Kbps does not sound good
enough you may increase the sampling rate. Note that the sampling rate
display will not be updated until you do another "Sampling Rate Test".
If the board passed all the tests described above, the system is properly
installed and ready to use.
12
Chapter 4
RUNNING THE SYSTEM PROGRAM
The system program is menu-driven and very user-friendly (ha ha ha). To
start the program, first change to the subdirectory where the program is
stored, then enter "VP880 /IRQ=?" or "880EMS", where "?" is the IRQ
setting. Note that "880EMS" supports IRQ=2 only. These two programs
are basically the same except that "VP880" uses convention DOS memory
while "880EMS" uses EMS memory. If you are going to record messages
longer than 500K bytes (single message length, not combined) you must
have EMS memory in your computer and use "880EMS". Otherwise,
"VP880" is adequate and more efficient than "880EMS". If you need help
on EMS memory, see Appendix A.
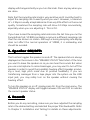
Once the proper program name is entered, the screen displays a menu
similar to the following:
______ Eletech Electronics VP-880 Speech Development Program Version 1.2 ______
+---------------------------+ +----------------------+ +----------------------+
¦
MAIN MENU
¦ ¦
RECORD / PLAY
¦ ¦ ROM DATA MANAGEMENT ¦
¦---------------------------¦ ¦----------------------¦ ¦----------------------¦
¦ [A] Sample rate Test
¦ ¦Memory Used :00000000¦ ¦Segment ( 1) : 0000000¦
¦ [B] Speaker ON/OFF
¦ ¦Current Byte : 0000000¦ ¦Segment ( 2) : 0000000¦
¦ [C] Record
¦ ¦Total Memory :00510352¦ ¦Segment ( 3) : 0000000¦
¦ [D] Play
¦ +----------------------+ ¦Segment ( 4) : 0000000¦
¦ [E] Load
¦ +----------------------+ ¦Segment ( 5) : 0000000¦
¦ [F] Save
¦ ¦
SPEECH EDITING
¦ ¦Segment ( 6) : 0000000¦
¦ [G] Speech Editing
¦ ¦----------------------¦ ¦Segment ( 7) : 0000000¦
¦ [H] ROM Data Management
¦ ¦Start Address: 0000000¦ ¦Segment ( 8) : 0000000¦
¦ [ESC] Quit
¦ ¦Stop Address : 0000000¦ ¦Segment ( 9) : 0000000¦
¦---------------------------¦ ¦Step Size
: 0000512¦ ¦Segment (10) : 0000000¦
¦ (c) Eletech Electronics
¦ ¦Window Size : 0000000¦ ¦Segment (11) : 0000000¦
¦ 1990 All Rights Reserved ¦ ¦----------------------¦ ¦Segment (12) : 0000000¦
+---------------------------+ ¦[ ] Start Address
¦ ¦Segment (13) : 0000000¦
+---------------------------+ ¦[ ] Stop Address
¦ ¦Segment (14) : 0000000¦
¦ SAMPLE RATE : 32.0 Kbit/s¦ ¦[A] Set Start Address ¦ ¦Segment (15) : 0000000¦
¦---------------------------¦ ¦[B] Set Stop Address ¦ ¦Segment (16) : 0000000¦
¦ SPEAKER STATUS : ON
¦ ¦[C] Set Step Size
¦ ¦Total Length : 0000000¦
+---------------------------+ ¦[D] Save Data To Disk ¦ ¦ROM Size
: 0000000¦
+----------------------+ +----------------------+
13
When the program is first activated, it checks the VP880 board and
flashes the current sampling rate on screen. If the sampling rate shows
a constant "0.0 Kbps", the board is not working properly. Refer to Chapter
5: Solutions to Common Problems for solutions. Otherwise, you may start
adjusting the sampling rate (see A. Sample Rate Test for details) or press
any key to stop the flashing and begin normal operation.
The screen display is partitioned into the following windows:
Main Menu
Contains a list of available functions
Record/Play Menu
Contains system memory information
Speech Editing Menu
Contains a list of available commands for speech editing
Rom Data Management Menu
Contains segment information for multiple message
Sample Rate & Speaker Status Display
Shows the sampling rate (Kbps) and speaker status (ON or OFF)
Main Menu functions are described below. Other menus and displays are
also described below at appropriate points.
A. Sample Rate Test:
The purpose of the Sampling Rate Test is to provide a continuously
updated sampling rate display on the screen so that you know where you
are when making sampling rate change. You may turn the sampling rate
knob at any time to change the sampling rate, but only in the Sampling
Rate Test will you get an instant feedback of the current sampling rate.
To adjust the sampling rate, choose the Sample Rate Test from the main
menu by pressing <A>. The on-screen sampling rate display should
become flashing. Gently turn the sampling rate knob (labeled "CLK", or
the only knob on the metal bracket) clockwise to increase the sampling
rate, counter-clockwise to decrease the sampling rate. The sampling rate
14
display will change instantly as you turn the knob. Press any key when you
are done.
Note that the sampling rate knob is very sensitive and it could be hard to
adjust the sampling rate to exactly what you want. However, a tolerance
of +- 2 Kbps is usually acceptable since it has very little effect on the sound
quality. Sometimes the sampling rate will show 0.0 Kbps momentarily,
especially when you are adjusting it. This is OK.
If you have turned the sampling rate knob since the last time you ran the
Sample Rate Test, VP-880 is probably running at a different sampling rate
than the one shown on screen. Although a wrong sampling rate display
does not affect the normal operation of VP880, it is misleading and
should be avoided.
B. Speaker ON/OFF:
This function toggles the speaker on and off. The speaker status is always
displayed on the screen in the "SPEAKER STATUS" field. Most of the time
you want to leave the speaker on so you can hear the sounds. But when
you use a microphone to record messages, you may want to turn off the
speaker in order to avoid the (possible) hawling effect (speaker producing a loud, high pitch noise due to positive feedback). If you are
transferring messages from a tape player into the system via the LINE
input jack, you may safely turn on the speaker without causing the
hawling effect.
To turn the speaker on or off, simply press <B> from the main menu. The
"SPEAKER STATUS" display will toggle between ON and OFF to indicate
the current speaker status.
C. Record:
Before you do any recording, make sure you have adjusted the sampling
rate to the desired setting and selected the proper filter bandwidth. Refer
to Chapter 3: Installation and Testing for details on these adjustments.
15
Press <C> from the main menu to choose this function. The system will
enter the record-standby mode. In the record-standby mode, the sound
source (microphone or tape) is looped back to the speaker in real time
without doing any actual recording. If the speaker is on, you can hear the
sound source which has actually gone through the entire digitization
process (encoding and decoding). Therefore the sound quality will be
very similar to what you will get in the actual application.
Once in the record-standby mode, the following options are available:
<Esc> Key
Quit this function
<A> Key
Append to a previous recording
<Any Other Key> Start a new recording and overwrite system memory
When recording, the message will be digitized and stored temporarily in
the system memory. Thus the available system memory amount limits the
maximum length of a single message. If you have EMS memory and run
"880EMS.EXE", the entire EMS memory can be used to store the recorded
data. This usually means that you can record 2 or 3M bytes of data as a
single message. If you don't have EMS memory, you will have to run
"VP880.EXE" and be limited to about 500K bytes maximum length for any
single message.
In the Record/Play Menu, the Current Byte field counts up as recording
goes on, showing you how many bytes have be recorded. If you start a
new recording, it counts up from zero. If you append to a previous
recording, it counts up from the end of the previous recording. The
Memory Used field shows the amount of memory used so far. The Total
Memory field shows how much memory (in number of bytes) is available.
To stop recording, press any key. You will be returned to the Main Menu.
You may then:
- Play the message to see if it's OK (use the "Play" function), or
- Save the message to your hard disk (use the "Save" function), or
- Edit the message (use the "Speech Editing" function), or
16
- Append to the recording (use the "Record" function), or
- Disgard the recording and start a new one (use the "Record" function)
If you want to append to a message file already stored on your hard disk,
you may do so by first loading it into the memory (use the "Load" function)
and then append to it (use the "Record" function).
To obtain the best sound quality for a certain sampling rate, first have the
message recorded by a voice talent in a recording studio with professional equipment onto a cassette tape. Then download the message into
the system via the TAPE input jack. No recording level (sensitivity)
adjustment is necessary in this case.
If you are recording directly from a microphone, you will definitely get
more background noise. You should adjust the microphone sensitivity
pot on the VP-880 board to reach a proper recording level in order to
avoid clipping distortion. There is no VU meter available for this purpose,
so you have to do some "try and error" experiment until you get it right.
The rule of thumb is that your recording should sound about as loud as
our demo message ("880DEMO.VOC").
If you want to record several messages in one shot, you may do so as long
as you have enough memory to buffer them. For example, if you have five
separate messages in a roll on a cassette, you may record them as a single
message and then separate them by using the "Speech Editing" function.
Once separated, you may save them to the hard disk as separate files.
The "Speech Editing" function also allows you to trim off the dead space
in the recording (undesired silence before and/or after the actual
message). See its description in this chapter for details.
Finally, always remember to save the recording after you have done the
necessary editing and/or separation. If you don't save it, it will not be
stored on the hard disk for later use.
17
D. Play
This function is used to play the message stored in the system memory.
If you want to play a file stored on your hard or floppy disk, you must load
the file into the system memory first by using the "Load" function. If you
have just made a new recording, it is already in the system memory and
you can play it without doing any loading.
Press <D> and follow the instructions on screen to play. As the playback
goes on, the "Current Byte" field in the Record/Play Menu will count up,
showing you the number of bytes currently being played. If you don't stop
the playback with any key press, it will play the full length specified in the
"Memory Used" field and stop by itself.
E. Load
Press <E> to load a sound file from a hard or floppy disk into the system
memory, for playback or editing purpose. You may specify a full path
name such as "A:TEST.VOC" or "\VOICE\TEST.VOC". Note that once the
file is loaded into the system memory, previous memory contents are
totally lost. So remember to save your recordings with the "Save" function
before loading a new file.
After the file is successfully loaded, the "Memory Used" field in the
Record/Play Menu will show the file length in number of bytes.
F. Save
Press <F> from the main menu to save your recordings to disk. The
amount of memory saved is always the amount shown in the "Memory
Used" field in the Record/Play Menu. The file format is "Binary", which
basically means that the file contains only data bytes with neither header
information nor checksum bytes. You must use this function to save your
recordings or they will be lost when you exit the program. However, this
function is not the only function that saves files. There is also a "save"
18
command in the "Speech Editing" function, which allows you to save a
specific portion of the memory.
If you don't want to save the file in the current directory, you may specify
a full path name such as "A:\BACKUP\VOICE\TEST.VOC" or
"FILES\TEST.VOC". You may save files to a hard disk or a floppy disk. If the
file already exists, you will be asked to either overwrite it or select another
filename.
After saving, the system memory is not cleared and still contains the same
data as before. The old data will be lost only when you load a new file,
make a new recording, or exit the program.
G. Speech Editing
Pressing the <G> key from the Main Menu puts the system in the Speech
Editing mode. In this mode you can select and save a portion of the
system memory. If you want to edit a message file stored on a hard or
floppy disk, you have to use the "Load" function to load it into the system
memory first.
In the Speech Editing mode, the following commands are available:
<Up Arrow>, <Down Arrow> Moves the Start Address by a Step Size
<Left Arrow>, <Right Arrow> Moves the Stop Address by a Step Size
<A> Type in the Start Address directly
<B> Type in the Stop Address directly
<C> Change the Step Size
<D> Save data from Start Address to Stop Address to disk
<Space Bar> Play data from Start Address to Stop Address
Using the above commands you will be able to "cut" a section of the
recording and save it as a separate file. If you want to "paste" sections
of a message together, you may use the DOS "COPY" command as
following:
19
COPY /B file1+file2+... file_all
This command copies file1, file2... together into one file "file_all".
However, this operation is not the same as the file assembling operation
provided in the ROM Data Management function. The DOS "COPY"
command simply copy all files together. It does not check for and
eliminate EOM flags and it does not patch up the destination file with
"silence" to match the EPROM size neither. Therefore you should use the
"COPY" command to combines sections together into a single message,
but not to combine messages together for multi-message applications.
The Speech Editing function makes it possible for you to record a number
of messages at once and separate them later. For example, if you record
three messages sequentially into the system memory, you may separate
them by taking the following steps:
a. Select the "Save" function and save the recording as a backup copy.
b. Select this function and play the recording. Watch the message
counter counts up while the recording is being played. Write down the
counter value when the first message starts to play, and also when it
finishes. This is the start and stop address of the first message. Set the
start and stop address of the buffer window accordingly and save it.
c. Repeat step B for the other two messages.
If these three messages are to be used for a multiple-message voice
module or IC, you have to use the "ROM Data Management" function to
combine them after they are separated into individual message files.
If these messages are to be used for single-message voice modules, then
no other operation is required. Just download the message as a binary
file to an EPROM programmer and program EPROMs.
20
H. ROM Data Management
This function is used to combine several message files into a multiplemessage format. It adds the necessary "End Of Message" (EOM) code
between messages so that multiple-message voice processors (VP1410
and VP1610) knows how to locate the target message.
Press <H> to enter the ROM Data Management Menu. The operation is
pretty straight forward. First you tell the system what size of EPROM you
are using. Available selections are 256K, 512K, 1M, 2M, 4M and 8M.
Then, when the Filename Menu opens in the center of the screen, you
enter the filenames of the messages to be combined, in the order you
want them to appear in the EPROM. Length of each file (in bytes), along
with the combined length and number of EPROM needed, is displayed
for your reference.
You may enter filenames with search path. If you enter a filename which
can not be found, the computer will beep and refuse to go on. You have
to enter a correct filename to continue or press <Esc> to quit.
The following commands are available to help you enter the correct
filenames:
<Up Arrow>, <Down Arrow> Moves the cursor up and down.
<F1> Search and select files.
The command allows you to view the contents of a directory (similar to
a DOS "DIR" command) and select files without typing in filenames. After
you press the <F1> key, a small window opens up on the left side of the
screen, which will be used to display directory contents, and the "File
Name" window in the center is the one that you use to enter filenames.
On the bottom of screen it says:
Please Input Pathname : *.*
21
At this point you have to either press the <Enter> key to accept the default
path (*.* = all files in the current directory) or enter a path name such as
"C:\VOICE\*.VOC". The "File Name" window on the left will then be filled
with filenames found in the path. You have the following options:
<Up Arrow>, <Down Arrow> Move the cursor up and down.
<Ins> Mark the file.
<Del> Un-mark the file.
<Space Bar> Play the file without marking it.
<Enter> Quit and select all marked files. This command brings all
marked filenames into the "File Name" window.
<Esc> Quit without selecting any files.
<F2> Assemble files.
After entering all necessary filenames, you are ready to press <F2> to
assemble them together. The assembling process does the following
operations:
1. Scan through every source file and eliminate all occurrence of the
EOM flag within each file. The EOM flag consists of six consecutive bytes
of AA ("10101010") and could appear occasionally in an un-assembled
file. When an undesired EOM flag is found in the middle of a file, one of
the bits will be changed so that it's no longer a EOM flag.
2. Add a EOM flag to the end of every source file and combine them
together into a single, temporary file. The EOM flag is used by multimessage voice processors such as VP1410, VP1606 and VP1608 to locate
the proper message in an EPROM.
At this point you will be prompted (at the bottom of screen) to either play
the temporary file (press <1>) or "Page & Save" it (press <2>). The "Page
& Save" command breaks the single, temporary file into several smaller,
target-EPROM sized files. If the temporary file is smaller than the target
EPROM in the first place, it is simply patched with enough dead space to
increase its size to match the target EPROM's.
22
Before storing assembled files to disk, VP-880 asks you to enter a
filename with a search path (if any) but no extension. It automatically
adds a number as the filename extension to the files. For example, if three
files are created as a result of assembling eight individual message files,
they will be named "FILENAME.1", "FILENAME.2", "FILENAME.3". These
binary-format files are of the same size as the target EPROM and can be
downloaded to a standard EPROM programmer to program EPROM
chips. Remember to the the "Binary" format when downloading the files
to the EPROM programmer. Refer to your EPROM programmer's manual
for downloading procedures.
23
24
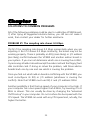
Chapter 5
SOLUTIONS TO COMMON PROBLEMS
All of the following problems could be due to a defective VP-880 board.
If, after trying all suggested solutions below, you still can not make it
work, then contact your dealer for further assistance.
PROBLEM #1: The sampling rate shows 0.0 Kbps.
It's OK if the sampling rate shows 0.0 Kbps momentarily when you are
adjusting it. But if it shows 0.0 Kbps constantly, the board may not be
working properly. There is probably an IRQ (more likely) or I/O address
(less likely) conflict between the VP-880 and another add-on board in
your system. If you can not determine which one is causing the conflict,
try removing all add-on boards except the video card and the floppy/hard
disk controller card. If doing so solves the problem, add those add-on
boards back one by one and see which is causing the problem.
Once you find out which add-on board is conflicting with the VP-880, you
must re-configure its IRQ or I/O address (whichever is causing the
conflict). Note that VP-880 must use IRQ 2 and I/O address 238H.
Another possibility is that the bus speed of your computer is too high. If
your computer has a bus speed higher than 8 MHz, try lowering it to 8
MHz or slower. This can usually be done by changing the "advanced
CMOS setup" in your computer. Do not confuse the bus speed with the
CPU speed. The VP-880 can work with any CPU speed and, actually, the
higher the better.
25
If the VP-880 still shows 0.0 Kbps sampling rate, the board may be
defective. Contact your dealer for repair or replacement.
PROBLEM #2: Nothing comes out of the speaker.
1. If the sampling rate reads 0.0 Kbps, see PROBLEM #1 for solutions.
2. Check the speaker connection. Note that there are three identical jacks
on the VP-880 board, and the speaker jack is the bottom one.
3. Make sure the speaker is turned ON in the VP-880 program.
4. Adjust the speaker volume. The volume knob is mounted on the VP880 board and not accessible from outside the computer, you have to
open the computer to make the adjustment. See the "VP-880 Board
Diagram" in Chapter 3 for the location of the volume knob. Turning the
knob clockwise increases the volume, counter-clockwise decreases it.
5. If you are using a microphone, make sure it's switched on. Check the
battery inside the microphone if there is one. Test the microphone
elsewhere and make sure it's good.
6. Test the speaker elsewhere and make sure it's good.
PROBLEM #3: How do I install EMS memory in my computer?
First, be aware that you don't need any EMS memory if you are not going
to run "880EMS.EXE" of which the only benefit is allowing you to record
a message longer than "VP880.EXE" can handle (usually larger than 4M
bits).
Second, having EMS memory in your system will add additional burden
to your computer. This means that if your computer is not that powerful
in the first place, EMS memory will make it worse.
If you have a 8088- or 80286-based PC, you should replace it with a 80386
or better computer. Equip the computer with at least 4MB of memory.
26
Upgrade the DOS to version 5.0 or higher (if applicable). Add the
following two lines to your CONFIG.SYS file (if they are there already,
then you already have EMS memory):
DEVICE=C:\DOS\HIMEM.SYS
DEVICE=C:\DOS\EMM386.EXE ????
Here "????" specifies how much memory (in kilo-bytes) should be turned
into EMS memory. If you have 4MB of memory and no other driver is
using it, you may try "2800". If everything goes well you should see a
message on the screen (when the computer is booting up) telling you
how much EMS memory has been installed. Otherwise an error message
will be displayed. If you encounter any difficulties when installing the
EMS memory, refer to your DOS manual or consult with a computer
expert.
PROBLEM #4: All my recordings are silent or very weak, but the
demo message played fine.
If you use a microphone to record messages:
1. Make sure the microphone is switched on and the battery inside (if
any) is good.
2. Adjust the microphone sensitivity pot and try again.
3. Check the cable connection. The microphone jack is the top one.
If you use a tape player to transfer messages:
1. Check the cable connection. The tape jack is the middle one.
PROBLEM #5: Sound quality is bad.
It is hard to define "bad" quality. A little bit of background noise is normal
with digitized voice. If there is excessive background noise then (1) the
recording level may be too low, (2) the host computer has a noisy power
supply, or (3) the board might be defective. If there is a popping noise
from time to time, especially when the disk is being accessed, it's most
likely due to the disk drive being too slow.
27
If the sound pitch is apparently lower than normal, the host computer is
probably too slow. If the sound is distorted, then the recording input level
may be too high (signal waveform is clipped on the top). One last
question, is the original sound source clear in the first place?
PROBLEM 6: How can I improve the sound quality in my actual
playback device?
Besides increasing the sampling rate, try the following:
1. Use a graphical equalizer to pre-condition your source sound. For
example, if you need more bass, simply boost the low frequencies with
the equalizer. This method proves to be very effective.
2. Select the proper filter bandwidth on the VP-880 board by setting the
6-position DIP switch as following:
DIP Switch Setting
Filter Bandwidth Suitable Sampling Rates
--------------------------------------------------------------------------------------------------------------------------------------S1=S2=ON, others=OFF 300 to 3.4 KHz
12 to 64 Kbps
S1=S2=OFF, others= ON 100 to 5.4 KHz
64 to 128 Kbps
This selection should be made based on your sampling rate and the
nature of your sound. If you select the extended bandwidth (100 to 5.4
KHz), you WILL have more background noise in your message, due to the
wider bandwidth. If you are not sure, digitize your message with both
bandwidths and see (or hear) which one you like better.
3. Use a proper speaker in your application. A good speaker will certainly
make a lot of difference in the sound quality. Also, a speaker in an
enclosure will usually sound better than a speaker without an enclosure.
If you don't get enough volume output from your speaker, try using one
with a bigger physical size. Sometimes sound quality is degraded when
an under-powered speaker is used.
28
PROBLEM 7: Message files are not assembled correctly.
Your hard disk or floppy disk is probably almost full. In order to assemble
message files, VP-880 needs a working disk space of roughly the same
size as the files combined. If there is not enough available disk space, VP880 will produce files of erroneous size (without a warning!)
29
30
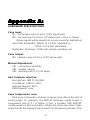
Appendix A:
HARDWARE SPECIFICATIONS
Voice Input:
JR1 - microphone input (3.5mm (1/8") phone jack)
JR2 - line level input (3.5mm (1/8") phone jack, mono or stereo)
(Stereo signals will be mixed into a mono sound for digitization)
Input Filter Bandwidth: 300 Hz to 3.4 KHz (standard) or
100 Hz to 5.4 KHz (extended)
Digitization Technique: CVSD with variable sampling rate
Voice Output:
JR3 - speaker output (3.5mm (1/8") phone jack)
Manual Adjustments:
VR1 - microphone sensitivity
VR2 - speaker volume
VR3 - sampling rate (12 to 64 Kbps)
Host Computer Interface:
Bus Interface: IBM PC ISA 8-bit
I/O Address: 238H to 23FH
Interrupt Request: IRQ 2
DMA Request: none
Voice Compression: none
Most voice compression schemes compress voice data at the cost of
sound quality. For example, the ADPCM technique usually boasts a
compression ratio of 2:1 or higher. In fact, a so-called "4-bit ADPCM"
usually samples in 8-bit (resolution = 8 bits), but stores only 4 bits of data
which encode the change of signal value from the previous sample. If the
31
change is bigger than 4 bits can encode, distortion occurs. The CVSD
technique that we use is sort of a "1-bit ADPCM". Each sample value
change is encoded in just one bit.
In order to compensate for the smaller number of encoding bits,
CVSD is usually sampling, in terms of KHz, at a much higher rate than an
ADPCM. This means that CVSD can usually achieve the same compression result as the so called voice compression techniques by just reducing
its sampling rate. Because both ways you get less amount of data with
a lower sound quality. We dare to compare the sound quality of our
modules and ICs with any other brands at the same data rate, compressed or not.
32