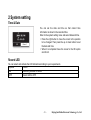
1
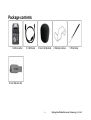
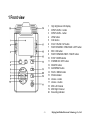
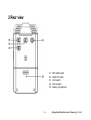
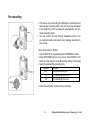
Lotoo L300 USER MANUAL -1- Beijing InfoMedia Electronic Technology Co., Ltd Contents Package contents .................................................................................................................... - 6 IMPORTANT ............................................................................................................................. - 7 Understanding the Lotoo L300 ..................................................................................................- 8 1 Front view ...........................................................................................................................................- 9 2 Rear view ..........................................................................................................................................- 10 3 Left and right side views .................................................................................................................... - 11 - Getting Started..........................................................................................................................- 12 1 Connecting the power supply ............................................................................................................- 13 Installing batteries ................................................................................................................................................................. - 13 Battery capacity indicator..................................................................................................................................................... - 14 External power supply .......................................................................................................................................................... - 14 - 2 SD Memory Card ..............................................................................................................................- 15 3 Turning power on/off .........................................................................................................................- 16 4 Function of control buttons ................................................................................................................- 17 - Recording .................................................................................................................................- 19 1 Recording Displays ...........................................................................................................................- 20 Display conversion................................................................................................................................................................ - 20 Information shown in the display ........................................................................................................................................ - 21 - 2 Recording..........................................................................................................................................- 22 -2- Beijing InfoMedia Electronic Technology Co., Ltd Basic recording operations .................................................................................................................................................. - 22 Adding Mark Point ................................................................................................................................................................ - 24 MONO/STEREO..................................................................................................................................................................... - 25 - 3 Setting Recording Parameters ..........................................................................................................- 26 Setting the gain for microphone(MIC GAIN) ..................................................................................................................... - 27 Auto Gain Control (AGC) ..................................................................................................................................................... - 29 Recording Template (QUALITY) ......................................................................................................................................... - 30 Matrix ...................................................................................................................................................................................... - 33 Pre-recording ......................................................................................................................................................................... - 34 Voice-Operated Recording (VOR)...................................................................................................................................... - 36 Power supply for external microphone (MIC power) ....................................................................................................... - 38 Filter ........................................................................................................................................................................................ - 39 Prefix name ............................................................................................................................................................................ - 40 - Playing Back ............................................................................................................................- 41 1 Playback interface .............................................................................................................................- 42 2 Operation for playing .........................................................................................................................- 44 Basic playback operation ..................................................................................................................................................... - 44 The previous file / the next file ............................................................................................................................................ - 45 Fast forward/Rewind ............................................................................................................................................................ - 46 The MARK points in the selected file ................................................................................................................................. - 47 Repeated playback of a selected section A-B .................................................................................................................. - 48 Smart audio level control......................................................................................................................................................... - 49 - Files management.....................................................................................................................- 50 View the file information ....................................................................................................................................................... - 52 - 1 Working directory ..............................................................................................................................- 53 -3- Beijing InfoMedia Electronic Technology Co., Ltd 2 Playback file ......................................................................................................................................- 54 3 Delete file ..........................................................................................................................................- 55 - Menu function setting ..............................................................................................................- 56 Operating method ................................................................................................................................................................. - 57 - 1 Menu items list ..................................................................................................................................- 58 2 System setting ..................................................................................................................................- 59 Time & Date ........................................................................................................................................................................... - 59 Record LED ........................................................................................................................................................................... - 59 Beep setting ........................................................................................................................................................................... - 60 Speaker setting ..................................................................................................................................................................... - 60 Auto skip................................................................................................................................................................................. - 61 Display extinction .................................................................................................................................................................. - 61 Auto Power off ....................................................................................................................................................................... - 61 Battery type ............................................................................................................................................................................ - 62 USB write protection............................................................................................................................................................. - 62 Language setting .................................................................................................................................................................. - 63 SD information....................................................................................................................................................................... - 63 SD speed test ........................................................................................................................................................................ - 63 SD format ............................................................................................................................................................................... - 65 Version.................................................................................................................................................................................... - 65 System reset .......................................................................................................................................................................... - 66 System update ...................................................................................................................................................................... - 66 Export / Import the configuration ........................................................................................................................................ - 66 - Troubleshooting .......................................................................................................................- 67 1 System prompt ..................................................................................................................................- 68 -4- Beijing InfoMedia Electronic Technology Co., Ltd 2 FAQ ...................................................................................................................................................- 72 - Additional information .............................................................................................................- 74 Specifications .......................................................................................................................................- 75 General ................................................................................................................................................................................... - 75 Physical ................................................................................................................................................................................... - 75 Input/Output ............................................................................................................................................................................ - 76 Power supply ........................................................................................................................................................................... - 76 - -5- Beijing InfoMedia Electronic Technology Co., Ltd Package contents 1 L300 recorder 2 USB Cable 3 Foam Windshield 4 Tabletop bracket 5 Wrist strap 6 User Manual disk -6- Beijing InfoMedia Electronic Technology Co., Ltd IMPORTANT Disclaimer All rights reserved. Without the written approval in advance, this manual and machine software whether in whole, or in part, cannot be copied, translated, nor compressed into computer-readable data. InfoMedia Electronic Technology Co., Ltd is not responsible for incidents, consequences or losses due to the violation of the IP rights. Beijing InfoMedia Electronic Technology Co., Ltd reserves the right to modify this manual and all the included information at any time without prior notification. Trademarks Notices Lotoo is the registered trademark of InfoMedia. IBM and PC/AT are registered trademarks of the international business recorder company. Microsoft and Windows are Microsoft Corporation’s registered trademarks in America and other countries. Apple and Macintosh are Apple Computer Inc.’s registered trademarks in America and other countries. Pentium is Intel Corporation’s registered trademark. Other trademarks and registered trademarks are owned by their respective companies. -7- Beijing InfoMedia Electronic Technology Co., Ltd Understanding the Lotoo L300 This section covers every part and the basic functions of the Lotoo L300’s buttons. Front view Rear view Side views -8- Beijing InfoMedia Electronic Technology Co., Ltd 1 Front view 1 2 3 4 5 6 7 8 9 10 11 12 13 14 15 16 17 18 19 20 -9- High brightness LCD display INPUT LEVEL + button INPUT LEVEL - button VIEW button CUE button PLAY / PAUSE / UP button FAST REVERSE / PREVIOUS / LEFT button REC / OK button FAST FORWARD /NEXT / RIGHT button STOP / DOWN button POWER ON / OFF button DELETE button AB REPEAT button FILES / MENU button PEAK indicator Volume - button Volume + button MIC Left Channel MIC Right Channel Recording Indicator Beijing InfoMedia Electronic Technology Co., Ltd 2 Rear view 21 22 23 24 25 - 10 - MIC GAIN switch QUALITY switch AGC switch HOLD switch Battery compartment Beijing InfoMedia Electronic Technology Co., Ltd 3 Left and right side views 26 27 28 29 30 31 - 11 - MIC Input jack LINE IN jack USB terminal HEADPHONE jack SD Memory card slot Attachement for wrist strap Beijing InfoMedia Electronic Technology Co., Ltd Getting Started This chapter introduces the preparation before recording with Lotoo L300, installation of batteries and SD memory card and some basic operations such as turning on and off of the recorder. Connect the power supply SD memory card Turning power On / Off Functions of control buttons - 12 - Beijing InfoMedia Electronic Technology Co., Ltd 1 Connecting the power supply Installing batteries The L300 can be powered with regular “AA” batteries, or via the USB cable connected to a PC or power adapter. When using batteries, you need two size-AA dry batteries or rechargeable batteries. Please select the correct battery type in the System Setting menu in order to display the correct remaining battery life. 1 As shown in illustration, lightly press down on the arrow and slide the battery cover open. 2 Insert two size-AA batteries observing the correct polarity. 3 Close the battery cover completely. Note: Do not mix different types of batteries, or an old battery with a new one. Make sure you get the correct polarity when installing batteries. There is no internal charger circuit. If rechargeable batteries are installed they must be charged externally. - 13 - Beijing InfoMedia Electronic Technology Co., Ltd Battery capacity indicator Level 1 2 3 4 Symbol Dry cells or rechargeable batteries. Batteries are full Remaining battery power is about 30% Remaining battery power is about 15% Remaining battery power is about 5% Note: Please replace the batteries as soon as “Low Power” is displayed so that the Lotoo L300 will continue to function. External power supply You can also supply power to L300 via the USB cable connected to a PC. 1 Insert the USB cable into USB terminal in the L300 2 Insert another end of the USB cable into the PC USB Jack. 3 Choose the [USB Power] when display promps [USB Work Mode]. 4 The L300 is now being supplied by the USB terminal. Note: External power supply will not charge the batteries. If you need to charge rechargeable cells, please use an external charger. - 14 - Beijing InfoMedia Electronic Technology Co., Ltd 2 SD Memory Card The L300 has no internal memory. You must insert the SD memory card to continue with your L300. Since the read-write speed of SD cards can vary, you may be unable to record high bit rate files on some cards. We recommend that you use high speed SD cards. If you don’t know the speed of your SD Card, you can test it with [System Setting> Test SD Speed] menu. There are many different types of SD Card and some have poor compatibility. We recommend using SD Cards produced by known manufacturers and make the speed test before starting. Insert the memory card 1 Lightly press down on the SD cover of the unit to open it. 2 As shown in illustration, carefully insert the memory card, press it all the way in until it is firmly in place. 3 Close the SD cover. Removing the SD Card 1 Lightly press down on the SD Cover and open it. 2 Lightly push the memory card inwards, it will then pop out. 3 Remove the memory card and close the bottom cover. Note: L300 supports hot-swapping. You can change your SD Card without switching Off the recorder. - 15 - Beijing InfoMedia Electronic Technology Co., Ltd 3 Turning power on/off 1 Make sure the HOLD Switch is in the ON position 2 Press and hold down the POWER switch for three seconds to turn on the power. 3 Press and hold down the POWER switch until the machine turns off to power down. Note: If the [HOLD Switch] is in the off position, the display will show “Keypad is locked”, please slide the HOLD switch to ON and try again. Make sure you have inserted SD Card, or the display will indicate “No SD”. You can’t enter Standby Mode until you insert SD Card. The display will displsy “Battery door is open” and turn off automatically when the battery cover is open. Close the cover and turn power on again. - 16 - Beijing InfoMedia Electronic Technology Co., Ltd 4 Function of control buttons Function buttons perform different operations in different modes, detailed description as follows. Button Recording Mode Play Mode FILELIST/SETUP Start recording OK button Press this button once it will start Confirms the Pre-Record and the second selected item press will start the actual recording. Pauses recording Toggles betweem Play / Pause Moves the cursor Recording will restart on secon upwards press Stop recording Stop playback Press this button for 2 seconds to stop recording. The file will be saved automatically. - Moves the cursor downwards In play mode (Long press) Fast reverse / (short press) previous track In Mark mode(short press) Goto previous mark point - 17 - Move to “Parent” Directory Beijing InfoMedia Electronic Technology Co., Ltd - In play mode (long press) Fast forward / (short press) Next track In mark mode (short press) Goto the next mark point - 18 - Move to sub-directory Beijing InfoMedia Electronic Technology Co., Ltd Recording This section introduces Recording with the Lotoo L300 and some related function settings. Recording interface Basic recording operations Set-up recording parameters - 19 - Beijing InfoMedia Electronic Technology Co., Ltd 1 Recording Displays Display conversion The L300 has two display modes, which can be selected as desired. Briefly press the VIEW button to switch between the two displays. The main display information emphasizes the recording time and the other the recording template. The two recording display are as shown: Note: The default (recording time) display will automatically be displayed if the L300 is put into record mode or if the machine is switched Off and On again. - 20 - Beijing InfoMedia Electronic Technology Co., Ltd Information shown in the display This section describes the main icons and infomation shown in the main screen. 1 2 3 4 5 6 7 8 9 10 11 12 13 14 15 16 17 18 - 21 - Status flag Recording level VU meter Current status Input device Input gain VOR Recording indication USB power supply Battery power indication Information of the memory card usage Remaining recording time Name of recording Length of current recording (HH:MM.SS) The total Mark points which have been added Stereo ST/ Mono MO indication Recording template (file format) Current date and time Recommended recording level Level overloaded indication Beijing InfoMedia Electronic Technology Co., Ltd 2 Recording Basic recording operations 1 Turn L300 On and check the memory card capacity and the battery level to ensure the record can be carried out. 2 Select the desired recording settings. The Recording setting includes recording template setup, pre-record setup, VOR setup, input device selection, file prefix,etc. 3 Get into FILE management, select “Working Folder” to save the recordings. 4 Press the recording button to start recording If you turn the pre-record on, the first press will start pre-recording and the second press will start actual recording. If you turn the pre-rec off, the first press will start actual recording immediately. The screen will display Recording Mode and the recording indicator light will remain ON after the actual recording begins. 5 Pressing the Pause button to pause recording, press Record button again to continue recording. 6 When the recording is done, long-press the Stop button to stop recording. New recording will be saved in the Working Folder and the file name will be generated automatically. - 22 - Beijing InfoMedia Electronic Technology Co., Ltd 7 Each time the CUE button is pressed during recording will create a mark point. 8 If the A-B/ SPLIT button is pressed while recording, the file will be split and a new recording started 9 You can turn on VOR (voice-operated recording) according to your needs. It will pause or start recording automatically according to the level of the surrounding noise. Note: The screen backlight will switch off after a period of time to save power depending on the setting. Pressing any key will start the backlight without triggering function operation. Never remove SD Card while recording. If its cover opened, recording will break off and be saved automatically. Never open the battery holder while recording. - 23 - Beijing InfoMedia Electronic Technology Co., Ltd Adding Mark Point CUE CUE (Mark) points can only be added in WAV files. MP3 files do not support this feature. A Cue point is a special marker written to a WAV file. It is an instantaneous record position used to easily locate a specific point. Cue points are recorded in the file headder and won’t affect the recording. 1 Press REC button to start recording 2 Press CUE button to add mark point while recording Every time you add a Cue point, the number of the point in the lower-left corner of screen will increase by one. 3 Long-press the STOP button to stop recording. Note: Each file can have up to 99 Cue points The minimum interval between two points is 1 second. Don’t add Cue points too quickly. MARK number - 24 - Beijing InfoMedia Electronic Technology Co., Ltd MONO/STEREO The L300 has two built-in and high-sensitivity microphones. You can record both binaural stereo and mono files. Stereo recording will record a clear stereo image. Mono recording has more directional characteristics. This function corresponds with [ST Bit Rate] and [MO Bit Rate] which are included in [Recording setting> Template]. 1 Go to the [Recording setting>Recording Template], choose [HIGH] or [LOW]. 2 Get into the chosen template, set the [Coding Template], [Sampling Rate], [ST Bit Rate] or [MO Bit Rate] one by one, then exit the template setup. Note: You can’t set bit rate for WAV format file. The value of the bit rate will change along with the [Coding Template], [Sampling Rate]. The value of the bit rate of [ST Bit Rate] and [MO Bit Rate] can only be set for MP3 format files. - 25 - Beijing InfoMedia Electronic Technology Co., Ltd 3 Setting Recording Parameters The Lotoo L300 has comprehensive manual setting functions. All recording settings can be altered according to your needs so as to obtain the desired effect. Please read this chapter carefully before recording because the record quality may be poor with inappropriate settings. Slide the external switches to set the parameters. The Lotoo L300 has some external commonly used record-setting switches on the rear and level buttons next to the main display. Change detailed setup parameters in setup menu. Long press on FILES/MENU button, to enter the SETUP menu. Choose [Recording setting]. Press Up/Down buttons to move the cursor, and then change the Recording settings options according to your needs. Press OK button to get into options and make selections according to the desired on-screen choices. Pressing Left button continuously to exit setup menu once finished. - 26 - Beijing InfoMedia Electronic Technology Co., Ltd Setting the gain for microphone(MIC GAIN) The L300 has a manual recording gain adjustment function. You can control the gain of the microphones to reach the desired recording level. 1 2 3 4 Sliding AGC switch to [OFF] Select MIC GAIN level according to your needs. MIC GAIN button [LOW]: Low Gain. MIC GAIN button [HIGH]: High Gain. Press REC button to start recording. You can add gain based on the default value by using the LEVEL adjustment buttons. 5 Long-press STOP the button to stop recording. Note: The MIC GAIN feature is only availible when AGC is OFF. - 27 - Beijing InfoMedia Electronic Technology Co., Ltd Input device LINE IN External MIC Internal MIC Adjustment range for MIC GAIN level LOW:0dB~31dB HIGH:0dB~31dB LOW:19dB~50dB HIGH:34dB~65dB LOW:19dB~50dB HIGH:34dB~65dB recommended point High gain ensures higher volume recording, but too much gain will spoil the recording quality. Please try to keep recording VU level meter shown in the screen around the recommended point to get the best recording effect. - 28 - Beijing InfoMedia Electronic Technology Co., Ltd Auto Gain Control (AGC) AGC (Auto Gain Control) adjusts the gain automatically according to the input sound levels. AGC keeps the overall sound level even during recording by increasing levels when input levels are low and attenuating them when input levels are high. 1 Sliding AGC switch ON (on the rear of unit) before starting recording. AGC switch [ON] : Turns AGC on AGC switch [OFF]: Turns AGC off. 2 Press REC button to start recording. The AGC status mark shown in the screen is pre-recording. The AGC status mark shown in the screen is recording. 3 Long-press the STOP button to stop recording. during the during the Note: Set to AGC to record voices of people both near and far at the same volume such as during meetings. When the VOR function is enabled, AGC function is invalid. It is defaulted to off. You can’t use manual gain adjustments while the AGC function is enabled. - 29 - Beijing InfoMedia Electronic Technology Co., Ltd Recording Template (QUALITY) The recording template conception of the renowned PAW V is also used in the L300. It has two built-in recording templates, [LOW] and [HIGH]. You can set the parameters of both templates according to your needs and select high or low template using the external QUALITY switch. 1 Go to [Recording setting>Template] in SETUP Get into SETUP by long-pressing the FILES/MENU button. Press the UP / DOWN buttons to move cursor. Pressing RIGHT or OK button to enter options. Select [HIGH] or [LOW] for the template. Press the OK button. Select codec format, sample rate and bit rate according to your needs. Pressing Left button continuously to exit setup when completed . 2 Selecting is made using the external QUALITY switch QUALITY switch [LOW]: Chooses Low template. QUALITY switch [HIGH]: Chooses High template. Note: Optional parameters of the two templates, low and high, are totally identical. Names are just used to differentiate the two templates, but sound quality is still decided by the parameters of template. - 30 - Beijing InfoMedia Electronic Technology Co., Ltd - 31 - Beijing InfoMedia Electronic Technology Co., Ltd - 32 - Beijing InfoMedia Electronic Technology Co., Ltd Matrix The input matrix allows the user to select where the the analog input signal is sent (to the left and or right recording channels). As an example: After having selected Stereo both from left, making a stereo recording with only one microphone connected to the left input will record the same signal on the left and right channels. Matrix mode Mono from left Mono Mix. Left & Right Stereo standard Stereo both from left Left only Mute Right Stereo mix Record file set Mono Mono Stereo Stereo Stereo Stereo - 33 - Output L Input L Input L & R Input L Input L Input L Input L & R Output R Input L Input L & R Input R Input L No signal Input L & R Beijing InfoMedia Electronic Technology Co., Ltd Pre-recording The feature of pre-recording is bufferring the ncoming sound before actual recording starts, and this sound will be added to the beginning of the recording file automatically once the actual recording starts. You can monitor the input through headphone while in the pre-recording mode and adjust record settings according to your needs. 1 Go to [Prerecord] in SETUP Get into SETUP by long-pressing the FILES/MENU button. Press UP/DOWN button to move cursor. Press RIGHT or OK button to enter options. Go to [Recording setting> Prerecord] Select the desired Pre-recording time Options function OFF Turn pre-recording off 1S Pre-recording time is 1 s 3S Pre-recording time is 3 s Press the Left button continuously to exit setup. - 34 - Beijing InfoMedia Electronic Technology Co., Ltd 2 Go to Pre-recording mode If [Prerecord] is active, you can get into pre-recording state by pressing REC button while the stop mode. The file name is assigned and shown on the screen while in pre-recording mode. The status icon on the screen is a circle, while in the pre-recording mode. You can monitor the recording through headphones and adjust recording settings according to your needs. 3 Start actual recording Press the REC button again to start the actual recording 4 Stop Pre-recording Pressing STOP button to stop recording while Pre-recording, the file will not be saved. Long-press STOP button long time to stop recording. Note No matter how long the Pre-recording mode is used, it only saves the initial seconds of sound prior to the actual recording start. - 35 - Beijing InfoMedia Electronic Technology Co., Ltd Voice-Operated Recording (VOR) VOR can activate the recording mode automatically by monitoring the level of the ambient sound. 1 Go to SETUP and select [VOR] function Get into SETUP by long-pressing the FILES/MENU button. Press UP / DOWN buttons to move cursor. Press RIGHT or OK button to enter options. Go to [Recording setting> VOR] select [VOR] function Options Function VOR OFF Turn VOR off level -10dBFs/-20dBFs/-30dBFs Set the active level of VOR VOR Pause Set the active mode of mode VOR to paus the current reording file Split Set the active mode of VOR to close the current recording file and create a new file VOR 5s/10s/30s/1m/2m/3m Set the active VOR time. time Pressing Left button continuously to exit setup when finished. - 36 - Beijing InfoMedia Electronic Technology Co., Ltd VOR pause 2 Start recording by pressing REC button. The VOR Recording icon will show on the display. 3 Recording will pause if the ambient level falls below the VOR active level setting and its duration is shorter than the VOR active time selection. The VOR Stop icon will be shown on the display. 4 Stop recording Stop recording by long-pressing STOP button. - 37 - Beijing InfoMedia Electronic Technology Co., Ltd Power supply for external microphone (MIC power) Some external microphones need a power supply. The L300 can provide a 3V microphone powering Please turn this switch on when you using plug-in powered electret condenser microphones or there will be no input signals. The voltage of external microphone supply is 3V. 1 Get into SETUP and set [MIC power] function to On Get into SETUP by long-pressing FILES/MENU button. Press the UP/DOWN button to move cursor. Press the RIGHT or OK button to enter options. Go to [Recording setting> MIC power] Select [MIC power] function Options Function ON Turn the external microphone power supply on. OFF Turn the external microphone power supply off. Press the Left button continuously to exit setup once completed. - 38 - Beijing InfoMedia Electronic Technology Co., Ltd Filter Turning the low cut filter on will reduce low frequency sounds. You can use this fuction to decrease the low frequency noise such as the wind noise. 1 Go to SETUP and set [Filter] function Get into SETUP by long-pressing the FILES/MENU button. Press the UP / DOWN buttons to move cursor. Press the RIGHT or OK button to enter options. Get into [Recording setting> Filter] Select [Filter] function Options Function ON Turn the low cut filter on. OFF Turn the low cut filter off. Press the Left button continuously to exit setup once complete. 2 Press REC button to start recording, sounds above 100Hz will be recorded. - 39 - Beijing InfoMedia Electronic Technology Co., Ltd Prefix name This sub-menu allows 4 characters to be entered in the front of the file name. This is very useful for file identification. The file number is stored behind these characters, and is a 4 digit number. Go to thePrefix menu in the settings, and once “USER” is highlighted, use the “UP” and “DOWN” keys to select a character. Press the “RIGHT” key to go to next step etc. Once all characters entered, press “OK”. Example of a file name: USER0001 (this is the default factory setting). - 40 - Beijing InfoMedia Electronic Technology Co., Ltd Playing Back This chapter introduces the playback function of Lotoo L300 and some related operations in detail. Playback interface Basic operation for playback Playback function settings - 41 - Beijing InfoMedia Electronic Technology Co., Ltd 1 Playback interface Press the VIEW button, you can look through the relevant information on the screen. The recording length and information about storage capacity and file format can also be displayed. 1 2 3 4 5 6 7 8 9 10 11 12 13 14 15 16 17 Play / Pause/ Stop / Fast forward / Rewind indication. VU level indication. Current status: Play / Pause / Stop / Fast forward / rewind. Cue (Marker) mode icon. Repeat status: repeat all / repeat one Headphone volume A-B repeat icon USB discharge icon Battery power status Rate of play process Total file length Filename Playback duration Current MARK point / total number of MARK points Stereo / Mono File format Current date and time - 42 - Beijing InfoMedia Electronic Technology Co., Ltd 18 Artist name 19 Track title Note: If the recording file was made without the artist and track title information, the screen will display nothing. Pressing DISP / HELP button can only disply two aformentioned screens. - 43 - Beijing InfoMedia Electronic Technology Co., Ltd 2 Operation for playing Basic playback operation 1 Use the left / right button to select the file to play. 2 Press the play / pause button to start playback. You will see the status of playback, shown on screen with the incrementing time corresponding to the progress bar. 3 Press the play / pause button to pause during playback and press again to contuinue. 4 Press the left / right buttons during playback to fast forward or rewind the file. Once these buttons are released, playback resumes. 5 Press the CUE button to go into MARK mode. Press the right / left buttons to select the previous or next MARK point while in MARK status. 6 Press the stop button to stop playback. 7 Press VOL+ or VOL- to adjust the monitor volume of headphone output during playback. 8 Press the DISP / HELP button to look through the relevant file information. - 44 - Beijing InfoMedia Electronic Technology Co., Ltd The previous file / the next file You can select the previous or next track both in the stop or playback modes. If the playing time from the start of the track is greater than 5s, you can press the left button to back to the beginning of the track. Otherwise, it will jump to the beginning of previous track. Press left button while in stop mode to jump to the beginning of the previous track. Press right button while stop to jump to the beginning of the next track. Note: If you select the previous song or next track while in playback mode, the newly selected track will remain in playback. If you select the previous or next track in pause or stop modes, the new file will remain in the stop position. - 45 - Beijing InfoMedia Electronic Technology Co., Ltd Fast forward/Rewind You can fast forward or rewind the audio file while in playback or pause modes. The track rewinds while the left Button is pressed during playback; The track will fast forward while the right Button is pressed during playback. . Note: Pressing the fast forward or rewind button during playback, it will remain in playback. Pressing the fast forward or rewind button while in pause mode will remain in the pause mode. The fast forward and rewind functions cannot jump across files, and will stop at the end / start of the file. - 46 - Beijing InfoMedia Electronic Technology Co., Ltd The MARK points in the selected file MARK point can immediately help you jump to the position which is marked. 1 Get into CUE (Mark) mode Press CUE button to enter to the MARK mode and showing the icon M on the screen. 2 Choose the Cue / mark point Press left / right button to jump to the previous / next Cue point. 3 Eexit MARK mode Press CUE button again to exit the MARK mode and the icon M will disappear. The previous or next track can now be selected by pressing the left / right buttons. Note: The function to select the previous or next track will be inactive in the Cue (Mark) mode, but the fast forward and rewind modes remain as normal. Selecting the MARK point cannot jump across from one track / file to the next. - 47 - Beijing InfoMedia Electronic Technology Co., Ltd Repeated playback of a selected section A-B Playback a specific section in a file repeatedly. 1 Press the A-B button once during playback or pause. That position becomes the start position (marker A) for the playback loop. 2 Press the A-B button again. That position becomes the end position (marker B) for the playback loop. The section set in steps 1 and 2 (A-B) is played back repeatedly. 3 To cancel repeat playback, press stop button or press the A-B button again. Note: In A-B mode, the functions of Fast forward and rewind are as normal, but MARK mode is inactive. A-B mode cannot jump from one track / file to the next. - 48 - Beijing InfoMedia Electronic Technology Co., Ltd Smart audio level control During playback the L300’s unique smart audio level control function dynamically detects the file’s current level value. When adjusting the output volume, the L300 can increase lower levels while ensuring, at the same time, that higher level signals don’t overload (clip), in order to preserve a perfect sound qualitiy.Using digital dynamic amplifying, the output playback level can be 4 times (+12dB) higher than the original level. 1 Press play / pause button to start playback. 2 Press VOLUME+ or VOLUME- to adjust the output volume during playback. - 49 - Beijing InfoMedia Electronic Technology Co., Ltd Files management This section introduces the FILELIST file management function in the Lotoo L300, It explains how to creat the working directory, and how to play or delete the FILELIST. Set working directory Play the file Delete the file - 50 - Beijing InfoMedia Electronic Technology Co., Ltd 1 Access to the FILELIST file management Press the FILES / MENU button and access the present working directory 2 Close the present directory Move the cursor to the folder icon at the top of the file list and press the OK button. This will close this folder and access to the “parent” folder in the directory. 3 Select another folder Press up / down buttons to select the folder. Press right button and choose [Open] then press the OK button. 4 You can access a folder by pressing the right button or OK button to select (Enter to directory) You can play or delete the files in this folder. 5 Exit the file management Press the FILES / MENU button for a short time again and you will exit the FILELIST management mode. - 51 - Beijing InfoMedia Electronic Technology Co., Ltd View the file information Press the VIEW button to select file. You can view the relevant information as follows: File name File record time File format and file length Channel, sample rate and bit rate. VIEW - 52 - Beijing InfoMedia Electronic Technology Co., Ltd 1 Working directory The working directory is the current folder that new recorded files will be saved in. The default working directory is the RECORD folder in the root directory. You can select any folder on the SD card as the working directory. 1 Press FILES / MENU button and enter to FILELIST. 2 Select the icon, Press OK to exit the current working directory. 3 Press up / down buttons to move the cursor to the selected folder and then press the right button to select the working directory. 4 Click OK to complete setting. The folder icon will change. 5 The new recording file will be saved in the new working directory. Open FOLDER1 W. Folder FOLDER2 Note: When you change the storage card, the system will look for the working directory. If the folder doesn’t exist, the system will create it. LINO can't create a new folder. If you want as work directory, please create it in SD card in advance through PC. - 53 - Beijing InfoMedia Electronic Technology Co., Ltd 2 Playback file The file playback operationi in the FILELIST: Play Delete 1 Enter the FILELIST, select the file using the up / down buttons. 2 Press OK or press the right button to select playback in the display window, then the playing start and you will see the statuse of playback shown on the screen. 3 Resume the stop status automaticlly after finishing the current file playback. Pressing the OK button will stop playback manually. 4 Fuctions such as the file playback, previous / next track, fast forward / rewind are active in the FLIELIST. The actural operations are same as in the standby mode. 5 Press Up / Down buttons to select the previous or next track. Please select mannually as it cannot jump to next track automatically 6 Long-press the Left / Right buttons to fast forward or rewind. - 54 - Beijing InfoMedia Electronic Technology Co., Ltd 3 Delete file Deleting unwanted files. 1 Enter the FILELIST. 2 Move to the desired folder and press the up / down button to select the file you want to delete. 3 Press the right button to open window and select the delete option according to display prompt or press the DELETE button directly. 4 The screen displays that “ Are you sure to delete the file” 5 Move the cursor to the OK option and press the OK button to delete the file. Play Delete Play Delete Warning: Once the file is deleted, it can’t be recovered. Are you sure to Delete the file OK Cancle - 55 - Beijing InfoMedia Electronic Technology Co., Ltd Menu function setting This section explains the setting menu of Lotoo L300 in detai. You can change the recording settings and system settings using the settings menu. Recording settings System settings - 56 - Beijing InfoMedia Electronic Technology Co., Ltd Operating method You can change the record and system settings through SETUP menu 1 Long-press the FILES / MENU button to access the SETUP menu. 2 Press the up / down / right / left buttons to move the cursor to select the option. 3 Press the OK or right buttons to access to options then change the system parameters according to the display prompts. 4 When setting is finished, press the left button to return to parent menu. 5 When finished with the settings, press the left button continuously to exit the SETUP menu and return to the main display. - 57 - Beijing InfoMedia Electronic Technology Co., Ltd 1 Menu items list Recording setting Template Pre-record VOR Input Device MIC power Noise cut System setting Time and Date Record LED Beep setting Speaker setting Back light Auto Power off Battery type USB write protected Language setting SD door check SD information Test SD speed Format SD Version System Reset - 58 - Beijing InfoMedia Electronic Technology Co., Ltd 2 System setting Time & Date OK Cancel You can set the date and time so that correct time information is stored in the recorded files. Enter to the system setting menu and select date and time. Press the right button to move the cursor to the position to be changed. Then press the up or down button to set the date and time. When it is completed move the cursor to the OK option and click it. Record LED You can select and activate the LED indicator according to your requirements. Options Fuction ON Recording indicator is active. OFF Record LED is OFF. - 59 - Beijing InfoMedia Electronic Technology Co., Ltd Beep setting You can activate or dis-activate the beep function. Select and open the beep menu. When active, pressing any button will emit a beep signal in the headphones. If you the loudspeaker is ON with headphone disconnected, it will only emit a beep signal in playback to avoid making a noise during recording. With thebeep OFF, no sounds will be emitted when buttons are pressed. Options Fuction ON Turn on prompt beep of button OFF Turn off prompt beep of button Speaker setting You can select turn on or turn off the internal loudspeaker. Turn on loudspeaker to monitor the playback through the built-in loudspeaker. Turn off loudspeaker to allow headphone monitoring only. Options Fuction ON Turn on loudspeaker OFF Turn off loudspeaker Note: If you have already turned on the loudspeaker with headphone connected, the loudspeaker will be auto off. The loudspeaker will not turn on until you disconnect the headphone. You can’t use the EQ effects when you turn on the loudspeaker to monitor the recording. - 60 - Beijing InfoMedia Electronic Technology Co., Ltd Auto skip During playback mode, jumping to the next index is possible when Auto Skip “On” is selected. Selecting “Index loop” restarts the playback of the same index, over and over again. Display extinction Allows the time until the screen switches Off to be chosen when no operations are performed for a given period of time. To reduce power consumption, this feature automatically turns off the display when no keys are pressed for a given time period. Options Fuctions OFF Backlight is always bright. 10s Set the display time to 10s until the screen goes dark when no button operations. 30s Set the display time to 30s until the screen goes dark when no button operations. 1m Set the display time 60s until the screen gose dark when no button operations. 3m Set the display time 3minutes until the screen gose dark when no button operations. 5m Set the display time 5minutes until the screen gose dark when no button operations. Pressing any button will turn on the screen back light without performing any other action. Auto Power off This feature automatically turns the power off when no operations are performed for a set period of time to reduce power consumption. Options Fuctions OFF Power remains on permanently 30s Set the delay to 30s until the power turns off. - 61 - Beijing InfoMedia Electronic Technology Co., Ltd 1m Set the delay to 1minute before the power turns off. 3m Set the time to 3 minutes before the power turns off. 5m Set the time to 5 minutes before the power turns off. During recording and playback or while connected via USB, the power does not turn off even if no operations are performed within the set time period. Battery type Due to the different voltages between dry batteries and rechargeable batteries, the type of battery can be selected to give more accurate remaining battery life displays. Options Fuctions Dry cell The battery type is for dry alkaline batteries. Ni-MH The battery type is for rechargeable batteries. If the wrong type is set, the remaining battery power will not be shown correctly USB write protection Selecting the USB write-protection will cut the communication between the Lotoo L300 with PC, it can prevent PC’s viruses being transferred into the Lotoo L300. You can activate this function as a safety protection feature. Options Fuctions ON Allow USB write-protection,you cannot edit the files in SD card when connected to the PC OFF Remove the USB write-protection, editing of files on the SD card when connected to the PC is possible. - 62 - Beijing InfoMedia Electronic Technology Co., Ltd Language setting You can change the system language of Lotoo L300. Options fuctions English Set the system language as English French Set the system language as French German Set the system language as German SD information Indicates the information of SD memory card. There are three items for SD memory card information: “Total” shows total capacity, “Remain” shows free space, and “Used” shows the space which has been occupied. SD speed test Due to the different read and write speeds of SD memory cards, some SD cards with lower speeds can not support recording at higher bit rate formats. You can test the speed of SD card through this option. After testing, the Lotoo L300 will offer some suggestions. Note: Before you use the new SD card, we advise you to test the speed through this option to ensure the normal recording on the SD card is possible. - 63 - Beijing InfoMedia Electronic Technology Co., Ltd 1 Enter to the [system setting >Test SD speed]. 2 Press the OK button to test the speed and press the DELETE button to quit. During the testing process, press the DELETE button to abort the test. 3 When testing is completed, some speed test suggestions for this SD card will be shown. Test finish! SD card is ok.. Start Exit SPEED Start Exit Speed testing suggestions If the speed testing suggestion is “SD card is ok”, it means the SD card speed is appropriate and it can be used for the high bit-rate format recordings. If the speed testing suggestion is that “96k-24bit recording is not recommended”, Please use higher speed card, it means that the speed of SD memory card is insufficient and you should change it with a higher speed SD card or only use it for the recording formats lower than WAV-96k-24bit. If the speed testing suggestion is that “48k-24bit recording is not recommended”. it means that the speed of SD memory card is insufficient and you should change it with a higher speed SD card or only use it for the recording formats lower than WAV-48k-24bit. Note: There should be a minimum of 200 MB of free space when you test the speed of an SD memory card. - 64 - Beijing InfoMedia Electronic Technology Co., Ltd SD format Formatting the SD card will delete all files on the card. Note: If power is abnormally cut off during record, damage may be caused to the SD card. Please re-format if this happens. Warning: Be sure to format SD card in the Lotoo L300. If you use PC or other devices to format SD card, it may not operate properly in the Lotoo L300. Errors may occur when recording. After formatting the SD card, all files will be lost and cannot be restored. Please backup before formatting SD card. Version You can see the software and hardware versions installed in the Lotoo L300. - 65 - Beijing InfoMedia Electronic Technology Co., Ltd System reset Reset all settings including the stored templates to the factory default settings. System update To update the Lotoo L300, first copy the update file (XXX.coe) to the root directory of the SD card. This can be done by inserting the card into a SD slot on the PC or via a USB connection with the Lotoo L300. Select the second window and press OK. At the end of the update cycle, the Lotoo L300 will automatically switch off. Turn back on the Lotoo L300 and verify the version. Export / Import the configuration This menu allows the settings of the high and low templates to be saved in a file on the SD card. Select Export and execute to save the templates on the SD card. To load the templates onto a new machine, insert the SD card containing the configuration into the Lotoo L300, select Load and confirm. Beware that the previous stored templates in the machine are overwritten by the new configuration. - 66 - Beijing InfoMedia Electronic Technology Co., Ltd Troubleshooting - 67 - Beijing InfoMedia Electronic Technology Co., Ltd 1 System prompt Some information prompts or error / problem messages may be displayed. This section provides tips on solving them. For any other problems, please contact your nearest agent. Message/Prompt Problem Power in batteries is exhausted. --------Please replace the batteries. Low power The battery type selection in the system settings does not match instaééed batteries. --------Please select the proper type of batteries. The Hold switch on the rear is in the HOLD position Keypad is locked --------Please slide the Hold switch to OFF and operate again. Interruption of power supply during recording --------You may continue to record or do other operations and the prompt will disappear after a power OFF / ON. In order to restore the SD card to normal SD error, please try use, we advise you backup the recordings and re-format the SD card. backup and format A bad area or unknown error occurs on SD card --------If you continue to use the SD card, it may cause operational problems and data loss. We advise to backup and format SD card. Then try again. No memory card in the device. No SD --------Please insert an SD card. SD failure, please change There are large “bad” areas on the SD memory card, you can’t use it. it. --------Take out the SD card and insert a new one. - 68 - Beijing InfoMedia Electronic Technology Co., Ltd Message/Prompt Battery door is open, Powering off….. SD door is opened. Problem The battery case cover is opened or not close entirely. --------Please close the case cover and try to power on again. The cover for SD card isn’t closed entirely. --------Please close the SD card slot door correctly. SD is broken, change The current SD card format is not compatible with the system of Lotoo another card. L300. The current SD card is damaged or wrong card format. --------Please change a new a SD card and try again. Format failed, change SD card is damaged another card --------Use a new SD card. SD card is write protected --------Take out the SD card and unlock the write-protection. Then attempt to format again. Keypad is locked, HOLD button is ON powering off….. --------Please turn HOLD switch OFF and restart. Can't create new file When there are too many files on the SD card, no more files can be created. --------Please delete some files or format SD card. Disk is full SD card is full. --------Please use a new smart card or delete some files. Unknown File. Lotoo L300 doesn’t support the current file format. --------Please use other device to play this file. - 69 - Beijing InfoMedia Electronic Technology Co., Ltd Message/Prompt SD Card Locked Problem The contents of the SD memory card is write protected (LOCK). --------Slide the write protect switch on theside of the memory card to the unlock position and try again. Cant't mark in RAW-MP3 The Cue / Mark operation of the Lotoo L300 is not supported in MP3 files. Format Failed A problem occurred during SD card formatting Please Retry --------Please try format again. If it still fails, you can try to use a computer to format it. Get SD Information Failed Errors occurred when reading the SD card. --------Please re-insert the SD card and try again. Don't adjust input level AGC is the automatic gain control option. You can’t control the gain when AGC is on manually when the function AGC is ON. --------If you want to adjust the gain manually, please turn OFF AGC function. Delete Failed The attributes of file are set to read only. --------Please connect to a computer to change the read only attribute. You can also use computer to delete the files. Delete Failed: SD is The contents of the SD memory card is protected by write protect it (LOCK). locked --------Slide the write protect switch on the side of the memory card to the unlock position and try again. Delete Failed: File is used If the file is in use, it cannot be deleted. --------Close the file and try again. Open Failed An unknown problem occurred with the file folder during opening. --------Copy files and format SD card through computer. Unknown Format File Lotoo L300 only supports the WAV, MP2 and MP3 files. It can’t support other files. - 70 - Beijing InfoMedia Electronic Technology Co., Ltd No File No files on the SD card. Disk Accessing Slowly The read/write speed of SD memory card is too low to record and play normally. --------Please change to a new higher speed SD card. You can test the speed of SD card with the [Test the SD speed] option. The file format is wrong or the file is damaged. --------You can attempt to copy this file to computer Some buttons are not used during in the current mode. If you press them, this prompt will appear. 200MB of memory on the SD card is required to create a temporary file in the speed testing process. --------Please delete some files and test again. Creating the temporary file has failed during the speed testing mode. --------Format the SD card and try again --------If SD card is damaged, please replace it. Opening the temporary file has failed during speed testing operation. --------Format the SD card and try again --------If SD card is damaged, please replace it. File Error Unused Key Disk is full File creative failed. Open file failed. - 71 - Beijing InfoMedia Electronic Technology Co., Ltd 2 FAQ You can solve many problems that may occur when using Lotoo L300 using the following tips. Problems The reasons and how to solve them The power won’t turn on. Batteries inserted incorrectly or in the incorrect polarity --------Insert batteries correctly in the correct orientation. Battery level is critically low and it won’t turn on --------Please retry your request after replacing the batteries. Buttons locked by HOLD button --------Turn HOLD switch off and retry. There’s no sound in The output volume is too low speaker. --------Increase the output volume gradually. Earphones were inserted --------Speaker shuts off automatically when earphones are inserted. It will work again after pulling out the headphones. [Speaker] option OFF in system settings. --------Speaker will never work if this option is turned OFF, please set it to ON. Can’t record Lack of SD Card’s storage capacity --------Replace the SD Card with a new one or try the operation again after deleting some files from the SD Card. There’s no sound in the Recording level was too low. recording file. --------Increase the recording gain, and then re-record. You haven’t inserted external microphone when chosen [External Sound Pick-up] as input device or haven’t connect LINE IN when [Line Input] is chosen. --------Connect external microphone or LINE IN, and then re-record. --------Change this option into [Internal Sound Pickup], and then re-record. - 72 - Beijing InfoMedia Electronic Technology Co., Ltd Problems The reasons and how to solve Recording file is interrupted Turn VOR function on automatically. --------The system will pause or spilt record according to this setup when external level is lower than the trigger level of the VOR function’s setup. You can change the initial level of VOR function’s setup or turn VOR off. Press SPLIT button while recording --------SPLIT button is used for splitting recorded files. It will generate new files automatically. The playback volume of Some detail cannot be heard for low volume while playing. recorded file is low. --------Increase the playback volume. The level of recorded file was too low. Adjust [Recording Gain] while recording. --------You can alter the level after the recording using a PC. Please choose proper gain for next recording. The firmware upgrading is Low battery while upgrading unsuccessful. --------You have to ensure the recorder has fully-charged batteries while upgrading internal software. Try the upgrade again after replacing the batteries. The Lotoo L300 [USB Communication] not chosen while connecting to the PC is connected to the PC with --------The recorder will display USB Working Mode: [USB Communication] and a USB cable, but the PC [USB Charging] while the Lotoo L300 is connected to the PC. Please choose doesn’t [USB Communication] or it will not be recognized by the PC. recognize it - 73 - Beijing InfoMedia Electronic Technology Co., Ltd Additional information - 74 - Beijing InfoMedia Electronic Technology Co., Ltd Specifications General Storage medium Audio codec format Sample rates Frequency response Signal-to-noise ratio (Playback) Signal-to-noise ratio (MIC path) Dynamic range (line in) Dynamic range(microphone in) THD+N SDHC/SD/Mini SD(adapter)/micro SD(adapter)/TF card(adapter) MP3,PCM 44KHz, 48KHz, 96KHz 20Hz ~40KHz,+-0.5dB 94dB(20Hz~22KHz,ASA “A” Weighted) 90dB(Mic channel+ 19dB Pre-amp+AD, 20Hz to 22KHz,ASA “A” weighted) >90dB >122dB ASA “A” Weighted <0.02%(20Hz~22KHz) Physical Dimensions Working temperature Working humidity 96.5g (3.5oz) 103(L)x62.6(W)x22.5(H) mm (4x2.5x0.9 inches) 20%~80% - 75 - Beijing InfoMedia Electronic Technology Co., Ltd Input/Output microphone filter setting microphone maximum gain microphone minimum gain Maximum input level (Line in) Maximum output level (phones) MIC in Line in Stereo earphone output USB SD card 20Hz~40KHz / 100Hz~40KHz 65dB 19dB +17dB 30mW(left)+30mW(right)(16Ω) External stereo MIC 3.5mm stereo jack Unbalanced line-in 3.5mm stereo jack 3.5mm stereo jack Support USB 2.0 SD v1.0/v1.1/v2.0:SD,SDHC Power supply Alkaline dry battery USB Power consumption LR6( AA) x 2 Mini-B type 3V,max 120mA (measurement conditions: Sandisk 2GB SDHC) - 76 - Beijing InfoMedia Electronic Technology Co., Ltd InfoMedia Electronic Technology Co., Ltd Floor 4, B Building, Printing Academy No. 2 Cuiwei Road, Haidian District Beijing, China.P.R Tel : 400 653 8168 www.lotoo.cn [email protected]