1
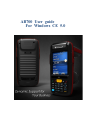
AB700 User guide
For Windows CE 5.0
Disclaimer
Copyright©2006 ATID Co., Ltd. An Unpublished Work – All right reserved. No part of the
contents of this documentation or the procedures described there in may be reproduced or
transmitted in any form or by any means without prior written permission of ATID Co., Ltd. or its
wholly owned subsidiaries ("ATID ").
Owners of ATID products are hereby granted a non-exclusive, revocable license to reproduce
and transmit this documentation for the purchaser's own internal business purposes.
Purchaser shall not remove or alter any proprietary notices, including copyright notices,
contained in this documentation and shall ensure that all notices appear on any reproductions
of the documentation.
Should future revisions of this manual be published, you can acquire printed versions by
contacting ATID Customer Administration. Electronic versions may either be downloadable
from the ATID web site (www.atid1.com) or provided on appropriate media. If you visit our web
site and would like to make comments or suggestions about this or other ATID publications,
please let us know via the “Contact ATID page.
Disclaimer
Reasonable measures have been taken to ensure that the information included in this manual is
complete and accurate. However, ATID reserves the right to change any specification at any
time without prior notice.
ATID is a registered trademark of ATID Co., Ltd.
The ATID logo is a trademark of ATID. All other trademarks and trade names referred to herein
are property of their respective owners.
AB700 is a registered trademark of ATID Co., Ltd. and of its wholly owned subsidiaries.
Microsoft Windows®, Windows® 2000, Windows® CE .NET, Windows® Embedded Handheld,
Windows® NT, and Windows® XP are registered trademarks of Microsoft Corporation.
ATID Co., Ltd.
#1205, Byuksan/Gyungln Digital Valley II, #481-10,
Gasan-Dong, Gumchon-Gu, Seoul, Korea
Tel: +82-2-544-1436
Fax: +82-2-2113-0040
www.atid1.com
2
AB700 User Guide
Table of Contents
Copyright and Agreement...............................................................................................................................5
Chapter1. Caution when using..................................................................................................................... 6
1. How to use the battery correctly............................................................................................................ 6
2. Caution when using................................................................................................................................... 6
Chapter2. Products compositions................................................................................................................. 7
1. Package components................................................................................................................................. 7
2. Name of Each Part.................................................................................................................................... 8
3. Function of Each Part............................................................................................................................... 9
Chapter3. Basic Functions........................................................................................................................... 10
1. Power and Battery................................................................................................................................... 10
1.1
Switch On Backup Battery...................................................................................................... 10
1.2
Detaching and Attaching Main Battery................................................................................. 11
1.3
Charging....................................................................................................................................... 12
1.4
Power On and Off..................................................................................................................... 12
1.5
Checking Battery Gauge.......................................................................................................... 14
1.6
Backup Battery........................................................................................................................... 15
1.7
Dispose of Battery..................................................................................................................... 15
2. System Reset............................................................................................................................................ 16
2.1
Soft Reset.................................................................................................................................. 16
2.2
Hard Reset.................................................................................................................................. 16
2.3
Initializing System...................................................................................................................... 17
3. Using Micro SD, SIM, SAM Card........................................................................................................ 18
3.1 Installing Micro SD.........................................................................................................................18
3.2 Installing SIM Card and SAM Card.......................................................................................... 19
4. System Settings........................................................................................................................................ 20
4.1
Setting Brightness...................................................................................................................... 20
4.2
Screen Calibration......................................................................................................................20
4.3
Setting Volume and Sounds................................................................................................... 21
4.4
Setting Data and Time............................................................................................................. 21
5. Using keypad............................................................................................................................................. 23
5.1
Using keypad.............................................................................................................................. 23
5.2
Inputting Data..............................................................................................................................23
5.3
Using <Fun> Button.................................................................................................................. 24
6. Using stylus................................................................................................................................................24
7. Using ActiveSync Program..................................................................................................................... 25
7.1
Installing Microsoft ActiveSync Program.............................................................................. 25
7.2
Connecting PC to PDA............................................................................................................ 26
7.3
Transmitting Data....................................................................................................................... 27
8. Firmware Upgrade.................................................................................................................................... 29
Chapter4. Optional Module.......................................................................................................................... 30
1. Using 1D or 2D Barcode Scanner...................................................................................................... 31
1.1 Scanning Barcode.......................................................................................................................... 31
1.2 Setting Barcode Emulator............................................................................................................ 32
1.3 Setting Barcode Symbology.........................................................................................................34
AB700 User Guide
3
1.4 Barcode Scanning Beam Position............................................................................................. 36
2. Using Wireless LAN................................................................................................................................. 37
2.1 Connecting to Wlan....................................................................................................................... 37
2.2 Setting Wlan Manually.................................................................................................................. 37
2.3 Checking WLAN Information........................................................................................................38
3. Using Bluetooth......................................................................................................................................... 39
3.1 Bluetooth Beginning and Closing............................................................................................... 39
3.2 Bluetooth Pairing............................................................................................................................ 42
3.3 Bixolon SPP-R200 Printer Demo............................................................................................... 45
4. Using GPS................................................................................................................................................. 47
4.1 Executing GPS Demo Program.................................................................................................. 47
5. Using Camera............................................................................................................................................48
5.1 Using Camera................................................................................................................................. 48
6. Using HF13.56MHz Reader................................................................................................................... 49
6.1 Executing HF13.56 Demo Program........................................................................................... 49
6.2 Mifare Tag Window........................................................................................................................ 49
6.3 ISO15693 Tag Window................................................................................................................. 50
7. Using 900MHz RFID Tag Reader........................................................................................................ 51
7.1Executing RF900Demo Program.................................................................................................. 51
8. Using Modem............................................................................................................................................ 52
8.1 Modem ON/OFF............................................................................................................................. 52
8.2 Modem Resetting............................................................................................................................53
Chapter5. Appendix....................................................................................................................................... 55
Configuration....................................................................................................................................................55
4
AB700 User Guide
Copyright and Agreement
- This manual is subject to copyright protection along with all relevant rights.
- No part of this document or the procedures described therein can be copied, reprodu
ced, changed, translated or transmitted in any form or by any means without prior w
ritten permission of ATID Co., Ltd. or its wholly owned subsidiaries.
- ATID reserves the right to change any contents of this manual at anytime without prior
notice.
- There are maybe some differences between the contents of this manual and the actual
behavior of product.
This manual is written for the person who is responsible for installing, configuring, and maint
aining the PDA. Read and follow all warnings and cautions in this document before you han
dle and operate ATID equipment
Safety Information
Read and follow all warnings and cautions in this manual before you handle and operate ATI
D equipment. If you do not follow the safety warnings and cautions, you might be seriously i
njured, and the equipment and data are also might be damaged.
Warnings!
A warning requires you must pay attention to the operating procedures, practices, co
nditions, and statements strictly, or might be injured seriously.
Cautions
A caution alerts you that you must be observe strictly when you operating procedure,
practicing, configuring, for preventing from damage and destruction of equipment, an
d loss of data.
Note
A note provides you the information which you must needs while you using
AB700 User Guide
5
Chapter1. Caution when using
Before you handle and operate your device, Please read through and familiar with the co
ntents of this manual.
1. How to use the battery correctly
When you dropped the main body or battery in water, please do not put it on the
stove or heater for drying. Just keep it in natural temperature or contact with purc
hase place.
Please do not take the metal object to approach to the terminal of battery
If you do not use the battery for a long time after charging, please keep it at room
temperature.
According to the life of battery and the processing time of its using, the buffering t
ime can be shortened. In this case, please contact your dealer.
You have to charging the device with the provided adaptor from factory.
2. Caution when using
User careless or products repair might damage the stored data. Manufacture is not
responsible for this damage, so important data should be kept separately
If you has problem, do not try to repair or disassemble the product arbitrarily, plea
se contact customer service center.
Do not use your where have electromagnetic wave or the risk may occur such as h
ospital, plane so on.
A high temperature or high humidity environment will causes trouble, Please note th
at.
Please do not using other sharp object to touch the screen, otherwise it might be
get damaged or not working properly.
Please be careful not to touch the metal paper cutting saw tooth, so as not to get
injured
If smell odors, occurs smoke or noise during use product, immediately disconnect
the charger and off the power, then Please contact with customer service center
If you have any other questions during use, please contact the customer service c
enter
6
AB700 User Guide
Chapter2. Products compositions
Mobile computer is a small, ergonomically designed PDA, which built on the Microsoft window CE
5.0 Operating System. The PDA could equip with Barcode Scanner, RFID Tag Reader, Smart Card
Reader, Wireless Modem, Camera and so on devices as optional items. Its various function applied
to Industry, Enterprise, Logistics and so on, can be used extensively in many fields.
1. Package components
After opening the product packaging box, check the items listed as below:
2. Adaptor and AC Cable
3. Main Battery
1. AB700 Body
5. USB Sync Cable
4. Leather Case
(Option)
AB700 User Guide
7. Stylus
7
6. Protective Fil
m
8. Hand Strap
*If there is missing or defective products on the above, please contact the customer support center or your place of
purchase.
2. Name of Each Part
Camera & flash
1D/2D scanner window
Scan & Function
buttons
WLAN LED
Phone receiver
refdarererece
Internal HF
Hand strap hole
Charge LED
Speaker
Volume/cursor
buttons
UHF Connecting por
t
pport
Main Battery
Touch screen
Scan button
Battery Latch
Keypad
Microphone
Reset button
Cradle, Sync, Power Adaptor
8
AB700 User Guide
3. Function of Each Part
Part
Descriptions
1D/2D scanner (Option)
Laser beam emitted through this window. Please be careful the foreign substances
and preventing from the damage.
Warning! Do not look at the laser beam direc
tly.
UHF connection port
Enable you to install a UHF 900Mhz tag reader module.
Internal HF
HF 13.56Mhz Embedded module mounting location.
Reset Button
Enable you to perform a warm Reset, Press <Power>button simultaneously, Enable you
to perform a hard Reset
Microphone
Enable you to conduct communication
WLAN(Option) LED
Displays whether the wireless WLAN power supply
Battery Latch
Enable you to detaching and attaching the main battery.
Main Battery
Enable to supply the power to the product.
Volume Buttons
Enable you to press <FNC>button simultaneously to adjusting volume.
Scan button (F7, F8)
It is possible to scan barcode or RFID tag
Scan button (F9)
It is possible to scan barcode or RFID tag
Speaker
Build-in speaker, which could emit various sound effects.
Sync Cable Connector
Enable you to connect and send data to PC via USB sync cable.
Ear Jack
Enable you to connect to earphone.
Left and right key
Power LED
Can move the cursor to the left /right direction and use the up/Down arrow keys with
combination <FNC> button
Power LED will be Red when the battery is charging, or will be green when it is charged
completely.
Adaptor Connecting Jack
Enable you to connect to adaptor which provided from factory.
Camera flash (option)
You can use the camera with flash
Camera (option)
It is possible to image capture and save.
Cradle Connector
Enable you to connect to PC or charging the battery while using cradle.
Key Pad
Touch Screen
Hand strap hole
AB700 User Guide
Enable you to input key value (number, alphabets, symbol), or executing assigned
programs.
Display running programs, and could execute, use, and exit programs via using stylus to
touch the screen.
Enable you to attach a hand strap or a stylus for the convenience of using, while need to
use the device for a long period time.
9
Chapter3. Basic Functions
1. Power and Battery
PDA battery is composed of main battery and backup battery. A main battery supplies the power
to the system and RAM which could keep save the data. A backup battery could keep save the
data of RAM when the main battery discharged completely.
Main Battery: 3.7V 3,000mA Lithium - ion
Backup Battery: 3.7V 105mA Lithium – polymer
Note:
Switch on the backup battery at first beginning of using PDA, and then install the main battery,
charge it completely.
1.1 Switch On Backup Battery
The image as blow shows the battery compartment, which already removed the main battery.
Slide the lever to right to start to supplying power to the system.
Backup Battery Switch
To attaching main battery to the back battery compartment of the PDA.
To confirm the battery latch locked firmly.
“Refer to 1.2 Battery attaching and detaching”
Connecting adaptor to the PDA adaptor connecting jack, and check if the “Power LED” is Red,
and then charging the power completely until it get into Green.
Note:
If the window wallpaper has shown on the screen, press the <power> button for a couple of seconds,
so that could shorten the charging times.
10
AB700 User Guide
1.2 Detaching and Attaching Main Battery
Detaching Battery
These images as below, shows the back bottom of the PDA.
Slide the battery latch to the right (UNLOCK side), and then lift the main battery out of the
compartment along both sides of groove.
Battery latch
Both sides of groov
Attaching Battery
Put the top part of battery into the upward groove, and then press down the bottom of
battery
into the battery compartment, slide battery latch to the left (LOCK side) to attach battery
firmly.
R/L Battery Attachin
g Groove
AB700 User Guide
11
1.3 Charging
You have to charge the battery via dedicated adapter, which provided from the factory.
“Power LED” is Red while charging or is Green when charged completely.
Connecting Adapter
1.
2.
3.
Plug the adapter cable to 220V socket.
Connect adapter DC cable to the “Power
connecting jack” of the main body.
“Power LED” is Red while charging.
Caution:
You must to charge the battery by using dedicated adapter, which provided from factory, or
your device might get damage.
1.4 Power On and Off
Press <Power> button one time, the device will enter low-Power mode (Sleep Mode) und
er the system is started and the following window is displayed on the desktop or other p
rograms is running in the system. Press <Power> button once again could activate the s
ystem.
Start button
Taskbar
12
AB700 User Guide
Taskbar: Display the currently running programs.
Start button: Activates the start menu and then execute a program.
Power On and Off via <Power> Button
Power Off:
1.
2.
When the system is in booting status, press
<Power> button for a couple of seconds,
then the backlight will be turned off and
enter the low-power mode (sleep mode).
You can also press <Start Button> ->
<Suspend> button to turn the device off.
Power On:
1.
2.
When the system power is in the off status,
press <Power> button quickly, then
backlight will be turned on and start the
system.
Connect to the ActiveSync USB cable; the
power will be turned on automatically.
Power Button
Note:
Even though the power is in off state, if there was a tiny battery gauge remained, the data of RAM will be saved, and
those programs which have been running for sometime before the power turned off, will be recover rapidly. If the main
battery and backup battery are both in the discharge state, the RAM data will disappear, and the system will be starting
if the power is charged again.
Power off automatically
The device has been powered but has not been used for a period of time, then the system will
enter low-power mode (sleep mode) automatically. You could set the sleep mode time at the
power management so that could save power and prolog the battery life.
[Start Button] -> [Setting] -> [Control Panel] -> [Power Management] -> [Power Off]
Power Icon
AB700 User Guide
You can also double click <Power> Icon to enter this
interface.
You can also press the <Power> button to
activate the system, when the device turned off
cause get into the sleep mode.
13
Battery Discharging
If the main battery discharge completely, the system will not turned on, the device will get into
low-power mode (sleep mode) automatically, and even press the <Power> button, the system
will not be turned on. In this case, you should charge the main battery or connect the adaptor to
the adaptor connecting jack of main body, then press the <Power> button to turn on the system.
1.5 Checking Battery Gauge
Note:
Battery life is largely affected from the user using method and surrounding environments.
A 2200mA battery is usually needs 6 ~ 12 hours to get charged completely.
Checking Battery Gauge
[Start Button] -> [Setting] -> [Control Panel] -> [Power Management] -> [Battery]
Low Power Warning
If the remaining battery gauge cannot support the system
running any more, a low power warning message window will be
popped up on the screen. In this case, you need to press the
<Power> button to turn off the power, and to charge the battery
as soon as possible.
14
AB700 User Guide
1.6 Backup Battery
A backup battery could safely keep the RAM data, even the main battery discharged com
pletely.
Caution:
If the main battery and the backup battery are both discharged, the RAM date will disapp
ear.
Among the running programs, the RAM data will disappear in which are using, and the sy
stem
1.7 Dispose of Battery
You need to purchase a new one if the battery damaged or reached its end of life.
Warning!
Please dispose the used batteries in a designated place.
AB700 User Guide
15
2. System Reset
If there is no response from the system or an application is locked up and stops respon
ding, and when you want to upgrade the firmware, reset the system is maybe necessary.
2.1 Soft Reset
When do you need to perform Soft Reset?
If there is no response for your command from the system, it calls (Hang-up). In this ca
se, you need to perform a soft reset. Soft reset will end programs and the user memor
y region will be deleted, but installed programs and data, and so on, are not affected.
[Soft Reset Procedure]
Using the stylus pen to press <Reset> button briefly, the system will restarting again, aft
er the screen turns off shortly.
[Soft Reset Result]
System will be restarting.
Operating System will be restarting (Windows CE).
Desktop will appear in about ten seconds.
User’s changed registry information, copied files and
Installed programs will be restored.
Power Button
Reset button
2.2 Hard Reset
When do you need to perform Hard Reset?
Hard Reset, which is also called Cold Reset, enables to initialize hardware completely. User’
s installed programs, copied files and registry values will keep remained even performed Ha
rd Reset, but the real time and date will be initialized. So you need to reset the time and d
ate after performed Hard Reset.
You need perform Hard Reset when the Soft Reset cannot restore the system.
[Hard Reset Procedure]
Using stylus pen to Press <Power> Button and <Reset> Button simultaneously, the system w
ill restarting again after the screen turns off shortly.
[Hard Reset Result]
System will be restarting.
Operating System (Windows CE) will be loading and restarting.
Desktop will appear in about ten seconds.
Time and date window will be popped up and need to reset it.
16
AB700 User Guide
2.3 Initializing System
Enter [Boot Menu] and do what you want, when in the situations as below:
1.
2.
3.
4.
When
When
When
When
you
you
you
you
need
need
need
need
to
to
to
to
restore the original registry information, which has been changed.
initialize “My device” storage spaces.
initialize “Flash Disk” storage spaces.
initialize system to factory default settings.
You can also press <Power> button and <Fun> button simultaneously, and then press <Rese
t> button to perform Hard Reset.
Power Button
Fun Button
Reset Button
[Boot Menu] window would appear in a couple of seconds.
Warning!
Except for [Clean System], please do not use other functions.
The system might be work not properly if you use other functions on the [Boot
Menu].
[Boot Menu]
Firmware Upgrade
It is for the image (BOOT, OS) update by SD Card
Clean(Without Flash)
My Device and Registry area recover as shipped
Clean(With Flash)
My Device, Registry and Flash Disk area recover as shipped
Exit
Finish the Boot Menu
0. Firmware Upgrade
1. Clean(Without Flash)
2. Clean(With Flash)
3. Exit
Menu Select : Enter No.
[Boot Menu] Start-up Screen
AB700 User Guide
17
18
AB700 User Guide
3. Using Micro SD, SIM, SAM Card
The image as below is battery compartment of , and there are 1EA SIM Card Slot, 1EA SA
M Card Slot and 1EA Micro SD Card Slot.
1 Micro SD Card Slot
1 SIM Card Sl
1 SAM Card Sl
3.1 Installing Micro SD
Push the cover to the right
along arrow direction to o
pen it.
lift the cover up along arro
w direction.
Put Micro SD card into Slo
t and press down the cove
r as arrow direction.
AB700 User Guide
Push the cover up as arro
w direction to lock it, and
attach the main battery an
d turn on the power.
19
You can find the Micro SD Memory Card icon when executing the file explorer, after inserted
the Micro SD card.
3.2 Installing SIM Card and SAM Card
SIM Card and SAM Card can easily insert and pull out along arrow direction.
20
AB700 User Guide
4. System Settings
4.1 Setting Brightness
Brightness is already set 80% at the factory, and brightness is the biggest consume part of the
power, so you might need to adjust it to your actual need.
[Setting Brightness]
1. [Start Button] -> [Setting] -> [Control Panel] -> [Backlig
ht]
2. [MyDevice] -> [Control Panel] -> [Brightness]
밝기: Enable you to adjust brightness.
끄기: Enable you to adjust the timing of turning off brightnes
s.
키램프: Enable you to adjust the timing of turning off key lam
p.
4.2 Screen Calibration
At first beginning of using the device after purchasing or need to use the device for a long period time,
if you cannot select the place where you touched with stylus, you need to reset the coordinate
calibration values.
Touch screen calibration
[Start Button] -> [Setting] -> [Control Panel] -> [Stylus] -> [Calibration] -> [Recalibratio
n]
Press and hold stylus pen briefly on the center of cross symbol, and repeat 5 times as
AB700 User Guide
21
it moves around the screen. The screen counts 30 seconds after calibrating, and you ca
n finish the recalibration to touch screen wherever you want, if you do not any action, t
he screen will automatically finish the recalibration of itself.
4.3 Setting Volume and Sounds
Volumes is already set 80% at the factory, and you can readjust you need volume at control
panel ->”Volume and Sounds”
Setting Volume and Sounds
[Start Button] –> [Setting] -> [Control Panel] -> [Volume and Sounds]
4.4 Setting Data and Time
[Start Button] -> [Setting] -> [Control Panel] -> [Date and Time]
22
AB700 User Guide
Setting Year:
Double Click the year, and
click the up and down ar
row button to set year.
Setting Month:
Double Click the Month or
Click L/R arrow button to
set Month.
Setting Day:
Click the day directly to s
et day.
Setting Time:
Click AM/PM, Time area dir
ectly, using up and down
arrow button to set Time.
AB700 User Guide
Setting Time Zone:
Click up and down arrow d
irection to select time zon
e and click apply button.
23
5. Using keypad
Keypad enables you to input numbers, alphabets and special symbols. And can also execute other
set function with <Fun> button.
5.1 Using keypad
When you change the current input language, please press <1<=>ALP> button.
[Number] -> [Lowercase alphabetic characters] –> [Uppercase alphabetic characters]
Order transition.
Click the input language icon
on the taskbar is also can chan
ge
5.2 Inputting Data
Numeric Keypad Mode: Press<1<=>ALP> button or keypad icon on the taskbar to change to the
numeric mode and directly press number on the keypad.
Alphabet Keypad Mode: Press <1<=>ALP> button or keypad icon on the taskbar to change to
the Lowercase or Uppercase and directly press alphabets or special symbols
on the keypad. Each button has 2 ~ 3 letters or symbols. Press the button
once, the first letter or symbol will be inputted, press twice continuously, then
the second letter or symbol will be inputted, and the third letter or symbol need
to press button three times continuously.
24
AB700 User Guide
5.3 Using <Fun> Button
Press <Fun> button and other buttons simultaneously can activate functions as below:
Fun + button
<Left>, <Light>
Cursor Key On the
Keypad &
Left Side <Up>,
<Down>
<Up>, <Down>
Cursor Key on the
Keypad
<1> ~ <9>
Descriptions
Increase or decrease the sound.
Perform Page Up or Page Down.
Perform F1 ~ F9 Function Key
<Back Space>
Delete a letter which located after the cursor.
<.>,<0>,<_>
Enable you to input <+> <000> < – > symbols.
6. Using stylus
You can tie the stylus to the hand strap hole, so that enable you to use the stylus as like a mouse on
a PC
.
Use Stylus to:
Select a letter on the soft keypad.
Select a program on the desktop or
taskbar.
Select button, zone or tab bar in a
window box or program.
Caution:
Please do not use sharp objects on the touch screen. Use only supplied stylus, otherwise would
bring seriously damage to the touch screen.
AB700 User Guide
25
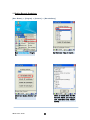
7. Using ActiveSync Program
ActiveSync program could synchronize between the PC and PDA device, so that enable you
to perform program installing, copy, transition, delete and so on operations.
7.1 Installing Microsoft ActiveSync Program
Download the latest version of ActiveSync program from Microsoft Windows CE. Website,
and install it to your PC.
ActiveSync: Windows XP
Download Address: http://www.microsoft.com/downloads/.
Caution:
You must use ActiveSync v3.7 version or above.
Designate installation folder, then click <
Next> button.
Click [Next] Button.
The installation was finished, and then us
es the USB cable to connect to the USB
port on the computer; ActiveSync will aut
omatically detect the device connection.
26
AB700 User Guide
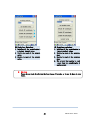
7.2 Connecting PC to PDA
Setting PC
[Start button] -> [Programs] -> [Microsoft ActiveSync]
< Windows XP >
Executing Microsoft ActiveSync program
Click [File], Click [Get Connected].
Select <Allow USB connection with
this desktop computer>, press OK button.
ActiveSync connected to PDA
AB700 User Guide
27
Setting PDA
[Start Button] -> [Setting] -> [Control Panel] -> [PC Connection]
Double click PC Connection ico
To check if set to connected t
o USB Sync cable
7.3 Transmitting Data
Using the USB cable to connect PC and the device.
Connecting state
Disconnecting state
You can check the ActiveSync connecting state on the taskbar.
< Windows XP >
Start button/Programs/Microsoft ActiveSyn
c
28
AB700 User Guide
After ActiveSync connected, click Ex
plore button.
Designate transmitting file path.
Transmitting files.
AB700 User Guide
29
8. Firmware Upgrade
[Start Button] -> [Setting] -> [Control Panel] -> [Firmware Upgrade]
30
AB700 User Guide
Chapter4. Optional Module
Provided variety of optional modules and in this chapter will provide you the information of e
ach module.
Optional modules as below:
1.
2.
3.
4.
5.
6.
7.
8.
Barcode Scanner
-. 1D Laser Barcode Scanner
-. 2D Imager Barcode Scanner
Wireless LAN – 802.11 a/ b/g
Bluetooth
GPS
Camera
HF13.56 Reader
UHF 900MHz Tag Reader
– EPC Gen 2, ISO/IEC 18000 6B
Modem
AB700 User Guide
31
1. Using 1D or 2D Barcode Scanner
Enable to equip with a compact image engine, which could recognize all the 1D and 2D bar
codes.
1.1 Scanning Barcode
Start Button/Programs/Demo
Apps/Scanner/BarcodeDemo
Press Scan Buttons to Rea
d Barcode.
32
AB700 User Guide
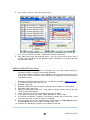
1.2 Setting Barcode Emulator
Barcode Emulator program enables you to set the barcode value input type, scan button, sc
an sound and so on.
Executing Barcode Emulator
[Start Button] -> [Programs] -> [Scanner] -> [BarcodeEmulator]
Run the Barcode Emulator
Barcode Emulator Icon will b
e showed on the taskbar.
Run WordPad Program, then
click the Emulator Icon
AB700 User Guide
Result Type
Keyboard Event: Barcode inputted o
ne by one.
Copy Paste: Barcode will be stored
be stored in clipboard and shown at
paste way.
33
Terminator
None: Not input terminal barcode value.
CRLF: Barcode value will include an “Enter”
Space: Barcode value will include a “Space”
Key Setup
F1-F8키: Hardware Keypad
Gun1, Gun2: Gun Trigger
Tab: Inputting type as same as Tab Key Function.
Sound: Set sound ON/OFF aft
er scanned barcode
Vibrator: Set vibrator ON/OFF
after scanned barcode
Close: Exit Emulator Program
34
AB700 User Guide
1.3 Setting Barcode Symbology
[Start Button] -> [Program] -> [Scanner] -> [BarcodeSetup]
Run BarcodeSetup Progra
m.
Set Barcode Type in detail.
Make a check mark on the
barcode which you want to
use, and then click <SET>
button.
Click Set Enable Status butt
on
AB700 User Guide
35
1.
2.
3.
2D Symbology Selection:
1. Initialize all the symbologies t
o factory default value.
2. Unable to read all the symbol
ogies.
3. Enable to read all the symbol
ogies.
1D Symbology selection:
1. Initialize all the symbologies to
factory default value.
2. Unable to read all the symbolo
gies.
3. Enable to read all the symbolo
gies.
4. Set a level that enable to read
more than two symbologies si
multaneously.
Warning!
Please do not look directly into the laser beam of barcode, or it may do harm to your
vision.
36
AB700 User Guide
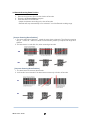
1.4 Barcode Scanning Beam Position
1. Remove the protective film from the window of barcode.
2. Executing the BarcodeDemo program.
3. Emit laser beam to the barcode.
• Adjust the distance according to the size of barcode.
• Barcode will stop automatically in five minutes if out of the Barcode reading range.
[Correct Scanning Beam Position]
1. The more small size of barcode, needs the more close to barcode. The effective scanning
rang of is from 40 ~ 300mm. if failed to scan barcode, please try to adjust scan angle and
distance.
2. The laser beam is a red thick line, when scanning a barcode.
1D
2D
[Incorrect Scanning Beam Position]
1. The laser beam must across the barcode.
2. It will couldn’t scan barcode if the laser beam across only a fraction of barcode.
1D
2D
AB700 User Guide
37
2. Using Wireless LAN
enable to equip an internal 802.11 radio module to transfer data and do wireless communication.
supports TCP/IP network protocol, and communicate with a host computer directly.
2.1 Connecting to Wlan
[Start Button] -> [Programs] -> [Demo Apps] -> [Wireless Lan]
Run the Wireless LAN progr
am.
Select <WLAN ON>, and the
n click Ok button.
2.2 Setting Wlan Manually
Double click a suitable device
from the list of AP.
Input Key Password, and the
n click OK button.
38
AB700 User Guide
2.3 Checking WLAN Information
Double click WLAN icon on t
he taskbar to check Wlan in
formation.
Start Button/Programs/ATID
App/Wireless Lan, and then
select <WLAN OFF> to stop
Wlan communication.
Note:
The Wlan LED will changed to green and the Wlan icon on the taskbar will be lig
hted on
AB700 User Guide
if failed the Wlan icon will be light off
39
3. Using Bluetooth
This User Guide is only applied to the AB700x PDA which installed "MD6RF" module.
AB700X PDA not only supports to the SPP printer device like as AT870/AT570, but also sup
ports Bluetooth Stack Service of Windows CE. This User Guide described how to Pairing an
d Disconnecting between AB700x and Bluetooth devices, and also described basic testing me
thod of Mobile Printer SPR-R203, which launched by Bixolon, as a sample device.
** AB700x could pairing with maximum 6ea devices, but assign COM Port only to COM2 an
d COM4.
3.1 Bluetooth Beginning and Closing
AB700x is using Stack of Windows basically, only could control the power of Bluetooth Modul
e’s ON/OFF.
1. Bluetooth Function Beginning
A.
Executing the “Bluetooth” demo program.
WinCE Start->Programs->Demo Apps->Bluetooth.
40
AB700 User Guide
B.
Select “Bluetooth ON” item, then press OK button.
C.
After Bluetooth executed, the Bluetooth BTPAN1 icon will be appeared on the b
ottom of Windows Taskbar, and the red cross mark on it shows that you access
is available and prepared to be accessed.
AB700 User Guide
41
2. Bluetooth Function Closing
A.
Executing “Bluetooth” demo App from Windows CE Menu.
B.
Select “Bluetooth OFF”, then to press OK button to off the Bluetooth power.
42
AB700 User Guide
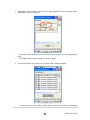
3.2 Bluetooth Pairing
After connecting each other through pairing way, Bluetooth devices could do its function
properly.
1. Executing Bluetooth program as below path.
Start->Settings->Control Panel->Bluetooth Device Properties
->
2. Press “Scan Device” button to searching devices which could pairing.
AB700 User Guide
43
3. Depending on the situation, maybe need to input password for some devices, then c
ould search devices continually.
** According to the devices need, some devices have to input Pin Code (password) f
irstly.
** SPP-R200 printer factory setting Pin Code is “0000”.
4. The devices which can connect will be listed, after finished searching.
** If cannot find your need device, please press “Scan Device” button to searching y
44
AB700 User Guide
our device again.
5. Double click your device name, click “Trusted” Tab to add the device to the pairing it
ems, then click “Yes” button to ending the Bluetooth Manager.
->
->
* You can set the Password (Authentication code) according to the each device.
* The Red Cross mark(X) on the Key icon will disappear if finished to registration.
AB700 User Guide
45
6. Click “Active” button to active the paired device.
7. Then, you can perform the data communication through COM2 Port.
8. After pairing and active the Bluetooth device, you can use the Device driver, S/W, a
nd SDK, which provided from the Bluetooth device manufacturer, to perform the relev
ant Bluetooth function.
3.3 Bixolon SPP-R200 Printer Demo
SPP-R200 is typical Mobile Printer of the Bixolon, you can using its App which get fr
om Bixolon website to perform print through Bluetooth.
**the Printer program and SDK, which described in this User Guide is based on the
5th Aug, 2011, and it’s would be a little different from homepage contents according t
o the Bixolon policy.
1. Download “SPP-R200 Windows SDK” from the Bixolon homepage (www.bixolon.com)
to a suitable directory and unzip the file.
2. Bluetooth Power ON.
3. Executing “Bluetooth Device Properties” programs which located in Control Panel.
4. SPP-R200 printer power ON.
5. Setting the SPP-R200 printer to be in the status of pairing. (Please refer to the User
Guide of SPP-R200 Printer)
6. Press “Scan Device” button to searching printer device nearby.
7. In the status of pairing, the factory setting password is “0000” usually.
8. If connected successfully, “COM2 port connected” message will be confirmed. (If had
connected one time, maybe not show the message.)
9. Copy and paste the DLL and executable file, which located at bin₩ce5₩MobileComp
ia_M3Plus₩ within the printer SDK, to AB700x Flash Disk.
10. Executing the Sample.exe program in the AB700X Flash Disk.
46
AB700 User Guide
11. Change the COM8 to COM2, then press “Open” button to testing printer.
AB700 User Guide
47
4. Using GPS
GPS Module designed to be installed on the back top of the AB700.
COM: 6 Baud rate: 9600
4.1 Executing GPS Demo Program
[Start Button] -> [Program] -> [DEMO Apps] ->[GPS-Demo]
Execute GPSDemo Program.
Confirmation of GPS receiving data:
1.
2.
Finding an open place to check your GPS
signals.
According to the actual environment, the time
to receive data is different (about 3~10min) ,
After receiving GPS data once, it is faster to
receive GPS data than the first attempt.
Start: Start to receiving GPS data
Stop: Stop to receiving GPS Data
Exit: Exit the GPS Demo program
48
AB700 User Guide
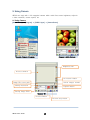
5. Using Camera
AB700 can equip with a 3.0 megapixel camera which could fixes screen brightness, adjust th
e video resolution, screen capture, etc.
5.1 Using Camera
[Start Button] -> [Program] -> [DEMO Apps] -> [CameraDemo]
Execute Camera Program.
Camera’s Main Screen.
Brightness Bar
Preview Window
Re-rotation Button
Image files store path
Stored images Numbe
Setting Resolution
Capture Button
Setting Image Effec
Camera UI
Preview Button
Preview Stop Button
AB700 User Guide
49
6. Using HF13.56MHz Reader
AB700 PDA enable to equip a HF13.56Mhz module as a option, and the recognition distanc
e is 3-8.5cm according to the standard of ISO, in the case of Mifare Tag, it’s will be 1~3.5c
m.
6.1 Executing HF13.56 Demo Program
[Start Button] -> [Program] -> [DEMO Apps] -> [RF13.56Demo]
6.2 Mifare Tag Window
Mifare:
Version: Read firmware version of ISO15693.
AntennaOff: Stop the Antenna.
MF_UID: Read Mifare Tag ID.
Block Read: Read Block Data..
Block Write: Write Block Data.
Keyload: Register authorization key to the R/W while t
o access Mifare
Increment: Increase the values to data block.
Decrement: Decrease the values to data block.
Click MF-UID button to read a Mifare
Tag
50
AB700 User Guide
6.3 ISO15693 Tag Window
ISO15693:
UID: Read ISO15693 Tag ID.
Read Blk: Read ISO15693 Block dat
a.
Write Blk: Write ISO15693 Block dat
a.
Click UID button to read ISO 15693
Tag
AB700 User Guide
51
7. Using 900MHz RFID Tag Reader
Enable to equip a UHF 900Mhz Tag Reader. Enable to read and write RFID Tag w
hich supported protocol of EPC GEN2. The Frequency range is 850MHz ~ 960MHz,
and could adjustable.
UHF Reade
r
7.1Executing RF900Demo Program
[Start button] -> [Program] -> [DEMO Apps] -> [RF900Demo]
INVENTORY Mode:
Run RF900Demo Program
Single Read: Read one Tag each ti
me.
Multi Read: Read multi Tag each tim
e (Anti Collision).
INVENTORY: Press <Inventory> butto
n to read tags.
52
AB700 User Guide
8. Using Modem
8.1 Modem ON/OFF
Press <Power Up> button, wati tillp
owerup succeed.
Click Start->Demo Apps ->
ModemTest
If there is the SIM card, then setti
ng each item on the Operator Se
tting interface, and press <Save>
button
Press <RAS Connect> button, if th
ere is no SIM card, the prompt
messege window will pop up.
AB700 User Guide
53
Then, RAS Connecting success
8.2 Modem Resetting
Double click Mydevice icon
Double click <Flash Disk>
54
AB700 User Guide
Delete <Gprs.ini> file
Double click <Phone UI>
Press <Yes> button, then to resetti
ng
AB700 User Guide
55
Chapter5. Appendix
Configuration
Physical and Environmental Characteristics
Dimension
158mm(L) X 78mm(W) X 28mm(H)
Weight
320g
Operation Temperature
-20℃ ~ 50℃
Storage Temperature
-30℃ ~ 60℃
Humidity
Non-condensing
Drop
1.5m drop to concrete
Performance Characteristics
Processor
Marvell™ PXA320 806MHz
Operating System
Windows CE 5.0
Memory
ROM 256MB (Max. 512MB) / RAM 256MB
Display
3.5" QVGA with Backlight, TFT LCD, 240*320 Pixels, 262,144 Color
Stylus Touch Screen Interface
Audio
Phone Receiver, Earphone Jack
Communication Port
RS-232Serial Port, USB 1.1 Client, USB 1.1 Host
Expansion Slot
1 Micro SD Slot (SDHC Support) ,1 SIM Slot / 1 SAM Slot
Keypad
31key
Notification
Vibrator, LED, Speaker
Power Supply
Main Battery
Lithium ion 3.7V Above 2,960mAH(rechargeable), Up to 4,400mAH(Option)
Backup Battery
Lithium-ion Polymer 3.7V, 80mAH(rechargeable)
Adaptor
Input AC100V ~ 240V, Output DC5V 3A
Network Character
Wireless Lan
WLAN(802.11 a/b/g compliant)
Bluetooth
Class Ⅱ, v2.1 EDR
GPS
Internal Antenna
Data Capture Devices
Barcode Engine
1D Laser Scanner, 2D Image Scanner
Camera
3.0Mega Pixel with Auto Focus
UHF 900MHz Tag Reader
Frequency
850MHz- 960Mhz (Adjustable)
Reading Range
0m ~ 7m (Differs from each tag)
Writing Range
0m ~ 3m (Differs from each tag)
Antenna Gain
2dbi (Standard)
56
AB700 User Guide
Speed
62.5 kbps
RF Output
1W EIRP
Protocol
EPC Gen2 ISO 18000 6C / ISO 18000 6B(option)
Multi-Reading
Anti-collision
Technical support and Sale Contact
ATID Co., Ltd.
#1210 Byuksan/Gyungin Digitial Valley II, #481-10 Gasan-Dong
Gumchon-Gu, Seoul, Korea
TEL: +82-2-544-1436
FAX: +82-2-2113-0040
Homepage: http://www.atid1.com
E-mail: [email protected], [email protected]
English: +82-70-8677-8589, +82-70-8677-8591
Chinese: +82-70-8677-8591
Japanese: +82-70-8677-8594
Korean: +82-70-8677-8594
AB700 User Guide
57