1
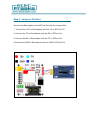
EFCom Pro User Guide
EFCom Pro Introduction
GPRS/GSM EFCom Pro is an ultra compact and reliable wireless module.
Besides Arduino, it is also compatible with AVR/ARM/FPGA/CPLD ...... It can
be connected with PC only via FT233RL, more exactly, our FT232 Bee Adapter,
instead of Arduino development board, which enables you to easily control
EFCom Pro via AT commands, dialing a phone, sending a message ……It has
been extensively used in a variety of fields, helping Arduino hobbyists promptly
to acquire GSM/GPRS mobile phone research , suitable for wireless
development projects,also applying to remote control development.
Step 1. Hardware and Software Preparation
Step 2. Jumpers Position
Connect the Bee Adapter to the EFCom Pro with the Jumper Wire
1. Connect the VCC in Bee Adapter with the +5v in EFCom Pro
2. Connect the TX in Bee Adapter with the RX in EFCom Pro
3. Connect the RX in Bee Adapter with the TX in EFCom Pro
4.Connect the GND in Bee Adapter with the GND in EFCom Pro
Step 3. Assemble the EFCom Pro Module
1.Assemble the Antenna to the EFCom Pro Module
2.Assemble the SIM Card
3.Connect the assembled EFCom Pro to the PC with USB Cable
4.Press and hold the PWR button a short while(Over 3 seconds) to turn it on.
Wait half a minute for theEFCom Pro Module to connect to the network (NET
LED will start blinking every 3 seconds or so). If it continues blinking every
800mS, which means EFCom Pro can’t connect to the Internet, please pull the
SIM card and re-plug it., or try another card.
Step 4. Send a SMS
Open the Serial Tool sscom32
1.Input AT and press Enter, and the module will respond OK.
2. Input AT+CMGF=1
3.Input AT+CMGS="158********"
4.Write the SMS body and press Esc.
5.Respond OK, you will receive a SMS, for example as below.
Step 5. Call a phone
1. Input ATD158********;
2. Respond OK, you will receive a call.
3. Input ATH to end a call