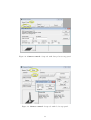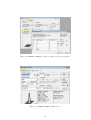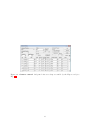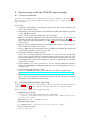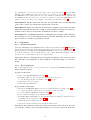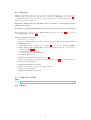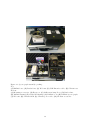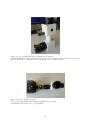
1
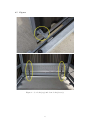
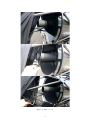
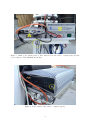
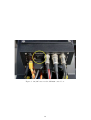
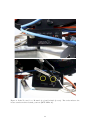
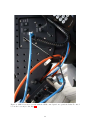
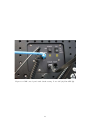
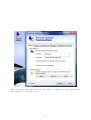
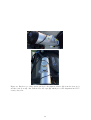
HPP Observatory
Quick User Guide
August 2015
Abstract
This step-by-step user guide describes the standard procedure for start-up, operation, and
shutdown of the HPP observatory as it is adequate for most student projects (e.g. VP-ASL
experiments) or for outreach activities. For more functionalities of the telescope, the mount,
or the camera see the corresponding manuals.
Contents
1 Instrument specifications
3
2 Start-up
2.1 Open the telescope box (“the dome”)
2.2 Remove mirror cover . . . . . . . . . .
2.3 Mounting the SBIG camera . . . . . .
2.4 Power-on the instruments . . . . . . .
2.5 Turn-on GM4000 mount . . . . . . . .
2.6 Start-up the instrument software . . .
2.7 Figures . . . . . . . . . . . . . . . . .
.
.
.
.
.
.
.
.
.
.
.
.
.
.
.
.
.
.
.
.
.
.
.
.
.
.
.
.
.
.
.
.
.
.
.
.
.
.
.
.
.
.
.
.
.
.
.
.
.
.
.
.
.
.
.
.
.
.
.
.
.
.
.
.
.
.
.
.
.
.
.
.
.
.
.
.
.
.
.
.
.
.
.
.
.
.
.
.
.
.
.
.
.
.
.
.
.
.
.
.
.
.
.
.
.
.
.
.
.
.
.
.
.
.
.
.
.
.
.
.
.
.
.
.
.
.
.
.
.
.
.
.
.
.
.
.
.
.
.
.
.
.
.
.
.
.
.
.
.
.
.
.
.
.
3 Shutdown
4
4
4
4
4
5
5
6
17
4 Instrument operation using individual
4.1 GM4000 mount operation . . . . . . .
4.1.1 Alignment of the telescope . .
4.2 CDK operation . . . . . . . . . . . . .
4.3 Camera operation (SBIG STX-16803)
4.4 Figures . . . . . . . . . . . . . . . . .
software packages
. . . . . . . . . . . .
. . . . . . . . . . . .
. . . . . . . . . . . .
. . . . . . . . . . . .
. . . . . . . . . . . .
.
.
.
.
.
.
.
.
.
.
.
.
.
.
.
.
.
.
.
.
.
.
.
.
.
.
.
.
.
.
.
.
.
.
.
.
.
.
.
.
.
.
.
.
.
.
.
.
.
.
18
18
19
19
19
21
5 Instrument operation using
5.1 Observatory control . . .
5.1.1 Setup . . . . . . .
5.1.2 Telescope control .
5.1.3 Focusing options .
5.2 Camera control . . . . . .
5.3 Image inspection . . . . .
5.4 Figures . . . . . . . . . .
.
.
.
.
.
.
.
MaxImDL
. . . . . . .
. . . . . . .
. . . . . . .
. . . . . . .
. . . . . . .
. . . . . . .
. . . . . . .
.
.
.
.
.
.
.
.
.
.
.
.
.
.
.
.
.
.
.
.
.
.
.
.
.
.
.
.
.
.
.
.
.
.
.
.
.
.
.
.
.
.
.
.
.
.
.
.
.
.
.
.
.
.
.
.
.
.
.
.
.
.
.
.
.
.
.
.
.
.
.
.
.
.
.
.
.
.
.
.
.
.
.
.
.
.
.
.
.
.
.
.
.
.
.
.
.
.
.
.
.
.
.
.
.
.
.
.
.
.
.
.
.
.
.
.
.
.
.
.
.
.
.
.
.
.
25
25
25
25
26
27
28
28
6 Spectroscopy with the DADOS spectrograph
6.1 General comments . . . . . . . . . . . . . . . .
6.2 Spectrograph assembly and setup . . . . . . . .
6.3 Alignment . . . . . . . . . . . . . . . . . . . . .
6.3.1 Spatial orientation . . . . . . . . . . . .
.
.
.
.
.
.
.
.
.
.
.
.
.
.
.
.
.
.
.
.
.
.
.
.
.
.
.
.
.
.
.
.
.
.
.
.
.
.
.
.
.
.
.
.
.
.
.
.
.
.
.
.
.
.
.
.
.
.
.
.
.
.
.
.
.
.
.
.
36
36
36
37
37
1
.
.
.
.
.
.
.
.
.
.
.
.
.
.
.
.
.
.
.
.
.
6.4
6.5
6.6
6.3.2 Focal alignment .
Operation . . . . . . . .
Calibration (TBD) . . .
Figures . . . . . . . . .
.
.
.
.
.
.
.
.
.
.
.
.
.
.
.
.
.
.
.
.
.
.
.
.
.
.
.
.
.
.
.
.
.
.
.
.
.
.
.
.
.
.
.
.
.
.
.
.
.
.
.
.
.
.
.
.
.
.
.
.
.
.
.
.
.
.
.
.
.
.
.
.
.
.
.
.
.
.
.
.
.
.
.
.
.
.
.
.
.
.
.
.
.
.
.
.
.
.
.
.
.
.
.
.
.
.
.
.
.
.
.
.
.
.
.
.
.
.
.
.
37
38
38
38
7 Data reduction using MaxImDL (TBD)
47
A Mounting the SBIG camera
48
B First light of DADOS spectrograph
53
2
1
Instrument specifications
telescope Planewave CDK20
optical design
Corrected Dall-Kirkham
aperture
20 inch = 508 mm
focal length
3454 mm
diffraction limit at λ = 500 nm
0.2 arcsec
focal ratio
F/6.8
central obstruction
39 % of the primary mirror diameter
back focus from racked in focuser
147 mm
camera SBIG STX-16803
CCD
KAF-16803
array
4096 × 4096 pixels2
pixel size
9 × 9 µm2
CCD dimensions
36.9 × 36.9 mm2
CCD type
full frame, antiblooming
shutter
even-illumination mechanical shutter
external ports
USB20/1.x and 10/100 Mbs Ethernet
telescope + camera
field of view
36.7 × 36.7 arcmin2
diagonal field of view
51.9 arcmin
plate scale
0.54 arcsec/pixel
magnitude limit
TBC
3
2
Start-up
Make sure that you go through all of the following operations, and that you stick to the
order.
2.1
Open the telescope box (“the dome”)
In general, observations are only allowed if the dome can be completely opened and locked
in its open position. In the winter make sure that no snow or dirt can fall down onto the
telescope when opening/sliding the dome! Only push/pull the dome from the inside so that
you can check that the telescope fits through the door opening!
• fully open both doors
• make sure the open doors are snapped into their secure locks (they cannot swing back,
see Fig. 1)
• release the dome locks (located inside the dome, see Fig. 1)
• check that the telescope is correctly parked and that it will fit through the doors. (if
this is not the case, stop all activities and call the HPP responsible or the VP-ASL
supervisor at IfA)
• push the dome away into its open position
• engage the dome locks
• close the doors
2.2
Remove mirror cover
When the telescope is parked, in particular when it is not used for a long time period, the
primary mirror should be protected by the corresponding plexiglas cover (see Fig. 2). For
removing/installing the cover pull back the spandex stray light cover and pass the mirror
cover through the bars as shown in Fig. 2.
2.3
Mounting the SBIG camera
The SBIG camera should always be attached to the telescope. If this is not the case or if
you intent to use the telescope without camera, see Appendix A for instructions about how
to mount or dismount the camera.
Important: if the camera is detached use the strap at the telescope handle to fix
the cables! (see Fig. 3)
2.4
Power-on the instruments
In general, all required instruments except the remote computer will be powered-on by activating the main power switch (see Figs. 4, 5).
Default setting:
•
•
•
•
•
•
•
remote computer - OFF
power adapter GM4000 mount - ON
Delta-T control box - ON
Delta-T heater switches (Fig. 8, primary, secondary) - OFF (LEDs off)
CDK Power (Fig. 9, 10) - ON
CDK fan switch (Fig. 10)- OFF
SBIG - ON
The power switch of the remote computer is on the backside (see Fig. 6).
Note that the SBIG does not have an on/off switch. It will start-up and initialize as soon
as it is connected to the power supply. Immediately after activating the main power switch
you should hear the fan of the camera.
4
2.5
Turn-on GM4000 mount
The GM4000 is a computerized mount and needs to be booted (and shut down after use! see
Sect. 3). To start the mount press the on/off button at the GM4000 control box (Figs. 4, 7).
Note that although the button looks like a switch it is actually only a button and it will
resume its initial position after pressing it (so press the button only once!). After a few
seconds the display of the GM4000 hand control will consecutively read “booting”-“startingup”-“version”-“initializing”. Initialization takes about 30 seconds and the mount is ready to
use as soon as the display reads the time and date.
Note that for visual observations the telescope is now ready and can be operated by the
hand control. For an overview of the basic functionalities of the hand control see Sect. 4.1.
2.6
Start-up the instrument software
All instruments can be fully operated by software installed on the remote computer outside
at the telescope. The computer can be remotely accessed by the control room computer.
Turn on both computers. To connect to the remote computer click on the Remote Desktop
shortcut (see Fig. 11) and use the login provided by the ASL supervisor. Ignore the warning
after clicking on Connect and click on Yes.
• control room:
username: XXXXXXX
password: XXXXXXX
• telescope computer:
username: XXXXXXX
password: XXXXXXX
Important: make sure to shutdown the remote computer before turning off the
main switch (see Sect. 3 for the correct shutdown procedure!)
You find the relevant programs grouped together on the desktop of the remote computer
(see Fig. 12):
• main program: MaxImDL
this software is used to control all individual components
• auxiliary software:
these are the individual software distributions from the manufacturers but they are
obsolete when using MaxImDL.
mount control: Virtual Keypad
telescope control / focus control: PWI3
camera control: CCDOps
See the next sections 4 and 5 for operational instructions of the software.
5
2.7
Figures
Figure 1: door locks (top) and dome locks (bottom).
6
Figure 2: Mirror cover.
7
Figure 3: Strap to fix the loose cable when camera is detached.
Figure 4: Overview of electronics: main power switch (circle), remote computer (A), power
adapter GM4000 mount (B), router (B), GM4000 control box (C), Delta-T control box (D),
(handles to push/pull dome (E)).
8
Figure 5: Main power switch (circle). Also indicated are the remote computer (A) and the
power adapter for the GM4000 mount (B).
Figure 6: Power switch of the remote computer (circle).
9
Figure 7: On/Off button at the GM4000 control box.
10
Figure 8: Delta-T control box. Frontside (top) and backside (bottom). The circles indicate the
heater switches in their default positions (OFF, LEDs off).
11
Figure 9: CDK electronics overview with the CDK control panel on top and the Delta-T control
box at the bottom (see also Fig. 8).
12
Figure 10: CDK control panel with default setting: Power ON (A), Fan OFF (B).
13
Figure 11: Shortcut and login for remote access to telescope computer. Note: ignore the warning
after clicking Connect and click on Yes.
14
Figure 12: Software shortcuts on remote computer.
15
Figure 13: Finder scope. Off position (circle) for the light modulator (A) from the front (top)
and the back (bottom). Also indicated are the caps (B) which protect the alignment knobs for
x and y direction.
16
3
Shutdown
!!! To prevent any damage to the instrument and the software it is very important to follow a correct shutdown procedure !!!
For shutting down reverse the start-up procedure:
• Shutdown Camera Disconnect the camera. In MaxImDL go to the camera control
window and click on the Warm up button. Wait until duty cycle is 0 % then click on
the Disconnect button. In CCDops use the ShtDn quick launch button. In the pop-up
panel then select Warm Up &Wait. After a few seconds the software will disconnect
the link with the camera and you can close CCDOps.
• Disconnect observatory utilities In MaxImDL go to the observatory control window and individually disconnect the webcam, the focuser, and the telescope. Then
close the PWI3 then close the programs. If the Virtual keypad was used disconnect
it and close the program.
• Turn off the light of the Finder scope (see Fig. 13)
• Park the GM4000 mount (see also comments in Sect. 4.1)
• Shutdown the GM4000 mount press the on/off button at the GM4000 control box
(Figs. 4, 7). Note that although the button looks like a switch it is actually only a
button and it will resume its initial position after pressing it (so press the button
only once!). After up to 5 seconds the mount will start the shutdown procedure
and the display will read shutting down. Wait until the display gets dark.
• Shutdown the remote computer by alt+F4 and select Herunterfahren
• turn off main power switch (Figs. 4, 5)
• install mirror cover (see Sect. 2.2, Fig. 2)
• open the dome doors and lock them in the secure locks
• release the dome locks
• close the dome from the inside so that you can check that the telescope fits through
the door opening (i.e. that the correct parking position was set).
• engage the dome locks
• close doors and lock the dome
17
4 Instrument operation using individual software packages
This section gives a short overview of basic functionalities of the instrument software. These
should be sufficient for most applications. For more specialized instrument operations see
the original user manuals of the instruments.
4.1
GM4000 mount operation
The GM4000 mount is operated by the Virtual Keypad software which is effectively only a
virtualization of the physical GM4000 hand control. Both the software and the hand control
have exactly the same functionalities and menu navigations. After connection of the software
(menu Connection-Connect ) the physical hand control and the software are synchronized and
therefore one can still use both (but not at the same time). For a complete overview of the
functionalities of the GM4000 mount see the manual, in particular Chapt. 13 (Men¨
ustruktur )
which is also given in the document GM4000 menu-structure.
general
In general navigation through the hand control menus is very intuitive. Start by hitting
MENU and then use the up/down keys (not the E-W/N-S keys!) to navigate through the
menu, use ENTER for selecting submenus and for initializing actions, and use ESC for returning to the superior (sub-)menu. Starting from the main screen (outside the menu, the
display reads the RA and DEC coordinates) you can use the quick access/action buttons as
indicated on the keys to directly enter various object catalogs for selecting new targets and
for using the automatic goto options. The E-W/N-S keys can be used for manually slewing
the telescope to a given position (after unparking the mount, see below). To change the slew
speed go to the main screen and use the up/down keys.
Note when using the automatic goto function the mount will indicate by a beep signal
when it has arrived the new position (turn on the PC-speakers when you are using the
virtual keypad). The fine positioning can sometimes take a few seconds therefore wait with
new operations until you hear the signal.
Note that when the telescope is moving automatically (i.e. by using a goto function) it
will immediately stop as soon as you hit one of the E-W/N-S keys or the STOP key.
unparking / parking of the telescope
For storage inside the dome the telescope needs to be in a fixed parking position predefined in the hand control. As long as the mount is in the parked state it is not possible to
move the telescope.
• press MENU
• select ALIGNMENT (by using the up/down keys, not the N-S/E-W keys!) and hit
ENTER
• select UNPARK/PARK and hit ENTER twice
Note that in case of unparking the mount will simply change its state but the telescope
will stay in its parking position. In case of parking the telescope will automatically move
to its parking position (the parking procedure can be started from any telescope orientation).
tracking speed
Depending on the object you need to change the tracking speed:
• MENU-DRIVE-TRACKING SPEED
One can choose between sidereal, solar (for solar system, e.g. planets), lunar, custom (only
for advanced users), and stop (no tracking).
18
4.1.1
Alignment of the telescope
If the pointing of the telescope is bad you can either try to load a different sky model
• MENU-ALIGNMENT-ALIGNE DATABASE-LOAD MODEL
or you have to redo the alignment procedure:
• MENU-ALIGNMENT-3-STARS (follow the instructions on the display)
For the alignment procedure the GM4000 mount requires calibration/centering of 3 reference
stars plus a few additional stars scattered on the sky for refining the sky model. From the
list of available stars (suggested by the software) choose bright stars that you know and
that are preferably widely scattered on the sky. The telescope will then slew to the (offset)
coordinates of the selected star and you will need to use the N-S/E-W keys to center the
star on the CCD. After centering the star confirm it and continue with the next star.
Note that for the first 3 reference stars it is not possible to cancel the calibration and
to choose a different star if the initially chosen star is not visible (e.g. because of clouds)
or not found. After calibration of the 3 reference stars add additional stars for refining the
correction model. Here you can abort if the star is not visible. Usually about 6 stars (3
reference stars + 3 additional stars) are sufficient enough for accurate pointing. For later
use do not forget to save the new model by
• MENU-ALIGNMENT-ALIGNE DATABASE-SAVE MODEL.
4.2
CDK operation
The software PWI3 is used for setting/monitoring the mirror temperature and the mirror
fan, as well as for operating the automated focusing stage. For the moment the software
should only be used for focusing. After launching the software click on the button CONNECT as indicated in Fig. 14. If the connection was successful the software will immediately
start monitoring and displaying the ambient and mirror temperatures.
Mirror temperature control
Not yet tested, do not use it for the moment.
Focusing
In the right side panel select the tab Focuser (Fig. 14) to operate the focusing stage. The
actual position is displayed in µm. You can change the position by using the IN/OUT buttons or you can manually set another absolute position and hit GOTO. Note when setting a
new position the motor will slightly overshoot and then slowly settle at the given position.
SBIG Filter
R
G
B
L
C
Hα
4.3
focus position at T=?TBD? [µm]
TBD
TBD
TBD
TBD
TBD
TBD
Camera operation (SBIG STX-16803)
The camera is operated by the software CCDOps. After launching the software the camera first needs to be linked to the software. Either use Camera-Establish COM Link or go
directly to the menu Camera-Setup which will both link the camera and open a panel for
setting the camera configuration (e.g. CCD temperature, binning mode, readout mode).
Both options are also available from the quick launch tab shown in Fig. 15. When linking of
the camera was successful this will be indicated in the monitoring panel at the bottom right
together with the actual CCD temperature, the duty cycle to stabilize the temperature, and
the selected filter (see Fig. 15).
19
standard operation settings (Camera-Setup, see Fig. 16)
• CCD cooling In order to reduce dark current the CCD can be cooled by a Peltierelement. Depending on ambient temperature use a setpoint between −20 ◦C and 0 ◦ C.
As soon as the temperature is reached the duty cycle should drop from 100 % to a
value < 75 %. If this is not the case then the camera cannot stabilize the temperature
and one should choose a higher setpoint.
• resolution mode This sets the on-chip binning value: high for no binning, medium
for 2 × 2 binning, and low for 3 × 3 binning. Besides for increasing the flux (but
lowering resolution) and therefore minimizing the integration time, binning is also used
for minimizing the overhead time for downloading the image. In high resolution mode
the image size is 4096 × 4096 pixels with a download time of TBC whereas for low
resolution the image size is 1365 × 1365 pixels with a download time of TBC.
• other settings do not change other settings but use default values given in Fig. 16.
selection of filters
For selecting different filters go to the menu Filter and click on the new filter. The monitoring panel at the bottom right will display Filter:moving until the new filter is set.
acquiring images
For acquiring images use the quick launch button Grab (see Fig. 15). In the pop-up panel
one can then choose the following options:
• Exposure Time Sets the integration time. Note that the shortest possible integration
time is 0.12 s. When choosing an integration time < 0.12 s the software will automatically reset it to 0.12 s. Also note that for high precision photometry one should use
integration times > 0.5 s or even > 1 s because the shutter might not be reliable for
shorter integration times.
• Dark Frame Choose Only for recording of dark images only, None for recording of
light images only, and Also for recording both light and dark images.
• Image Size Sets the (sub)image to be read out. Default is Full for reading out the
complete CCD-array.
• Exposure delay not used, choose 0.
• Special Processing Choose None for single image recording and use Auto Grab for
recording sequences of images. For single recording one can save the image after acquisition by using the quick launch button Save (see Fig. 15). If Auto Grab is selected a
new pop-up window will appear where one can select the root filename and directory
using the button Set Name/Dir, and the Number of exposures to be consecutively acquired. Do not change the other settings (use default values given in Fig. 17).
focusing mode
For focusing one can use the Focus button (see Fig. 15) for consecutively acquiring images. In the pop-up panel one can then choose the following options:
• Exposure Time Sets the integration time
• Frame size (Sub)array to be readout (e.g. to minimize overhead/download time)
• Turbo Mode Fast readout of CCD without proper resetting of the charges after readouts (e.g. to minimize overhead time, default is Off ).
• other settings do not change other settings but use default values given in Fig. 18.
20
image inspection
For quick image inspection use the quick launch buttons XHair (cross-hairs), Hist (histogram), and/or use the Contrast pop-up panel which appears after each readout (see
Fig. 15). In the Contrast panel one can manually set the greyscale range and select different zoom options (Mag).
4.4
Figures
Figure 14: PWI3 panel. Only use functions indicated by circles.
21
Figure 15: CCDOps main panel. Quick launch options and monitoring panel at the bottom
right are indicated by circles. Open sub-panels: cross-hairs, histogram, and contrast.
22
Figure 16: Camera setup panel with default values and user options indicated by circles.
23
Figure 17: Autograb panel with default values and user options indicated by circles.
Figure 18: Focus panel with default values and user options indicated by circles.
24
5
Instrument operation using MaxImDL
The observatory software MaxImDL is based on the widely used ASCOM driver standards
for telescopes, cameras, webcams, focuser assemblies, and many other instruments used in
Astronomy. Therefore, all the individual components can be controlled by MaxImDL and
advanced options, e.g. automatic focusing or planetarium utilities, can be used. In addition
the software has a wide range of built-in data reduction utilities and can manage calibration
data flows based on fits-header informations.
This section gives a short overview of basic functionalities of MaxImDL. These should
be sufficient for most applications. For a first glance into the functionalities of MaxImDL
see also the video tutorials (http://www.cyanogen.com/maxim_tut.php) provided by the
manufacturer and/or the MaxImDL user manual.
Note: operation using MaxImDL assumes a well aligned telescope. If the pointing is bad or insufficient repeat the alignment procedure using the hand control
as described in Section. 4.1.1.
5.1
Observatory control
All observatory utilities except the operation of the CCD camera (e.g. telescope pointing,
focusing, planetarium utilities; for the camera operation see Sect. 5.2) are controlled by the
Observatory window (e.g. see Figs. 20-27). The observatory window can be launched by
the quick access button in the main panel of MaxImDL (see Fig. 19).
5.1.1
Setup
Go to the Setup tab (see Fig. 20). Connect each component separately starting from the
top using the corresponding Connect buttons. For disconnecting start from the bottom.
Note:
When connecting the Focuser the PWI3 software is launched in the background. Leave it
open and only close it after closing MaxImDL.
Note:
The webcam is only used when using the Spectrograph.
5.1.2
Telescope control
The telescope can be controlled manually by the Telescope tab (see Fig. 21) or one can use
the Go to button for known objects given by the Catalog tab (see Fig. 23) or by using
the right-click option of the mouse by the All Sky tab (see Fig. 24) or the Zoom tab (see
Fig. 25).
Telescope
The information window summarizes the current position, the tracking status and if the
telescope is moving or Idle.
Use the Mount panel to Park/Unpark the telescope and to set sidereal tracking on/off.
It is only possible to enable/disable Sidereal Tracking / No Tracking but setting the Solar
Tracking / Lunar Tracking is only possible using the hand control (see Section 4.1).
The telescope can be moved manually in a similar way as with the keypad on the hand
control by using the keys in the Nudge panel. The speed (the movement corresponding to
one mouse click) can also be set there.
To move the telescope to specific coordinates use the Target Coordinates panel and click
on the Go To button to move the telescope.
All the other options in this panel should already be correctly set. For example the Site and
Optics settings are directly loaded from the GM4000 mount (see Fig. 22). Note that Alt/Az
can only be displayed by the different panels if the Site and Optics settings are correctly set.
25
Catalog
To find a specific object one can either display objects using Search ID for searching for
the object’s name or one can restrict the list of all available objects by defining different
Criterions using the Search Region option. For example by specifying a minimum altitude
one can only display all currently visible objects.
To move the telescope to an object highlight the object in the list and click on the Go to
button.
All Sky and Zoom
This tab shows a map of the sky. Use the Options button to change the density or type of
the displayed objects and turn on/off the object labels. See also the mouse right-click and
scrolling options, e.g. to zoom in/out or to move the telescope to the current mouse position.
5.1.3
Focusing options
The automated focuser is operated by the Focus tab in the observatory window (see Fig. 26).
The Focuser Status panel displays the current focuser position and the results of the last
focus measurement.
There are two approaches for focusing the image onto the camera:
Manual focusing
Use both the Camera Control window (see Sect. 5.2) and the Observatory/Focuser
window:
• Take multiple exposures (see Sect. 5.2 and Fig. 31) while moving the focuser in/out by
using either the Incremental or the Absolute panel (see Fig. 26).
To speed up the image acquisition choose a subframe around the object to be focussed
(see Sect. 5.2).
• Optimize the FWHM or the Half Flux Dia. values given by the information panel in
the Camera Control window.
Automatic focusing
Use the Autofocus panel in the Observatory window (see Figs. 26, 27):
• click on the Options button and set the options as given by Fig. 26.
• click on the Snapshot button to acquire a full-field image (using the current settings
given in the Camera Control window.
• in the full-field snapshot image MaxImDL automatically selects the brightest star as
focus reference. If another star should be used for focusing click on this star. The Information panel in the Observatory/Focus window will then display the coordinates
of the chosen reference star.
• click on the Exposure button to define the exposure settings for automatic focusing
(see Fig. 27), i.e. define the Exposure Time, the Binning mode, the size of the Subframe,
and the Filter.
• Finally, click on the Start button in the Autofocus panel to start the automatic
focusing procedure.
• MaxImDL then automatically acquires images of the chosen reference star for different
focus positions. The results are continuously displayed in the Information panel and a
HFD / Position plot is created (see Fig. 26).
• As soon as the minimum of the HFD / Position plot can be determined click on the
Abort button to stop the focusing.
• Use the Absolute panel to move the focuser to the Minimum position.
26
5.2
Camera control
All camera operations (e.g. setup and image acquisition) are controlled by the Camera
Control window (e.g. see Figs. 28, 31). The camera control window can be launched by the
quick access button in the main panel of MaxImDL (see Fig. 19).
Setup
Go to the Setup tab (see Fig. 28). Click on Setup Camera to set the camera model. Use the
settings according to Fig. 28 and only change the model (i.e. STX-16803 for standard imaging
or ST-1603 for spectroscopy (Sect. 6)). Click on Setup Filter to set the filter settings (e.g.
filter names, see Fig. 30). When using the ST-1603 camera set Filter or Controlling Camera
Model to No Filter else use SBIG Universal. Note that the filter settings can only be
accessed and changed when the camera is disconnected. If the filter settings are still ok
(default situation) click on the Connect button. The camera should now be connected
and some basic information (e.g. cooling status) is displayed in the information area (see
Fig. 28). Activate the cooling by clicking on Coolers on and set a setpoint value by clicking
on Cooler for Camera 1.
• CCD cooling In order to reduce dark current the CCD can be cooled by a Peltierelement. Depending on ambient temperature use a setpoint between −20 ◦C and 0 ◦ C.
As soon as the temperature is reached the duty cycle should drop from 100 % to a
value < 75 %. If this is not the case then the camera cannot stabilize the temperature
and one should choose a higher setpoint.
Image acquisition
For acquiring images go to the Expose tab (see Fig. 31). Here one can define all exposure
settings and also define named presets for often used settings.
In particular use the following options:
• Exposure Preset Sets basic settings for commonly used camera presets (e.g. Single
Imaging, Continuous Imaging, Dark ). Choose the preset that matches your intention
and adapt some of the settings below to optimize the exposure.
Note: whenever one of the pre-defined settings of the chosen preset is changed this is
indicated by a star (e.g. ∗ Single Imaging).
• Seconds Sets the integration time. Note that the shortest possible integration time is
0.12 s. When choosing an integration time < 0.12 s the software will automatically reset
it to 0.12 s. Also note that for high precision photometry one should use integration
times > 0.5 s or even > 1 s because the shutter might not be reliable for shorter
integration times.
• Frame Type Choose Light for recording normal images with shutter open and Dark
for dark images with the shutter closed.
• Filter Wheel Select different filters. The monitoring panel at the bottom right will
display Waiting for Filter wheel until the new filter is set.
• Binning Set the on-chip binning value (1 for no binning). Besides for increasing the
flux (but lowering resolution) and therefore minimizing the integration time, binning
is also used for minimizing the overhead time for downloading the image.
• Subframe Sets the (sub)image to be read out. Click On and draw the subframe using
the mouse.
Note: for the ST-1603 Subframe does not work and needs to be de-activated!
• Acquisition settings Choose Single for single exposures, Continuous for multi-exposures,
or Autosave for multiple exposure settings (see also Fig. 32).
• more Options (e.g. automatic dark exposure/subtraction) are available using the
Options button.
• Start / Stop Start or stop the exposure with the chosen settings.
27
5.3
Image inspection
For quick image inspection use the stretch button (see Fig. 19) to manually set the greyscale
range and use the mouse-click options:
• scrolling for zooming in/out
• dragging + Shift + left-click for adjusting brightness and contrast (similar to DS9
functionality)
• dragging + Ctrl + left-click for shifting the image
For more options see Sect. 7 (TBD).
5.4
Figures
Figure 19: Quick launch buttons for camera control and observatory control (two buttons on
the right) and for setting the image cuts (i.e. stretch, left button.)
Figure 20: Observatory: Setup tab. Connect/Disconnect each component separately. The
Webcam is only used for Spectrometry.
28
Figure 21: Observatory: Telescope tab.
Figure 22: Observatory: Telescope tab with Site and Optics sub-panel.
29
Figure 23: Observatory: Catalog tab.
30
Figure 24: Observatory: All Sky tab.
Figure 25: Observatory: Zoom tab.
31
Figure 26: Observatory: Focus tab with sub-panel Autofocus Settings (accessed by the Options button).
Figure 27: Observatory: Focus tab with sub-panel Refinement Exposure (accessed by the
Exposure button).
32
Figure 28: Camera control: Setup tab with Setup Camera sup-panel.
Figure 29: Camera control: Setup tab with Cooler sup-panel.
33
Figure 30: Camera control: Setup tab with Setup Filter sup-panel.
Figure 31: Camera control: Expose tab.
34
Figure 32: Camera control: Sub-panel Autosave Setup accessible by the Expose tab (see
Fig. 31).
35
6
Spectroscopy with the DADOS spectrograph
6.1
General comments
Operation of the DADOS spectrograph has been tested successfully (see Appendix. B) but
the observing procedure and the calibration strategy still need to be improved and established respectively.
Next steps:
• determine approximate correlation between the µm screw positions and
observed spectral region
• determine best focus positions for the Slitviewer-Webcam and the spectrum
on the ST-1603 camera.
Note: use the calibration lamp and solar spectrum
• Improve and mark alignment of the Webcam with respect to the slits. In
principle all slits fit onto the field-of-view of the webcam (see Fig. 39).
Note: align the slits horizontally as in Fig. 39 for N-S and E-W movement
of the target.
• align the spectrograph assembly and the ST-1603 camera to the telescope
N-S / E-W movement of the target.
• observe different spectral standard stars at different pointing directions and
test tracking quality for target on the slit.
• investigate manual tracking options.
Note: for very small pointing corrections of a few arcsec the mount first
moves away a greater distance and then slowly comes back to the corrected
position (compensation of gear-wheel errors). This is not practical for manual tracking corrections but it might be possible to switch-off or relax this
setup for the mount.
• check whether it is more practical to use an external Webcam software
(instead of MaxImDL) to simultaneously have the webcam and the telescope
controls open
• establish full calibration procedure
Note: see DADOS tutorial by Bernd Koch from Baader planetarium
(http://www.baader-planetarium.de/dados/download/tutorial-dados-d.pdf)
• check impact of Barlow-Lens, i.e. check vignetting with/without lens.
Note: the spectrograph is optimized for F/10 but the telescope is F/6.8.
The barlow lens should correct for that.
6.2
Spectrograph assembly and setup
See Figs. 33-38 for an overview of the packing of all the components and their assembly for
observation. See Fig. 41 for the calibration assembly using the neon calibration lamp.
The spectrograph consists of the following sub-parts:
• DADOS spektrograph:
- 3 reflection gratings (200 L/mm, 900 L/mm, 1200 L/mm)
- 2 eyepieces + focus lens for using eyepieces as slit viewer - different adapter pieces
for telescope and camera
• Webcam slit viewer + USB Extender-cable
• ST-1603 CCD camera
• 1.5x Barlow-lens to extend telescope focal ratio of F/6.8 to ∼F/10
• Neon calibration lamp
• telescope adapter piece
36
For attachment to the telescope use the adapter piece as shown by Fig. 37. For the Webcam use the USB-Extender cable and connect it to the remote telescope computer. For
the ST-1603 use the same USB-cable as for the STX-16803 which is already laid through
the GM4000 mount and connected to the remote computer. Connect the ST-1603 power
adapter to the power outlet box belonging to the main power switch (see Fig. 5).
IMPORTANT: Always make sure that the webcam USB cable and the ST-1603
power cable cannot get stuck when moving the telescope!
IMPORTANT: Make sure that the Barlow-lens is tightly screwed into the DADOS spectrograph and that the complete spectrograph assembly is securely attached to the telescope and all the attachment screws are tight!
IMPORTANT: see DADOS manual for exchanging the gratings. Only exchange
the gratings in a clean environment with electrostatic shielding! Use the optical
gloves and never touch the gratings by hand!
6.3
6.3.1
Alignment
Spatial orientation
Attach the ST-1603 and the Webcam with orientations as indicated by Fig. 37. This makes
sure that all three slits are visible and horizontally oriented in the webcam (see Fig. 39).
When attaching the complete spectrograph assembly to the telescope make sure that it
is oriented horizontal or vertical with respect to N-S / E-W. This makes it easier to move
the target onto the slit using the telescope N-S/E-W keys.
Important: Before attaching the spectrograph assembly to the telescope make
sure that the focal alignment is done (using the calibration lamp, see next Section)!
6.3.2
Focal alignment
The focal alignment needs to be done off the telescope using the slit illumination and the
Neon calibration lamp:
A) slits on Webcam:
• turn on the slit illumination (see Fig. 34).
• focus the slits onto the webcam by moving the webcam in/out.
i.e. the slit-image should look similar to Fig. 39 or better
• tightly fix the webcam position
• turn off the slit illumination
B) spectrum on ST-1603:
• Attach the calibration lamp to the spectrograph assembly according to Fig. 41.
i.e. replace the Barlow-lens by the 2” receptacle to attach the lamp
• loosen the Focuser fixation screw (see Fig. 34)
• start continuous imaging by the ST-1603 camera
• focus the Neon spectrum onto the ST-1603 camera by using the camera Focuser of
the DADOS spectrograph. (see Figs. 34, 43)
• tighten the Focuser fixation screw
• detach the calibration lamp and re-attach the Barlow-lens
Important: Also make sure that the spatial orientation of the webcam, the camera, and the complete spectrograph assembly is correct (see previous Section)!
37
6.4
Operation
All sub-components required for the operation of the Spectrograph (i.e. the telescope, the
ST-1603 CCD camera, and the Webcam) are controlled by MaxImDL. See Section 5 for
operational instructions for the telescope and the CCD camera. In particular note how to
setup and connect the ST-1603:
Important: When using the ST-1603 camera set Filter or Controlling Camera
Model to No Filter !
Important: for the ST-1603 Subframe does not work and needs to be de-activated!
The webcam is also connected by the Observatory window (e.g. see Fig. 20) and operated
by the Webcam tab (see Fig. 42).
General operation procedure:
• slew telescope to target
• if required: focus target onto slit focal plane imaged by ST-1603 by using the MaxImDL Focus tab.
- when using telescope adapter piece as in Fig. 37 focus position ∼ 24913 µm (TBC)
• center target onto desired slit by using the N-S/E-W buttons of the telescope
control (see Figs. 21, 42:
- select step size 10 Sec. or less
- if required turn On/Off slit illumination
• turn Off slit illumination
• acquire spectrum with ST-1603 (see Fig. 44)
• change spectral range by using the grating µm screw (see Fig. 40 and comments therein)
• check target-slit alignment
• acquire spectrum with ST-1603
• change spectral range by using the grating µm screw
• check target-slit alignment
• acquire spectrum with ST-1603
• ...
6.5
Calibration (TBD)
TBD
see also http://www.baader-planetarium.de/dados/download/tutorial-dados-d.pdf
6.6
Figures
38
Figure 33: Spectrograph assembly: packing.
Top:
(A) DADOS case, (B) Barlow-lens, (C) Webcam, (D) USB Extender-cable, (E) ST-1603 case
Bottom:
(A) Mounting accessories, (B) Eyepieces, (C) Calibration lamp Neon, (D) Barlow-lens,
(E) DADOS manual, (F) additional Gratings, (G) DADOS tools, (H) DADOS spectrograph,
(J) Webcam, (K) ST-1603 CCD, (L) ST-1603 power cable, (M) ST-1603 accessories
39
Figure 34: Spectrograph assembly: DADOS spectrograph.
(A) Slit illumination, (B) towards ST-1603, (C) Focuser for ST-1603 with fixation screw (circle),
(D) towards telescope, (E) Slit viewer, (F) µm screw for grating position
Figure 35: Spectrograph assembly:
Connect ST-1603 CCD camera with the DADOS spectrograph.
(A) ST-1603, (B) adapter piece, (C) DADOS
40
Figure 36: Spectrograph assembly: Webcam
The webcam has been modified by an adapter peace to attach the slit-viewer focusing lens.
(A) Webcam, (B) adapter piece, (C) Focusing lens
41
Figure 37: Spectrograph assembly:
Complete assembly with attached Barlow-lens and Webcam ready to be attached to the telescope. Note that this webcam orientation will produce the slit-image as in Fig. 39. The telescope
adapter piece as shown is optimized for focusing the target onto the slit.
(A) Barlow-lens, (B) Webcam, (C) Adapter piece for telescope
42
Figure 38: Spectrograph assembly attached to the telescope.
Note: in this image the webcam is mounted 180◦ opposite to the recommended position (see
Fig. 37).
Figure 39: Optimized slit orientation on the webcam.
43
Figure 40: Changing the grating position to change the spectral range:
Loosen the fixation screw (but do not completely remove it!) and use the µm screw to change
the illumination angle of the grating. Note that pushing the grating (µm screw goes in) works
better than pulling (push fixation screw sideways to support pulling the grating with µm screw):
(A) µm screw, (B) fixation screw
Figure 41: Spectrograph calibration assembly:
Replace the Barlow-lense by the 2” receptacle and attach the Neon calibration lamp. Note: for
storage of the Barlow-lens attach it to the barlow-lens adapter piece.
(A) 2” receptacle, (B) Barlow-lens on adapter piece for storage, (C) Neon calibration lamp,
(D) telescope adapter piece (not used for calibration)
44
Figure 42: Webcam operation with slit illumination On (top) and Off (bottom). Settings
for the webcam are accessible by the Options button.
Note that in these images the webcam orientation is not in the recommended position (see
Figs. 37, 39)
45
Figure 43: Neon calibration spectrum.
Figure 44: Commissioning image of Vega spectrum.
Note that in this image the webcam and spectrograph assembly orientation are bad. For the
recommended orientations see Sect. 6.3 and Figs. 37, 39.
46
7
Data reduction using MaxImDL (TBD)
TBD
see also video tutorial at http://www.cyanogen.com/maxim_tut.php
47
A
Mounting the SBIG camera
IMPORTANT
Mounting or dismounting the camera requires two people. Do not try it on your own!
DISMOUNTING
Make sure the SBIG power cable and the USB cable are unplugged (see Fig. 48)!
Do not unplug the filter wheel cable and the autoguider cable.
DISMOUNTING
Never dismount the filter wheel which is directly attached to the camera (see Fig. 46)!
For storage attach the camera cover as shown in Fig. 46.
Mounting or dismounting the camera requires two people. One person holds the camera and
the other person tightens/loosens the screws. Note that you need to use the US Allen key
set (red set, blue set is metric). For using the camera mount the adapter plate that has
an edge whereas for visual observations with eye-pieces use the round adapter plate (Allen
screw 5/32”, see Fig. 45).
• Attach the camera adapter plate to the CDK according to Fig. 45 (with the wedge side
facing upwards, use the Allen 1/32” key).
• Loosen all four 5/64” Allen screws at the camera flange (Fig. 46).
• Mount the camera according to Fig. 47 with the autoguider head on the same side as
the wedge of the adapter plate. Align the camera parallel to the wedge. Make sure the
camera flange tightly fits to the camera adapter plate and then tighten all four 5/64”
Allen screws.
• Plugin the SBIG power cable and the USB cable (Fig. 48)
48
Figure 45: Adapter plates for the camera (top) and for the eye-pieces (bottom). Note the wedge
side facing upwards (away from the CDK control panel). Use the 5/32” Allen key to mount the
plates.
49
Figure 46: SBIG camera with attached filter wheel. For storage attach the cover plate (top).
For mounting the camera loosen all four 5/64” Allen screws at the camera flange.
50
Figure 47: Mounting the camera. Note the autoguider head (A) is at the same side as the wedge
of the adapter plate. Make sure the camera flange tightly fits to the camera adapter plate and
then tighten all four 5/64” Allen screws.
51
Figure 48: Attach the camera power cable and the USB cable.
Note: in this image instead of the USB cable the Ethernet cable is used. However, only use the
USB-cable!
52
B
First light of DADOS spectrograph
Figure 49: Uncalibrated Vega spectrum using the 900 L/mm grating.
The different spectral regions are not calibrated but simply scaled to match each other. The
plate scale is ∼0.096 nm/pixel which was determined using the solar spectrum and the Neon
calibration spectrum.
Figure 50: As comparison to our uncalibrated first light spectrum (Fig. 49):
Flux calibrated Vega spectrum by Bernd Koch: DADOS Tutorial Baader Planetarium
(http://www.baader-planetarium.de/dados/download/tutorial-dados-d.pdf).
53