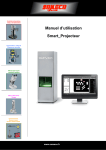
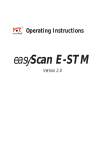
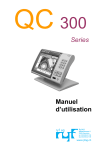
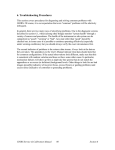
1
Optical Edge and Crosshair
User’s Guide
Metlogix Inc.
33 South Commercial Street
Manchester, NH 03101 USA
June 2011 Issue 1
Features of the M2 Measuring Solution
■ Designed for Multi-Touch software control: In addition to conventional mouse interface, the expanded MultiTouch logic allows for versatile pan and zoom of the and active part view with a pinch, swipe, or press.
■ Advanced crosshair probe toolbox: For Optical Edge enabled systems, both “simple” and “auto edge”
crosshair probes are available. The “auto edge” probe captures points on edges automatically. The M2’s industry
first Edge Logic™ system(OE enabled systems only) enables gesture driven control of start and end
measurement commands. Start and finish measurements quickly, without the need for direct software interaction.
■ Graphics-based “Part View” constructions: Generate popular construction types, like Distances and
Tangent Lines, from within the graphical part view itself.
■ Industry-leading support for additional tolerance conventions: Tolerances can be applied in the standard
feature to feature fashion, or by using a more traditional “place tolerancing” system. Engineering drawings may
indicate that all features reported to 2 significant digits will get one tolerance value, where all features reported to
3 digits will get another. The M2 software allows for the entry and application of universal tolerance values
according to these feature resolution groupings.
■ Feature Detail Graphics: Individual feature views provide informative drawings displaying point cloud
distributions, as well as nominal deviations, and tolerance results. Scroll through your measured features list from
this view for a feature by feature display of Actual, Nominal, Tolerance, Deviation and Data Fit Type information.
■ Report Generation: Flexible reporting capability supports a range of application requirements, from simple to
complex. Custom report headers, footers, and printout graphics can all be included as part of easily generated
program playback routines, or simply printed, or exported as data files, on the fly.
■ Support for all current industry standard software methodologies for Stage and Optics calibration:
Simple machine/optic calibration can be achieved using popular machine and optic correction methods. (LEC,
SLEC, NLEC, Distance Calibration).
■ Industry leading Operating System platform: The Windows® 7 operating system represents the current
enterprise solution for personal computer based software operating systems. You gain the performance and
reliability of a globally recognized software solution as part of you measuring machine package.
■ Additional Windows based functionality: Other Windows functionality may also be utilized to meet and
address specific application requirements. Flexibility in exporting data, printing reports and interfacing to third
party windows applications will be enhanced under this widely supported operating system.
Page | 2
Welcome!
Thank you for choosing to learn more about the M2 Optical Edge and Crosshair Software package. The following
guide will present and explain the (9) key concepts and procedures of the M2 software package.
This guide will:
■ Serve as a syllabus for understanding the core fundamental concepts of the M2 inspection software.
■ Provide a quick reference format for seeking help on a particular procedure from within a topic.
■ Present in a logical learning flow, necessary for understanding any piece of measuring software.
Page | 3
Sections
Section 1: Introduction to the User Interface (UI)
The M2 Toolbar Buttons
7
The M2 Menu
11
The Command and Control Buttons
12-17
Section 2: Feature Measurement/Construction
Measure Circle Example
19
Repeat Feature Measurement Example
19
Probe Points Requirements by Feature
20
Line Construction Example
20
Using EdgeLogic Example
20-21
Supported Constructions
22
Section 3: Probing and the Optical Edge Probes
Using an External Crosshair
24
Teaching the Optical Edge probe
25
Using the Manual optical edge probe
26
Using the Auto optical edge probe
27
The Auto Point Entry Feature
28
Section 4: The Feature List and Part View
18
23
29
Using the Feature Multi-Select Tool
30
Deleting Features
30
Accessing Feature Detail Screens
31
Panning/Zooming the Part View
31
Section 5: Part Alignment and Datuming
32
Establishing a Part Skew
33
Establishing a Part Datum
33
Rotate Coordinate System Example
34
Offsett Alignment Example
34-35
Section 6: Applying Tolerances
6
36
Page | 4
Applying X/Y Position Tolerance Example
37
Using the “Auto Rounding” Nominals Feature
37-38
Using the “Place Tolerance” System
38-39
Supported Tolerances by Feature
40
The Tolerance Symbols/Buttons
41
Section 7: Reporting
42
Selecting a Report Template
43
Hide/Show Report Data Example
43
Printing a Report
44
Customizing a Report
44-45
The Printout Settings
45
Section 8: Data Export
46
Data File Export Example
47
The Data Export Settings
47
Section 9: Part Programs, Editing, and Playback
Program Playback
49
Using Program Playback Mode Example
50-51
Using Program Edit Mode Example
51-52
Appending Program Steps Example
52
Re-Measuring Feature Steps Example
53
Deleting Program Steps Example
54
Play from Selected Step Example
54
Adding a User Message Example
55
48
Page | 5
Section 1: Introduction to the User Interface(UI)
This section describes the main M2 software interface. The diagrams below illustrate basic button function
information and button location for various M2 software commands. These button commands and their functions
are enlarged for additional detail below the diagrams.
The M2 “Viewpanel”
“Viewpanel” layouts:
Vertical Format:
The M2 vertical layout contains two(2) main viewports, one on the upper portion of the screen and one at the
bottom. The upper viewport displays encoder position, feature detail, and active measurement information. The
bottom viewport displays the part view and detailed report data. The feature and program list are always
displayed to the right of the lower viewport, along the lower right hand side of the screen.
Page | 6
The M2 “Vertical Format” Toolbar Buttons
Buttons
Order below is according to the “toolbar” image above (left to right).
■ Home Button: Resets all viewports to default view positions. Exits a measurement routine.
■ Magnification Button/Menu: Provides access to the magnification selection menu.
■ Undo Button: Executes an “Undo” on the last performed software command.
■ Help Button: Launches a PDF viewer with the M2 User’s Manual.
Page | 7
■ M2 System Button/Menu: Provides access to the System Command button.
Order below is according to the “toolbar” image above (left to right).
■ Probe Menu: Provides access to the Probe selection buttons.
■ Measure Point Button/Menu: Measures Point feature and provides access to the Point Menu.
■ Measure Line Button/Menu: Measures Line feature and provides access to the Line Menu.
■ Measure Circle Button/Menu: Measures Circle feature and provides access to the Circle Menu.
■ Measure Distance Button/Menu: Measures Distance feature and provides access to the Distance Menu.
■ Measure Angle Button/Menu: Measures Angle feature and provides access to the Angle Menu.
■ Measure Datum Button/Menu: Measures Datum feature and provides access to the Datum Menu.
Order below is according to the “toolbar” image above (left to right).
■ Part View Selector: Sets the bottom view panel to display the part view.
■ Data View Selector: Sets the bottom view panel to display the data view.
■ Preferences Menu: Provides access to configured preference selection items, including unit type, distance
calibration, and the on-screen keyboard launcher. (These items are configured in “Settings”-“Desktop”).
■ Zoom Menu: Provides access to the Part View Zoom control buttons.
Page | 8
Horizontal Format:
The M2 horizontal layout contains three(3) main viewports, one large viewport on the left side of the screen and
two smaller viewports to on the right side of the screen. The left viewport is the “focus” port and can provide a
large display of the current encoder position, selected feature detail, or part view . The view selector buttons in the
top tool bars will set the desired view to the “focus” viewport. The viewports themselves can also be pressed to
switch views on the fly. By default, the feature and program list is displayed below the small right hand viewport.
The location of the small viewports can be changed within the “Desktop” settings screen.
Page | 9
The M2 “Horizontal Format” Toolbar Buttons
Buttons
Order below is according to the “toolbar” image above (left to right).
■ M2 System Button/Menu: Provides access to the System Command button.
Page | 10
■ DRO View Selector: Sets the DRO view to the “focus” view port
■ Part View Selector: Sets the part view to the “focus” viewport.
■ Data View Selector: Sets the data view to the “focus” viewport.
■ Magnification Button/Menu: Provides access to the magnification selection menu.
■ Undo Button: Executes an “Undo” on the last performed software command.
■ Help Button: Launches a PDF viewer with the M2 User’s Manual.
Order below is according to the “toolbar” image above (left to right).
■ Measure Point Button/Menu: Measures Point feature and provides access to the Point Menu.
■ Measure Line Button/Menu: Measures Line feature and provides access to the Line Menu.
■ Measure Circle Button/Menu: Measures Circle feature and provides access to the Circle Menu.
■ Measure Distance Button/Menu: Measures Distance feature and provides access to the Distance Menu.
■ Measure Angle Button/Menu: Measures Angle feature and provides access to the Angle Menu.
■ Measure Datum Button/Menu: Measures Datum feature and provides access to the Datum Menu.
■ Preferences Menu: Provides access to configured preference selection items, including unit type, distance
calibration, and the on-screen keyboard launcher. (These items are configured in “Settings”-“Desktop”).
Page | 11
M2 User Interface
Interface and Button Detail:
The M2 System Menu:
Print: executes print command for the current view.
Settings: provides access to the setup screens buttons.
Play Part: initiates run of the current, or loaded, part.
Open Part: allows loading of previously saved part.
New Part: clears loaded part or current feature/program list.
Save Part: saves file of current feature program state.
Log Out: returns system to login screen, logging off user.
Exit: exits the current software session.
Page | 12
Command/Control Buttons:
Simple Crosshair: selects the manual crosshair probe for manual point
entry.
Manual Edge Probe: selects the manual edge probe for user assisted
optical edge detection measurements.
Auto Edge Probe: selects the auto edge probe for automatic optical edge
detection measurements.
Optical Edge Teach: initiates the three-pass optical edge teach routine.
Zoom All Features: sets the current Part View zoom level to fit the
current features in the feature list.
Zoom Selected Feature: sets the current Part View zoom level to the
specified marquee region.
Zoom Marquee: sets the current Part View zoom level to a defined
marquee region.
Page | 13
Polar/Cartesian: sets the current coordinate system display type to Polar or
Cartesian.
DMS/DD: sets the displayed angular unit type to Degrees/Minute/Seconds or
Decimal Degrees.
IN/MM: sets the displayed linear unit type to inch or millimeter.
On-Screen Keyboard: displays the On-Screen keyboard.
Distance Calibration: initiates a distance calibration routine.
Format Toggle: displays the data report formats available for selection;
Standard, Tolerance, CSV, and European.
Hide Row: hides the currently selected report view data row. Report exports and
printouts will reflect these hidden rows.
Edit Cell: enabled editing of applicable report view data cells.
Export Data: displays buttons for data export in .CSV or .TXT format.
Page | 14
Filter All: applies the “displays all features” filter to the currently selected data
report format.
Filter Selected: applies the “filter by selected feature” filter to the currently
selected data report format.
Filter Toleranced: applies the “filter by tolerance features” filter to the currently
selected data report format.
Filter Passed Tolerance: applies the “filter by passed toleranced features”
filter to the currently selected data report format.
Filter Failed Tolerance: applies the “filter by failed toleranced features” filter to
the currently selected data report format.
Filter Selected: applies the “filter by selected feature” filter to the currently
selected data report format.
Record Into: executes a “Record Into” routine on the currently selected program
edit step. The “Record Into” step will be recorded after the selected step.
Play From Here: executes a “Program Playback” from the currently selected
program edit step.
Re-measure Feature: prepares the software to re-measure a previously
measured feature while in Program Edit Mode.
Delete Feature Step: deletes the currently selected program step.
Add User Message: displays a text entry screen for adding user messages to
programs.
Page | 15
Measure/Construct Buttons:
Repeat Point: enables the multi-measure capability for point features.
Create Point: displays the Create Point feature screen.
Repeat Line: enables the multi-measure capability for line features.
Create Line: displays the Create Point feature screen.
Repeat Circle: enables the multi-circle capability for line features.
Measure Arc: initiates a discrete Arc feature measurement.
Create Circle: displays the Create Circle feature screen.
Page | 16
Repeat Distance: enables the multi-distance capability for Distance features.
Create Distance: displays the create Distance feature screen.
Repeat Angle: enables the multi-angle capability for angle features.
Create Angle: displays the create Angle feature screen.
Page | 17
Measure Skew: enables the multi-angle capability for angle features.
Rotate Skew: displays the Rotate Skew Angle screen.
Offset Skew: displays the Offset Skew screen.
Page | 18
Section 2: Feature Measurement and Construction
Concepts:
■
Feature measurements in the M2 software can be performed either explicitly using a Crosshair or Optical
Edge probe, or automatically using the Auto Edge probe along with the EdgeLogic system(Available for
Optical Edge enabled systems only).
■
The Edge Logic probing system allows features to be measured without interacting with the software itself.
Crossing the same edge location twice will initiate an Edge Logic measurement, when the desired points have
been probed on the feature, crossing an edge location twice again will complete the measurement. The M2
software will make an intelligent feature type determination for Circles, Arcs, Lines, and Distances.
■
Explicit feature measurements can always be performed by choosing the desired feature and probing at least
the minimum required points on the feature’s edge. Features can be measured or constructed, as above, or
by allowing the M2 software to determine the feature type automatically, using Edge Logic, and based on the
points collected.
■
Feature constructions are performed by selecting the desired feature construction type, then selecting the
parent features to be used for the feature construction. When the feature measurement is complete, the
desired construction will be added to the feature list and part view.
■
The M2 software supports measuring, constructing and creating: Lines, Circles, Angles, Points, and
Distances. When a feature measurement is complete, it is added to the Feature List and Part
View.
■
Detailed feature information, including coefficients and a data cloud of the points probed, is always available
for measured features.
■
Applicable tolerances types can always be applied to measured features.
Page | 19
Simple Crosshair “Measure Circle” Example:
The M2 Software supports measuring Circle features and can be accomplished using the following procedure:
■ Select the Measure Circle button from the Measure Toolbar.
■ Using the “Enter” button, or by pressing in the yellow points windows, probe at least 3 points on the feature’s
edge using the simple crosshair probe, selected from the probe menu.
■ Press “Done” ”(Green Check Button) to complete the Circle Measurement. The Circle is added to the Feature
List and Part View.
*All supported feature types can be measured explicitly using the same procedure described above. In
addition, any of the M2 Probe Types may be used to measure features explicitly according to the
procedure above. In the case of the Auto Edge probe, the Enter key need not be used, points will be
entered automatically upon crossing an edge.
“Measure Repeat” Example:
The M2 software supports measuring features in “Repeat Mode” using the following procedure:
■ When measuring in “Repeat Mode”, the Measure Feature button does not need to be pressed between each
feature measurement. The system prepares the next feature measurement automatically at the completion of the
previous feature. This mode is designed for measuring a large quantity of “like features” sequentially. “Repeat
Mode” is available for all feature types using the same procedure.
■ Press the measure feature button for the desired feature type and select the corresponding repeat button for
that feature.
■ You can now begin probing the first feature. When finished press “Done”.
■ You will notice that the system is now ready for another line measurement. This will continue until “Repeat
mode” is exited. Press the “Done” ”(Green Check Button) button to exit “Repeat Mode”.
Page | 20
Points requirements for probed and constructed features:
■ Point Features require one (1) or more points. When more than one (1) point is probed or used in a
construction, the average point is the result.
■ Line Features require two (2) or more points. When more than two (2) points are probed, a data fit type is
applied to the feature’s data cloud.
■ Circle and Arc Features require three (3) or more points. When more than three (3) points are probed, a data
fit type is applied to the feature’s data cloud.
■ Angle Features require four (4) or more points. The first (2) points must be probed on one leg of the angle,
followed by two (2) additional points on the second leg. More points can be added after the initial (4) in any
location of the angle’s legs.
■ Distance “Features” are measured or constructed using only two (2) points. Distances are measured by
probing (2) points, and constructed using (2) previously measured points.
“Construct Line” Example:
The M2 Software supports Tangent Line Constructions, they can be performed using the following procedure:
■ Select the measure line button from the measure toolbar.
■ Select the two circles from the feature list or part view that are to be parents of the tangent line construction.
■ Press “Done” ”(Green Check Button) to complete the Tangent Line construction. The feature will be added to
the feature list and part view.
*All supported feature constructions can be performed using this same procedural method.
Using “Edge Logic” Example:
The Edge Logic measurement capability allows for feature measurement without the need for “key-press”
interaction with the software. Automated measure start and end, as well as intelligent feature type assignment are
made possible using Edge Logic.
■ Select the Auto Edge optical edge probe from the probe menu.
Page | 21
■ At a typical probing velocity, probe the same (2) edge locations on the feature to be measured.
■ The measure prompt will be displayed in the upper view port.
■ Probe the remaining points desired around, or along, the edge of the feature to be measured. Our points probed
will be displayed in the measure feature display in the top viewport.
■ When the desired number of points is reached, again cross an edge location twice, at a moderate probing
velocity.
■ The feature measurement will automatically be completed, and the feature will be added to your feature list and
part view.
Page | 22
Supported Constructions:
The list below contains all of the possible feature construction types on a feature-by-feature basis. The “feature
types” from the list below represent the measure feature types that should be chosen from the M2 to achieve the
desired “construction sub-type” listed to the right. The features chosen as parent feature will determine which
construction subtype is produced.
Feature Type
Construction Sub-type
Feature Type
Construction Sub-type
Point
Average Point
Line
Average Line
Duplicate Point
Duplicate Line
Center Point
Perpendicular Line
End Point
Mid Line
Mid Point
Center Line
Intersect Point
Tangent Line
Tangent Point
Parallel Line
Perpendicular Point
Feature Type
Construction Sub-type
Feature Type
Construction Sub-type
Distance
Duplicate Distance
Circle or Arc
Duplicate Circle/Arc
Center Distance
Average Circle
Nearest Distance
Bolt Circle
Farthest Distance
Length Distance
Feature Type
Construction Sub-type
Angle
Duplicate Angle
Line Angle
Included Angle
-180deg minus Angle
180deg plus Angle
360deg minus Angle
Page | 23
Section 3: Probing and the Optical Edge Probes
Concepts:
■
In the M2 software, features are measured either manually, using an externally supplied crosshair and image
source, manually entering points in the software, or by probing points automatically across the edge of a
feature using one of M2’s “Auto Edge” optical edge probes.
■
There are two main types of M2 probes: Crosshair probes and Optical Edge probes.
■
M2 systems that support optical edge measurement probes will display a probe menu providing access to the
various probe choices. For systems without optical edge support, the M2 software will always be prepared to
accept manually entered points from within a feature measurement routine.
■
The M2 crosshair probe is used to manually enter point positions that are determined using some externally
generated crosshair image, or other reference based positioning mechanism. The simple Crosshair probe
requires that the operator’s eye be used to line up the crosshair with the feature edge, or requires positioning
of a target artifact according some reference location. Points are then entered by pressing the “Enter” key or
by pressing the yellow “measure feature” view port.
■
The two M2 Optical Edge probes(Manual and Auto) will capture points automatically upon crossing a feature
edge; The Manual optical edge probe requires that edge crossings be confirmed by keypress, where the last
edge crossed is stored for “keypress” entry. The Auto optical edge probe enters points immediately for each
edge crossed within a feature measurement.
■
Both Optical Edge probe types require that the measuring machines light levels have been successfully
taught in the M2 software. If, when in a feature measurement, points are not being registered upon edge
crossing, the optical edge system should be re-taught.
Page | 24
Page | 25
“Using an External Crosshair” Example:
The M2 Software supports measuring features with an “External Crosshair” using the following procedure:
■ In Optical Edge enabled systems, select the crosshair probe from the probe menu. For crosshair only systems
proceed to the next step.
■ Press a Measure Feature button from the center or bottom toolbar.
■ Position your comparator crosshair, or externally generated crosshair, on the edge of the feature to be
measured.
■ Press the large measure feature button,” or click in the yellow measure window, to enter points for the feature
measurement. Press “Done”(Green Check Button) to complete the measurement.
Note: If a measurement fails after pressing “Done”, please refer to the probe points requirements list or the
measure feature examples, both found in Section 2.
The Optical Edge Probes
Page | 26
M2 systems equipped with Optical Edge capability can make use of two types of Optical Edge probe, the
“Manual” Optical Edge probe and the “Auto” Optical Edge probe.
The use of either of these probes requires that a valid optical edge teach routine be performed in the M2 software.
“Teaching Optical Edge” Example:
■ Select the “Probe Teach” button located in the probe menu.
■ Follow the on-screen instructions for positioning your optical sensor throughout the 3-stage teach routine.
■ At the completion of the teach routine a message will be displayed indicating the results of the teach. After a
successful teach, the Optical Edge probes can be used to perform feature measurements. If an edge teach failure
occurs, attempt the teach routine again. If failure continues, please contact your machine service provider for
assistance.
“Using the Manual optical edge probe” Example:
Page | 27
The Manual optical edge probe requires that edge crossings be confirmed by keypress. The point acquired at the
last edge crossing will be added to the current feature measurement when either the large measure feature
button(vertical format) or the yellow measure window(horizontal format) is pressed. The M2 Software supports
measuring features with the “Manual Edge probe” using the following procedure:
■ Select the Manual optical edge probe from the probe menu.
■ Press a Measure Feature button from the center or bottom toolbar.
■ Cross an edge on the feature to be measured, a point enter sound will be played indicating an edge crossing.
■ Press the large measure feature button, or click in the yellow measure window, to enter the point for the last
edge crossed. This point will be added to the counter for the current feature measurement.
■ After the desired number of points have been probed, press “Done”(Green Check Button) to complete the
measurement.
Note: If a measurement fails after pressing “Done”, please refer to the probe points requirements list or the
measure feature examples, both found in Section 2.
“Using the Auto optical edge probe” Example:
Page | 28
The Auto optical edge probe enters points automatically upon crossing an edge. The point acquired at the edge
crossing will be added to the current feature measurement routine. The M2 Software supports measuring features
with the “Auto edge probe” using the following procedure:
■ Select the Auto optical edge probe from the probe menu.
■ Press a Measure Feature button from the center or bottom toolbar.
■ Cross an edge on the feature to be measured, a point enter sound will be played and the point will be added to
the current measurement.
■ After the desired number of points have been probed, press “Done”(Green Check Button) to complete the
measurement.
Note: If a measurement fails after pressing “Done”, please refer to the probe points requirements list or the
measure feature examples, both found in Section 2.
“Auto Point Entry” Example:
Page | 29
The M2 software supports “Auto Point Entry” with the crosshair or the Manual Edge probe using a count-down
timer.
■ Select the crosshair probe from the probe menu. Select the desired feature to measure.
■ A small red dot will appear in the measure window of the top viewport. This red dot is the activation button for
the “Auto Point Entry” timer. Press the dot to enable the timer.
■ Position the stage on the edge you would like to begin probing on. As you move, the dots will turn green
indicating the timer is armed.
■ Once you stop moving the stage, the timer graphic will count down and a point will be automatically “fired” at the
current crosshair position.
■ You can now move on to the next point to be fired.
Note: When using the count-down timer, you may accidentally enter an incorrect point. To remove an entered
point, simply press the “Undo” button or the Cancel Point button(red “X”), and proceed with probing.
Page | 30
Section 4: Feature List and Part View
Concepts:
■
The Feature List and Part View are the primary means of viewing and manipulating features that have been
measured, constructed, or created in the M2 software.
■
Selecting features in the feature list allows for feature construction, access to feature detail views, as well as
provides a means of deleting features.
■
The Part View is a graphical display of features measured, constructed, or created in the M2 software.
Features are displayed in their relative positions to each other.
■
The Part View supports feature selection for constructions using the same simple method as the Feature List.
Feature selection from the Part View also provides a means for deleting features and accessing additional
feature detail.
■
A simple set of tools are provided for zooming and panning around the Part View. For touch screen enabled
systems, pinch-zooming and two finger panning is also supported.
■
In program playback, the part view and feature list provide a means for both program playback and program
editing guidance. In program playback mode, the Part View will highlight the next feature to be measured, as
well as indicate measured versus unmeasured features, using a black vs grey shaded feature graphic. In
program edit mode, the feature list will indicate your current position within the program sequence, and
indicate the position in the sequence where edit commands will be performed.
Page | 31
“Feature Selection Tool” Example:
The M2 software manages feature selection using the Multi-Selection button located at the top of the feature list.
■
Features in the Feature List can be selected and de-selected either individually or in groups. The Multiple
Selection tool is used to choose which selection mode is active.
■
The single bar selector allows for individual feature selection and de-selection when pressed.
■
The double bar selector allows for mutiple features to be selected, one feature at a time.
■
Pressing or clicking on the current selection mode button will toggle to the alternate selection mode.
“Delete Feature(s)” Example:
Feature deletion in the M2 software:
■
Features can be deleted by selecting them in the Feature List and then pressing the Delete button(Red “X”)
from the bottom toolbar. The Delete key on a keyboard may also be used.
■
Features can be deleted either individually or in groups by using the Multi-Selection mode.(see above).
■
To delete all the features in the Feature List you can press and hold the Delete button.
■
Features that have been deleted can be restored by pressing the Undo button.
Page | 32
“Feature Detail View” Example:
Accessing the Feature Detail screens:
■
To access expanded Feature Detail, select the desired feature from the Feature List, and press the
DRO/Feature Detail viewport on either the left or right side of the screen. Or in the M2 vertical format, feature
detail will be displayed automatically upon selecting a feature from the feature list.
■
The expanded Feature Detail view will fill either the large “focus” viewport, or for M2 vertical format, the top
view port of the M2 application window.
■
The Feature Detail screen contains the feature graphic, showing the probed points, as well as fit and
tolerance zones.
■
The Feature Detail screen also provides access to tolerancing and datuming functions. These topics as well
as an explanation of the actuals, nominals, tolerance, and deviation screens are covered in Sections 6 and 7.
“Part View Zoom/Pan” Example:
Panning and Zooming the Part View:
As features are measured, constructed and created, they will populate the Part View. Depending on the zoom
level, features may fall outside the viewable area of the Part View. Panning allows you to “grab” the Part View and
move it in any direction.
■
With two-fingers spaced about an inch apart, press within the Part View, hold down, and move your fingers.
The Part View will pan according to the direction of your finger swipe. When using a mouse, the right mouse
button is used to pan.
■
Features that are outside the limits of the Part View can also be brought into viewable range by using one of
the several available zoom commands found in the Part View Zoom Menu. Touch screen systems with multitouch support can also make use of “pinch-zooming” within the Part View.
Page | 33
Section 5: Part Alignment and Datuming
Concepts:
■
Datuming in the M2 software can be accomplished using any of a variety of alignment operations. These
operations may be used individually or in combination, and will be based upon the capability of the measuring
machine, as well as the particular alignment requirements of the application.
■
Datum operations can be performed in the form of explicit datum feature measurements, by modifying the
individual coefficient values of previously measured features, or by constructing datum features from existing
features.
■
The M2 software supports a two part alignment system. Skew correction for a part, as an alignment step,
corrects for x-axis alignment error. Establishing an origin, or datum, point sets a coordinate system zero
position. Used together, a complete two part alignment can be achieved.
■
When measuring a datum dependent part, it is advisable to go through the process of establishing a datum or
part alignment first, followed by measuring the features associated with that datum.
■
”Offset Skew” allows for setting a skew line position in a location that is not directly measured by the system.
This skew position is identified by offset values from other measured or constructed features.
■
”Rotate Skew” allows for the presetting of the current skew orientation to a specified angular value.
Page | 34
“Part Skew” Example:
The M2 software supports skew or secondary alignment and can be explicitly measured using the following
procedure:
■ Select a Probe from the probe menu.
■ Press the “Datum” toolbar button to access the datum submenu.
■ Press the “Measure Skew” button to initiate the explicit skew measurement or skew construction.
■ Probe at least (2) points on the line to apply skew to, or select the features from the feature list or part view that
you would like to construct the skew line from.
■ Press Done(“Green” Check Button) to complete the skew measurement.
Note: Previously measured or constructed features can also be used to apply skew by manually zeroing the theta
angle coefficient and the X or Y axis coefficient. Pressing the label buttons to the left of these coefficients, in
either the feature detail screen or the mini-DRO view port, sets the corresponding value to zero.
“Part Datum” Example:
The M2 software supports setting a Datum(Origin) point and can be performed using the following procedure:
Note: Setting a datum position is typically performed on a previously constructed or measured feature. Datum
points can be explicitly measured as well using the “Measure Datum” button.
“Datum Construction” Method
■ Press the “Datum” toolbar button to initiate the datum procedure. The system is now prepared to set an existing
feature to the datum, or to explicitly measure a datum position.
■ Select the feature that you would like to set as the Datum Zero position.
■ Press “Done” to apply the datum to the selected feature.
Or…to measure explicitly:
■ After pressing the measure datum button, probe a point and press Done(“Green” Check Button)
Page | 35
Note: Previously measured or constructed features can also be used to apply a datum by manually zeroing the X
and Y coefficients of the feature. Pressing the label buttons to the left of these coefficients, in either the feature
detail screen or the mini-DRO view port, sets the corresponding value to zero.
“Rotate Coordinate System” Example:
The M2 software supports “Rotating” of the coordinate system. The rotation will be added to the feature list to
indicate the manipulation of the coordinate system.
■ Press the “Datum” toolbar button to access the datum submenu.
■ Press the “Rotate” button to access the “Rotate Coordinate System” screen.
■ Enter the desired angular rotation value into angle field.
■ Press “Done” to complete coordinate system rotation.
“Offset Alignment” Example:
The M2 software supports establishing an “Offset Alignment” from previously measured features.
■ Press the “Datum” toolbar button to access the datum submenu.
■ Press the “Offset Alignment” button to access the “Offset Alignment” screen.
■ Using the Axis Selector, select the axis that you would like the offset applied in.
■ Enter the desired offset values to be applied to feature #1 and #2 and press “Done”.
■ The system will exit to standard Measure mode, displaying the measure prompt.
Page | 36
■ Measure or select the features that you would like to be the basis for the offset alignment values entered in the
previous step.
■ Press “Done” to complete the offset alignment. The new alignment feature will be added to your feature list an
part view.
Page | 37
Section 6: Applying Tolerances
Concepts:
■
The Tolerance functionality in the M2 software allows you to apply blueprint nominal information to the
measured and constructed features of a target measurement subject.
■
Each feature type has a supported group of tolerance conditions that can be applied to that feature. Typically,
tolerance conditions are applied to features after valid datum operations have been performed and a part
coordinate system has been established.
■
The feature detail screens are used to apply tolerance types to features, enter
tolerance values, and execute other tolerance related operations.
■
Once a tolerance is applied, you can see on screen, or in a report, the actual, nominal, and variance data for
a given feature.
■
Tolerance conditions can be applied to a single part inspection routine or included within a part program for
repetitive part measurement.
■
Tolerances can be applied in the standard feature to feature fashion, or by using a more traditional “place
tolerancing” system. Engineering drawings may indicate that all features reported to 2 significant digits will get
one tolerance value, where all features reported to 3 digits will get another. The M2 software allows for the
entry and application of universal tolerance values according to these feature resolution groupings.
■
Notification that a feature has failed tolerance is indicated in the feature list, the part view, the feature detail
view, and the report view by way of red color signaling.
Page | 38
“X/Y Position Tolerance” Example:
The M2 software supports applying an XY positional tolerance to a circle feature and can be accomplished by
using the following procedure:
■ Select the circle feature in the feature list you intend to apply the tolerance to.
■ Access the feature detail screen for the circle by selecting it in the feature list or by pressing in the feature detail
viewport.
■ Toggle the feature detail screen from “Actuals” view to “Nominals” view using the screen selection button
located above the feature coefficients.
■ Set the nominal position values in X and Y for your circle feature.
■ Select the X or Y positional tolerance button from the toolbar and then enter the desired tolerance values in the
appropriate fields.
■ Switch the detail view screen from “Tolerance” to “Deviation” using the view selector button to observe the
results of the applied tolerance.
“Auto-Round Nominals” Example:
The M2 software supports “Auto-Rounding” of nominal values and can be accomplished according to the
following example:
The following software feature can often save time when repetitively entering nominal feature data. The key
principal is that when you first measure a part that needs tolerances applied, it is common for the measured
values to be close to the blue print nominal values. Using “Auto-Round Nominals”, the nominals for each
coefficient can be quickly rounded up or down to match the likely nominal values, based upon the actual
measured values.
■ Align and establish a datum for the part being measured part.
■ Measure the first feature that requires a tolerance from the print. In our example we will use a “Circle”.
Page | 39
■ Select the detailed feature view for this circle. The actual values of the circle you just measured are now
displayed.
■ Press the “Actuals/n/t/d” button, to display the nominal entry screen.
■ To enter the nominal information, select the numeric field to the right of the X button, the values will now turn
blue and a numerical keypad will appear. You can either use the keypad to manually enter the nominal value, or
“Auto Rounding” can be used, as described below.
■ As an example, the measured value of the circle is 0.4997”, the nominal value from the print is 0.5000”. In this
case, to round up to .5000” to match the print, simply press the “4” digit. This will round the X nominal value to
.5000”.
Note: The digit selected will cause rounding, either up or down, based on the value in the place to the right. For
example, if the value is .3727 and you select and press the ‘2’, your new value will be .3730.
■ To make adjustments up or down to any digit, select the digit, and while holding down, slide your finger or the
mouse pointer downward off of the digit. This will select the digit place to be incremented or decremented from.
■ Slide your finger or mouse pointer to your left to increase the value, or to the right to decrease the value.
“Place-Tolerancing” Example:
The M2 software supports “Place-Tolerance” style tolerance entry and can be configured using the procedure
below:
This time saving convention relies upon using tolerance information found in the “detail block” of a blue print. This
blueprint element indicates the tolerance values to be used, based on the number of digits reported for the actual
value of a feature. The following is an example of how this may appear:
.X
+/- 0.1”
.XX
+/- 0.01”
.XXX
+/- 0.001”
The above graphic indicates that if a diameter coefficient has a nominal value of 1.50, the tolerance that should
be applied is +/- .01.
Note: In order to take advantage of “place tolerancing” the option must be enabled. Set the item “Enable
tolerance places” to “Yes” in the Tolerance Setup screen of the settings section of the M2 software. “Tolerance
place data on new part” can also be set to “Yes” within this setup screen in order to apply the same place
tolerance chart to all newly created parts. This method of tolerancing is supported for both metric and English
values.
■ Align and datum you part. Measure the first feature to be toleranced. For our example we will use a circle.
Page | 40
■ Once you have measured the circle, select the detailed feature view. You will see the actual values of the circle.
Select the Nominal/n/t/d/a button once. You will now see the nominal data entry page. Enter the nominal values
for the X.Y and D coefficients either by using the keypad or the “Auto-rounding” feature.
■ Check your blueprint and see how many digits to the left of the decimal point were used to specify the
dimension. Then look at the tolerance block and look for the corresponding number of “X’s” and the value
associated with it.
■ For example, if the nominal value for the X position was 1.500 and the Y value was 2.000 and the Diameter was
1.000, then look for the value associated with XXX. For this example we will use .001 for XXX tolerancing.
■ Press the third digit to the right of the decimal point for the X,Y and D values. You will now see all digits to the
right of this place position go gray.
■ From the nominal entry screen, you will see an icon “X.X, X.XX, X. XXX” in the bottom toolbar. Press this button
and the place tolerance set up screen will appear. In this screen, you can enter the values from the tolerance
block of you blue print that corresponds to the various “X.X” value. Only fill in the place fields that correspond to
the print you are working from.
Page | 41
Supported Tolerances:
The following list contains all of the supported tolerance types on a feature by feature basis. The “feature type”
from list below represents the feature type that supports the tolerance listed to the right.
Feature Type
Tolerance Type
Feature Type
Tolerance Type
Point
True Position (RFS)
Line
X/Y Positional
X/Y/Z Positional
Angle (Theta)
Parallelism
Angularity
Perpendicularity
Straightness
_____________________________________________________________________________________
Circle
True Position
Distance
(RFS/MMC/LMC)
X/Y/Z Positional
Length
X/Y Positional
Diameter
Concentricity
Runout
Roundness
_____________________________________________________________________________________
Arc
True Position(RFS)
Angle
Angle(Theta)
X/Y Positional
Diameter/Radius
Page | 42
The following tolerance symbols indicate the associated tolerance type as well as the correct corresponding
tolerance entry button within the M2 software.
Page | 43
Section 7: Reporting
Concepts:
■
After feature or part measurements, any of (4) standard report formats can be viewed within the Report View
screen. By default, any features within the Feature List will be populated within each of these (4) report
formats.
■
The report styles range from simple, including only feature numbers and actual values, to complex, including
graphical representations of the results and tolerance data.
■
Individual rows of feature data can be hidden from any report format to create fully customized reports for
print or export.
■
Flexibility for report contents and formatting allows for full customization of the data format, header
information, and header and footer graphics. Part view graphics, time and date stamps, and operator
information can all be included for any report type.
■
Reports can be viewed, printed, or exported at the conclusion of a single part measurement, or they can be
included in a part program to support repetitive and/or automated measurement and reporting.
■
Reports can be printed as hard copies to standard Windows compatible printers, or exported as data files in
popular file formats.
Page | 44
“Select Report Template” Example:
The M2 software supports (4) report format templates. These templates can be toggled using the following
procedure.
■ Populate your Feature List with measured, constructed, or created features.
■ Access the report view screen using the “Report View” button found in the top or bottom toolbar.
■ Select from the available report templates using the “Report Type” menu button found in the bottom toolbar.
■ The name of the currently selected report template will be shown at the top left of the report screen.
“Hide Report Data” Example:
The M2 software supports hiding and displaying of specific report data rows and can be accomplished using the
following procedure:
■ Populate your Feature List with measured, constructed, or created features.
■ Access the report view screen using the “Report View” button found in the top right toolbar.
■ Select the individual or group of data rows that you would like to hide for a given report template.
■ Press the “Hide Data” button from the bottom toolbar to hide these rows from display. The hidden rows will be
excluded from printed reports, and file exports.
■ Rows of hidden data for a given feature can be restored by pressing the “Hide Data” button with the feature
selected.
Page | 45
“Print Report Template” Example:
The M2 software supports printing the selected report view to a Windows compatible printer using the following
procedure:
■ Display the desired report template in Report View and configure the report to look like the desired printed
report.
■ While in Report View, press the “Print Report” button found in the M2 System Menu and confirm print settings
from the displayed Windows Print dialog box.
“Customize Report Template” Example:
The M2 software supports customizing reports with custom header information, part view graphics, grid lines,
column headers, page numbers, etc.. The following diagram and list of “Print Options” can be used to configure
the report contents to meet specific reporting requirements:
Page | 46
The options listed below can be configured either globally from within the “Printouts” setup screen, or at the point
of each print execution.
Note: To configure the software to prompt for “Printout” settings at each Print command, configure the “Printout”
settings item called “Prompt for Print Settings” to “Yes”.
“Printout” settings items:
■ Print Report Header Set this field to “Yes” to include the report header in your report printout. Additional
items, listed below, will affect what items are included in the report header. Set this item to “No” to omit the report
header from printed reports.
■ Print Column Header Set this field to “Yes” to include column headers in report printouts. The column
header labels the contents of a report column by category. Some examples are X, Y, Deviation, etc…Set this field
to “No” to omit the column header from printed reports.
■ Print Grid Lines Set this field to “Yes” to include grid lines on printed reports. Set this field to “No” to have
the grid lines removed from printed reports.
■ Print “PrintLogo.bmp” in Header: Set this field to “Left”, “Center”, or “Right” to include a custom bitmap
image in the desired location of the report header. Set this field to “No” to omit the custom bitmap from the report
header. Place the desired custom bitmap image, with the file name “PrintLogo.bmp”, into the root location of your
M2 software.
Page | 47
■ Print User Name in Header Set this field to “Left”, “Center”, or “Right” to include the currently “logged-in”
user name in the desired location of the report header. Set this field to “No” to omit the username from the report
header.
■ Print Date/Time in Header Set this field to “Left”, “Center”, or “Right” to include the system date and time
in the desired location of the report header. Set this field to “No” to omit the date and time from the report header.
■ Print Part View with Data Set this field to “Top”, “Bottom”, or “Watermark” to include an image of the
current part view in the desired location of the printed report. Setting the field to “Watermark” will print an alpha
blended part view image underneath the report data. Set this field to “No” to omit the part view image from printed
reports.
■ Print Page Number in Footer Set this item to “Yes” to include a page number in the report footer. Set this
item to “No” to omit page numbers from report printouts.
■ Printed Part View Height Set this item to the desired size of the part view to be included with the printed
report. This item can be set to 25%, 50%, 75%, or 100% of the native size of the part view image.
■ Print Custom Text in Header Enter custom alpha-numeric information into these fields to be displayed in
the report header. Custom text entered into these fields will always be aligned left and bottom in the report
header. Leaving these fields blank will omit custom text from the printed report.
Page | 48
Section 8: Data Export
Concepts:
■
Measurement data in the M2 software can be exported to a data file on your computer from the Report View
screen. Data can be exported in standard ACSII “.txt” format, or in .csv format for import to a spreadsheet or
SPC application.
■ The exported data file will be formatted according to the selected report template at the time the export is
executed. The exported file will also reflect any other modifications made to the report view, including the
hiding or modification of data cell contents.
■
The destination of exported data files can be configured from within the “File Locations” setup screen. Data
can be exported to a folder location, a fixed drive location, or a network location.
■
Data file exports can have custom file names applied, and can be configured to append an existing file,
overwrite an existing file, or be added as a new file with an “auto-number” applied.
■
Data Export steps that are part of a saved part program can be edited to change the report format type of the
exported data file.
Page | 49
“Export Data File” Example:
The M2 software supports exporting of measurement data in either .txt or .csv format and can be accomplished
using the following procedure:
■ Display the desired report template in report view and configure the report formatting according to the file export
style desired.
■ Press the “Export Data” toolbar button, found in the bottom toolbar, and choose the desired export format.
■ The exported data file will be written to the designated target location, and a message will appear indicating
successful export of the data file.
■ To select a specific target location for the file export, set the export location in the “File Location” setup screen.
The export options can be configured as a global setting from within the “Export Setup” screen, or on an export by
export basis by enabling the “settings export prompt” from within the “Export” setup screen.
Note: To configure the software to prompt for “Export” settings at each File Export command, configure the
“Export” settings item called “Prompt for Export Settings” to “Yes”.
“Export” settings items:
■ File Name Configure the desired base filename for file exports in the “File name” field of the “Export” setup
screen.
■ Include column headers Set this field to “Yes” to include column headers in file export. The column header
labels the contents of a report column by category. Set this field to “No” to omit the column header from printed
reports.
■ Target file type Set this field to “Append” to append exported data to the existing target file, set to
“Overwrite” to overwrite the target file with a new file on each data export, and set to “Auto Number” to create a
new file on each export that increments, starting with the Auto number file name identified below.
■ Auto number file name Set this field to the desired file export “auto-number”. The file number will
automatically increment when the target file type is set to “Auto Number”.
Page | 50
Section 9: Part Programs, Editing, and Playback
Concepts:
■
In the M2 software, groups of measured, constructed, and created features can be saved to a part program
file. Part program files, when loaded, will prepare the M2 software to repeat a sequence of feature
measurement steps. When a part program file is loaded, all existing feature list contents are cleared, making
room for the newly loaded part features.
■
The M2 software can be in any of three operating modes: interactive mode, playback mode and edit mode.
■
”Interactive” mode is the default “free measure” mode of the M2 software and is typically used for either part
program creation, or for performing “on the fly” or non- programmatic measurements. “Playback” mode is for
running a previously saved or recently created part measurement routine. “Edit” mode is used for modifying
the steps of a previously saved or recently created part program.
■
In “edit” mode, program steps can be modified, deleted, and/or added to an existing part program. Functions
such as, re-measuring features, appending measurement steps, and changing system parameters, can all be
modified within the M2’s “edit” program mode. Only programs that have not been locked by a supervisor will
allow access to the Edit mode functionality.
■
Once a part has been loaded, a part run can be executed to begin a program playback routine, or to enter the
programs “edit” mode. The M2 software will provide a visual indication of the current part program step and
what the next step in the measurement routine is.
■
At the completion of program playback, a program options panel will be displayed. The display panel provides
you with a convenient mechanism for replaying the part program, staring a new part, or evaluating or editing
the currently loaded program.
■
Additional feature and system characteristics will also be saved as part of an M2 part program. Details such
as, applied tolerances, selected magnifications, and data output or printing can all be saved as part of an M2
part program file.
■
Part program files in the M2 software will always be saved using the extension “.mlxpart”.
Page | 51
Page | 52
Program Playback
Groups of measured and constructed features, as well as other software operations, can be “played back” as part
of a sequence of program steps. When a saved part is newly opened, the Feature List will populate with shaded
(grey) feature items. This grey color indicates that the features are “un-measured”, or not yet played back.
The feature data for a newly opened part will reflect the last recorded actual values prior to the part program being
saved. As the program playback proceeds, measured features will display in white (pass or no tol) or red (fail tol)
and reflect newly acquired measurement data.
The Blue Pin will indicate the current step in the program playback routine. The playback state can be toggled by
pressing or clicking on the resume playback button in the bottom toolbar.
IMPORTANT: Programs created using the Optical Edge probes will always default to the Manual Edge probe type
for the first feature in a program playback. This will help avoid unwanted probe firing in the event edges must be
traversed in order to position your probe for the start of playback. See section 3 for information on using the
Manual Edge probe.
-With the exception of the above rule, all feature program steps will be played back according to the probe type
used to measure the feature initially. In addition, the operator can always over-ride the probe type used in
playback by selecting the desired probe from the probe menu.
Page | 53
“Using Program Playback Mode” Example:
The M2 Software supports playing back part programs using the following procedure:
■ Press the play button in the M2 System Menu to execute program playback.
In the event the program is newly created (not from a previously saved file) a default program file name will
automatically be assigned and the program file saved.
■ Probe the first feature in the playback sequence according to the screen instruction, and the Blue Pin position in
the “run” list. The feature to be measured will be highlighted by a white region on grey background, within the part
view. The first two features in playback should be probed using the red ball as the target location. Once a valid
coordinate system is established, subsequent features will require the target ball be green in order for the
currently selected probe to be active. The target playback ball will be red until the stage coordinates are close to
the target ball at which point the ball turns green.
■ Continue measuring the programmed features of the part program, where each target ball will turn green
allowing for point entry by either manual crosshair or an optical edge probe. The size of the active target playback
zone can be increased or decreased the Edge Zone parameter in the “Programs” settings screen.
Page | 54
■ When the program playback is complete, the program options screen will appear. The part program can then;
be Replayed, cleared for New Part creation, display measurement results, or edited(pending adequate privileges).
■ For features with tolerances applied, the features name in the “run” list, the part view graphic, and the
corresponding detail view field, will display in either red (fail) or white(pass).
■ Other software functions may also execute during playback. Data exports, report printouts, and user messages
are some examples.
Program Editing
All newly created part programs can be edited.
Program Editing may or may not be available for a given saved part program. A programs author may select the
availability of program edit controls using the “Allow program editing” setting in the program properties edit step.
Note: It is always recommended that a program author generates an “edit copy” of any program file. Because the
“Allow programming editing” setting is permanent and not reversible by a regular user, this copy will be needed if
further edit changes are required after “locking” the program.
Changes made to an existing program will be reflected in subsequent program runs for the current program file
session. If the file is reloaded these changes will only be reflected if the program file was saved.
“Using Program Edit Mode” Example:
The M2 software supports editing of current, or previously saved part programs using the following procedure:
■ To edit existing program files, open the target program file.
.mlxpart
■ Press the “program play” button from the M2 menu.
■ Press the “Run” button found at the top of the feature/program list to toggle to edit mode.
Page | 55
The “Edit” mode will always be available for either newly created or “unlocked” programs.
■ The program steps will be listed within the “Edit” view. Select a program step to make changes to recorded
feature detail, tolerance values, and data export and printing commands.
■ Use the feature detail screens to make changes to tolerance and feature data for a selected program step. Use
the “on-screen” controls to make changes to data export and print steps, and magnification steps.
■ If desired, save the program file using the “Save” button from the M2 System Menu .
“Appending Program Steps” Example:
The M2 software supports appending, or “recording-in”, program steps and can be accomplished using the
following procedure:
■ Select the program edit view.
■ Select the program step where you would like your newly created program operations to be added. These
newly added program operations will be inserted after the selected program step.
■ Press the “Record Into” button from the bottom toolbar.
■ A blue “Edit Pin” will be positioned between the currently selected program step and the following step,
indicating the current “record into” position.
Note: When editing a program that has already been “played back”, the context generation will occur
automatically, filling in context dependent program steps automatically from the previously acquired program data.
For programs that have not yet been “played back” the software will prompt the operator to manually measure all
context dependent features prior to completing the context generation.
■ Once the “record into” edit command has been initiated, the operator may measure or construct new features or
insert data output or print command steps according to the standard software procedures for these functions.
■ These newly added program steps will be added to the current program edit list.
■ To save the newly added program steps to the currently loaded part program, press the “save” button found in
the M2 System Menu.
“Re-Measuring Feature Steps” Example:
Page | 56
The M2 software supports re-measuring feature steps in “edit” mode and can be accomplished using the following
procedure:
■ Select the program edit view.
■ Select the program feature step of the feature that you would like to re-measure.
■ Press the “re-measure feature” edit command from the bottom toolbar.
■ The software will prompt the operator to re-measure the selected feature. Proceed with re-measuring the
selected feature and press “done” when finished.
■ The newly measured feature data will replace the existing measured feature within the program.
Note: The “re-measure” edit command is commonly used to record new environment variables, along with the
feature measurement, for a given step within a program. The newly created feature program step will contain all
program variable information that exists at the time the “re-measure” is executed.
■ To save the newly created feature program steps to the currently loaded part program, press the “save” button
found in the M2 System Menu.
“Deleting Program Steps” Example:
Page | 57
The M2 software supports deleting program steps and can be accomplished using the following procedure:
■ Select the program edit view.
■ Select the program step that you would like to delete.
■ Press the “delete program step” edit command found in the bottom toolbar.
■ The selected program step will be deleted.
■ Newly deleted program steps will be deleted for current part playback session. Save the program using the
“save” button found in the M2 System Menu to permanently apply these “delete” changes to the part program.
“Play from Selected Step” Example:
The M2 software supports playing a part program back from a specified program step, and can be accomplished
using the following procedure:
-When “Play from Selected Step” is used, the software will determine requirements for generating feature context.
If context dependent features have already been measured, the system will advance immediately to the selected
“play from step”. If it is determined that additional context information is required, the operator will be prompted to
measure the feature(s) required to do so.
■ With a program loaded, select the program edit view.
■ Select the program step that you would like to “play from”.
■ Press the “play from selected step” button found in the bottom toolbar.
■ Context dependent steps will be executed automatically, or prompted for manually and playback will begin from
the selected step. Program playback will proceed from this step per normal playback behavior.
“Adding a User Message” Example:
Page | 58
The M2 software supports adding and editing custom “user messages” for program playback, and can be
accomplished using the following procedure:
-Note: “User messages” are added and edited in program edit mode. Part program edit mode can only be
accessed after the play program button has been pressed.
■ Select the program edit view.
■ Select the program step where you would like the user message displayed in program playback. The message
will be displayed after this selected step.
■ Press the “User Message” edit command found in the bottom toolbar.
■ The “user message” window will appear. Enter the desired user message text into the space provided.
■ Press the “Done” button to complete the user message. The user message will be displayed as part of the
program playback sequence.
Acknowledgements:
Page | 59
Windows is a registered trademark of Microsoft Corporation in the United States and/or other countries.
Page | 60