1
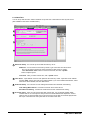
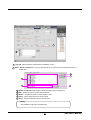
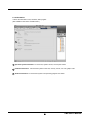
CMS USER GUIDE Please read this manual thoroughly before use, and keep it handy for future reference This manual is contains information on CMS Light software which will enable you to use this product properly. It has limited function as difference model, and not available function or menu will be disabled. Before Before Setting Setting What WhatisisCMS? CMS? CMS is an integrated security management system that provides a useful solution for central monitoring station operation. System SystemSetting Setting(Recommended) (Recommended) ►CPU : P-4 or more high level than Celeron 1.5GHz ►MEMORY : 256MB or more ►VGA CARD : AGP 64MB or more ►HDD : Additional space more than 100MB ►O/S : Windows 2000 or Windows XP Professional ►DirectX : V9.0 or more 3 CMS User’s Manual Contents Contents When you purchased CMS program, make sure that the following Contents are included. CMS software User’s manual 4 CMS User’s Manual Table Table of of Contents Contents Chapter 1. CMS user’s guide 1. CMS Program Installation…….……………………………………………………………………………………7 2. CMS Watch Program Execution…………………………………………………………………………………10 3. CMS Watch…...………………………………………………………………………………………………………11 3.1 CMS Watch Display………………………………………………………………………………………11 3.2 Remote DVR server connection..…………………………………..…………………………………13 3.3 Picture Composition………………………………………………………………………………………18 3.4 Log/Ptz/Playback Tab…………………………….……………………………………………..………19 3.5 Server List Tree………….………………………….………………………………………………………22 3.6 Setup camera to individual view panel………….………………………………………………………23 3.7 1Ch Playback………………………………………………………..…………………………………………26 3.8 Full screen Display……..……………………………………………………………………………27 3.9 Backup…………………….…………………………………………………………………………………28 4. CMS Playback……………………………………………………………………………………………………31 4.1 CMS Playback picture………………………………………………………………………………………31 4.2 Allocate DVR server to View panel…..………………………………………………………………33 4.3 Select search date and time………………………………………………………………………………34 4.4 Bookmark………………….....…………………………………………………………………………………36 4.5 Event…………………..…………………………………………………………………………………………39 4.6 Adjustment……….………………………………………………………………………………………………40 4.7 Printing……………………..……………………………………………………………………………………44 5. CMS E-map ………………………………………………………………………………………………………46 5.1 E-map display…………………………………………………………………………………..…………46 5.2 E-map addition………………………………………………………………………………………………47 5.3 Edit E-map……………………………………………………………………………………………………48 5.4 Delete E-map…………………………………………………………………………………………………49 5.5 Device control registration…………..……………………………………………………………………50 5.6 Remove Device control one piece each…..….………………………………………………………51 5.7 Remove all Device control…………………………………….…………………………………………52 5.8 Camera screen output…………….………………………………………………………………………53 6. System setting……….……………………………………………………………………………………………54 6.1 Resource……………………………………………………………………………………………………54 6.1.1 Camera……………………………………………………………………………………………….……54 6.1.2 PTZ…………………………………………………………………………………………………………55 6.1.3 Audio………………………………………………………………………………………………………57 6.1.4 Alarm In……………………………………………………………………………………………………58 6.1.5 Alarm Out…………………………………………………………………………………………….……59 5 CMS User’s Manual 6.2 Display………………………………………………………………………………………………………60 6. 1. 1 External Output …………………………………………………………………………………60 6.3 Schedule……..…………………………………………………………………………………………………61 6.3.1 Camera Schedule…………………………………………………………………………….………61 6.3.2 Recording Schedule…………………………………………………………………………….……62 6.3.3 Storage…………………………………………………………………………………….……………65 6 . 4 E ve n t … … … … … … … … … … … … … … … … … … … … ……………………………………………… 66 6.4.1 Motion Detection ……………………………………………………………………..….…………..…66 6.4.2 Object Watch……………………………………………………………….……………………………67 6.4.3 Alarm In …………………………..……………………………………………………………………68 6.4.4 Emergency.………………………………………………………………………………………………69 6.4.5 Video Loss.…………………………………………………….…………………………………………70 6.4.6 E-mail…………………………………………………………………………………………………………71 6.5 Backup………………………………………………………………………………………………………73 6.5.1 Backup schedule………………………………………………………………………..…………………73 6.6 Network ……………………………………………………………………………………………………74 6.6.1 Connection………………….……………………………………………………..…………………………74 6.6.2 DDNS…………………………………………………………………………………………………………75 6.6.3 Stream Control……………………………………………………………………………………………76 6.6.4 Emergency Monitor………………………………………………………………………………………77 6.7 System ……………………………………………………………………………………………………78 6.7.1 User…………………………………………………………………………………………………………78 6.7.2 Log ………………………………………………………………………………………………………86 6.7.3 Date Time …………………..……………………………………………………………………………88 6.7.4 Etc………….………………………………………………………………………………………………87 6.7.5 Information………………………………………………………………………………………………91 6 CMS User’s Manual 1. CMS Program Installation 1 Insert CMS CD, and double click on “setup.exe” to run the setup program. 2 Click on next button. 7 CMS User’s Manual 3 Check the box “I accepted this License Agreement” and click on [Next]. 4 Enter the path to install the CMS program, and click on [NEXT] button. 5 Installation will start. 8 CMS User’s Manual 6 After the Center Program is completely installed, click on “FINISH” button. 7 On the desktop, “CMS Watch” 9 CMS User’s Manual 2. CMS Watch Program Execution 1 Double click on “CMS Watch” icon to run the Center Program. 10 CMS User’s Manual 3. CMS Watch 3.1 CMS Watch Display CMS Watch provide function as like real time DVR remote watch, control. CMS Watch has a user interface as below. The explanation of each part is as follows. 5 6 1 7 2 3 4 8 1 View panel : Displays live picture and 1ch playback. You can move any camera picture in view panel by drag &drop. 2 Split button: Select 4/6/9/10/13/16/25/33/36 splits. If you press 4/6/9/10/13/25/33 split button repeatedly, camera picture will rotate in order. 4 split 36 split 6 split 9 split 10 split 13 split 16 split 25 split 33 split 3 Toolbar Channel rotation : Set rotation of split screen(1/4/6/9/10/13/16/25/33/36) Full screen : Expand view panel to full screen. Live mode conversion : It is a function to convert from 1 channel playback back to watch. Instant Recording : If click “I-REC” button on emergency, all channel will record by continuous mode. * After log-in, button will be enabled for use. 11 CMS User’s Manual 4 Log/PTZ/Playback : - Log Tab : Displays a list of recent event text. - PTZ Tab : Toggle to PTZ controls - Playback Tab : Toggle to 1 channel playback controls 5 Time Display : Show current time / date. 6 Menu buttons : Click a button to change to Search Mode, Setup Mode, Login software or shutdown system. Server Connection Search E-Map Backup System setup 7 Resource list : It shows information for camera, Alarm-In and Alarm-Out devices connect to the DVR system. 8 HDD Capacity (Usage) : Display HDD Usage by percentage and size. ☞ [Note] CMS Light version software can support 10 users to connect to a DVR in the same time. 12 CMS User’s Manual 3.2 Remote Server Connection CMS Watch has a capability of collection and administration on every DVR servers in network. Addition AdditionofofDVR DVRServer Servergroup group 1.When you add or connect remote DVR server, click as below. button , then it will shows 2. Press “Connection” button to open Sever Connect. 3. Input group name. 4.Press “Add” button to add group to server list. 13 CMS User’s Manual Addition AdditionofofDVR DVRRemote RemoteServer Server 1. Select group to be registered . 2. Input server connect information. 4 5 1 2 3 1 Remote DVR server List : Displays registered group and server list 2 Import : Imports server connect information from other DVR. 3 Export : Exports server connect information to other DVR or the outside DVR 4 Group : Displays group name or can be changed to another group. 5 Name : Displays server name or can be input server name to add new connect server. 14 CMS User’s Manual 16 6 7 8 9 10 11 12 13 14 15 6 Server Type :Select server type according to DVR type. 7 Network Type : Select network type. 8 Address : Input IP address or domain name of DVR server to connect. 9 Port : Input network port number to communicate with CMS and DVR server 10 ID : Input administrator ID of DVR server. 11 Password : Input password of DVR server . 12 Auto Connection when Startup : Check to log-in automatically when CMS start. 13 Add : Press “Add” button to add group or server. 14 Update : Press “Update” button to update revised server information. 15 Del : Press “Del” button to delete server from server list. 16 Connect : Press “Connect” button to connect to selected DVR server. 3. Press “Add” button to add server to server list. 15 CMS User’s Manual Remote RemoteDVR DVRServer ServerConnection Connection 1. Click button and “Connection” button to popup server connect windows 2. Select server in DVR server list. 3. Click “Connect” button to connect , and connected server is shown on server list. ☞ [Note] CMS Light version software can support 10 users to connect to a DVR in the same time. 16 CMS User’s Manual Remote Remote DVR DVRServer ServerDisconnecting Disconnecting 1. Click button and “Disconnection” button to popup Disconnect windows. 2. Select DVR server which you want to disconnect. 3. Click “Disconnect” button to disconnect DVR sever 4. Click “Close” button to close windows . Exit CMS Exit CMS 1. Click button and “Exit” button to exit to Windows. 17 CMS User’s Manual 3.3 Picture Composition Picture PictureComposition Composition 3 [C01] CAMERA01 1 2 4 NextDVR 5 6 REC : M 1 Camera Mark : display for camera motion and normal or PTZ camera. : It means normal camera. : It means PTZ camera. 2 DVR Server Type : Displays DVR Server type. 3 Camera number : display for channel number 4 Camera name : display for camera name. 5 MIC Mark : Display for the audio recording of each camera. 6 Recording : display for recording condition of each camera. (see table below) Recording Type Screen Display Not recording None Continuous REC : C Motion REC : M Object detection REC : O Alarm In REC : A Pre Alarm REC : P ATM/POS Recording REC : $ 18 CMS User’s Manual 3.4 Log/Ptz/Playback Tab Log LogTab Tab Click “Log” tap to display a list of events about Continuous Recording, Motion, Object Watch, Pre Recording, ATM/POS, Network Connection. PTZ PTZTab Tab Select “Ptz” Tab to display buttons for PTZ control. * PTZ Control 1. On Watch Mode Select channel which has PTZ camera setup. 2. Click “Ptz” tab. 3. Click PTZ function button to control. 2 1 3 4 1 Auto Pan : It is function to observe automatically along two points which have been previously setup. “AutoPan” : Click button to enable AutoPan and click again to disable. “Start” : Button to setup PTZ start position. “End” : Button to setup PTZ end position. 2 Preset : It is function to setup PTZ position to a Preset ID and later recall the ID to move to that position. “SetPreset” : Save PTZ position information to Preset ID “Move Preset” : Move to PTZ position which was setup for Preset ID. “Enter” : Use button to enter on PTZ OSD menu. “OSD” : Use button to open PTZ OSD menu. “Del” : Use button to delete Preset ID 3 Focus/Zoom/Speed : It is function to control PTZ Focus, Zoom and P/T Speed. 4 Direction Button : It is function to control PTZ direction by 8-way. 19 CMS User’s Manual Playback PlaybackTab Tab Click “Playback” tap to display playback buttons and graphic time bar for selected channel. 3 1 2 4 5 6 7 1 Refresh : Refresh timeline with recent recorded data. 2 Camera : Select channel to display record data time bar. 3 Date/Time selection : Select year, month, data and time. 4 Time Line : Shows time scale, time line can be zoomed by 10 times to improve detail. * Time Line Zoom In and Out .1. Click left side of mouse in the timeline. 2. Click right side of mouse in the timeline. 20 CMS User’s Manual 5 Recording data display Orange Continuous Blue Motion Gray Object Watch Green Alarm-In Yellowish Green Pre Rec Violet ATM/POS 6 Time line bar : Designate time which you want to search. 7 Playback Button : Click button to control playback. Normal Fast Slow Max. Speed Mute Volume up Reverse play per 1 picture Normal play First data Normal play per 1 picture Last data Reverse play Pause 21 CMS User’s Manual 3.5 Server List Tree It provides conditions of each devices which are cameras, alarm-In, alarm-Out as a tree. DVR Server name Camera name and condition : Normal Camera (It has as video input) : Normal Camera (It doesn’t have a video input) : PTZ Camera (It has a video input) : PTZ Camera (It doesn’t have a video input) : Covert Camera Alarm-In name, Condition : No event occurrence : Event occurrence condition Alarm-Out name Condition : External device is not generated : External device is generated 22 CMS User’s Manual 3.6 Setup camera to individual view panel To watch picture, you can set up each cameras of DVR which is connect and watch in one or several DVR server . Setup Setupcamera cameraininview viewpanel panel 1. To see resource information in DVR server list, put ‘+’ to spread resource information. 2. If you drag camera and move another site in DVR server list, camera picture will be shown at another site. 3. Repeat 3 times to set up camera from one or many DVR server. ☞ [Note] • All cameras in DVR servers can be set up on View panel. If you drag DVR server or camera group in DVR server list, you can camera setup at once . DVR server Camera Group 23 CMS User’s Manual Remove Removecamera camerafrom fromView Viewpanel panel 1. Select camera picture which you want to remove. 2. Drag it to DVR server list. 3. Removed site will be display logo, this site means vacant area. 24 CMS User’s Manual Moving Movingcamera camerapicture picturevia viaview viewpanel panel 1. Select camera picture and drag it. CH 1 CH 2 CH 3 CH 4 2. Drop camera to the location you desire, the cameras will then exchange places. CH 4 CH 2 CH 3 CH 1 25 CMS User’s Manual 3.7 1Ch Playback This is the feature to activate 1 channel playback, whilst in live screen the operator can instantly playback one camera by a preset time period. 1Ch 1ChPlayback Playback 1. Select camera picture which you want to search in Watch mode. 2. Click “Playback” Tab. 3. Click button . 4. Recorded time graph is displayed for selected channel 5. After select time, click 6. Click button to playback. button to return to Watch Mode. 26 CMS User’s Manual 3.8 Full Screen Display Convert ConvertFull Fullscreen screen 1. Click button to expand view panel. 2. Below shows that view panel seen in full screen . 3. Click right button of mouse to return to original size. 27 CMS User’s Manual 3.9 Backup How HowtotoBackup Backup 1. Select channel to backup on screen. 2. Click button to display as following picture. 3. Click “Backup” button to pop-up backup dialogue. 28 CMS User’s Manual 4. Input detail information to progress backup. 1 5 2 6 3 7 4 1 Backup format : Select recording format for backup. • Time Backup This function is used to backup video data in video format, viewer software is needed for playback. • AVI Backup This is used to backup video data in one of the standard MS Windows Media Player formats. • SFX Backup (Self Extract file) This is used to backup video data with player included for playback. • BMP, JPEG Backup This is used to backup still images in BMP or JPEG format. 2 Range : Set up backup time. 3 Camera : Select camera or channel to backup. Only one channel can be selected for AVI and SFX formats. 4 Size : Click “Calculate” button to calculate backup data size. 5 Source : Displays transmitted server name. 6 Destination : Set up backup destination. 7 Option : Depending on the selected backup format the setup options can differ. • Time Backup Backup event Option (Continuous, Motion, Alarm, Pre Rec, Audio) • AVI Backup Audio Backup, Codec, compression quality. • SFX Backup (Self Extract file) Audio Backup • BMP, JPEG Backup Watermark, Watermark Check S/W Copy, Frame information display. 5. Click “OK” button to progress backup. 29 CMS User’s Manual The back management menu shows the backup information, time, cycle, format and status . A schedule list of all backup currently in process and the order will progressed according to list in order. Backup Backupmanagement management 1. Click button to find backup schedule list as shown as below. 2. Click “Backup Management” button, then backup schedule management list will be shown. 1 4 5 6 2 3 1 Backup schedule list : Displays current backups in progress when a backup is complete it will be deleted from the backup schedule list. 2 Backup information : Displays backup information of selected backup. 3 Backup progress : Displays backup progress and percentage complete. 4 Priority up : Select backup from the list click priority up to move up in the backup schedule list. 5 Priority down : Select backup from the list click priority down to move down in the backup schedule list. 6 Delete : Delete backup from backup schedule list. 30 CMS User’s Manual 4. CMS Playback 4.1 CMS Playback picture CMS Playback can watch and record DVR’s recorded data in network by remote control. CMS Playback has a user interface as below. The explanation of each part is as follows. 8 9 1 10 11 12 14 13 3 2 15 16 4 17 18 5 6 7 1 View panel: Displays the playback of recorded data. 2 Split button : Choose the screen division displayed by 4/6/9/10/13/16/25/33/36 splits. 4 split 36 split 6 split 9 split 10 split 13 split 16 split 25 split 33 split 3 Search date : Input the search date and time. 4 Camera : Select channel to playback. 5 Time line : Display for time scale can be zoomed by up to 10 times. 6 Recorded data bar : Displays recording type and time recording detail as bar graph. Orange Continuous Blue Motion Gray Object Watch Green Alarm-In Yellowish Green Pre Rec Violet ATM/POS 31 CMS User’s Manual 7 Time Line Bar : Displays time position to search recorded data, move to select playback time. 8 Time Display : Show current time and date. 9 Menu Button : Click button to change to Search Mode, E-map, Backup Mode or System setup and Server connection. Server Connection Search System setup E-Map Backup 10 Server list : DVR server which is connected CMS is listed. 11 Calendar : Displays the calendar. If data exists on a data the number will be show as different color. 13 Event : Displays a list of alarm-in and motion detection events. If you select an event in the list, then the search facility will move to when the event time and playback on screen. 14 Adjustment : Adjust display of the selected picture. Adjust the picture brightness, contrast, sharpness, enlarge screen and zoom. 15 Printer : Click to print image (select one camera only). 16 Refresh : If you click button, timeline will update with the latest recorded data. 17 Playback Panel : Click button to control playback. (Just use play, reverse play, stop, in KSR-304T and KSR-304N.) Forward play per 1 picture Forward Play Reverse play Last data First data Reverse play per 1 picture Pause 18 Speed/Volume : Change the playback speed and volume. Normal Slow Fast Max speed Mute Increase volume 32 CMS User’s Manual 4.2 Allocate DVR server to View panel Allocate DVR server in network to View panel to search DVR server’s picture.. Allocate AllocateDVR DVRserver servertotoView Viewpanel panel 1. Select DVR server in the DVR server list. 2. Drag DVR server and put it View panel. 3. The recording information of DVR server will be adapted in CMS Playback 4. To search another DVR server, repeat it. 33 CMS User’s Manual 4.3 Select search date and time Move between recorded dates by use of calendar. If you select a date on the calendar the search facility moves to that date. If data exists in selected month, it will show the dates as a different color. Once date is selected the record information will show automatically in timeline. Select Selectsearch searchdate dateand andtime time 1. Click “Calendar” button to select search date. 2. Select date which you wish to search in the calendar. 1 2 4 3 5 6 1 Last year : Move to previous year. 2 Next year : Move to next year. 3 Last month: Move to last month. 4 Next month : Move to next month. 5 Date : It shows dates for selected month . 6 Today : Moves to today’s date. 3. Change the date for search using date entry in the timeline. 4. Move timeline bar to search which time you want to view. 34 CMS User’s Manual The timeline size can be enlarge whenever you left click the mouse button on the timeline, the size of timeline will be adjusted (max. 10steps). Use for sensitive time adjustment and to see recording schedule easily. Enlarge EnlargeTimeline Timelinesize size 1. Left click mouse button in time line. 2. When you left click the mouse button repeatedly, the timeline will enlarged. Reduce ReduceTimeline Timelinesize size 1. Right click the mouse button in time line. 2. When you right click the mouse button repeatedly, it will be reduce the zoom and eventually return to 24 hr display. 35 CMS User’s Manual 4.4 Bookmark Bookmark function is used to save a fixed position on recorded data. It is useful to find and playback a certain event within recorded data without wasting time searching. Add AddBookmark Bookmark 1. Click ”Bookmark” button. 3 1 5 2 4 6 1 Add : Add the currently displayed frame to the bookmark list. 2 Go to : Jump to the selected bookmark. 3 Edit : Delete name and time of selected bookmark. 4 Del : Delete selected bookmark. 5 Del All : Delete all bookmark. 6 Bookmark list : it shows all bookmark list. 2. Select bookmark time. 3. Click “Add” Button. 4. Input the name of bookmark. 5. Click ”OK” button to add Bookmark, it is then displayed on the time line. 36 CMS User’s Manual Delete DeleteBookmark Bookmark 1. Select item which you want to delete. 2. Click “Del” button, then it will be deleted. Delete Deleteall allBookmark Bookmark 1. Click “DelAll” Button for all bookmark deletion. 2. Click “Yes” button, then it will be deleted. Revise ReviseBookmark Bookmark 1. Select item which you want to revise. 2. Click “Edit” button 3. Revise the information of bookmark. 4.Click “OK” button, then you can see the revision of bookmark. 37 CMS User’s Manual Go GototoBookmark Bookmark 1. Select item which you want to go. 2. Click “Goto” button. 3. It will moved the time which bookmark designated. 38 CMS User’s Manual 4.5 Event Event which is occurred in the DVR system is shown. All event which is occurred by motion detection, alarm is listed in the event list. Double click to see picture which you want to search. (Not available in KSR-304T and KSR-304N.) Event Event 1. Click “Event” button to search Event. Current page number/total page number Go to previous page Go to next page Select to camera channel Event list display 2. Double click event which you want to search. 3. The picture of selected event shows. 39 CMS User’s Manual 4.6 Adjustment Adjustment Adjustment 1. Click “Adjustment” button for image improvement. 1 2 3 5 4 6 8 7 1 Brightness : Adjust brightness of displayed image. 2 Contrast : Adjust contrast of displayed image. 3 Sharpness : Adjust sharpness of displayed image. 4 Restore : Restore the displayed frame’s original parameters. 5 Screen Zoom : Enlarge or reduce displayed image. 6 Zoom In : Enlarge displayed image. 7 Zoom Out : Reduce displayed image. 8 Move : Locate one site to another site. 2. Select channel which you want to adjust. 40 CMS User’s Manual 3. Adjust Brightness/Contrast/Sharpness button. 4. Click button to go initial setup. Zoom ZoomIn/Zoom In/Zoomout out 1. Select channel which you want to zoom in/zoom out. 2. Click button to go Zoom in/Zoom out. 41 CMS User’s Manual Zoom ZoomInIn 1. Play recorded image which you want to zoom in. 2. Select channel which you want enlarge. 3. Click button, then mouse pointer will change sign. 4. Move mouse pointer site which you want enlarge. 5. You can zoom in by left clicking on a frame. 6. If you want to cancel it, click button. Zoom ZoomOut Out 1. Play recorded image which you want to zoom out. 2 Click button, then mouse pointer will change sign. 3. Move mouse pointer site which you want reduce. 4. You can zoom out by left clicking on a frame. 5. If you want to cancel it, click button 42 CMS User’s Manual Movement Movement 1. Zoom out a image. 2. Click button, then mouse pointer will change sign 3. Select area which you want move and drag it. 4. If you want to cancel it, click button. 43 CMS User’s Manual 4.7 Printing Printing Printing 1. Select searching picture which you want to print. 2. Click 3. Click to print. , then it will be printed 44 CMS User’s Manual ☞ [Note] Print Setup 1. Click Start Æ setupÆ printer In Windows 2. Double click [adds Print] in Print menu. 3. Click [next] in adds print wizard. 4. Check it [local print] is selected, then click [Next]. 5. Click [Disk included] or select print driver, 6. If deriver set up, print setup will be finished. Image printing 1. When you are printing, print monitor size. If print is not executed 1. Reconfirm printer setup in Windows. 2. Check Printer cable or power cable is connecting or not. 45 CMS User’s Manual 5. CMS E-Map 5.1 CMS E-Map CMS E-map is computer map of area with designated location of installed cameras, sensors and controls. CMS E-map has user interface as below. The explanation of each box is as follows. 3 4 1 5 6 7 2 8 1 View Panel :It is the part for mark of condition of camera and alarm controls in the E-map. 2 Camera image panel : Print selected camera control image in E-map. 3 Time : It shows time. 4 Menu : Click a button to change to Search Mode, Search Mode, System Setup or Server connection. 5 Server list : The resource information of camera, alarm-in, alarm-out is show in order. 6 E-map editing panel : Register E-map or edit or delete it. It can delete all cameras, Alarm-In, Alarm-Out control in the E-map. Clockwise control Reduce E-map Original E-map Selected E-map Add E-map Edit E-amp Delete E-map Delete All controls Anti-clockwise control Enlarge E-map 7 Device selection panel : It shows the information of camera control. 8 Device list panel : It show the information listed devices. 46 CMS User’s Manual 5.2 E-map addition Add AddE-map E-map 1. Click “New” button to add E-Map. 2. Input Map name and Map path. 3 . Click “OK” button, then display which is registered will be shown. 47 CMS User’s Manual 5.3 Edit E-map Edit EditE-map E-map 1. Click “Edit” button to add E-map image. 2. Input Map name and Map path. 3 . Click “OK” button, then display which is edited will be shown. 48 CMS User’s Manual 5.4 Delete E-map Delete DeleteE-map E-map 1. Delete ”Delete” button to delete E-map. 2. Message will be shown as like “ Do you really want to delete?”. 3. Click “Yes” button, then E-map will be deleted. 49 CMS User’s Manual 5.5 Device control registration Device Devicecontrol controlregistration registration 1. Spread resource information to see the resource information of connected DVR server in DVR server list. 2.Drag and drop cameras, alarm in and alarm out in DVR server list, then click mouse button to site which you want to put. 50 CMS User’s Manual 5.6 Remove device control one piece each Remove Removedevice devicecontrol controlone onepiece pieceeach each 1. Select control which you want to remove. 2. Drag camera picture and put it to DVR server list 3. Removed site marked as vacancy. 51 CMS User’s Manual 5.7 Remove all device control Remove Removeall alldevice devicecontrol control 1. Click “Reset” button to remove all device control. 2. A box will be shown as below. 3. Click “Yes” button, then all device control will be removed. 52 CMS User’s Manual 5.8 Camera screen output Camera Camerascreen screenoutput output 1. Double click control in E-map. 2. Camera screen which you want to search will be output. 53 CMS User’s Manual 6. System setup 6.1 Resource It is a external device which consists of DVR system. You can make splendid DVR security system by use of camera. PTZ, MIC, Alarm in/out and other devices. 6.1.1 Camera You can set up brightness, contrast, hue, saturation about each cameras. How you choose camera number select camera number in left side of server view. 2 3 4 9 5 6 8 1 7 1 Camera : Select channel to setup camera. 2 Enable : setting camera enable or not. 3 Name : Input the name of site which camera is installed. 4 Use Convert Channel : It is a function of camera picture hide. It is useful for user to conceal camera recording . (Not available in KSR-304T and KSR-304N.) ☞ [Note] • When you watch a screen in remote area. A user who is authorized “secret channel” can see a screen. Please 5 Brightness/Contrast/Hue/Saturation : It is a function of brightness, contrast, hue, saturation. (Not available in KSR-304T and KSR-304N.) 6 AGC( Auto Gain Control) : System operates brightness control automatically. (Not available in KSR-304T and KSR-304N.) 7 Default : Make initial setting of brightness, contrast, hue, saturation. 8 Apply to : The selected channel setting value can be applied to all or just selected channels. 9 Picture : It shows picture which you select. ☞ [Note] • Please check adjustment of camera and monitor because Brightness/Contrast/Hue/Saturation can not use for change a picture. 54 CMS User’s Manual 6.1.2 PTZ You can control PTZ or Speed dome which is connected DVR system or external device. To use this device, install RS485 to external device, then set up this device. (Not available in KSR-304T and KSR-304N.) 2 4 3 5 6 7 8 9 10 11 12 1 1 Camera : Select channel to setup camera. 2 Enable : Set up PTZ (Pan/Tilt/Zoom) function . 3 Model : Select PTZ which is installed camera number or speed dome model. 4 Add : Click Add button to add new PTZ model. 5 BPS : Select PTZ’ transferring speed(2400~19200 Bps). 6 Address : Input PTZ adress(0~255). 7 Port : Select port number which is connected PTZ. 8 Interface Mode : Select port method which is connected PTZ. 9 Parity : Set up beat (None, Odd, Even) to search date transferring errors . 10 Data Bit : Set up date bit as 5, 6, 7 or 8. 11 Stop Bit : Set up stop bit as 1 or 2. 12 Default : go to initial setting number. 55 CMS User’s Manual Adds AddsPTZ PTZList List 1. Click “Add” button to adds new PTZ model. 2. Select folder and click it . 3. Select PTZ model which you want to add. 4. Click “Open” button, then new PTZ model will be listed. 56 CMS User’s Manual 6.1.3 Audio The audio setup allows users to modify live audio output and recordings on the watch screen. 2 8 3 5 6 4 1 7 1 Camera : Select the channel to set up the camera. 2 Audio Input : Select the audio channel to link with the selected channel. 3 Live : Set up live audio output on the watch screen. 4 Recording : Set up audio recording. 5 Name : Enter audio channel name. 6 Sampling : Select audio quality to record audio. 7 Audio Link Info : Displays each channel audio property. 8 Apply to : The selected channel setting value can be applied to all or just selected channels. 57 CMS User’s Manual 6.1.4 Alarm In According to alarm input type which is connected in Alarm-In port separately, you can set up event. And you can record camera picture connected with alarm when event occurs. (Not available in KSR304T and KSR-304N.) 2 3 4 1 1 Alarm-In : Select channel to setup Alarm-In. 2 Name : Input site name which is installed Alarm-In. 3 Signal type : Whenever you put button, input type of alarm-in will change as like [NC]-> [NO], [NO]>[NC]. : If normally opened alarm get closed ,event occurs. : If normally closed alarm get opened ,event occurs 4 Discard time : When event occurs in alarm, it records camera picture which is connected with alarm from first event occurrence time. 58 CMS User’s Manual 6.1.5 Alarm Out When event is occurred, you can operate external device as like siren in alarm in by send electric signal. (Not available in KSR-304T and KSR-304N.) 2 3 1 1 Alarm-Out : Select channel to setup Alarm-Out. 2 Name : You can input alarm output site or name of external device as like siren. 3 Running Time : You can set up maintain operating time when alarm was output. 59 CMS User’s Manual 6.2 Display 6.2.1 External Output It print camera picture to external monitor. You can set up time with selection of camera which is printed in external monitor. (Not available in KSR-304T and KSR-304N.) 1 2 3 4 1 Camera : Select camera which you want output to external monitor. 2 Dwell Time : Set-up transferring time with dragging slider. 3 Camera : Select camera which you want output to external monitor. 4 Dwell Time : Set-up transferring time with dragging slider. 60 CMS User’s Manual 6.3 Schedule 6.3.1 Camera Schedule Recording information (Recording Frame, Quality, Resolution, Emergency Frame) can be set up time as like week, weekend, holidays and make schedule your own ways. 1 2 3 4 5 7 6 8 1 Schedule Type: Click ∇ button, then schedule list will be shown. If you select type which you want, recording information of that type will be shown. You can select type which you want and drag it to designate scope 2 Name : It shows selected items in schedule lists. * List order about schedule type 1. Input new name about recording information. 2. Click [color] button to designate different color with other schedules . 3. Adjust record frame, emergency record frame, resolution 4. If you click [Update] button, schedule type list will be registered. 3 Frame : It can adjust frame number of recording. 4 Quality : It can adjust recording quality. 5 Resolution : It can adjust recording display size. 6 Emergency Frame : It can adjust frame number in order to record camera picture in emergent situation. 7 Apply to : The selected channel setting value can be applied to all or just selected channels. 8 Schedule Timeline : It is schedule timeline to set up time as like week, weekend, holiday. You can select type which you want and drag it to designate scope. ☞ [Note] • On the KSR-3 series Model, Resolution and recording type . 61 CMS User’s Manual 6.3.2 Recording Schedule This DVR designate the scope of weekday, Saturday, holiday for recording schedule setup. The period of schedule from current month to following 12 month. 1 2 4 3 5 1 Schedule Type : Click ∇ button to see recording type list. The type of recording is Weekday, Saturday, Holiday. Weekdays : It can adjust recording schedule on every week of 12 month. Saturday : It can adjust recording schedule on Saturday of 12 month. Holiday : It can adjust recording schedule on holiday of 12 month. 2 Year View : It shows recording schedule from current month to following 12 month. 3 Schedule Timeline : You can set a variety of recording mode on time of each cameras. After you select recording mode, designate scope by dragging mouse. 4 Recording Mode : It shows a variety of recording type. Select recording type and drag it to schedule line. Continuous : Continuous recording regardless of event occurs. Motion : Motion recording when some motion was detected. Object Watch : It records in case object exist or detected in some area. (Not available in KSR-304T and KSR-304N.) Alarm in : It uses for recording when event occurs in Alarm in. Pre Alarm : It records several seconds before event occurs when event is detected in alarm or movement in camera . ATM/POS : It uses for recording when event occurs in ATM/POS. (Not available in KSR-304T and KSR-304N.) 5 Apply to : The selected channel setting value can be applied to all or just selected channels. 62 CMS User’s Manual Holiday HolidaySetup Setup 1. If you want to designate holiday in recording schedule, select schedule type as ‘Holiday’ then “Holiday” button will be shown. 2. Click “Holiday” for holiday setup. 3 1 2 1 Calendar : Select date as holiday. Last year Next year Last month Next month Go to today 2 Repeat period : Regarding designate day, you can select as follows. No Rotate : Regarding designate day, recognize one day as holiday Every [ ] day : Repeat per day from entered day. Every [ ] Week : Repeat per day from entered week. Every [ ] Month : Repeat per day from entered month. Every [ ] Year : Repeat per day from entered year. 3 Holiday list : It shows designated dates and repetition period by list . 63 CMS User’s Manual 4 5 6 7 4 Scope : It is a function to designate holiday period. Unlimited : not designate scope. View Count [ ] times : Set up holiday scope from first designate day. End : Set up holiday scope from first designate day to last designate day. 5 Add : Adds date which is designated day. Click “Add” button to add. 6 Update : Update holiday information. Click on the “Update” button to update holiday information. 7 Del : Delete date which is designated day. Click “Del” button to delete. 64 CMS User’s Manual 6.3.3 Storage It shows list of storages in remote DVR server. (Not available in KSR-304T and KSR-304N.) 1 1 Display of disk division : It shows hard disk list in DVR . Regarding each hard disk, you can check capable hard disk volume and whole volume and the condition of disk division. 65 CMS User’s Manual 6.4 Event 6.4.1 Motion Detection This Motion Detection uses connected with recording, alarm, emergency when motion is detected. 3 4 2 5 6 7 11 1 8 9 10 1 Camera : Select channel to setup camera. 2 Motion Detection Area : Designate scope of motion detection area to see movement of picture in camera. It will be marked green color. Motion detection scope designation : Click mouse left button to designate the area of motion detection Motion detection scope cancellation: Click mouse right button to cancel the area of motion detection . 3 Number of Blocks : It can set up number of blocks to occur motion detection event. (Not available in KSR-304T and KSR-304N.) 4 Detection level : it can set up detection level about motion detection area. 5 Pre Rec Time : It is a function of recording on basis of motion detection event pre-time. 6 Pre Rec Time : It is a function of recording on basis of motion detection event post-time. 7 Use Beep : It makes beef when movement is found in motion detection area . 8 Linked Camera : Select camera which will connect with motion detection type camera. If motion detection type camera detect any movement, it will record with selected camera. 9 Linked PTZ Setting : If motion detection type camera detect any movement, it point the location of PTZ camera’s preset, then select preset information. (Not available in KSR-304T and KSR-304N.) 10 Linked Alarm Out : Select alarm out to connect with camera which is set up motion detection. (Not available in KSR-304T and KSR-304N.) 11 Apply to : The selected channel setting value can be applied to all or just selected channels. 66 CMS User’s Manual 6.4.2 Object Watch This function is used to find out when and which objects appear or disappear in a selected area. Object watch can use with alarm, continuous camera recording, PTZ. (Not available in KSR-304T and KSR-304N.) 3 4 2 5 6 7 11 1 8 9 10 1 Camera : Select channel to setup camera. 2 Object Watch Area : Designate scope of object watch area to see object emerge or not. It will be marked green color. Motion detection scope designation : Click mouse left button to designate the area of object watch Motion detection scope cancellation: Click mouse right button to cancel the area of object watch . 3 Number of Blocks : It can set up number of blocks to occur object watch event. 4 Detection level : it can set up detection level about object watch area. 5 Pre Rec Time : It is a function of recording on basis of object watch event pre-time. 6 Pre Rec Time : It is a function of recording on basis of object watch event post-time. 7 Use Beep : It makes beef when movement is found in object watch area . 8 Linked Camera : Select camera which will connect with object watch type camera. If object watch type camera detect any movement, it will record with selected camera. 9 Linked PTZ Setting : If motion object watch type camera detect any movement, it point the location of PTZ camera’s preset, then select preset information. 10 Linked Alarm Out : Select alarm out to connect with camera which is set up object watch . 11 Apply to : The selected channel setting value can be applied to all or just selected channels. 67 CMS User’s Manual 6.4.3 Alarm In Alarm in recognize emergency in outer area and use with recording, alarm, PTZ control. (Not available in KSR-304T and KSR-304N.) 2 3 4 5 6 1 7 1 Alarm-In : Select channel to setup Alarm-In. 2 Use : Select Alarm use or not. 3 Name : Input the name of area which Alarm in is installed. 4 Linked Camera (Pre &Post Alarm) : Input pre-record time and Post pre-record time which will be connected with alarm-in 5 Linked camera : Select camera which is linked with alarm in. It records connected camera together when event occurs. 6 Linked PTZ Setting : You can select PTZ camera which is linked with alarm in. 7 Linked Alarm Out : You can set up emergency sound make when alarm in make event. 68 CMS User’s Manual 6.4.4 Emergency Emergency mean motion detection, video loss, alarm in. Each channel has a function that it set up emergency and record and send situation to remote area when event occurs. (Not available in KSR304T and KSR-304N.) 1 2 3 1 Motion : Select channel that motion event will set up emergency. It is a function that it send high resolution record to remote area when event occurs. 2 Video Loss : Select channel that video loss will set up emergency. It is a function that it send record to remote area when event occurs. 3 Alarm-In : Select channel that Alarm-in event will set up emergency. It is a function that it send high resolution record to remote area when event occurs. 69 CMS User’s Manual 6.4.5 Video Loss Video loss check about no picture input problem cased by camera problem or compulsory removal . When video loss occurs, you can use it linked with camera recording, alarm, PTZ camera control. (Not available in KSR-304T and KSR-304N.) 2 3 4 5 1 6 1 Camera : Select channel to setup camera. 2 Beep used : Check this box to use alarm. 3 Camera : mark the name of selected camera. 4 Linked camera : You can designate camera which will be linked with video loss. When video loss occurs, PTZ camera sigh designated direction to preset number. 5 Linked PTZ Setting : You can designate PTZ camera which will be linked with video loss. When video loss occurs, PTZ camera sigh designated direction to preset number. 6 Linked Alarm Out :You can designate alarm out which will be linked with video loss. When video loss occurs, you can set up making of emergency sound in alarm out. 70 CMS User’s Manual 6.4.6 E-mail It is a function of notice administer to e-mail when emergency or other problems is occurred. E-mail notice can be use both each person notice and group notice. (Not available in KSR-304T and KSR-304N.) 5 1 2 3 4 6 1 Mail list name : Input name of who will be added in the mail list. 2 Mail setup : Input Receiver, CC, Subject. Receiver : Input receiver’s mail address. CC : Input CC’s mail address. Subject : Input title of message. 3 Mail server setup : Input information of server name, Mail address. ID, Password etc. Sender name : Input address of sender name. Mail address : Input Mail address of sender. Server (SMTP) : Input server address of sender. Server Authentication : If server uses password identification to access mail address. ID : Input ID for SMTP. Password : Input password for SMTP. 4 Notification Item : Select notification item between “emergency” and “event”. Select channel which will inform by e-mail when event, video loss, motion detection has occurred. 5 Mail address manage : Here you can manage e-mail groups. 6 Mail list : Mail list can be added, updated or deleted. Add: Add list in mail list. Update : Edit the information of an account in the mail list. Delete : Delete item from the mail list. 71 CMS User’s Manual Manage Manageuser usermail mailgroups groups 2 6 1 10 11 7 3 4 9 5 8 1 Name : Input the contact name you wish to search for. 2 Search : Click the button to start the search. 3 Mail list : Displays all registered contact names and e-mail addresses in a list. 4 Add : Add new user name and e-mail address. 5 Del : Delete the selected user from the list. 6 Group Name : Select a group name from the drop down menu, all e-mail contacts connected to the group name will then appear below in the group list. 7 Group list : Displays all e-mail contacts in current selected group. 8 Add : Add a new group. 9 Del : Delete selected group. 10 Add : Add selected e-mail contact from mail list to add to a group list. 11 Del : Delete selected e-mail contact from the group list. 72 CMS User’s Manual 6.5 Backup 6.5.1 Backup Schedule Backup Schedule can backup with designated backup media at decided time. You can set up backup schedule by selection of backup time, repeated rotation period, backup media. 1 6 2 3 4 5 7 9 8 1 Backup list name : Input backup name which will be added to the backup list. 2 Time : Select “Daily”, “Weekly”, “Monthly” or “Yearly” and the repetition period. Then select the start and end time range. Start Time : Enter the time you wish to start the backup. (Must be after end time range) Start Time Range : Enter the start time range for the backup period. End Time Range : Enter the end time range for the backup period. 3 Destination : Enter the details for where the backup is to be made. Server : Select the DVR server on which the backup will be made. Media type : Select backup media on which backup data will be stored. Device : Select the drive path for the type of media on DVR server. Path : Select the path which the backup will be made. 4 Option : Make a backup by an event category. 5 Camera : Select the camera or channel to backup. 6 Backup list : It shows the backup details for the time, cycle period and backup media. The backup will start in order according to time which is set up in the backup list. 7 Add : After entering a backup schedule, click on the “Add” button. 8 Update : Select to update a backup in the list, click on the “Update” button. 9 Delete : Select backup to delete from the list, click on the “Delete” button. 73 CMS User’s Manual 6.6 Network 6.6.1 Connection This DVR can set up network components to provide video/audio streaming function and remote control in network. (Not available in KSR-304T and KSR-304N.) 1 2 3 4 5 6 7 1 Obtain an IP address automatically (DHCP) : Dynamic address assignment is a type of receiving address from DHCP. DVR which receive address automatically from DHCP server set up network address in system. 2 Obtain DNS Server Address automatically : Input IP address to main DNS server and assistant DNS server. ☞ [Note] • Please contact network administer or internet service provider if you don’t know ip address or network structure. 3 Stream bandwidth : You can control transferring speed from network . 4 Max acceptable : you can set up client number. ☞ [Note] • if a lot of users connect and watch it, the basis function of system will be disturbed. It is useful for control of user number. If many user connect at once, it will denial of entry. 5 WEB DVR Support : Select to enable or disable the Web DVR facility. 6 CMS Support : Select to enable or disable the CMS software connection. 7 Port Number : Input network port to transfer live video. Click “Check” button to now permission or not of network herb. 74 CMS User’s Manual 6.6.2 DDNS DVR system which is connected by DDNS does not require a static IP address, therefore the system can be connected to ADSL line with a dynamic IP. (Not available in KSR-304T and KSR-304N.) 1 2 3 4 5 6 1 Account : Input ID and Password for the DDNS server. 2 Server Address : Input the address of server which provides DDNS service. 3 Server Port : Input port number of DDNS server. 4 Client Port : Input client port number of DDNS. 5 Update Time :Input update time of DDNS information. 6 Use DDNS : Check this box to use DDNS. 75 CMS User’s Manual 6.6.3 Stream Control Set the Stream control for all cameras by frame rate, resolution and quality. (Not available in KSR-304T and KSR-304N.) 1 2 3 4 5 1 Use : Select camera which you want to use transfer control. 2 Camera : It shows each camera number. 3 Remote frame : Control the frame rate which is transferred by each camera across the network. 4 Remote resolution: Set the resolution size to be transferred by each camera across the network. 5 Remote quality : Set the quality of picture to be transferred by each camera across the network. 76 CMS User’s Manual 6.6.4 Emergency Monitor This function transfers the pictures and data to Emergency Monitor on the client computer when emergency or event occurs. You have to set up remote IP address, port number, and picture transfer time. (Not available in KSR-304T and KSR-304N.) 1 2 3 5 4 1 Emergency Monitor Name : Input the Emergency Monitor setup name for the account. 2 Emergency Monitor Address : Input address information of Emergency Monitor. Address: Input IP address of remote client computer. Port : Input port number for transfer to remote client computer. 3 Emergency Monitor Dwell Time : Set up dwell time of Picture and event information on remote client computer when emergency or event occurs. 4 Notification Item : Select emergency monitor transfer method. Emergency Monitor has two types of method :‘Emergency’ and ‘Event. Select channel to inform Emergency monitor for the options motion detection, video loss, alarm in. 5 Emergency Monitor List : Emergency Monitor accounts can be added, deleted and edited. Add : Add account in Emergency Monitor list. Edit : Edit existing account in the Emergency Monitor list. Delete : Delete account in Emergency Monitor list. 77 CMS User’s Manual 6.7 System 6.7.1 User Manage users and groups. This function can limit the authority of a user or group to manage the DVR, which enables the user to administer the unit effectively. 3 1 4 5 2 1 Group list : Displays current group accounts. Groups can be added or deleted from the list. 2 User list : Displays current user accounts. Users can be added or deleted from the list. 3 Account : Displays the information of user currently selected and is the area of data input for a new user. Name : Enter the name of the user. Group : Select the group category appropriate to the user access level. Password : Enter the user password. Use Password Expiry Date : Set up the password expiry function. Password Expiry Date : Set up the use by date for the password. Advanced Password Expiry Date : Set up the alarm function before the expired date. Telephone : Enter the telephone number of the user. E-mail : Enter the e-mail address of the user. Description : Enter any addition explanation if required. 4 Server : Stops the user authorization to interfere with DVR server DB allocation options. Shut down: Whether the user can exit the DVR software or shutdown the system. DB Alloc : Whether user can allocate DB changes on the hard disk in the DVR server. 5 Watch : Set user authorization from login, 1ch playback, PTZ control, covert camera and Recording functions in live mode. Login : Allocate authorization to login when in live screen. Instant Playback : Allocate authorization to use 1ch playback. PTZ control : Allocate authorization to control PTZ. Covert Channel Live : Allocate authorization to see covert channels. Instant Recording : Allocate authorization to use instant recording. 78 CMS User’s Manual 6 7 8 6 Search : Allow user authorization for login, backup, protection camera features in search mode. Login : Allocate authorization to login when in the search menu. Backup : Allocate authorization to make a backup. Covert Channel Search : Allocate authorization to see covert channel. 7 Setup : Allow user authorization to change composition for the DVR system setup. Login : Allocate authorization to login when in the setup menu. Camera : Allocate authorization to set up camera options. Alarm : Allocate authorization to set up sensor (alarm-in) and alarm (alarm-out) options. External monitor : Allocate authorization to set up external monitor options. Camera Schedule : Allocate authorization for recording schedule setup. Recording Schedule : Allocate authorization to set up recording options. Motion : Allocate authorization to set up motion detection options. Emergency : Allocate authorization to emergency setup. Video Loss : Allow authority to set up video loss. Notification : Allocate authorization to Notification setup. Backup : Allocate authorization to make a backup. Network : Allocate authorization to set up network connection. DDNS : Allow authority to set up DDNS. Stream Control : Allow authority to set up stream control. Setting : Allocate authorization to set up watermark, recording speed, system restarting and language features. Data/Time : Allow authority to set up the system data and time. Information : Allocate authorization to see the system OS, hardware and DVR program information. Audio : Allocate authorization to set up live audio and recording options. Emergency Monitor : Allow authority to set up the emergency notice function. 8 Camera : Allocate authorization to which cameras can be watched and searched. 79 CMS User’s Manual Setup Setupaanew newgroup groupaccount account 1. Click on the “Add” button to add a new group name. 2. Input the name and description of the group for account information. 3. If you click on the “OK” button, the group will be added to the group list. 80 CMS User’s Manual Delete Deleteaagroup groupaccount account 1. Select the group you wish to delete. 2. Click on the “Del” button. 3. When the message box is shown as below, click on the “Yes” button. 4. Confirm that the group has been deleted from the group list. 81 CMS User’s Manual Set Setup upaanew newuser useraccount account 1. Click on the “Add” button to add a user account. 2. Enter the user name, password, group, phone, e-mail and description. 3. Click on the “OK” button and the user will be added to the user list. 82 CMS User’s Manual Delete Deleteaauser useraccount account 1. Select the user name you wish to delete. 2. Click on the “Del” button. 3. When the message is shown as below, click on the “Yes” button. 4. You can confirm that the user account has been deleted in the user list. 83 CMS User’s Manual Set Setup upauthorization authorizationlevel levelfor forgroup groupaccounts accounts 1. Select the group for which you wish to allocate authorization changes in the group list. 2. Adjust the group authorization in the permission menus. 3. Click on the “OK” button to save the changes in authorization. 84 CMS User’s Manual Set Setup upindividual individualuser useraccount accountauthorization authorizationlevel level 1. Select the user account for which you wish to configure authorization changes. 2. Adjust the user authorization in the permission menus. 3. Click on the “OK” button to save the changes in authorization. 85 CMS User’s Manual 6.7.2 Log It is a function to record a series of contents. When DVR system is operated or not operated, it will be recorded in system log. (Not available in KSR-304T and KSR-304N.) 2 1 4 3 1 Option : Set up Log Path and Duration. Log Path : It shows path which log will restored. Click “Browse” button to select path which log will restore. Duration : Input duration period to log file. If you set up duration period, it will be maintained until period. If duration period is expired, log data will be disappeared. 2 Item : You can select items which you want search when you search log. System : It shows the information of system condition. Network : It shows remote program connecting, network condition. Video : It shows information of live pictures. DB : It shows information of DB condition . Setup : It shows contents that user change system . Backup : It shows information of local backup and remote backup. Alarm In : It shows channel and time which alarm in is started Alarm Out : It shows channel and time which alarm in is started Notification : It shows emergency and some issue which comes from external area . 3 Date/Time Filter : It is a function to print log data in checked scope. Range : Select scope of date in log list. Start : Select time and date which you want to start. End : Select time and date which you want to end. Search : Click “Search” button, then you can search log data within checked scope 4 Category Filter : Select data which is coincide with level and type. Level : Select level of importance in log list. Type : Select type of log item. 86 CMS User’s Manual 5 6 7 8 9 5 View Count : Select total line numbers which can show 6 Page control : it used when you convert log list page. Go first page Go next page Go to Go previous page Go last page Current Page/ All pages 7 Print : Print log data. 8 Save as : Copy log data with another media. 9 Log List : It shows the list of founded log data . 87 CMS User’s Manual 6.7.3 Date/Time You can set up date and time. Select Date/time set up and save current date and time by NTP server. (Not available in KSR-304T and KSR-304N.) 1 2 3 4 1 Date/Time Setup : You can set up current date and time by use of . Data/Time : You can select current time by hands or get current time from NTP server. And you can adjust current time which received from NTP server to system. Click “Get Internet Time” button to receive current time, and click “Update” button to adjust system. Time Zone : After you select current time, click “Update” button. 2 Time Server : Input address of server “NTP (Network Time Server)” At first. Input NPT server address and click ”Add” button, then NTP server will be added. If you want to delete NTP address, select NTP server will be deleted, then click “Del” button. 3 Automatic Setup : It is a function of Time Setting When Reboot and Schedule Time Setting . Time Setting When Reboot : It reset time and NTP server when reboot. Schedule Time Setting : It reset time and NTP server when schedule time setting . 4 Overwrite option : when you set previous time than current time, you can decide whether delete recorded data or not. First option is that previous time will be deleted and adjust time. Second option is that you will not delete and you ignore time-gap record. But record will be played when the scope of recorded time and system time is concurrent each other. 88 CMS User’s Manual 6.7.4 Etc 1 2 3 5 3 1 Auto Delete : This is the auto delete data function after DB retention time. Use Auto Delete : Set up auto delete function. DB Retention Time : Set up DB retention time. 2 Watermark : Set whether watermark feature is encrypted with recorded data. Watermark : Enable or disable watermark feature. Display : When recorded picture is played back the display will indicate that watermark is used. ☞ [Note] • Watermark encrypts the data so when anyone tries to alter the picture data the system can discriminate the changes. This is to prevent forgery or tampering video given for evidence. 3 Video format : Select picture format type which camera uses. You can select between NTSC or PAL formats, please reboot the DVR after changing the video format. 4 Recording Type : Select once or cycle to recording type. If select once, it will be stopped to record until HDD full. If select cycle, it will be overwritten to record on HDD Alarm Out : Trigger alarm signal to selected alarm-out channel on HDD full. Dwell Time : Set alarm trigger dwell time on HDD full. 5 System restarting : You can set the system to restart system as a maintenance precaution. Restarting the system lets the computer reconfigure files and so reduces the prevention of system damage through file errors. (recommended reboot once a week) Use : Enable or disable the restarting feature. Cycle : Input cycle period (day) of system restarting . Dwell Time : Input system restarting time. 89 CMS User’s Manual 6 7 5 Language : Select language to appropriate for installation country. 6 Import / Export configuration : Import configuration file to out of DVR or export configuration file from another DVR. e f a b c a System Configuration list : displays detail about DVR system configuration. b Path : displays location of system configuration file c Browse : click [Browse] button to select folder for save. d Import : Import configuration file to another DVR. e Export : Export configuration file from another DVR. ☞ [Note] • Not available in KSR-304T and KSR-304N. 90 CMS User’s Manual 6.7.5 Information It shows the information of OS, hardware, DVR program. (Not available in KSR-304T and KSR-304N.) 1 2 3 1 Operation System Information : It shows OS, System version, service pack version. 2 Hardware Information : It shows DVR system’s CPU size, memory volume, Lan card, graphic card 3 Software Information : It shows DVR system’s OS operating program and version. 91 CMS User’s Manual Warranty Information This product has passed thorough quality control and test, and if this get broken during normal use We provide 12 months warranty service. Warranty Guide Check this warranty sheet first. Please contact the distributor after checking out any defect in the product. The standard for repairing, replacement or reimbursement follows Customers. Warranty Contents Any defect under normal use within the warranty service period we give you free repair service according to the warranty sheet. We change you with the fee of parts and service despite free warranty service period. 1. Any breakage made without care. 2. Breakage or trouble made by natural disaster . 3. Breakage or trouble made by breaking the product guide or manual. 4. Brakeage or trouble made by wrong power voltage or frequency . 5. When you want to reassemble for full system or replace parts within warranty service period. 6 When unauthorized engineer modified or made damage on the product trying to repair it. We may charge you with the fee. We don’t support the breakage after warranty service period. If the customer wants to get it repaired, we charge them with the fee. Product Warranty Service Sheet Product & Model Number Product Sheet Number Distributor Date you purchased Warranty Period 1 year from the purchase date Name Customers Address ¾ This warranty sheet may not be provided again. ¾ Please get this sheet field when you purchase the product. ¾ You should show this warranty service sheet when you get a warrantee service. 92 CMS User’s Manual