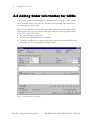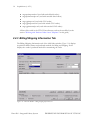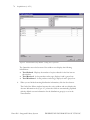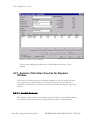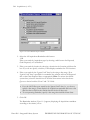
1
User’s Guide Integrated Library System Acquisitions VIRTUA ILS – INTEGRATED LIBRARY SYSTEM Acquisitions User’s Guide Version 43.1 January 2004 Copyright 1999-2004 VTLS Inc. All Rights Reserved. Virtua and the Virtua Design marks are used under license from Sega Corporation. 1701 Kraft Drive Blacksburg, Virginia 24060 U. S. A. Phone 540.557.1200 Fax 540.557.1210 E-mail: [email protected] Acquisitions (v. 43.1) i Table of Contents TABLE OF FIGURES 1. 1.1 2. VIII INTRODUCTION TO ACQUISITIONS 1 USING THIS GUIDE 1 ADDING A PURCHASE ORDER 2 2.1 ACCESSING THE ADD PO REQUEST DIALOG BOX 2.2 ADDING ORDER INFORMATION FOR MONOGRAPHS AND SERIALS 2.3 ADDING ORDER INFORMATION FOR COGS 2.3.1 COMPLETING THE ORDER DESCRIPTION FIELD 2.4 ASPECTS OF THE ADD ORDER WINDOW 2.4.1 NON-EDITABLE HEADER OF THE ADD ORDER WINDOW 2.4.2 ORDER HEADER INFORMATION TAB 2.4.3 BILLING/SHIPPING INFORMATION TAB 2.4.4 LINE ITEMS LIST BOX 2.4.5 CREATE BRIEF BIB BUTTON 2.4.6 ITEM-LEVEL COMMAND BUTTONS 2.4.7 WHEN SAVING… OPTIONS 2.4.8 ORDER-LEVEL COMMAND BUTTONS 2.4.9 CHECK BOXES 2.5 INSERTING ORDER LINE ITEMS 2.5.1 COPYING AN ORDER LINE ITEM 2.5.2 WORKFLOW FOR COG ORDERS 2.5.3 USING THE DRAG-AND-DROP TOOL 2.6 EDITING ORDER LINE ITEM INFORMATION 2.6.1 ORDER LINE EDITOR - MONOGRAPHS 2.6.1.1 Elements of the Line Item Header Information Sub-tab 2.6.1.2 Editing the Account Information Sub-tab 2.6.2 ORDER LINE EDITOR - SERIALS 2.6.2.1 Serial Orders and Locations 2.6.2.2 Serial Orders and Subject Codes 2.6.2.3 Editing the Enumeration Information Sub-tab (Serials) 2.6.3 ORDER LINE EDITOR - COGS 2.6.3.1 Editing the Enumeration Information Sub-tab (COGs) 2.7 SAVING A NEW PURCHASE ORDER 2.7.1 ABOUT THE “WHEN SAVING…” OPTIONS 2.7.2 SPECIAL HANDLING OPTIONS UPON SAVING 2.7.2.1 Rush Order Option PROPRIETARY INFORMATION OF VTLS INC. 2 4 6 8 9 11 11 14 15 16 16 16 17 17 18 21 22 24 25 28 29 30 33 33 33 34 35 35 36 37 38 38 Virtua ILS – Integrated Library System ii Acquisitions (v. 43.1) 2.7.2.2 Auto Receive Option 2.7.3 SYSTEM CHECKS UPON SAVING 39 40 3. 43 WORKING WITH PURCHASE ORDERS 3.1 UPDATING A PURCHASE ORDER 3.1.1 UPDATING TRANSMITTED MONOGRAPH AND SERIAL ORDERS 3.1.2 UPDATING SAVED OR TRANSMITTED COG ORDERS 3.1.3 UPDATING SAVED MONOGRAPH AND SERIAL ORDERS 3.1.3.1 Updating Line Items 3.1.3.2 Deleting Line Items 3.1.4 OTHER UPDATING FUNCTIONS 3.2 VIEWING A PURCHASE ORDER 3.2.1 VIEWING ORDER LINE ITEMS 3.3 DELETING A PURCHASE ORDER 3.3.1 DELETING A PURCHASE ORDER FROM THE UPDATE ORDER WINDOW 3.4 CANCELING A PURCHASE ORDER (OR LINE ITEM) 3.4.1 OVERVIEW OF THE CANCEL FUNCTION 3.4.2 THE CANCEL FUNCTION – SERIAL AND COG ORDERS 3.4.3 CANCELING AN ORDER 3.4.4 CANCELING AN ORDER LINE ITEM 3.4.5 SYSTEM CHECKS AFTER A CANCELLATION 3.4.6 TRANSMITTING A CANCELED ORDER 3.5 RENEWING A PURCHASE ORDER 3.6 COPYING A PURCHASE ORDER 3.6.1 OVERVIEW 3.6.2 USING THE COPY FUNCTION 43 44 46 47 48 50 51 52 53 54 56 58 58 58 59 61 63 63 64 66 66 67 4. 70 WORKING WITH DISTRIBUTIONS 4.1 INTRODUCTION 4.2 SPECIFYING DISTRIBUTION GROUPS 4.2.1 ASPECTS OF THE ADD DISTRIBUTION GROUPS WINDOW 4.2.1.1 UnSelected Distribution Groups List 4.2.1.2 Selected Distribution Groups List 4.2.1.3 List of Individual Library Locations 4.2.1.4 Quantities 4.2.1.5 Command Buttons 4.3 VIEWING OR UPDATING DISTRIBUTION GROUPS 4.4 WORKING WITH DISTRIBUTION GROUPS UPON RECEIVING 4.4.1 EDITING DISTRIBUTION INFORMATION 4.4.2 PRINTING/CUSTOMIZING DISTRIBUTION INFORMATION 4.4.2.1 Working with distributionprint.utf 70 71 75 76 76 76 77 77 77 78 78 81 82 5. 85 SENDING PURCHASE ORDERS Virtua ILS – Integrated Library System PROPRIETARY INFORMATION OF VTLS INC. Acquisitions (v. 43.1) iii 5.1 INTRODUCTION 5.2 ABOUT EDIFACT FUNCTIONALITY 5.3 TRANSMITTING ORDERS FROM THE ORDER WINDOW 5.4 TRANSMITTING ORDERS USING THE SEND ORDERS FUNCTION 5.4.1 INTRODUCTION 5.4.2 SPECIAL RULES 5.4.3 USING THE SEND ORDERS FUNCTION 5.4.3.1 Verification and Completion of Transmissions 5.4.4 SEND ORDERS SUMMARY (FOR TRANSMISSION METHOD PRINT OR E-MAIL) 5.4.5 SEND ORDERS SUMMARY (FOR TRANSMISSION METHOD EDIFACT) 5.4.6 ERROR HANDLING 5.4.7 GETTING A PRINTED COPY OF AN ORDER 5.4.8 RESENDING AN ORDER 5.5 WORKING WITH THE PRINTED PURCHASE ORDER LETTER 5.5.1 ABOUT P.O. LETTER TEMPLATE FILES 5.5.2 HOW VIRTUA USES P.O. LETTER TEMPLATE FILES 5.5.3 EDITING P.O. LETTER TEMPLATE FILES 5.5.3.1 General Editing Tips 5.5.4 EDITING THE DATA ELEMENTS OF THE P.O. TEMPLATE 5.5.4.1 Header 5.5.4.2 Vendor Information 5.5.4.3 Date 5.5.4.4 Entity ID 5.5.4.5 Salutation 5.5.4.6 Table Column Labels 5.5.4.7 Table Row Labels 5.5.4.8 PostTableColumn 5.5.4.9 Notes and Addresses 5.5.4.10 Signature 85 86 86 87 87 88 88 90 92 94 95 95 95 96 96 97 99 99 100 100 101 102 102 103 104 105 106 106 107 6. 108 WORKING WITH RECEIPTS 6.1 INTRODUCTION 6.1.1 SUPPORT FOR REPETITIVE AND INTEGRATED WORKFLOWS 6.1.2 FEATURES OF RECEIPTS 6.2 DISPLAYING THE RECEIPTS WINDOW 6.2.1 ASPECTS OF THE RECEIPTS WINDOW 6.2.1.1 Header 6.2.1.2 PO Line Items List Box 6.2.1.3 Command Buttons 6.2.1.4 When Saving… Options 6.3 ADDING RECEIPT INFORMATION 6.3.1 USING THE EXPRESS RECEIVE FUNCTION 6.3.2 USING THE RECEIVE FUNCTION 6.3.3 USING THE EXPAND FUNCTION 6.3.3.1 Viewing Line Item Receipt Information 6.3.3.2 Adding Line Item Receipt Information PROPRIETARY INFORMATION OF VTLS INC. 108 108 109 110 112 112 113 113 114 114 115 116 119 119 120 Virtua ILS – Integrated Library System iv Acquisitions (v. 43.1) 6.3.4 USING THE EDIT RECEIPT INFORMATION DIALOG BOX 6.3.4.1 Assigning a Status 6.3.4.2 Assigning a Condition 6.3.4.3 Receipt Date and Quantity Received 6.3.4.4 Adding to the New Book List 6.3.4.5 Printing a Receipt Slip 6.3.5 CUSTOMIZING THE PRINTED RECEIPT SLIP 6.3.6 SPLITTING THE RECEIPT OF A LINE ITEM 6.3.7 RECEIVING MORE COPIES THAN ORDERED 6.4 UPDATING RECEIPT INFORMATION 6.4.1 UPDATING EXAMPLE 6.4.2 MULTIPLE COPIES AND THE DETERMINATION OF QUANTITY RECEIVED 6.5 VIEWING RECEIPT INFORMATION 6.6 DELETING RECEIPT INFORMATION 6.7 SAVING RECEIPT INFORMATION 6.7.1 INVOICING WHEN SAVING 122 123 123 124 124 124 125 127 129 129 131 134 134 136 137 137 7. 140 WORKING WITH INVOICES 7.1 INTRODUCTION 7.1.1 SUPPORT FOR REPETITIVE AND INTEGRATED WORKFLOWS 7.1.2 DISPLAYING ONLY RECEIVED ITEMS 7.1.3 RECORD LOCKING 7.2 DISPLAYING THE ADD INVOICE WINDOW 7.2.1 ASPECTS OF THE INVOICE WINDOW 7.2.1.1 Header Elements 7.2.1.2 Invoice Order Line Information List Box 7.2.1.3 Command Buttons 7.2.1.4 When Saving… Options 7.3 ADDING AN INVOICE 7.3.1 CHANGING THE CURRENCY TYPE 7.3.2 INSERTING INVOICE LINE ITEMS 7.3.3 WORKING WITH MISCELLANEOUS FEES 7.3.3.1 About Miscellaneous Fees 7.3.3.2 Adding Invoice Header Fees 7.3.3.3 Adding Invoice Line-item Fees 7.3.4 WORKING WITH DISCOUNTS 7.3.4.1 Applying an Invoice Header Discount 7.3.4.2 Applying an Invoice Line-item Discount 7.3.5 WORKING WITH ACCOUNTS AT THE INVOICE LEVEL 7.3.6 WORKING WITH TAXES 7.3.6.1 About Invoice Taxes 7.3.6.2 Applying Invoice Header Taxes 7.3.6.3 Applying Invoice Line-item Taxes 7.3.6.4 Updating Invoice Taxes 7.4 UPDATING AN INVOICE 7.4.1 UPDATING INVOICE LINE ITEMS Virtua ILS – Integrated Library System 140 140 141 141 141 144 144 145 146 147 147 148 148 153 153 153 156 159 160 161 162 164 164 165 167 168 169 171 PROPRIETARY INFORMATION OF VTLS INC. Acquisitions (v. 43.1) v 7.4.2 DELETING INVOICE LINE ITEMS 7.4.3 UPDATING MISCELLANEOUS FEES 7.4.3.1 Updating Invoice Header Fees 7.4.3.2 Updating Invoice Line-item Fees 7.4.4 DELETING MISCELLANEOUS FEES 7.4.5 UPDATING DISCOUNT DATA 7.4.6 DELETING DISCOUNT DATA 7.5 VIEWING AN INVOICE 7.6 DELETING AN INVOICE 7.7 SAVING AN INVOICE 7.7.1 “WHEN SAVING…” OPTIONS 7.7.2 SYSTEM CHECKS UPON SAVING 7.7.3 PAYING WHEN SAVING… 173 173 173 175 177 178 178 179 181 182 183 183 184 8. 185 WORKING WITH PAYMENT VOUCHERS 8.1 INTRODUCTION 8.1.1 SUPPORT FOR REPETITIVE AND INTEGRATED WORKFLOWS 8.2 DISPLAYING THE PAYMENT WINDOW 8.2.1 ASPECTS OF THE SELECT INVOICES FOR PAYMENT WINDOW 8.2.1.1 Header Elements 8.2.1.2 Balance Information 8.2.1.3 Invoices Display Box 8.2.1.4 Command Buttons 8.2.1.5 When Saving… Options 8.3 EDITING PAYMENT HEADER ELEMENTS 8.4 SELECTING INVOICES FOR PAYMENT 8.4.1 PAYING ALL THE INVOICES 8.4.2 APPLYING CREDITS TO ALL PAID INVOICES 8.4.2.1 Expand Credits Function 8.4.2.2 Apply Credits Function 8.4.3 PAYING SELECTED INVOICES 8.4.4 APPLYING CREDITS TO SELECTED INVOICES 8.4.4.1 Expand Credits Function 8.4.4.2 Apply Credits Function 8.5 WORKING WITH SELECTED, EXPANDED INVOICES 8.5.1 VIEWING A SELECTED, EXPANDED INVOICE 8.5.2 ASPECTS OF THE INVOICE (PAYMENT) WINDOW 8.5.2.1 Balance Information 8.5.2.2 Invoice/Line Fees and Invoice/Line Taxes Tabs 8.5.2.3 Buttons on the Invoice/Line Fees and Invoice/Line Taxes Tabs 8.5.2.4 Invoice Line Items Display Box 8.5.2.5 Command Buttons 8.5.3 PAYING AN INVOICE LINE ITEM 8.5.4 APPLYING CREDITS TO AN INVOICE LINE ITEM 8.5.4.1 Expand Credits Function 8.5.4.2 Apply Credits Function PROPRIETARY INFORMATION OF VTLS INC. 185 186 186 188 188 190 191 191 193 193 194 194 195 196 197 197 199 199 201 201 201 202 203 203 204 205 205 207 208 208 210 Virtua ILS – Integrated Library System Acquisitions (v. 43.1) vi 8.5.5 PAYING ON THE WHOLE INVOICE 8.5.6 APPLYING CREDITS TO THE WHOLE INVOICE 8.5.6.1 Expand Credits Function 8.5.6.2 Apply Credits Function 8.5.7 EXITING THE INVOICE (PAYMENT) WINDOW 8.6 CREATING A PAYMENT VOUCHER WITHOUT INVOICES 8.7 SAVING A PAYMENT VOUCHER 8.8 VIEWING A PAYMENT VOUCHER 8.8.1 VIEWING INVOICE DETAILS 8.9 CUSTOMIZING PRINTED PAYMENT VOUCHERS 211 212 213 214 214 215 217 218 220 222 9. 224 WORKING WITH CREDITS 9.1 9.1.1 9.1.2 9.2 9.3 9.4 9.5 9.6 9.7 INTRODUCTION ABOUT VIEWING AND APPLYING CREDITS ABOUT RECORD LOCKING DISPLAYING THE ADD CREDIT WINDOW ADDING A SPECIFIC CREDIT ADDING AN INTERNAL CREDIT UPDATING A CREDIT RECORD VIEWING A CREDIT RECORD DELETING A CREDIT RECORD 224 225 225 225 227 229 230 232 233 10. WORKING WITH CLAIMS 236 10.1 INTRODUCTION 10.1.1 CLAIM INTERVALS AND MAXIMUM CLAIM LIMITS 10.1.2 METHOD OF TRANSMISSION 10.2 CUSTOMIZING PRINTED CLAIM LETTERS 10.2.1 EDITING THE CLAIM LETTER TEMPLATE FILE: ENGPRINTCLAIM.UTF 10.2.1.1 General Editing Tips 10.2.1.2 Default Claim Letter Template (First Screen) 10.2.1.3 Default Claim Letter Template (Second Screen) 10.2.1.4 Default Claim Letter Template (Third Screen) 10.3 VIEWING A CLAIM 10.3.1 ASPECTS OF THE CLAIMS WINDOW 10.3.1.1 Columns 10.3.1.2 Command Buttons 10.3.1.3 Adjusting Column Width 10.4 ISSUING A CLAIM 10.4.1 ISSUING AN INDIVIDUAL CLAIM 10.4.1.1 Individual Claiming and Exceeding the Maximum Number of Claims 10.4.2 PROCESSING CLAIMS IN BATCH MODE 10.5 TRANSMITTING A CLAIM 10.5.1 TRANSMITTING AN INDIVIDUAL CLAIM (“PRINT”) 10.5.2 TRANSMITTING AN INDIVIDUAL CLAIM (“E-MAIL”) Virtua ILS – Integrated Library System 236 237 237 238 239 240 241 244 246 248 248 249 249 249 250 250 252 252 253 254 256 PROPRIETARY INFORMATION OF VTLS INC. Acquisitions (v. 43.1) vii 10.5.3 TRANSMITTING ALL OUTSTANDING CLAIMS 10.6 DELETING A CLAIM 10.7 CLAIMS AND SYSTEM PROCESSES 259 260 260 11. 261 WORKING WITH REMINDERS 11.1 TYPES OF REMINDERS 11.1.1 TYPES OF ACQUISITIONS REMINDERS 11.2 ACCESSING GENERAL REMINDERS 11.2.1 SEARCHING FOR ACQUISITIONS REMINDERS 11.2.2 ASPECTS OF THE REMINDERS WINDOW 11.2.2.1 List Box 11.2.2.2 Command Buttons 11.3 TASKS TO PERFORM FROM THE REMINDERS WINDOW 11.3.1 VIEWING CLAIM INFORMATION 11.3.2 ADDING A USER-DEFINED REMINDER 11.3.3 ACCESSING THE PURCHASE ORDER ASSOCIATED WITH A REMINDER 11.3.4 MODIFYING THE IGNORE UNTIL DATE 11.3.5 DELETING A REMINDER MANUALLY 11.4 ADDING USER-DEFINED REMINDERS FROM OTHER ACCESS POINTS 11.4.1 OTHER POINTS OF ACCESS TO REMINDERS 11.4.1.1 Adding User-defined Reminders Directly to a Purchase Order Line Item 11.4.1.2 Adding User-defined Reminders Directly to a Purchase Order 11.4.2 DELETING USER-DEFINED REMINDERS 11.5 ACQUISITIONS REMINDERS AND AUTOMATIC SYSTEM FUNCTIONS 261 262 263 263 265 265 266 266 267 267 268 269 270 270 270 271 274 277 277 12. 279 APPENDIX A – CHANGES TO THIS USER’S GUIDE 12.1 VERSION 42.4 – VERSION 43.0 12.1.1 NEW SECTIONS 12.1.2 MODIFIED SECTIONS 12.2 VERSION 43.0 – VERSION 43.1 279 279 279 280 INDEX 281 PROPRIETARY INFORMATION OF VTLS INC. Virtua ILS – Integrated Library System viii Acquisitions (v. 43.1) Table of Figures Figure 2-1. Add P. O. Request Dialog Box __________________________________________________ 3 Figure 2-2. Add Order Window Header ____________________________________________________ 4 Figure 2-3. Add Order Window - Monograph or Serial Order __________________________________ 4 Figure 2-4. Add Order Window - COG Order _______________________________________________ 6 Figure 2-5. Add Order Window – Catch-all Order Group ______________________________________ 9 Figure 2-6. Add Order Window _________________________________________________________ 10 Figure 2-7. Add Order Window Header ___________________________________________________ 11 Figure 2-8. Order Header Information Tab (Monograph/Serial Order) __________________________ 12 Figure 2-9. Order Header Information Tab (COG Order)_____________________________________ 12 Figure 2-10. P.O. Date Calendar ________________________________________________________ 13 Figure 2-11. Add Order Window – Billing/Shipping Information Tab ____________________________ 14 Figure 2-12. OPAC Search Window ______________________________________________________ 19 Figure 2-13. View Bibliographic Record Window ___________________________________________ 20 Figure 2-14. Add Order Window – Displaying a Line Item ____________________________________ 21 Figure 2-15. Update Order Window - Catch-All Order Group _________________________________ 23 Figure 2-16. View Bibliographic Record Window - Statuses Tab _______________________________ 24 Figure 2-17. Order Line Editor - Bibliographic Information Tab _______________________________ 26 Figure 2-18. Order Line Editor Window___________________________________________________ 27 Figure 2-19. Order Line Editor - Monograph ______________________________________________ 28 Figure 2-20. Order Line Editor – Account Information Tab ___________________________________ 31 Figure 2-21. Order Line Editor - Enumeration Information Sub-tab (Serials) _____________________ 34 Figure 2-22. Order Line Editor - Enumeration Information Sub-tab (COGS) ______________________ 36 Figure 2-23. Add Order Window - "When Saving..." Options (Monographs and Serials) _____________ 37 Figure 2-24. Add Order Window - "When Saving..." Options (COGs)____________________________ 37 Figure 2-25. Rush Order and Auto Receive Check Boxes______________________________________ 38 Figure 2-26. Information - Purchase Order Added __________________________________________ 40 Figure 2-27. Order Number Request Dialog Box ____________________________________________ 40 Figure 2-28. Purchase Order Error Message_______________________________________________ 41 Figure 2-29. Purchase Order Confirm Dialog Box __________________________________________ 41 Figure 2-30. Error Message - Over-encumbrance ___________________________________________ 42 Figure 3-1. Update PO Request Dialog Box________________________________________________ 44 Figure 3-2. Error Message _____________________________________________________________ 44 Figure 3-3. View Order Window (Update Mode) ____________________________________________ 45 Figure 3-4. Update Order Window - Catch-All Order Group __________________________________ 47 Figure 3-5. Update Order Window – Serial Order___________________________________________ 48 Figure 3-6. Order Line Editor Window____________________________________________________ 49 Figure 3-7. Delete Warning ____________________________________________________________ 50 Figure 3-8. P.O. Line Item Deletion Message_______________________________________________ 51 Figure 3-9. View PO Request Dialog Box__________________________________________________ 52 Figure 3-10. View Order Window________________________________________________________ 53 Figure 3-11. Delete PO Request Dialog Box _______________________________________________ 55 Figure 3-12. Error Message ____________________________________________________________ 55 Figure 3-13. Delete Order Window ______________________________________________________ 56 Figure 3-14. P.O. Line Item Deletion Message______________________________________________ 57 Figure 3-15. Cancel PO Request Dialog Box _______________________________________________ 59 Figure 3-16. Error Message ____________________________________________________________ 59 Figure 3-17. Cancel Order Window ______________________________________________________ 60 Figure 3-18. Order Line Editor (Cancel Function) __________________________________________ 61 Figure 3-19. Cancel Order Window ______________________________________________________ 62 Virtua ILS – Integrated Library System PROPRIETARY INFORMATION OF VTLS INC. Acquisitions (v. 43.1) ix Figure 3-20. Send Orders Dialog Box - Transmit Canceled Orders _____________________________ 64 Figure 3-21. Renew PO Request Dialog Box _______________________________________________ 65 Figure 3-22. Add Order Window - Renewal ________________________________________________ 65 Figure 3-23. Information Dialog Box _____________________________________________________ 66 Figure 3-24. Copy PO Request Dialog Box ________________________________________________ 68 Figure 3-25. Add Order Window - Copied P.O. _____________________________________________ 69 Figure 4-1. Order Line Editor - Distribution-enabled Monograph Order _________________________ 71 Figure 4-2. Add Distribution Groups Window ______________________________________________ 72 Figure 4-3. Add Distribution Groups Window - Displaying the List of Libraries ___________________ 73 Figure 4-4. Add Distribution Groups Window – Editing the List of Libraries ______________________ 74 Figure 4-5. Order Lne Editor - Distribution-enabled Monograph Order (Account Information) _______ 75 Figure 4-6. Receipts Window - Distribution-enabled Monograph Order__________________________ 79 Figure 4-7. Edit Distribution Groups Window ______________________________________________ 80 Figure 4-8. Edit Distribution Groups _____________________________________________________ 81 Figure 4-9. Print (Distribution) Dialog Box ________________________________________________ 82 Figure 4-10. Default Distribution Receipt Template File ______________________________________ 83 Figure 5-1. Send Orders Dialog Box _____________________________________________________ 89 Figure 5-2 Print (Order) Dialog Box _____________________________________________________ 91 Figure 5-3. E-mail Records Dialog Box ___________________________________________________ 91 Figure 5-4. Send Orders Summary Window ________________________________________________ 92 Figure 5-5. Information Dialog Box ______________________________________________________ 93 Figure 5-6. Send Orders Summary Window ________________________________________________ 94 Figure 5-7. Confirm Dialog Box _________________________________________________________ 95 Figure 5-8. Sample Purchase Order Letter_________________________________________________ 98 Figure 5-9. Default Purchase Order Letter Template File (1) _________________________________ 100 Figure 5-10. Default Purchase Order Letter Template File (2) ________________________________ 103 Figure 5-11. Default Purchase Order Letter Template File (3) ________________________________ 105 Figure 5-12. Default Purchase Order Letter Template File (4) ________________________________ 107 Figure 6-1. View Bibliographic Record Window - Statuses Tab _______________________________ 110 Figure 6-2. Add/Update Receipts Request Dialog Box _______________________________________ 111 Figure 6-3. Receipts Window – Add/Update Mode__________________________________________ 112 Figure 6-4. Receipts Window __________________________________________________________ 115 Figure 6-5. Receipts Window – After Express Receive Function _______________________________ 116 Figure 6-6. Receipts Window __________________________________________________________ 117 Figure 6-7. Edit Receipt Information Dialog Box___________________________________________ 117 Figure 6-8. Receipts Window – After Receive Function ______________________________________ 118 Figure 6-9. Line Item Receipt Information Window _________________________________________ 119 Figure 6-10. Line Item Receipt Information Window ________________________________________ 121 Figure 6-11. Receipts Window - Updated _________________________________________________ 122 Figure 6-12. Edit Receipt Information Dialog Box__________________________________________ 122 Figure 6-13. Default Receipt Slip Template File ___________________________________________ 126 Figure 6-14. Edit Receipt Information Dialog Box__________________________________________ 127 Figure 6-15. Line Item Receipt Information Window ________________________________________ 128 Figure 6-16. Receipts Window - Condition Values Split______________________________________ 129 Figure 6-17. Line Item Receipt Information Window ________________________________________ 130 Figure 6-18. Line Item Receipt Information Window ________________________________________ 131 Figure 6-19. Edit Receipt Information Dialog Box__________________________________________ 132 Figure 6-20. Line Item Receipt Information Window ________________________________________ 132 Figure 6-21. Line Item Receipt Information Window ________________________________________ 133 Figure 6-22. View Receipts Request Dialog Box ___________________________________________ 134 Figure 6-23. Receipts Window _________________________________________________________ 135 Figure 6-24. Line Item Receipt Information Window ________________________________________ 135 PROPRIETARY INFORMATION OF VTLS INC. Virtua ILS – Integrated Library System x Acquisitions (v. 43.1) Figure 6-25. View Invoice Request Dialog Box ____________________________________________ 138 Figure 6-26. Add/Update Invoice Request Dialog Box_______________________________________ 138 Figure 6-27. Add Invoice Window ______________________________________________________ 139 Figure 7-1. Add Invoice Request Dialog Box ______________________________________________ 142 Figure 7-2. Add Invoice Window _______________________________________________________ 143 Figure 7-3. Add Invoice Window _______________________________________________________ 147 Figure 7-4. Add Invoice Line Items Window_______________________________________________ 149 Figure 7-5. Add Invoice Line Items Window_______________________________________________ 150 Figure 7-6. Add Invoice Window with Inserted Line Items____________________________________ 152 Figure 7-7. Invoice Fees Dialog Box ____________________________________________________ 154 Figure 7-8 Invoice Fee Modification Dialog Box ___________________________________________ 154 Figure 7-9. Invoice Fees Dialog Box ____________________________________________________ 155 Figure 7-10. Add Invoice Window - Invoice Fees Displayed __________________________________ 156 Figure 7-11. Line Fees Dialog Box______________________________________________________ 157 Figure 7-12 Line Fee Modification Dialog Box ____________________________________________ 157 Figure 7-13. Line Fees Dialog Box______________________________________________________ 158 Figure 7-14. Add Invoice Window - Line Fee Displayed _____________________________________ 159 Figure 7-15. Invoice Discounts Dialog Box _______________________________________________ 160 Figure 7-16.Invoice Line Item Window___________________________________________________ 161 Figure 7-17. Invoice Line Item Window __________________________________________________ 163 Figure 7-18. Add Invoice Window - Taxes Buttons__________________________________________ 165 Figure 7-19. Invoice Taxes Window _____________________________________________________ 166 Figure 7-20. Invoices Line Taxes Window ________________________________________________ 167 Figure 7-21. Update Invoice Request Dialog Box __________________________________________ 169 Figure 7-22. Update Invoice Window ____________________________________________________ 170 Figure 7-23. Invoice Line Item Window __________________________________________________ 172 Figure 7-24. Invoice Fees Dialog Box ___________________________________________________ 174 Figure 7-25. Update Invoice Window - Invoice Fees Displayed _______________________________ 175 Figure 7-26. Line Fees Dialog Box______________________________________________________ 176 Figure 7-27. Update Invoice Window - Line Fee Displayed___________________________________ 177 Figure 7-28. View Invoice Request Dialog Box ____________________________________________ 179 Figure 7-29. View Invoice Window ______________________________________________________ 180 Figure 7-30. Delete Invoice Request Dialog Box ___________________________________________ 181 Figure 7-31 Delete Invoice Window _____________________________________________________ 182 Figure 7-32. Add Invoice Window - "When Saving..." Options ________________________________ 183 Figure 7-33. Select Invoices for Payment Window __________________________________________ 184 Figure 8-1. Create Voucher Request Dialog Box ___________________________________________ 187 Figure 8-2. Select Invoices for Payment Window ___________________________________________ 188 Figure 8-3. Select Invoices for Payment Window - More Than One Currency ____________________ 190 Figure 8-4. Calendar - Payment Date____________________________________________________ 193 Figure 8-5. Select Invoices for Payment Window ___________________________________________ 195 Figure 8-6. Apply Credits to Invoices Window _____________________________________________ 196 Figure 8-7. Select Invoices for Payment Window ___________________________________________ 198 Figure 8-8. Apply Credits to Invoice Window______________________________________________ 200 Figure 8-9. Invoice (Payment) Window __________________________________________________ 202 Figure 8-10. Invoice (Payment) Window _________________________________________________ 207 Figure 8-11. Apply Credits to Invoice Line Item Window_____________________________________ 209 Figure 8-12. Invoice (Payment) Window _________________________________________________ 211 Figure 8-13. Invoice (Payment) Window _________________________________________________ 212 Figure 8-14. Apply Credits to Invoice Window_____________________________________________ 213 Figure 8-15. Create Voucher Request Dialog Box __________________________________________ 215 Figure 8-16. Voucher Without Invoices Window ___________________________________________ 216 Virtua ILS – Integrated Library System PROPRIETARY INFORMATION OF VTLS INC. Acquisitions (v. 43.1) xi Figure 8-17 Information (Voucher Added) Window _________________________________________ 217 Figure 8-18. Print (Voucher) Dialog Box _________________________________________________ 218 Figure 8-19. View Voucher Request Dialog Box ___________________________________________ 219 Figure 8-20. Display Voucher Window___________________________________________________ 219 Figure 8-21. Voucher Without Invoices Window ___________________________________________ 220 Figure 8-22. View from the Expand Invoice Button _________________________________________ 221 Figure 8-23. Default Payment Voucher Template File – printvoucher.utf ________________________ 223 Figure 9-1. Add Credit Request Dialog Box _______________________________________________ 226 Figure 9-2. Add Credit (Internal) Window ________________________________________________ 226 Figure 9-3. Add Credit (Specific) Window ________________________________________________ 227 Figure 9-4 Update Credit Request Dialog Box_____________________________________________ 230 Figure 9-5. Update Credit (Specific) Window______________________________________________ 231 Figure 9-6. Update Credit (Internal) Window _____________________________________________ 231 Figure 9-7. View Credit Request Dialog Box ______________________________________________ 232 Figure 9-8. View Credit Window________________________________________________________ 233 Figure 9-9. Delete Credit Request Dialog Box ___________________________________________ 234 Figure 9-10. Delete CreditWindow ______________________________________________________ 234 Figure 10-1. Default Claim Letter_______________________________________________________ 238 Figure 10-2. Default Claim Letter Template File - engprintclaim.utf (1)_________________________ 241 Figure 10-3. Claim Letter Template - engprintclaim.utf (2) ___________________________________ 244 Figure 10-4. Claim Letter Template - engprintclaim.utf (3) ___________________________________ 246 Figure 10-5. Claims Window __________________________________________________________ 248 Figure 10-6. Claims Window __________________________________________________________ 251 Figure 10-7. Claims Window __________________________________________________________ 251 Figure 10-8. Print (Claim) Dialog Box___________________________________________________ 254 Figure 10-9. Claim Letter Printing Confirmation___________________________________________ 255 Figure 10-10. Claims Window After Transmission __________________________________________ 256 Figure 10-11. E-mail (Claims) Records Dialog Box_________________________________________ 257 Figure 10-12. E-mail Composition Window _______________________________________________ 258 Figure 10-13. Claims Window After Transmission __________________________________________ 259 Figure 11-1. Reminders Window________________________________________________________ 262 Figure 11-2. General Reminders Request Window__________________________________________ 264 Figure 11-3. Reminders Window________________________________________________________ 265 Figure 11-4. Claims Window __________________________________________________________ 267 Figure 11-5. Add Reminder Dialog Box __________________________________________________ 268 Figure 11-6. Set Ignore Until Date Dialog Box ____________________________________________ 269 Figure 11-7. View Order Window - Reminders_____________________________________________ 272 Figure 11-8. Reminders Window________________________________________________________ 273 Figure 11-9. Add Reminder Dialog Box __________________________________________________ 273 Figure 11-10. Claims Window- Reminders Functionality_____________________________________ 273 Figure 11-11. View Order Window - Reminders____________________________________________ 275 Figure 11-12. Reminders Window_______________________________________________________ 275 Figure 11-13. Add Reminder Dialog Box _________________________________________________ 276 Figure 11-14. Reminders Window_______________________________________________________ 276 PROPRIETARY INFORMATION OF VTLS INC. Virtua ILS – Integrated Library System xii Acquisitions (v. 43.1) (This page intentionally blank) Virtua ILS – Integrated Library System PROPRIETARY INFORMATION OF VTLS INC. Acquisitions (v. 43.1) 1 1. Introduction to Acquisitions T he Virtua Acquisitions User’s Guide provides task-oriented instructions for creating records in the Acquisitions subsystem of the Virtua™ ILS – Integrated Library System. The guide describes the features, functions, menus, and windows of the Acquisitions subsystem for this release of the Virtua ILS software. It also takes you step by step through the various Acquisitions workflows, from adding your first purchase order and receiving items to creating your first invoice and payment voucher. Note: From this point on, we will refer to the Virtua ILS – Integrated Library System as simply Virtua or the Virtua system in this guide. This introduction covers the following topics: ⇒ Using This Guide 1.1 Using This Guide The Virtua Acquisitions User’s Guide is one of two guides about the Acquisitions subsystem. This guide focuses on Acquisitions records and workflows. It also deals with distributions, claims, and reminders. The other guide, Getting Started with Virtua Acquisitions, provides an overview of key global aspects of the Acquisitions subsystem, briefly touches on parameters, and orients you to the Acquisitions menu. In addition, the guide goes into detail about setting up your fund accounts and creating vendor records, both of which you must do before you create your first purchase order. Lastly, the Getting Started with Virtua Acquisitions Guide covers functionality regarding Acquisitions notes and the Title Selection List. To locate specific information in this guide, use the hyperlinked page numbers in the table of contents and table of figures or the hyperlinked section headings at the beginning of each chapter. If you are using a paper copy, you will find the index in the back of the guide to be especially helpful. Your comments about using this guide are welcome. A Reader’s Comment Form is available in the the back of the guide. PROPRIETARY INFORMATION OF VTLS INC. Virtua ILS – Integrated Library System 2 Acquisitions (v. 43.1) 2. Adding a Purchase Order T he purchase order is at the heart of Virtua Acquisitions. To acquire an item from a vendor, you must create a purchase order, which is a request for one or more copies of one or more line items. In Virtua, the main purchase order functions consist of adding, editing (line items), viewing, updating, deleting, canceling, copying and sending. The Add Order window lets you build the order record for one of three different types of orders: Monograph, Serials, or COG (Catch-all Order Group). Virtua supports a variety of currencies and workflows to accommodate the different needs of different order types, payment types, and environments—either centralized or distributive. This chapter covers the following topics: ⇒ ⇒ ⇒ ⇒ ⇒ ⇒ ⇒ Accessing the Add PO Request Dialog Box Adding Order Information for Monographs and Serials Adding Order Information for COGs Aspects of the Add Order Window Inserting Order Line Item Information Editing Order Line Item Information Saving a New Purchase Order 2.1 Accessing the Add PO Request Dialog Box The first step in adding a purchase order is to access the Add P.O. Request dialog box. To access the Add PO Request dialog box, 1. On the Acquisitions toolbar, click Add Purchase Order . -OROn the Virtua menu bar, click Acquisitions, click Orders, and then choose Add. The Add PO Request dialog box appears (Figure 2-1). Virtua ILS – Integrated Library System PROPRIETARY INFORMATION OF VTLS INC. Acquisitions (v. 43.1) 3 Figure 2-1. Add P. O. Request Dialog Box 2. In the Order Number field, type an order number or leave the text box blank and let Virtua assign a number. The number can be up to nine digits long. Note: Once a purchase order number has been used, you cannot reuse it. There is no facility for resetting the purchase order number “counter.” 3. In the Order Type field, choose Monograph, Serial, Standing Order, Monographic Set, or Planned Order. 4. In the Payment Type field, choose Standard, Prepaid, or Deposit/Donation. 5. Choose a vendor from the pull-down list box. Note: • When you begin typing a vendor name, Virtua automatically completes your string with the closest match it finds in the vendor index. • Only active vendors appear in the pull-down list. To be active, the Active check box on the vendor record must be selected. • If you choose an alternate vendor name, the regular vendor name will appear on the order itself. 6. Click the Retrieve button or press Enter. The Add Order window appears. The non-editable header of the window (Figure 2-2) displays all the information that you entered in the Add PO Request dialog box. PROPRIETARY INFORMATION OF VTLS INC. Virtua ILS – Integrated Library System 4 Acquisitions (v. 43.1) Figure 2-2. Add Order Window Header The other elements on the Add Order window will vary slightly, depending on the order type you selected. 2.2 Adding Order Information for Monographs and Serials If you choose Monograph or Serial as the order type on the Add PO Request dialog box, the Add Order window will look like Figure 2-3. Figure 2-3. Add Order Window - Monograph or Serial Order Virtua ILS – Integrated Library System PROPRIETARY INFORMATION OF VTLS INC. Acquisitions (v. 43.1) 5 We will briefly describe the steps for adding order information. Then in a following section, we will describe in detail all the elements on the Add Order window. To add order information for a Monograph or Serial, 1. Edit the fields on the Order Header Information tab: Order Date, Currency Type, and Print File (for details, see the section “Order Header Information Tab”). Note: If your library has not created additional print files for the same order type (such as Monographs or Serials) in different languages, no other choices besides the default print file will be available in the Print File pull-down list box. The default file for Monographs is engmonprintpo.utf and the one for Serials is engserprintpo.utf. 2. Edit the fields on the Billing/Shipping Information tab: Billing Method, Shipping Method, Billing Sent To, and Shipping Sent To (for details, see the section “Billing/Shipping Information Tab”). Note: If the value for the Shipping Method is “No Specific Method” and you want to choose a specific method, you must do three things: • Cancel the Add Purchase Order function, • Add shipping method values to the EDIFACT tab of the vendor record, and • Launch the Add Purchase Order function again. 3. Insert line items, creating a brief bibliographic record for the line item if needed (see the section “Inserting Order Line Items”). 4. Edit line items (see the section “Editing Order Line Item Information”). 5. Select a “When Saving…” option (see the section “About the “When Saving…” Options”). 6. If appropriate, select an option for special handling for the order such as Rush Order or Auto Receive (see the section “Special Handling Options Upon Saving”). 7. Click the Save button. The order is saved to the database. In addition, if the order is for a serial, a holdings record is automatically created for each serial line item. The Holdings tab on the View Bibliographic Record window will display a new line item for the serial. The location of the record will be the sublocation specified in the Order Line Editor, and instead of a copy number, the system will display ON ORDER. PROPRIETARY INFORMATION OF VTLS INC. Virtua ILS – Integrated Library System 6 Acquisitions (v. 43.1) 2.3 Adding Order Information for COGs A COG order is either a Monographic Set, Planned Order, or Standing Order. Adding order information for a COG order is a little different than adding order information for a Monograph or Serial order. There are some differences between the Add Order window for a COG order such as a Monographic Set (Figure 2-4) and the Add Order window for a Monograph or Serial (Figure 2-3). On the COG order… • An Order Description field exists. • The item-level command buttons are disabled. • A Transmit and Reopen for Update radio button replaces the Immediately Proceed to Receipts option on Monograph and Serials orders. Figure 2-4. Add Order Window - COG Order Virtua ILS – Integrated Library System PROPRIETARY INFORMATION OF VTLS INC. Acquisitions (v. 43.1) 7 To add order information for a COG order, 1. Follow the steps for adding Order Header Information and Billing/Shipping Information that we presented for a Monograph or Serial order. Note: If your library has not created additional print files for COG order types in different languages, no other choices besides the default print file will be available in the Print File pull-down list box. The default file for COGs is engcogprintpo.utf. 2. In addition, edit the following fields that are available for COG orders only: • Status field on the Order Header Information tab. Note that the software will not let you select “Ordered” on a new COG order. • Cancel Date on the Order Header Information tab. This optional field lets you enter a date when the COG order will be canceled. (For details on editing a date field, see the description of the Order Date field in the section “Order Header Information Tab.”) • Order Description field (see the section “Completing the Order Description Field”). Note: On a COG order you cannot insert line items at this point. The item-level command buttons are disabled. Proceed to the “When Saving…” options. 3. Select a “When Saving…” option. Note: To insert line items on the order, select the Transmit and Reopen for Update radio button. 4. Click the Save button. The COG order window reopens in Update mode. 5. 6. 7. 8. Insert line items (see the section… Edit line items (see the section…. Select a “When Saving…” option (see the section…. If appropriate, select the Auto Receive check box (see the section “Auto Receive Option” in this guide). 9. Click the Save button. PROPRIETARY INFORMATION OF VTLS INC. Virtua ILS – Integrated Library System 8 Acquisitions (v. 43.1) 2.3.1 Completing the Order Description Field The Add Order window for COG orders displays a detail box labeled Order Description where you can EITHER… 1) Type information about volumes and numbers, or in the case of Planned Orders, information about the order that your library and the vendor have agreed upon. -OR2) Drag and drop bibliographic information from the View Bibliographic Record window into the description field (see the section “Using the Drag-and-Drop Tool”). Note: If you drag bibliographic data into the field where typed information already exists, the typed information will be cleared. To complete the Order Description field, • In the Order Description detail box (Figure 2-5), type information or drag and drop bibliographic information (author, title, and publication data or data from linked 880 tags only) from the View Bibliographic Record window. Virtua ILS – Integrated Library System PROPRIETARY INFORMATION OF VTLS INC. Acquisitions (v. 43.1) 9 Figure 2-5. Add Order Window – Catch-all Order Group As long as all order header and billing and shipping information is complete AND the status of the order is set to Approved, you are now ready to save and transmit the COG order, after which you can add line items. 2.4 Aspects of the Add Order Window Basically, the Add Order window contains the same elements for each type of purchase order with a couple exceptions. The Add Order window (Figure 2-6) consists of nine distinct elements: • • • • Header display of the information you provided on the Add PO Request dialog box. Order Header Information tab. Billing/Shipping Information tab. A list box, which will contain purchase order line items. PROPRIETARY INFORMATION OF VTLS INC. Virtua ILS – Integrated Library System 10 Acquisitions (v. 43.1) • • • • • Create Brief Bib button. Item-level command buttons. Radio buttons that offer a choice of workflow procedures upon saving. Check boxes for specifying a Rush Order or Auto Receive. Order-level command buttons. Figure 2-6. Add Order Window You can resize the Add Order window to suit your needs. Just place your mouse cursor at the boundary of the window. When the cursor changes to a horizontal or vertical arrow, hold down the left mouse button and drag the edge of the window. You can also adjust column widths in the Line Items list box for more complete viewing of column labels and contents. To expand a column width, 1. Click on the column divider. 2. Drag the mouse to the left or right until you reach the desired width. Virtua ILS – Integrated Library System PROPRIETARY INFORMATION OF VTLS INC. Acquisitions (v. 43.1) 11 2.4.1 Non-editable Header of the Add Order Window Regardless of the type of purchase order or the type of purchase order payment, the non-editable header on the Add Order window (Figure 2-7) always displays the following elements derived from the data you provided on the Add PO Request dialog box: Figure 2-7. Add Order Window Header • Order Number – The order number you entered on the Add PO Request dialog box or a system-assigned number. The number can contain up to nine digits. You cannot edit this number unless, when you save the order, the system finds a duplicate number and rejects it, in which case you will need to assign a new number. • Order Type – The order type that you chose on the Add PO Request dialog box. • Vendor – The vendor you chose on the Add PO Request dialog box. It is the vendor to which you will send the purchase order. You cannot edit this field. Vendor names derive from vendor records, which your library created and saved to the database. Note: If the vendor name is too long to display fully in the header, do the following: Move your mouse cursor over the name so that a tooltip will pop up displaying the full name. • Payment Type – The payment type that you chose on the Add PO Request dialog box. 2.4.2 Order Header Information Tab The Order Header Information tab of the Add Order window for a Monograph or Serial order (Figure 2-8) differs somewhat from the Order Header Information tab for a COG order (Figure 2-9). PROPRIETARY INFORMATION OF VTLS INC. Virtua ILS – Integrated Library System 12 Acquisitions (v. 43.1) Figure 2-8. Order Header Information Tab (Monograph/Serial Order) Figure 2-9. Order Header Information Tab (COG Order) We discuss the various elements below: • Status – (Editable on COG orders only) The status of the entire order, which is fluid and system maintained. The status in the header and the statuses for the line items are interdependent. ♦ In the Virtua Profiler, your library can define status values for use with line items, and in the Order Line Editor you can choose one of those statuses for each line item. But the status value in the header of a Monograph or Serial is calculated by the system, which takes into account ALL the line item statuses. ♦ By contrast, the Status field for a new COG order is editable. The only status option you cannot select for a new COG order is “Ordered.” Note: In general, the system uses the most restrictive of the line item statuses to determine the status of the purchase order as a whole. • Total – (Not Editable) The total value of the purchase order in the selected currency of the order. To see the equivalent value of the total in the base, or home, currency, move your mouse cursor over the value. A tooltip will appear, displaying the home currency value. • Order Date – (Editable) The order date is the date that the purchase order is initiated. The default is the current day as set on your PC. You can edit the date by typing in a new date or by clicking the down arrow in the Order Date box to view and edit a drop-down calendar. The calendar displays the current month with a red circle around the current date (Figure 2-10). Virtua ILS – Integrated Library System PROPRIETARY INFORMATION OF VTLS INC. Acquisitions (v. 43.1) 13 Figure 2-10. P.O. Date Calendar ♦ Choose a new month and/or year by clicking the left and right arrows at the top of the calendar. ♦ Choose a new date by clicking the date on the calendar. Virtua inserts the date in the Order Date field. • Currency Type – (Editable) The currencies available in the pull-down list box derive from the Currencies parameter in the Global Settings of the Virtua Profiler. The currency displayed is pulled from the vendor record. If no currency value is specified in the vendor record, the value defaults to the base currency of the system. • Cancel Date – (Editable) Appears on COG orders only. The date the COG order will be canceled. To enable the current (default) date, click the check box. To edit the date, see the instructions for Order Date, above. • Print File – (Editable) The files available in the pull-down list box are those purchase order templates, including any translated templates, designated for use with this particular type of purchase order. For example, if the order is a Monograph order, only files of the type *monprintpo.utf appear in the list, where the asterisk represents the language code as specified in the vendor record. If no language code is specified in the vendor record, Virtua displays the default file engmonprintpo.utf, but you can override this default and choose another filename in the pull-down list. In addition to engmonprintpo.utf, the purchase order letter templates that are available and shipped with the Virtua client are… ♦ engmonprintporush.utf (used with rushed Monograph orders) ♦ engmonprintcancelpo.utf (used with canceled Monograph orders) ♦ ♦ engserprintpo.utf (used with Serial orders) PROPRIETARY INFORMATION OF VTLS INC. Virtua ILS – Integrated Library System 14 Acquisitions (v. 43.1) ♦ ♦ ♦ ♦ ♦ ♦ engserprintporush.utf (used with rushed Serial orders) engserprintcancelpo.utf (used with canceled Serial orders) engcogprintpo.utf (used with COG orders) engcogprintporush.utf (used with rushed COG orders) engcogprintcancelpo.utf (used with canceled COG orders) All these files reside in the VTLS\Virtua directory and can be modified (see the section “Working with Purchase Order Letter Templates” in this guide). 2.4.3 Billing/Shipping Information Tab The Billing/Shipping Information tab of the Add Order window (Figure 2-11) displays acquisitions address names and preferred methods for billing and shipping. It also displays the vendor’s preferred method for transmitting the order. Figure 2-11. Add Order Window – Billing/Shipping Information Tab Virtua ILS – Integrated Library System PROPRIETARY INFORMATION OF VTLS INC. Acquisitions (v. 43.1) 15 On the Billing/Shipping Information tab, you can find the following header elements: • Billing Method – The pull-down list box contains the available methods for paying bills. These methods are preset in Virtua and cannot be changed. They are Courier (default), E-mail, Fax, Mail, and X12. • Shipping Method – The pull-down list box contains a list of methods that a vendor might use to ship orders to your library. The shipping methods are based on EDIFACT standard codes and descriptions. In the vendor record, you can specify those methods that you want to appear in this list box. By default, the system displays the first shipping method specified. When no shipping method is specified in the vendor record, the system displays No Specific Method, which means that the method is left up to the vendor. If, in fact, you want to choose a specific shipping method for your order, you must do three things: ♦ Cancel the Add Purchase Order function, ♦ Add shipping methods to the vendor record, and ♦ Create the purchase order. • Billing Sent To and Shipping Sent To – The contents of these two pull-down list boxes depend on two parameters: Acquisitions Addresses and Basic Options, which includes the setting for Filter Acquisitions Records by Log-in Location. ♦ If the log-in location filter is ON, only those address names associated with the session’s log-in location will appear in the list. ♦ If the log-in location filter is OFF, all address names set up in the Acquisitions Addresses parameter will appear in the list. • Transmission Method – (Not Editable) This field displays the preferred transmission method specified in the vendor record. Currently, the available transmission methods are Print, E-mail, EDIFACT via ftp, and EDIFACT and Print. If no method is specified, the system uses Print. 2.4.4 Line Items List Box The Line Items list box on the Add Order window is empty until you insert line items on your purchase order. For COG orders, the item-level command buttons are disabled until you save and transmit the order. Virtua offers a drag-and-drop tool to facilitate insertion of line items (see the section “Using the Drag-and-Drop Tool”). When you insert an item, the system displays the title in the list box along with the line number, vendor title ID—which you have the PROPRIETARY INFORMATION OF VTLS INC. Virtua ILS – Integrated Library System 16 Acquisitions (v. 43.1) option to specify via the Order Line Editor—default line item status, default price (0), default quantity (1), and line total. 2.4.5 Create Brief Bib Button Before a title can be inserted as a purchase order line item, a bibliographic record must exist in the database. The Create Brief Bib button lets you create a brief bibliographic record “on the fly” in order to insert that record title as a purchase order line item. Clicking the Create Brief Bib button displays in the MARC Editor either the system default workform, acq.wfm, or a library-defined default workform as specified in the Cataloging Options window. Using this workform, you can create a brief bibliographic record. After you save the new record to the database, the View Bibliographic Record window will appear. From this window, you can drag and drop the title into the Line Items list box on the Add Order window. 2.4.6 Item-level Command Buttons Four command buttons relate to line items and are located just under the Line Items list box. These buttons are Copy Item, Insert Item, Delete Item, and Edit Item. • • • • Copy Item – Copies the selected line item and inserts the copy in the display box. Insert Item – Displays the OPAC Search window where you can search for the bibliographic record of the item you want to insert. Delete Item – Deletes the selected line item(s). If you delete the last line item on the purchase order and save the order, the purchase order header is automatically deleted from the database. Edit Item – For a selected line item, displays the Order Line Editor where you can edit information such as account, copy, and location. 2.4.7 When Saving… Options When you save the purchase order, you can select one of four radio buttons to determine what happens next: • • • • Exit This Window Repeat This Function Immediately Proceed to Invoices (for Standard or Serial orders only) Immediately Proceed To Receipts (for Standard or Serial orders only) Virtua ILS – Integrated Library System PROPRIETARY INFORMATION OF VTLS INC. Acquisitions (v. 43.1) 17 -ORTransmit and Reopen for Update (for COG orders only) Your selection is persistent, meaning it will be the default selection in any future order function until it is changed. For details, see the section “Saving a New Purchase Order” in this guide. 2.4.8 Order-level Command Buttons Four buttons apply to the purchase order as a whole and are located at the bottom of the window. These buttons are Notes, Claims, Save, and Cancel. • • • • Notes – Displays the Acquisitions Notes window, where you can view and add notes directly attached to this purchase order as well as view priority notes that are indirectly attached to the purchase order, i.e., notes belonging to records associated with the purchase order. If notes exist, the button will display an asterisk. For details, see the Getting Started with Virtua Acquisitions Guide. Claims – Since you cannot claim a new or an empty purchase order, this button is disabled on the Add Order window. Save – Saves the purchase order to the database. Cancel – Cancels your data entries on the order and closes the Add Order window. 2.4.9 Check Boxes Two check boxes give you a way of flagging the order for special handling or an expedited workflow. These are… • • Rush Order Auto Receive For details, see the section “Saving a New Purchase Order” in this guide. PROPRIETARY INFORMATION OF VTLS INC. Virtua ILS – Integrated Library System 18 Acquisitions (v. 43.1) 2.5 Inserting Order Line Items The process of inserting a purchase order line item on the Add Order window is the same whether you are adding a Monograph, Serials, or COG order. The only thing that is different is the workflow. If you are adding a COG order, you will be inserting line items after you save and transmit the order (see the section “Workflow for COG Orders”). Inserting purchase order line items involves two or three steps, depending on whether a bibliographic record for the title already exists in the database. The steps are… 1. Displaying the List of Titles window or the View Bibliographic Record for the purchase order line item you want to insert. Hint: Keep in mind that you can access the View Bibliographic Record for any selected title on the Title Selection List (for details, see the Getting Started with Acquisiitons Guide). -ORCreating a brief bibliographic record for the purchase order line item you want to insert by using the Create Brief Bib button (see the section “Create Brief Bib Button” in this guide). 2. Dragging and dropping the bibliographic information from the List of Titles window or the View Bibliographic Record window into the Line Items list box on the Add Order window. Keep in mind that when you insert line items, • You can add an unlimited number of line items to a purchase order. • There can be only ONE currency type for all the items. To insert a line item on the purchase order, 1. On the Add Order window, click the Insert Item button. The Virtua OPAC Search window appears (Figure 2-12). Virtua ILS – Integrated Library System PROPRIETARY INFORMATION OF VTLS INC. Acquisitions (v. 43.1) 19 Figure 2-12. OPAC Search Window 2. Search for and display the List of Titles window or the View Bibliographic Record window (Figure 2-13) for the title that you want to add to your purchase order. PROPRIETARY INFORMATION OF VTLS INC. Virtua ILS – Integrated Library System 20 Acquisitions (v. 43.1) Figure 2-13. View Bibliographic Record Window The Full, Items, Holdings, and MARC tabs on the View Bibliographic Record window display the bibliographic information that you need to insert on the Add Order window. 3. Add the bibliographic information to the Line Items list box on the Add Order window by using the drag-and-drop tool. (For details about using this feature, see the section “Using the Drag-and-Drop Tool”). Note: You can drag and drop bibliographic information into the Add Order window list box from anywhere on the Full and MARC tabs and from the headers only of the Items and Holdings tabs. 4. After “dropping” the information in the list box, click the Add Order window. The title information appears as a line item in the Line Items list box (Figure 2-14) along with various default values in the appropriate columns. Virtua ILS – Integrated Library System PROPRIETARY INFORMATION OF VTLS INC. Acquisitions (v. 43.1) 21 Figure 2-14. Add Order Window – Displaying a Line Item Note: • If the item you inserted has no 245 tag, the system will display the title information from the next most important title tag in the record. • If the item you inserted has no title, the system will display “No Title Info Available” in the column labeled Title. 5. Using the drag and drop method, continue inserting as many items as necessary. After inserting a purchase order line item, you can copy or edit it. 2.5.1 Copying an Order Line Item Each line item on a purchase order can be assigned only ONE location. If you want to order a line item for multiple locations, Virtua gives you an easy way to duplicate the original line item so that you do not have to re-insert it. PROPRIETARY INFORMATION OF VTLS INC. Virtua ILS – Integrated Library System 22 Acquisitions (v. 43.1) To copy a line item, 1. On the Add Order window, highlight the line item that you want to copy. 2. Click the Copy Item button. A duplicate line item appears on the purchase order. 3. 4. 5. 6. Highlight the copied line item. Click the Edit Item button. On the Order Line Editor, edit the Main Location field. Click the Save button. Your purchase order now contains two purchase order line items, each of which represents a copy for a specific location. 2.5.2 Workflow for COG Orders Before you can insert line items on a COG order, you must save and transmit it. In many cases, you will be creating a COG order after you physically receive ordered line items. Because of this, Virtua provides a mechanism that lets you create, transmit, and update (i.e., insert received line items on) a COG order in one uninterrupted workflow. After transmission, Virtua automatically reopens the order in Update mode (Figure 2-15). (For details about transmitting purchase orders, see the chapter “Sending Purchase Orders” in this guide.) Virtua ILS – Integrated Library System PROPRIETARY INFORMATION OF VTLS INC. Acquisitions (v. 43.1) 23 Figure 2-15. Update Order Window - Catch-All Order Group At this point, the View Bibliographic Record that is linked to the order via the Order Description displays the Statuses tab (Figure 2-16). PROPRIETARY INFORMATION OF VTLS INC. Virtua ILS – Integrated Library System 24 Acquisitions (v. 43.1) Figure 2-16. View Bibliographic Record Window - Statuses Tab To insert a line item on a COG order, 1. On the Update Order window, click the Insert Item button. 2. Follow the steps presented in the section “Inserting Order Line Items.” 2.5.3 Using the Drag-and-Drop Tool To insert an order description or a line item on the Add Order window, you do not have to type bibliographic information. Instead, you can conveniently use the dragand-drop tool. After doing a search in the Virtua OPAC, you can drag the bibliographic information from the List of Titles or the View Bibliographic Record window and drop it into the Order Description field or Line Items list box on the Add Order window. Virtua ILS – Integrated Library System PROPRIETARY INFORMATION OF VTLS INC. Acquisitions (v. 43.1) 25 To drag bibliographic information from the List of Titles or View Bibliographic Record window into the Add Order window, 1. Set up your screen so that you can see the Add Order window AND either the List of Titles or View Bibliographic Record window (for a FRBR record, the Manifestation record must be the active record). To do this, you might have to drag some windows by the title bar to get them out of your way. 2. Select the title to drag: • On the View Bibliographic Record window, click anywhere on the Full tab or MARC tab OR click in the header of the Items tab or Holdings tab. -OR• On the List of Titles window, position the hand cursor over the desired title. 3. Hold down the left mouse button and drag the title to the Line Items list box or the Order Description field on the Add Order window. Hint: When dragging is successful, the mouse cursor changes to a small document icon. 4. Release the mouse button. The title appears as a line item along with various default values, which appear automatically in the appropriate columns. 2.6 Editing Order Line Item Information After you insert a line item on your purchase order, you need to edit it using the Order Line Editor. In the Order Line Editor, all line-item editing is done on the Order Info/Distribution tab. The Bibliographic Information tab (Figure 2-17) displays the same View used for the Full tab of the View Bibliographic Record window and is readonly. PROPRIETARY INFORMATION OF VTLS INC. Virtua ILS – Integrated Library System 26 Acquisitions (v. 43.1) Figure 2-17. Order Line Editor - Bibliographic Information Tab To edit information for a purchase order line item, 1. On the Add Order window, highlight the line item you want to edit. 2. Click the Edit Item button. 3. The Order Line Editor window appears (Figure 2-18), displaying two main tabs and two or three subtabs, depending on the order type. The title of the item, which is read-only, appears in the header. Note: Certain fields (Subject Code, Shipping Sent To, Location, and Account) on the Order Line Editor are automatically populated with values defined elsewhere. Once you edit any of those values, they will persist as the new default values for the next line item that you insert. This holds true whether the order is in Add mode or Update mode. Virtua ILS – Integrated Library System PROPRIETARY INFORMATION OF VTLS INC. Acquisitions (v. 43.1) 27 Figure 2-18. Order Line Editor Window 4. Edit all the fields (except the Total Price field, which is read-only) on the Line Item Header Information subtab. 5. Edit all the fields on the Account Information tab. 6. If the order is a Serial or COG, edit the enumeration information on the Enumeration Information subtab. 7. If desired, click the Notes button to add notes to this line item. Once a line-item note is added, an asterisk will display on the Notes button. Note: The Claims button is disabled when the purchase order is in Add mode. 8. Click the Save button. The line item information is saved, and the Add Order window reappears, displaying a refreshed Line Items list box. Note: If you added a line-item note, the Line Items list box on the Add Order window will display an asterisk in the Number column of the affected line. PROPRIETARY INFORMATION OF VTLS INC. Virtua ILS – Integrated Library System 28 Acquisitions (v. 43.1) For each order type, we discuss the editable fields on the Order Line Editor in more detail below. 2.6.1 Order Line Editor - Monographs For a Monograph, the Order Line Editor window (Figure 2-19) displays two main tabs, Order Info/Distribution and Bibliographic Information. The Order Info/Distribution tab has two subtabs, Line Item Header Information and Account Information. The title of the item, which is read-only, appears at the top of the Order Info/Distribution tab. Figure 2-19. Order Line Editor - Monograph Virtua ILS – Integrated Library System PROPRIETARY INFORMATION OF VTLS INC. Acquisitions (v. 43.1) 29 2.6.1.1 Elements of the Line Item Header Information Sub-tab The Line Item Header Information sub-tab contains the following fields: • • • • • • • • • • Unit Price Copies Total Price (read-only) Due Date Vendor Title ID Subject Code Status Shipping Sent To Location Requestor Barcode Below, we describe each field and, where needed, offer instructions for editing it. Unit Price (optional) – Displays the monetary unit symbol (for example, $) for the currency selected on the Add Order window. The default value is 0. You can edit the value, but you cannot edit the monetary symbol itself. Hint: To see the price you specify reflected in the Total Price, click the Total Price field to refresh it. Copies – Displays the number of copies ordered for the specified location. The default is 1. Edit the field by typing in a value. Total Price (read-only) – Displays the total cost of the line item. If you order multiple copies, the system calculates this value by multiplying the unit price by the number of copies ordered. To update the field, click it. Due Date – Displays the order interval (current date + lead time) required by the vendor and stored in the vendor record. (For instructions on editing this type of field, see the description of the Order Date field in the section “Order Header Information Tab.”). Vendor Title ID (optional) – Lets you record and track the title ID that the vendor has assigned to this particular item. Subject Code (optional) – Displays the default subject code as defined by your library in the Subject Codes parameter in the Virtua Profiler. Other subject codes defined by your library are available in the pull-down list box. PROPRIETARY INFORMATION OF VTLS INC. Virtua ILS – Integrated Library System 30 Acquisitions (v. 43.1) Hint: Some libraries like to use subject codes, or definitions, as a way to group orders for reporting purposes. Examples of subject codes are Fiction, Science Fiction, Juvenile, Reference, History, Literature, and Bibliographies. Status – Displays the status of the item, which is pulled from the Order window. Other statuses, as defined by your library in the Statuses parameter in the Virtua Profiler, are available in the pull-down list box. As the order progresses in the workflow, the status of the item changes, which may influence the status of the purchase order itself. For example, once an Approved purchase order is transmitted, the status of each line item, as well as the status of the purchase order itself, becomes Ordered. Note: Once the status of the purchase order is Ordered, To Be Canceled, or Canceled, you cannot edit any line item information except claims. Shipping Sent To – If the Filter Acquisitions Records By Log-in Location setting (Acquisitions Basic Options parameter) is selected, lists only those acquisitions address names associated with the current log-in location. Otherwise, lists ALL the acquisitions address names set up in the Acquisitions Addresses parameter. This field lets you select a shipping address for this purchase order line item that is different from the shipping address for the purchase order. Location (optional for a Monograph or COG order) – If the Filter Acquisitions Records By Log-in Location setting (Acquisitions Basic Options parameter) is selected, lists the log-in location for the session and all the sublocations belonging to that location. Otherwise, lists ALL the locations and sublocations set up in the Location Names parameter (Global Settings tab) for use in your system. For details, see the Virtua Profiler/Acquisitions Parameters User’s Guide. Note: For any one line item, you can assign only ONE location. If you need to order an item for more than one location, you can either… • Create multiple line items using the same bibliographic information. -OR• Create two purchase orders using the same bibliographic information. Requestor Barcode (optional) – Displays the barcode of the person who initiated the request for purchase of this line item. When the order is saved, the system checks the validity of the barcode, and if the check fails, will display an error message. The Order window will remain open so that you can edit the invalid barcode. 2.6.1.2 Editing the Account Information Sub-tab The Account Information sub-tab in the Order Line Editor lets you assign one or more accounts to be encumbered by the total price of a line item. If the Filter Virtua ILS – Integrated Library System PROPRIETARY INFORMATION OF VTLS INC. Acquisitions (v. 43.1) 31 Acquisitions Records By Log-in Location setting (Acquisitions Basic Options parameter) is selected, only accounts linked to the log-in location for your session will be available on this sub-tab. (For information about setting up the fund accounting structure, see the Getting Started with Virtua Acquisitions Guide.) To edit the Account Information sub-tab, 1. On the Order Info/Distribution tab in the Order Line Editor, click the Account Information sub-tab (Figure 2-20). Figure 2-20. Order Line Editor – Account Information Tab The Account, Fiscal Year, and Percent fields on the sub-tab are populated with default values. The default fiscal year is defined in the Fiscal Year parameter in the Virtua Profiler. The default account is the first account in the fund accounts table in the database. These same values appear in columns in the display box. 2. In the Account field, accept the default spending account, or choose another account to encumber. The accounts available in the pull-down list box depend on whether the Filter Acquisitions Records By Log-in Location setting is selected. PROPRIETARY INFORMATION OF VTLS INC. Virtua ILS – Integrated Library System 32 Acquisitions (v. 43.1) 3. In the Fiscal Year field, accept the default value, or choose the fiscal year in which the payment for this item is to be made. 4. In the Percent field, accept the default of 100 percent. -ORIf you want to pay for the order from more than one account, type the percent of the total cost that you want to charge to this specific fund account. You can type a percentage using up to two decimal places. Note: When you type a percentage, the software automatically calculates the amount based on the unit price and displays it in the Amount column in the display box. The amount may vary slightly from the amount that is actually encumbered due to rounding. 5. Add or delete account information as required (see the sections below). Note: The Fund Code field at the bottom of the Account Information tab is not editable. The value, if one exists, is pulled from the Fund Code field on the Account screen in the Account Management module. 2.6.1.2.1 Charging a Line Item to More Than One Account On the Account Information sub-tab, you can spread the cost of one line item over more than one account. For example, if you spread the cost equally over three accounts, two accounts would pay 33.33 percent and one would pay 33.34 percent. If you choose to use multiple accounts, each account will appear on its own line in the summary display box on the sub-tab. To charge an item to more than one account, 1. Edit the information that appears by default for the first account. The edited account information appears in the display box. 2. Click the Add Account button. The system automatically adds a set of default account values. 3. Edit the default values in the Account, Fiscal Year, and Percent fields. 4. Make sure the percent values for the two accounts total 100, and then click the Save button. –OR- Virtua ILS – Integrated Library System PROPRIETARY INFORMATION OF VTLS INC. Acquisitions (v. 43.1) 33 Click the Add Account button again, and repeat steps 3 and 4 to divide the cost among three accounts. 2.6.1.2.2 Deleting Account Information On the Account Information tab, you can delete account information specified in the display box. To delete account information, 1. Highlight the desired account in the display box. 2. Click the Delete Account button. The account is deleted from the display box without a warning message. 2.6.2 Order Line Editor - Serials The steps for editing line items on a Serial order are basically the same as those for a Monograph order (see the section “Order Line Editor - Monographs”) except for three aspects: sublocations, subject codes, and enumeration information. 2.6.2.1 Serial Orders and Locations For Monograph and COG orders, choosing a value in the Location field in the Order Line Editor is optional. For Serial orders, it is mandatory. Virtua uses the location data to create a holdings record for the purchase order line item. 2.6.2.2 Serial Orders and Subject Codes For libraries that want to be able to generate reports on Serial order items that have been deposited or donated, Virtua offers a convenient mechanism that uses subject codes. To make full use of the Deposit/Donation payment type for Serial orders, take the following steps: • Define your subject codes in the Subject Codes parameter in the Virtua Profiler. These codes can describe each type of item your library orders. They can be used to distinguish a donated item (coded DON, for example) from a deposited item (coded DEP, for example). PROPRIETARY INFORMATION OF VTLS INC. Virtua ILS – Integrated Library System 34 Acquisitions (v. 43.1) • In the Subject Code field in the Order Line Editor, assign the appropriate subject code to each line item on the Serial order. The system will automatically add that item’s subject code to subfield $m of the 941 tag of the holdings record for that item. 2.6.2.3 Editing the Enumeration Information Sub-tab (Serials) For a Serial order, the Order Info/Distribution tab has an Enumeration Information sub-tab (Figure 2-21) in addition to the Line Item Header Information sub-tab and Account Information sub-tab available for a Monograph order. Figure 2-21. Order Line Editor - Enumeration Information Sub-tab (Serials) Virtua ILS – Integrated Library System PROPRIETARY INFORMATION OF VTLS INC. Acquisitions (v. 43.1) 35 The Enumeration Information sub-tab lets you record a) enumeration information in a free-text format and b) subscription dates. The subscription information will appear on the transmitted order and is useful for monitoring subscription renewals. To edit Enumeration Information for a Serial order, 1. On the Order Info/Distribution tab in the Order Line Editor, click the Enumeration Information sub-tab. 2. In the Enumeration Information text box, type the enumeration and chronology data for this serial. 3. In the Start Subscription, End Subscription, and Cancel Date fields, click the check box, and then click the down arrow to see the intereactive calendar. 2.6.3 Order Line Editor - COGs The steps for editing line items on a COG order are basically the same as those for a Monograph order (see the section “Order Line Editor - Monographs”) except for one aspect: enumeration information. 2.6.3.1 Editing the Enumeration Information Sub-tab (COGs) For a COG order, the Order Info/Distribution tab has an Enumeration Information sub-tab (Figure 2-22) in addition to the Line Item Header Information sub-tab and Account Information sub-tab available for a Monograph order. PROPRIETARY INFORMATION OF VTLS INC. Virtua ILS – Integrated Library System 36 Acquisitions (v. 43.1) Figure 2-22. Order Line Editor - Enumeration Information Sub-tab (COGS) To edit Enumeration Information for a COG order, 1. On the Order Info/Distribution tab in the Order Line Editor, click the Enumeration Information sub-tab. 2. In the Enumeration Information text box, type the enumeration and chronology data for this Monographic Set, Standing Order, or Planned Order. 2.7 Saving a New Purchase Order After inserting and editing all the line items for a purchase order, you are ready to save the order to the database and, depending on the “When Saving…” option you select, transmit it to the vendor at the same time. The Order window offers several options, each representing a different workflow, for saving the order. The selection of an option is persistent. Virtua ILS – Integrated Library System PROPRIETARY INFORMATION OF VTLS INC. Acquisitions (v. 43.1) 37 2.7.1 About the “When Saving…” Options The bottom of the Add Order window for Monograph and Serial orders (Figure 2-23) offers four available “When Saving…” options: Exit This Window, Repeat This Function, Immediately Proceed To Invoices, and Immediately Proceed To Receipts. Figure 2-23. Add Order Window - "When Saving..." Options (Monographs and Serials) The bottom of the Add Order window for COG orders (Figure 2-24) offers three available “When Saving…” options: Exit This Window, Repeat This function, and Transmit and Reopen for Update. Figure 2-24. Add Order Window - "When Saving..." Options (COGs) We describe each option below. • Exit This Window (default) – The system saves the current purchase order and closes the Add/Update Order window. • Repeat This Function – The system saves the current purchase order and opens the PO Request dialog box so that you can request a another purchase order. The new purchase order will open in the same mode as the current purchase order. If an error occurs when saving the current purchase order, the system will handle the error and not display the dialog box. Note: A convenient aspect of this repetitive workflow involves purchase order default values on the Add PO Request dialog box, on the Add Order window, and in the Order Line Editor. Once you have set the values for the first purchase order, they will persist for every subsequent purchase order that you add. These values apply to the following fields: • Add PO Request dialog box: Order Type, Payment Type, Vendor PROPRIETARY INFORMATION OF VTLS INC. Virtua ILS – Integrated Library System 38 Acquisitions (v. 43.1) • • Add Order window: Billing Method, Shipping Method, Billing Sent To, and Shipping Sent To Order Line Editor: Subject Code, Main Location, Sublocation, and Account • Immediately Proceed to Invoices – The system saves and transmits the still unreceived line items (except in the case of a COG order in Update mode) on the current purchase order and automatically opens the Add/Update Invoice Request dialog box. All line items that were saved with a status of Approved will be automatically updated to a status of Ordered. They will be displayed on the Add Invoice window with a status of Valid for Payment. Note: Selecting the Auto Receive check box disables this radio button. • Immediately Proceed to Receipts – The system saves and transmits the current purchase order and automatically opens the Receipts window with data fields already populated. Note: Selecting the Auto Receive check box disables this radio button. • Transmit and Reopen for Update – The system saves the current COG purchase order, transmits it with default item distribution information, and automatically reopens the window in Update mode for the addition of line items. In addition to the “When Saving…” options, you have the option of flagging the order for special handling or an expedited workflow. 2.7.2 Special Handling Options Upon Saving On the Add Order window, below the “When Saving…” options, there are two check boxes, Rush Order and Auto Receive, that determine how the order is handled (Figure 2-25). Figure 2-25. Rush Order and Auto Receive Check Boxes 2.7.2.1 Rush Order Option The Rush Order check box gives you a way to flag an order so that it can be transmitted separately via the Send Orders function. When the Rush Orders radio button is selected on the Send Orders window, all orders flagged as Rush are Virtua ILS – Integrated Library System PROPRIETARY INFORMATION OF VTLS INC. Acquisitions (v. 43.1) 39 transmitted. In this way, you can send Rush orders, say, once a day and send other types of orders on a different schedule. Hint: If only some of the items on your purchase order need to be rushed, create a separate Rush order for just those items. For details about the send orders function, see the chapter “Sending Purchase Orders.” 2.7.2.2 Auto Receive Option The Auto Receive check box lets you expedite the order/receipt process. When you save an order with the Auto Receive check box selected, the software bypasses the transmission stage and automatically receives the purchase order line items with default values. As long as the purchase order has not been transmitted, the Auto Receive option is available in Add or Update mode on the Order window. By default, the Auto Receive check box is unchecked. After Virtua saves an order with Auto Receive checked, it closes the Order window. The Auto Receive option is designed to save you steps in managing COG orders such as Approval Plan and Standing orders. It is also designed for use with orders that are transmitted outside of the Virtua software—for example, orders placed via the Internet. In such cases, your library may already have physically received the purchase order line items so there is no need to “receive” them in Virtua. The Auto Receive function takes care of three steps in one: It lets you save an order, set the status of the purchase order line items to Ordered, and “receive” the purchase order line items so that invoicing may proceed at a later time. In addition to receiving all purchase order line items automatically and setting the status of the purchase order to Ordered, the Auto Receive function also updates the receipts information on the Statuses tab on the View Bibliographic Record window. Each line item will be received with the following default receipt information: Status: Condition: Receipt Date: Quantity Received: New Books List setting: Print Receipt Slip setting: Received Satisfactorily Correct Item Current date Same value as the Quantity Ordered Per the default as specified in the Profiler. NO PROPRIETARY INFORMATION OF VTLS INC. Virtua ILS – Integrated Library System 40 Acquisitions (v. 43.1) 2.7.3 System Checks Upon Saving When you save a purchase order, Virtua takes the following actions: • If appropriate, prompts you that the purchase order was added to the database (Figure 2-26). Figure 2-26. Information - Purchase Order Added • Checks for duplicate purchase order IDs. ♦ If it finds a duplicate ID, it will display a message (Figure 2-27) so that you can enter a new order ID or accept a system-assigned ID. Figure 2-27. Order Number Request Dialog Box • Checks that all required fields on the order are complete. ♦ If it finds an incomplete or empty required field such as the Shipping Sent To or Billing Sent To field, it will display an Error message (Figure 2-28) and keep the Order window open so that you can add the information. Virtua ILS – Integrated Library System PROPRIETARY INFORMATION OF VTLS INC. Acquisitions (v. 43.1) 41 Figure 2-28. Purchase Order Error Message • For distribution-enabled monograph orders, checks whether a distribution group for the each line item is specified. ♦ If it finds you have not chosen a distribution group, it will display a Confirm dialog box (Figure 2-29) and keep the Order window open so that you can add the information. Figure 2-29. Purchase Order Confirm Dialog Box • Checks whether the barcode, if one exists, in the Requestor Barcode field is valid. ♦ If it finds the barcode invalid, the system will display an Error message, and the Add Order window will remain open so that you can edit the barcode. • Updates the status of the order. If the status is Approved, the appropriate accounts are encumbered. • Records purchase order status information, including order type and payment type, on the Statuses tab of the View Bibliographic Record window. • Checks if the appropriate fund accounts have enough free balance. Note: If the amount on the purchase order is greater than the free balance of the selected account(s), the software will display an Error message (Figure 2-30), informing you of the over-encumbrance, affected line item, and name of the account. The Order window will remain open so that you can change the Overencumbrance percentage specified for the account(s) and then save the order again. PROPRIETARY INFORMATION OF VTLS INC. Virtua ILS – Integrated Library System 42 Acquisitions (v. 43.1) Figure 2-30. Error Message - Over-encumbrance • • Records the event in the Acquisitions transaction log. If no errors occur and depending on your choice of action upon saving, can display either a new Add PO Request dialog box or the Receipts window with all data fields complete or the Update Order window. Virtua ILS – Integrated Library System PROPRIETARY INFORMATION OF VTLS INC. Acquisitions (v. 43.1) 43 3. Working with Purchase Orders I n this chapter we provide step-by-step instructions for performing the tasks and functions related to purchase orders once they have been saved to the database. In our descriptions, we point out the similarities and differences in the functions, depending on the type of purchase order with which you are working. This chapter covers the following topics: ⇒ ⇒ ⇒ ⇒ ⇒ ⇒ Updating a Purchase Order Viewing a Purchase Order Deleting a Purchase Order Canceling a Purchase Order (or Line Item) Renewing a Purchase Order Copying a Purchase Order 3.1 Updating a Purchase Order You can edit purchase orders that have been saved or transmitted. Depending on the type of order and whether it has been transmitted or not, you may be able to update only certain aspects of it. • • • For a transmitted Monograph or Serial order, you can update the order only by adding or editing a claim, note, or reminder or by relinking an item to another bibliographic record. For a saved Monograph or Serial order, you can update the order by editing various elements on the order, copying line items, inserting and editing line items, and adding and editing notes. For a COG order, once the order has been saved and transmitted, you can insert line items and add claims, notes, or reminders immediately, but you CANNOT edit the Order Description field. To update a purchase order, 1. On the Virtua menu bar, click Acquisitions, choose Orders, and then choose Update. The Update PO Request dialog box appears (Figure 3-1). PROPRIETARY INFORMATION OF VTLS INC. Virtua ILS – Integrated Library System 44 Acquisitions (v. 43.1) Figure 3-1. Update PO Request Dialog Box 2. Type the number of the order you want to update. 3. Click the Retrieve button or press Enter. What happens next depends on the type of purchase order and whether it has been transmitted or not. • For a Monograph or Serial order that has already been transmitted, you will first see an Error message (Figure 3-2) informing you that only claims, notes, and reminders can be updated. Then the View Order window appears. Figure 3-2. Error Message • For COG orders and Monograph or Serial orders that have NOT been transmitted, the Update Order window appears. 3.1.1 Updating Transmitted Monograph and Serial Orders Once a Monograph or Serial order has been transmitted, you can update only three features: claims, notes, and reminders. Even if the order has been canceled, you can still update it by adding notes or reminders. Since you cannot edit header elements of the transmitted purchase order or edit order line items, the Orders/Update function displays the View Order window (Figure 3-3) instead of the Update Order window. Note that a new header element, Ordered By, Virtua ILS – Integrated Library System PROPRIETARY INFORMATION OF VTLS INC. Acquisitions (v. 43.1) 45 appears on the View (and Update) Order window. This field displays the user who actually placed the order. Because the username comes from the log in, this field does not appear until after the order is saved. Figure 3-3. View Order Window (Update Mode) At the item level, you can do the following: • • Add an item reminder. -ORView a selected item in the Order Line Editor, where you can edit claims and notes for the specific line item. Note: Although you cannot delete transmitted line items, you can cancel them using the Order Cancel function (see the section “Canceling an Order or Order Line Items”). At the order level, you can do the following: • Add/edit a reminder. PROPRIETARY INFORMATION OF VTLS INC. Virtua ILS – Integrated Library System 46 Acquisitions (v. 43.1) • • • Copy the purchase order. Add/edit a note. Add/edit a claim (depending on the due date). When you have completed your editing, • Save your changes to the database by choosing a “When Saving…” option and clicking the Save button. 3.1.2 Updating Saved or Transmitted COG Orders Once a COG order has been saved or transmitted, you can update it. Typically, for a COG order, your library has already received the physical item, so you could be updating the order at status Approved to insert a new line item and then proceed to receipts. • If the COG order has been saved only and not transmitted, the line-item area on the Update Order window will be inactive. The Order Description field will be available for editing. The Transmit and Re-open for Update radio button will be available as a “When Saving…” option. • If the COG order has been transmitted, the Order Description field on the Update Order window (Figure 3-4) will be inactive. The line-item area will be active, so you can copy, insert, delete, and edit line items and add/edit item reminders. Note: Once you have transmitted a COG order, you have the option to delete line items, but we recommend that you cancel them instead using the Order Cancel function (see the section “Canceling an Order or Order Line Items”). Virtua ILS – Integrated Library System PROPRIETARY INFORMATION OF VTLS INC. Acquisitions (v. 43.1) 47 Figure 3-4. Update Order Window - Catch-All Order Group Depending on whether the COG order has been transmitted or not, you can also update the order by… • • Editing the billing/shipping information, order date, currency type, print file, or rush flag. Copying the order, adding/editing reminders, adding/editing notes, or issuing claims. When you have completed your editing, • Save your changes to the database by choosing a “When Saving…” option and clicking the Save button. 3.1.3 Updating Saved Monograph and Serial Orders Once a Monograph or Serial order has been saved, you can update it on the Update Order window (Figure 3-5). PROPRIETARY INFORMATION OF VTLS INC. Virtua ILS – Integrated Library System 48 Acquisitions (v. 43.1) Figure 3-5. Update Order Window – Serial Order You can update the order by… • • • Editing the billing/shipping information, order date, currency type, or print file. Copying, deleting, inserting, and editing line items (for details, see the next section). Copying the order or adding order-level notes. When you have completed your editing, • Save your changes to the database by choosing a “When Saving…” option and clicking the Save button. 3.1.3.1 Updating Line Items If you are updating a Monograph or Serial order before it has been transmitted, you can update the order line items. Virtua ILS – Integrated Library System PROPRIETARY INFORMATION OF VTLS INC. Acquisitions (v. 43.1) 49 To update order line-item information, 1. On the Update Order window (Figure 3-5), highlight the line item you want to update, and then click the Edit Item button. Note: If you are updating a Serial order, be aware that if the title of the line item is from a 245 tag with a first indicator of 0 (meaning do not display), the line item in Update or View mode will be “No title available.” The Order Line Editor window appears (Figure 3-6). Figure 3-6. Order Line Editor Window 2. On each of the sub-tabs, edit the data elements as needed. 3. Add/edit line-item notes by clicking the Notes button. 4. Click the Save button. The Order Line Editor window closes, and the Update Order window reappears with a refreshed Line Items box. PROPRIETARY INFORMATION OF VTLS INC. Virtua ILS – Integrated Library System 50 Acquisitions (v. 43.1) 5. On the Update Order window, select another line item to edit. -ORClick the Save button to save your changes to the database. 3.1.3.2 Deleting Line Items If you are updating a Monograph or Serial order before it has been transmitted, you can delete order line items. Caution: Always check encumbrance and expenditure statuses before deleting a line item. To do this, 1. On the Order Line Editor, note the name of the account and fiscal year for the line item. 2. Access Fund Accounts/Setup. 3. On the Account Management window, find the account in question. 4. Double-click it to view the Encumbrance and Expenditure fields. To delete an individual line item, 1. Display the Update Order window for the purchase order. 2. Highlight the line item you want to delete, and then click the Delete Item button. Note: The Delete button is enabled only if the status of the line item is NOT Ordered, Canceled, or To Be Canceled. Virtua displays a warning (Figure 3-7) asking for confirmation. Figure 3-7. Delete Warning 3. Click the Yes button. The system deletes the line item and refreshes the Update Order window, renumbering the remaining line items to reflect the deletion(s). Virtua ILS – Integrated Library System PROPRIETARY INFORMATION OF VTLS INC. Acquisitions (v. 43.1) 51 4. Click the Save button. The deletion is saved. If only ONE line item exists and you delete it, or if you delete ALL the line items on the order and then save the order, the system responds with the following message: Figure 3-8. P.O. Line Item Deletion Message • • If you click Yes, the system deletes the purchase order. If you click No, the Update window stays active so you can add new line items. 3.1.3.2.1 After Deleting a Line Item After you delete a line item, the software takes the following actions: • • • • Verifies that the line item is not linked to any outstanding receipt, order, claim, invoice, credit, or payment. Verifies the deletion. Decreases encumbrance totals for all accounts by the amount of the line item deleted. This decrease is reflected immediately in the Total field on the Update Order window. Logs the event in the Acquisitions transaction log. 3.1.4 Other Updating Functions Other functions that you can perform in Update mode are adding or editing reminders, adding or editing notes, and issuing claims. PROPRIETARY INFORMATION OF VTLS INC. Virtua ILS – Integrated Library System 52 Acquisitions (v. 43.1) • • • Adding/editing reminders: For a transmitted order, you can view reminders, add user-defined reminders, or edit existing reminders. (For information about reminders, see the chapter “Working with Reminders” in this guide.) Adding/editing notes: For either a saved or transmitted order, you can view, add, or edit notes. (For information about notes, see the Getting Started with Virtua Acquisitions Guide.) Issuing claims: For a transmitted purchase order or order line item, you can issue a claim. The Claims button on the Update Order window and on the Order Line Editor window gives you a convenient way to issue a claim. (For information about claiming, see the chapter “Working with Claims” in this guide. 3.2 Viewing a Purchase Order When a purchase order is in View mode, you can perform a number of functions, depending on whether the order has been transmitted or not. • If the order has been transmitted, you can… ♦ Copy the order. ♦ Add/edit reminders at the order level or line-item level. ♦ View claims at the order level or line-item level. ♦ View notes at the order level or line-item level. ♦ View line-item information. • If the order has been saved only, you can… ♦ Copy the order. ♦ View notes at the order level or line-item level. ♦ View line-item information. To view a saved or transmitted purchase order, 1. On the Virtua menu bar, click Acquisitions, choose Orders, and then choose View. The View PO Request dialog window appears (Figure 3-9). Figure 3-9. View PO Request Dialog Box Virtua ILS – Integrated Library System PROPRIETARY INFORMATION OF VTLS INC. Acquisitions (v. 43.1) 53 2. Type the number of the purchase order you want to view. 3. Click the Retrieve button or press Enter. The View Order window appears (Figure 3-10) displaying all the line items associated with the purchase order, including line items with the status of Canceled. (Although line items with the status Canceled and To Be Canceled will appear, the Total field in the purchase order header will NOT include the cost of those items.) Figure 3-10. View Order Window 3.2.1 Viewing Order Line Items To view the data elements of an order line item, 1. On the View Order window, highlight the desired line item, and then click the View button. PROPRIETARY INFORMATION OF VTLS INC. Virtua ILS – Integrated Library System 54 Acquisitions (v. 43.1) The Order Line Editor window appears. 2. Review the data elements on all sub-tabs, and then click OK. The View Order window becomes the active window again. 3. Click the Close button. 3.3 Deleting a Purchase Order Once a purchase order is created, Virtua lets you delete it as long as you have NOT transmitted the order or any line items to the vendor. Once you have transmitted the order and it is at the status of Ordered, you can only cancel it (see the chapter “Canceling a Purchase Order.”) You can delete Monograph and Serial orders in two ways: • • Using the Delete function on the Delete Order window. -ORDeleting each individual line item on the Update Order window. Note: With COG orders, even if you delete all the line items, the purchase order itself remains in the database. Caution: Before deleting a purchase order, always check encumbrance and expenditure statuses. To do this, for each line item on the purchase order, • Display the Order Line Editor. • Note the name of the account and fiscal year. • Access Fund Accounts/Setup. • On the Account Management window, find the account in question. • Double-click the account to view the Encumbrance and Expenditure fields. To delete a purchase order, 1. On the Virtua menu bar, click Acquisitions, choose Orders, and then choose Delete. The Delete PO Request dialog box appears (Figure 3-11). Virtua ILS – Integrated Library System PROPRIETARY INFORMATION OF VTLS INC. Acquisitions (v. 43.1) 55 Figure 3-11. Delete PO Request Dialog Box 2. Type the number of the purchase order you want delete. 3. Click the Retrieve button or press Enter. If the purchase order has a status of Ordered, an Error message appears, stating that the order cannot be deleted, only canceled (Figure 3-12). Figure 3-12. Error Message Otherwise, the Delete Order window appears (Figure 3-13). At this point, the system locks the order record so that no one can modify it while you are in the process of deleting it. PROPRIETARY INFORMATION OF VTLS INC. Virtua ILS – Integrated Library System 56 Acquisitions (v. 43.1) Figure 3-13. Delete Order Window 4. Click the Delete button or press Enter. The system deletes the order from the database and automatically disencumbers funds associated with the order. 3.3.1 Deleting a Purchase Order from the Update Order Window On the Update Order window, you can delete every line item on a Monograph or Serial order and thereby delete the entire order. Note that you CANNOT delete a COG order in this way. To delete a purchase order by deleting all the line items, 1. Display the Update Order window for a Monograph or Serial order (Figure 6-38). 2. Highlight the first line item that you want to delete. 3. Click the Delete Item button. Virtua ILS – Integrated Library System PROPRIETARY INFORMATION OF VTLS INC. Acquisitions (v. 43.1) 57 Note: The Delete Item button is enabled only if the status of the line item is other than Ordered, Canceled, or To Be Canceled. The system displays a warning asking for confirmation. 4. Click the Yes button. 5. Repeat steps 1-4 for each line item on the purchase order. 6. Click the Save button. If the order contains only ONE line item and you delete it, or if you delete ALL the line items on the order and then save the order, the system responds with the following message: Figure 3-14. P.O. Line Item Deletion Message • • If you click Yes, the system deletes the purchase order from the database. If you click No, the Update Order window stays active so you can add new line items. PROPRIETARY INFORMATION OF VTLS INC. Virtua ILS – Integrated Library System 58 Acquisitions (v. 43.1) 3.4 Canceling a Purchase Order (or Line Item) 3.4.1 Overview of the Cancel Function Virtua lets you cancel a purchase order once the order has been transmitted but not fully received. When a Monograph order has the status Received or Paid, you cannot cancel it; you can only modify the order or otherwise adjust it with a credit memo. Likewise, Virtua lets you cancel a Monograph purchase order line item as long as it has not been fully received. You can choose to cancel all copies of the line item or only some of the copies. Note that if you cancel the sole line item on a purchase order or ALL the line items on a purchase order, Virtua will cancel the whole purchase order. Serial and COG orders abide by somewhat different cancellation rules, which we discuss in the next section. Note: If the maximum number of claims for an order/item, as specified in the vendor record, is exceeded, Virtua will also automatically cancel a purchase order or line item. For details, see the section “Claim Intervals and Maximum Claim Limits” in this guide. Once you have canceled an order or order line item, your library will want to notify the vendor of the cancellation and perhaps “mask” the records that were created for the canceled order. • You can notify the vendor via the Send Orders function where you have the option of transmitting canceled orders and printing cancellation notices. • You can mask records using the Mask Record check box, which is available in three places in the client: in the MARC Editor, on the Add Title Selection List window (see the Getting Started with Acquisitions Guide), and on the Import Records to Selection List window (see the Cataloging User’s Guide). Using the InfoStation, you can generate a report of all purchase orders with the status of canceled. 3.4.2 The Cancel Function – Serial and COG Orders The Cancel function works the same for all types of purchase orders with the following exceptions: Virtua ILS – Integrated Library System PROPRIETARY INFORMATION OF VTLS INC. Acquisitions (v. 43.1) 59 Serial Order – You can cancel a Serial order at any time, even after you have received the first issue. You can also specify a date of cancellation on the Enumeration Information tab in the Order Line Editor. COG Order – A COG order remains open to accept new line items until you discontinue or cancel the order. You can specify a date of cancellation for the order as a whole on the Order Header Information tab on the Add Order window. Note that you can modify a COG order even after you have canceled it. 3.4.3 Canceling an Order To cancel a purchase order, 1. On the Virtua menu bar, click Acquisitions, choose Orders, and then choose Cancel. The Cancel PO Request dialog box appears (Figure 3-15). Figure 3-15. Cancel PO Request Dialog Box 2. Type the order number of the record you want to cancel. 3. Click the Retrieve button or press Enter. If the order that you want to cancel has not yet been transmitted, an Error message appears (Figure 3-16). Figure 3-16. Error Message PROPRIETARY INFORMATION OF VTLS INC. Virtua ILS – Integrated Library System 60 Acquisitions (v. 43.1) Otherwise, the Cancel Order window appears (Figure 3-17). Figure 3-17. Cancel Order Window The Cancel Order window displays two new buttons under the Line Items list box: Cancel All and Cancel Line. Note that the Print File field contains the filename of the cancellation letter: engmonprintcancelpo.utf. 4. Click the Cancel All button. The status of every line item on the order that has NOT yet been received changes to To Be Canceled. Note: If the line item you choose to cancel has been partially received, the received copies will retain their original line number on the order. The canceled copies will form a new line item with the status of To Be Canceled. Virtua ILS – Integrated Library System PROPRIETARY INFORMATION OF VTLS INC. Acquisitions (v. 43.1) 61 3.4.4 Canceling an Order Line Item To cancel a purchase order line item, 1. On the Cancel Order window (Figure 3-17), highlight the line item to be canceled. 2. Click the Cancel Line button. The Order Line Editor appears (Figure 3-18). Figure 3-18. Order Line Editor (Cancel Function) 3. In the Copies to Cancel field, specify the number of copies to be canceled. Note: Virtua will allow you to cancel only those copies that have NOT yet been received as indicated in the Copies Received field. 4. Click the Save button or press Enter. The Cancel Order window (Figure 3-19) becomes the active window. PROPRIETARY INFORMATION OF VTLS INC. Virtua ILS – Integrated Library System 62 Acquisitions (v. 43.1) On the Cancel Order window, the status of the canceled copy or copies is now To Be Canceled. After you transmit the canceled order via the Send Orders function (see the section, “Transmitting a Canceled Order"), the status To Be Canceled will change to Canceled. Figure 3-19. Cancel Order Window 5. Click the Save button. Virtua performs system checks, which we describe in the next section. Virtua ILS – Integrated Library System PROPRIETARY INFORMATION OF VTLS INC. Acquisitions (v. 43.1) 63 3.4.5 System Checks After a Cancellation After you click the Save button on the Cancel Order window, the system does the following: • • • • • • Displays a Confirm message asking if you want to proceed with the cancellation. Verifies that the new purchase order is valid and that the canceled line items have not been fully received. Decreases the encumbrance totals for all accounts by the amount of the line items canceled. Understands that if only ONE line item exists on the order and it is canceled, or if ALL the line items on the order are canceled, the entire purchase order will be canceled. Displays a message informing you of the successful cancellation of either the purchase order or line item. Displays canceled line items on the purchase order but NOT on the invoice. 3.4.6 Transmitting a Canceled Order After you cancel a purchase order or order line item, you need to notify the vendor of the cancellation. To do this, transmit the canceled order. To transmit a canceled order, 1. On the Virtua menu bar, click Acquisitions, choose Orders, and then choose Send Orders. The Send Orders dialog box appears (Figure 3-20). PROPRIETARY INFORMATION OF VTLS INC. Virtua ILS – Integrated Library System 64 Acquisitions (v. 43.1) Figure 3-20. Send Orders Dialog Box - Transmit Canceled Orders 2. Select the check box Transmit Canceled Orders. 3. Click the Send button. Using the vendor’s preferred transmission method, Virtua transmits all orders and/or all line items at the status To Be Canceled. • If an entire purchase order is canceled, Virtua will send the entire purchase order to the vendor, and each line item will be marked "Canceled." • If only specific line items on a purchase order are canceled, Virtua will send only the canceled line items to the vendor. 3.5 Renewing a Purchase Order You can renew a purchase order for a Serial order subscription once the subscription has been invoiced. A subscription can be renewed any number of times. Internally, Virtua keeps track of the each renewal by assigning an extension number to the order number in the renewal record. The software uses this internal number for linking the renewal to the original purchase order. To renew a Serial purchase order, 1. On the Virtua menu bar, click Acquisitions, choose Orders, and then choose Renew. Virtua ILS – Integrated Library System PROPRIETARY INFORMATION OF VTLS INC. Acquisitions (v. 43.1) 65 The Renew PO Request dialog box appears (Figure 3-21). Figure 3-21. Renew PO Request Dialog Box 2. Type the order number of the purchase order you want to renew. 3. Click the Retrieve button or press Enter. A new Add Order window appears (Figure 3-22), bearing the same purchase order number as the original Serial order. Figure 3-22. Add Order Window - Renewal PROPRIETARY INFORMATION OF VTLS INC. Virtua ILS – Integrated Library System 66 Acquisitions (v. 43.1) This renewed Serial order is an exact copy of the latest order for this subscription. In other words, if this is the third renewal generated for this purchase order, then this is an exact copy of the second renewal. 4. Edit the information on the renewed order as you would a new order. The only function you cannot perform is inserting new line items. 5. Delete or edit any line item as needed. 6. Choose a “When Saving…” radio button. 7. Click the Save button. The software displays the following Information dialog box. Figure 3-23. Information Dialog Box To complete the renewal, transmit the order and process the vendor’s invoice as you would any other invoice. 3.6 Copying a Purchase Order 3.6.1 Overview There are at least two situations where it might be useful to duplicate a purchase order: • • When an order has been canceled and you want to resubmit it. When a vendor is unable to fulfill an order and you want to submit it to another vendor. To accommodate these situations, Virtua provides a Copy purchase order function, which you can access from two places: Virtua ILS – Integrated Library System PROPRIETARY INFORMATION OF VTLS INC. Acquisitions (v. 43.1) • • 67 The Acquisitions/Orders drop-down menu. -ANDThe Update Order window (Figure 3-4 or Figure 3-5) or the View Order window (Figure 3-10) via the Copy button. When you copy a purchase order, keep in mind these things: • • • You will not be able to change the Order Type on the copied order. (A copied purchase order must be of the same type as the source purchase order.) If the copied order contains line items that are Canceled or To Be Canceled, the line items are copied with a status of Needs Approval. If the preferred language of the vendor for the copied purchase order is different than that of the original vendor, the software will know to use the new preferred language for the printed purchase order letter. 3.6.2 Using the Copy Function To copy a purchase order directly, 1. On the Virtua menu bar, click Acquisitions, choose Orders, and then choose Copy. -ORTo view or update the order before you copy it, 1. On the Acquisitions menu, click Orders, and then choose View or Update. After viewing and/or updating the order, click the order-level Copy button. Note: If you updated the order, Virtua will ask if you wish to save the purchase order before the copy is made. The Copy PO Request dialog box appears (Figure 3-24). PROPRIETARY INFORMATION OF VTLS INC. Virtua ILS – Integrated Library System 68 Acquisitions (v. 43.1) Figure 3-24. Copy PO Request Dialog Box 2. In the Order Number field, type the order number of the original purchase order. 3. In the New Order Number field, type the order number of the copied order, or leave the text box blank and let Virtua assign a number. Note: If you launched your copy request from an Order window (rather than directly from the Virtua menu bar), the Order Number and Vendor fields will contain the same values as the active record. 4. Choose the appropriate vendor from the Vendor pull-down list box. 5. Click the Retrieve button or press Enter. The Add Order window appears (Figure 3-25), displaying the new order number and vendor for the copied purchase order. Virtua ILS – Integrated Library System PROPRIETARY INFORMATION OF VTLS INC. Acquisitions (v. 43.1) 69 Figure 3-25. Add Order Window - Copied P.O. On the copied order, note the following: • If, on the original order, the status of the line items and the purchase order itself was Ordered, it is now reset to Approved. This tells you that you need to transmit or resubmit this order to the vendor in order for the order to be processed. • On the Billing/Shipping Information tab, the shipping method for the copied purchase order is set to No Specific Method. • If you deleted line items on the original purchase order, the line items renumber correctly on the new purchase order. 6. Edit the copied purchase order as needed. 7. Click the Save button to save the order to the database. PROPRIETARY INFORMATION OF VTLS INC. Virtua ILS – Integrated Library System 70 Acquisitions (v. 43.1) 4. Working with Distributions V irtua provides a workflow for libraries that use distribution groups in their Acquisitions processes. The Distribution Groups workflow is available for Monograph orders only, and it works in conjunction with the Distribution Groups parameter in the Virtua Profiler. Important: If you enable the Filter Acquisitions Records By Log-in Location flag, you should NOT enable the Distributions Group parameter and vice versa. To do so will cause problems in your system. This chapter covers the following topics: ⇒ ⇒ ⇒ ⇒ Introduction Specifying Distribution Groups Viewing or Updating Distribution Groups Working with Distributions and Receiving 4.1 Introduction In the Distribution Groups workflow, Virtua lets you assign specific libraries or distribution groups to a purchase order line item under three conditions: 1. The Use Distribution Groups check box is selected in the Acquisitions Distribution Groups parameter in the Virtua Profiler. 2. Distribution groups are configured in the Acquisitions Distribution Groups parameter in the Virtua Profiler (for details, see the Virtua Profiler/Acquisitions Parameters User’s Guide). 3. The order line item is part of a Monograph order. If all three conditions are met, for a selected order line item, a Distribution button will appear in the Order Line Editor (Figure 4-1). Virtua ILS – Integrated Library System PROPRIETARY INFORMATION OF VTLS INC. Acquisitions (v. 43.1) 71 Figure 4-1. Order Line Editor - Distribution-enabled Monograph Order For a distribution-enabled order, the Order Info/Distribution tab displays only ONE sub-tab initially: Line Item Header Information. Three fields are disabled—Copies, Main Location, and Sublocation—because the values for these fields can be specified on the Add Distribution Groups window. Edit the enabled fields on the Order Line Editor window as you would any other order. 4.2 Specifying Distribution Groups For a selected line item on a distribution-enabled Monograph purchase order, you can specify distribution information. In this way, if you order 10 copies of an item, you can designate which individual library locations in which groups or consortiums will receive the specified number of copies. To specify a distribution group for an order line item, 1. On the Order Line Editor window (Figure 4-1), click the Distribution button. PROPRIETARY INFORMATION OF VTLS INC. Virtua ILS – Integrated Library System 72 Acquisitions (v. 43.1) The Add Distribution Groups window appears (Figure 4-2). Figure 4-2. Add Distribution Groups Window 2. In the Unselected Distribution Groups area, highlight the group or groups that you want to select. 3. Click the single-arrow button to move one or more groups to the Selected Distribution Groups area. -ORClick the double-arrow button to move ALL the groups (whether selected or not) to the Selected Distribution Groups area. The library locations that constitute the group(s) you selected now appear in alphabetical order in the main display area on the window (Figure 4-3). Note that by default, each library location is already checked, indicating that it is a potential recipient of a copy of the line item on the order. Virtua ILS – Integrated Library System PROPRIETARY INFORMATION OF VTLS INC. Acquisitions (v. 43.1) 73 Figure 4-3. Add Distribution Groups Window - Displaying the List of Libraries After selecting the distribution group(s), you are ready to edit specific information for each library location. 4. Edit the library locations that will receive copies of the item. To do this, • Select or de-select any library for distribution by checking or unchecking the check box next to the location. 5. Edit the number of copies ordered for any library location. To do this, • Click in the Ordered column to highlight it and then click again. • Type the number of copies. Note: You CANNOT edit information in any column except the Ordered column. After editing any specific libraries, the Add Distribution Groups window might look like Figure 4-4. PROPRIETARY INFORMATION OF VTLS INC. Virtua ILS – Integrated Library System 74 Acquisitions (v. 43.1) Figure 4-4. Add Distribution Groups Window – Editing the List of Libraries The Quantities area at the bottom of the window now displays the following information: • Total Ordered - Displays the number of copies ordered for the line item on this window. • Total Received - At the purchase order stage, displays 0 and is grayed out. • Total Distributed - At the purchase order stage, displays 0 and is grayed out. 6. When you are finished entering distribution information, click the Save button. The Order Line Editor window becomes the active window and now displays the Account Information tab (Figure 4-5), where the fields are automatically populated with the default account information for the distribution group(s) as set in the Virtua Profiler. Virtua ILS – Integrated Library System PROPRIETARY INFORMATION OF VTLS INC. Acquisitions (v. 43.1) 75 Figure 4-5. Order Lne Editor - Distribution-enabled Monograph Order (Account Information) 7. Edit the account information as needed. 8. Click the Save button. 4.2.1 Aspects of the Add Distribution Groups Window The Add Distribution Groups window consists of five areas: • • • • • Unselected Distribution Groups List Selected Distribution Groups List List of Individual Library Locations (within selected groups) Quantities Command Buttons We discuss each area separately below. PROPRIETARY INFORMATION OF VTLS INC. Virtua ILS – Integrated Library System 76 Acquisitions (v. 43.1) 4.2.1.1 UnSelected Distribution Groups List On the Add Distribution Groups window, the Unselected Distribution Groups list displays every distribution group that is configured in the Virtua Profiler. The group designated as the default in the Virtua Profiler will display first in the list. You can choose to apply any of these groups to a line item. Once you select one or more groups, they appear in the Selected Distribution Groups list. You can move one group or several groups simultaneously from one list to the other, but a group cannot be displayed in both lists at the same time. • To move one or more groups, highlight the group(s) and click the single-arrow button. • To move ALL the groups, whether selected or not, click the double-arrow button. 4.2.1.2 Selected Distribution Groups List On the Add Distribution Groups window, the Selected Distribution Groups list displays all the distribution groups that were selected from the list on the left. 4.2.1.3 List of Individual Library Locations On the Add Distribution Groups window, the display box beneath the two lists of distribution groups itemizes the library locations that are members of the selected distribution group(s). The libraries are listed in alphabetical order by group. Note that if a library location is a member of more than one selected distribution group, it will appear more than once in this list. These are the libraries that potentially will receive copies of the purchase order line item. A check box appears next to the name of each library location. By default, all check boxes are checked, which means that all the libraries are automatically selected to receive copies. Click any check box to de-select that library location. The Ordered column displays by default the Quantity Ordered value that is set in the Virtua Profiler for the library group. To edit the value, select it and type over it. You cannot edit information in the Group column, Library column, or Distributed column. Virtua ILS – Integrated Library System PROPRIETARY INFORMATION OF VTLS INC. Acquisitions (v. 43.1) 77 4.2.1.4 Quantities The Quantities area displays the following values: • Total Ordered – The number of copies ordered for the line item, as specified either in the Copies field on the Line Item Header Information tab or in the column labeled Ordered in the List of Libraries area. • Total Received – The number of copies of the item that have already been received. At the purchase order stage, this field will have the value 0 (zero) and will be grayed-out. • Total Distributed – Displays the number of copies that have been distributed to library locations after being received. At the purchase order stage, this field will have the value 0 (zero) and will be grayed-out. 4.2.1.5 Command Buttons The Add Distributions Group window contains two command buttons: • • Save – Saves the values recorded on this window and returns you to the Order Line Editor. Cancel – Cancels any values recorded on this window and closes the window. 4.3 Viewing or Updating Distribution Groups As with other aspects of a purchase order, distribution groups are available for viewing and updating. You can update distribution groups for a line item as long as the order has not been transmitted. To view distribution groups, 1. Display the View Order window. 2. Highlight the line item for which you want to view distribution information, and then click the View button. 3. On the Order Line Editor window, click the Distribution button. The View Distribution Groups window appears. PROPRIETARY INFORMATION OF VTLS INC. Virtua ILS – Integrated Library System 78 Acquisitions (v. 43.1) To update distribution groups, 1. Display the Update Order window. 2. Highlight the line item for which you want to update distribution information, and then click the Edit Item button. 3. On the Order Line Editor window, click the Distribution button. The Update Distribution Groups window appears. You can edit the selected distribution groups and/or change the library location selections for any one group. You can also edit the number of copies ordered. 4.4 Working with Distribution Groups Upon Receiving At the receipts stage in the workflow for a distribution-enabled purchase order, you can… • • Edit aspects of the distribution information for a selected line item. -ANDPrint the distribution information to send to the vendor. 4.4.1 Editing Distribution Information A Distribution button appears on the Receipts window only for a distribution-enabled purchase order. When the window first appears, the button is disabled. After you receive and highlight a line item, it becomes enabled so that you can edit the distribution information for the receipt. For your convenience, Virtua places the last received item at the top of the list in the PO Line Items list box so that you can easily locate it for use in distributions. To edit distribution information at the receipts stage, 1. On the Receipts window, receive a line item and highlight it. The Distribution button becomes enabled (Figure 4-6). Virtua ILS – Integrated Library System PROPRIETARY INFORMATION OF VTLS INC. Acquisitions (v. 43.1) 79 Figure 4-6. Receipts Window - Distribution-enabled Monograph Order 2. Click the Distribution button. The Edit Distribution Groups window appears (Figure 4-7). Note that the Selected Distribution Groups list box at the top of the window is grayed out so that you cannot select another group. PROPRIETARY INFORMATION OF VTLS INC. Virtua ILS – Integrated Library System 80 Acquisitions (v. 43.1) Figure 4-7. Edit Distribution Groups Window The Edit Distribution Groups window displays the same values that were saved at the purchase order stage. 3. In the main display area, edit any library location by checking or unchecking the associated check box. 4. In the Distributed column, type a value for any selected library location, even a location for which no copies were ordered. To do this, click the cell to highlight it, and then type the number of distributed copies. Note: You cannot edit the value in the Ordered column. After editing, the Edit Distribution Groups window might look like Figure 4-8. Virtua ILS – Integrated Library System PROPRIETARY INFORMATION OF VTLS INC. Acquisitions (v. 43.1) 81 Figure 4-8. Edit Distribution Groups 5. Click the Save button. The Receipts window reappears. 4.4.2 Printing/Customizing Distribution Information At the receipts stage in the workflow for a distribution-enabled purchase order, you can print the distribution information to send to the vendor along with the invoice. The distribution information that is printed resides in a file, which you can customize, called distributionprint.utf. To print distribution information, 1. On the Edit Distribution Groups window (Figure 4-8), click the Print button. The Print dialog box appears (Figure 4-9), displaying Distribution as the format. PROPRIETARY INFORMATION OF VTLS INC. Virtua ILS – Integrated Library System 82 Acquisitions (v. 43.1) Figure 4-9. Print (Distribution) Dialog Box 2. In the Number of Copies field, type or choose a value. 3. Click OK. The printout contains information from the Group, Libraries, Ordered, and Distributed columns. 4.4.2.1 Working with distributionprint.utf The printout of the distribution information contains a combination of receipt and purchase order data. The text is stored in the file distributionprint.utf (Figure 4-10) which serves as a default template. The file resides in the Virtua directory. Virtua ILS – Integrated Library System PROPRIETARY INFORMATION OF VTLS INC. Acquisitions (v. 43.1) 83 Figure 4-10. Default Distribution Receipt Template File The default fields of the default template file shown in Figure 4-10 will generate a distribution “receipt” that looks like this: PROPRIETARY INFORMATION OF VTLS INC. Virtua ILS – Integrated Library System 84 Acquisitions (v. 43.1) Order ID: 1777 Line Number: 1 Title: Stonewall Jackson and the American Civil War. Bib ID: 7029 ISBN/ISSN: No ISBN/ISSN Receipt Date: June 5, 2002 Condition: Correct Item Status: Received Satisfactory On New Book List: True ----------------------------------------------------------------------------------------------------------Group Name Library Name Order Quantity Distributed Quantity ----------------------------------------------------------------------------------------------------------Main Countyline 2 2 Main Gulbenkian 1 1 As with all *.utf files that we ship with Virtua, you can edit the template distributionprint.utf using an editor, such as Windows 2000 Notepad, that supports Unicode. To customize distributionprint.utf, • Apply the same rules for editing and customizing that we discussed in an earlier section on purchase order templates (see the section “Working with Purchase Order Letter Templates”). Virtua ILS – Integrated Library System PROPRIETARY INFORMATION OF VTLS INC. Acquisitions (v. 43.1) 85 5. Sending Purchase Orders V irtua gives you options for sending purchase orders singly or in batch. You have the option of transmitting a purchase order upon saving it or sending it at another time via the Send Orders function. Alternatively, you can use the Send Orders function to transmit all outstanding orders together. This chapter covers the following topics: ⇒ ⇒ ⇒ ⇒ ⇒ Introduction About EDIFACT Functionality Transmitting Orders from the Order Window Using the Send Orders Function Working with Purchase Order Letter Templates 5.1 Introduction Virtua lets you send a purchase order only if its status is Approved or To Be Canceled and—if you expect to use the Send Orders function—only if you are authorized via permissions to access Send Orders. If you try to transmit an order that is not Approved or To Be Canceled, the software will return an Error message. After you successfully transmit an order, the system automatically changes the status of the order to Ordered. Virtua supports ONE transmission method (Print) for Serial and COG orders and FOUR transmission methods for Monograph orders (although currently, the EDIFACT methods are not fully implemented): • Print, where the system generates a printed purchase order letter. • E-mail, where the system e-mails the purchase order to the vendor's e-mail address. • EDIFACT, where the system generates an EDIFACT file and stores it on the server in a library-specified directory. • EDIFACT and Print, where the system generates an EDIFACT file, which it stores on the server, and prints a purchase order letter. When you send an order, Virtua will look for information stored in the vendor record to determine which method to use to send the order data to the vendor. If a method is specified, it will appear on the Billing/Shipping Information tab of the Order window. If no transmission method is indicated, the system will default to “Print.” PROPRIETARY INFORMATION OF VTLS INC. Virtua ILS – Integrated Library System 86 Acquisitions (v. 43.1) The Virtua client installation provides nine default templates for printing purchase order letters for different types of orders. You can modify and translate these templates to suit your local needs. In this chapter, we discuss the different methods of transmission, describe the Send Orders function in detail, and with regards to the Print method, explain how your library can customize the purchase order letter templates. 5.2 About EDIFACT Functionality Virtua Acquisitions will fully support the technology of Electronic Data Interchange (EDI), which allows for computer to computer exchange of business information using a standardized electronic format. EDIFACT is one of many implementations (along with SISAC and BISAC) of the EDI standard. Our implementation of the EDIFACT standard will use ftp as the method for sending and receiving data. For data transfer to take place electronically, both Virtua and the vendor/supplier must support the EDIFACT standard. In addition, the vendor record must specify the SAN and the agency. Currently, Virtua offers partial support for purchase order transmission using EDIFACT. Caution: The use of distribution groups is not compatible with EDI functionality. Before you can use EDIFACT functionality, you will need to modify the dbadmin .profile to include the $EDIFACT_PATH environment variable. In addition, the $EDIFACT_PATH directory needs to exist. For details, see the Virtua System Management Reference Guide, which also describes the use of the EDIFACT_NEW_LINE variable for determining the output format of EDIFACT messages. 5.3 Transmitting Orders from the Order Window Virtua gives you a way of transmitting a newly created purchase order directly and automatically from the Add Order window. To transmit a purchase order from the Add Order window, Virtua ILS – Integrated Library System PROPRIETARY INFORMATION OF VTLS INC. Acquisitions (v. 43.1) 87 1. On the Add Order window, select the Immediately Proceed to Receipts radio button or Immediately Proceed to Invoices radio button at the bottom of the window. -ORIn the case of a COG order, select the Transmit and Re-open for Update radio button. 2. Click the Save button. The software will send the current order automatically, using the transmission method specified in the vendor record and displayed on the Bill/Shipping Information tab of the Add Order window. • If the transmission method is “print,” the Print dialog box (Figure 5-2) appears. • If the transmission method is “e-mail,” the E-mail Records dialog box (Figure 5-3) appears, with the Send To field automatically populated with either the order email address or default e-mail address (as stored in the vendor record). For Monograph and Serial orders, keep in mind that if you select the Exit this Window radio button and click the Save button, you lose the opportunity to transmit the order from the Add Order window. You can, however, re-open the order in Update mode, make changes to the order, and then save and transmit the order. Note: If you save a COG order and exit the Add Order window without transmitting, you can access the order again via the Order/Update function and still transmit it via the Transmit and Re-open radio button. 5.4 Transmitting Orders Using the Send Orders Function 5.4.1 Introduction The Send Orders function lets you choose among various options for transmitting Approved orders and includes an option for transmitting Canceled orders. The transmission method as displayed on the Billing and Shipping Information tab of the Order window determines how the purchase order is sent. The transmission method is pulled from the vendor record. • If no transmission method is specified in the vendor record, the system will default to “Print.” PROPRIETARY INFORMATION OF VTLS INC. Virtua ILS – Integrated Library System 88 Acquisitions (v. 43.1) • If the transmission method specified is not yet supported by the software, the system will display a message to that effect and will default to “Print.” 5.4.2 Special Rules It’s important to note two rules regarding e-mail transmissions and transmissions of multiple orders. To send orders for vendors with e-mail as the transmission method, • Choose either Single Order or By Vendor. Otherwise, the system defaults to “Print.” To send multiple orders for a vendor with e-mail as the transmission method, • Choose By Vendor. All available orders for that vendor will be sent in a single email message. Otherwise, the system defaults to “Print.” 5.4.3 Using the Send Orders Function To transmit a purchase order using the Send Orders function, 1. On the Virtua menu bar, click Acquisitions, choose Orders, and then choose Send Orders. The Send Orders dialog box appears (Figure 5-1). Virtua ILS – Integrated Library System PROPRIETARY INFORMATION OF VTLS INC. Acquisitions (v. 43.1) 89 Figure 5-1. Send Orders Dialog Box 2. Select a transmission category by clicking a radio button. Depending on the category you select, grayed out fields such as PO Number, Vendor, Start, and Stop will become active as appropriate. • • • • • All Outstanding - Sends ALL orders that have Approved status. Single Order - Sends a specific Approved order whose number is supplied in the P.O. number field. By Vendor - Sends ALL Approved orders for a specific vendor whose name is supplied in the Vendor field. When you begin typing a name, Virtua automatically completes your string with the closest match it finds in the vendor index. By Date - Sends ALL Approved orders whose Last Modified date falls within the specified date range indicated in the Start and Stop date fields Rush Orders - Sends ALL Approved orders marked as Rush Orders. 3. Select the Filter By Location check box if, for the transmission category you selected, you want the orders to be filtered by a location that you type or choose in the pull-down list box. Hint: Type the first letter of the location, and the software will position you at that point in the list. PROPRIETARY INFORMATION OF VTLS INC. Virtua ILS – Integrated Library System 90 Acquisitions (v. 43.1) Note: The Filter By Location check box will be enabled only if the Filter Acquisitions Records By Log-in Location flag in the Virtua Profiler is not enabled. • When the flag is not enabled and the Filter By Location check box is selected, the pull-down list will display ALL main locations and sublocations that are configured in the system. • If you choose a main location, Virtua will send orders for that main location and all its sublocations. 4. Select the Transmit Canceled Orders check box if you want to transmit canceled orders. Note: • When a whole purchase order has been canceled, the purchase order as a whole will be sent to the vendor via the preferred transmission method; each line of the order will be marked Canceled. • When specific line items only have been canceled, only the canceled line items will be sent to the vendor; the non-canceled line items will not be transmitted. 5. Click the Send button. The software makes several checks and then completes the transmission(s) as we describe below. 5.4.3.1 Verification and Completion of Transmissions After you click the Send button, the software does the following: • Checks to make sure the orders exist and are Approved, or in the case of canceled orders at the status To Be Canceled, in the system. Virtua ILS – Integrated Library System PROPRIETARY INFORMATION OF VTLS INC. Acquisitions (v. 43.1) • 91 If orders do not exist or are not Approved or are not at the status To Be Canceled, returns an Error message. Next, depending on the order transmission method specified in the vendor record and the Send Orders option selected, the software displays the… • Print (Order) dialog box (Figure 5-2). Figure 5-2 Print (Order) Dialog Box -OR• E-mail Records dialog box (Figure 5-3). Figure 5-3. E-mail Records Dialog Box PROPRIETARY INFORMATION OF VTLS INC. Virtua ILS – Integrated Library System 92 Acquisitions (v. 43.1) If the vendor record contains a value in the E-mail field on the Order Address tab or Default Address tab, Virtua automatically populates the Send To field with this e-mail address. If the vendor record does not contain an e-mail address, then the Send To field will be blank, and you can type in the vendor’s e-mail address. After you complete the necessary information in the dialog box and click OK, the software performs the appropriate transmission while displaying the Send Orders Summary window, which lists the transmitted orders (Figure 5-4 and Figure 5-5). Note: Currently, if the transmission method specified on the purchase order is not Print or E-mail, the system displays a message to inform you that it does not support the transmission method of the purchase order and so will default to “Print.” 5.4.4 Send Orders Summary (for Transmission Method PRINT or E-MAIL) Orders assigned the transmission method of “Print” or “E-mail” will appear on the Send Orders Summary window (Figure 5-4). The column labeled Transmission will specify either Print or E-mail. Notice the editable check boxes in the column labeled Success. Figure 5-4. Send Orders Summary Window Virtua ILS – Integrated Library System PROPRIETARY INFORMATION OF VTLS INC. Acquisitions (v. 43.1) 93 The check box in the Success column next to each order number lets you indicate if the order was printed or e-mailed successfully. • If an order fails to print or be e-mailed, de-select the associated check box. In this way, when you click OK, the status of that order will not change to Ordered. Note: If you click the Cancel button on the E-mail Records dialog box (Figure 5-3), the Send Orders Summary window will appear, but the check box in the Success column next to the order number will NOT be selected. This means that the transmission was NOT successful and will not be registered in the database. When you click the OK button, the system message (Figure 5-5) appears, but since it refers only to successfully transmitted orders, it has no importance for you. • If ALL orders fail to print or be e-mailed, click the Clear All button to remove all the checks. In this way, when you click OK, none of the statuses of the orders will change. When orders are printed or e-mailed successfully, and you click OK, the system returns a message about the change of status of all successfully transmitted orders. • For orders that were at the status Approved, the message indicates that the status of the successfully transmitted orders has been changed to Ordered (Figure 5-5). Figure 5-5. Information Dialog Box • For orders that were at the status To Be Canceled, the message indicates that the status of the successfully transmitted order or line items has been change to Canceled. Note that only those line items on the order that have been fully or partially canceled will print. PROPRIETARY INFORMATION OF VTLS INC. Virtua ILS – Integrated Library System 94 Acquisitions (v. 43.1) 5.4.5 Send Orders Summary (for Transmission Method EDIFACT) When EDIFACT is fully implemented, orders assigned the transmission method of EDIFACT (or EDIFACT and Print) will appear on the Send Orders Summary window (Figure 5-6). Notice that the column labeled Success displays Yes or No rather than an editable check box as on the the Send Order Summary for Print only orders. Figure 5-6. Send Orders Summary Window The YES in the Success column means that the system has successfully translated the purchase order information into the EDIFACT format and has created an EDIFACT file, • which contains all purchase order information required by EDIFACT, including the shipping and billing address(es). • which resides on the server in a library-specified directory (such as /edi/ediPO), where you can retrieve it and ftp it to the vendor. • one of which is generated per purchase order. • the name of which consists of a combination of a VTLS internal unique sequence number and the vendor ID. Virtua ILS – Integrated Library System PROPRIETARY INFORMATION OF VTLS INC. Acquisitions (v. 43.1) 95 5.4.6 Error Handling If an error occurs during the printing or EDIFACT conversion of a given purchase order, the system will display a message on the Send Orders Summary window. For example, if the vendor record does not specify the SAN, the system will tell you that the vendor record is missing information. • If there is an error with EDIFACT, the system will remove the EDIFACT file generated for the purchase order. • If the system encounters any errors in the transmission process as a whole, it will display an Error message for you to acknowledge. 5.4.7 Getting a Printed Copy of an Order To get a printed copy of an order that has already been transmitted, 1. 2. 3. 4. Display the Send Orders window (Figure 5-1) Select the Single Order radio button. Type the P.O. Number in the appropriate field. Click the Send button. Virtua displays the following message: Figure 5-7. Confirm Dialog Box 5. Click the Yes button. A copy of the order will print. 5.4.8 Resending an Order PROPRIETARY INFORMATION OF VTLS INC. Virtua ILS – Integrated Library System 96 Acquisitions (v. 43.1) If you make changes to an order, you can re-transmit it up until the time that the order is completely Received or the status is Paid. Note: Before re-transmission, you must reset the order status to Approved. 5.5 Working with the Printed Purchase Order Letter For use with the Print method of transmission, the Virtua installation program provides six default files, each containing a letter template for use with one type of purchase order and one type of canceled purchase order. The name of each file indicates the type of order, for example, engmonprint.utf is used for Monograph orders in English and engserprint.utf is used for Serial orders in English. If your library prints purchase orders in different languages, your library will want to translate the letter templates into different languages and save each translated file with a different prefix. For example, a filename containing a letter in French would have the prefix fre, and a filename containing a letter in German would have the prefix ger. Virtua automatically chooses the correct file to print for a particular type of purchase order and displays it in the Print File field on the Order Header Information tab on the Order window. Virtua also knows which language version of the file to use based on the language value stored in the vendor record. If no filename exists that contains the language value specified in the vendor record, Virtua defaults to the English version. For more information on the Print File field, see the section “Order Header Information Tab” in this guide. 5.5.1 About P.O. Letter Template Files The files containing the purchase order letter templates are easy to identify. Located in the VTLS\Virtua directory, each template has a filename with the following characteristics: • • • • Contains a three-character code such as ser that indicates the purchase order type. Contains a variable three-character prefix such as eng that represents the language of the file. Contains a .utf extension, which means you can edit the file with any text editor that supports Unicode such as Notepad in Windows 2000. If for use with a canceled order, contains the word cancel. Virtua ILS – Integrated Library System PROPRIETARY INFORMATION OF VTLS INC. Acquisitions (v. 43.1) • 97 If for use with a rush order, contains the word rush. The nine default purchase order templates are: engmonprintpo.utf engmonprintporush.utf engmonprintcancelpo.utf For a Monograph order in English. For a rushed Monograph order in English For a canceled Monograph order in English. engserprintpo.utf engserprintporush.utf engserprintcancelpo.utf For a Serial order in English. For a rushed Serial order in English For a canceled Serial order in English. engcogprintpo.utf engcogprintporush.utf engcogprintcancelpo.utf For a COG order in English. For a rushed COG order in English. For a canceled COG order in English. These nine files (along with the default files engprintclaim.utf, printvoucher.utf, receipt.utf, distributionprint.utf, and receivingreport.utf) are copied to your VTLS\Virtua and VTLS\Virtua\New Acquisitions Files directories upon initial installation of the Virtua client. The software uses the files in the VTLS\Virtua directory, and it is the files in this directory that you will want to customize. When you install an upgrade to the Virtua client, the files in the VTLS\Virtua directory remain untouched. But the installation of the upgrade will overwrite the files in the VTLS\Virtua\New Acquisitions Files directory with any new files included in the upgrade. 5.5.2 How Virtua Uses P.O. Letter Template Files Virtua uses a purchase order letter template file when you send a purchase order that is assigned the transmission method of Print. The Order window displays the name of the file in the Print File field on the Order Header Information tab on the Order window. The particular template Virtua uses to print the order depends on the type of order being sent. For example, if the order is for a serial, Virtua displays in the Print File field ***serprintpo.utf, where *** stands for the language code of the file. If a language code is stored in the vendor record, Virtua will use that code to display the appropriate translated template file. If no translated file exists, Virtua will display the English file (in this case, engserprintpo.utf) by default. The print process works like this. After you either 1) save a purchase order and automatically proceed to receipts or 2) click the Send button on the Send Orders dialog PROPRIETARY INFORMATION OF VTLS INC. Virtua ILS – Integrated Library System 98 Acquisitions (v. 43.1) box, Virtua automatically displays a Print Order dialog box (Figure 5-2). The Print function prints the purchase order letter (Figure 5-8) using the appropriate template file, in this case engmonprintpo.utf. English Monograph Order Second Optional Header String Book Shop 660 Bibliophile Road Blacksburg, VA 24060 U. S. A. 1 May, 2001 Order ID: 1949, Order Type Monograph Dear Vendor: We are submitting this order for the following items: --------------------------------------------------------------------------------------------------------Line No. ISSN/ISBN Account ID Coverage Quantity Unit Price Line Total --------------------------------------------------------------------------------------------------------1 No ISSN/ISBN 500001 1 Author: Title: Publ.: Henderson, G. F. R. (George Francis Robert), 1854-1903 Stonewall Jackson and the American Civil War Gloucester, Mass., P. Smith, 1968 [c 1962] $50.00 $50.00 --------------------------------------------------------------------------------------------------------PO Total Bill To: Ship To: $50.00 Deborah O’Connor Memorial Library Deborah O’Connor Memorial Library We hope that you will be able to fill our order promptly. Thank you for your cooperation. Sincerely yours, Deborah O’Connor Memorial Library Acquisitions Department Figure 5-8. Sample Purchase Order Letter Your library can customize and translate different purchase order letters by editing the different templates. Virtua ILS – Integrated Library System PROPRIETARY INFORMATION OF VTLS INC. Acquisitions (v. 43.1) 99 Note: By default, the template files are Read Only when installed. Before you can edit them, you must change the permissions on the files via the Windows File/Properties function. 5.5.3 Editing P.O. Letter Template Files You can edit every aspect of the template files for the purchase order letter. We list the editable elements below. To edit them, use a text editor, such as Windows 2000 Notepad, that supports Unicode. • Textual content of the letter; • Placement of the header, salutation, and closing; • Format and placement of the vendor address; • Size of the margins; • Labels of columns and rows; • Columns widths and row labels. The instructions for editing these elements are included in the file itself. Each line of instruction is preceded by two asterisks (**), which comments out the line and keeps it from printing. 5.5.3.1 General Editing Tips Below, we have captured the default template file engmonprintpo.utf in four parts, starting with Figure 7-9. The files engserprintpo.utf and engcogprintpo.utf contain the same data elements as engmonprintpo.utf except that some elements in the template for COG orders are commented out so that they do not print. Here are some general tips for editing the files. More specific tips follow each figure. 1. For any line in the file, you can edit only the textual portion that appears to the right of the = sign. 2. Labels and text can be in any language. 3. If you want to add a blank line, for example between HeaderStrings, you must type the following: HeaderStringsN= , where “N” indicates the next line number in the sequence and where only a blank space exists after the = sign. 4. If you do not want the data in any given line to appear in the printed letter, type two asterisks (**) in front of the line, for example: **ISSN/ISBN=ISSN/ISBN,0,10 PROPRIETARY INFORMATION OF VTLS INC. Virtua ILS – Integrated Library System 100 Acquisitions (v. 43.1) 5.5.4 Editing the Data Elements of the P.O. Template In this section we describe each element of a purchase order template file (engmonprintpo.utf) and how to edit it. We have captured the template file in four screens (Figure 5-9, Figure 5-10, Figure 5-11, and Figure 5-12). Before we captured the screens, we removed all the “commented-out” instructions (i.e., those lines in the file preceded by **) to make it easier for you to see the individual data elements that we describe. Default Purchase Order Template (Four Screens) Figure 5-9. Default Purchase Order Letter Template File (1) 5.5.4.1 Header Virtua ILS – Integrated Library System PROPRIETARY INFORMATION OF VTLS INC. Acquisitions (v. 43.1) 101 The purchase order allows for an optional header (Figure 5-9) that can consist of several lines, or “strings.” If you want to include a header in your letter, type each line in order, starting with HeaderStrings1=. BeginHeader LinesDown= Type a number that indicates the number of lines from the top of the page to leave blank before starting the header. PercentOver= Type a number between 0 and 100 that indicates the percentage of the page from the left to leave blank before starting the header. Alternatively, type the word LeftJustify, Center, or RightJustify. HeaderStrings1= Type the first line of your header here. HeaderStrings2= Type the second line of your header here. Note: You can have as many lines of HeaderString(s) as you want. You just need to start with 1 and continue numbering consecutively. EndHeader 5.5.4.2 Vendor Information You cannot edit the vendor name and address, but you can specify the format of the address (see below). • Vendor Name - Pulled from the vendor record. • Vendor Address - Pulled from the vendor record. • “Attention” information - Pulled the vendor record. If this information is specified, it will print on the purchase order after the vendor name and before the vendor address. BeginVendor LinesDown= PercentOver= VendorFormat= Type the number of lines down from the header to leave blank before starting the vendor information. Same as for the header. Type the format of the address. Four formats are available. The allowable formats and examples of their printed equivalents are: ZipCityStateCountry 24060 Blacksburg, VA U.S.A. ZipCityState 24060 Blacksburg, VA CityStateZipCountry Blacksburg, VA 24060 U.S.A. CityStateZip Blacksburg, VA 24060 EndVendor PROPRIETARY INFORMATION OF VTLS INC. Virtua ILS – Integrated Library System 102 Acquisitions (v. 43.1) 5.5.4.3 Date You can specify the format of the date on the purchase order letter (Figure 5-9). BeginDate DateFormat= LinesDown= PercentOver= EndDate Type the format of the date: d=day, mmmm=month, and yyyy (or yy) =year Type the number of lines down from the vendor address to leave blank before starting the date. Same as for the header. 5.5.4.4 Entity ID The Entity ID (Figure 5-9) is the label for the purchase order number, which the system prints on the letter automatically. The label can be in any language. In our example of a purchase order letter, the label is Order ID: BeginEntityID LinesDown= PercentOver= EntityID= EndEntityID Type the number of lines down from the date to leave blank before starting the entity ID. Same as for the header. Type a label for the order number such as Order ID: Virtua ILS – Integrated Library System PROPRIETARY INFORMATION OF VTLS INC. Acquisitions (v. 43.1) 103 Figure 5-10. Default Purchase Order Letter Template File (2) 5.5.4.5 Salutation The purchase order allows for several lines, or “strings,” of salutation, which includes the first paragraph of the letter (Figure 5-10). BeginSalutation LinesDown= PercentOver= Salutation1= Salutation2= Salutation3= EndSalutation Type the number of lines down from the entity ID to leave blank before starting the salutation. Same as for the header. Type the first line of the salutation such as Dear Vendor: Leave blank if you want a space between the salutation and opening paragraph. Type the first line of the opening paragraph. PROPRIETARY INFORMATION OF VTLS INC. Virtua ILS – Integrated Library System 104 Acquisitions (v. 43.1) 5.5.4.6 Table Column Labels The purchase order contains pre-set columns of information about each line item. You CANNOT add columns, but you can change their order. The default column labels are P. O. Line Number, ISSN/ISBN, Account ID, Account Name, Begin Subscription (commented out for a Monograph order), End Subscription (commented out for a Monograph order), Coverage, Quantity, Price (per unit), and Line Total. You can edit or translate the labels to suit your needs. Besides the labels, you must specify two numbers that indicate the begin and end positions of the column (Figure 5-10). Some of these elements deserve further comment. For one thing, although the Account Name label is commented out by default in the file, your library can choose to use that label instead of Account ID. To use Account Name instead of Account ID, remove the two asterisks (**) preceding Account Name and place them in front of Account ID. • • ISSN/ISBN - Pulled from tag 020 (ISBN), tag 022 (ISSN), or tag 024 (Other Standard Identifier) of the bibliographic record. Virtua pulls the data in that order so that if it finds no value in tag 020, it goes to tag 022, etc. Coverage - Used for Serial orders. Data is pulled from the Enumeration Information field on the Order Line Editor window. BeginTableColumns POLineNo= ISSN/ISBN= AccountID= **Account Name = **BeginSubscription= **EndSubscription= Coverage= Quantity= Price= LineTotal= EndTableColumns Virtua ILS – Integrated Library System PROPRIETARY INFORMATION OF VTLS INC. Acquisitions (v. 43.1) 105 Figure 5-11. Default Purchase Order Letter Template File (3) 5.5.4.7 Table Row Labels The purchase order letter contains pre-set rows of information for each line item. You CANNOT add rows, but you can change their order and edit their labels. The default row labels are Author, Title, Edition Statement, Publication Statement, Item Note, and Series Statement. You can edit or translate the labels to suit your needs. Besides the labels, you must specify two numbers that indicate the begin position of the label and the begin position of the data string (Figure 5-11). • • • • • Author - Pulled from tag 1xx (all indexed subfields) of the bibliographic record. Title - Pulled from tag 245 (all indexed subfields) and any linked 880 tags of the bibliographic record. Vendor Title ID - Pulled from tag 941 (b) of the holdings record. Edition Statement - Pulled from tag 250 of the bibliographic record. Publication Statement - Pulled from tag 260 (a, b, c) and linked 880 tags of the bibliographic record. PROPRIETARY INFORMATION OF VTLS INC. Virtua ILS – Integrated Library System 106 Acquisitions (v. 43.1) • • Item Note - Pulled from the purchase order line item note field as long as the note is designated for the vendor. Series Statement - Pulled from tag 440 (a, n, p, v, x), tag 490 (a, l, v, x), or tag 830 (a, n, p, v) of the bibliographic record. BeginTableRows Author= Title= Vendor Title ID= EditionStatement= PublicationStatement= ItemNote= SeriesStatement= EndTableRows BeginPostTableColumns POTotal= EndPostTableColumns 5.5.4.8 PostTableColumn There is one default column label—PO Total—that appears after the table of column labels. You can edit this label as you see fit. 5.5.4.9 Notes and Addresses The purchase order letter can include PO Notes, Order Description, Billing Address, Shipping Address, and Vendor Notes. You can edit or translate the default labels for these elements to suit your needs. Besides the labels, you must specify two numbers that indicate the begin position of the label and the begin position of the data string (Figure 5-11). BeginPostTable PONote= Description= BillAddress= ShipAddress= VendorNotes= EndPostTable Virtua ILS – Integrated Library System PROPRIETARY INFORMATION OF VTLS INC. Acquisitions (v. 43.1) 107 Figure 5-12. Default Purchase Order Letter Template File (4) 5.5.4.10 Signature The signature area includes closing remarks, complimentary close, blank lines, and typed signature (Figure 5-12). BeginSignature LinesDown=2 PercentOver= Signature1= Signature2= Signature3= Signature4= Signature5= Type the number of lines down from the shipping address to allow before starting the closing remarks. Same as for the header. Type the first line of your closing remarks. Type the second line of your closing remarks or leave blank. Type the complimentary close such as Sincerely yours, You may want to leave this line blank. Type the sixth line of your closing such as your name, title, or the name of your department. EndSignature PROPRIETARY INFORMATION OF VTLS INC. Virtua ILS – Integrated Library System 108 Acquisitions (v. 43.1) 6. Working with Receipts A receipt records the arrival of ordered material and is attached to a purchase order. It follows that before you can receive line items, a purchase order must exist. Further, you cannot enter receipt information for a purchase order unless that order has the status Ordered, which means that the order has been transmitted. All receipt activity takes place on the Receipts window. In this chapter, we provide step-by-step instructions for working with all aspects of the Receipts function. This chapter covers the following topics: ⇒ ⇒ ⇒ ⇒ ⇒ ⇒ ⇒ Introduction Displaying the Receipts Window Adding Receipt Information Updating Receipt Information Viewing Receipt Information Deleting Receipt Information Saving Receipt Information 6.1 Introduction The Receipts function lets you add, update, view, and delete receipts that are directly related to ONE purchase order. In the case of a Serial order, the function lets you add, update, view, and delete the first expected issue. In addition, the Receipts function lets you receive individual line items and individual copies of line items on a purchase order and use a different receipt status and condition for each. You can also set a “print flag” for each line item so that Virtua prints a receipt slip for each copy of that line item when you save the receipt form. 6.1.1 Support for Repetitive and Integrated Workflows Virtua supports repetitive and integrated workflows between orders and receipts and between receipts and invoices. On the Order window, you have three options regarding receipts: Virtua ILS – Integrated Library System PROPRIETARY INFORMATION OF VTLS INC. Acquisitions (v. 43.1) 109 • • • If you select the Immediately Proceed to Receipts radio button, the software transmits the order automatically and displays the Receipts window immediately. If you select the Immediately Proceed to Invoices radio button, the software transmits the order automatically, sets the status of the line items to Ordered, and displays the Add/Update Invoice Request dialog box immediately. Receipts are not updated until you save the invoice. If you select the Auto Receive check box, the software sets the status of the line items to Ordered, saves the order, and automatically populates receipt information on the Statuses tab on the View Bibliographic Record window with default values. On the Receipts window, if your library assigns a staff member to perform only one step repeatedly in the receipts process, Virtua can accommodate your setup. When you save a receipt, you have the choice of… • • • Exiting the window (Exit This Window) - The system saves the receipt and closes the window. Repeating the same function (Repeat This Function) - The system saves the receipt and displays the Receipts Request dialog box in the same mode as the current receipt. That is, if the current receipt is in Add/Update mode, the new receipt will open in Add/Update mode. Proceeding to the invoice function (Immediately Proceed to Invoices) - The system saves the receipt and displays the Invoices window. Whichever option you choose, it will persist as the selected value until changed. 6.1.2 Features of Receipts • • • • • • • For each purchase order line item and each copy of that line item, you can enter information to receive that item/copy. Each receipt is considered an extension of the line item information on a purchase order. You can change receipt information about items that have been received. You can edit distribution information for items that have been received. If an item has a status of Returned, the system will not count it towards the amount received. For each line item that is received, you have the option to print or not print a receipt slip. For each line item that has been received, you have the option of deleting the item. Virtua does not lock receipt records. When you access the receiving function, the software automatically places a lock on the linked purchase order. PROPRIETARY INFORMATION OF VTLS INC. Virtua ILS – Integrated Library System 110 Acquisitions (v. 43.1) • When you receive an item that has been requested at the bib level, Virtua will alert you with an on-screen message. Via Acquisitions parameters in the Virtua Profiler, you can specify the following: • • • A default value as the receipt status when receiving a line item. A default value as the receipt condition when receiving a line item. Whether a masked bibliographic record will be unmasked upon receipt. 6.2 Displaying the Receipts Window If you save a purchase order with the Immediately Proceed to Receipts radio button selected, the Receipts window will display directly after the order is transmitted. Otherwise, to access the Receipts window, • Display the Statuses tab of the View Bibliographic Record window in the OPAC, and click the Add/Update button in the Receipt Status Information area (Figure 6-1): Figure 6-1. View Bibliographic Record Window - Statuses Tab -OR- Virtua ILS – Integrated Library System PROPRIETARY INFORMATION OF VTLS INC. Acquisitions (v. 43.1) 111 • Use the Virtua toolbar icon or menu option as described below. To display the Receipts window, 1. On the Acquisitions toolbar, click Add/Update Receipts . -OROn the Virtua menu bar, click Acquisitions, choose Receipts, and then choose Add/Update. The Add/Update Receipts Request dialog box appears (Figure 6-2). Figure 6-2. Add/Update Receipts Request Dialog Box 2. In the Order No. field, type the purchase order number. Hint: You can find this number on the Statuses tab of the View Bibliographic Record window. 3. Click the Request button. Virtua locks the associated purchase order. At this point… • If the purchase order has been transmitted, the Receipts window (Figure 6-3) will appear. If priority purchase order header notes exist, a Messages box will appear simultaneously to inform you of that. • If the purchase order has not been transmitted, an Error message will appear to inform you of that. PROPRIETARY INFORMATION OF VTLS INC. Virtua ILS – Integrated Library System 112 Acquisitions (v. 43.1) Figure 6-3. Receipts Window – Add/Update Mode 6.2.1 Aspects of the Receipts Window You can resize the Receipts window to suit your needs. Just place your mouse cursor at the boundary of the window. When the cursor changes to a horizontal or vertical arrow, hold down the left mouse button and drag the edge of the window. You can also adjust column widths for easier viewing of items in the PO Line Items list box. To expand a column, 1. Click on the column divider. 2. Drag the mouse to the left or right. 6.2.1.1 Header For your reference, the header on the Receipts window displays two fields that are read-only: • • Purchase Order Number - The number of the order to be received. Vendor - The vendor name pulled from the purchase order. Virtua ILS – Integrated Library System PROPRIETARY INFORMATION OF VTLS INC. Acquisitions (v. 43.1) 113 6.2.1.2 PO Line Items List Box The PO Line Items list box on the Receipts window displays the ordered line items on the purchase order. The information appears in labeled columns, each of which can be expanded for easier viewing. The columns are: • • • • • • • • • Line - Line number taken from the purchase order. Notes - If purchase order notes exist for this line item, this column will display an asterisk (*). Vendor Title ID - The optional ID number, taken from the purchase order, that the vendor has assigned to this particular item. Title - Title of the line item ordered. If the item has no title, the software displays No Title Available. Location - Location for which the item/issue was ordered. If multiple copies were ordered for multiple locations, each location appears on a separate line in the display box. Ordered - Number of copies ordered as indicated on the purchase order. Only those items from the purchase order that qualify for receiving appear. Received - Number of copies received to date. PO Line Status - The status of the line item on the purchase order. Condition - Displays the condition of the item upon receipt as specified in the Edit Receipt Information dialog box. If two copies of the item have different conditions, the condition of each copy will display on a separate line. 6.2.1.3 Command Buttons Four item-level command buttons appear directly below the PO Line Items list box. The functions of the buttons apply to selected line items only: • • • • Item Reminder - Displays the Reminders window. Expand - Displays the Line Item Receipt Information window. Express Receive – Receives the selected line item with all default values. Receive – Displays the Edit Receipt Information dialog box, where you can modify default receipt values. Four header-level command buttons appear at the bottom of the window. The functions of these buttons apply to the Receipts window as a whole: • View PO Notes - If a priority purchase order header note exists, this button will be enabled so that you can view the note on the Acquisitions Notes window. PROPRIETARY INFORMATION OF VTLS INC. Virtua ILS – Integrated Library System 114 Acquisitions (v. 43.1) • • • Reminders - Displays the Reminders window for the selected line item as well as the receipt record as a whole. Save - Saves the Receipts information to the database. Cancel - Cancels any data entries and closes the Receipts window. 6.2.1.4 When Saving… Options When you save a receipt, you can select one of three “When Saving…” options: • • • Exit This Window Repeat This Function Immediately Proceed to Invoices 6.3 Adding Receipt Information To add a receipt, the purchase order must have the status of Ordered. Virtua gives you several options for receiving a selected line item: • • • Express Receive - Lets you receive directly using the default receipt values. This method is useful when you want to receive items repetitively. Receivel - Lets you receive directly using other than default receipt values. Expand - Lets you view expanded information about a selected line item and displays a table of information about the copies that have already been received. With this function, you can also view or add notes as well as add, modify, or delete a receipt. Virtua ILS – Integrated Library System PROPRIETARY INFORMATION OF VTLS INC. Acquisitions (v. 43.1) 115 6.3.1 Using the Express Receive Function Use the Express Receive function when you are receiving items repetitively and using default receipt values. To add a receipt directly using the Express Receive feature, 1. Display the Receipts window for the desired purchase order (Figure 6-4). Figure 6-4. Receipts Window 2. Select one or more line items that you want to receive. 3. Click the Express Receive button. Virtua performs a check to see if any of the received items have been requested. If there is a title request against an item that is being received, the system will issue a pop-up message, identifying the line item of the item(s). The software receives the line item(s). In the PO Line Items list box (Figure 6-5), the Received column indicates the number received and the Condition column indicates the default condition upon receipt PROPRIETARY INFORMATION OF VTLS INC. Virtua ILS – Integrated Library System 116 Acquisitions (v. 43.1) Figure 6-5. Receipts Window – After Express Receive Function 6.3.2 Using the Receive Function Use the Receive function when you want to receive each item directly, but you also want to be able to edit one or more default values. To add a receipt directly using the Receive function, 1. Display the Receipts window for the desired purchase order (Figure 6-6). Virtua ILS – Integrated Library System PROPRIETARY INFORMATION OF VTLS INC. Acquisitions (v. 43.1) 117 Figure 6-6. Receipts Window 2. Select the line item that you want to receive. 3. Click the Receive button. Virtua performs a check to see if any of the received items have been requested. If there is a request against an item that is being received, the system will issue a popup message to notify you. The Edit Receipt Information dialog box (Figure 6-7) appears, displaying default values. Figure 6-7. Edit Receipt Information Dialog Box 4. Accept the default receipt information. PROPRIETARY INFORMATION OF VTLS INC. Virtua ILS – Integrated Library System 118 Acquisitions (v. 43.1) -OREdit the following fields and check boxes as needed (for details see the section “Edit Receipt Information Dialog Box” in this guide): • Status • Condition • Receipt Date • Quantity Received • On New Book List • Print Receipt Slip When Saved 5. Click the Save button. The Receipts window reappears (Figure 6-8), displaying the updated information for the received line item. Figure 6-8. Receipts Window – After Receive Function At this point, you can… • Receive another line item. -OR• Save this receipt to the database by clicking the Save button. Virtua ILS – Integrated Library System PROPRIETARY INFORMATION OF VTLS INC. Acquisitions (v. 43.1) 119 6.3.3 Using the Expand Function The Expand button on the Receipts window (Figure 6-8) displays the Line Item Receipt Information window (Figure 6-9) where you can view copies already received; add, modify, or delete a receipt; and view any priority purchase order line item notes. 6.3.3.1 Viewing Line Item Receipt Information Figure 6-9. Line Item Receipt Information Window If the selected line item has already been received or partially received, the Notes button and Delete button will be enabled; otherwise, they will be disabled until a receipt is created. 6.3.3.1.1 Header The header of the Line Item Receipt Information window displays the following information for the selected line item: • • • • PO Number PO Line Number Title Quantity Ordered PROPRIETARY INFORMATION OF VTLS INC. Virtua ILS – Integrated Library System 120 Acquisitions (v. 43.1) • • • Quantity Received Quantity Returned Quantity Expected 6.3.3.1.2 Received Copies List Box The columns in the Received Copies list box on the Line Item Receipt Information window (Figure 6-9) correspond to the fields in the Edit Receipt Information dialog box and reflect the values set there. List Box Column Print NBL Received Receipt Date Condition Status Dialog Box Field Print Receipt Slip When Saved On New Book List Quantity Received Receipt Date Condition Status For details, see the section “Edit Receipt Information Dialog Box” in this guide. 6.3.3.1.3 Command Buttons for Line Item Receipts • • • • • View PO Notes – If a priority purchase order line item note exists for this line item, the button will be enabled so you can view the note on the Acquisitions Notes window. Notes – Disabled until a receipt is added. When enabled, displays the Acquisitions Notes window so that you can add a note to the receipt of this line item. If receipt line-item notes exist, an asterisk will display on the button. Add – Displays the Edit Receipt Information dialog box so that you can add information for a line item selected on the Receipts window. Modify - Displays the Edit Receipt Information dialog box so that you can modify existing information for a selected line item receipt. Delete - Deletes the entire line of a selected receipt. 6.3.3.2 Adding Line Item Receipt Information After viewing data on the Line Item Receipt Information window (Figure 6-9), you can add a receipt. Virtua ILS – Integrated Library System PROPRIETARY INFORMATION OF VTLS INC. Acquisitions (v. 43.1) 121 To add line item receipt information, 1. On the Line Item Receipt Information window, click the Add button. The Edit Receipt Information dialog box appears (Figure 6-7). 2. Complete the fields as appropriate (for details, see the section “Edit Receipt Information Dialog Box”). 3. Click the Save button. The Line Item Receipt Information window becomes active (Figure 6-10), displaying the updated information. Figure 6-10. Line Item Receipt Information Window 4. Click the Save button. The Receipts window becomes active, reflecting the updated data (Figure 6-11). If you added any notes on the Line Item Receipt Information window, an asterisk will appear in the Notes column for that line item. PROPRIETARY INFORMATION OF VTLS INC. Virtua ILS – Integrated Library System 122 Acquisitions (v. 43.1) Figure 6-11. Receipts Window - Updated 5. Click the Save button. Note: A receipt is not saved to the database until you click the Save button on the Receipts window. 6.3.4 Using the Edit Receipt Information Dialog Box The Edit Receipt Information dialog box (Figure 6-12) lets you edit the default line item receipt values. In this section, we describe each field in detail. Figure 6-12. Edit Receipt Information Dialog Box Virtua ILS – Integrated Library System PROPRIETARY INFORMATION OF VTLS INC. Acquisitions (v. 43.1) 123 6.3.4.1 Assigning a Status For every purchase order line item, you can choose a receipt status from a pull-down list box in the Edit Receipt Information dialog box (Figure 6-12). Your library can define the values for receipt statuses in the Acquisitions parameters in the Virtua Profiler. In addition, you can set a default value such as Received Satisfactorily, which will appear automatically in the Status field. Virtua provides a number of preset receipt statuses, which we list below, but your library will want to define its own and add them in the Profiler. • • • • • • • • • Not Received Received Satisfactorily Received Not Satisfactorily Referred to a Supervisor Hold Pending Investigation Requesting Permission to Return Returned Accepted as Duplicate Referred to a Librarian When you receive an item with the receipt status of Returned, the system will not count that item in the Received amount. 6.3.4.2 Assigning a Condition For every purchase order line item, you can assign a Condition to indicate a special type, status, or condition of receipt. Your library can define Condition values in the Acquisitions parameters in the Virtua Profiler. The first condition in the list of conditions that your library defines will serve as the default value. Virtua provides a number of preset Conditions, but your library will want to define its own and add them in the Profiler. There is no limit to the number of Conditions your library can define. Those defined will appear in the pull-down list box on the Edit Receipt Information dialog box (Figure 6-12). PROPRIETARY INFORMATION OF VTLS INC. Virtua ILS – Integrated Library System 124 Acquisitions (v. 43.1) Sample Conditions • Correct Item • Damaged Item • Defective Item • Other Problem • Duplicate • Wrong Title • Wrong Edition • Wrong Volume/Issue 6.3.4.3 Receipt Date and Quantity Received When you add a receipt, the date that appears in the Receipt Date field will be the system, or current, date. The quantity that appears in the Quantity Received field will be the same as the quantity ordered. You can edit both fields. 6.3.4.4 Adding to the New Book List If you select the On New Book List check box on the Edit Receipt Information dialog box (Figure 6-12), Virtua flags the item in the database so that it will be included in a New Book List report. Using InfoStation, you can generate a report that lists all books within a set date range and/or classification range and/or at a set location. After you run the report, the system will reset all NBL flags to blank. Via the Virtua Profiler you can set the Acquisitions List Flag parameter to ON so that the system checks the box On New Book List automatically. 6.3.4.5 Printing a Receipt Slip You can flag the system to print a receipt slip for each copy of each line item when you save a receipt. To do this, on the Edit Receipt Information dialog box (Figure 6-12), select the Print Receipt Slip When Saved check box for any line item. When you click the Save button on the Receipts window, the system will display the Print (Receipt) dialog box. Virtua ILS – Integrated Library System PROPRIETARY INFORMATION OF VTLS INC. Acquisitions (v. 43.1) 125 The receipt slip contains the following preset information, with each element receiving its own line. • Purchase order ID • Purchase order line number • Title • Bib ID • ISBN/ISSN • Vendor • Receipt Date • Location • Condition • Receipt Status • Acquisitions List Flag setting (i.e., whether the item is on the New Book List) • Vendor Notes VTLS ships Virtua with a default template for a printed receipt slip. Your library can customize the receipt slip by editing or translating the default file (see below). You can edit the file to determine which data elements should print and in which language and format. 6.3.5 Customizing the Printed Receipt Slip Your library can customize the printed receipt slip by editing the file receipt.utf (Figure 6-13) to determine the elements on the slip, print order of the items, and alignment (left or right justified or centered) of the items. Note: By default the file receipt.utf is read-only when it is installed. Before you can edit it, you must change the permissions on the file via the Windows File/Properties function. PROPRIETARY INFORMATION OF VTLS INC. Virtua ILS – Integrated Library System 126 Acquisitions (v. 43.1) Default Receipt Slip Template File Figure 6-13. Default Receipt Slip Template File To edit the receipt slip template file, use an editor that supports Unicode, such as Windows 2000 Notepad. For information about editing .utf files, see the section “Working with Purchase Order Letter Templates” in this guide). Virtua ILS – Integrated Library System PROPRIETARY INFORMATION OF VTLS INC. Acquisitions (v. 43.1) 127 6.3.6 Splitting the Receipt of a Line Item If you need to assign different receipt values such as status or condition to different copies of a received title, you can do so by splitting the receipt of the line item. To do this, you must receive each copy separately and assign different information to the individual copies via the Edit Receipt Information dialog box. To split the copies of a line item, 1. On the Receipts window, highlight the desired line item. 2. Click the Receive button. The Edit Receipt Information dialog box appears (Figure 6-14). Figure 6-14. Edit Receipt Information Dialog Box 3. Complete the fields as needed for one (or more) of the copies that match the criteria on this dialog box. 4. Click the Save button. The updated Receipts window displays the number of copies received that match the criteria you specified on the Edit Receipt Information dialog box. 5. Repeat steps 1-4 for each additional received copy where you need to assign a different status or condition. PROPRIETARY INFORMATION OF VTLS INC. Virtua ILS – Integrated Library System 128 Acquisitions (v. 43.1) To see the copies split out with their individual descriptions, 1. On the Receipts window, select the line item the receipt of which you just split. 2. Click the Expand button. The Line Item Receipt Information window appears (Figure 6-15), displaying a separate line item for each copy received. Figure 6-15. Line Item Receipt Information Window In addition, if each copy has a different condition, the PO Line Items list box on the Receipts window (Figure 6-16) will display a separate line for each condition. Virtua ILS – Integrated Library System PROPRIETARY INFORMATION OF VTLS INC. Acquisitions (v. 43.1) 129 Figure 6-16. Receipts Window - Condition Values Split 6.3.7 Receiving More Copies Than Ordered You can receive more copies than were ordered. Here’s how. • If you ordered five items and seven items show up all in the same condition, you can receive all seven at one time. • If all the items are not in the same condition, you can receive each copy individually (see “Splitting the Receipt of a Line Item” above) with different receipt information. • Alternatively, you can receive all seven at once and then later modify the receipt to split out the copies with different receipt information (see our example in the next section). 6.4 Updating Receipt Information You can update receipt information at any time in the acquisitions process. For example, you might want to update the receipt of three copies when only one was ordered. To update line item receipt information, 1. On the Receipts window, select the line item that you want to update, and then click the Expand button. PROPRIETARY INFORMATION OF VTLS INC. Virtua ILS – Integrated Library System 130 Acquisitions (v. 43.1) The Line Item Receipt Information window appears (Figure 6-17). If priority purchase order header notes exist, a Messages box will appear simultaneously to inform you of that Figure 6-17. Line Item Receipt Information Window 2. Highlight the line item that you want to edit, and then click the Modify button. -ORDouble-click the line item. The Edit Receipt Information dialog box (Figure 6-14) appears. 3. Edit the available fields as needed (see the section “Using the Edit Receipt Information Dialog Box”). 4. Click the Save button. The updated Line Item Receipt Information window becomes active. 5. Click the Save button. The updated Receipts window becomes active. 6. Click the Save button. Virtua ILS – Integrated Library System PROPRIETARY INFORMATION OF VTLS INC. Acquisitions (v. 43.1) 131 The receipt information is saved to the database. 6.4.1 Updating Example Let’s say that you want to update the receipt of each of three copies when only one copy was ordered. You have already received all three items, but now you want to modify the receipt information to show the following statuses: • • • Returned for one copy, Accepted as Duplicate for the second copy, and Received Satisfactory for the third. To do this, first modify the current receipt of the three items, and then add two new receipts. Here’s how to proceed: 1. On the Line Item Receipt Information window (Figure 6-18), highlight the line showing the receipt of the three items. Figure 6-18. Line Item Receipt Information Window 2. Click the Modify button. The Edit Receipt Information dialog box appears (Figure 6-19). PROPRIETARY INFORMATION OF VTLS INC. Virtua ILS – Integrated Library System 132 Acquisitions (v. 43.1) Figure 6-19. Edit Receipt Information Dialog Box 3. 4. 5. 6. Change the Quantity Received to 1. Change the Status to Returned Change the Condition to Other Problem. Click the Save button. The Line Item Receipt Information window reflects the changes you made (Figure 6-20). Figure 6-20. Line Item Receipt Information Window Virtua ILS – Integrated Library System PROPRIETARY INFORMATION OF VTLS INC. Acquisitions (v. 43.1) 133 To add the receipt Accepted as Duplicate, 1. Click the Add button to see the Edit Receipt Information dialog box again. 2. Make sure the Quantity Received is 1. 3. Change the Status to Accepted as Duplicate. Note: The system counts the status Accepted as Duplicate in the Received value for the order. 4. Make sure the Condition is Correct Item. 5. Click the Save button. To add the receipt Received Satisfactory, 1. On the Line Item Receipt Information window, click the Add button again. 2. Repeat steps 2-5 above to add the third receipt, this time with the status of Received Satisfactory. After completing all receipts, the Line Item Receipt Information window should look similar to Figure 6-21. Figure 6-21. Line Item Receipt Information Window PROPRIETARY INFORMATION OF VTLS INC. Virtua ILS – Integrated Library System 134 Acquisitions (v. 43.1) 6.4.2 Multiple Copies and the Determination of Quantity Received When multiple copies of a line item are involved in a receipt, it is important to know how Virtua determines the value for “Quantity Received” on the Add Invoice Line Items window (Figure 7-4) Virtua counts as received copies assigned the following statuses: • • • Received Satisfactorily. Received Not Satisfactorily. Accepted As Duplicate. 6.5 Viewing Receipt Information To view a receipt for a purchase order, 1. On the Virtua menu bar, click Acquisitions, choose Receipts, and then choose View. The View Receipts Request dialog box appears (Figure 6-22). Figure 6-22. View Receipts Request Dialog Box 2. In the Order No. field, type the purchase order number. 3. Click the Request button. The Receipts window appears (Figure 6-23). If priority purchase order header notes exist, a Messages box will appear simultaneously to inform you of that. Virtua ILS – Integrated Library System PROPRIETARY INFORMATION OF VTLS INC. Acquisitions (v. 43.1) 135 Figure 6-23. Receipts Window Note that the Express Receive and Receive command buttons are disabled in View mode. To view line item receipt information, 1. Highlight the line, and then click the Expand button. The Line Item Receipt Information window appears (Figure 6-24). Figure 6-24. Line Item Receipt Information Window PROPRIETARY INFORMATION OF VTLS INC. Virtua ILS – Integrated Library System 136 Acquisitions (v. 43.1) You can view, but you CANNOT modify the information on this window. Note that all the command buttons except Notes are disabled. 2. When you are finished viewing the information, click the Cancel button. -OR3. Select a “When Closing…” option. Note: You can proceed immediately to invoicing from the Receipts window in View mode. To do this, select the Immediately Proceed to Invoices radio button and click Cancel. • If an invoice already exists for this vendor, a dialog box appears for your entry of the invoice ID. The Invoice window that appears will also be in View mode. • If an invoice does not exist, the system informs you that it cannot find an invoice. 6.6 Deleting Receipt Information If you have received an item by mistake or received an item that turned out to be the wrong item, you can delete the line item on the Line Item Receipt Information window. Here are some points to remember when you delete a line item from receipts: • • • The line item is NOT deleted from the purchase order. The system updates the fields Quantity Received and Quantity Expected. The software logs the transaction in the Acquisitions transaction log. To delete one or more line item receipts, 1. On the Line Item Receipt Information window, highlight the line item(s) you want to delete. 2. Click the Delete button. The line item is removed from the Received Copies list box. Virtua ILS – Integrated Library System PROPRIETARY INFORMATION OF VTLS INC. Acquisitions (v. 43.1) 137 6.7 Saving Receipt Information After you receive all the line items for a purchase order or edit an existing receipt, you will want to verify that all the information is complete and save the receipt record to the database. To do this, 1. Determine what you want the next procedure to be upon saving. At the bottom of the Receipts window, you have the following choices: • • • Exit This Window (default) – The system saves the current receipt and closes the Receipts window. Repeat This Function – The system saves the current receipt and opens a request dialog box so that you can request a new receipt. If an error occurs when saving the current invoice, the system will handle the error and not display the dialog box. Immediately Proceed to Invoices – The system saves the current receipt and automatically opens the Add/Update Invoice dialog box so that you can enter an invoice ID. 2. Click the Save button to save the receipt record to the database and attach it to the purchase order. At this point, the system prints a receipt slip for each copy of any line item where you selected the check box Print Receipt Slip When Saved on the Edit Receipt Information dialog box. 6.7.1 Invoicing When Saving By selecting the Immediately Proceed to Invoices radio button, you can proceed immediately from receipts to invoicing whether you are in View mode or Add/Update mode. For example, if you are in View mode on the Receipts window and want to view an invoice upon saving receipts, select the Immediately Proceed to Invoices radio button and click the Cancel button. The View Invoice dialog box appears (Figure 6-25). PROPRIETARY INFORMATION OF VTLS INC. Virtua ILS – Integrated Library System 138 Acquisitions (v. 43.1) Figure 6-25. View Invoice Request Dialog Box To view an invoice, type the required information and click the Request button. Similarly, if you are in Add/Update mode on the Receipts window and want to create an invoice upon saving receipts, select the Immediately Proceed to Invoices radio button, and click the Save button. The Add/Update Invoice dialog box appears (Figure 6-26). Figure 6-26. Add/Update Invoice Request Dialog Box To add a new invoice or update an existing one for the purchase order line items received, 1. On the Add/Update Invoice dialog box, select the Add or Update radio button. Virtua ILS – Integrated Library System PROPRIETARY INFORMATION OF VTLS INC. Acquisitions (v. 43.1) 139 2. Type an invoice number. Note: The invoice number can be alphanumeric and up to 35 characters long. Invoice numbers are case sensitive, which means that BE101 is not the same as Be101. The name of the vendor whose order you just received is selected for you in the Vendor name field. 3. Click the Request button The Add (or Update) Invoice window appears (Figure 6-27), displaying all the valid line items for the associated purchase order. Note that if no items were received for a given line item, the line item can still appear on the Invoice window, but the value in the column labeled Qty (Quantity) will be 0. Figure 6-27. Add Invoice Window PROPRIETARY INFORMATION OF VTLS INC. Virtua ILS – Integrated Library System 140 Acquisitions (v. 43.1) 7. Working with Invoices T he invoicing function lets you record invoices as they are received from a vendor and link them to the associated purchase orders. In this chapter, we discuss all aspects of working with invoices. We provide step-by-step instructions for adding, updating, viewing, and deleting invoices and invoice line items. In addition, we discuss invoice fees, taxes, and discounts. This chapter covers the following topics: ⇒ ⇒ ⇒ ⇒ ⇒ ⇒ ⇒ Introduction Displaying the Add Invoice Window Adding an Invoice Updating an Invoice Viewing an Invoice Deleting an Invoice Saving an Invoice 7.1 Introduction Virtua provides an invoice function that offers libraries a variety of options regarding workflows, display of information, and application of adjustments such as fees, discounts, and taxes. 7.1.1 Support for Repetitive and Integrated Workflows Virtua supports repetitive and integrated workflows at the invoice stage. If your library assigns a staff member to perform only one step repeatedly in the invoice process, Virtua can accommodate your setup. Virtua also supports workflows that expedite the acquisitions process by eliminating the need to rekey data and by skipping the receipt stage altogether. When you save an invoice, you have the choice of… • Exiting the window (Exit This Window) - The system saves the invoice and closes the window. Virtua ILS – Integrated Library System PROPRIETARY INFORMATION OF VTLS INC. Acquisitions (v. 43.1) 141 • • Repeating the same function (Repeat This Function) - The system saves the invoice and displays the Invoice Request dialog box in the same mode as the current invoice; i.e., if the current invoice is in Add mode, the new invoice will open in Add mode. Proceeding to the payment function (Immediately Proceed to Payments) - The system saves the invoice and displays the Select Invoices for Payment window, where payment is automatically shown for each invoice line item. This option is not available in View mode. Whichever option you choose, it will persist as the selected value until changed. 7.1.2 Displaying Only Received Items Via an Acquisitions parameter, Virtua gives you a display option on the Invoice window. The Invoice Line Item Display parameter in the Virtua Profiler lets you determine whether ALL purchase order line items or only RECEIVED purchase order line items appear on the Add Order window. To display only RECEIVED purchase order line items, • Set the Invoice Line Item Display parameter to display only received purchase order line items. Note: Regardless of how this parameter is set, if you jump directly from orders to invoices using the Immediately Proceed to Invoices function, ALL purchase order line items, whether received or not, will be displayed. If you are handling pro forma invoices where no purchase order line items are “received” in Virtua, put 0 in the Quantity Received field on the Add Invoice Line Items window and save the invoice. The software will update the receipts information on the Statuses tab on the View Bibliographic Record window. 7.1.3 Record Locking Virtua locks the invoice record and the associated purchase order when an invoice is being updated or deleted. This means that if you try to access that same record during updating or deletion, you will be permitted only to view it, not edit it. 7.2 Displaying the Add Invoice Window PROPRIETARY INFORMATION OF VTLS INC. Virtua ILS – Integrated Library System 142 Acquisitions (v. 43.1) The Add/Update Invoice Request dialog box will display automatically if you do EITHER of the following: 1) From the Add Order window, you save the purchase order, having first selected the Immediately Proceed to Invoices radio button. -OR2) From the Receipts window, you save the receipt, having first selected the Immediately Proceed to Invoices radio button. In either case, the Add Invoice window will appear, already displaying all the line items linked to the current purchase order. Otherwise, you can access the Add Invoice window via the Virtua toolbar or menu bar as described below. To display the Add Invoice window, 1. On the Acquisitions toolbar, click Add Invoice . -OROn the Virtua menu bar, click Acquisitions, and then choose Add Invoice. The Add Invoice Request dialog box appears (Figure 7-1). Figure 7-1. Add Invoice Request Dialog Box 2. Type an invoice number, which must be unique, for the current vendor. (Identical invoice numbers can co-exist as long as the vendor names associated with them are different.) Virtua ILS – Integrated Library System PROPRIETARY INFORMATION OF VTLS INC. Acquisitions (v. 43.1) 143 Note: The invoice number can be alphanumeric and up to 35 characters long. Invoice numbers are case sensitive, which means that BE101 is not the same as Be101. 3. Accept the current vendor name, or choose another from the alphabetical pulldown list of all vendors configured for the system. If you enter a purchase order ID, this field is disabled. 4. If desired, type the purchase order number in the Purchase Order ID field. This allows Virtua to populate the Add Invoice window automatically with the appropriate invoice data. If you do not enter a purchase order number, the Add Invoice window will display only default data, and you will have to enter line item information manually. 5. Click the Request button. The Add Invoice window appears (Figure 7-2). Figure 7-2. Add Invoice Window PROPRIETARY INFORMATION OF VTLS INC. Virtua ILS – Integrated Library System 144 Acquisitions (v. 43.1) 7.2.1 Aspects of the Invoice Window You can resize the Add Invoice window to suit your needs. Just place your mouse cursor at the boundary of the window. When the cursor changes to a horizontal or vertical arrow, hold down the left mouse button and drag the edge of the window. You can also adjust column widths for easier viewing of items in the PO Line Items list box. To expand a column, 1. Click on the column divider. 2. Drag the mouse to the left or right. You can remain on the Add Invoice window to view, add, modify, or delete data elements until you choose to exit the invoicing function. 7.2.1.1 Header Elements The invoice header elements on the Add Invoice window are… • • • • • • • • Invoice - (Not editable) Invoice number specified in the Add Invoice Request dialog box. This number can be alphanumeric and up to 35 characters long. Note that invoice numbers are case sensitive, which means that BE101 is not the same as Be101. Vendor - (Not editable) Vendor name specified in the Add Invoice Request dialog box. Status - (Not editable) Status of the invoice generated and maintained by the system. The Status field will contain a value only if the invoice is linked to a purchase order/receipt. Line Total - (Not editable) Sum of all the line item values in the Amount column. Invoice Discount - (Not editable) Total of all invoice (header-level) discounts applied to the invoice. Invoice Fee Total - (Not editable) Total of all invoice (header-level) fees applied to the invoice. Invoice Tax Total - (Not editable) This field is displayed only when the Use Taxes setting is enabled in the Virtua Profiler. It displays the total of all invoice (headerlevel) taxes applied to the invoice. Vendor Discount Percent - (Not editable) The default discount, as set in the vendor record, that will be applied to the invoice. Virtua ILS – Integrated Library System PROPRIETARY INFORMATION OF VTLS INC. Acquisitions (v. 43.1) 145 • • • • • Method of Payment - (Editable) Payment method for this invoice. You can choose from a pull-down list of methods that your library has configured in the Virtua Profiler. Invoice Date - (Editable) By default, the date the invoice was created. Currency Type - (Editable) The currency to be used for this invoice. By default, the field displays the home currency. Invoice SAP - (Editable) This field is displayed only when the Use SAP setting is enabled in the Virtua Profiler. The field offers a pull-down list of the SAP codes that your library has configured in the Virtua Profiler. The default is also specified in the Profiler. Invoice Total - (Not editable) Total amount of the invoice, taking into account all fees, taxes, or discounts at both the header and item levels. 7.2.1.2 Invoice Order Line Information List Box Below the header on the Add Invoice window is the Invoice Order Line Information display box, which lists the line items to be invoiced. The line items can be from any number of purchase orders as long as they are all associated with the same vendor and the same currency. For each line item, the display box shows the following information: • • • • • • • • • • • Order Number - Order and order line number for the title. Notes - An asterisk, if line-item notes exist. Vendor Title ID - The ID, as optionally entered on the Order Line Editor window. Title - The title of the ordered item. Price - The item price, as entered on the Order Line Editor window. Quantity - The quantity ordered, as entered on the Order Line Editor window, OR the quantity received if the Invoice Line Item Display flag is set to display received items only. Amount - Total price for all copies of the title. Status - Current status. Discount - Total of all line discounts that apply to the line item. Fee Total - Total of all line fees that apply to the line item. Tax Total - Total of all line taxes that apply to the line item. PROPRIETARY INFORMATION OF VTLS INC. Virtua ILS – Integrated Library System 146 Acquisitions (v. 43.1) 7.2.1.3 Command Buttons The Add Invoice window displays item-level and invoice-level command buttons. Item-Level • • • • • • Line Taxes - Lets you apply specific tax types to a highlighted line item. This button appears only when the Use Taxes setting is enabled in the Virtua Profiler. Line Notes – Lets you view and add notes, which will be attached to the selected invoice line item, as well as view and add priority notes, which will be attached to records linked to this line item. Line Fees - Lets you add miscellaneous fees, which will be added directly to the cost of the specific item and thus charged to the same account as the line item itself. Insert - Lets you insert line items from a purchase order that you specify. Edit - Lets you edit the price, quantity, and status of the selected line item. Delete - Lets you delete the selected line item. Invoice-Level • • • • • • • Invoice Taxes - Lets you apply specific tax types to the invoice as a whole. This button appears only when the Use Taxes setting is enabled in the Virtua Profiler. Invoice Discount - Lets you apply discounts to the invoice as a whole. Invoice Notes - Lets you view and add notes that will be attached to this invoice as well as view and add priority notes that will be attached to records linked to this invoice. Invoice Fees - Lets you add invoice header fees, which may be charged to a specified “fee” account or charged proportionately across all the line items on the invoice. Add/Save - Add appears on new invoices and functions the same as Save on existing invoices. They both save invoice information to the database. Cancel - Cancels any data entries you made and closes the Invoice window. Receipt Report - Displays a Print dialog box from which you can print a receipt report. The receipt report is used to verify that all order line items on the invoice have been properly received. For each line item, the report contains default elements such as quantity received, description of commodities, date received, name of receiver, receiver ID, and agency comments. Like all letters and notices in Virtua, this report is derived from a configurable template. The template file is receivingreport.utf, which is located in the VTLS\Virtua directory. (For general information about editing .utf text files, see the section “Editing P.O. Letter Template Files” in this guide.) Virtua ILS – Integrated Library System PROPRIETARY INFORMATION OF VTLS INC. Acquisitions (v. 43.1) 147 7.2.1.4 When Saving… Options When you save an invoice record, you can select one of three “When Saving…” options: • • • Exit This Window Repeat This Function Immediately Proceed to Payments 7.3 Adding an Invoice To add an invoice to the database, 1. Start by editing the header elements on the Add Invoice window (Figure 7-3). • Edit any of the following as needed: Method of Payment, Invoice Date, Currency Type and Invoice SAP (if applicable). Figure 7-3. Add Invoice Window PROPRIETARY INFORMATION OF VTLS INC. Virtua ILS – Integrated Library System 148 Acquisitions (v. 43.1) 2. 3. 4. 5. 6. 7. 8. Insert invoice line items as needed. Edit line item account information. Add header and line fees. Post header and line discounts. Post header and line taxes (if appropriate). Choose a “When Saving…” option. Click the Add button. In the following sections, we describe in more detail the different aspects of adding an invoice. 7.3.1 Changing the Currency Type The Currency Type field in the header of the Add Invoice window displays the home currency by default, but if you want, you can choose another currency for the invoice. Invoice prices, fees, and taxes are displayed using the invoice currency. If you edit the Currency Type field, all prices, fees, and taxes will be converted to the new currency values. Caution: We recommend that you change the currency type at the invoice level only ONE time. If you change it once and then need to change it again, we recommend that you first cancel out of the invoice, bring it back up, and then change the currency type. Otherwise, you risk a loss of accuracy in the original value due to rounding. 7.3.2 Inserting Invoice Line Items If you are creating an invoice manually (i.e., Virtua has not already inserted the invoice line items for you as part of an integrated workflow), you will need to add purchase order line items to the invoice. To insert invoice line items, 1. On the Add Invoice window, click the Insert button under the list box. The Add Invoice Line Items window appears (Figure 7-4). Virtua ILS – Integrated Library System PROPRIETARY INFORMATION OF VTLS INC. Acquisitions (v. 43.1) 149 Figure 7-4. Add Invoice Line Items Window The Add Invoice Line Items window lets you bring in a purchase order or specific purchase order line items and edit their data for the invoice. 2. In the Order Number field, type the purchase order number. Note: • The purchase order must be associated with the same vendor as on the invoice. If it is not, the system returns an error, in which case you can enter a new purchase order number or close the Add Invoice Line Items window and enter a new vendor on the invoice. • Depending on the setting of the Invoice Line Item Display parameter, the window will display either 1) ALL the line items from the purchase order that have a status of Valid for Payment or Partially Valid for Payment and that have NOT yet been fully invoiced or 2) only RECEIVED purchase order line items. 3. In the Line Number field, type a line number if you want to display a specific purchase order line item only. 4. Click the Request button. The appropriate purchase order line items appear in the display box (Figure 7-5). The first line item in the list box is selected for you, and all information for that PROPRIETARY INFORMATION OF VTLS INC. Virtua ILS – Integrated Library System 150 Acquisitions (v. 43.1) line item is displayed on the right side of the window in the Selected Line Item Info section. Figure 7-5. Add Invoice Line Items Window 5. Select the line item for which you want to edit invoice information. Note: If the list of line items is long, you may want to use the Search ISBN/ISSN feature to find the desired item. The Search ISBN/ISSN button is enabled only if there are line items in the display box. To search by ISBN/ISSN, click the button, type the control number, and let the software find and highlight the line item for you. 6. In the Selected Line Item Invoice Info section, edit the Invoice Unit Price field as needed. Note: • The PO line unit price is stated in the currency of the PO line currency. The Invoice Unit Price field displays the same PO line unit price but in the currency of the invoice. • The edited invoice unit price might be significantly higher than the price on the purchase order. The software can notify you if the price is too high to be acceptable. Here’s how: Via the Invoice Price Variance Threshold parameter in the Virtua Profiler, your library can set a threshold percentage, which Virtua ILS – Integrated Library System PROPRIETARY INFORMATION OF VTLS INC. Acquisitions (v. 43.1) 151 represents the disparity between the invoice unit price and the price of the line item on the purchase order. When the percentage is exceeded, your library can determine if the software will notify you on-screen. Via the same parameter, your library can also decide to allow you to override the notification or not. For details, see the Virtua Profiler/Acquisitions Parameters User’s Guide. 7. Edit the Invoice Quantity field and Receive Quantity field as needed. Note: If no quantity has been received within Virtua Acquisitions, you can put 0 in the Receive Quantity field. 8. Edit the Invoice Status field as needed. Note: Your library has defined the invoice statuses for your library in the Invoice Statuses parameter in the Virtua Profiler. Your library has also defined the invoice status that appears by default on the Add Invoice Line Items window. 9. Select or de-select the Include Line Item on Invoice check box and/or the Include All Lines on Invoice check box, depending on whether you want only the selected line item or ALL the line items from the purchase order to appear on the invoice. Note: The selection of these check boxes determines whether the software displays YES or NO next to each line item in the display box on the window. 10. Select the next line item and repeat steps 3-7 for as many line items as needed. 11. After adding all the invoice line items, click OK. The Add Invoice window becomes active (Figure 7-6), displaying the line items you selected and edited for addition to the invoice. The Invoice Total appears in the header as a read-only field. PROPRIETARY INFORMATION OF VTLS INC. Virtua ILS – Integrated Library System 152 Acquisitions (v. 43.1) Figure 7-6. Add Invoice Window with Inserted Line Items At this point, you can… • Insert additional line items that are on a different purchase order but associated with the same vendor. Note: There is no limit to the number of different purchase orders that can be linked to any one invoice, but all the purchase orders must be in the same currency. -OR• Add item-level or invoice-level fees, discounts, and taxes. In addition, you can modify account information at the line-item level. We discuss each of these aspects in the following sections. Virtua ILS – Integrated Library System PROPRIETARY INFORMATION OF VTLS INC. Acquisitions (v. 43.1) 153 7.3.3 Working with Miscellaneous Fees 7.3.3.1 About Miscellaneous Fees Miscellaneous fees such as shipping and handling, special delivery, and photocopying are associated with invoices. If your library does not need to track taxes separately, you can also consider taxes as miscellaneous fees. To keep track of these fees, your library can define fee codes in two Acquisitions parameters in the Virtua Profiler: Invoice Header Fee Types parameter and Invoice Line-item Fee Types parameter. The information that is required in the Virtua Profiler consists of the… • Name of the fee (or tax). -AND• In the case of header-level fees, account number from which the money will be expended. When you attach an invoice to a purchase order, you can add fees and apply them at two different levels of an invoice: • Header level. • Line-item level. The system assesses fees after it applies discounts to the invoice and calculates taxes. 7.3.3.2 Adding Invoice Header Fees Fees that you add at the header level apply to ALL purchase order line items on the invoice. Your library can define any number of header fee types in the Invoice Header Fee Types parameter in the Virtua Profiler. These fee types appear in the pull-down list box in the Invoice Fee Modification dialog box (Figure 7-8). A given header fee can be associated with a specific account in the Virtua Profiler. Note: Once an account is associated with a header fee, you will not be able to add child accounts to it or delete it. • If the type of header fee you choose is associated with an account, the system charges the fee to that account. PROPRIETARY INFORMATION OF VTLS INC. Virtua ILS – Integrated Library System 154 Acquisitions (v. 43.1) • • If the type of header fee you choose is NOT associated with an account, the system distributes the fee proportionally among the line items based on the total price of each line item. If the type of header fee you choose is NOT associated with an account AND if the price of each line item is distributed between more than one account, the system distributes the header fee proportionally among all the line items and equally between the accounts of any one line item. To add an invoice header fee, 1. On the Add Invoice window, click the Invoice Fees button. The Invoice Fees dialog box (Figure 7-7) appears. Figure 7-7. Invoice Fees Dialog Box 2. Click the Insert button. The Invoice Fee Modification dialog box (Figure 7-8) appears. Figure 7-8 Invoice Fee Modification Dialog Box Virtua ILS – Integrated Library System PROPRIETARY INFORMATION OF VTLS INC. Acquisitions (v. 43.1) 155 3. Type the amount of the fee. 4. Accept the default Invoice Fee Type, or choose another from the pull-down list box. 5. Accept the default SAP code to apply to the fee, or choose another from the pulldown list box. Note: The Fee SAP field is displayed only if the Use SAP flag is enabled in the Virtua Profiler. 6. Click the Post button or press Enter. The Invoice Fees dialog box reappears (Figure 7-9), displaying the posted fee type, amount, and associated SAP code. Figure 7-9. Invoice Fees Dialog Box 7. Continue inserting invoice fees as required. -ORUse the Edit and Delete buttons to modify any posted fees. 8. Click the Save button or press Enter. The Add Invoice window becomes active (Figure 7-10), displaying the Invoice Fee Total in the header. The software automatically adjusts the Invoice Total accordingly. PROPRIETARY INFORMATION OF VTLS INC. Virtua ILS – Integrated Library System 156 Acquisitions (v. 43.1) Figure 7-10. Add Invoice Window - Invoice Fees Displayed 7.3.3.3 Adding Invoice Line-item Fees Line-item fees are added directly to the cost of the line item and are charged against the account associated with the line item. If more than one account is associated with a line item, the software will distribute the fees equally among the accounts. When line items do not exist on the invoice, the Line Fees button is grayed out, or disabled. Your library can define any number of line-item fee types in the Invoice Line-item Fee Types parameter in the Virtua Profiler. These fee types appear in the pull-down list box in the Line Fee Modification dialog box (Figure 7-12). To add a line-item fee on the Invoice window, 1. On the Add Invoice window, highlight the desired line item. 2. Click the Line Fees button. The Line Fees dialog box (Figure 7-11) appears. Virtua ILS – Integrated Library System PROPRIETARY INFORMATION OF VTLS INC. Acquisitions (v. 43.1) 157 Figure 7-11. Line Fees Dialog Box 3. Click the Insert button. The Line Fee Modification dialog box (Figure 7-12) appears. Figure 7-12 Line Fee Modification Dialog Box 4. Type the amount of the fee. 5. Accept the default Line Fee Type, or choose another from the pull-down list box. 6. Accept the default SAP code to apply to the fee, or choose another from the pulldown list box. Note: The Fee SAP field is displayed only if the Use SAP flag is enabled in the Virtua Profiler. 7. Click the Post button or press Enter. PROPRIETARY INFORMATION OF VTLS INC. Virtua ILS – Integrated Library System 158 Acquisitions (v. 43.1) The Line Fees dialog box reappears (Figure 7-13), displaying the posted fee type, amount, and SAP. Figure 7-13. Line Fees Dialog Box 8. Continue inserting line-item fees as required. -ORUse the Edit and Delete buttons to modify any posted fees. 9. Click the Save button or press Enter. The Add Invoice window becomes active (Figure 7-14), displaying the posted Fee Total in the Invoice Order Line Information display box. The software adjusts the Invoice Total in the header accordingly. Virtua ILS – Integrated Library System PROPRIETARY INFORMATION OF VTLS INC. Acquisitions (v. 43.1) 159 Figure 7-14. Add Invoice Window - Line Fee Displayed 7.3.4 Working with Discounts You can apply discounts at two different levels of an invoice: header level and lineitem level. • The value of a discount applied to the invoice as a whole will appear in the Invoice Discount field in the header of the Add Invoice window. • The value of a discount applied to an invoice line item will appear in the Discount column in the Invoice Order Line Information display area. The software applies discounts before it calculates taxes and assesses fees for either the invoice as a whole or specified invoice line items. Header discounts are distributed proportionally among the line items and subtracted from the price that is encumbered for each line. Line-item discounts are figured into the price that is encumbered for that line. PROPRIETARY INFORMATION OF VTLS INC. Virtua ILS – Integrated Library System 160 Acquisitions (v. 43.1) 7.3.4.1 Applying an Invoice Header Discount To apply a discount to the whole invoice, 1. On the Add Invoice window, click the Invoice Discount button. The Invoice Discount dialog box appears (Figure 7-15). Figure 7-15. Invoice Discounts Dialog Box 2. Specify a discount percent by selecting the Discount Percent check box and typing a percentage in the text box. 3. Specify a discount amount by selecting the Discount Amount check box and typing an amount in the text box. Note: If you choose to set both a percent and an amount, the system will apply the discount percent first and then the discount amount. 4. Accept the default SAP code to apply to the discount, or choose another in the pull-down list box. Note: The Discount SAP field appears only when the Use SAP flag is enabled in the Virtua Profiler. 5. Click the Post button. The Add Invoice window becomes active, displaying the new Invoice Discount in the header. The software automatically adjusts the Invoice Total accordingly. Virtua ILS – Integrated Library System PROPRIETARY INFORMATION OF VTLS INC. Acquisitions (v. 43.1) 161 7.3.4.2 Applying an Invoice Line-item Discount To apply a discount to an invoice line item, 1. On the Add Invoice window, highlight the desired line item. 2. Click the Edit button. The Invoice Line Item window appears (Figure 7-16), displaying three sections of information about the line item (A fourth section, containing tax type and tax amount data, is also available if the Use Tax flag is enabled in the Virtua Profiler): • • • Line-item data Line-item discounts Account data. You can edit all the fields on the dialog box, but here we are concerned with lineitem discount information only. Figure 7-16.Invoice Line Item Window 3. In the Discount section, edit the Discount Percent field. PROPRIETARY INFORMATION OF VTLS INC. Virtua ILS – Integrated Library System 162 Acquisitions (v. 43.1) Note: The Discount Percent field reflects the vendor discount percent as set in the vendor record. If the vendor discount percent is other than 0, the Discount Percent check box will be selected and the percentage will appear in the text box. 4. If desired, select the Discount Amount check box and specify a discount amount. Note: If you choose to set both a discount percent and a discount amount, the system will apply the percent first and then the amount. 5. Accept the default SAP code to apply to the line discount, or choose another in the pull-down list box. Note: The Discount Line SAP field appears only when the Use SAP flag is enabled in the Virtua Profiler. 6. Click the Post button. The Add Invoice window becomes active, displaying the posted line discount in the Invoice Order Line Information display box. The software adjusts the Invoice Total in the header accordingly. 7.3.5 Working with Accounts at the Invoice Level Each invoice line item is associated with one or more fund accounts as assigned on the Order Line Item Editor window. You can modify this account information at the invoice stage. For any invoice line item, you can view and edit account information in the Accounts section on the Invoice Line item window (Figure 7-17). Note: Although you can assign more than one account to a line item at the purchase order level, you can assign only ONE account to the line item as the invoice level. This means that if you want to modify accounts where two accounts are associated with a line item, you will be able to add only one new account. Virtua ILS – Integrated Library System PROPRIETARY INFORMATION OF VTLS INC. Acquisitions (v. 43.1) 163 Figure 7-17. Invoice Line Item Window To edit the account information for the selected invoice line item, 1. Modify the Fiscal Year and New Account fields by choosing a new value in the pull-down list. 2. Select the Apply New Account check box. 3. Click the Post button. To reflect the new expenditure, the system unencumbers the old account(s) and encumbers the newly selected account for the invoice line item AND updates the account information for the purchase order line item. Note: If you change the account(s) of an invoice line item, the system will update encumbrances only for the order line item and invoice line item in question. The system will NOT automatically recalculate the encumbrances for any other invoices associated with the order line item. For this reason, we recommend that you change accounts at the invoice level only if the order line item will be appearing on only ONE invoice. PROPRIETARY INFORMATION OF VTLS INC. Virtua ILS – Integrated Library System 164 Acquisitions (v. 43.1) 7.3.6 Working with Taxes 7.3.6.1 About Invoice Taxes Different libraries have different ways of handling taxes on invoices: • • Some libraries want to consider taxes as types of fees and include them in the list of header fees or line-item fees, which a library defines in the Virtua Profiler. Some libraries want to keep track of taxes, such as a Value Added Tax (VAT), separately from fees and charge such taxes to a special account. For libraries that track taxes separately, Virtua offers a Taxes parameter in the Virtua Profiler, where a library can define different taxes, the default tax, the account to which a tax is charged, and the tax percent. The software will automatically calculate the tax on an invoice or invoice line item based on the percent specified in the parameter and will automatically charge the tax, whether it is applied to the invoice or an invoice line item, to the specified account. Note: Once a tax is associated with an account, you will not be able to add child accounts to it or delete it. To apply one or more taxes to an invoice or an invoice line item, the Use Taxes flag in the Taxes parameter must be enabled. Here are the rules on an invoice: • • • • If the type of tax you choose to apply is associated with an account, the system charges the tax to that account whether the tax is applied to the invoice or an invoice line item. If the type of header tax you choose to apply is NOT associated with an account, the system distributes the tax proportionally among the line items based on the total price of each line item. If the type of line-item tax you choose to apply is NOT associated with an account, the system charges the tax to the account of the line item itself. If the type of header tax you choose to apply is NOT associated with an account AND if the price of each line item is distributed between more than one account, the system distributes the header tax proportionally among all the line items and equally between the accounts of any one line item. All functions related to invoice or invoice line taxes take place on either the Invoice Taxes window or the Invoice Line Taxes window. • For invoice line items, the system calculates taxes after applying discounts but before assessing fees. Virtua ILS – Integrated Library System PROPRIETARY INFORMATION OF VTLS INC. Acquisitions (v. 43.1) 165 • For the invoice as a whole, the system calculates the tax based on the entire invoice, including any applied discounts or assessed fees. This means that if you do not want fees to be taxed, you should apply the invoice tax first and then assess the fees. 7.3.6.2 Applying Invoice Header Taxes To apply a header tax to an invoice, 1. Verify that the Use Taxes check box is selected in the Taxes parameter. 2. On the Add Invoice window (Figure 7-18), click the Invoice Taxes button. Figure 7-18. Add Invoice Window - Taxes Buttons The Invoice Taxes window appears (Figure 7-19). PROPRIETARY INFORMATION OF VTLS INC. Virtua ILS – Integrated Library System 166 Acquisitions (v. 43.1) Figure 7-19. Invoice Taxes Window 3. Select one or more taxes to apply to the invoice from the All Available Taxes list box. 4. Click the arrow button to move your selection(s) to the Selected Taxes list box. -ORClick the double arrow button to move ALL the available taxes to the Selected Taxes list box. 5. To select a SAP code to apply to this tax, click twice in the SAP column and select a code. Note: The SAP column appears only when the Use SAP flag is enabled in the Virtua Profiler. 6. Click the Apply button. The system automatically calculates the tax on the entire invoice, including any applied discounts and assessed fees. The Add Invoice window becomes active, displaying the amount of the tax in the Invoice Tax Total field in the header. The software adjusts the Invoice Total in the header accordingly. Virtua ILS – Integrated Library System PROPRIETARY INFORMATION OF VTLS INC. Acquisitions (v. 43.1) 167 7.3.6.3 Applying Invoice Line-item Taxes Line-item taxes are applied directly to the cost of a line item and are charged against the account associated with the tax. If no account is associated with the tax, line-item taxes are charged against the account associated with the line item. When line items do not exist on the invoice, the Line Taxes button is grayed out, or disabled. Your library can define any number of line-item tax types in the Taxes parameters in the Virtua Profiler. These tax types are available for selection in the Invoice Line Taxes window. To apply a tax to an invoice line-item, 1. On the Add Invoice window, highlight the line item to which you want to apply the tax. 2. Click the Line Taxes button. The Invoice Line Taxes window appears (Figure 7-20). Figure 7-20. Invoices Line Taxes Window 3. Select one or more taxes to be applied to the line item from the All Available Taxes list box. 4. Click the arrow button to move your selection(s) to the Selected Taxes list box. -OR- PROPRIETARY INFORMATION OF VTLS INC. Virtua ILS – Integrated Library System 168 Acquisitions (v. 43.1) Click the double arrow button to move ALL the available taxes to the Selected Taxes list box. 5. To select a SAP code to apply to this line tax, click twice in the SAP column and select a code. Note: The SAP column appears only when the Use SAP flag is enabled in the Virtua Profiler. 6. Click the Apply button. The software calculates the tax on the price listed for the line item, minus any discounts that have been applied. Any line fees assessed for the line item are not taxed. The Add Invoice window displays the amount of the line-item tax in the Invoice Order Line Information display box under the column Tax Total. The software adjusts the Invoice Total in the header accordingly. 7.3.6.4 Updating Invoice Taxes To update header taxes or line-item taxes on an invoice, 1. On the Update Invoice window, click the Invoice Taxes button (in the case of a header tax). -ORHighlight the line item (in the case of a line-item tax), and then click the Line Taxes button. The Invoice Taxes window or Invoice Line Taxes window, as appropriate, appears. 2. In the Selected Taxes list box, highlight any items you want to remove from the invoice or line. 3. Click the arrow to transfer the item(s) to the All Available Taxes list box. 4. In the All Available Taxes list box, select any items you want to add to the invoice or line. 5. Click the arrow to transfer the item(s) to the Selected Taxes list box. 6. Click the Apply button. Virtua ILS – Integrated Library System PROPRIETARY INFORMATION OF VTLS INC. Acquisitions (v. 43.1) 169 The Update Invoice window become active, displaying the updated header tax values in the Invoice Tax Total field and the updated line tax values in the Tax Total column for the selected line. 7.4 Updating an Invoice Once an invoice is created and saved in the system, you can update various aspects of the record, such as inserting new line items, up until the invoice is paid or partially paid. If you update a paid or partially paid invoice and then try to save it, the system displays a warning that payments already exist for this invoice and that only unpaid line items will be updated. Note: To update an invoice that has already been paid, you must use a credit memo. When you modify an invoice, the software locks the invoice record (and the associated purchase order) so that another user is blocked from modifying the record until you save it. Updating an invoice involves the same functions used to add an invoice. For a fuller explanation of each of the tasks below, see the section “Adding an Invoice” in this guide. To update an invoice, 1. On the Virtua menu bar, click Acquisitions, choose Invoices, and then choose Update. The Update Invoice Request dialog box appears (Figure 7-21). Figure 7-21. Update Invoice Request Dialog Box PROPRIETARY INFORMATION OF VTLS INC. Virtua ILS – Integrated Library System 170 Acquisitions (v. 43.1) 2. Type the number of the invoice that you want to update. 3. Accept the default vendor or choose a new one from the pull-down list box. 4. Click the Request button or press Enter. The Update Invoice window appears (Figure 7-22). Figure 7-22. Update Invoice Window 5. In the header, update any of the following elements as needed: Method of Payment, Invoice Date, Currency Type, and Invoice SAP (if applicable). Note: If you change the Currency Type, the system will automatically convert the invoice prices, fees, and taxes in the original currency to the new currency as long as that currency has been configured in the Virtua Profiler. 6. 7. 8. 9. Update invoice line items as needed. Update line item account information. Update header and line fees. Update header and line discounts. Virtua ILS – Integrated Library System PROPRIETARY INFORMATION OF VTLS INC. Acquisitions (v. 43.1) 171 10. Choose a “When Saving…” option. 11. Click the Save button. In the following sections, we describe in more detail the different aspects of updating an invoice. 7.4.1 Updating Invoice Line Items To update invoice line items, you can either insert new line items or edit existing ones. (For details abouting insert new line items, see the section “Inserting Invoice Line Items” in this guide.) To update existing invoice line items, 1. On the Update Invoice window, highlight the line item you want to update, and click the Edit button. (If the line item you want to update is the first item, no highlighting is necessary.) The Invoice Line Item window appears (Figure 7-23), displaying three sections of information about the line item (A fourth section, containing tax type and tax amount data, is also available if the Use Taxes flag is enabled in the Virtua Profiler): • • • Line-item data Line-item discounts Account data. PROPRIETARY INFORMATION OF VTLS INC. Virtua ILS – Integrated Library System 172 Acquisitions (v. 43.1) Figure 7-23. Invoice Line Item Window 2. Update any line item data element on the Invoice Line Item window. Note: If you must increase the invoice line item price, the software can notify you if the price is too high to be acceptable. Here’s how: Via the Invoice Price Variance Threshold parameter in the Virtua Profiler, your library can set a threshold percentage to represent the disparity between the invoice unit price and the price of the line item on the purchase order. When the percentage is exceeded, your library can determine if the software will notify you on-screen. Via the same parameter, your library can also determine if the software should allow you to override the notification. For details, see the Virtua Profiler/Acquisitions Parameters User’s Guide. 3. Update the information in the Discounts section as needed (for details see the section “Applying an Invoice Line-item Discount”). 4. Update account information as needed (for details see the section “Working with Accounts at the Invoice Level”). 5. Click the Post button. The Update Invoice window becomes active. Virtua ILS – Integrated Library System PROPRIETARY INFORMATION OF VTLS INC. Acquisitions (v. 43.1) 173 7.4.2 Deleting Invoice Line Items You can delete selected line items from the Update Invoice window. To delete an invoice line item, 1. On the Update Invoice window, highlight the line item that you want to delete. 2. Click the Delete button. The software displays a Warning and asks if you are sure you want to delete the line item. 3. Click OK. The line item is deleted from the Invoice Order Line Information display box. Note: If you delete a line item that is valid for or partially valid for payment, Virtua changes the status of the item from Invoiced back to its previous status. The system will also disencumber the invoice price, along with fees and taxes, and encumber the purchase order line price. 7.4.3 Updating Miscellaneous Fees 7.4.3.1 Updating Invoice Header Fees To update an invoice header fee, 1. On the Update Invoice window, click the Invoice Fees button on the bottom row of the window. The Invoice Fees dialog box (Figure 7-24) appears, displaying any fees already assigned. PROPRIETARY INFORMATION OF VTLS INC. Virtua ILS – Integrated Library System 174 Acquisitions (v. 43.1) Figure 7-24. Invoice Fees Dialog Box 2. Highlight the line you want to edit, and then click the Edit button. The Invoice Fee Modification dialog box appears. 3. Modify the value in the Amount field, and then click the Post button. 4. On the Invoice Fees dialog box, click the Save button. The Update Invoice window (Figure 7-25) becomes active, displaying an updated fee total in the Invoice Fee Total field in the header. The software automatically adjusts the Invoice Total accordingly. Virtua ILS – Integrated Library System PROPRIETARY INFORMATION OF VTLS INC. Acquisitions (v. 43.1) 175 Figure 7-25. Update Invoice Window - Invoice Fees Displayed 7.4.3.2 Updating Invoice Line-item Fees To update an invoice line-item fee, 1. On the Update Invoice window, highlight the line item associated with the fee you want to update. 2. Click the Line Fees button. The Line Fees dialog box appears (Figure 7-26). PROPRIETARY INFORMATION OF VTLS INC. Virtua ILS – Integrated Library System 176 Acquisitions (v. 43.1) Figure 7-26. Line Fees Dialog Box 3. Highlight the line you want to edit, and then click the Edit button. The Line Fee Modification dialog box appears. 4. Modify the value in the Amount field, and then click the Post button. 5. On the Line Fees dialog box, click the Save button. The Update Invoice window (Figure 7-27) becomes active, displaying an updated line fee in the Fee Total column for the selected line item. The software automatically adjusts the Invoice Total accordingly. Virtua ILS – Integrated Library System PROPRIETARY INFORMATION OF VTLS INC. Acquisitions (v. 43.1) 177 Figure 7-27. Update Invoice Window - Line Fee Displayed 7.4.4 Deleting Miscellaneous Fees To delete an invoice header or line-item fee, 1. On the Update Invoice window, click the Invoice Fees or Line Fees button, as appropriate. 2. On the Invoice Fees or Line Fees dialog box, highlight the fee you want to delete. 3. Click the Delete button. The software will ask you if you really want to delete the fee. 4. Click the Yes button, and then click the Save button. The fee is deleted. If the fee was a header fee, the Invoice Total on the Update Invoice window is recalculated to reflect the deletion. If the fee was a line fee, the value in the Fee Total column of that line is recalculated to reflect the deletion. PROPRIETARY INFORMATION OF VTLS INC. Virtua ILS – Integrated Library System 178 Acquisitions (v. 43.1) 7.4.5 Updating Discount Data To update the discount percent and/or amount applied to the header, 1. On the Update Invoice window (Figure 7-27), click the Invoice Discount button. 2. On the Invoice Discounts dialog box, adjust the discount percent and/or amount as needed. 3. Click the Post button. The Update Invoice window becomes active, displaying an updated discount total in the Invoice Discount field in the header. The software automatically adjusts the Invoice Total accordingly. To update the discount percent and/or amount applied to a line item, 1. On the Update Invoice window, highlight the line you want to edit. 2. Click the Edit button. 3. On the Invoice Line Item window, adjust the discount percent and/or amount as needed. 4. Click the Post button. The Update Invoice window becomes active, displaying an updated amount in the Discount column for the selected line item. The software automatically adjusts the Invoice Total accordingly. 7.4.6 Deleting Discount Data To delete a discount percent and/or amount on either the Invoice Discounts dialog box or Invoice Line Item window, de-select the Discount Percent and/or Discount Amount check box. This will automatically reset the percent and/or amount to 0. Virtua ILS – Integrated Library System PROPRIETARY INFORMATION OF VTLS INC. Acquisitions (v. 43.1) 179 7.5 Viewing an Invoice Once an invoice is created and saved in the system, you can view information on the invoice at any time. An invoice in View mode is not locked, which means that another user can view or update the invoice simultaneously. To view an invoice, 1. On the Virtua menu bar, click Acquisitions, choose Invoices, and then choose View. The View Invoice Request dialog box appears (Figure 7-28). Figure 7-28. View Invoice Request Dialog Box 2. Type the number of the invoice that you want to view. 3. Accept the default vendor or choose a new one from the pull-down list box. 4. Click the Request button or press Enter. The View Invoice window appears (Figure 7-29). PROPRIETARY INFORMATION OF VTLS INC. Virtua ILS – Integrated Library System 180 Acquisitions (v. 43.1) Figure 7-29. View Invoice Window Note that on the View Invoice window you CANNOT edit any information. If notes or fees exist, you can click the appropriate button to view the information, but you cannot edit it. 5. When you are finished viewing the window, click OK. Virtua ILS – Integrated Library System PROPRIETARY INFORMATION OF VTLS INC. Acquisitions (v. 43.1) 181 7.6 Deleting an Invoice You can delete an invoice any time up until the invoice is paid, either fully or partially. After payment, you can only adjust accounts by applying a credit memo. When you access the Delete function, the software locks the invoice and the associated purchase order. To delete an invoice, 1. On the Virtua menu bar, click Acquisitions, choose Invoices, and then choose Delete. The Delete Invoice Request dialog box appears (Figure 7-30). Figure 7-30. Delete Invoice Request Dialog Box 2. Type the number of the invoice that you want to delete. 3. Accept the default vendor or choose a new one from the pull-down list box. 4. Click the Request button or press Enter. The Delete Invoice window appears (Figure 7-31). PROPRIETARY INFORMATION OF VTLS INC. Virtua ILS – Integrated Library System 182 Acquisitions (v. 43.1) Figure 7-31 Delete Invoice Window 5. Click the Delete button in the bottom row of command buttons. The system displays a Warning stating that the invoice cannot be recovered once deleted and asking you to confirm the deletion. 6. Click the Yes button. If the software finds no payments attached to the invoice, the invoice is deleted. 7.7 Saving an Invoice After adding and editing all invoice line items, fees, discounts, and taxes for the invoice, you are ready to save the invoice to the database and, depending on the “When Saving…” option you select, create a payment voucher at the same time. The Invoice window offers several options, each representing a different workflow, for saving the invoice. The selection of an option is persistent. Virtua ILS – Integrated Library System PROPRIETARY INFORMATION OF VTLS INC. Acquisitions (v. 43.1) 183 7.7.1 “When Saving…” Options The bottom of the Add Invoice window (Figure 7-32) offers three “When Saving…” options: Exit This Window, Repeat This Function, and Immediately Proceed to Payments. Figure 7-32. Add Invoice Window - "When Saving..." Options We describe each option below. • Exit This Window (default) – The system saves the current invoice and closes the Invoice window. • Repeat This Function – The system saves the current invoice and opens a request dialog box so that you can request a new invoice. If an error occurs when saving the current invoice, the system will handle the error and not display the dialog box. • Immediately Proceed to Payments – The system saves the current invoice and automatically opens the Payment window with data fields already populated with the appropriate information. 7.7.2 System Checks Upon Saving When you save an invoice containing received items, Virtua takes the following actions: • • • If appropriate, confirms that the invoice was saved successfully. Determines that the invoice line items are valid or partially valid for payment. Updates encumbrances to include any differences in the line prices from those on the purchase order and to include any fees, discounts, or taxes. PROPRIETARY INFORMATION OF VTLS INC. Virtua ILS – Integrated Library System 184 Acquisitions (v. 43.1) 7.7.3 Paying When Saving… When saving the invoice, if you select the Immediately Proceed to Payments radio button, the Select Invoices for Payment window automatically appears, displaying all the invoices for the associated vendor (Figure 7-33). Figure 7-33. Select Invoices for Payment Window The software has automatically created the payment voucher and paid the invoice total (notice the value of $490.00 in the Payment field). To finish creating the payment voucher for this invoice, you can either… • • Add an ID in the Voucher ID field, and then click the Save button. -ORSelect any other invoices to be included on the payment voucher (see the section “Selecting Invoices for Payment” in this guide). Virtua ILS – Integrated Library System PROPRIETARY INFORMATION OF VTLS INC. Acquisitions (v. 43.1) 185 8. Working with Payment Vouchers This chapter covers the following topics: ⇒ ⇒ ⇒ ⇒ ⇒ ⇒ ⇒ ⇒ ⇒ Introduction Displaying the Payment Window Editing Payment Header Elements Selecting Invoices for Payment Working with Selected, Expanded Invoices Creating a Payment Voucher without Invoices Saving a Payment Voucher Viewing a Payment Voucher Customizing Printed Payment Vouchers 8.1 Introduction T he Virtua Acquisitions payment function lets you create a new payment voucher or view an existing one that contains a list of invoices eligible for payment and belonging to a specified vendor. After viewing the invoices, you can select one or more invoices that have the same currency, pay them, and save the payment under a specified voucher ID. Once saved, payment vouchers can be viewed but not modified or deleted. Currently, when you save a print voucher, Virtua automatically displays a Print Voucher dialog box so you can print the voucher. You can remain on the Payment window adding payments or viewing vouchers until you choose to exit the payment function. To do payment transactions, you must have the proper permissions as defined in the Virtua Profiler. Note: Currently, the payment function does not let you distinguish between different types of purchase orders placed with a vendor. Neither does it let you track statistical information for ONE library only in an environment where multiple libraries share vendor records. PROPRIETARY INFORMATION OF VTLS INC. Virtua ILS – Integrated Library System 186 Acquisitions (v. 43.1) 8.1.1 Support for Repetitive and Integrated Workflows Virtua supports repetitive and integrated workflows. If your library assigns a staff member to perform only one step repeatedly in the payment process, Virtua can accommodate your setup. Virtua supports workflows that expedite the acquisitions process by eliminating the need to rekey data and by skipping the receipt stage altogether. When you save a payment voucher, you have the choice of… • Exiting the window (Exit This Window) - The system saves the payment voucher and closes the window. • Repeating the same function (Repeat This Function) - The system saves the payment voucher and displays the Voucher Request dialog box in the same mode as the current voucher. That is, if the current voucher is in Create mode, the new voucher will also be in Create mode. 8.2 Displaying the Payment Window If you click Save on the Add (or Update) Invoice window, having first selected the Immediately Proceed to Payments radio button, the Select Invoices for Payment window will display automatically Other wise, you can access the payment window for a specific vendor from the Virtua menu bar or from the Acquisitions toolbar. To display the window from which to pay invoices, . 1. On the Acquisitions toolbar, click New Voucher -OROn the Virtua menu bar, click Acquisitions, choose Vouchers, and then choose New. The Create Voucher Request dialog box appears (Figure 8-1). Virtua ILS – Integrated Library System PROPRIETARY INFORMATION OF VTLS INC. Acquisitions (v. 43.1) 187 Figure 8-1. Create Voucher Request Dialog Box 2. Type the name of a vendor, or choose one from the pull-down list box. Note: When you begin typing a name, Virtua automatically completes your string with the closest match it finds in the vendor index. 3. To create the new voucher using available invoices for the specific vendor, select the check box Create From Available Invoices. For a discussion of what occurs when you do NOT select the check box, see the section “Creating a Payment Voucher without Invoices.” 4. Click the Request button. The Select Invoices for Payment window appears (Figure 8-2), displaying ALL invoices eligible for payment for the selected vendor. If no invoices are eligible for payment, the software informs you that there are no invoices to pay. PROPRIETARY INFORMATION OF VTLS INC. Virtua ILS – Integrated Library System 188 Acquisitions (v. 43.1) Figure 8-2. Select Invoices for Payment Window The text cursor appears by default in the Voucher ID field at the top of the window. 8.2.1 Aspects of the Select Invoices for Payment Window You can resize the Select Invoices for Payment window to suit your needs. Just place your mouse cursor at the boundary of the window. When the cursor changes to a horizontal or vertical arrow, hold down the left mouse button and drag the edge of the window. 8.2.1.1 Header Elements The elements on the left side of the header on the Select Invoices for Payment window are as follows. Each element has its own specifications, which we describe below. Virtua ILS – Integrated Library System PROPRIETARY INFORMATION OF VTLS INC. Acquisitions (v. 43.1) 189 • • Voucher ID - A unique, alphanumeric string up to 30 characters long that you are required to assign to the payment to save it and identify it for future reference. Note that Voucher IDs are case sensitive. Vendor - The name of the vendor you specified on the Voucher Request. You cannot edit this field. If the vendor name is truncated on the window, you can see the full name by passing your mouse cursor over the text and viewing a tooltip. • Payment Date - The date the payment is made. By default, it is the current date, but you can edit it. • Print File Prefix - The name of the file that the software will use to print the payment voucher. The default file is printvoucher.utf, but translated versions of the file may be available in the pull-down list box. • Accession Number - An optional field that can display a number. Your library can use this number for any purpose. Virtua does not use it, but the system does save it. • Currency - In order to pay eligible invoices, all the invoices must reflect the same currency value. ♦ If all the eligible invoices share the same currency, this field will display the currency type in a non-editable format as shown in Figure 10-2, where USD is the currency. ♦ If all the invoices do NOT share the same currency, the field displays the word All in a pull-down list box (Figure 8-3). This means that all invoices, regardless of the currency associated with their orders, appear in the display box. When this occurs, all the command buttons on the window are disabled except for Expand Credits, Notes, and Cancel. ♦ If you select a specific currency, all the invoices that use the currency appear in the display box and only credits that use this currency can be applied. If no credits qualify, the Apply Credits button is disabled. ♦ If you pay some invoices using one currency and then select a new currency, the software will warn you that the previous payments/credits will be canceled and will ask you if you want to continue with the change of currency. • Payment SAP - This field is displayed only when the Use SAP setting is enabled in the Virtua Profiler. The field offers a pull-down list of the SAP codes designated for payments that your library has configured in the Virtua Profiler. PROPRIETARY INFORMATION OF VTLS INC. Virtua ILS – Integrated Library System 190 Acquisitions (v. 43.1) Figure 8-3. Select Invoices for Payment Window - More Than One Currency 8.2.1.2 Balance Information The Balance Information is at the top right of the window. The software calculates the balances for you. You cannot edit this information. • If all the invoices share the same currency, the balance fields will display current values when you display the window. • If all the invoices do NOT share the same currency, all the balance fields will be 0. Total - The total amount, including line and invoice fees and taxes, of all the invoices sharing the selected currency. Previous Paid - The total amount previously paid for all the invoices sharing the selected currency. This includes the amount previously paid on the invoice line items, line fees, invoice fees, line taxes, and invoice taxes. Balance - The amount due calculated by subtracting the Previous Paid amount from the Total. Virtua ILS – Integrated Library System PROPRIETARY INFORMATION OF VTLS INC. Acquisitions (v. 43.1) 191 Applied Credits - The total amount of all the credits applied to the invoices sharing the selected currency. The value initially stands at 0 and changes as credits are applied. Payment - The total amount paid on this new voucher. It is calculated by subtracting the Balance from the Total. The value initially stands at 0 and changes as invoices are paid. New Balance - The Total amount minus the Payment amount. The initial balance changes as invoices are paid. 8.2.1.3 Invoices Display Box The list box on the Select Invoices for Payment window displays eight labeled columns described below. Invoice - The invoice number. Date - The date the invoice was created. Invoice Total - The total amount of the invoice. Invoice Fees - The total amount of the invoice fees associated with the invoice. Invoice Taxes - The total amount of the invoice taxes associated with the invoice. Credits - The total amount of credits applied to the invoice. Previous Paid - The total amount previously paid on this invoice. Payment - The total payment on the invoice for the current voucher. Balance - The Amount minus Payment. 8.2.1.4 Command Buttons Fourteen command buttons appear below the invoices list box. • The functions of the six buttons in the first row apply to selected invoices only: • The functions of the eight buttons in the second and third rows apply to ALL the invoices displayed. 8.2.1.4.1 Buttons that Apply to Selected Invoices Pay Balance - Pays the selected invoice in full, including the invoice fees and line fees. The button is enabled only if the selected invoice has a balance greater than 0. Pay Cancel - Cancels the payment of the selected invoice and undoes any credits applied. The button is enabled only if the selected invoice has a payment greater than 0. PROPRIETARY INFORMATION OF VTLS INC. Virtua ILS – Integrated Library System 192 Acquisitions (v. 43.1) Expand Invoice - Displays the Invoice (payment) window so you can specialize the payment for the selected invoice. Expand Credits - For a selected invoice, displays the Apply Credits to Invoice window. Apply Credits - Applies available credits to the selected invoice. The button is enabled only if a) credits with the specified currency exist in the potential payment record and b) the selected invoice has already been paid. Credits closest to expiring are applied first. Unapply Credits - Undoes any credits that have been applied to a selected invoice. 8.2.1.4.2 Buttons that Apply to the Payment Window Pay All - Pays all the invoices in the display box. Pay Cancel - Cancels the payment of all the invoices and undoes any credits applied. The button is enabled only if the invoices have a collective balance greater than 0. Expand Credits - For all the invoices, displays the Apply Credits to Invoices window. Apply Credits - The button is enabled only if a) credits with the specified currency exist in the potential payment record and b) some of the invoices have already been paid. The button applies eligible credits as follows: • Credits closest to expiring are applied first. • Credits are applied to each paid invoice record in turn until all the credits that can be applied have been applied or all the invoices have been paid. Unapply Credits - Undoes any credits that have been applied. Notes - Lets you view and add notes that will be attached to this payment voucher as well as view and add priority notes that will be attached to records directly associated with this payment voucher. For details about Acquisitions notes, see the Getting Started with Virtua Acquisitions Guide. Save - Sends an Add Payment Request to the server. The software informs you of any errors or of the success of the payment and closes the window. Cancel - Closes the Select Invoices for Payment window. Virtua ILS – Integrated Library System PROPRIETARY INFORMATION OF VTLS INC. Acquisitions (v. 43.1) 193 8.2.1.5 When Saving… Options When you save the payment voucher, you can select one of two options for the next stop in your workflow: • Exit This Window • Repeat This Function 8.3 Editing Payment Header Elements Before you select the invoices for payment, make sure the header of the Select Invoices for Payment window contains all the values you want. You CANNOT edit the Vendor or Currency fields. To edit the payment header elements, 1. Type the unique, alphanumeric Voucher ID, which is required to save the payment record. 2. Accept the Payment Date or edit it. To do this, a) In the Payment Date field, click the down arrow to see a drop-down calendar (Figure 8-4). Figure 8-4. Calendar - Payment Date b) Configure the calendar: • To select a new month, click the left or right arrow at the top of the calendar. • To select a new date, click a date on the calendar • To remove the calendar, click anywhere outside it. 3. Accept the default print file, or choose another from the list box. PROPRIETARY INFORMATION OF VTLS INC. Virtua ILS – Integrated Library System 194 Acquisitions (v. 43.1) Note: Each file in the list box contains a translated version of the default file printvoucher.utf, which is in English. The filename for a voucher in French would be freprintvoucher.utf; similarly, the filename for the voucher in German would be gerprintvoucher.utf. 4. Type an Accession Number, if your library has defined one for reporting purposes. 8.4 Selecting Invoices for Payment After you complete or edit the header elements on the Select Invoices for Payment window, you can pay ALL the invoices in the window or select the invoices you want to pay. 8.4.1 Paying All the Invoices To pay all the invoices in full, 1. Make sure the Currency field in the header displays the currency shared by all the invoices displayed. 2. Click the Pay All button (Figure 8-2). The Payment and Balance columns in the display box and the Balance Information at the top of the window reflect the payment of all the invoices (Figure 8-5). Virtua ILS – Integrated Library System PROPRIETARY INFORMATION OF VTLS INC. Acquisitions (v. 43.1) 195 Figure 8-5. Select Invoices for Payment Window To undo, or cancel, the payment function, • Click the Pay Cancel button. 8.4.2 Applying Credits to All Paid Invoices You can expand credit information to view available credits or apply credits to all paid invoices under the following conditions: • There are credits attached to the potential payment record, • The credits use the specified currency, and • The credits are not restricted so they can be applied to any of the invoices that have been paid. If the above conditions are not met, the Expand Credits button for the invoice will not be enabled. PROPRIETARY INFORMATION OF VTLS INC. Virtua ILS – Integrated Library System 196 Acquisitions (v. 43.1) 8.4.2.1 Expand Credits Function To view the credits that are available for this payment voucher, 1. Click the Expand Credits button at the bottom of the window. The Apply Credits to Invoices window appears (Figure 8-6), displaying the list of credits that are available to apply to the invoices once they are paid. The top of the window displays Balance Information. You can resize this window to suit your needs. Figure 8-6. Apply Credits to Invoices Window 2. Review the Balance Information: • Payment - Amount paid on this voucher. • Payment Balance - Total Applied Credits subtracted from the Payment amount. • Total Credit Amount - Amount of credits available for use. Virtua ILS – Integrated Library System PROPRIETARY INFORMATION OF VTLS INC. Acquisitions (v. 43.1) 197 • • • Total Applied Here - Amount of credits applied to the selected invoice during this add voucher request. Total Applied - Amount of credits applied to all the invoices during this add voucher request. Credit Balance - Total Applied subtracted from Total Credit Amount. 3. Select the specific credit you want to apply and click the Apply Credit button. -ORTo apply all the available credits, click the Apply All button. 4. Click OK to copy the credits to the Select Invoices for Payment window. To undo, or cancel, any credits you applied, • Click the appropriate cancel button, either Apply Cancel for a specific credit or Cancel All for all the credits. 8.4.2.2 Apply Credits Function You can apply credits directly to all paid invoices without expanding the credits to see the Apply Credits window. To apply all available credits directly to the paid invoices, • Click the Apply Credits button. As many credits as possible are applied to the payment. Credit records with an expiration date closest to the current date are used first. The software adjusts the Balance Information on the Select Invoices for Payment window accordingly. 8.4.3 Paying Selected Invoices To pay selected invoices, 1. Make sure the Currency field in the header displays the currency shared by all the invoices displayed. 2. Highlight the invoice(s) you want to pay. To highlight more than one invoice, hold down the CTRL key and click each line item in turn. 3. Do ONE of the following: PROPRIETARY INFORMATION OF VTLS INC. Virtua ILS – Integrated Library System 198 Acquisitions (v. 43.1) a) Click the Pay Balance button, in which case the Payment and Balance columns in the display box and the Balance Information at the top of the window will reflect the payment of the selected invoices. -ORb) Click the Expand Invoice button (Figure 8-7). Figure 8-7. Select Invoices for Payment Window If you click the Expand Invoice button, the Invoice (payment) window appears (Figure 8-9). For a discussion of this window, go to the section “Working with Selected, Expanded Invoices.” To undo, or cancel, the payment function, • Click the Pay Cancel button. Virtua ILS – Integrated Library System PROPRIETARY INFORMATION OF VTLS INC. Acquisitions (v. 43.1) 199 8.4.4 Applying Credits to Selected Invoices You can expand credit information to view available credits or apply credits to a selected invoice under the following conditions: • • • There are credits attached to the potential payment record, The credits use the specified currency, and The credits are not restricted so they can be applied to the selected invoice that has been paid. 8.4.4.1 Expand Credits Function To view the credits that are available for the selected invoice, 1. Highlight the invoice. 2. Click the Expand Credits button directly under the display box. The Apply Credits to Invoice window appears (Figure 8-8), displaying the list of credits that are available to apply to the selected invoice once it is paid. The top of the window displays Balance Information. You can resize this window to suit your needs. PROPRIETARY INFORMATION OF VTLS INC. Virtua ILS – Integrated Library System 200 Acquisitions (v. 43.1) Figure 8-8. Apply Credits to Invoice Window 2. Review the Balance Information: • Payment - Amount paid on this voucher. • Payment Balance - Total Applied Credits subtracted from the Payment amount. • Total Credit Amount - Amount of credits available for use. • Total Applied Here - Amount of credits applied to the selected invoice during this add voucher request. • Total Applied - Amount of credits applied to all the invoices during this add voucher request. • Credit Balance - Total Applied subtracted from Total Credit Amount. 3. Select the specific credit(s) you want to apply and click the Apply Credit button. -ORTo apply ALL the available credits, click the Apply All button. 4. Click OK to copy the credits to the Select Invoices for Payment window. Virtua ILS – Integrated Library System PROPRIETARY INFORMATION OF VTLS INC. Acquisitions (v. 43.1) 201 To undo, or cancel, any credits you applied, • Click the appropriate cancel button, either Apply Cancel for a specific credit or Cancel All for all the credits. 8.4.4.2 Apply Credits Function You can apply credits directly to the selected paid invoice without expanding the credits to see the Apply Credits window. To apply all available credits directly to the selected paid invoice, 1. Highlight the paid invoice to which you want to apply credits. 2. Click the Apply Credits button directly under the display box. As many credits as possible are applied to the invoice. Credit records with an expiration date closest to the current date are used first. The software adjusts the Balance Information on the Select Invoices for Payment window accordingly. 8.5 Working with Selected, Expanded Invoices The Expand Invoice payment function gives you a way to specialize payment for a single invoice. Note: Currently, we recommend that you pay invoice header fees and taxes only when you are paying the whole invoice. If your invoice involves no header fees and taxes, feel free to pay invoice line items individually; however, here again, we recommend that you pay the whole invoice line rather than paying line fees and/or line taxes separately. 8.5.1 Viewing a Selected, Expanded Invoice To view an expanded invoice in order to specialize payment, 1. On the Select Invoices for Payment window (Figure 8-7), select the invoice you want to expand. 2. Click the Expand Invoice button. PROPRIETARY INFORMATION OF VTLS INC. Virtua ILS – Integrated Library System 202 Acquisitions (v. 43.1) The Invoice (payment) window appears (Figure 8-9), displaying balance information for the invoice, details of invoice and line fees, and details of each line item on the invoice. Figure 8-9. Invoice (Payment) Window When the Invoice (payment) window is visible, you CANNOT perform tasks on the Select Invoices for Payment window. 8.5.2 Aspects of the Invoice (Payment) Window The Invoice (payment) window displays expanded information about the line items on a single invoice. We outline the various elements of the window below. • The Balance Information area on the window mirrors the Balance Information on the Select Invoices for Payment window except that it applies to ONE invoice. The balance information is not editable. • The Invoice Fees tab and Line Fees tab let you see the details of the fees applied to the invoice and line items and let you apply specific credits once a payment is made. Virtua ILS – Integrated Library System PROPRIETARY INFORMATION OF VTLS INC. Acquisitions (v. 43.1) 203 • The Invoice Taxes tab and Line Taxes tab let you see the details of the taxes applied to the invoice or line items. • The button functions on the window mirror the button functions on the Select Invoices for Payment window except that they apply to ONE invoice or a specific line item on ONE invoice. • You can resize the window to suit your needs. Just place your mouse cursor at the boundary of the window. When the cursor changes to a horizontal arrow, hold down the left mouse button and drag the edge of the window. We discuss each of these elements in more detail below. 8.5.2.1 Balance Information The software calculates the balances for you. You CANNOT edit this information. Total - The total amount, including line and invoice fees and taxes, of all the line items on the invoice. Previous Paid - The total amount previously paid for all the line items, line fees and taxes, and invoice fees and taxes. Balance - Total minus the Previous Paid amount. Payment - The total amount paid (not taking into account applied credits) on this invoice for this voucher; i.e., the Total minus the Balance. The value initially stands at 0 and changes as fees and line items are paid. Applied Credits - The total amount of all the credits applied to the line items on this invoice. The value initially stands at 0 and changes as credits are applied. New Balance - The Total minus the Payment. The initial balance changes as fees and line items are paid. 8.5.2.2 Invoice/Line Fees and Invoice/Line Taxes Tabs The software calculates the fees and tax balances for you and displays them on the appropriate tab at the top right of the window. You cannot edit this information. The tabs display the following balance information: PROPRIETARY INFORMATION OF VTLS INC. Virtua ILS – Integrated Library System 204 Acquisitions (v. 43.1) Total - The total amount of fees or taxes. Previous Paid - The total amount of fees or taxes that was previously paid. Pay Amount - The total payment due for the fees or taxes, i.e., the Total minus the Balance. The value initially stands at 0 and changes as fees or taxes are paid. Applied Credits - The total amount of all the credits applied to the fees (not yet available for taxes). The value initially stands at 0 and changes as credits are applied. Balance -The Balance minus the Pay Amount. The initial value of the Balance, which represents the Total minus the Previous Paid amount, changes as fees or taxes are paid. 8.5.2.3 Buttons on the Invoice/Line Fees and Invoice/Line Taxes Tabs Expand Credits - Displays the Apply Credits to Invoice Fees (or Apply Credits to Line Item Fees, as appropriate) window with the list of credits that can be applied to the selected fees (not yet available for taxes). The button is enabled only if a) the selected fees exist, b) the fees have been paid during this add voucher request, and c) credits exist that can be applied towards the fees. Eligible credits either have no account limitations or use the same account and the same currency as the selected fees. The Payment Invoice window is disabled while the Payment Credits window is open. Apply Credits - Applies the available credits to the selected fees (not yet available for taxes). Credits with the expiration date closest to the current date are used first. The button is enabled only if a) the selected fees exist, b) the fees have been paid during this add voucher request, and c) credits exist that can be applied towards the fees. Eligible credits either have no account limitations or use the same account and the same currency as the selected fees. Unapply Credits - Undoes, or cancels, any applied credits for selected fees (not yet available for taxes). Pay Fee/Tax – Depending on whether the tab is specific to the invoice or a line, pays the invoice header/selected line fees or the invoice/selected line taxes in full. This button is enabled only if the fees or taxes exist and have not been paid. Note: Currently, we do not recommend that you pay invoice fees and taxes separately from paying the whole invoice. Likewise, we do not recommend that you pay invoice line fees and line taxes separately from paying the whole invoice line. Virtua ILS – Integrated Library System PROPRIETARY INFORMATION OF VTLS INC. Acquisitions (v. 43.1) 205 Pay Cancel - Cancels the payment of any selected fees for this add voucher request and cancels any credits applied. The button is enabled only if selected fees exist and have been paid or partially paid during this add voucher request. 8.5.2.4 Invoice Line Items Display Box The line items list box on the Invoice (payment) window displays eight labeled columns described below. Order - The purchase order ID and line number separated by a hyphen. Title - The title of the item ordered. Line Total - The total amount of the line item, including the line fees and taxes. Line Fees - The total amount of the line fees. Line Taxes - The total amount of the line taxes. Credits - The total amount of credits applied to the line item. This includes credits applied to the line fees. Payment - The amount to be paid on this add voucher request. Balance - The balance due for the line item; i.e., the Line Total minus the Pay Amount. 8.5.2.5 Command Buttons Twelve command buttons appear below the Invoice Line Items list box. • The functions of the five buttons in the first row apply to selected invoice line items only: • The functions of the seven buttons in the second and third rows apply to the invoice as a whole. 8.5.2.5.1 Buttons that Apply to Selected Line Items Pay Balance - Pays the selected line item. The button is enabled only if a line item is selected and has not already been paid in full. PROPRIETARY INFORMATION OF VTLS INC. Virtua ILS – Integrated Library System 206 Acquisitions (v. 43.1) Pay Cancel - Cancels the payment of the line item and undoes any credits applied. The button is enabled only if a selected line item has been paid or partially paid during this add voucher request. Expand Credits - Displays the Apply Credits to Invoice Line Item window with the list of credits that can be applied to the selected line item. The button is enabled only if a) a line item is selected, b) the selected line item has been partially paid on this add voucher request (payment of line fees constitutes a payment), and c) credits exist that can be applied towards the selected line item. Eligible credits either have no account limitations or use the same account and the same currency as the selected line item. The Payment Invoice window is disabled while the Payment Credits window is open. Apply Credits - Applies the available credits to the selected line item. Credits with the expiration date closest to the current date are used first. The button is enabled only if a) a line item is selected, b) the selected line item has been partially paid on this add voucher request (payment of line fees constitutes a payment), c) and credits exist that can be applied towards the selected line item. Eligible credits either have no account limitations or use the same account and the same currency as the selected fees. Unapply Credits - Undoes, or cancels, any applied credits for the selected line item. 8.5.2.5.2 Buttons that Apply to the Invoice as a Whole Pay Invoice - Pays in full all the invoice line items. The button is enabled only if all the line items have NOT been paid in full. Pay Cancel - Cancels the payment of the invoice line items and any fees and undoes any credits applied. This button is enabled only if the invoice has a payment greater than 0. Expand Credits - Displays the Apply Credits to Invoice window. Apply Credits - Applies available credits to the parts of the invoice that have been paid. Credits with the expiration date closest to the current date are used first. The button is enabled only if some aspect of the invoice—invoice fees, line fees, or line item balance—has been paid and credits exist that can be applied towards the invoice. Eligible credits either have no account limitations or use the same account and the same currency as the invoice. OK - Copies the changes entered for the invoice to the Select Invoices for Payment window. Closes the Invoice (payment) window and re-enables the Select Invoices for Payment window. Virtua ILS – Integrated Library System PROPRIETARY INFORMATION OF VTLS INC. Acquisitions (v. 43.1) 207 Cancel - Closes the Invoice (payment) window, cancels any changes made on the window, and re-enables the Select Invoices for Payment window. 8.5.3 Paying an Invoice Line Item You can pay an invoice line item from the Invoice (payment) window. To pay an invoice line item from the Invoice (payment) window, 1. In the display box (Figure 8-10), highlight the invoice line item(s) for which you want to pay the line balance. This will activate the Pay Balance button. 2. Click the Pay Balance button. Figure 8-10. Invoice (Payment) Window The software pays the selected line in full and adjusts all calculations accordingly. PROPRIETARY INFORMATION OF VTLS INC. Virtua ILS – Integrated Library System 208 Acquisitions (v. 43.1) To undo, or cancel, any payments you made, • Click the appropriate Pay Cancel button. ♦ To cancel line fees only, click the Pay Cancel button on the Line Fees tab. ♦ To cancel the line item payment AND line fees, click the Pay Cancel button directly under the display box. 8.5.4 Applying Credits to an Invoice Line Item You can expand credit information to view available credits or apply credits to a selected invoice line item under the following conditions: • There are credits attached to the potential payment record, • The credits use the specified currency, and • The credits are not restricted so they can be applied to the selected invoice line item that has been paid. 8.5.4.1 Expand Credits Function To view the credits that are available for the selected invoice line item, 1. Highlight the invoice line item. 2. Click the Expand Credits button directly under the display box. The Apply Credits to Invoice Line Item window appears (Figure 8-11), displaying the list of credits that are available to apply to the selected invoice line item once it is paid. The top of the window displays Balance Information. You can resize this window to suit your needs. Virtua ILS – Integrated Library System PROPRIETARY INFORMATION OF VTLS INC. Acquisitions (v. 43.1) 209 Figure 8-11. Apply Credits to Invoice Line Item Window 3. Review the Balance Information: • Payment - Amount paid on this voucher. • Payment Balance - Total Applied Credits subtracted from the Payment amount. • Total Credit Amount - Amount of credits available for use. • Total Applied Here - Amount of credits applied to the selected invoice line item during this add voucher request. • Total Applied - Amount of credits applied to the invoice during this add voucher request. • Credit Balance - Total Applied subtracted from Total Credit Amount. 4. Select the specific credit(s) you want to apply and click the Apply Credit button. -ORTo apply ALL the available credits, click the Apply All button. 5. Click OK to copy the credits to the Select Invoices for Payment Window. PROPRIETARY INFORMATION OF VTLS INC. Virtua ILS – Integrated Library System 210 Acquisitions (v. 43.1) To undo, or cancel, any credits you applied, • Click the appropriate cancel button, either Apply Cancel for a specific credit or Cancel All for all the credits. You can apply credits directly to the selected paid invoice line item without expanding the credits to see the Apply Credits window. 8.5.4.2 Apply Credits Function To apply all available credits directly to the selected paid invoice line item, 1. Highlight the paid invoice to which you want to apply credits. 2. Click the Apply Credits button directly under the display box. As many credits as possible are applied to the invoice line item. Credit records with an expiration date closest to the current date are used first. The software adjusts the Balance Information on the Invoice (payment) window accordingly. Virtua ILS – Integrated Library System PROPRIETARY INFORMATION OF VTLS INC. Acquisitions (v. 43.1) 211 8.5.5 Paying on the Whole Invoice The Invoice (payment) window not only lets you pay a selected invoice line item, but also the whole invoice. To pay the whole invoice, 1. Display the Invoice (payment) window (Figure 8-12). Figure 8-12. Invoice (Payment) Window 2. Click the Pay Invoice button. The software pays all line items in full and adjusts all calculation accordingly (Figure 8-13). PROPRIETARY INFORMATION OF VTLS INC. Virtua ILS – Integrated Library System 212 Acquisitions (v. 43.1) Figure 8-13. Invoice (Payment) Window To undo, or cancel, any payments you made, • Click the appropriate Pay Cancel button. ♦ To cancel invoice fees only, click the Pay Cancel button on the Invoice Fees tab. ♦ To cancel the invoice payment AND invoice fees, click the Pay Cancel button at the bottom of the window. 8.5.6 Applying Credits to the Whole Invoice You can expand credit information to view available credits or apply credits to the invoice as a whole under the following conditions: • There are credits attached to the potential payment record, • The credits use the specified currency, and • The credits are not restricted so they can be applied to the invoice that has been paid. Virtua ILS – Integrated Library System PROPRIETARY INFORMATION OF VTLS INC. Acquisitions (v. 43.1) 213 8.5.6.1 Expand Credits Function To view the credits that are available for the whole invoice, 1. Click the Expand Credits button at the bottom of the Invoice (payment) window. The Apply Credits to Invoice window appears (Figure 8-14), displaying the list of credits that are available to apply to the invoice once it is paid. The top of the window displays Balance Information. You can resize this window to suit your needs. Figure 8-14. Apply Credits to Invoice Window 2. Review the Balance Information: • Payment - Amount paid on this voucher. • Payment Balance - The Payment minus the Total Applied Credits. • Total Credit Amount - Amount of credits available for use. • Total Applied Here - Amount of credits applied to the selected invoice line item during this add voucher request. PROPRIETARY INFORMATION OF VTLS INC. Virtua ILS – Integrated Library System 214 Acquisitions (v. 43.1) • • Total Applied - Amount of credits applied to the whole invoice during this add voucher request. Credit Balance - The Total Credit Amount minus the Total Applied. 3. Select the specific credit(s) you want to apply and click the Apply Credit button. -ORTo apply ALL the available credits, click the Apply All button. 4. Click OK to copy the credits to the Select Invoices for Payment Window. To undo, or cancel, any credits you applied, • Click the appropriate cancel button, either Apply Cancel for a specific credit or Cancel All for all the credits. 8.5.6.2 Apply Credits Function You can apply credits directly to the whole paid invoice without expanding the credits to see the Apply Credits window. To apply all available credits directly to the whole paid invoice, • Click the Apply Credits button at the bottom of the Invoice (payment) window. As many credits as possible are applied to the invoice. Credit records with an expiration date closest to the current date are used first. The software adjusts the Balance Information on the Invoice Items for Payment window accordingly. 8.5.7 Exiting the Invoice (Payment) Window After you have completed tasks on the Invoice (payment) window, you will exit and return to the Select Invoices for Payment window where you can choose another invoice to expand or choose to save the payment. Virtua ILS – Integrated Library System PROPRIETARY INFORMATION OF VTLS INC. Acquisitions (v. 43.1) 215 To exit the Invoice (payment) window, • Click OK. The software does the following: • Copies the entries from the Invoice (payment) window to the Select Invoices for Payment window. • Closes the Invoice (payment) window. • Re-enables the Select Invoices for Payment window. 8.6 Creating a Payment Voucher without Invoices So far, our discussion has focused on creating a payment voucher with invoices. But Virtua also lets you create a payment voucher without invoices. To create a payment voucher without invoices, 1. On the Virtua menu bar, click Acquisitions, choose Vouchers, and then choose New. The Create Voucher Request dialog box appears (Figure 8-15). Figure 8-15. Create Voucher Request Dialog Box 2. De-select the radio button Create From Available Invoices. 3. Click the Request button. The Voucher Without Invoices window appears (Figure 8-16). PROPRIETARY INFORMATION OF VTLS INC. Virtua ILS – Integrated Library System 216 Acquisitions (v. 43.1) Figure 8-16. Voucher Without Invoices Window 4. Type the Voucher ID. 5. If the name in the read-only Vendor field is truncated, pass your mouse cursor over the field to see the full name in a tooltip. 6. Edit the Payment Date as needed. 7. Choose the file that you want to use to print the payment voucher (see “Editing Payment Header Elements”). 8. Complete the Accession Number field, if desired. 9. Edit the Currency field, which displays the base currency by default. 10. Choose a Payment SAP code from the pull-down list (available only if the Use SAP flag is enabled in the Virtua Profiler). Virtua ILS – Integrated Library System PROPRIETARY INFORMATION OF VTLS INC. Acquisitions (v. 43.1) 217 11. Type at least ONE set of entries for Account/Fiscal Year/Amount data. To do this, i. Complete each of the three fields Account, Fiscal Year, and Amount. ii. Click the Add Account button. The data appears in the Account Information table on the window. iii. Add as many more accounts as needed in the same way. 12. Click the Notes button to view any notes directly or indirectly attached to this payment voucher. -ORClick the Notes button to add, modify, or delete any notes that are directly attached to this payment voucher. 13. When you are ready to save, choose a “When Saving…” option. 14. Click the Save button. Your payment voucher is saved to the database. 8.7 Saving a Payment Voucher After completing your tasks on the Select Invoices for Payment window or the Voucher Without Invoices window, you must save the payment voucher to add it to the database. Currently, as soon as you save the payment voucher, the Print (Voucher) dialog box appears so that you can print the voucher. To save and print the payment voucher, 1. On the payment window, click the Save button. Via an information window (Figure 8-17), the system verifies that the voucher was added to the database. Figure 8-17 Information (Voucher Added) Window PROPRIETARY INFORMATION OF VTLS INC. Virtua ILS – Integrated Library System 218 Acquisitions (v. 43.1) 2. Click OK. The Print (Voucher) dialog box appears (Figure 8-18). Figure 8-18. Print (Voucher) Dialog Box 3. Select the number of copies you want and click OK. The payment voucher prints. If the payment you save and print is a partial payment only, the next time you issue a new voucher for this vendor, the line item for any previously paid invoice will NOT appear, and a new balance will appear on the payment window. 8.8 Viewing a Payment Voucher Virtua also lets you view payment vouchers and then print them. To view and pay an existing voucher, 1. On the Virtua menu bar, click Acquisitions, choose Vouchers, and then choose View. The View Voucher Request dialog box appears (Figure 8-19). Virtua ILS – Integrated Library System PROPRIETARY INFORMATION OF VTLS INC. Acquisitions (v. 43.1) 219 Figure 8-19. View Voucher Request Dialog Box 2. Type the Voucher ID. 3. Click the Request button. For a voucher with invoices, the Display Voucher window appears (Figure 8-20), displaying information about paid invoices. You can resize this window to suit your needs. Figure 8-20. Display Voucher Window For a voucher without invoices, the Voucher Without Invoices window appears (Figure 8-21), displaying the voucher total and account information specified when the voucher was created. You can resize this window to suit your needs. PROPRIETARY INFORMATION OF VTLS INC. Virtua ILS – Integrated Library System 220 Acquisitions (v. 43.1) Figure 8-21. Voucher Without Invoices Window 8.8.1 Viewing Invoice Details On the Display Voucher window (Figure 8-20) you can view voucher elements and information about paid or partially paid invoices. If the vendor name is truncated on the window, pass your mouse cursor over the text to see the full name in a tooltip. To see details about a selected invoice, • On the Display Voucher window, click the Expand Invoice button. An invoice detail window appears (Figure 8-22). Virtua ILS – Integrated Library System PROPRIETARY INFORMATION OF VTLS INC. Acquisitions (v. 43.1) 221 Figure 8-22. View from the Expand Invoice Button • • To view a list of credits applied to the voucher, click the Expand Credits button, which will be enabled only if credits have been applied. To view notes linked to the voucher, click the Notes button, which will be enabled and displayed with an asterisk (*) only if notes are available. To print the voucher you are viewing, 1. On the Virtua menu bar, click File. 2. Choose Print. The Print (Voucher) dialog box appears (Figure 8-18). The voucher that prints here will contain the same information as the voucher that prints after you save a payment voucher except that any credit information will be summarized rather than detailed. PROPRIETARY INFORMATION OF VTLS INC. Virtua ILS – Integrated Library System 222 Acquisitions (v. 43.1) 8.9 Customizing Printed Payment Vouchers Currently, Virtua automatically displays the Print (Voucher) dialog box after you click the Save button on the Select Invoices for Payment window or the Voucher Without Invoices window. By default, the Print function prints a payment voucher that looks like the following: ------------------------------------------------------------------------------------------------------John L. Espley Library Special Collections Christiansburg, VA 24073 Pay To: Academic Book Center 5600 N.E. Hassalo Street Portland, OR 97213 USA Voucher Number: 25 April 27, 2001 Voucher Currency: USD Invoices This Voucher: Invoice # 368 Invoice Date April 26, 2001 TOTALS Payment Due $231.00 $231.00 NET PAYMENT THIS VOUCHER: $231.00 Vendor Notes: --------------------------------------------------------------------------------------------------------As it does for orders, receipts, and claims, VTLS ships the Virtua software with a template (Figure 8-23) for printed payment vouchers. Your library can customize the voucher by editing the default file or translating it and saving each language version with an identifying prefix. You can edit the file to determine which data elements should print and in which language and format. The text of the printed payment voucher is in a file called printvoucher.utf, which resides in the VTLS\Virtua directory. Virtua ILS – Integrated Library System PROPRIETARY INFORMATION OF VTLS INC. Acquisitions (v. 43.1) 223 Note: By default, the file printvoucher.utf is Read Only when it is installed. Before you can edit it, you must change the permissions on the file via the Windows File\Properties function. Default Payment Voucher Template File Figure 8-23. Default Payment Voucher Template File – printvoucher.utf To edit the payment voucher template file, use a text editor such as Notepad, which supports Unicode. For details about editing .utf files, see the section “Working with the Printed Purchase Order Letter” in this guide. PROPRIETARY INFORMATION OF VTLS INC. Virtua ILS – Integrated Library System 224 Acquisitions (v. 43.1) 9. Working with Credits This chapter covers the following topics: ⇒ ⇒ ⇒ ⇒ ⇒ ⇒ ⇒ Introduction Displaying the Add Credit Window Adding a Specific Credit to the Database Adding an Internal Credit to the Database Updating a Credit Record Viewing a Credit Record Deleting a Credit Record 9.1 Introduction If you have the proper permissions as defined in the Virtua Profiler, you can perform credit transactions such as adding, updating, viewing, and deleting. Virtua Acquisitions supports two types of credits, Specific and Internal, which you can assign when you create a credit record. • Specific Credit – This credit is linked directly to a vendor and used against any future invoice presented for payment. • Internal Credit – This credit is created internally and used to adjust the expenditure for an account, for example, when an order for a partially paid item is canceled. When you add a credit and save it to the database, the software… • Stores a record that uniquely links the credit number to the vendor (specific credit only). • Validates the currency. • Logs the event in the Acquisitions transaction log. • Adjusts expenditures. • Makes the credit available the next time an invoice is presented for payment for that vendor (specific credit only). The software indicates that the credit is available by enabling the Apply Credits button on the Select Invoices for Payment window and/or the Select Invoice Items for Payment window when invoices are paid. You can apply the credit directly or save it to be applied against any future invoice. Virtua ILS – Integrated Library System PROPRIETARY INFORMATION OF VTLS INC. Acquisitions (v. 43.1) 225 9.1.1 About Viewing and Applying Credits You can view credits that are available for a selected vendor, a selected invoice, or a selected invoice line item (including line fees) by clicking the Expand Credits button on the Select Invoices for Payment window or the Invoice (payment) window, as appropriate. You can select all available credits or only certain credits to apply to the invoice or line item. If you apply a credit to a particular invoice or invoice line item, the credit amount decreases the payment total on the payment window. You are not required to link a credit directly to a line item on the original purchase order or to an account. We discuss the use of credits in detail in the chapter “Working with Payment Vouchers” in this guide. 9.1.2 About Record Locking Virtua locks the credit record when a credit is being updated or deleted. This means that if you try to access that same record during updating or deletion, you will be permitted only to view it, not edit it. 9.2 Displaying the Add Credit Window To display the Add Credit window, . 1. On the Acquisitions toolbar, click New Credit -OROn the Virtua menu bar, click Acquisitions, choose Credits, and then choose New. The Add Credit Request dialog box appears (Figure 9-1). PROPRIETARY INFORMATION OF VTLS INC. Virtua ILS – Integrated Library System 226 Acquisitions (v. 43.1) Figure 9-1. Add Credit Request Dialog Box 2. Choose the type of credit you want to add. 3. Type the desired credit number. Note: The credit number can be alphanumeric and up to 30 characters long. Credit numbers are case sensitive, which means that GG101 is not the same as Gg101. 4. Click the Request button or press Enter. • If you are adding an Internal Credit, the following Add Credit window appears (Figure 9-2), displaying the credit number you assigned and credit type you chose. Figure 9-2. Add Credit (Internal) Window Virtua ILS – Integrated Library System PROPRIETARY INFORMATION OF VTLS INC. Acquisitions (v. 43.1) 227 • If you are adding a Specific Credit, the following Add Credit window appears (Figure 9-3), displaying the credit number you assigned and credit type you chose. Figure 9-3. Add Credit (Specific) Window 9.3 Adding a Specific Credit To add a specific credit to the database, you must edit various fields on the Add Credit window (Figure 9-3). To add a specific credit to the database, 1. Type or choose the appropriate information for the following data fields. • Currency - The code of the base currency used for this credit. (Typing the first letter of the code in the Currency field will display the code that is the closest match.) • Amount - The amount of the credit in the base currency. PROPRIETARY INFORMATION OF VTLS INC. Virtua ILS – Integrated Library System 228 Acquisitions (v. 43.1) • • • • • • • • • • Fiscal Year - Only open fiscal years are available in the pull-down list box. A fiscal year cannot be closed if any outstanding orders, credits, or payments exist. Your library can set up fiscal years in the Acquisitions parameters in the Virtua Profiler. Account - (Optional for a Specific Credit). The account used to apply the credit at the time of payment. Note: If you choose a specific account, the credit will be available ONLY if all the line items on the payment voucher are being paid from that account. If you complete the optional fields Order Number and Order Line Number on this credit record, the accounts that appear in the Account pull-down list box will be only those associated with the original order. Credit Status - The status assigned to this credit. System-defined statuses are Incomplete, Disallowed, Hold Pending Investigation, Valid for Use, Fully Used, and Expired. Create Date - The default date for the credit is the current date, but you can type or choose another. Last Modified Date - The date the credit was last updated, which cannot be edited at this point. Expiration Date - (Optional) The date the credit will expire if not used. To edit this field, select the check box and then click the down arrow in the list box to see a calendar you can modify. Vendor -The vendor who received the original order, invoice, and payment. Order Number - (Optional) The purchase order number from which this credit originates, which may be useful for tracking accounts history. Order Line Number - (Optional) The line number of the purchase order from which this credit originates. Credit SAP - This field appears only when the Use SAP setting is enabled in the Virtua Profiler. 2. Add notes, if desired, by clicking the Notes button. When a note is added, the Notes button will display an asterisk (*). 3. After adding all credit data, click the Save button or press Enter. At this point,… • The system checks the credit record and confirms that a credit was added. If the system finds an error in the credit record such as a disabled account, it will display an Error message and keep the record open for you to make any changes. • The software logs the event in the transaction log and makes the credit available the next time an invoice is presented for payment for that vendor. Virtua ILS – Integrated Library System PROPRIETARY INFORMATION OF VTLS INC. Acquisitions (v. 43.1) 229 9.4 Adding an Internal Credit An internal credit allows you to make an internal adjustment to an account without modifying the account directly in the fund accounting module. Virtua records an internal credit in the audit trail where it then becomes available for reporting purposes. Internal credits are useful for providing a way to control and report on discretionary costs. The use of internal credits also provides flexibility when adjustments must be made based on different currencies. To add an internal credit to the database, you must edit various fields on the Add Credit window (Figure 9-2). To add an internal credit to the database, 1. Type or choose the appropriate information for the following data fields. • • • • • • • • Currency - The code of the base currency used for this credit. (Typing the first letter of the code in the Currency field will display the code that is the closest match.) Amount - The amount of the credit in the base currency. Fiscal Year - Only open fiscal years are available in the pull-down list box. A fiscal year cannot be closed if any outstanding orders, credits, or payments exist. Your library can set up fiscal years in the Acquisitions parameters in the Virtua Profiler. Account - The account that is to be adjusted by the credit. Credit Status - Choose a status from the pull-down list. System-defined statuses are Incomplete, Disallowed, Hold Pending Investigation, Valid for Use, Fully Used, and Expired. Create Date - The default date for the credit is the current date, but you can type or choose another. Last Modified Date - The date the credit was last updated, which cannot be edited at this point. Credit SAP - This field appears only when the Use SAP setting is enabled in the Virtua Profiler. 2. Add notes, if desired, by clicking the Notes button. When a note is added, the Notes button will display an asterisk (*). 3. After adding all credit data, click the Save button or press Enter. PROPRIETARY INFORMATION OF VTLS INC. Virtua ILS – Integrated Library System 230 Acquisitions (v. 43.1) The system checks the credit record and confirms that a credit was added. If the system finds an error in the credit record such as a disabled account, it will display an Error message and keep the record open for you to make any changes. 9.5 Updating a Credit Record When you choose the Update Credit function, the software locks the credit record so that it cannot be modified by other users. To update an Internal Credit, the credit record must be at a status other than Valid for Use. To update a credit record, 1. On the Virtua menu bar, click Acquisitions, choose Credits, and then choose Update. The Update Credit Request dialog box appears (Figure 9-4). Figure 9-4 Update Credit Request Dialog Box 2. Type the credit number of the desired record. Hint: The credit number is case sensitive. 3. Click the Request button or press Enter. The Update Credit window appears (Figure 9-5 and Figure 9-6). Virtua ILS – Integrated Library System PROPRIETARY INFORMATION OF VTLS INC. Acquisitions (v. 43.1) 231 Figure 9-5. Update Credit (Specific) Window Figure 9-6. Update Credit (Internal) Window 4. Modify any data fields (except the Last Modified Date) and add or edit notes as needed. 5. Click the Save button or press Enter. The system verifies that the record was updated. PROPRIETARY INFORMATION OF VTLS INC. Virtua ILS – Integrated Library System 232 Acquisitions (v. 43.1) 9.6 Viewing a Credit Record When you choose the View Credit function, the credit record is NOT locked as it is when you choose the Update function. To view a credit record, 1. On the Virtua menu bar, click Acquisitions, choose Credits, and then choose View. The View Credit Request dialog box appears (Figure 9-7). Figure 9-7. View Credit Request Dialog Box 2. Type the credit number of the desired record. Hint: The credit number is case sensitive. 3. Click the Request button or press Enter. The View Credit window appears (Figure 9-8), displaying the contents of the credit record. Virtua ILS – Integrated Library System PROPRIETARY INFORMATION OF VTLS INC. Acquisitions (v. 43.1) 233 Figure 9-8. View Credit Window 4. Add notes, if desired, by clicking the Notes button. 5. Click OK. 9.7 Deleting a Credit Record You can delete a credit record once it is in the database. But you CANNOT delete a credit record whose funds have been applied or have been partially applied. When you choose the Delete Credit function, the software locks the credit record so that it cannot be modified by other users. To delete a credit record that meets the criteria for deletion, 1. On the Virtua menu bar, click Acquisitions, choose Credits, and then choose Delete. The Delete Credit Request dialog box appears (Figure 9-9). PROPRIETARY INFORMATION OF VTLS INC. Virtua ILS – Integrated Library System 234 Acquisitions (v. 43.1) Figure 9-9. Delete Credit Request Dialog Box 2. Type the credit number of the desired record. Hint: The credit number is case sensitive. 3. Click the Request button or press Enter. The Delete Credit window appears (Figure 9-10), displaying grayed-out fields. You cannot edit any fields on this window. Figure 9-10. Delete CreditWindow 4. Click the Delete button or press Enter. Virtua ILS – Integrated Library System PROPRIETARY INFORMATION OF VTLS INC. Acquisitions (v. 43.1) 235 The software will display a message verifying that the credit was deleted from the database. If funds in the credit record have already been applied, either fully or partially, the software will return an Error message instead. PROPRIETARY INFORMATION OF VTLS INC. Virtua ILS – Integrated Library System 236 Acquisitions (v. 43.1) 10. Working with Claims This chapter covers the following topics: ⇒ ⇒ ⇒ ⇒ ⇒ ⇒ ⇒ Introduction Customizing Printed Claim Letters Viewing a Claim Issuing a Claim Transmitting a Claim Deleting a Claim Claims and System Processes 10.1 Introduction T he claiming function in Virtua has two parts: 1) identifying library purchases and specific issues that have not been received from the vendor by an expected date, taking into account a specified grace period, and 2) notifying the vendor of the situation. Currently, Virtua lets you do basic claiming from both the Acquisitions and Serials subsystems. • You can create, view, or delete claim records from the Order window in Acquisitions and from the Serials Check-in window in Serials. • You can transmit claim letters by means of printing/mailing and e-mailing. Normally, you would use the claiming function in Acquisitions to claim a new Serial order where the first issue has not arrived, whereas you would use the claiming function in Serials to claim a specific Expected issue that has not been received. As with other functions in Acquisitions, users must have the proper permissions set in the Virtua Profiler to perform claiming transactions. The Claims function lets you… • • • • • Claim items on demand. Claim items that are past due. Claim items at any point in the acquisitions process after the order is transmitted. Issue individual claims or issue claims in a batch process. Transmit individual claims or transmit all outstanding claims. Virtua ILS – Integrated Library System PROPRIETARY INFORMATION OF VTLS INC. Acquisitions (v. 43.1) 237 10.1.1 Claim Intervals and Maximum Claim Limits For the claims function to work properly, your library must establish the time intervals between the expected date of an order and the overdue date. In addition, your library must determine a maximum number of claims. You can set the following interval values and maximum claim counts for both monographs and serials in the vendor record: • • • • Order interval Claim interval Reclaim interval Maximum number of claims The system also monitors the claim and reclaim interval values to determine when subsequent claims can be issued for an order not yet received. Once a specific maximum number of claims is reached for a purchase order or line item, Virtua automatically pops up a message and asks if you want to cancel the order or line item. 10.1.2 Method of Transmission In a future release, if your library has established electronic communications with a specific vendor, you will be able to send claims in EDIFACT format via e-mail or ftp. The method of transmission will be indicated in the vendor record. You can transmit a claim via two methods: e-mail or print. • If the vendor record (Acquisitions Info tab) specifies “e-mail” as the transmission method for claims, when you transmit a new claim, the E-mail dialog box appears. Whether the dialog box will display the e-mail address automatically depends on whether the vendor record’s claim address or default address specifies an e-mail address. • If the vendor record (Acquisitions Info tab) specifies “print” as the transmission method for claims, when you transmit a new claim, the Print dialog box appears. In the next section we discuss aspects of the printed claim letter. PROPRIETARY INFORMATION OF VTLS INC. Virtua ILS – Integrated Library System 238 Acquisitions (v. 43.1) 10.2 Customizing Printed Claim Letters When Virtua prints (transmits) a claim, it uses a text file as a template to generate the claim letter (Figure 10-1). Virtua provides a default text file called engprintclaim.utf, which your library can customize to suit its needs. Because the file is in UTF-8 format, it can support all character sets for printing claims for international vendors. English Claim Letter More Header Information Book Shop 660 Bibliophile Road Blacksburg, VA 24060 U.S.A. 9 April 2001 Claim No.: 7390 Dear Vendor: We are kindly requesting that you send the following items, which have been ordered but not yet received. LCCN ISSN/ISBN Publisher Edition Copy Series Description --------------------------------------------------------------------------------------------------------New impression Author: Title: Publ.: 1 Claim ID: 7390 PO: 1776 Henderson, George Francis Robert Stone Jackson and the American Civil War/ London, Longman, Green, 1911 --------------------------------------------------------------------------------------------------------We hope for a prompt response to our request. Thank you for your cooperation. Sincerely yours, Deborah O’Connor Memorial Library Acquisitions Department Figure 10-1. Default Claim Letter Virtua ILS – Integrated Library System PROPRIETARY INFORMATION OF VTLS INC. Acquisitions (v. 43.1) 239 The file engprintclaim.utf resides in the VTLS\Virtua directory. This file replaces two text files, claimletterintro.txt and claimletterwrapup.txt, which were available in earlier releases of Virtua. The software no longer uses these .txt files, so if your library has customized them for your claim letters, you will now want to customize engprintclaim.utf instead. Customizing claim letters may include translating them. If your library uses different language versions of the claim letter, you will need to identify the different files by using a three-character language code (the same code used to identify translated purchase order letters) in the filename such as fre for French or ger for German. In this way, a claim letter template that is written in German would be named gerprintclaim.utf. The claim letter that the system prints will be in the same language as that of the purchase order letter. That is, if for the purchase order letter the system printed fremonprintpo.utf, the system would will look to print the claim letter file freprintclaim.utf. If it cannot find the file, it will resort to printing the default claim letter file engprintclaim.utf. 10.2.1 Editing the Claim Letter Template File: engprintclaim.utf The text of the printable claims letter is in a file called engprintclaim.utf, which resides in the VTLS\Virtua directory. By editing the file, you can determine which data elements should print and in which language and format. Note: By default, the file engprintclaim.utf is Read Only when it is installed. Before you can edit it, you must change the permissions on the file via the Windows File/Properties function. To edit the claims letter, use an editor that supports Unicode. • If your platform is Windows 2000, you can use Notepad. • If your platform is Windows 95 or Windows 98, you can use an editor such as SC UniPad, which you can download from the Internet. Using one of the above editors, you can edit the following aspects: textual content; placement of the heading, salutation, and closing; format and placement of the vendor address; size of the margins; and labels and widths of columns and rows. We describe these aspects in detail below. PROPRIETARY INFORMATION OF VTLS INC. Virtua ILS – Integrated Library System 240 Acquisitions (v. 43.1) 10.2.1.1 General Editing Tips 1. For any line, you can edit only the textual portion that appears to the right of the equal sign (=) (Figure 10-2). 2. Labels and text can be in any language. 3. If you want to add a blank line, for example between HeaderStrings, you must type the following: HeaderStringsN=, where “N” indicates the next line number in the sequence and where only a blank space exists after the equal sign (=). 4. If you do not want the data in any given line to appear in the printed letter, type two asterisks (**) in front of the line, for example: **ISSN/ISBN=ISSN/ISBN,0,10 5. The claim letter template file itself contains instructions on how to edit the file. Instructions precede each section, which we discuss below. You can identify the instructions by the double asterisks (**) that precede each line in the file. Note: In the following section we describe each element of the default claim letter template file (engprintclaim.utf) and how to edit it. We have captured the template file in three screens (Figures 10-2, 10-3, and 10-4). To make it easier for you to see the data elements that we describe, we have removed all the editing instructions that are “commented-out” in the file. Virtua ILS – Integrated Library System PROPRIETARY INFORMATION OF VTLS INC. Acquisitions (v. 43.1) 241 10.2.1.2 Default Claim Letter Template (First Screen) Figure 10-2. Default Claim Letter Template File - engprintclaim.utf (1) 10.2.1.2.1 Header Information The Acquisitions claims letter allows for an optional header that can consist of several lines, or “strings.” If you want to include a header in your letter, type each line of the header in order, starting with HeaderStrings1= as shown in Figure 10-2. BeginHeader LinesDown= PercentOver= HeaderStrings1= Start the Header section here. Type a number that indicates the number of lines from the top of the page to leave blank before starting the header. Type a number between 0 and 100 that indicates the percentage of the page from the left to leave blank before starting the header. Alternatively, type the word LeftJustify, Center, or RightJustify. Type the first line of your header here. PROPRIETARY INFORMATION OF VTLS INC. Virtua ILS – Integrated Library System 242 Acquisitions (v. 43.1) HeaderStrings2= Type the second line of your header here. Note: You can have as many lines of HeaderString(s) as you want. You just need to start with 1 and continue numbering consecutively. EndHeader End the Header section here. 10.2.1.2.2 Vendor Information Figure 10-2 shows the Vendor section of the file. You cannot edit the vendor name and address, but you can specify the format of the address. • Vendor name - Pulled from the vendor record. • Vendor address - Pulled from the vendor record. • “Attention” information - Stored in the vendor record. If this information is specified, it will print on the purchase order after the vendor name and before the vendor address. BeginVendor LinesDown= PercentOver= VendorFormat= EndVendor Start the Vendor section here. Type the number of lines down from the header to leave blank before starting the vendor information. Type a number between 0 and 100 that indicates the percentage of the page from the left to leave blank before starting the header. Alternatively, type the word LeftJustify, Center, or RightJustify. Type the format of the address. Four formats are available. The allowable formats and examples of their printed equivalents are: ZipCityStateCountry 24060 Blacksburg, VA U.S.A. ZipCityState 24060 Blacksburg, VA CityStateZipCountry Blacksburg, VA 24060 U.S.A. CityStateZip Blacksburg, VA 24060 End the Vendor section here. 10.2.1.2.3 Date Figure 10-2 shows the date section of the file. You can specify the format of the date on the claim letter. BeginDate DateFormat= LinesDown= Start the Date section here. Type the format of the date: d=day, mmmm=month, and yyyy (or yy) =year Type the number of lines down from the vendor address to leave blank before starting the date. Virtua ILS – Integrated Library System PROPRIETARY INFORMATION OF VTLS INC. Acquisitions (v. 43.1) 243 PercentOver= EndDate Type a number between 0 and 100 that indicates the percentage of the page from the left to leave blank before starting the header. Alternatively, type the word LeftJustify, Center, or RightJustify. End the Date section here. 10.2.1.2.4 Entity ID Figure 10-2 shows the Entity ID section of the file. The Entity ID is the label for the claim number, which the system assigns automatically. The label can be in any language. In our example of a claim letter, the label is Claim ID: BeginEntityID LinesDown= PercentOver= EntityID= EndEntityID Start the EntityID section here. Type the number of lines down from the date to leave blank before starting the entity ID. Type a number between 0 and 100 that indicates the percentage of the page from the left to leave blank before starting the header. Alternatively, type the word LeftJustify, Center, or RightJustify. Type a label for the claim number, which is system assigned, such as Claim # or Claim No.: End the EntityID section here. Tip: The claim number on the claim letter is system assigned, which means that you cannot use this field to designate the first (e.g., Claim #1), second, or third claim letter being sent. If you want to designate a first, second, and third claim letter, we suggest that you create three ***printclaim.utf files, one for each number in the sequence, and swap them around as needed. Alternatively, you could use the first paragraph of your letter to state whether this is the first, second, or third claim letter to the patron. PROPRIETARY INFORMATION OF VTLS INC. Virtua ILS – Integrated Library System 244 Acquisitions (v. 43.1) 10.2.1.3 Default Claim Letter Template (Second Screen) Figure 10-3. Claim Letter Template - engprintclaim.utf (2) 10.2.1.3.1 Salutation The Acquisitions claim letter allows for several lines, or “strings,” of salutation, which includes the first paragraph of the letter (Figure 10-3). BeginSalutation LinesDown= PercentOver= Salutation1= Salutation2= Start the Salutation section here. Type the number of lines down from the entity ID to leave blank before starting the salutation. Type a number between 0 and 100 that indicates the percentage of the page from the left to leave blank before starting the header. Alternatively, type the word LeftJustify, Center, or RightJustify. Type the first line of the salutation such as Dear Vendor: Leave blank if you want a space between the salutation and opening paragraph. Virtua ILS – Integrated Library System PROPRIETARY INFORMATION OF VTLS INC. Acquisitions (v. 43.1) 245 Salutation3= EndSalutation Type the first line of the opening paragraph such as We kindly request that you send…. End the Salutation section here. 10.2.1.3.2 Table Column Labels Figure 10-3 shows the Table Columns section of the file. The claims letter contains pre-set labeled columns. You cannot add columns, but you can change their order and edit or translate the labels to suit your needs. The columns are populated with data as follows: • • • • • • LCCN - Data is pulled from tag 010 of the bibliographic record. ISSN/ISBN - Data is pulled from tag 020 (ISBN), tag 022 (ISSN), or tag 024 (Other) of the bibliographic record. Virtua pulls the data in that order so that if it finds no value in tag 020, it goes to tag 022, etc. Publisher Number - Data is pulled from tag 028 of the bibliographic record. Edition Statement - Data is pulled from tag 250 of the bibliographic record. Copy Number - Data is pulled from the claims table in the database. Description - Data is pulled from the claims table in the database that stores either issue information (for serials) or purchase order number and line number (for acquisitions). For each line below, to the right of the equal sign (=), type the label of the column followed by a comma; then type a number representing the starting position of the column followed by a comma; and then type a number representing the ending position of the column. Below we use LCCN as an example, where the label LCCN starts at the left margin and occupies a column 10 positions wide. BeginTableColumns LCCN= LCCN,0,10 ISSN/ISBN= PublisherNumber= EditionStatement= Copy No.= Description= EndTableColumns Note: The delimiters BeginPreTable and EndPreTable, which you see in the file, are placeholders that currently have no function. Do NOT delete them. PROPRIETARY INFORMATION OF VTLS INC. Virtua ILS – Integrated Library System 246 Acquisitions (v. 43.1) 10.2.1.4 Default Claim Letter Template (Third Screen) Figure 10-4. Claim Letter Template - engprintclaim.utf (3) 10.2.1.4.1 Table Row Labels Figure 10-4 shows the Table Rows section of the file. The claims letter contains pre-set labeled rows. You cannot add rows, but you can change their order and edit or translate the labels to suit your needs. The rows are populated with data as follows: • • • • • Author - Data is pulled from tag 100 (a, b), 110 (a, b), or 111 (a, b) of the bibliographic record. Title - Data is pulled from tag 130 (a) or 240 (a) or tag 245 (a, b, h) of the bibliographic record. Vendor Title ID - Data is pulled from tag 941 (b) of the holdings record. Publication Statement - Data is pulled from tag 260 (a, b, c) of the bibliographic record. Series - Data is pulled from tag 440 (a, n, p, v, x), tag 490 (a, l, v, x), or tag 830 (a, n, p, v) of the bibliographic record. Virtua ILS – Integrated Library System PROPRIETARY INFORMATION OF VTLS INC. Acquisitions (v. 43.1) 247 • • Vendor Notes - Data is pulled from the vendor record. COG Description - Data is pulled from the Description field on the COG purchase order record. For each line below, to the right of the equal sign (=), type the label of the row followed by a comma; then type a number representing the starting position of the label followed by a comma; and then type a number representing the starting position of the data. Below we use Author as an example, where the label Author: starts at the left margin and the data begins 12 positions from the left margin. BeginTableRows Author= Author:,0,12 Title= Vendor Title ID= Publication Statement= Series= Vendor Notes= COG Description= EndTableRows Note: The delimiters BeginPostTable and EndPostTable, which you see in the file (Figure 12-4), are placeholders that currently have no function. Do NOT delete them. 10.2.1.4.2 Signature Figure 10-4 shows the Signature section of the file. The signature area includes closing remarks, complimentary close, blank lines, and typed signature. BeginSignature LinesDown=2 PercentOver= Signature1= Signature2= Signature3= Signature4= Signature5= Signature6= EndSignature Start the Signature section. Type the number of lines down from the shipping address to allow before starting the closing remarks. Type a number between 0 and 100 that indicates the percentage of the page from the left to leave blank before starting the header. Alternatively, type the word LeftJustify, Center, or RightJustify. Type the first line of your closing remarks. Type the second line of your closing remarks or leave blank. Type the complimentary close such as Sincerely yours, You may want to leave this line blank. You may want to leave this line blank. Type the sixth line of your closing such as your name, title, or the name of your department. End the Signature section. PROPRIETARY INFORMATION OF VTLS INC. Virtua ILS – Integrated Library System 248 Acquisitions (v. 43.1) 10.3 Viewing a Claim To view claims linked to a purchase order, 1. Display the View Order window. 2. Click the Claims button. The Claims window appears (Figure 10-5), displaying all the claims associated with this purchase order. Figure 10-5. Claims Window 10.3.1 Aspects of the Claims Window The Claims window lists the claims, sorted by claim date, that have been issued. The claims listed may be linked to a holdings record or a specific issue, depending on your point of access to the Claims window. If there are more claims than can be displayed on the window, a scroll bar will appear. Virtua ILS – Integrated Library System PROPRIETARY INFORMATION OF VTLS INC. Acquisitions (v. 43.1) 249 You can resize the Claims window to suit your needs. Just place your mouse cursor at the boundary of the window. When the cursor changes to a horizontal arrow, hold down the left mouse button and drag the edge of the window. 10.3.1.1 Columns • • • • • (No label) - Displays the number of the claim in the list, which you can highlight to select the claim. Creation Date - The date the claim was created. Status - Status of claim, either Created or Transmitted. If you have not printed the claim, its status is Created. If you have printed the claim, its status is Transmitted. Transmission Method - The vendor’s preferred method such as print, save, or email, which is pulled from the vendor record. Transmission Date - The date the status changed from Created to Transmitted. If the claim status is Created, this field is blank. 10.3.1.2 Command Buttons In View mode, only the Close button is active. • • • • • New Claim - Creates a new claim. Reminders - Lets you add a User-defined reminder. Delete - Deletes the selected claim in the claim list. Transmit - Transmits the selected claim in the claim list. Currently, the only available transmission method is Printed Claim Letter. Close - Closes the Claims window. 10.3.1.3 Adjusting Column Width For complete viewing, you can expand the width of any column on the Claims window. To expand a column, 1. Point your mouse at the column divider. The pointer becomes a two-headed arrow. 2. Hold down the mouse button and drag the divider to the left or right. PROPRIETARY INFORMATION OF VTLS INC. Virtua ILS – Integrated Library System 250 Acquisitions (v. 43.1) 10.4 Issuing a Claim You can issue individual claims at the purchase order header level or line-item level, or you can issue a batch of claims via an overnight process. When a claim is created, the total claim count for the vendor associated with the claim is incremented. The historical claim count is stored in the vendor record. 10.4.1 Issuing an Individual Claim To issue an individual claim, 1. Display the Update Order window (or the View Order window in the case of a transmitted order). 2. To issue a claim at the header level, click the Claims button. -ORTo issue a claim at the line-item level, highlight the line item; click the Edit (or View) Item button; and then on the Order Line Editor window, click the Claims button. Note: • If the order has not yet been transmitted or has already been fully received, the Claim button will be disabled. • If the claim is for a serial issue, you can also issue a claim directly from the Serials Check-in window. • We recommend that you issue claims at the level of the line item. The Claims window appears (Figure 10-6). Virtua ILS – Integrated Library System PROPRIETARY INFORMATION OF VTLS INC. Acquisitions (v. 43.1) 251 Figure 10-6. Claims Window 3. To issue a claim, click the New Claim button. A message box pops up with the message, “A new claim was successfully added.” The Claims window now displays the data shown in Figure 10-7. In our example, the window displays Print as the transmission method. If the vendor’s preferred claims transmission method is e-mail, the window will display E-mail instead. Figure 10-7. Claims Window PROPRIETARY INFORMATION OF VTLS INC. Virtua ILS – Integrated Library System 252 Acquisitions (v. 43.1) Note: If you try to create a new claim when a claim already exists at the status Created, the software will return an error, informing you that you must transmit the existing claim before you can create a new one for this item/serials issue. 10.4.1.1 Individual Claiming and Exceeding the Maximum Number of Claims During individual claiming, if the claim sequence number of a claim for a given order or purchase order line item exceeds the value of the Maximum Number of Claims as set in the vendor record, the system will pop up a message asking if you want to cancel the order or line item. If you click Yes, the order or line item is canceled. 10.4.2 Processing Claims in Batch Mode Virtua provides a program called autoClaim.exe that gives you a way to process ALL new claims and reclaims that are outstanding in the system. To process Acquisitions claims in batch mode, 1. Log in to your UNIX server as dbadmin. 2. At the database prompt, type autoClaim.exe to see the following options: Type: 1 to claim serials 2 to claim acquisitions 0 to claim all 3. At the database prompt, type: autoClaim.exe 2 4. Press the Enter key to run the program. The program issues claims in a batch process that you can run overnight. The program automatically claims overdue purchase order line items and reclaims purchase orders and purchase order line items by using the claim and reclaim dates that Virtua calculates for each order or line item of a purchase order. Virtua calculates claim and reclaim dates based on the following information: • • Date of the transmission of the order. The line item order interval, or lead time, specified in the vendor record. Virtua ILS – Integrated Library System PROPRIETARY INFORMATION OF VTLS INC. Acquisitions (v. 43.1) 253 • • The claim interval, or grace period after the due date, specified in the vendor record. The reclaim interval specified in the vendor record. The program will also look at the value for the Maximum Number of Claims: • If the claim sequence number of a claim exceeds the maximum number of claims indicated in the vendor record, AND • If the Auto Cancel Purchase Orders Flag is turned ON in the Acquisitions parameters in the Virtua Profiler, Then the program will set the status of the purchase order or line item in question to To Be Canceled. But… • If the claim sequence number of a claim exceeds the maximum number of claims indicated in the vendor record, AND • If the Auto Cancel Purchase Orders Flag is turned OFF, then the program will cease issuing claims for that purchase order or line item, and it will indicate in the log file that this purchase order or line item is valid for cancellation. As long as the value of the Maximum Number of Claims is not exceeded, autoClaim.exe will create a new claim record for each order line item with the status of On Order or Partially Received and whose claim date is earlier than the date set in the batch claiming program. The program generates a log file called autoClaim.log, which will list all claims and reclaims issued, errors in processing, purchase orders/line items canceled, and purchase orders/line items valid for cancellation. The log file will reside in the same directory from which you ran the program. You can set an environment variable to specify the level of logging and the destination of the log file (for details, see the Virtua System Management Reference Guide). For details on running autoClaim.exe, see the System Management: Acquisitions User's Guide. 10.5 Transmitting a Claim After issuing claims, you will want to transmit them, either individually from the Claims window or in batch using the Transmit Claims menu function. PROPRIETARY INFORMATION OF VTLS INC. Virtua ILS – Integrated Library System 254 Acquisitions (v. 43.1) When you transmit an individual claim, you can choose to transmit it at the level of the purchase order header or at the level of the purchase order line item. • To transmit a claim at the level of the header, you must access the Claims window from the Order window. • To transmit a claim at the level of the line item, you must access the Claims window from the Order Line Editor window. Currently, the available transmission methods are “Print” and “E-mail.” 10.5.1 Transmitting an Individual Claim (“Print”) To transmit an individual claim, 1. On the Claims window (where Print is shown as the transmission method), click the Transmit button. The Print (Claim) dialog box appears (Figure 10-8). Figure 10-8. Print (Claim) Dialog Box 2. Accept the default print format: Claim. 3. Select the number of copies of the letter. 4. Click OK. Note: Remember that to transmit a claim issued at the line-item level, you need to access the Claims window from the Order Line Editor window. Virtua ILS – Integrated Library System PROPRIETARY INFORMATION OF VTLS INC. Acquisitions (v. 43.1) 255 Virtua prints the claim letter in the language that corresponds to the language of the purchase order letter; that is, Virtua looks for the same prefix in the claim letter filename that was used in the purchase order letter filename. • If the system cannot find that particular language file template for the claim letter, it will use the default claim letter template engprintclaim.utf. • If the software cannot find any claim letter template, it will display an Error message. • If you transmit a claim issued at the purchase order header level, the only claim information the letter will contain is the Claim ID and the P.O. number. • If you transmit a claim issued at the order line-item level, the claim letter will contain bibliographic information about the item as well as the Claim ID and the P.O. number. After printing, the software asks you if the claim printed successfully (Figure 10-9). Figure 10-9. Claim Letter Printing Confirmation • • If you answer No, the software suggests that you check the status of your printer or see your system administrator. If you answer Yes, the Claims window reappears (Figure 10-10), displaying the transmission date and the new claims status—Transmitted. PROPRIETARY INFORMATION OF VTLS INC. Virtua ILS – Integrated Library System 256 Acquisitions (v. 43.1) Figure 10-10. Claims Window After Transmission 10.5.2 Transmitting an Individual Claim (“E-mail”) To transmit an individual claim, 1. On the Claims window (where E-mail is shown as the transmission method), click the Transmit button. The E-mail (Claim) Records dialog box appears (Figure 10-11). Virtua ILS – Integrated Library System PROPRIETARY INFORMATION OF VTLS INC. Acquisitions (v. 43.1) 257 Figure 10-11. E-mail (Claims) Records Dialog Box 2. In the Send To field, type the e-mail address. Note: If the claim address (or default address) on the vendor record specifies an email address, the Send To field on the dialog box will display the e-mail address automatically. 3. In the Subject field, type a subject for the e-mail. 4. Click OK. The e-mail Composition window appears (Figure 10-12). PROPRIETARY INFORMATION OF VTLS INC. Virtua ILS – Integrated Library System 258 Acquisitions (v. 43.1) Figure 10-12. E-mail Composition Window 5. If you did not complete the Send To and Subject fields on the E-mail dialog box, complete those field on the Composition window. 6. Click the Send button. The software confirms that the claim letter was queued for e-mailing. The Claims window reappears, displaying the transmission date and the new claims status—Transmitted. Virtua ILS – Integrated Library System PROPRIETARY INFORMATION OF VTLS INC. Acquisitions (v. 43.1) 259 Figure 10-13. Claims Window After Transmission 7. Click the Close button. 10.5.3 Transmitting All Outstanding Claims In addition to transmitting claims individually, you can transmit ALL outstanding claims, i.e., all those with the status Created. To transmit ALL outstanding claims, 1. On the Virtua menu bar, click Acquisitions, choose Claims, and then choose Transmit Claims. The Print (Claim) dialog box appears (Figure 10-8). 2. Accept the default print format: Claim. 3. Select the number of copies of each letter. 4. Click OK. The software prints a claim letter for each vendor record for which there is an outstanding claim. If there is more than one outstanding claim for a vendor, all the claims print on one letter. PROPRIETARY INFORMATION OF VTLS INC. Virtua ILS – Integrated Library System 260 Acquisitions (v. 43.1) 10.6 Deleting a Claim You can delete a claim only if the claim has not yet been transmitted to the vendor. If the claim has been transmitted, then you can only cancel the claim. To delete a claim, 1. Display the Claims window. 2. Select the claim you want to delete. 3. Click the Delete button. The software asks you to confirm the deletion. 4. Click the Yes button. The claim is deleted. 10.7 Claims and System Processes At the time of claiming, Virtua automatically updates the database with the new status and/or expected shipping date. The expected receipt date is the current date plus the claim interval, which your library can set. A vendor record may contain the claim period for both monographs and serials. After you transmit a claim, Virtua creates the claim entry in the database. In a future release, a parameter set by your library will determine whether the claims are sent online as they are created or whether the claim letters are printed by a batch program and mailed out at regular intervals. Virtua ILS – Integrated Library System PROPRIETARY INFORMATION OF VTLS INC. Acquisitions (v. 43.1) 261 11. Working with Reminders R eminders in Acquisitions serve several functions. They can alert you if 1) a new title on order has not yet been received; 2) an Order Expected reminder has expired and a Claim Expected reminder is added; 3) a claim that has been issued is late; and 4) there are special conditions such as “published late,” which will entail an adjustment to the Expected interval. Virtua Acquisitions creates and deletes system-defined reminders automatically to serve most reminder functions, but it also accommodates user-defined reminders, which staff can add manually. User-defined reminders give your library a way to customize reminders to serve local needs. This chapter covers the following topics: ⇒ ⇒ ⇒ ⇒ ⇒ Types of Reminders Accessing General Reminders Tasks to Perform from the Reminders Window Adding User-defined Reminders from Other Access Points Acquisitions Reminders and Automatic System Functions 11.1 Types of Reminders Virtua supports different types of reminders for different situations. There are… Two main types of reminders: • Acquisitions reminders • Serials reminders For Acquisitions reminders, there are three subtypes: • Acquisitions Expected • Claim Expected • User-defined When you view the Reminders window (Figure 11-1), one column is labeled Type (i.e., either Acquisitions or Serials) and one is labeled Subtype (i.e., Expected, Claim, or Userdefined). PROPRIETARY INFORMATION OF VTLS INC. Virtua ILS – Integrated Library System 262 Acquisitions (v. 43.1) Figure 11-1. Reminders Window 11.1.1 Types of Acquisitions Reminders Virtua Acquisitions offers three types of reminders: a) Acquisitions Expected Reminders - System generated for any one purchase order line item that has not been received by the due date, which the system calculates when the order is transmitted. The system derives the due date by adding the lead time—the time expected for the vendor to fill the order—to the current date. The value for the lead time is stored in the vendor record. You can determine if you want the software to display the Expected reminder as of the due date or if you want the software to ignore the reminder until a specified date. If you want the software to ignore the reminder until a specified date, you must specify a New Ignore Until date (see the section “Modifying the Ignore Until Date”); otherwise, the software uses the due date as the Ignore Until date. b) Claim Expected Reminders - System generated when an issue is claimed or reclaimed either manually or automatically by the claim batch job autoClaim.exe. The system calculates these reminders by using the value of the reclaim interval as specified in the vendor record. Each Claim Expected reminder is linked to a specific purchase order or purchase order line item. You can determine if you want the software to display the Claim Expected reminder as of the reclaim date or if you want the software to ignore the reminder until a specified date. If you want the software to ignore the reminder until a specified date, you must specify a new Ignore Until date; otherwise, the software uses the reclaim date. Virtua ILS – Integrated Library System PROPRIETARY INFORMATION OF VTLS INC. Acquisitions (v. 43.1) 263 c) User-defined Reminders - User generated. If authorized, you can manually create User-defined reminders from the Reminders window and link them to selected purchase orders/line items. You can also create User-defined reminders directly from different types of Virtua Acquisitions records. 11.2 Accessing General Reminders You can view, add, or edit reminders from various points in Virtua. One way to access reminders is by way of a General Reminders Request where you can search for reminders using different variables. Via a General Reminders Request, you can choose to search for and view reminders according to any of the following criteria: • • • • • All Serial reminders All Acquisitions reminders Only those Serial or Acquisitions reminders within a specified date range Only those Serial or Acquisitions reminders whose “Ignore Until” date has not yet arrived (by defining a date range that includes future dates) Only those reminders at a specified location Our discussion here focuses on Acquisitions reminders. 11.2.1 Searching for Acquisitions Reminders To search for Acquisitions reminders, . 1. On the Acquisitions toolbar, click Serials Reminders -OROn the Virtua menu bar, click Acquisitions, choose Subscriptions, and then choose Serials Reminders. The General Reminders Request window (Figure 11-2) appears. PROPRIETARY INFORMATION OF VTLS INC. Virtua ILS – Integrated Library System 264 Acquisitions (v. 43.1) Figure 11-2. General Reminders Request Window 2. Select the All Acquisitions Reminders radio button. -ORFilter your search by Acquisitions type by selecting a radio button for Expected, Claim Expected, or User-defined. 3. Filter your search by location by choosing a location in the Location pull-down list box. If you do not specify a location, Virtua displays reminders for ALL locations. 4. Filter your search by the “Ignore Until” date by choosing a date range. (If no “Ignore Until” date is specified for a reminder, the software will use the Expected date or the Claim Expected date, as appropriate.) Hint: To activate the default system dates, select the check boxes or click the down arrow in the date boxes. Choose a date in both the “From” and “To” fields. Note: • If you do NOT filter your search by the “Ignore Until” date (i.e., you do not specify a date range), Virtua displays all Acquisitions reminders that have a due date less than or equal to the current date for the last 30 days only. • To see upcoming reminders, specify a date range that includes future dates. 5. Click OK. The Reminders window (Figure 11-3) appears, displaying all Acquisitions reminders according to the criteria you set. Virtua ILS – Integrated Library System PROPRIETARY INFORMATION OF VTLS INC. Acquisitions (v. 43.1) 265 Figure 11-3. Reminders Window 11.2.2 Aspects of the Reminders Window The Reminders window consists of a list box and five command buttons. In the list box, reminders are sorted according to the Ignore Until date, with the earliest date displayed first. The first reminder in the list is selected by default. You can double-click on any line item in the list box and the Order window for that title will open in View mode. 11.2.2.1 List Box The list box contains reminders sorted in chronological order with the earliest date first. The following information is displayed for each entry in the list box: • • • Title/Remarks For User-defined reminders, the text of the Remarks pulled from the Add Reminder dialog box. The title of the serial pulled from the 245 tag of the bibliographic record for the purchase order line item. Additional Information - The associated purchase order number and, if appropriate, the purchase order line number. For a User-defined reminder that is not associated with a purchase order or purchase order line item (such as a Serial reminder), this field will be blank. Reminder Type – Whether Acquisitions or Serials. PROPRIETARY INFORMATION OF VTLS INC. Virtua ILS – Integrated Library System 266 Acquisitions (v. 43.1) • • • • Reminder Subtype - Whether Acquisitions Expected, Claim Expected, or Userdefined. Date – The Ignore Until date. Location – The location where the title is held. For a User-defined reminder that is not associated with a purchase order or purchase order line item, this field will be blank. Quantity – The number of items associated with the title. For a User-defined reminder that is not associated with a purchase order or purchase order line item, this field will be blank. If more reminders are listed than can fit in the window, a scroll bar will appear. You can adjust the width of any column by clicking on the column separator, holding down the mouse key, and pulling the cursor to the right. 11.2.2.2 Command Buttons The Reminders window displays five command buttons: • • • • • Claims – Displays the Claim window for the purchase order or purchase order line item linked to the selected reminder. Add Reminder – Displays the Add Reminder window where you can create a User-defined reminder for the purchase order/line item highlighted, or selected, on the Reminders window. Hint: The first reminder is always selected by default. Ignore Until - Displays the Set Ignore Until Date dialog box where you can set a new Ignore Until date or modify the original Ignore Until date. Delete - Deletes the selected reminder. Close - Closes the Reminders window and automatically saves any changes. If no line item is selected, the Ignore Until and Delete buttons are disabled. 11.3 Tasks to Perform from the Reminders Window When reminders are listed on the Reminders window, you can perform six tasks: • • • • View claim information (if available) for a selected purchase order/line item. Add a User-defined reminder associated with a selected purchase order/line item. Access the associated purchase order in View mode by double-clicking a reminder. Modify the original Ignore Until date via increments. Virtua ILS – Integrated Library System PROPRIETARY INFORMATION OF VTLS INC. Acquisitions (v. 43.1) 267 • • Set a New Ignore Until Date. Delete a selected reminder. We discuss each of these aspects in more detail below. 11.3.1 Viewing Claim Information To view claim information from the Reminders window, 1. Highlight the line item for which you want to view claims (Figure 11-4). Figure 11-4. Claims Window 2. Click the Claims button. The Claims window appears, where you can view or add a claim for the selected purchase order/line item. 11.3.2 Adding a User-defined Reminder To add a User-defined reminder to a purchase order/line item via the Reminders window, 1. Highlight a reminder that is associated with the desired purchase order/line item. 2. Click the Add Reminder button. PROPRIETARY INFORMATION OF VTLS INC. Virtua ILS – Integrated Library System 268 Acquisitions (v. 43.1) The Add Reminder dialog box (Figure 11-5) appears. Figure 11-5. Add Reminder Dialog Box 3. Type your reminder message in the Remark field. Your message can be up to 60 characters in length. 4. Click OK. The reminder is added to the Reminders window. Notice that the Additional Info column displays the same purchase order/line item that you highlighted originally. For more information, see the section “Adding User-defined Reminders from Other Access Points” in this guide. 11.3.3 Accessing the Purchase Order Associated with a Reminder To access the purchase order associated with a Reminder, • On the Reminders window, double-click the reminder that is associated with the desired purchase order. The View Order window appears. On the View Order window, you can perform all the functions normally available in View mode. Virtua ILS – Integrated Library System PROPRIETARY INFORMATION OF VTLS INC. Acquisitions (v. 43.1) 269 11.3.4 Modifying the Ignore Until Date If you want to use a due date or reclaim date other than the date that the system automatically calculates and assigns to an Expected item or claim, you must modify the Ignore Until date. To modify the Ignore Until date, 1. On the Reminders window (Figure 11-4), highlight the desired reminder. 2. Click the Ignore Until button. The Set Ignore Until Date dialog box (Figure 11-6) appears. Figure 11-6. Set Ignore Until Date Dialog Box 3. Select a radio button that specifies the length of time to add to the original Ignore Until date. -ORIn the New Ignore Until Date field, type or choose a new date. PROPRIETARY INFORMATION OF VTLS INC. Virtua ILS – Integrated Library System 270 Acquisitions (v. 43.1) Note: If you set a new Ignore Until date, • The new date must be equal to or greater than the current date. • You will not be able to see the new Ignore Until date in the system until the actual date arrives and the reminder is displayed. • You will not be able to change the date again until the new Ignore Until date rolls around, i.e., when the reminder is displayed on the Reminders window. 4. Click OK. The system modifies the Ignore Until date. 11.3.5 Deleting a Reminder Manually To delete a reminder, 1. On the Reminders window, highlight the desired reminder. 2. Click the Delete button. The software responds: “Do you really want to delete this reminder?” 3. Click the Yes button. Once you delete an Expected reminder, you can only re-create it by deleting and readding the issue record with which the deleted reminder was associated. 11.4 Adding User-defined Reminders from Other Access Points We have discussed accessing and adding Reminders starting with a General Reminders Search. But there are other points of access to the Reminders window. You can create a User-defined reminder that is linked to a purchase order or purchase order line item by accessing the Reminders window directly from an Acquisitions record such as an order, receipt, or claim. Keep in mind that from these records you CANNOT view those User-defined reminders (for example, Serial reminders) that are not linked to a specific purchase order or purchase order line item. You can view such reminders only by executing a search from the General Reminders Request window. 11.4.1 Other Points of Access to Reminders Virtua ILS – Integrated Library System PROPRIETARY INFORMATION OF VTLS INC. Acquisitions (v. 43.1) 271 • From the Update Order or View Order window. The Update Order andView Order windows display two Reminders buttons. To view all reminders associated with a purchase order line item, highlight the line item, and click the Reminders button in the Line Items area. To view ALL (header-level and line item-level) reminders associated with the order, click the Reminders button at the bottom of the window. • From the Update Receipts or View Receipts window. The Update Receipts andView Receipts windows display two Reminders button, one at the item level and one at the header level. To view all reminders associated with a line item, highlight the line item, and click the Reminders button in the Receipt Line Items area. To view ALL (header-level and line item-level) reminders associated with the receipt, click the Reminders button at the bottom of the window. • From the Claims window. The Claims window displays a list of claims that may be either header-level or item-level. When you highlight a claim and click the Reminders button, you can view ALL reminders for that purchase order or purchase order line item. 11.4.1.1 Adding User-defined Reminders Directly to a Purchase Order Line Item From the Order window, Receipts window, or Claims window, you can add a Userdefined reminder that is linked to a purchase order line item. To add a User-defined reminder to a line item from the Order window or Receipts window, 1. Display the View/Update Order window or the View/Update Receipts window. 2. Highlight the line item for which you want to view and/or add a reminder (Figure 11-7). PROPRIETARY INFORMATION OF VTLS INC. Virtua ILS – Integrated Library System 272 Acquisitions (v. 43.1) Figure 11-7. View Order Window - Reminders 3. Click the Item Reminder button. The Reminders window appears. As Figure 11-8 shows, no reminders exist for the selected line item. Virtua ILS – Integrated Library System PROPRIETARY INFORMATION OF VTLS INC. Acquisitions (v. 43.1) 273 Figure 11-8. Reminders Window 4. Click the Add Reminder button. The Add Reminder dialog box (Figure 11-9) appears. Figure 11-9. Add Reminder Dialog Box 5. Type your reminder message in the Remark field (required entry). 6. Accept the current system date, or choose a new date in the Ignore Until date box. 7. Click OK. The Reminders window (Figure 11-10) displays your reminder along with the number of the purchase order and purchase order line item. Figure 11-10. Claims Window- Reminders Functionality PROPRIETARY INFORMATION OF VTLS INC. Virtua ILS – Integrated Library System 274 Acquisitions (v. 43.1) 8. On the Reminders window, click the Close button. The reminder is added to the purchase order line item. To add a User-defined reminder to a line item from the Claims window, • Follow the same procedure that we described above. The only difference is that you would access the Reminders window from the Claims window associated with a selected purchase order line item. 11.4.1.2 Adding User-defined Reminders Directly to a Purchase Order From the Order window, Receipts window, or Claims window, you can add a Userdefined reminder that is linked to the purchase order header. To add a User-defined reminder to a purchase order header from the Order window or Receipts window, 1. Display the View/Update Order window (Figure 11-11) or the View/Update Receipts window. Virtua ILS – Integrated Library System PROPRIETARY INFORMATION OF VTLS INC. Acquisitions (v. 43.1) 275 Figure 11-11. View Order Window - Reminders 2. Click the Reminders button at the bottom of the window. The Reminders window appears (Figure 11-12). Figure 11-12. Reminders Window PROPRIETARY INFORMATION OF VTLS INC. Virtua ILS – Integrated Library System 276 Acquisitions (v. 43.1) 3. Click the Add Reminder button. The Add Reminder dialog box (Figure 11-13) appears. Figure 11-13. Add Reminder Dialog Box 4. Type your reminder message in the Remark field (required entry). 5. Accept the current system date, or type a new date in the Ignore Until date box. 6. Click OK. The Reminders window (Figure 11-14) displays your reminder along with the number of the purchase order Figure 11-14. Reminders Window Virtua ILS – Integrated Library System PROPRIETARY INFORMATION OF VTLS INC. Acquisitions (v. 43.1) 277 7. On the Reminders window, click the Close button. The reminder is added to the purchase order header. To add a User-defined reminder to a purchase order header from the Claims window, • Follow the same procedure that we described above. The only difference is that you would access the Reminders window from the Claims window associated with the purchase order header. 11.4.2 Deleting User-defined Reminders You must delete User-defined reminders manually. To do this, 1. Display the Reminders window. 2. Highlight the reminder to be deleted. 3. Click the Delete button. 11.5 Acquisitions Reminders and Automatic System Functions Virtua handles a number Acquisitions functions related to reminders, such as additions and deletions, automatically. For example, when you… • Fully receive a purchase order line item, any Acquisition Expected reminders or Claim Expected reminders for it are deleted. • Cancel a purchase order line item, any Acquisition Expected reminders or Claim Expected reminders for it are deleted. • Claim a purchase order or purchase order line item manually (or if the system issues a claim automatically), a Claim Expected is added. • Re-claim a purchase order or purchase order line item, the software keeps track of the claim number so that the number of successive claims generated cannot exceed the maximum claim value set in the vendor record. • Receive a claimed issue, the Claim Expected reminder for the order is deleted. PROPRIETARY INFORMATION OF VTLS INC. Virtua ILS – Integrated Library System 278 Acquisitions (v. 43.1) • Delete a claim, any Claim Expected reminder associated with the item is deleted. • Create a Claim Expected reminder manually (or if the system creates one automatically), the Acquisitions Expected reminder for that item is deleted. Virtua ILS – Integrated Library System PROPRIETARY INFORMATION OF VTLS INC. Acquisitions (v. 43.1) 279 12. Appendix A – Changes to this User’s Guide 12.1 Version 42.4 – Version 43.0 12.1.1 New Sections Section 2.4.5: “Create Brief Bib Button” – Describes the functionality underlying the new Create Brief Bib button on the Order window. Section 10.5.2: “Transmitting an Individual Claim (“E-mail”)” – Added to give a fuller description of the e-mailing claims functionality that was available in Release 42.4. 12.1.2 Modified Sections Section 2.4.3: “Billing/Shipping Information Tab” – Revised to include the new functionality underlying the Billing Sent To and Shipping Sent To addresses. Section 2.5.3: “Using the Drag-and-Drop Tool” – Revised to include new drag-anddrop functionality from the List of Titles window. Section 2.6.1.1: “Elements of the Line Item Header Information Sub-tab” – Revised to describe the Shipping Sent To field, which replaces the former Main Location field, and the Location field, which replaces the former Sublocation field. Section 2.6.1.2: “Editing the Account Information Sub-tab” – Revised to include the new use of decimal percentages. Section 7.3.5: “Working with Accounts at the Invoice Level” – Added an important note at the end of the section. Section 8.5: “Working with Selected, Expanded Invoices” – Added an important note at the beginning of the section. Chapter 11: “Working with Reminders” – The chapter has been reorganized and information has been modified and clarified. There is no new functionality. PROPRIETARY INFORMATION OF VTLS INC. Virtua ILS – Integrated Library System 280 Acquisitions (v. 43.1) 12.2 Version 43.0 – Version 43.1 In the 43.1 version of the guide, we corrected textual errors and made the following revisions: • We documented that you must assign an invoice number on the Add Invoice Request dialog box. Previously, we incorrectly stated that if you did not assign an invoice number, the system would assign one for you. • We corrected the documentation regarding the Auto Receive check box. It is no longer displayed on the Add Invoice window. If you want to invoice purchase order line items that have not yet been received, you must put 0 in the Receive Quantity field on the Add Invoice Line Items window. • We clarified the description of the Auto Receive function vs. the Immediately Proceed to Invoices function. • The Modify Credit Request dialog box was renamed Update Credit Request dialog box, so we recaptured the figure to show the new title bar. • We documented that a reminder can be no longer than 60 characters. If you try to type a longer reminder, a message will appear. • We documented that once a purchase order number has been used, you cannot reuse it. There is no facility for resetting the purchase order number “counter.” • We documented that the payment function does not let you distinguish between different types of purchase orders placed with a vendor. Neither does it let you track statistical information for ONE library only in an environment where multiple libraries share vendor records. • We updated section 5.2 “About EDIFACT Functionality” and the screen capture in section 5.4.5 “Send Orders Summary (for Transmission Method EDIFACT).” Virtua ILS – Integrated Library System PROPRIETARY INFORMATION OF VTLS INC. Acquisitions (v. 43.1) 281 Index " "No title available" line item · 49 "No Title Info Available" · 21 $ $EDIFACT_PATH environment variable · 86 . .utf template files · 97 *printclaim.utf · 239 distributionprint.utf · 84 printvoucher.utf · 222, 223 purchase order letter · 97 read-only at installation · 223 receipt.utf · 125 receivingreport.utf · 146 tips for editing · 99, 239 9 941 tag, holdings record · 34 A Accession Number (for payments) · 193, 194, 216 Accession Number field · 189 Account field, Order Line Editor · 31 Account ID on purchase order template · 104 account information editing on the Account Information sub-tab · 30 updating on invoices · 163, 172 working with at the invoice level · 162 Account Name on purchase order template · 104 accounts adding on the Account Information sub-tab · 32 deleting on the Account Information sub-tab · 33 acq.wfm · 16 Acquisitions Addresses parameter · 15, 30 Acquisitions Expected reminders · 262 Acquisitions Libraries parameter · 33 Acquisitions List Flag parameter · 124 active vendors, determining · 3 Add Credit (Internal) window (fig) · 227 Add Credit (Specific) window (fig) · 227 PROPRIETARY INFORMATION OF VTLS INC. Add Credit Request dialog box (fig) · 226 Add Credit window, displaying · 225 Add Distribution Groups window (fig) · 72 displaying the list of libraries · 73 editing the List of Libraries · 74 Add Distribution Groups window, aspects of · 75, 76 Add Invoice Line Items window (fig) · 149, 150 Add Invoice Request dialog box (fig) · 142 Add Invoice window aspects of · 144 buttons · 146 displaying · 141 header elements · 144 order line information · 145 Add Invoice window (fig) · 139, 144, 148 displaying invoice fees · 156 displaying line fees · 159, 177 inserted line items · 152 Add Order window aspects of · 9 Billing/Shipping Information tab, elements of · 14 buttons · 16 COG (fig) · 6 Create Brief Bib button · 16 item-level buttons · 16 Line Items list box · 15 Monograph or Serial (fig) · 5 non-editable header, elements of · 11 Order Header Information tab, elements of · 11 order-level buttons · 17 Add Order window (fig) Billing/Shipping Information tab · 14 Catch-all Order Group · 9 copied purchase order · 69 displaying a line item · 21 header · 4, 11 Order Header Information tab · 10 Renewal · 66 Add PO Request dialog box accessing · 2 completing · 3 Add PO Request dialog box (fig) · 3 Add Reminder button · 266 Add Reminder dialog box · 268 Add Reminder dialog box (fig) · 273, 276 Add Title Selection List window · 58 Add/Update Invoice Request dialog box (fig) · 138 Add/Update Receipts Request dialog box (fig) · 111 adding accounts on the Account Information sub-tab · 32 COG order line items · 22 fees to invoices · 153 internal credits to the database · 229 invoice header fees · 153 invoice line-item fees · 156 Virtua ILS – Integrated Library System 282 Acquisitions (v. 43.1) invoices · 147 line items on invoices · 148 order descriptions to COG orders · 8, 25 payment vouchers to the database · 217 purchase order line items · 18, 25 purchase orders · 2 receipts · 114 reminders at the line-item level · 271 reminders at the order header level · 274 specific credits to the database · 227 User-defined reminders · 267, 270 alert upon receiving a requested item · 110, 115, 117 alternate vendor name, choosing · 3 Apply Credits button · 192 Apply Credits to Invoice Line Item window Balance Information · 209 Apply Credits to Invoice Line Item window (fig) · 209 Apply Credits to Invoice window Balance Information · 196, 200, 213 Apply Credits to Invoice window (fig) · 196, 200, 213 applying invoice header taxes · 165 invoice header-level discounts · 160 invoice line item taxes · 167 invoice line-item discounts · 161 Approval Plan orders, managing · 39 Approved order status · 9 asterisks commenting out information on templates · 99 denoting a purchase order line item note · 27 on (Credit) Notes button · 228, 229 on (Display Voucher) Notes button · 221 on (Line Item Receipts) Notes button · 120 on (PO line) Notes button · 27 on (PO) Notes button · 17 Author on purchase order template · 105 Auto Cancel Purchase Orders Flag parameter · 253 Auto Receive check box · 109 default receipt values used · 39 on Order window · 39 Auto Receive function · 109 description of · 39 autoClaim.exe · 252, 262 automatic transmission of orders · 86 B batch claiming · 252 bib information, dragging and dropping · 20 Billing Method field · 15 Billing Sent To field · 15 Billing/Shipping Information tab (fig) · 14 Billing/Shipping Information tab, elements of · 15 BISAC · 86 brief bibliographic records, creating · 16 buttons Virtua ILS – Integrated Library System Add Distribution Groups window · 77 Add Invoice window · 146 Add Order window · 16, 17 Cancel Order window · 60 Claims window · 249 Invoice (payment) window · 205 Receipts window · 113 Reminders window · 266 Select Invoices for Payment window · 191 C calendar (fig) payment date · 193 purchase order date · 13 Cancel All button, Cancel Order window · 60 Cancel button purchase orders · 17 Receipts window · 137 Cancel Date field · 7, 13 Cancel Line button, Cancel Order window · 61 Cancel Order window (fig) · 60, 62 Cancel Order window, command buttons · 60 Cancel PO Request dialog box. (fig) · 59 canceled purchase orders and record masking · 58 printing · 93 related system processes · 63 sending · 63, 89 updating · 44 canceling COG purchase orders · 59 purchase order line items · 58, 61 purchase orders · 58, 59 Serial purchase orders · 59 transmission of purchase orders · 93 cancellation notices · 64 sending to vendors · 63 Cataloging User’s Guide · 58 changes to the guide · 279 changing currency at invoice stage · 148 charging items to more than one account · 32 claim count · 250 claim date, calculation of · 252 Claim Expected reminders · 262 Claim ID on claim letter · 243 claim interval · 237, 252 claim letters · See also engprintclaim.utf default example · 238 default template file (fig 1) · 241 default template file (fig 2) · 244 default template file (fig 3) · 246 designating number in sequence · 243 editing · 239, 240 printing · 238, 254, 255 translating · 239 PROPRIETARY INFORMATION OF VTLS INC. Acquisitions (v. 43.1) 283 claiming aspects of · 236 disallowed on the Add Order window · 17 line items on orders · 250 purchase orders · 250 transmitted orders · 52, 236 claims · 43 deleting · 260 intervals for · 237 issuing in batch · 252 issuing individual · 250 limits for · 237 methods of transmission · 236, 237, 254 processing in batch · 252 running autoClaim.exe · 252 setting up the printed letter · 238 system processes for · 260 transmitting · 253 all outstanding · 259 individual (e-mail) · 256 individual (print) · 254 viewing · 248 viewing from the Reminders window · 267 working with · 236 Claims button · 266 on Order Line Editor window · 27 on purchase orders · 17 Claims window aspects of · 248 button descriptions · 249 column descriptions · 249 Claims window (fig) · 248, 251, 252, 256, 259 reminders functionality · 274 COG orders canceling · 59 canceling line items · 46 completing the order description · 8 deleting · 54, 56 deleting line items · 46 editing line items · 35 linking to the bibliographic record · 8 Statuses tab availability · 22 transmission method for · 85 updating · 43, 46 column widths, adjusting · 10, 112, 144, 249 command buttons · See buttons Condition codes defining · 123 examples of · 123 Condition column, Receipts window · 113 conditions of receipt · See Condition codes copied order, aspects of · 69 Copies field, Order Line Editor · 29 Copy (Orders) function, using · 67 Copy Item button (Order) · 16 Copy PO dialog box (fig) · 68 copying PROPRIETARY INFORMATION OF VTLS INC. order line items · 21 purchase orders · 66 Create Brief Bib button · 18 using · 16 Create Voucher Request dialog box (fig) · 187, 215 creating brief bibliographic records · 16 payment vouchers · 186 payment vouchers without invoices · 215 credit memos · 169 used to update paid invoices · 181 credit numbers, criteria for · 226 Credit SAP field · 229 credits adding notes to · 228, 229 adding to the database · 227, 229 applying to all paid invoices · 195, 197 applying to an invoice line item · 208, 210 applying to selected invoices · 199, 201 applying to the whole invoice · 212, 214 deleting · 233 displaying the Add Credits window · 225 expanding to view · 196, 199, 208, 213 locking · 225, 230, 233 system checks upon saving · 228 system-defined statuses for · 228, 229 types supported · 224 updating · 230 viewing · 232 working with · 224 Currencies parameter · 13 currency requirements invoices · 145, 152 paying invoices · 189 purchase orders · 18 currency tooltip · 12 Currency Type field · 145 editing at invoice stage · 148 payment vouchers · 189 purchase orders · 13 customizing claim letters · 238 distribution receipt · 84 payment vouchers · 222 purchase order letters · 96 receipt reports · 146 receipt slips · 125 D Default Payment Voucher Template File (fig) · 223 Default Purchase Order Letter Template engmonprintpo.utf (fig 1) · 100 engmonprintpo.utf (fig 2) · 103 engmonprintpo.utf (fig 3) · 105 engmonprintpo.utf (fig 4) · 107 Virtua ILS – Integrated Library System 284 Acquisitions (v. 43.1) default purchase order templates · 96 editing data elements · 100 editing overview · 99 tips for editing · 99 use of · 97 default transmission method · 15, 88, 92 default values purchase order line items · 26 purchase orders · 38 Delete button Claims window · 260 Delete Credit window · 234 Delete Invoice window · 182 Delete Order window · 56 Line Item Receipt Information window · 136 Update Invoice window · 173 Update Order window · 56 Delete Credit Request dialog box (fig) · 234 Delete Credit window (fig) · 234 Delete Invoice Request dialog box (fig) · 181 Delete Invoice window (fig) · 182 Delete Item button (Order) · 16, 50 Delete Order window (fig) · 56 Delete Order window, displaying · 54 Delete PO Request dialog box (fig) · 55 deleting accounts on the Account Information sub-tab · 33 claims · 260 COG orders · 54, 56 credits · 233 invoice discounts · 178 invoice fees · 177 invoice taxes · 168 invoices · 181 line items on invoices · 173 line items on orders · 50 line items on receipts · 136 purchase orders · 51, 54, 56 User-defined reminders · 277 Deposit/Donation payment type and Serial orders · 33 Discount Amount field · 162 Discount Line SAP field · 162 Discount Percent field · 162 Discount SAP field · 160 discounts application of · 159 deleting on invoices · 178 encumbrance of · 159 invoice header level, applying · 160 invoice line-item, applying · 161 updating on invoices · 178 working with on invoices · 159 Display Voucher window (fig) · 219 Distribution button Order Line Editor · 70, 71 Receipts window · 78 distribution groups Virtua ILS – Integrated Library System specifying for Monograph orders · 71 system checks on selection of · 41 updating · 77 viewing · 77 working with · 70 working with upon receiving · 78 Distribution Groups parameter · 70 distribution information editing upon receiving · 78 printing upon receiving · 81 distribution receipts printing · 81 template file (fig) · 83 distributionprint.utf · 84, 97 working with · 82 drag-and-drop tool using to insert COG order descriptions · 8, 24 using to insert P.O. line items · 20, 24 Due Date field, Order Line Editor · 29 duplicate order numbers, system check · 40 E EDI standard · 86 incompatibility with distribution groups · 86 Virtua support for · 86 EDIFACT and shipping methods · 15 description of files · 94 error handling in transmissions · 95 formatting output · 86 implementation of EDI · 86 preparations for use · 86 storage of files · 85 transmission method · 15 transmissions of purchase orders · 85, 94 Edit button (Invoice Fees) · 174, 176 Edit Distribution Groups window (fig) · 80, 81 Edit Item button (Order) · 16 Edit Receipt Information dialog box (fig) · 117, 122, 132 split line items · 127 Edit Receipt Information dialog box, completing · 122 editing account information · 30 claim letter template files · 239, 240 distribution information · 78 enumeration information COG orders · 35 Serial orders · 34 Ignore Until date · 269 line items on invoices · 149 order line items · 25 P.O. template files · 99, 100 payment voucher template files · 222 receipt slips · 125 PROPRIETARY INFORMATION OF VTLS INC. Acquisitions (v. 43.1) 285 Edition Statement on purchase order template · 105 E-mail (Claims) Records dialog box (fig) · 257 E-mail Records dialog box · 91 E-mail Records dialog box (fig) · 91 E-mail transmission method, purchase order · 15, 85 e-mailed purchase orders, canceling transmission of · 93 e-mailing claims · 237 purchase orders · 91 encumbrances, updated at the invoice level · 183 engcogprintcancelpo.utf · 14, 97 engcogprintpo.utf · 14, 97 engcogprintporush.utf · 97 engmonprintcancelpo.utf · 13, 60, 97 engmonprintpo.utf · 13, 97 default template file · 100, 103, 105, 107 editing details billing/shipping addresses · 106 date · 102 entity ID · 102 header · 100 notes · 106 salutation · 103 signature · 107 table columns · 104 table rows · 105 vendor · 101 engmonprintporush.utf · 97 engprintclaim.utf · 97, 239, 255 customizing · 238 default template file · 241, 244 editing data elements · 240 date · 242 entity ID · 243 header · 241 overview · 239 salutation · 244 signature · 247 table columns · 245 table rows · 246 tips · 240 vendor · 242 sample text file · 246 engserprintcancelpo.utf · 14, 97 engserprintpo.utf · 13, 97 engserprintporush.utf · 97 Entity ID on claim letter · 243 Enumeration Information sub-tab editing for COG orders · 35 editing for Serial orders · 34 Error message - over-encumbrance (fig) · 42 errors during order transmission · 95 Exit This Window radio button · 16, 37, 114, 137, 147, 183, 193 Expand (Receipt) button · 113 PROPRIETARY INFORMATION OF VTLS INC. Expand Credits button · 192 Expand function · 119 Expand Invoice button · 192 Expected reminders · See Acquisitions Expected reminders or Claim Expected reminders Express Receive button · 113 Express Receive function · 115 F fee codes, defining in parameters · 153 Fee SAP field · 155, 157 fees adding to invoices · 153 assessment of · 153 deleting on invoices · 177 invoice header, adding · 153 invoice header, updating · 173 invoice line-item, adding · 156 invoice line-item, updating · 175 updating on invoices · 173 fees vs. taxes · 153, 164 Filter Acquisitions Records By Log-in Location flag · 70, 90 Filter Acquisitions Records by Log-in Location setting · 15 Filter Acquisitions Records By Log-in Location setting · 30, 31 effects on the Account Information tab · 31 Filter By Location check box · 89 Fiscal Year field, Order Line Editor · 32 fiscal years, editing on orders · 32 FRBR record window, dragging and dropping from · 25 ftp, method for sending/receiving orders · 86 Fund Code field, Order Line Editor · 32 Fund Code value, source of · 32 G General Reminders Request · 263 General Reminders Request window · 270 General Reminders Request window (fig) · 264 Getting Started with Acquisiitons Guide · 18 Getting Started with Acquisitions Guide · 58 Getting Started with Virtua Acquisitions Guide · 1, 52, 192 grace period for vendors · 252 H header Add Invoice window · 144 Virtua ILS – Integrated Library System 286 Acquisitions (v. 43.1) Add Order window · 11 claim letter · 240, 241 fees · 146 Items or Holdings tab, View Bibliographic Record window · 20, 25 Line Item Receipt Information window · 119 purchase order letter · 99, 100 Receipts window · 112 Select Invoices for Payment window · 188, 193 header fees · See invoices OR fees holdings record creation and the Serial order · 5 I Ignore Until button · 266 Ignore Until date · 262 modifying · 269 setting a new · 262 Immediately Proceed to Invoices radio button · 16, 38, 109, 114, 137, 142 affect on the Invoice Line Item Display setting · 141 Immediately Proceed to Payments radio button · 140, 141, 147, 183, 184 Immediately Proceed to Receipts radio button · 16, 109, 110 Import Records to Selection List window · 58 Include All Lines on Invoice check box · 151 Include Line Item on Invoice check box · 151 Information (Voucher Added) window (fig) · 218 InfoStation · 124 Insert button (Invoice Fees) · 154 Insert button (Invoice) · 148 Insert button (Line Fees) · 157 Insert button (Order) · 146 Insert Item button (Order) · 16, 18 inserting COG order line items · 22 line items on invoices · 148 order line items · 18 internal credits · 224, 226 adding · 229 description of · 229 introduction to the guide · 1 Invoice (payment) window aspects of · 202 balance information · 203 buttons · 205, 206 exiting · 214 fee-related buttons · 204 fees information · 203 line items display box · 205 taxes information · 203 tax-related buttons · 204 Invoice (payment) window (fig) · 202, 207, 211 display after payment · 212 Virtua ILS – Integrated Library System invoice currency, at header level · 148 Invoice Date field · 145 invoice details, viewing from payment window · 220 Invoice Discount button · 146 Invoice Discount field · 144 Invoice Discounts dialog box (fig) · 160 Invoice Fee Modification Dialog Box (fig) · 155 Invoice Fee Total field · 144 Invoice Fees button · 146, 154, 173 Invoice Fees dialog box (fig) · 154, 155, 174 Invoice field · 144 invoice IDs · See invoice numbers Invoice Line Item Display parameter · 141, 149 Invoice Line Item window (fig) · 161, 163, 172 invoice line items · See line items on invoices Invoice Line Taxes window (fig) · 167 Invoice Notes button · 146 invoice numbers assigning · 142 specifications for · 139, 143, 144 Invoice Price Variance Threshold parameter · 151, 172 Invoice Quantity field · 151 invoice receipt report · See Receipt Report button Invoice SAP field · 145 Invoice Status field · 151 Invoice Tax Total field · 144, 166 invoice taxes · See taxes Invoice Taxes button · 146, 165, 168 Invoice Taxes window (fig) · 166 Invoice Total field · 145 Invoice Unit Price field · 150 Invoice Unit Price, editing · 151 invoices adding · 147 adding fees · 153 applying credits to · 212 applying header taxes to · 165 applying line-item discounts · 161 deleting · 181 deleting discounts · 178 deleting fees · 177 deleting line items · 173 deleting taxes from · 168 editing the currency type · 148 header fees adding · 153 encumbering · 153 header fees, updating · 173 header-level discounts, applying · 160 inserting line items · 148 line-item fees adding · 156 encumbering · 156 line-item taxes applying · 167 encumbering · 167 PROPRIETARY INFORMATION OF VTLS INC. Acquisitions (v. 43.1) 287 locking · 141, 169, 181 no limit to number of POs linked · 152 options when saving · 140 options when saving · 183 paying · 211 paying all · 194 paying selected · 197 paying when saving · 147, 184 quantity received how system determines · 134 repetitive workflow · 140 saving · 182 options when… · 147 selecting for payment · 194 software actions after saving · 183 statuses · 144 updating · 169 updating account information · 172 updating discounts · 178 updating fees · 173 updating line items · 171 updating line-item fees · 175 updating taxes on · 168 viewing · 179 working with · 140 working with account information · 162 working with discounts · 159 working with taxes · 164 invoicing received items only · 141 invoicing unreceived items · 141 invoicing upon saving an order · See Immediately Proceed to Invoices radio button. See Immediately Proceed to Invoices radio button invoicing when saving a receipt · See Immediately Proceed to Invoices radio button ISBN/ISSN, searching line items by · 150 ISSN/ISBN on purchase order template · 104 Item Note on purchase order template · 106 Item Reminder button · 113 L lead time for orders · See order interval Line Fee Modification dialog box (fig) · 157 Line Fees button · 146, 156, 175 Line Fees dialog box (fig) · 157, 158, 176 Line Item Header Information tab elements for Monograph orders · 29 Line Item Receipt Information window · 119 buttons · 120 header elements · 119 list box · 120 viewing · 119 Line Item Receipt Information window (fig) · 119, 121, 130, 131, 133, 136 PROPRIETARY INFORMATION OF VTLS INC. split line items · 128 line items on invoices deleting · 173 inserting · 148 updating · 171 line items on orders adding · 18, 25 adding on COGs · 22 assigning shipping addresses · 30 bibliographic information about · 21 canceling · 58, 61 charging to more than one account · 32 copying · 21 deleting · 50 editing · 25 effects of deleting · 51 persistence of default values · 26 recalling on Add Invoice Line Items window · 149 unlimited number allowed · 18 updating · 48 viewing · 53 viewing notes for · 120 line items on payment vouchers applying credits to · 208 aspects of · 202 balance information · 203 buttons · 205, 206 display box · 205 fee information · 203 fee-related buttons · 204 paying · 207 tax information · 203 tax-related buttons · 204 viewing · 201 working with · 201 line items on receipts adding · 120 deleting · 136 receiving more than ordered · 129 updating · 129 viewing · 135 Line Notes button (invoices) · 146 Line Taxes button (invoices) · 146, 167, 168 linking COG orders to the bibliographic record · 8 List of Library Locations, Distribution Groups window · 76 List of Titles window, dragging and dropping from · 18, 25 Location field, Order Line Editor · 30 location names, defining in the Virtua Profiler · 30 location, sending orders by · 89 locations use of in Serial orders · 33 locks on records · 141, 169, 181, 225, 230, 233 log-in location filter · See Filter Acquisitions Records By Log-in Location flag Virtua ILS – Integrated Library System 288 Acquisitions (v. 43.1) M Manifestation record, dragging and dropping from · 25 Mask Record check box · 58 masking records created for canceled orders · 58 maximum number of claims · 237 Maximum Number of Claims · 277 exceeding · 252, 253 set in the vendor record · 252 value set in the vendor record · 253 Method of Payment field · 145 modifying · See updating Monograph orders deleting line items · 45 elements of the Line Item Header Information tab · 29 specifying distribution groups · 71 transmission methods for · 85 updating · 43, 44, 47 N NBL · See New Book List New Book List adding to · 124 check box · 118, 124 generating a report from · 124 New Book List parameter · See Acquisitions List Flag parameter New Claim button · 249 New Ignore Until Date field · 269 New Vouchers icon · 186 No Specific Method, meaning of · 15 Notepad · 84, 96, 99, 126, 239 notes · 43 adding to credit records · 228, 229 payments without invoices · 217 purchase orders · 17 adding to updated purchase orders · 52 Notes button credits · 228, 229 invoice line items · 146 invoices · 146 Line Item Receipt Information window · 120 payments · 192, 217 purchase orders · 17 O OPAC Search window (fig) · 19 order cancellations and system processes · 63 Order Description field · 6, 8 not active after transmission · 46 Virtua ILS – Integrated Library System Order Header Information tab – COG (fig) · 12 Order Header Information tab – Monograph/Serial (fig) · 12 Order Header Information tab (fig) · 10 Order Header Information tab, elements of · 11 order interval · 29, 237, 252 Order Line Editor aspects for COGs · 35 aspects for Monographs · 28 aspects for Serials · 33 Bibliographic Information tab (fig) · 26 Distribution-enabled Monograph order (Account Information) (fig) · 75 Distribution-enabled Monograph order (fig) · 71 Enumeration Information sub-tab (fig) · 34, 36 Monograph (fig) · 28 Order Line Editor window (fig) · 27, 49 Account Information tab · 31 Cancel function · 61 order line items · See line items on orders Order Number field · 3, 11 order number, finding · 111 Order Type field · 3, 11 Ordered By field · 45 Ordered column, Distribution Groups window · 76 Other Standard Identifier · 104 P paid invoices applying credits to all · 195 applying credits to selected · 199 updating · 169 parameters for fiscal years · 228 for invoice header fees · 153 for invoice line-item fees · 156 for invoice line-item taxes · 167 for miscellaneous invoice fees · 153 for New Book List · 124 for receipt conditions · 123 for receipt statuses · 123 for receipts · 110 for subject codes · 33 Pay All button · 192 Pay Balance button · 191 Pay Cancel button · 191, 192 Pay When Saving check box · 187 paying invoices automatically upon saving · 184 paying when saving an invoice · See Immediately Proceed to Payments radio button Payment Date field · 189 editing · 193 Payment SAP field · 189, 216 Payment Type field · 3, 11 PROPRIETARY INFORMATION OF VTLS INC. Acquisitions (v. 43.1) 289 payment voucher line items · See line items on payment vouchers payment vouchers Accession Number · 193, 194, 216 adding notes to · 217 adding to database · 217 creating · 186 creating without invoices · 215 customizing · 222 expanding selected invoices · 201 options when saving · 193 overview · 185 paying all invoices · 194 paying an invoice line item · 207 paying on the whole invoice · 211 Print File Prefix · 193, 194, 216 printed example · 222 printing · 217, 221 saving · 217 selecting invoices for payment · 194, 197 setting up printed forms · 222 viewing · 218 working with · 185, 222 payment window, displaying · 186 payments, repetitive workflow · 186 Percent field, Order Line Editor · 32 percent values, editing on orders · 32 PO Total on purchase order template · 106 preferred language of vendor · 67 price variance threshold · See Invoice Price Variance Threshold parameter price, editing on orders · 29 Print (Claim) dialog box · 254 Print (Claim) dialog box (fig) · 254 Print (Distribution) dialog box · 81 Print (Distribution) dialog box (fig) · 82 Print (Order) dialog box · 91 Print (Order) dialog box (fig) · 91 Print (Receipt) dialog box · 124 Print (Voucher) dialog box · 217, 222 Print (Voucher) dialog box (fig) · 218 Print File field, purchase orders · 13 Print File Prefix (for payments) · 193, 194, 216 print files available for purchase orders · 96 Print Receipt Slip check box · 118 Print Receipt Slip When Saved check box · 124 Print transmission method, purchase order · 15, 85 Print Voucher dialog box · 185 printing canceled orders · 93 claim letters · 254, 255 copy of transmitted order · 95 distribution information · 81 payment vouchers · 217 purchase orders · 87, 88, 91 receipt reports · 146 receipt slips · 124 PROPRIETARY INFORMATION OF VTLS INC. viewed payment vouchers · 221 printvoucher.utf · 97, 223 editing · 222 priority purchase order header notes, indication of · 113 pro forma invoices, handling · 141 Publication Statement on purchase order template · 105 purchase order header information, system checks upon saving · 40 purchase order letter default example · 98 editing details · See also engmoprintpo.utf working with · 96 purchase order letter templates editing data elements · 100 editing overview · 99 location of · 96, 97 read-only upon installation · 99 rules for overwriting · 97 tips for editing · 99 types available · 96 use of · 97 purchase order line items · See line items on orders purchase order number assigning · 3 finding · 111 length of · 3 no way to reset · 3 purchase orders adding · 2 line items · 18 notes to · 17 adding/editing notes in Update mode · 52 adding/editing reminders in Update mode · 51 assignment of numbers · 11 automatically transmitting · 86 Billing Method field · 15 Billing Sent To field · 15 Billing/Shipping Information tab, elements of · 14 canceling · 59 overview · 58 Serial and COG · 58 canceling transmission of · 93 claiming · 250 claiming a line item · 250 copying · 66 Currency Type field · 13 customizing the printed order · 96 deleting · 51, 54 from Delete Order window · 54 from Update Order window · 56 line items · 50 editing account information · 30 Fiscal Year field · 32 line items · 25 Virtua ILS – Integrated Library System 290 Acquisitions (v. 43.1) Percent field · 32 e-mailing · 91 invoicing upon saving · 38 issuing claims · 52 locking · 111, 141, 169, 181 no limit to number linked to invoices · 152 non-editable header, elements of · 11 options for sending · 89 options when saving · 16, 37 Order Header Information tab, elements of · 11 persistence of default values · 38 Print File field · 13 printing · 85, 87, 88, 91 renewing subscriptions · 64 resending · 95 Rush Order checkbox · 38 saving · 36 sending · 85, 87, 88 Shipping Method field · 15 Shipping Sent To field · 15 software actions after saving · 40 specifying method for sending · 86 standards of transmission · 86 status of · 12 Transmission Method field · 15 transmission methods · 85, 87 updating · 43 line items · 48 viewing · 52 line item notes · 120 line items · 53 viewing from the Reminders window · 268 working with · 43 Q Quantities area, Distribution Groups window · 77 quantity received, criteria for invoicing · 134 R Receipt Date field · 124 receipt line items · See line items on receipts Receipt Report button · 146 receipt slips customizing · 125 elements of · 125 printing · 124 receipt values used with Auto Receive · 39 receipt.utf · 97, 126 default template file · 126 receipts adding · 114 indirectly · 120 using Expand · 119 Virtua ILS – Integrated Library System using Express Receive · 115 using Receive · 116 alert for requested items · 110, 115, 117 Condition codes for · 123 deleting line items · 136 features of · 109 introduction to · 108 invoicing upon saving · 137 locking · 109 options for adding · 114 when saving · 108, 137 overview · 108 printing slips · 124 receiving more than ordered · 129 related parameters · 110 repetitive workflow · 108, 114 requirements for · 108 saving · 137 and printing slips · 137 options when… · 114 to the database · 121 Serial orders · 108 splitting receipt of a line item · 127 statuses · 123 Accepted as Duplicate · 131 Returned · 123, 131 updating · 129 example · 131 receipt information at the invoice stage · 141 viewing · 134 working with · 108 Receipts window · 42 aspects of · 112 buttons · 113 displaying · 110 displaying from the Statuses tab · 110 Distribution-enabled Monograph order (fig) · 79 header · 112 proceeding to invoices in View mode · 136 receipts line items · 113 viewing · 134 Receipts window (fig) · 115, 117 Add/Update mode · 112 after Express Receive · 116 after Receive function · 118 Condition values split · 129 updated with receipts information · 122 View mode · 135 Receive button · 113 Receive function · 116 Receive Quantity field · 151 received purchase order line items only, displaying on invoices · 141, 149 receiving at the invoice stage · 109 automatically · 39, 109 PROPRIETARY INFORMATION OF VTLS INC. Acquisitions (v. 43.1) 291 receivingreport.utf · 97, 146 reclaim interval · 237, 253 record locking · 141, 169, 181, 225, 230, 233 reminders · 43. See Also User-defined reminders Acquisitions Expected · 262 adding to orders from the Order, Receipts, or Claims window · 274 adding to purchase order line items from the Order, Receipts, or Claims window · 271 adding to updated purchase orders · 51 adding User-defined · 267, 270 automatic deletion of · 277 Claim Expected · 262 date range default · 264 deleting manually · 270 User-defined · 277 filtering by location · 264 filtering searches · 264 interaction with Acquisitions functions · 277 link to orders · 265 location · 266 modifying the Ignore Until date · 269 points of access · 270 searching for · 263 system generated · 262 types of Acquisitions · 262 types supported by Virtua · 261 User-defined · 263 viewing · 263 viewing from the Order, Receipts, or Claims window · 271 working with · 261 Reminders button · 114, 249 Reminders window aspects of · 265 command buttons · 266 list box · 265 using · 266 Reminders window (fig) · 262, 265, 267, 273, 276 Renew PO Request dialog box (fig) · 65 renewing, Serial purchase orders · 64 renumbering on copied order · 69 Repeat This Function radio button · 16, 38, 114, 137, 147, 183, 193 repetitive workflows invoices · 140 payments · 186 purchase orders · 38 receipts · 108, 114 reports on canceled orders · 63 on New Book List · 124 requestor barcode, system validity check · 41 resending purchase orders · 95 resizing windows Add Order · 10 PROPRIETARY INFORMATION OF VTLS INC. Apply Credits window · 196 Claims window · 249 Invoice · 144 Invoice (payment) · 203 Receipts · 112 Select Invoices for Payment · 188 Rush Order check box · 38 Rush Order function, description of · 38 Rush orders, sending · 89 S SAP code fields internal credits · 229 invoices · 145 payments · 189, 216 SAP codes applying to invoice discounts · 160 applying to invoice fees · 155 applying to invoice line discounts · 162 applying to invoice line taxes · 168 applying to invoice line-item fees · 157 applying to invoice taxes · 166 Save button Account Information tab · 32 Add Credit window · 228, 229 Add Distribution Groups window · 74 Add Order window · 69, 87 Cancel Order window · 62, 63 Edit Receipt Information dialog box · 118, 121, 127, 130, 132, 133 Invoice Fees dialog box · 155 Invoice window · 146 Line Fees dialog box · 158 Line Item Receipt Information window · 121, 130 Order Line Editor · 49, 61 purchase orders · 17 Receipts window · 118, 121, 124, 131, 137, 138 Select Invoices for Payment window · 217 Update Credit window · 231 Update Order window · 48, 50, 51, 57 Vouchers Without Invoices window · 217 saved COG orders, sending · 87 saved Monograph and Serial orders, sending · 87 saving invoices · 182 system checks · 183 payment vouchers · 217 purchase orders · 36 system checks · 40 receipts · 137 SC UniPad · 239 Search ISBN/ISSN button · 150 Select Invoices for Payment window aspects of · 188 balance information · 190 Virtua ILS – Integrated Library System 292 Acquisitions (v. 43.1) buttons · 191, 192 header elements · 188 editing · 193 invoices display box · 191 Select Invoices for Payment window (fig) · 184, 188, 195, 198 more than one currency · 190 Selected Distribution Groups list · 76 Send Orders dialog box (fig) · 89 transmit canceled orders function · 64 Send Orders function options available · 89 special rules · 88 using · 87 Send Orders Summary window for EDIFACT orders · 94 for e-mailed orders · 92 for printed orders · 92, 93 Send Orders Summary window (fig) · 93, 94 Send To (e-mail) field, automatic population of · 91 sending canceled purchase orders · 63 claims · 253 distribution information · 81 multiple purchase orders · 88 purchase orders · 86, 87, 88 rush orders · 38 Serial orders and the Deposit/Donation payment type · 33 assigning locations · 33 automatic creation of holdings records · 5 canceling · 59 deleting line items · 45 editing enumeration information · 34, 35 line items · 33 renewing · 64 transmission method for · 85 updating · 43, 44, 47 use of subject codes · 33 serial title not displaying in Update/View modes · 49 Serials Reminders icon · 263 Series Statement on purchase order template · 106 Set Ignore Until Date dialog box (fig) · 269 shipping information · See Billing/Shipping Information tab Shipping Method field · 15 Shipping Sent To field · 15 Shipping Sent To field, Order Line Editor · 30 SISAC · 86 specific credits · 224, 227 adding · 227 Standing orders, managing · 39 Status field COG purchase orders · 7, 12 credits · 228, 229 invoices · 144 Virtua ILS – Integrated Library System Monograph/Serial purchase orders · 12 Status field, Order Line Editor · 30 statuses claim · 249 purchase orders · 12 receipt · 123 Statuses parameter · 30, 151 Statuses tab, View Bibliographic Record window · 23, 39, 41 Statuses tab, View Bibliographic Record window (fig) · 24 Subject Code field, Order Line Editor · 29 subject codes examples of · 30 role in deposits/donations · 33 setting up in the Virtua Profiler · 33 use with serial orders · 33 Subject Codes parameter · 29, 33 sublocations required for Serial orders · 33 subscription dates recording · 35 use of · 35 SubscriptionRenewalAction Orders function · 64 System Management: Acquisitions User's Guide · 253 T taxes appearance on payments · 203, 205 applying to invoice headers · 165 invoice line items · 167 calculation of · 164, 166, 168 deleting from invoices · 168 encumbrance of · 164 updating on invoices · 168 working with on invoices · 164 Taxes button invoice line items · 146 invoices · 146 Taxes parameter · 164 taxes vs. fees · 153, 164 templates claim letter · 239 distribution receipt · 82, 83, 84 payment voucher · 223 purchase order letters · 13, 96, 97, 99 receipt slip · 125, 222 receiving report · 146 Title on purchase order template · 105 Title Selection List · 1, 18 tooltips use in viewing home currency value · 12 use in viewing long vendor names · 11, 189, 220 Total Distributed field · 74 PROPRIETARY INFORMATION OF VTLS INC. Acquisitions (v. 43.1) 293 Total field payment vouchers · 190, 203 purchase orders · 12 Total Ordered field · 74 Total Price field, Order Line Editor · 29 Total Received field · 74 Trans Method field, purchase order · 15 transaction log logging credit transactions · 224, 228 logging purchase order updates · 51 logging purchase orders · 42 logging receipt deletions · 136 transmission methods claims · 249, 254 display of · 88 purchase orders · 15, 85, 87 default · 92 stored in the vendor record · 15, 86 Transmit (Claim) button · 249 Transmit and Reopen for Update radio button · 6, 7, 17, 38 Transmit Canceled Orders check box · 64, 90 Transmit Claims function · 253 transmitted order, printing copy of · 95 transmitting canceled purchase orders · 63 claims · 237 at the header level · 253 at the line-item level · 253 purchase orders · 86, 88 error handling · 95 upon saving · 86 upon updating · 87 saved COG orders · 87 saved Monograph and Serial orders · 87 updated orders · 87 transmitting purchase orders · See also sending purchase orders types of credits · 224 orders · 2 reminders · 261 displaying invoice fees · 175 line-item tax · 170 Update Order window (fig) Catch-All Order Group · 23, 47 Serial order · 48 Update Order window, accessing · 44 Update PO Request dialog box (fig) · 44 updated orders, transmitting · 87 updating accounts on invoices · 163, 172 canceled orders · 44 COG orders · 43, 46 credits · 230 distribution groups · 77 encumbrances · 183 fees on invoices · 173 invoice discounts · 178 invoice header fees · 173 invoice line-item fees · 175 invoices · 169 line items on invoices · 171 line items on orders · 48 Monograph orders · 44, 47 paid invoices · 169 purchase order header elements · 48 purchase orders · 43 receipt information at the invoice stage · 141 receipts · 129 example · 131 Serial orders · 44, 47 taxes on invoices · 168 Use Distribution Groups check box · 70 Use SAP flag · 145, 157, 160, 162, 166, 168, 189, 216, 228, 229 Use Taxes flag · 144, 146, 161, 164, 171 User-defined reminders · 263 accessing those not linked to POs. · 270 adding · 267, 270 adding at the line-item level · 271 adding at the order header level · 274 deleting · 277 restriction on length · 268 using this guide · 1 UTF-8 format · 238 U Unapply Credits button · 192 Unicode · 84, 96, 99, 126, 223, 239 Unit Price field, Order Line Editor · 29 unmasking bibliographic records upon receipt · 110 unreceived items invoicing · 38 Unselected Distribution Groups list · 76 Update Credit Request dialog box (fig) · 230 Update Credit window (fig) · 231 Update Invoice Request dialog box (fig) · 170 Update Invoice window (fig) PROPRIETARY INFORMATION OF VTLS INC. V VAT, calculated automatically on invoices · 164 vendor discount percent editing · 162 stored in vendor record · 144 Vendor Discount Percent field · 144 Vendor field · 3, 11 vendor grace period · 252 vendor name choosing · 3 Virtua ILS – Integrated Library System 294 Acquisitions (v. 43.1) displaying long names in headers · 11 Vendor Title ID column Add Invoice window · 145 Add Order window · 16 Vendor Title ID column, Receipts window · 113 Vendor Title ID field, Order Line Editor · 29 Vendor Title ID on purchase order template · 105 vendors, determining validity of · 3 View Bibliographic Record window dragging and dropping from · 18, 20, 25 Statuses tab · 39, 41 View Bibliographic Record window (fig) · 20 Statuses tab · 110 View Credit Request dialog box (fig) · 232 View Credit window (fig) · 233 View Invoice Request dialog box (fig) · 138, 179 View Invoice window (fig) · 180 View Order window · 45 accessing from the Reminders window · 265 functions available in Update mode · 45 functions available in View mode · 52 updating on · 44 View Order window (fig) · 53 Reminders · 272, 275 Update mode · 45 View PO Notes button · 113, 120 View PO Request dialog box (fig) · 53 View Receipts Request dialog box (fig) · 134 View Voucher Request dialog box (fig) · 219 viewing claims · 248 credits · 232 distribution groups · 77 Virtua ILS – Integrated Library System invoice details from payment window · 220 invoices · 179 line item taxes · 172 line items on orders · 53 payment vouchers · 218 purchase orders · 52 receipts · 134 Virtua ILS – Integrated Library System · 1 Virtua Profiler/Acquisitions Parameters User’s Guide · 70, 151, 172 Virtua System Management Reference Guide · 86 Voucher ID field · 184, 188, 189 Voucher Without Invoices window (fig) · 216, 220 vouchers · See payment vouchers W When Saving... options invoices · 140, 147, 183 payment vouchers · 193 persistent nature of · 36 purchase orders · 16, 37 receipts · 114, 137 updated purchase orders · 87 When Saving...options (fig) · 37, 183 X X12 · 15 PROPRIETARY INFORMATION OF VTLS INC. Acquisitions (v. 43.1) 295 Reader’s Comment Form Virtua Acquisitions User’s Guide VTLS Inc. welcomes your comments and suggestions on the quality and usefulness of this publication. We will consider your input for future revisions of the guide. Did you find any errors? If so, please indicate the chapter, section, and page number. ______________________________________________________________________________ ______________________________________________________________________________ ______________________________________________________________________________ Is the information clearly presented? If not, please indicate where we need improvement. ______________________________________________________________________________ ______________________________________________________________________________ ______________________________________________________________________________ Do you need more information? If so, where? ______________________________________________________________________________ ______________________________________________________________________________ ______________________________________________________________________________ Are our examples correct? Helpful? Do you need more examples? ______________________________________________________________________________ ______________________________________________________________________________ ______________________________________________________________________________ What features did you like about the guide? ______________________________________________________________________________ ______________________________________________________________________________ ______________________________________________________________________________ Have you any other suggestions for improvement? ______________________________________________________________________________ ______________________________________________________________________________ ______________________________________________________________________________ Please send your comments to: Documentation Manager VTLS Inc. 1701 Kraft Drive Blacksburg, VA 24060 U.S.A. Fax: 540/557/1210 E-mail: [email protected] Thank you for helping us improve our documentation. PROPRIETARY INFORMATION OF VTLS INC. Virtua ILS – Integrated Library System