1
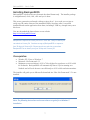
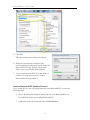
BackyardEOS Version 2.0.0 User's Guide http://www.BackyardEOS.com/ Copyright 2010-2011 BinaryRivers Corporation - All Rights Reserved BackyardEOS – User's Guide Table of Contents BackyardEOS Overview ..................................................................................................... 4 Imaging Mode ................................................................................................................. 4 Frame & Focus Mode ..................................................................................................... 4 Planetary Mode ............................................................................................................... 5 Drift Align Mode ............................................................................................................ 5 Supported Cameras ............................................................................................................. 6 Installing BackyardEOS...................................................................................................... 7 Prerequisites: ................................................................................................................... 7 Create a BackyardEOS Desktop Shortcut................................................................... 9 Camera Preparation....................................................................................................... 11 BackyardEOS Screen Layout............................................................................................ 12 Camera Connection and Imaging Modes Area ............................................................. 12 Camera Information Area ............................................................................................. 12 Minor Modes & Settings Area ...................................................................................... 13 Weather Area ................................................................................................................ 13 Progress Wheel & Abort ............................................................................................... 13 Imaging Center.............................................................................................................. 13 Settings.............................................................................................................................. 14 Image Capture ............................................................................................................... 14 Filename Template.................................................................................................... 15 Download Folder....................................................................................................... 17 Sub- folders ................................................................................................................ 17 Filter List................................................................................................................... 17 Save To ..................................................................................................................... 17 Quality....................................................................................................................... 17 Progress Center ......................................................................................................... 18 Live View...................................................................................................................... 19 Maximum Aperture................................................................................................... 19 Save Snap Images ..................................................................................................... 19 Throttle...................................................................................................................... 19 FWHM Average........................................................................................................ 19 PHD Guider................................................................................................................... 20 PHD dither on start-up: ............................................................................................. 21 Dither aggressiveness:............................................................................................... 21 Settle dither at: .......................................................................................................... 21 Calm down period:.................................................................................................... 21 Weather Provider .......................................................................................................... 21 TEMPerHUM............................................................................................................ 22 Yahoo RSS feed ........................................................................................................ 22 Text File Delimited ................................................................................................... 22 General .......................................................................................................................... 22 Language ................................................................................................................... 23 Daylight Color........................................................................................................... 23 2 BackyardEOS – User's Guide Abort Delay............................................................................................................... 23 Low Battery Alarm ................................................................................................... 23 Netbook Resolution .................................................................................................. 24 Planetary........................................................................................................................ 24 Advanced Settings......................................................................................................... 25 EOS Utility Check .................................................................................................... 25 Skip READ EXIF Data ............................................................................................. 25 Skip WRITE EXIF Data ........................................................................................... 26 Processor Affinity ..................................................................................................... 26 Camera Auto-Connect............................................................................................... 26 Camera Force Read Properties.................................................................................. 26 Experimental Settings: .................................................................................................. 26 BackyardEOS Operations ................................................................................................. 28 Starting BackyardEOS .................................................................................................. 28 Frame and Focus Mode................................................................................................. 29 A word about Full Width Half Maximum (FWHM) ................................................ 29 Focusing without Live View..................................................................................... 30 Imaging Mode ............................................................................................................... 32 Creating an Imaging Session .................................................................................... 32 Using the Capture Plan Center.................................................................................. 32 Histogram Center ...................................................................................................... 33 Aborting an Image Session ....................................................................................... 34 Using the (exposure) Loop feature............................................................................ 34 Using the (exposure) Preview feature. ...................................................................... 34 Using the (exposure) Test Cable feature................................................................... 34 Using the Eclipse Framing feature............................................................................ 35 Some notes regarding Darks and Flats...................................................................... 35 Viewing Images ............................................................................................................ 36 Fit Zoom.................................................................................................................... 36 Presentation ............................................................................................................... 36 Toggle Crosshair ....................................................................................................... 36 EXIF Data ................................................................................................................. 37 Eclipse Framing ........................................................................................................ 37 Thumbnail ................................................................................................................. 37 Other Image Center Controls .................................................................................... 37 Planetary Mode ............................................................................................................. 38 Using the Planetary Capture Plan ............................................................................. 38 Drift Align Mode .......................................................................................................... 41 ASCOM ........................................................................................................................ 43 ASCOM as-is Position or Tear Off........................................................................... 44 Troubleshooting ................................................................................................................ 45 Why is there an alarm every 15 seconds, what does it mean? ...................................... 45 Why is the Camera Center reporting a conflicting dial mode? ..................................... 45 Why is the Lens Drive in Frame & Focus not driving my lens? .................................. 45 Why is the abort button not aborting my session? ........................................................ 45 Index.................................................................................................................................. 46 3 BackyardEOS – User's Guide BackyardEOS Overview BackyardEOS has four main modes; Imaging Mode, Frame & Focus Mode, Planetary and Drift Align Mode. Each mode is specifically designed to focus on the actual task at hand. Imaging Mode The imaging mode allows you to fully automate your imaging session with different capture plans. A capture plan can contain a mix of shutter actuations in one single plan; BULB, Tv, Av, and Program shutter speed if supported by your camera model. In Imaging Mode, BackyardEOS is capable of communicating with the popular guiding software PHD to automate dithering between each exposures (see Settings, PHD Guider section) Automatic RAW acquisition, never forget to set your camera’s image quality to raw again; BackyardEOS will set it to RAW for you. Support several shutter actuations in one single plan; BULB, TV, AV, and Program. Full Dithering support with PHD Guiding software. A comprehensive image files naming structure which includes target name, exposure duration, ISO speed, filters used camera sensor temperature, and timestamp. BackyardEOS keeps your original .CR2 files. No predefined ISO speed list; BackyardEOS gives you the entire selection your camera supports. No predefined TV list; BackyardEOS gives you the entire selection your camera supports. No predefined AV list; BackyardEOS gives you the entire selection your camera lens (if attached) supports. Histogram in L (Luminance) or RGB display. A Weather Center capable of reporting on current weather condition, humidity level, and dew point. BackyardEOS adds valuable EXIF metadata to your .CR2 files; such as target name, filers used, and current weather conditions (if configured) just to name a few. Frame & Focus Mode The Frame & Focus with live FWHM, gives you instant focus feedback and the ability to view the full DLSR field of view. Use of Live View (if the model of your camera supports Live View.) Live FWHM with instant focus feedback in big numbers you can see from a distance. 4 BackyardEOS – User's Guide Frame your target knowing you can see the full DLSR field of view (except on Netbooks) An instant Zoom Box feedback with up to 5x. Lock the Zoom Box position anywhere on the full DLSR field of view; not just the center. Star HD which stacks live view frames instantly and enhance stars using a blend of contrast, brightness, invert, and logarithm, and edge detections when a Bahtinov mask is used. Control and focus your camera lens if you are using photo lens from BackyardEOS. Planetary Mode In Planetary Mode, BackyardEOS has the ability to capture short movies with your digital canon DSLR using its Live View capabilities (this feature is only available on those EOS digital models having Live View), directly to your computer. The Planetary Model allows you to set the following parameters: Shutter (Bulb, 2.5 seconds to 1/8000)* ISO (100-3200)* Aperture (f2.8 to f22)* White Balance Target Name Image Count (The total number of Live View images to be captured.) For planets, use the in-camera 5x zoom feature to enhance viewing. Place the zoom rectangle where your object is and click to zoom and lock on its position. * Settings are dependent on the existing capabilities of your EOS digital camera. Drift Align Mode The Drift Align Mode allows you to record the drift error by stacking live view frames over a period of time; typically between 2 to 10 minutes. It all depends on how accurate your initial mount alignment is. Uses Live View. It works by stacking live view frames over time; leaving a star trail behind. Current image stack with star trail is always visible. First frame is always visible as a reference point. Rotatable crosshair for proper east/west and north/south orientation. Adjustable crosshair width. No predefined drift period, let it run for as long (or as short) as you need. 5 BackyardEOS – User's Guide Supported Cameras BackyardEOS supports the following Canon EOS cameras that support long exposures using only a USB cable. EOS 1Ds Mark II 1 2 3 EOS 1Ds Mark III EOS 1D Mark III EOS 5D Mark II EOS 7D EOS 20D 12 3 EOS 30D 12 3 EOS 40D EOS 50D EOS 60D EOS 350D/XT 12 3 EOS 400D / XTi 12 EOS 450D / REBEL Xsi EOS 500D / REBEL T1i EOS 550D / REBEL T2i EOS 600D / REBEL T3i EOS 1000D / REBEL XS EOS 1100D / REBEL T3 Here is a snapshot of the cable which comes with the Canon EOS camera: The included cable is approximately 6ft long. If your require a cable longer than 10 feet you should consider using an Active Repeater extension USB cable 1 Requires a serial cable fo r bulb exposure. Otherwise limited to 30 second exposures . Does not have Live View. 3 Canon has stopped support for the 350D and earlier models on Windows 7... they only have drivers for these older models on Windows XP and Vista (32 bit only.) Th is is a Canon limitat ion. The EOS Utility will not work either on Windows 7 (64 b it) for the 350D and earlier models. BackyardEOS uses the same Canon SDK as Canon uses for their EOS Utility so Backyard EOS is limited (not by choice) to what Canon supports. 2 6 BackyardEOS – User's Guide Installing BackyardEOS BackyardEOS is delivered in an electronic download format only. The installer package is straightforward;; click, click, click and you’re done. This are no gymnastics performed with any registry keys! As a result you can just as easily copy the entire content of the installation folder anywhere after a successful installation and run the application from there; including a USB key; though it may run a bit slower. You may download the latest release on our website. http://www.BackyardEOS.com/ BackyardEOS requires a license file to run. There are 2 ways in which you can obtain a license file. Purchase a copy of BackyardEOS or request a free 30 day trial license file. Please consult our web site to purchase BackyardEOS or to obtain your free 30 day trial license file. Prerequisites: Window XP, Vista, or Windows 7 Microsoft .Net Framework 3.5 Minimum screen resolution is 1024 x 768 or higher for regular use or 1024 x 600 for Netbooks. BackyardEOS will automatically detect if you're running on a Netbook and will scale down to run efficiently on 1024 x 600 resolution monitors. The installer will guide you to Microsoft's download site if the .Net Framework 3.5 is not installed. Note: The following instructions and screen shots are typical for a Windows 7 installation. 7 BackyardEOS – User's Guide Once you have downloaded the BackyardEOS ZIP (RAR) file to your hard drive, 1. Locate the BackyardEOSv2.zip file and double-click on it. ) This file is a self-extracting zip file, so no special program is required to unzip it.) The following WinRAR dialog is displayed. 2. Highlight the BackyardEOSv2 (above) and click on the Extract To button. The Extraction path and options dialog is displayed. 3. Enter the destination path when BackyardEOS is to be installed. 4. Click the New Folder button to create a new folder where BackyardEOS is to be installed. 8 BackyardEOS – User's Guide 5. Click OK. The extraction progress dialog is displayed. 6. When the extraction has completed (the extraction dialog window has closed), locate the BackyardEOS license file and copy it to the folder where you installed BackyardEOS. 7. You can start BackyardEOS from the folder or continue on to the next section to create a BackyardEOS desktop shortcut. Create a BackyardEOS Desktop Shortcut If you would like to create a desktop shortcut to start BackyardEOS, execute the following steps: 1. Open a Windows File Explorer dialog and locate the BackyardEOS.exe executable file where you installed BackyardEOS. 2. Right click on the file name and select Create Shortcut. 9 BackyardEOS – User's Guide 3. Look down the list of files near the bottom and you will see a file named BackyardEOS.exe - Shortcut. Click of this file and drag it to a location on your desktop. 4. If you would like to rename the shortcut, right click on the shortcut on the desktop and select Rename. 5. Enter the new name for the shortcut and press the Enter key. 6. You're done. You can reposition the BackyardEOS shortcut where it is most convenient for you. 10 BackyardEOS – User's Guide Camera Preparation Preparing your camera is an important part of your setup. Here are the general steps to prepare your camera for a successful imaging session. 1. Install the camera drivers that came with your camera. If you can connect your camera to the EOS Utility (or EOS capture for older models) then all the drivers are properly installed. 2. Important: Please ensure the in-camera option "Communication" is set to either "Normal" or "PC Connection". If it is set to "PTP" it will not work. (The "PTP" setting is for printing images and is not suitable to control the camera for imaging purposes.) 3. Connect the USB cable to the camera and your computer. If this is the first time you connect the camera to your computer let Windows complete its driver setup before starting BackyardEOS. 4. Turn your camera ON and set the dial to ‘M’. If your camera has a ‘B’ mode you still need to set the dial to ‘M’ the first time you connect it to BackyardEOS. This will allow the program to read all TV values properly for first time use. The dial may be set to "B" for subsequent connections. 5. Turn the Auto Focus OFF on the camera lens if you are using photo lens. You may have to turn it back to AF if you which to use the focus Lens Drive in Frame & Focus Mode in BackyardEOS. This feature is lens and camera dependent. 6. Close the Canon EOS Utility if it’s running (or any other programs that is currently connected to your camera). The Canon SDK only allows for one program to access the camera at any given time. 11 BackyardEOS – User's Guide BackyardEOS Screen Layout The BackyardEOS screen layout is segmented into seven major functional and informational areas. Camera Connection and Imaging Modes Area This are provides access to the following mode: Camera Connection and Disconnection Imaging Frame and Focus Planetary Drift Align Camera Information Area This area provides information about the connected camera, as follows: Camera make and model Battery level ISO Dial Mode setting Mirror lock status 12 BackyardEOS – User's Guide Minor Modes & Settings Area The Minor Modes and settings provides the following: Enable and disable PHD tracking Access to the ASCOM Plugin Center Daylight and night-time screen modes Access to the program configuration/settings dialog Weather Area This area displays the current weather information, depending on its configuration. Progress Wheel & Abort The Progress Wheel displays in-progress exposure information (i.e., exposure number, current seconds into an exposure, frames-per-second (fps) reading, etc.) The Abort button provides the ability to terminate an exposure or recording session. Imaging Center The Imaging center area provides information about the current capture plan, allows setup and changes to a capture plan. 13 BackyardEOS – User's Guide Settings This section describes each of the settings provided by BackyardEOS. To access the settings dialog, click the Setting icon. The Settings dialog (below) is displayed. Image Capture The Image Capture settings section provides the ability to configure the following: Filename Convention (template) Captured image file download folder Captured image file download sub- folders Imaging Filter name list Add EXIF data Save captured files to either the computer or the computer and the Camera Card Set the quality of the captured images (RAW, RAW + JPEG) Display the Progress Center as a large display Camera Connect 14 BackyardEOS – User's Guide Here is the Image Capture settings section: Filename Template The filename template provides the user with the ability to configure the file naming convention for captured images. The default file naming template is: <target>_< frametype>_< duration>s_<iso>iso_< fstop>_<temperature>_< filter>_<stdev>st dev_<timestamp> To make a change to the filename template, click the ellipsis button side of the field. The following dialog is displayed: 15 to the right BackyardEOS – User's Guide Each of the current name values are displayed in the ten fields. The possible filename items are: Name Item # Name Description 1 <target> Name of the object being captured and comes from the Target Name field in the imaging section. 2 <frametype> Indicates the frame type (lights, darks, flats, Dark Flats & Bias) 3 <duration>s Indicates the length of the exposure in seconds. 4 <iso> Indicates the camera's ISO setting for the captured image. 5 <temperature> Indicates the camera's sensor temperature at the time the image is captured. 6 <stdev> indicated the standard deviation...? 7 <fwhm> indicates the Full Width Half Maximum (fwhm) of the target image? 8 <fstop> Indicates the camera's fstop (i.e., f5.6) 9 <filter> This field lists the filters available to the camera. The name of each filter is separated by a space. (i.e., 6nmHa Oiii Sii Empty) 10 <date> The current date the image is captured 11 <time> The current time the image is captured 12 <cameraname> Indicates the name of the camera from the camera's firmware. (i.e., EOS50D) To change a value: 1. Click the down arrow on the right side of the field to be changed. 2. Select the new value from the drop-down list. The field is updated with the new selection. 3. You may clear a value by highlighting the value and pressing Delete. 4. You may also add text to a field value as long as the added text is made outside of the < > characters. 5. Make additional changes. As changes are made. the preview for the filename template, near the bottom of the dialog, is updated to show the changes. 6. The file field, Unique Identifier, allows the selection of a <timestamp> or <sequence>. The default setting is <timestamp>. 7. Click Save to save your changes. 8. Click Cancel to exit the dialog without making changes. You may also add a unique identifier to the file naming conventions. The two choices are: Time stamp (default) Sequence (number): up to six digits. Once this option is select, BackyardEOS automatically increments the sequence number with each image captured and 16 BackyardEOS – User's Guide save. The last sequence number is remembered from imaging session to imaging session. The sequence number may not be reset in Version 2. Download Folder The Download folder allows you to specify the folder location where the current imaging sessions files are stored. Clicking the ellipses button to the right of the Download Folder field displays the Windows TM Browser dialog. Browse to the desired folder or create a new folder and click OK. Sub-folders The Sub-Folders settings provides a semi-automated way of creating folders for your images. BackyardEOS provides three folder creation templates. They are: Library Style (Lights, Darks, Flats, etc.) If Library style is select, BYEOS will automatically create a sub- folder named LIBRARY under your selected Download folder and will create a LIGHTS, DARKS, FLATS, etc. folder as those types of images are captured. HDR Style (Target (name), duration, ISO, Shutter) If HDR style is selected, BYEOS will automatically create a sub- folder named HDR under your selected Download folder and will create additional sub-folders named with the Target Name, Exposure, ISO, and current Shutter. Date Style (yyyy- mm-dd / Target (name)) If Date style is selected, BYEOS will automatically create a sub- folder named with the current date (yyyy- mm-dd) under your selected Download folder and will create an additional sub- folder with the name of the current Target. Filter List The Filter List is an optional field which stores the filters available to the camera. The name of each filter is separated by a space (space delimited.) (i.e., 6nmHa Oiii Sii Empty) If this field is configured with filters and the <filter> option is included in the selected FileName template, the filter selected in the drop-down Filter list in the Capture Plan section will be inserted into the image filename. Save To The Save To setting allows you to save captured images to your Computer or to your Computer and Camera Card (CF/SD card in your camera.) The default setting is to save captured images to your computer. Quality The Quality setting allows you to save captured images in Canon RAW format or RAW+JPEG format. The default setting is to save captured images in RAW format. 17 BackyardEOS – User's Guide Progress Center The Progress Center setting allows you to display either the standard Capture Plan Center or a condensed, larger view that let you know, at-a-glance, how many images in a series (capture plan) have been executed (i.e., 1 of 5) and how much time remains until the capture plan is completed (i.e., 10:47.) The image on the left shows the normal Capture Plan Center, while the image on the right shows the large Progress Center. Clicking Suspend pauses the current imaging plan until Resume is clicked. 18 BackyardEOS – User's Guide Live View The Live View settings area provide the following configurable settings: Maximum Aperture Save Snap Images Throttle (in milliseconds) FWHM Average (frames) Maximum Aperture When enabled each time a live view session is activated the camera will be set to the highest ISO / Aperture / TV for maximum light sensitivity. When disabled the current camera settings are used. Default is ON. Save Snap Images The Save Snap Images setting will keep a copy of all snapped images from the Frame and Focus windows; otherwise these images are not saved to your hard drive. The default setting is on. Throttle The Throttle setting is a pause_ time (in milliseconds) between each live view frame. This setting is useful for slower computers, so that Live View does not bring the computer to a halt trying to process and display live view images. The default Throttle setting is 50 milliseconds. Reducing the Throttle value and Live View is faster... but it will also consume more processor time. FWHM Average Full Width Half Maximum is the width of a star's image at half its peak. Focus is achieved when you get the lowest value for the same star over time, indicating a tighter star. The FWHM Average slows down the FWHM calculation by averaging the last x frames used to calculate the FWHM in frame in focus. It prevents the numbers from varying up and down rapidly, and as a result acts as a type of a filter for poor seeing. The default setting is 10 frames. 19 BackyardEOS – User's Guide PHD Guider For those that utilize the PHD Guiding system, this settings configuration area provides the means to enable and set the operating parameters for how BackyardEOS interacts with PHD Guiding during your images sessions. Those settings are: PHD Dither at start-up Dither aggressiveness Settle dither at calm down period Dither every X images Dithering is the process of moving the image’s location across images. The result is that the noise generated by the camera will be in different location for ALL of your images. When you stack your images, the noise will be taken out more efficiently because it's never at the same location. Without dithering, you end up stacking your noise and dark subtraction can only do so much. BackyardEOS sends a signal to PHD to tell it to move the “lock position” (the position of the crosshairs in PHD) by a small, random amount. Once PHD has moved the star and reestablished stable guiding in the new location, BackyardEOS will resume imaging. BackyardEOS automatically ignores dithering for *all* image types other than LIGHT. So it's okay to leave it on as it won't dither for images of type DARK, FLAT, DARK_FLAT, and BIAS. In PHD… 1. Start PHD as you would normally do. You must have PHD v1.8.6 or later. 2. Check the ‘Enable Server’ option in PHD under the ‘Tools’ menu. PHD will remember this setting so you only have to do this once. In BackyardEOS… Enable PHD dithering in BackyardEOS. You do this by clicking the PHD button in the Imaging Mode. The Message Center will display the message “PHD dithering is enabled”. IMPORTANT: BackyardEOS is not able to dither if the ‘Enable Server’ option is not checked in PHD, even if the PHD Dithering is enabled in BackyardEOS. 20 BackyardEOS – User's Guide PHD dither on start-up: This parameter will automatically turn ON (or OFF) the BackyardEOS dither feature each time you start BackyardEOS. You still need to check the ‘Enable Server’ in PHD. Dither aggressiveness: The dither sent will be a random number of pixels in X and Y, scaled by the level you set here. In the lowest level, the random numbers will vary from 0.5 to 0.5 pixels and in the highest they will vary from -1.5 to 1.5 pixels in the guide frame. Since people typically guide at shorter focal lengths than they image at, this will usually have a much larger effect in your main images. Settle dither at: This parameter specifies how far off the star can be from the lock position before Dithering is considered a success. Typical value is between 0.10 and 0.30. Calm down period: A set number of seconds to pause between dithering and the next image capture. This is particularly useful to let PHD stabilize properly. Weather Provider The Weather Center supports 3 weather providers. 1. TEMPerHUM device, 2. Yahoo Weather RSS feed, 3. User-supplied text delimited file. Note: If you set the weather provider to ‘Auto detect’, BackyardEOS will attempt to read the TEMPerHUM device first, if it fails it will try the Text File Delimited, if it fails it will try the Yahoo RSS feed if a WOEID is provided. If it can't find any of these two sources, it will display an N/A reading in the Weather Center. 21 BackyardEOS – User's Guide TEMPerHUM A TEMPerHUM device sells for about $20 on eBay; this is an awesome piece of hardware and is highly recommended. BackyardEOS supports TEMPerHUM versions 1 and 2. 1. Plug the TEMPerHUM device in a USB port. You do not need to install the drivers that came with it. 2. In BackyardEOS, open the Settings dialog and set the Weather Provider to ‘TEMPerHUM’ or ‘Auto detect’. 3. Click the Save button to close the settings window. Yahoo RSS feed 1. Open your browser and go to http://weather.yahoo.com. 2. Enter your location and hit enter. 3. Look in the URL address bar; the numbers at the end is what yahoo calls a WOEID (Where On Earth ID). 4. In BackyardEOS, open the Settings dialog and set the Weather Provider to ‘Yahoo’ and enter the WOEID in the Yahoo WOEID field. 5. Click the Save button to close the settings window. Here is an example (in this case the WOEID is 24002902) http://weather.yahoo.com/canada/ontario/clarence-creek-24002902 Text File Delimited 1. Open the Settings dialog and set the Weather Provider to ‘Text File Delimited’ or ‘Auto detect’. 2. Click on ‘Text File Mapping” 3. Select a text file containing the weather information. BackyardEOS will read the last line only! This allows for cumulative weather information in the same file over time. 4. Enter the start position of each field and the number of characters to read from the start position. The reading box will show the result instantly. 5. There is no reading required for dew point. This is because the dew point is calculated from the temperature and humidity level. 6. Select the readout unit in the file; Fahrenheit or Celsius. 7. Click the Save button to close the settings window. General The General settings allows you to set: Language Daylight Color Abort Delay (seconds) 22 BackyardEOS – User's Guide Low Battery Alarm (%) disabled Netbook Resolution Language BackyardEOS supports the following language choices: German English Spanish Italian French Netherlands Turk Ukrainian Chinese (simplified) To change the language, click on the drop-down list, select your language and click Save. You will need to exit/Close BackyardEOS and restart it for the language change to take effect. Daylight Color Aquamarine Kahki Light Steel Blue Pale Green Silver White To change the Daylight Color, click on the drop-down list, select your color and click Save. Abort Delay The Abort Delay is a "long [button] press" feature. When set, you need to keep the Abort button down for x seconds before the abort sequence is triggered Low Battery Alarm The Low Battery Alarm setting provides a means of setting a warning when the camera battery's remaining power (percentage) has been reached/depleted. If you set the reading to 25% (as an example), when the camera reports a battery remaining percentage to BackyardEOS, if the read ing is equal to or less than 25% (the setting), BackyardEOS will issue a low battery warning. 23 BackyardEOS – User's Guide Setting the percentage to -1%, disables the warning. If you use an external A/C power supply to power your camera, make sure the setting is at -1%. The default setting is -1%. Note: The camera's software/firmware is not accurate in reporting the remaining battery percentage. User report seeing the percentage dropping from 90% to 50% or less in a single increment. BackyardEOS simply displays the percentage value that the camera reports to it. Netbook Resolution Checking this option will enable BackyardEOS to work in 1024x600 resolution. BackyardEOS attempts to auto detect your resolution at startup and will automatically scale it down for you. However, in some cases BackyardEOS is unable to detect the Netbook resolution, so this setting provides a means to set it manually. Planetary The Planetary settings area allows you to set the following: Merge AVI BackyardEOS merges all AVI output produced during one planetary recording into a single AVI file. By default BackyardEOS creates 2GB AVI segments. This setting is optional because it adds a few additional minutes to the process. The default setting is off. Memory Preservation Memory Preservation is needed to control memory consumption in Planetary mode. BackyardEOS v2 has increased the frames per second rate in planetary significantly by grabbing as many live view frames from the camera as possible and as fast as it can... the images are then pushed into memory and a background process takes them from memory 1 by 1 and adds them into the AVI file. This can consume a lot of memory very fast... the memory preservation parameter tells BYE to slow down the reading live view frames if the remaining available memory in the computer falls under this value... without it, you would run out of memory if you were doing a few thousand frames. The default setting is 25MB. 24 BackyardEOS – User's Guide Changes in the Memory Preservation value will not improve/increase the Frames Per Second (FPS) rate. Memory Preservation simply prevents your computer from running out of memory if your camera/computer combination is able to capture them faster than they can be pushed into the AVI. Advanced Settings The Advanced settings dialog provides the following configurations: Performance and Stability EOS Utility Check Skip READ EXIF data Skip WRITE Exit data Processor Affinity Camera Auto-connect Camera Force Read Properties EOS Utility Check When enabled BackyardE OS will verify if EOS Utility is running before connecting a camera. Connection will be denied if it is found to be running to prevent camera contention between BYE and EOS Utility. Skip READ EXIF Data BYE will not read the E XIF data of downloaded images; in rare cases spawning an external command prompt process (.exe) from .net will cause Windows to hang. This option allows the user to opt out. As a negative side effect, the camera sensor temperature will not be retrievable. Should be enabled if BYE is showing signs of instability. 25 BackyardEOS – User's Guide Skip WRITE EXIF Data BYE will not add the E XIF data to downloaded images; in rare cases spawning an external command prompt process (.exe) from .net will cause Windows to hang. This option has no negative side effect other than not have extra data added to the image files coming out of BYE. Should be enabled if BYE is showing signs of instability. Processor Affinity On multi-core CP U computers, BYE will use a single core for increase stability and minimum to no performance lost. Should be enabled if BYE is showing signs of instability. Camera Auto-Connect Instruct BYE to auto-connect the camera when one is plugged in while BYE is running. Camera Force Read Properties Will force BYE to refresh its memory cache of pertinent camera properties setting before each picture is taken. Should be enabled if BYE is showing signs of instability. May add roughly 2 seconds before each picture. Experimental Settings: Virtual Mirror Lock Virtual mirror lock is experimental feature... as such, it is not reliable on all camera models and may introduce amp glow. Make sure you experiment with your camera before using in the field. The feature uses the existing USB cable to flip the mirror up before opening the shutter. The delay between the mirror flip and the shutter opening is controlled by the "Mirror lock" value on the Imaging tab. Note: Virtual mirror lock is NOT a substitution for the native in-camera mirror lock. If you plan on using mirror lock, you should consider using a serial cable and use the native in-camera mirror lock function. A native function is always preferred over a software alternative. Mirror Lock requires a serial cable in addition to the USB cable. 26 BackyardEOS – User's Guide Save Clicking Save, saves your changes and closes the Advanced Settings dialog. Cancel Clicking Cancel, ignores any changes made to the Advanced Settings dialog and closes the Advanced Settings dialog. Maximum Stability Clicking Maximum Stability Reset defaults 27 BackyardEOS – User's Guide BackyardEOS Operations Starting BackyardEOS To start BackyardEOS: 1. 2. 3. 4. Make sure BackyardEOS is properly installed (see Installing BackyardEOS section) Double-click on the BackyardEOS icon. If a camera is detected at start-up, BackyardEOS will automatically connect to it. If a camera is not detected at start-up, connect the camera and then press the ‘Connect’ button in the upper left corner. Note: BackyardEOS automatically remembers its screen location and positions itself in the same location where it was last used. The busy signal on the upper LCD display on your EOS camera is not caused by BackyardEOS. In fact as soon as you plug the USB cable from the camera to the computer the busy signal shows up... BackyardEOS does not even have to be on yet. No worries about losing any images or what not... it's simply Canon's way of saying the camera is connected to a computer. The camera is not really busy saving or working on images... when it does you'll see a red light turned on at about the 4 o'clock position on the rotary dial just right of the camera's ON/OFF switch. 28 BackyardEOS – User's Guide Frame and Focus Mode A word about Full Width Half Maximum (FWHM) The FWHM focus metric in BackyardEOS is purely a pixel width analysis done against the Live View live feed, or snapped picture. BackyardEOS measures how many 'whole' pixels are saturated at half the maximum saturated value of the highest saturated pixel for a given/selected star. The algorithm then analyses both the left and right side (again at half the height) to mathematically compute the pixel fraction that is above the half height and adds this to the FWHM measurement... the same is done on the right side. The result LEFT_FRACTION + WHOLE + RIGHT_FRACTION = FWHM. It is very precise. There is no color channel analysis performed in this process. FWHM only works on one single star at a time so you should make sure to have only one star in the small zoom box where the FWHM draws its data from. Note: Your goal, when using FWHM, is to adjust the focus until the FWHM value is as low a value as possible for a single star. If you want to focus on other bright objects... like the moon or daytime... you should use the Standard Deviation feedback and work with the highest number. Note that BackyardEOS defaults the ISO to the highest possible value supported by you camera. By default, BackyardEOS calculates and displays FWHM. To display Standard Deviation, click the Standard deviation checkbox. Note: Live View remains on until you manually pause it or switch to another mode. To focus with Live View: 1. 2. 3. 4. Start BackyardEOS Connect to your camera Click the Frame & Focus button. Adjust your camera lens or telescope focuser to achieve best focus. Note that as you change focus, the FWHM value changes instantly. Use the lowest FWHM value, or if using Standard Deviation, use the highest value. 5. Click Snap Image to take an exposure and freeze the image to closely inspect the focus. 29 BackyardEOS – User's Guide BackyardEOS uses the exposure settings when the Snap Image is taken. 6. When satisfied that the best focus has been achieved, click the Imaging button or another mode button (don't click Disconnect) to terminate Live View Frame and Focus mode. The Loop button (between Snap and Live View) is a toggle ON/OFF button. When ON the Snap images will loop continuously, when OFF the Snap button take a single shot. The Live Vie w button. You can toggle Live View on/off by pressing the live view button in the lower right corner. The button will toggle images between a PAUSE and PLAY image. IF you're not sure if the live view is *streaming* simply move the camera to confirm and watch the screen. The Snap Image button. When you snap an image live view is automatically paused. This is to allow the camera to take the picture and for BackyardEOS to display the image. If you wish to resume live view after a snapped image click the Live View button. Focusing without Live View You can still use the Frame and Focus without Live View. Simply pause Live View and snap a image, or a series of images. FWHM is used, using the still images instead of Live View. You may set the number of exposures (default is one), shutter speed (default is bulb), exposure duration (in seconds), the ISO (default is 3200) and a pause value (default is one second) between each exposure. These settings are typically used to assist in nonLive View focusing. Let's say that you're using a Bahtinov Mask, the stars are not very bright and Live View doesn't show the Bahtinov pattern very well. You decide that you need a continual loop of two to five second exposures (depending on the star brightness) at the default ISO to allow you to manually focus and achieve evenly spaced diffractions, based in the image shown in BackyardEOS. Here's how to accomplish that. To frame and focus without Live View: 1. 2. 3. 4. 5. 6. Start BackyardEOS Connect to your camera Click the Frame & Focus button. Set the exposure settings. Set the number of pause seconds. Enable the loop feature by clicking the Loop button. 7. Start the loop plan by clicking Snap Image. 8. Adjust the focus until you are satisfied with the diffraction spikes. 9. If you run out of time, simply press Snap Image again and repeat the process until you are satisfied. 30 BackyardEOS – User's Guide 10. When satisfied that the best focus has been achieved, click the Imaging button or another mode button (don't click Disconnect) to terminate the Frame and Focus mode. Note: In Frame & Focus mode, all snapped images are taken in JPG only. By default these images are not saved. You can change this behavior in the button's configuration panel. Click on the highlighted text "Snap" on the button to access the settings panel . 31 BackyardEOS – User's Guide Imaging Mode Creating an Imaging Session Using the Capture Plan Center The simple method for acquiring images is as follows: 1. Make sure your camera is turned on and is connected. 2. Click the Imaging button in the upper-left corner of the main screen. 3. In the Capture Plan Center area, select the Frame Type (the default is Lights.) Other choices are Darks, Flats, Dark Flats and Bias. 4. Select the Cable Support setting (the default is Camera USB.) Additional choices are available depending on the camera model. 5. Select the (optional) Mirror Lock setting (in seconds.) The default setting is 0. The Mirror Lock value represents the wait time (in seconds) between mirror flip up and the actual start of the exposure. Note: If the Virtual Mirror Lock feature is checked in the Advanced Settings dialog, this Mirror Lock setting will be enabled. Otherwise, the Mirror Lock setting will be (disabled) grayed out. 6. Enter the Target Name. 7. Select the (optional) Filter which will be used in this capture plan. 8. Set the (optional) Delay value (in seconds) which will be used to delay the start of the capture plan once you press the Start Capture button. (This is meant to give you time to walk away before the first exposure, to eliminate any vibration you may cause by walking away, to be transferred to your first frame.) 10. Enter the settings for the Exposure groups (there are twenty- five possible exposure groups.) a) Set the number of Exposures for the first exposure group. b) Select the Shutter setting. (The default is BULB.) There are many other choices, based upon the features of the camera model. c) Select the Duration of the exposures. (The default is one.) d) Select the ISO setting. (The default is ISO 1600.) There are many other choices, based upon the camera model 32 BackyardEOS – User's Guide e) Select the (optional) Pause value (in seconds), which will be used to pause the camera between each exposure. (This setting provides some ability to allow the camera's sensor to cool a bit between each exposure.) f) If more than one exposure group is desired, repeat steps a through e for each additional exposure group. 11. Click Start Capture. When the Start Capture button is clicked, two display areas show the progress of the imaging session. The two display areas are the Progress Center and the Progress Wheel/Abort Capture area in the upper-right corner of BackyardEOS. As each captured image is completed, the image will be displayed in the Image Center display area. (see the 'Viewing Images' section below.) BackyardEOS does add Exif data and some software may not like that. You can opt out of adding extra Exif data by checking the appropriate box in Settings > Advanced Settings. If you check the Skip WRITE exif data in BackyardEOS, the .cr2 (RAW) downloaded by BackyardEOS is 100% as- is delivered by the camera. Histogram Center The Histogram Center provides a graphical representation of the tonal distribution in the most recently captured digital image and acts as an aid to show whether image detail has been lost to blown-out highlights or blackedout shadows. The following options are provides in the Histogram Center. Vertical Division Bars This button toggles through zero, one two or three vertical division bars. (The image above shows two bars. Clicking the button showing the two will increase the bars to three. 33 BackyardEOS – User's Guide Luminance and RGB The Luminance and RGB (Red, Green, Blue) buttons toggle the histogram to switch between a Luminance or an RGB representation of the image data. Clicking the Luminance button once, will display Luminance data and clicking it a second time will display RGB. Conversely, clicking the RGB button once, will display RGB data and clicking it a second time will display Luminance data. Aborting an Image Session To abort an imaging session, click the Abort button (see image above) in the upper right corner of the application, just below the progress wheel. Depending on your configuration (see ‘Abort Delay’ in the Settings dialog) you may need to press down on the Abort button for a few seconds to initiate the abort sequence. Note: Depending on your configuration you may need to press down on the Abort button for a few seconds to initiate the abort sequence. If an imaging session is in progress using PHD guiding, pressing the Abort button once will terminate the guiding, but does not terminate the imaging session. Clicking the Abort button twice terminates the PHD guiding session and the imaging session as well. Using the (exposure) Loop feature. When the Capture Plan settings have been entered, clicking the Loop button will cause the imaging session to repeat continuously, until the Abort button is clicked. Using the (exposure) Preview feature. The Preview button takes the first image (only) in your plan, in JPG format, instead of RAW, and displays it to allow you to examine what the resulting image will look like without the added post-processing of a RAW image. Consider using this feature (with Loop) when you use the eclipse framing feature when you don't want/need a RAW image. Using the (exposure) Test Cable feature. The Test Cable feature, when enabled, opens up the selected COM port to test your serial cable if you are using one. If you select anything but "Camera USB" in the Cable Support drop-down list, the Test Cable button is enabled. If the test cable fails there is no point in starting you 34 BackyardEOS – User's Guide imaging session if you're using a serial cable. You need to find the root cause as to why the test cable did not actuate the camera shutter. Using the Eclipse Framing feature The Eclipse Framing overlays the current imaging session with an image from a previous imaging session. The purpose is to facilitate framing a second session (or post meridian flip) exactly as your original session was. This way, when you stack both sets you don't lose any data at the edge of your images. The feature offers full control over the opacity of the eclipsed image and also allows you to flip the eclipsed image for post- meridian image framing. When Eclipse Framing is clicked, the Eclipse Framing settings adjustment dialog is displayed in the upper right corner of the Image Center. The ellipses Image button on the far right displays a Windows File Explorer dialog when clicked, to allow you to navigate to the desired image and select it. BackyardEOS loads the selected image into the Image Center window. The Rotate button rotates the image 180 degrees from its current position. The Opacity slider provides the ability to adjust the transparency of the image that is loaded into the Image Center window. Some notes regarding Darks and Flats Both darks and flats (at least with a DSLR) require some user interaction with the scope and camera, so there are no clear-cut settings to be used. Since the darks should match the light frames in terms of ISO setting, temperature and exposure, if you shoot your darks at twilight, you should only need to reset your file type to "Darks" after covering your scope (perhaps adjust the number of exposures, and rerun your plan.) Flats of course depend on your method of capturing them (t-shirt, illuminated panel, etc.), but require setting the camera to AV and BackyardEOS to AV-Flat, then resetting your ISO downward until you get proper histogram placement. There are two methods to take flats. 1. Choose the AV-Flat shutter. This will take a normal AV shot and the camera will make all the necessary metering for you. There is no control over the camera when taking AV-Flats. 2. Choose the appropriate TV shutter that will give the 30,000 you are seeking. You may have to take a few test shots to find out the necessary TV shutter required to produce the optimal ADU (25,000-30,000.) 35 BackyardEOS – User's Guide Viewing Images The Image Center area provides the means to view the images as they are captured and/or to select and view images displayed in the filmstrip area below the large image display area. The Image Center provides the following functions with the Image Action buttons : Fit Zoom Scale and display the entire image while preserving the images aspect ratio. Presentation Display the image in full- screen presentation. To close the Presentation window, click the window close button (the 'X') in the upper-right hand corner of the image. Toggle Crosshair Places a grid with a centered, circular crosshair over the entire image. 36 BackyardEOS – User's Guide EXIF Data Displays the EXIF data for the selected image. Eclipse Framing Please refer to the Eclipse Framing feature in the Imaging mode chapter. Thumbnail Toggles the filmstrip display on and off. Other Image Center Controls Image Name The image name area immediately above the image displays the file name of the currently displayed image. Image Size The image size percentage control in the upper-right corner of the Image Center is toggled off and on with the Fit Zoom button. The Fit Zoom button is preprogrammed to allow the image size to be scaled from 20% to 400%. In this mode, the image scroll bars are displayed to allow the image to be scrolled in either axis at the current image size. Thumbnail / Filmstrip The filmstrip area displays a thumbnail representation of each of the images captured during the current imaging session. Clicking on a thumbnail image displays the image in a full screen presentation mode. 37 BackyardEOS – User's Guide Planetary Mode The BackyardEOS Planetary mode provides the ability to write short movies with your digital Canon DSLR using its Live View capabilities directly on your computer. When the Planetary button is clicked, the Planetary capture Plan area is displayed. Use the in-camera 5x zoom feature to enhance viewing. To center your object, double-click anywhere in the Planetary Imaging Center area, move the Zoom Rectangle around to center your image (Do not hold the mouse button down while moving.) When you are satisfied with the position of the rectangle, click one time in the image to lock the rectangle in place. The image within the rectangle will expand (enlarge) to fill the Planetary Imaging Center window. The Planetary Imaging Center controls provide the following functionality. Fit Zoom Scale and display the entire image while preserving the images aspect ratio. Presentation Display the image in full- screen presentation. To close the Presentation window, click the window close button (the 'X') in the upper-right hand corner of the image. Zoom Rectangle Toggles the Zoom Rectangle. Places a rectangular box over the center of the image and allows you to move it for the 5x zoom location. 5x Zoom Provides a 5x enlargement of the area within the Zoom Rectangle. Using the Planetary Capture Plan The Planetary Capture Plan provides functionality similar to the Image Capture Center. The method for planetary recording is as follows: 1. Make sure your camera is turned on and is connected. 2. Click the Planetary button in the upper- left corner of the main screen. 3. In the Planetary Plan Center area, select the Shutter (the default is BULB.) There are additional choices, based upon the features of the camera model. 38 BackyardEOS – User's Guide 4. Select the ISO setting. (The default is ISO 1600.) There are many other choices, based upon the camera model. 5. Select the Aperture setting. The choices available are based upon the camera model and lens. 6. Select the White Balance setting. The default is automatic.) 7. Select the Te mperature value. (The default is 5200K.) The color temperature is setting is invisible for cameras that do not support it. For those that do, it's visible but enabled only when "Color Temperature" is selected. 8. Enter the Target Name. 9. Select the Maximum value for this session. The default is 100. 10. Click Record. There are two major factors that affect FPS: 1. Your computer CPU speed. 2. The camera model. BackyardEOS limits each AVI file to a maximum size of 2GB. This maximum value is fixed at 2GB and is not configurable. In addition, BackyardEOS uses the DIB codec, it's a lossless compression codec so there is no loss of data. During the recording mode, BackyardEOS sends one out of every ten frames to the image display area instead of each and every frame. Updating the display in this manner allows BackyardEOS to have as much processing power as possible to capture and push the images into the AVI file. (Allowing all frames to be displayed would slow down the overall FPS.) The progress wheel in the upper-right corner will display the Planetary recording activity in the following sequence... Preparing Sampling Recording 39 Creating AVI File BackyardEOS – User's Guide When you enter Planetary Mode, BackyardEOS automatically shifts to the camera's Live View mode and displays the following active Live Vie w button. Clicking the Live Vie w button toggles between Live View Pause and Resume. Note: The create AVI file process is 100% dependent on your computer CPU speed, RAM available, and Hard Disk write speed. 40 BackyardEOS – User's Guide Drift Align Mode The Drift Align Mode allows you to record the drift error by stacking Live View frames over a period of time; typically between 2 and 10 minutes. It all depends on how accurate your initial mount polar alignment is. During the timed stacking process, a star train will form. When the Drift Align button is pressed the Histogram and capture Plan area is changed to the Zoom Box Center. (as shown here -->) In addition, the large Imaging Center area is changed to the Drift Alignment Center. As in the Frame and Focus Center area, clicking once in the Drift Alignment Center area locks the crosshairs in the zoom Box center. Double-clicking in the Drift Alignment Center area unlocks the crosshairs in the Zoom Box center area and allows the drift alignment crosshairs to be moved with the movement of the mouse. Clicking a single time will lock the crosshairs in their current location. There are five adjustments available in the Drift Align mode: They are; 1. Zoom Control Zooms the crosshair area from 2x to 10x. 2. Rotate Rotates the crosshairs. Click the up control rotates the crosshairs in a clockwise movement in increments of +0.25 degrees. Click the down control rotates the crosshairs in a counter-clockwise movement in increments of -0.25 degrees. The movement is clockwise from 0 degrees or 45 degrees and counter-clockwise from 360 degrees to 315 degrees. 3. Width (crosshair) The Width control sets the spacing of the horizontal and vertical crosshairs. The default is 5. The range is from 1 to 10. 4. Drift Align Offset The crosshair in drift alignment can be offset from the center on both X and Y axis. The default offset is 0 in X (horizontal) and Y (vertical.) The maximum range in X and Y is from -1000 to +1000. This is particularly useful if you are using an AstroTrac 41 BackyardEOS – User's Guide mount, where it is very difficult to get the star in the field of view, let alone center the star on the crosshair. This setting allows you to bring the crosshair to your star instead of bringing the star to the crosshair. 5. Record Pressing Record initiates the drift align session. The recording continues until you press Abort, which terminates the drift align session. 42 BackyardEOS – User's Guide ASCOM The ASCOM feature in BackyardEOS implements manual focuser control for electronic focusers compatible with ASCOM version 5.5 or greater. (For example: RoboFocus, StarLight Digital Feather Touch, Optec TCF, Starizona Micro-Touch, FLI Digital Focusers, Moonlite Motorized focusers, and JMI Smart Focus.) Note: In order to utilize this feature, you must already have installed ASCOM Platform version 5 for greater. Access to the ASCOM platform web site for downloads can be found here: http://ascom-standards.org/ Access to the ASCOM Plug-ins page can be found here: http://ascom-standards.org/Downloads/Index.htm Clicking ASCOM shifts the BackyardEOS screen from this, to this. 43 BackyardEOS – User's Guide ASCOM as-is Position or Tear Off BackyardEOS allows the ASCOM PlugIn Center window to remain in its standard display position as show in the image above-right or to have the PlugIn Center window displayed as a stand-alone (separate) window that you can position anywhere on your screen that is convenient for you. The tear-off window is still tied to the BackyardEOS UI... with the added flexibility to place it wherever you want on your screen. Its location is also remembered the next time you tear it off. To make the ASCOM window stand alone, click the angled arrow in the upper right corner of the ASCOM PlugIn Center window. If the ASCOM platform is installed on your system, the platform version is displayed at the top of the ASCOM PlugIn window. The absence of a Platform version in the PlugIn Center window is an indication that the ASCOM Platform is not installed and must be installed before this feature can be used. The ASCOM PlugIn Center window displays Focuser and a Telescope control buttons at the bottom of the PlugIn Center window. Please note that the Telescope control button functionality is planned for an upcoming future release of BackyardEOS. The Focuser button functionality provides the means of controlling an ASCOM compliant electronic focuser (listed above.) Before you begin, make sure that your ASCOM-compliant focuser is installed, powered up and working correctly. 44 BackyardEOS – User's Guide Troubleshooting This section tries to explain some concepts and to elaborate as to why BackyardEOS may be behaving in certain ways. Why is there an alarm every 15 seconds, what does it mean? BackyardEOS will sound an alarm every 15 seconds when the battery reaches a low threshold. The threshold is configurable in the settings dialogue. You can disable the alarm by setting the threshold to -1%. Why is the Camera Center reporting a conflicting dial mode? BackyardEOS changes the dial mode programmatically. This may lead to some confusion because the physical dial on the camera may be set to BULB, yet BackyardEOS is reporting a MANUAL, BULB, TV, AV, or PROGRAM dial mode setting in the Capture Plan Center. This is by design. The benefit is tremendous... it is the only way to have a 100%, fully-automated capture plan that combine BULB, TV, AV, and Program shutters in one single capture plan without physically touching the camera. The 50D, 60D and camera models with 3 and 4 digits (###d & ####d) do not support mixed capture plans with a Program or Av shutters; only BULB and TV. On these models, you need to change the dial manually to Av or Program if you wish to take an Av or Program shutter pictures using BackyardEOS. Why is the Lens Drive in Frame & Focus not driving my lens? Do you have a camera lens attached to your camera? Some lens requires that they be set to AF mode and some work in MF mode. Experiment with your lens to see which setting is best for you. Why is the abort button not aborting my session? Check the configuration “Abort Delay” in the setting dialog. It may be set to a value greater than zero. 45 BackyardEOS – User's Guide Index 5x zoom................................................. 5 aspect ratio .......................................... 27 automate ................................................ 4 Av.................................................... 4, 29 Bahtinov mask....................................... 5 bulb........................................................ 7 BULB ........................................ 4, 24, 29 camera model ............................ 4, 23, 24 capabilities ........................................ 5, 6 capture ....................... 4, 5, 13, 17, 24, 29 capture plans ................................... 4, 29 communicating...................................... 4 CR2 ....................................................... 4 crosshair .......................................... 6, 27 dithering .................................... 4, 16, 17 Dithering ................................... 4, 16, 17 Drift Align..................................... 2, 4, 6 drift error ............................................... 6 drift period............................................. 6 Eclipse Framing................................. 28 EXIF................................ 2, 4, 10, 21, 28 EXIF Data .......................................... 28 exposure duration .................................. 4 exposures................................. 4, 6, 7, 24 field of view .......................................... 5 file name.............................................. 28 filmstrip ......................................... 27, 28 Filmstrip............................................. 28 Fit Zoom....................................... 27, 28 focus .................................. 4, 5, 9, 15, 23 Frame & Focus.......... 2, 3, 4, 5, 9, 23, 29 Frame & Focus Mode ............... 2, 4, 5, 9 frames.............................. 5, 6, 14, 15, 20 full-screen............................................ 27 FWHM .................................. 2, 5, 14, 15 grid ...................................................... 27 HD ......................................................... 5 Histogram.............................................. 4 Image Action buttons .......................... 27 Image Center ........................... 25, 27, 28 Image Name ....................................... 28 image quality......................................... 4 Image Size .......................................... 28 Imaging ........................... 2, 4, 10, 16, 23 Imaging Mode ............................. 2, 4, 16 imaging session ......... 4, 9, 24, 25, 26, 28 ISO ............................ 4, 5, 12, 13, 14, 24 lens ...................................... 3, 4, 5, 9, 29 Live View................ 2, 5, 6, 7, 14, 15, 23 Luminance............................................. 4 metadata ................................................ 4 mount alignment ................................... 6 movies ................................................... 5 Netbooks ........................................... 5, 8 orientation ............................................. 6 PHD................................. 2, 4, 15, 16, 17 Planetary.................................. 2, 4, 5, 20 Presentation ....................................... 27 Program ........................................... 4, 29 RAW ................................... 4, 10, 13, 25 RGB ...................................................... 4 sensor .................................. 4, 12, 21, 24 shutter.............................................. 4, 29 shutter speed.......................................... 4 stacking ........................................... 6, 16 star trail ................................................. 6 target name ............................................ 4 Target Name........................ 5, 11, 13, 24 temperature.................... 4, 11, 12, 18, 21 thumbnail ............................................ 28 Thumbnail ......................................... 28 timestamp .................................. 4, 11, 12 Toggle Crosshair ............................... 27 Tv ...................................................... 4, 9 USB ....................... 6, 8, 9, 17, 22, 23, 25 weather ...................................... 4, 17, 18 Weather Center ............................... 4, 17 White Balance ....................................... 5 zoom...................................................... 5 Zoom ............................................... 5, 28 46