1
PV-GS400Eng.book 1 ページ 2004年6月4日 金曜日 午後3時17分
Operating Instructions
Digital Video Camcorder
Model No.
PV-GS400
Before attempting to connect, operate or adjust this product,
please read these instructions thoroughly.
Spanish Quick Use Guide is included.
Guía para rápida consulta en español está incluida.
Mini
For USA assistance, please call: 1-800-211-PANA(7262) or, contact us via the web at: http://www.panasonic.com/contactinfo
For Canadian assistance, please call: 1-800-561-5505 or visit us at www.panasonic.ca
LSQT0801 A
PV-GS400Eng.book 2 ページ 2004年6月4日 金曜日 午後3時17分
Things You Should Know
Thank you for choosing Panasonic!
You have purchased one of the most
sophisticated and reliable products on the market
today. Used properly, we’re sure it will bring you
and your family years of enjoyment. Please take
time to fill in the information on the right.
The serial number is on the tag located on the
underside of your Camcorder. Be sure to retain
this manual as your convenient Camcorder
information source.
Date of Purchase
Dealer Purchased From
Dealer Address
Dealer Phone No.
Model No.
Serial No.
Safety Precautions
WARNING: TO PREVENT FIRE OR SHOCK HAZARD,
DO NOT EXPOSE THIS EQUIPMENT TO RAIN OR MOISTURE.
Your Ò Camcorder is designed to record and play back in Standard Play (SP) mode and Long Play
(LP) mode
It is recommended that only cassette tapes that have been tested and inspected for use in Camcorder
with the Ò mark be used.
CAUTION
RISK OF ELECTRIC SHOCK
DO NOT OPEN
CAUTION: TO REDUCE THE RISK OF ELECTRIC SHOCK,
DO NOT REMOVE COVER (OR BACK)
NO USER-SERVICEABLE PARTS INSIDE
REFER SERVICING TO QUALIFIED SERVICE PERSONNEL
AC Adaptor
≥The rating plate is on the underside of the AC Adaptor.
2
This symbol warns the user
that uninsulated voltage within
the unit may have sufficient
magnitude to cause electric
shock.
Therefore, it is dangerous to
make any kind of contact with
any inside part of this unit.
This symbol alerts the user that
important literature concerning
the operation and maintenance
of this unit has been included.
Therefore, it should be read
carefully in order to avoid any
problems.
PV-GS400Eng.book 3 ページ 2004年6月4日 金曜日 午後3時17分
FCC Note: This equipment has been tested and found to comply with the limits for a Class B digital
device, pursuant to Part 15 of the FCC Rules. These limits are designed to provide reasonable
protection against harmful interference in a residential installation. This equipment generates, uses, and
can radiate radio frequency energy and, if not installed and used in accordance with the instructions,
may cause harmful interference to radio communications. However, there is no guarantee that
interference will not occur in a particular installation. If this equipment does cause harmful interference
to radio or television reception, which can be determined by turning the equipment off and on, the user is
encouraged to try to correct the interference by one or more of the following measures:
≥Reorient or relocate the receiving antenna.
≥Increase the separation between the equipment and receiver.
≥Connect the equipment into an outlet on a circuit different from that to which the receiver is connected.
≥Consult the dealer or an experienced radio/TV technician for help.
FCC Caution: To assure continued compliance, follow the attached installation instructions and use
only shielded interface cables with ferrite core when connecting to computer or peripheral devices.
Any changes or modifications not expressly approved by the party responsible for compliance could
void the user’s authority to operate this equipment.
Declaration of Conformity
Trade Name:
Panasonic
Model No.:
PV-GS400
Responsible party: Matsushita Electric Corporation of America
One Panasonic Way, Secaucus, NJ 07094
Support Contact: Panasonic Consumer Electronics Company
1-800-211-PANA (7262)
This device complies with Part 15 of the FCC Rules. Operation is subject to the following two
conditions: (1)This device may not cause harmful interference, and (2) this device must accept
any interference received, including interference that may cause undesired operation.
CAUTION: TO PREVENT FIRE OR SHOCK HAZARD AND ANNOYING INTERFERENCE, USE THE
RECOMMENDED ACCESSORIES ONLY.
CAUTION: TO PREVENT ELECTRIC SHOCK, MATCH WIDE BLADE OF PLUG TO WIDE SLOT,
FULLY INSERT.
CAUTION: DANGER OF EXPLOSION IF BATTERY IS INCORRECTLY REPLACED. REPLACE
ONLY WITH THE SAME OR EQUIVALENT TYPE.
≥Since this product gets hot during use, operate it in a well ventilated place; do not install this
equipment in a confined space such as a bookcase or similar unit.
WARNING
AS WITH ANY SMALL OBJECT, SD CARDS CAN BE SWALLOWED BY YOUNG CHILDREN. DO
NOT ALLOW CHILDREN TO HANDLE THE SD CARD.
3
PV-GS400Eng.book 4 ページ 2004年6月4日 金曜日 午後3時17分
IMPORTANT SAFETY INSTRUCTIONS
1) Read these instructions.
2) Keep these instructions.
3) Heed all warnings.
4) Follow all instructions.
5) Do not use this apparatus near water.
6) Clean only with dry cloth.
7) Do not block any ventilation openings. Install in accordance with the manufacturer’s instructions.
8) Do not install near any heat sources such as radiators, heat registers, stoves, or other apparatus
(including amplifiers) that produce heat.
9) Do not defeat the safety purpose of the polarized or grounding-type plug. A polarized plug has two
blades with one wider than the other. A grounding type plug has two blades and a third grounding
prong. The wide blade or the third prong are provided for your safety. If the provided plug does not fit
into your outlet, consult an electrician for replacement of the obsolete outlet.
10) Protect the power cord from being walked on or pinched particularly at plugs, convenience
receptacles, and the point where they exit from the apparatus.
11) Only use attachments/accessories specified by the manufacturer.
12) Use only with the cart, stand, tripod, bracket, or the table specified by the
manufacturer, or sold with the apparatus. When a cart is used, use caution
when moving the cart/apparatus combination to avoid injury from tip-over.
S3125A
13) Unplug this apparatus during lightning storms or when it will be left unused for
long periods of time.
14) Refer all servicing to qualified service personnel. Servicing is required when the apparatus has been
damaged in any way, such as when the power-supply cord or plug is damaged, liquid has been
spilled or objects have fallen into the apparatus, the apparatus has been exposed to rain or
moisture, does not operate normally, or has been dropped.
4
PV-GS400Eng.book 5 ページ 2004年6月4日 金曜日 午後3時17分
Precautions
USE & LOCATION
WARNING
≥TO AVOID SHOCK HAZARD ... Your
Camcorder and power supply should not be
exposed to rain or moisture. Do not connect the
power supply or operate your Camcorder if it
gets wet. Your Camcorder has been designed
for outdoor use, however it is not designed to
sustain direct exposure to water, rain, sleet,
snow, sand, dust, or a direct splashing from a
pool or even a cup of coffee. This action could
permanently damage the internal parts of your
Camcorder. Do not attempt to disassemble this
unit. There are no user serviceable parts inside.
Unplug your Camcorder from the power supply
before cleaning.
CAUTION
≥DO NOT AIM YOUR CAMCORDER AT THE
SUN OR OTHER BRIGHT OBJECTS
≥DO NOT LEAVE THE CAMCORDER WITH
THE EVF AIMED DIRECTLY AT THE SUN AS
THIS MAY CAUSE DAMAGE TO THE
INTERNAL PARTS OF THE EVF
≥DO NOT EXPOSE YOUR CAMCORDER TO
EXTENDED HIGH TEMPERATURE ... Such as,
in direct sunlight, inside a closed car, next to a
heater, etc... This action could permanently
damage the internal parts of your Camcorder.
≥AVOID SUDDEN CHANGES IN
TEMPERATURE ... If the unit is suddenly
moved from a cold place to a warm place,
moisture may form on the tape and inside the
unit.
≥DO NOT LEAVE YOUR CAMCORDER OR
THE POWER SUPPLY TURNED ON WHEN
NOT IN USE.
≥STORAGE OF YOUR CAMCORDER ... Store
and handle your Camcorder in a manner that
will not subject it to unnecessary movement
(avoid shaking and striking). Your Camcorder
contains a sensitive pick-up device which could
be damaged by improper handling or storage.
CARE
≥TO CLEAN YOUR CAMCORDER ... Do not use
strong or abrasive detergents when cleaning
your Camcorder body.
≥TO PROTECT THE LENS ... Do not touch the
surface of the lens with your hand. Use a
commercial Camcorder lens solution and lens
paper when cleaning the lens. Improper
cleaning can scratch the lens coating.
≥TO PROTECT THE FINISH OF YOUR
CAMCORDER ... Before handling your
Camcorder, make sure your hands and face are
free from any chemical products, such as
suntan lotion, as it may damage the finish.
Apparatus Claims of U.S. Patent Nos. 4,631,603, 4,577,216, and 4,819,098, licensed for limited
viewing.
This product incorporates copyright protection technology that is protected by method claims of certain
U.S. patents and other intellectual property rights owned by Macrovision Corporation and other rights
owners. Use of this copyright protection technology must be authorized by Macrovision Corporation,
and is intended for home and other limited viewing uses only unless otherwise authorized by
Macrovision Corporation. Reverse engineering or disassembly is prohibited.
This class B digital apparatus complies with CANADIAN ICES-003.
U.S.A. CONSUMERS ONLY
This Product has a fluorescent lamp that contains a small amount of mercury. It also contains lead
in some components. Disposal of these materials may be regulated in your community due to
environmental considerations. For disposal or recycling information please contact your local
authorities, or the Electronics Industries Alliance: <http://www.eiae.org.>
U.S.A./CANADA CONSUMERS: ATTENTION:
A lithium ion/polymer battery that is recyclable powers the product
you have purchased. Please call 1-800-8-BATTERY for information
on how to recycle this battery.
5
PV-GS400Eng.book 6 ページ 2004年6月4日 金曜日 午後3時17分
Before opening the CD-ROM package, please read the following.
End User License Agreement (for USB Driver, Video Stream
Driver, MotionDV STUDIO and SD Viewer)
You (“Licensee”) are granted a license for the Software defined in this End User Software Agreement
(“Agreement”) on condition that you agree to the terms and conditions of this Agreement. If Licensee
does not agree to the terms and conditions of this Agreement, promptly return the Software to
Matsushita Electric Industrial Co., Ltd. (“Matsushita”), its distributors or dealers from which you made
the purchase.
Article 1
License
Licensee is granted the right to use the software, including the information recorded or described on the
CD-ROM, instruction manuals, and any other media provided to Licensee (collectively “Software”), but
all applicable rights to patents, copyrights, trademarks and trade secrets in the Software are not
transferred to Licensee.
Article 2
Use by a Third Party
Licensee may not use, copy, modify, transfer or allow any third party, whether free of charge or not, to
use, copy or modify the Software, except as expressly provided for in this Agreement.
Article 3
Restrictions on Copying the Software
Licensee may make a single copy of the Software in whole or in part solely for back-up purpose.
Article 4
Computer
Licensee may only use the Software on a single computer at a single location.
6
PV-GS400Eng.book 7 ページ 2004年6月4日 金曜日 午後3時17分
Article 5
Reverse Engineering, Decompiling or Disassembly
Licensee may not reverse engineer, decompile, or disassemble the Software, except to the extent
either of them is permitted under law or regulation of the country where Licensee resides. Matsushita,
or its distributors or dealers will not be responsible for any defects in the Software or damage to
Licensee caused by Licensee’s reverse engineering, decompiling, or disassembly of the Software.
Article 6
Limitation of Liability
The Software is provided “AS-IS” without warranty of any kind, either expressed or implied, including,
but not limited to, warranties of non-infringement, merchantability and/or fitness for a particular
purpose. Further, Matsushita does not warrant that the operation of the Software will be uninterrupted
or error free. Matsushita or any of its distributors or dealers will not be liable for any damage suffered by
Licensee arising from or in connection with Licensee’s use of the Software.
Article 7
Export Control
Licensee agrees not to export or re-export to any country the Software in any form without the
appropriate export licenses under regulations of the country where Licensee resides, if necessary.
Article 8
Termination of License
The right granted to Licensee hereunder will be automatically terminated if Licensee violates any of the
terms and conditions of this Agreement. Upon such automatic termination, Licensee must destroy the
Software and related documentation together with all the copies thereof at Licensee’s own expense.
7
PV-GS400Eng.book 8 ページ 2004年6月4日 金曜日 午後3時17分
Contents
Before Use
Quick Guide ...................................................
Standard Accessories....................................
Controls and Components .............................
The Remote Controller ..................................
Power Supply.................................................
Charging Time and Available Recording
Time ............................................................
The One-touch Free Style Grip Belt ..............
Attaching the Lens Cap .................................
Attaching the Shoulder Strap.........................
Inserting a Cassette.......................................
Using a Memory Card....................................
Turning on the Camcorder.............................
Selecting Modes ............................................
Using the Viewfinder/LCD Monitor.................
Using the Menu Screen .................................
List of Menus .................................................
Setting Date and Time ...................................
Internal Lithium Battery Recharge .................
LP Mode ........................................................
Audio Recording Mode ..................................
8
Recording Mode
10
12
12
15
16
17
17
18
18
18
19
19
20
20
21
22
26
26
26
26
About Recording............................................
Recording on a Tape .....................................
Recording a Still Picture on a Card
(Photoshot) .................................................
Quick Start.....................................................
Self-timer Recording......................................
Zoom In/Out Functions ..................................
Digital Zoom Function ...................................
Image Stabilizer Function..............................
Fade In/Out Functions ...................................
Backlight Compensation Function .................
MagicPix Functions .......................................
Soft Skin Function .........................................
Wind Noise Reduction Function ....................
Wide/Pro-Cinema Function ...........................
Cinema Function ...........................................
Recording in Special Situations.....................
Recording in Natural Colors ..........................
Adjusting White Balance Manually ................
Manual Shutter Speed Adjustment................
Manual Iris Adjustment ..................................
Manual Focus Adjustment .............................
Recording with Fixed Brightness ...................
Advanced Functions ......................................
Using the Auto Pop-up Flash ........................
Red Eye Reduction Function.........................
Digital Effect Functions..................................
27
27
29
31
31
31
32
32
33
33
34
34
34
35
35
35
36
36
37
38
38
38
39
40
41
41
PV-GS400Eng.book 9 ページ 2004年6月4日 金曜日 午後3時17分
Playback Mode
Playing Back a Tape......................................
Finding a Scene You Want to Play Back .......
Slow Motion Playback....................................
Still Playback/Still Advance Playback ............
Index Search Function...................................
Playback Zoom Function ...............................
Playback Digital Effect Functions ..................
Playing Back a Card ......................................
Slide Show.....................................................
Creating a Title ..............................................
Adding a Title.................................................
Writing Printing Data on a Card .....................
Protecting the Files on a Card .......................
Deleting the Files Recorded on a Card..........
Formatting a Card..........................................
Playing Back on Your TV...............................
With a PC
44
44
45
45
46
46
47
47
48
49
49
50
50
51
51
52
Editing Mode
Recording from a Tape onto a Card ..............
Audio Dubbing ...............................................
Copying on a DVD-R or an S-VHS
(or a VHS) Cassette ....................................
Recording the Contents of Other
Equipment ...................................................
Using the DV Cable for Recording.................
PC Connection With DV Interface Cable .......
Printing pictures by directly connecting to
the printer (PictBridge) ................................
53
53
54
54
55
56
56
Using the Software with a Computer .............
Using USB Driver ..........................................
Connecting Computer and Camcorder..........
Using as a Web Camera ...............................
Using MotionDV STUDIO ..............................
Using the SD Viewer .....................................
Using the ArcSoft Software ...........................
To disconnect USB Cable safely ...................
If you no longer need software or driver
(Uninstall)....................................................
Notes .............................................................
58
58
59
59
62
65
66
68
68
69
Others
Indicators .......................................................
Initializing the Modes .....................................
Warning/Alarm Indicators ..............................
Notes and Hints.............................................
Cautions for Use............................................
Before Requesting Service (Problems and
Solutions) ....................................................
Explanation of Terms ....................................
Specifications ................................................
Camcorder Accessory System ......................
Camcorder Accessory Order Form
(For USA Customers) .................................
Request for Service Notice (USA Only) ........
Limited Warranty (For USA Customers)........
Customer Services Directory.........................
Warranty (For Canadian Customers) ............
Index..............................................................
Spanish Quick Use Guide/
Guía española para el uso rápido...............
71
72
73
74
82
86
87
89
91
92
93
94
95
96
97
99
9
PV-GS400Eng.book 10 ページ
2004年6月4日 金曜日 午後3時17分
Before Use
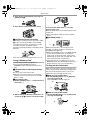
Quick Guide
1 Attach the Battery to the AC Adaptor and
charge it.
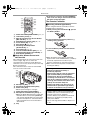
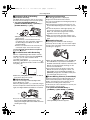
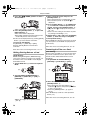
ª Inserting a Card
1 Slide the [OPEN] Lever 1 to open the Card
Slot Cover 2.
1
2
OPEN
2 While holding the Memory Card with its cut
corner on top 3, insert it into the Card Slot.
≥Before use, fully charge the Battery.
≥Since the Battery will not be charged when
the DC Cable is connected to the AC
Adaptor, disconnect it from the AC Adaptor.
≥The [CHARGE] Lamp lights up, and charging
starts.
≥When the [CHARGE] Lamp goes off,
charging is completed.
2 Attach the charged Battery to the
Camcorder.
3
3 Close the Card Slot Cover 2 securely.
ª Recording on a Tape
1 Set the [OFF/ON] Switch 1 to [ON].
≥The [POWER] Lamp 2 lights up.
2
POWER
O
ON
FF
1
2 Set the Mode Dial to Tape Recording Mode.
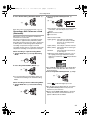
S
PC
front and pull down to open the Cassette
Compartment Cover.
2 Insert a Cassette.
D
ª Inserting a Cassette
1 Slide the [OPEN/EJECT] Lever 1 toward the
3 Press the Recording Start/Stop Button.
≥Recording starts.
OPEN/
EJECT
1
3 Close the Cassette Holder by pressing the
[PUSH] mark 2.
4 Close the Cassette Compartment Cover.
2
PUSH
10
4 Press the Recording Start/Stop Button
again to pause the recording.
PV-GS400Eng.book 11 ページ
2004年6月4日 金曜日 午後3時17分
Before Use
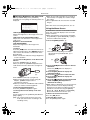
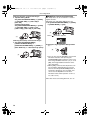
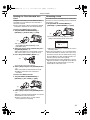
ª Recording a Still Picture on a Card
(Photoshot)
1 Set the Mode Dial to Card Recording Mode.
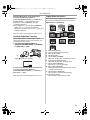
ª Playing Back a Card
It plays back files recorded on a Card.
1 Set the Mode Dial to Picture Playback Mode.
PC
SD
S
PC
D
2 Press the [PHOTO SHOT] Button.
PHOTO
SHOT
2 Start Playback.
1: Starting the Slide Show
5: Playing back the next picture
6: Playing back the previous picture
∫: Stop the Slide Show
;: Pause the Slide Show
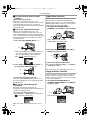
ª Playing Back a Tape
1 Set the [OFF/ON] Switch 1 to [ON].
≥The [POWER] Lamp 2 lights up.
2
POWER
O
ON
FF
1
2 Set the Mode Dial to Tape Playback Mode.
PC
SD
3 Press the [6] Button to rewind the tape.
STILL
ENTER
FADE
4 Press the [1] Button to start playback.
STILL
ENTER
FADE
5 Press the [∫] Button to Stop Playback.
STILL
ENTER
FADE
11
PV-GS400Eng.book 12 ページ
2004年6月4日 金曜日 午後3時17分
Before Use
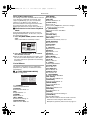
Controls and Components
Before Use
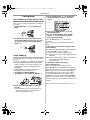
Standard Accessories
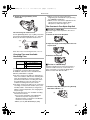
ª Camcorder
Illustrated are accessories supplied with the
Camcorder.
(1)
1)
(4)
(5)
(6)
PV-DAC14D
2)
K2GJ2DZ00017
3)
K2CA2EA00005
(2)
4)
CR2025
CGA-DU14
5)
N2QAGC000018
6)
VYF2992
K2KC4CB00009
(1) Smart Accessory Shoe
N2QCBD000030
7)
VFC3506
8)
VFA0425A
1) AC Adaptor, DC Cable and AC Cable -16-
CAUTION:
This unit will operate on 110/120/220/240 V
AC. An AC plug adaptor may be required for
voltages other than 120 V AC. Please
contact either a local or foreign electrical
parts distributor for assistance in selecting
an alternate AC plug. We recommend using
the accessory power plug adaptor
(VJSS0070) in an area which has special AC
outlets.
2) Battery Pack -163) Remote Controller and Button-Type
Battery -154) Magic Wire Remote Control with Narration
Mic -155) Lens Cap -186) AV Cable -527) Shoulder Strap -188) USB Connection Kit (USB Cable and
CD-ROM) -58-
12
(3)
≥The Video DC Light (optional), Video Flash
(not supplied) or the Stereo Zoom
Microphone (optional), etc. can be attached
here. Power is supplied directly from the
Camcorder when using an accessory
supported by the Smart Accessory Shoe.
≥Do not touch the connector part of the
Smart Accessory Shoe.
(2) LCD Monitor Open Button [PUSH OPEN]
-20(3) LCD Monitor -20-, -85-
Due to limitations in LCD production
technology, there may be some tiny bright or
dark spots on the LCD Monitor screen.
However, this is not a malfunction and does
not affect the recorded picture.
(4) Card Slot Cover -19(5) Card Slot -19(6) Card Slot Cover Open Lever [OPEN] -19(12)(13)(14)(15)
(7)
WIDE/
PRO-CINEMA
(8)
ADVANCED
MAGIC
PIX
(9)
MULTI/
P-IN-P
REC
(10)
(11)
SOFT
SKIN
TELE
MACRO
STILL
SD
CARD
ENTER
BACK
LIGHT
MENU
FADE
PUSH
CLOSE
ACCESS
(16)(17)(18)(19)(20)(21)
(7) Wide/Pro-Cinema Button
[WIDE/PRO-CINEMA] -35(8) Flash Button [ß] -40(9) Recording Check Button [S] -27Recording Button [REC] -54(10) Backlight Button [BACK LIGHT] -33-, -55(11) Card Access Lamp [ACCESS] -19(12) Multi Button [MULTI] -42Picture-in-Picture Button [P-IN-P] -43(13) Advanced MagicPix Button
[ADVANCED MAGICPIX] -34-
PV-GS400Eng.book 13 ページ
2004年6月4日 金曜日 午後3時17分
Before Use
(14)
(15)
(16)
(17)
(18)
(19)
(20)
(21)
Soft Skin Button [SOFT SKIN] -34Tele Macro Button [TELE MACRO] -32Menu Button [MENU] -21Pause Button [;] -47Still Button [STILL] -28-, -40Fast Forward/Cue Button [5] -44-, -47Play Button [1] -44-, -47Enter Button [ENTER] -21Stop Button [∫] -44-, -47Fade Button [FADE] -33Rewind/Review Button [6] -44-, -47(22)(23)(24)(25)(26)(27)(28)
(29)
(30)
(31)
(33) (34) (35)
(36)
(32)
(22) Lens (LEICA DICOMAR)
≥LEICA is a registered trademark of Leica
microsystems IR GmbH and DICOMAR is a
registered trademark of Leica Camera AG.
(23) Lens Hood -85(24) Multi Manual Ring -31-, -37-, -38(25) Microphone (built-in, stereo) -32-, -34(26) Focus/Zoom Button [FOCUS/ZOOM] -38(27) Shutter/Iris Button [SHUTTER/IRIS]
-37-, -38(28) White Balance Button [WB] -36(29) Eyecup
(30) Power LCD Button [POWER LCD] -21Power LCD Lamp -21(31) Mode Selector Switch
[AUTO/MANUAL/AE LOCK] -27-, -35-, -38(32) Grip Belt Release Button -17(33) White Balance Sensor -37(34) Recording Lamp -27(35) Auto Pop-up Flash -40(36) Remote Control Sensor -16-
(40)(41)(42)(43)
(37)
REMOTE/MIC
(PLUG IN POWER)
(38)
AV IN/OUT
PHONES
(39)
(37) USB Jack [ ] -59(38) Jack for Magic Wire Remote Control with
Narration Mic [REMOTE] -28-
Microphone Jack [MIC]
≥When connecting an external microphone or
audio equipment to this jack, the built-in
microphone does not operate.
≥When connecting the Magic Wire Remote
Control with Narration Mic to this jack and
the [TALK] Button is pressed, the built-in
microphone does not operate. -28≥When connecting the pin plug of the Magic
Wire Remote Control with Narration Mic to
this jack, plug it in as far as it goes.
≥A compatible plug-in powered microphone
can be used. Please consult your dealer for
more information.
≥The microphone may make noises
depending on the type used. In this case,
we recommend using the battery with the
Camcorder instead of the AC adaptor.
(39) Audio-Video Input/Output Jack
[AV IN/OUT] -52Headphone Jack [PHONES]
≥Connecting an AV Cable to this jack
activates the Camcorder’s built-in speaker,
but connecting a headphone, etc.
deactivates it.
≥When connecting the pin plug of the AV
Cable to this jack, plug it in as far as it goes.
≥When using headphones, set [AV JACK] of
the [AV IN/OUT] or [INITIAL] sub-menu to
[OUT/PHONES]. If you set [AV JACK] to
[OUT], you may hear noises on the right.
(40) Reset Button [RESET] -73(41) Cassette Eject Lever [OPEN/EJECT] -18(42) Speaker -44(43) Sub Recording Start/Stop Button
≥This button makes it easier to record from a
non-standard or lower position, for example
at waist level.
13
PV-GS400Eng.book 14 ページ
2004年6月4日 金曜日 午後3時17分
Before Use
ª Remote Controller
Using the wireless Remote Controller that is
supplied with the Camcorder, most of the
Camcorder functions can be operated from a
distance.
S
PC
D
(45)
QUICK START
POWER
ON
O
(50)
(44)
(62)
(63)
(64)
(65)
(46)
FF
(47)
(48)
(51)
(52)
OSD
MULTI/
P-IN-P
¥REC
A.DUB
V
PLAY
FF/W
1
5
/REW
6
START/
STOP
PHOTO
SHOT
TITLE
ZOOM
T
(66)
(67)
W
STILL ADV PAUSE STILL ADV
E
;
D
INDEX
K
STOP
INDEX
L
SELECT
(44) Mode Dial -20(45) Quick Start Recording Button
[QUICK START] -31Quick Start Recording Lamp -31(46) Power Lamp [POWER] -19-, -27-, -44(47) Recording Start/Stop Button -27(48) Power Switch [OFF/ON] -19-, -27-, -44-, -82(49) Cassette Holder
(50) Cassette Compartment Cover -18(51) Zoom Lever [W/T] -31-, -32Volume/Jog Lever [`VOL/JOG_] -44-, -45(52) Photoshot Button [PHOTO SHOT] -29-, -53-
DATE/
TIME
DISPLAY RESET
sVOL r
(49)
∫
P.B. ZOOM
VAR.
SEARCH
MENU
(68)
STORE
ENTER
OFF/ON
P.B.DIGITAL
(62)
(63)
(64)
(65)
(66)
(67)
(68)
Date/Time Button [DATE/TIME] -72Indication Output Button [OSD] -52Display Button [DISPLAY] -72Reset Button [RESET] -88Recording Button [¥REC] -55Audio Dubbing Button [A.DUB] -53Direction Buttons for Playback Zoom
Function [π, ∑, ∏, ∫] -46-
(54)(55)(56) (57) (58)
(53)
(59)
DV
S-VIDEO
IN/OUT
(69)
(70)
(71)
(72)
(73)
DATE/
TIME
PHOTO
SHOT
TITLE
MULTI/
P-IN-P
¥REC
A.DUB
V
PLAY
FF/W
1
5
/REW
6
START/
STOP
ZOOM
T
sVOL r
OSD
DISPLAY RESET
(74)
W
STILL ADV PAUSE STILL ADV
E
;
D
INDEX
K
STOP
INDEX
L
SELECT
∫
VAR.
SEARCH
P.B. ZOOM
MENU
STORE
(75)
(76)
ENTER
OFF/ON
P.B.DIGITAL
(60) (61)
(53) Eyepiece Corrector Knob -20(54) Viewfinder -20-, -85-
Due to limitations in LCD production
technology, there may be some tiny bright or
dark spots on the Viewfinder screen.
However, this is not a malfunction and does
not affect the recorded picture.
(55)
(56)
(57)
(58)
Battery Eject Button [PUSH BATT] -17Battery Holder
Shoulder Strap Holders -18Grip Belt (One-touch Free Style Grip Belt)
-17(59) Tripod Receptacle
≥Used for mounting the Camcorder on an
optional tripod.
(60) DV Terminal [DV] -54-, -55-, -56≥Connect this to the digital video equipment.
(61) S-Video Input/Output Jack
[S-VIDEO IN/OUT] -52-
14
(69) Slow Motion/Still Advance Buttons [E, D]
(E: Reverse, D: Forward) -45(70) Index Search Buttons [:, 9]
(:: Reverse, 9: Forward) -46(71) Selection Button [SELECT] -47(72) Store Button [STORE] -47(73) Off/On Button [OFF/ON] -47(74) Zoom/Volume Button [ZOOM/VOL]
-31-, -44-, -46(75) Variable Speed Search Button
[VAR. SEARCH] -45(76) Menu Button [MENU] -21-
PV-GS400Eng.book 15 ページ
2004年6月4日 金曜日 午後3時17分
Before Use
(79)
(80)
(81)
(82)
OSD
DATE/
TIME
DISPLAY RESET
PHOTO
SHOT
T
MULTI/
P-IN-P
¥REC
A.DUB
PLAY
FF/W
1
5
6
ZOOM
TITLE
V
/REW
START/
STOP
sVOL r
(77)
(78)
E
;
D
INDEX
K
STOP
INDEX
L
∫
VAR.
SEARCH
The Remote Controller
(86)
ª Inserting a Button-type Battery
P.B. ZOOM
MENU
STORE
(84)
(85)
W
STILL ADV PAUSE STILL ADV
SELECT
(83)
(87)
ENTER
OFF/ON
P.B.DIGITAL
(77) Photoshot Button [PHOTO SHOT] -29-, -53(78) Title Button [TITLE] -50(79) Multi-Picture/Picture-in-Picture Button
[MULTI/P-IN-P] -42-, -48(80) Rewind/Review Button [6] -44-, -47(81) Pause Button [;] -45-, -47(82) Stop Button [∫] -44-, -47(83) Recording Start/Stop Button
[START/STOP] -27(84) Play Button [1] -44-, -47(85) Fast-forward/Cue Button [5] -44-, -47(86) Playback Zoom Button [P.B. ZOOM] -46(87) Enter Button [ENTER] -21-
ª Magic Wire Remote Control with
Narration Mic
This controller allows the scene to be shot from
various angles, high to low, and is also
convenient when a Tripod is used. When the
controller is not in use, attach the clip to the Grip
Belt for convenience.
This controller makes it easier for left-handed
users to use the Camcorder.
(88)
(89)
(90)
(91)
(92)
≥Insert the plug securely into the [REMOTE]
Jack as far as it will go. A loose connection
will affect normal operation.
(93)
(88) Microphone [MIC] -28(89) Recording Start/Stop Button [REC]
(90) Zoom Lever [W/T]
Before using the Remote Controller, insert the
supplied button-type battery.
1 While pressing the Lock Button 1, pull out
the Battery Holder.
1
2 Insert the button-type battery with the (i)
marking facing upwards.
3 Insert the Battery Holder into the Remote
Controller.
≥When the button-type battery is exhausted,
replace it with a new CR2025 battery. (A battery
is normally expected to last about 1 year.
However, it depends on operation frequency.)
≥Make sure to match the poles correctly when
inserting the battery.
Warning
Danger of explosion if battery is
incorrectly replaced.
Replace only with the same or equivalent
type recommended by the equipment
manufacturer. Discard used batteries
according to manufacturer’s instructions.
Risk of fire, explosion and burns. Do not
recharge, disassemble, heat above 212°F
(100°C) or incinerate. Keep the
Button-Type battery out of the reach of
children. Never put Button-Type battery
in mouth. If swallowed, call your doctor.
≥Zoom speed changes in 2 stages.
(91) Photoshot Button [PHOTO SHOT]
(92) Microphone Switch Button [TALK] -28-
≥When the Magic Wire Remote Control with
Narration Mic is connected to [REMOTE]
Jack and the [TALK] Button is pressed, the
narration microphone is activated and the
built-in microphone on the Camcorder is
deactivated.
(93) Clip
Replace battery with Panasonic PART NO.
CR2025 only. Use of another battery may
present a risk of fire or explosion.
Caution: Battery may explode if mistreated.
Dispose of used battery promptly. Keep
away from children.
Do not recharge, disassemble or dispose of
in fire.
15
PV-GS400Eng.book 16 ページ
2004年6月4日 金曜日 午後3時17分
Before Use
ª Using the Remote Controller
1 Direct the Remote Controller at the Remote
Control Sensor (36) of the Camcorder and
press an appropriate button.
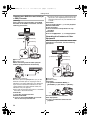
Power Supply
ª Using the AC Adaptor
10˚
(36)
15˚
15˚
15˚
1
≥Distance from the Camcorder: Within
approximately 15 feet (5 meters)
≥Angle: Within approximately 10o in the
upward, and 15o in the downward and
horizontal directions from the central axis
≥The above operating ranges are for indoor use.
Outdoors or under strong light, the Camcorder
may not operate properly even within the above
ranges.
≥Within a 3 feet (1 meter) range, you can also
use the Remote Controller on the LCD Monitor
side of the Camcorder.
Selecting Remote Controller Modes
When 2 Camcorders are used simultaneously,
they can be operated individually by selecting
different Remote Controller Modes.
≥If the Remote Controller Mode of the Camcorder
and that of the Remote Controller do not match,
[REMOTE] Indication is displayed.
Setup on the Camcorder:
Set [REMOTE] on the [INITIAL] Sub-Menu to the
desired Remote Controller Mode. (-23-, -24-, -25-)
1 Connect the DC Cable to the Camcorder.
2 Connect the DC Cable to the AC Adaptor.
3 Connect the AC Cable to the AC Adaptor
and the AC Jack.
≥The AC Cable’s outlet plug does not fit
entirely into the AC Adaptor jack. A gap will
remain as shown 1.
≥Before connecting or disconnecting the
power supply, set the [OFF/ON] Switch on
the Camcorder to [OFF] and make sure that
[POWER] Lamp is not lit.
ª Using the Battery
Before use, fully charge the Battery.
≥We recommend using a Panasonic Battery.
≥We cannot guarantee the quality of this
Camcorder when batteries from other
companies are used.
1 Attach the Battery to the AC Adaptor and
charge it.
Setup on the Remote Controller:
6
2
1
5
W
STILL ADV PAUSE STILL ADV
E
;
D
INDEX
K
STOP
INDEX
L
∫
1
P.B. ZOOM
SELECT
[VCR1]: Press the [D] Button and [∫] Button
simultaneously. 1
[VCR2]: Press the [E] Button and [∫] Button
simultaneously. 2
≥When the battery in the Remote Controller is
replaced, the mode is automatically reset to
[VCR1] Mode.
16
≥Since the Battery will not be charged when
the DC Cable is connected to the AC
Adaptor, disconnect it from the AC Adaptor.
≥The [CHARGE] Lamp lights up, and charging
starts.
≥When the [CHARGE] Lamp goes off,
charging is completed.
≥When the battery is completely discharged,
the [CHARGE] lamp blinks at first, but the
battery is charged normally. When the
temperature of the battery is too high or low,
the [CHARGE] lamp blinks and the charging
time becomes longer than usual.
PV-GS400Eng.book 17 ページ
2004年6月4日 金曜日 午後3時17分
Before Use
2 Attach the charged Battery to the
Camcorder.
≥When you use the Camcorder while
brightening the LCD Monitor up by pressing
the [POWER LCD] Button.
≥When you use accessories applicable to the
Smart Accessory Shoe (Stereo Zoom
Microphone, Video DC Light, etc.).
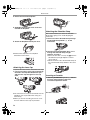
The One-touch Free Style Grip Belt
ª To Use as a Grip Belt
Disconnecting the Power Source
Set the [OFF/ON] Switch (48) to [OFF] and, while
pressing the [PUSH BATT] Button (55), slide the
Battery or DC Cable upward to disconnect it.
(55)
Adjust the length of the Grip Belt to the size of
your hand.
1 Detach the end of the Grip Belt.
PUSH
BATT
2 Adjust the length of the Grip Belt to the size
O
ON
of your hand.
FF
(48)
≥For other notes concerning this item, see -74-.
Charging Time and Available
Recording Time
CGA-DU14 A
B
CGA-DU21 A
B
2h45min.
2h (1h30min.)
3h55min.
3h (2h15min.)
A Charging Time
B Maximum Continuous Recording Time
≥“1h30min.” indicates 1 hour and 30 minutes.
≥Battery CGA-DU14 is supplied.
≥The times shown in the table are approximate
times. The numbers indicate the recording time
when the Viewfinder is used. The numbers in
parentheses indicate the recording time when
the LCD Monitor is used. In actual use, the
available recording time may be shorter.
≥The times shown in the table are for continuous
recording at a temperature of 68oF (25oC) and
humidity of 60%. If the Battery is charged at a
higher or lower temperature, the charging time
may be longer.
≥In the following cases, the available recording
time becomes shorter.
≥You use the Viewfinder and LCD Monitor
simultaneously when using the 0 Lux
MagicPix function, rotating the LCD Monitor
forward to record yourself.
≥When you set [EVF ON/AUTO] to [ON].
3 Reattach the Grip Belt.
ª To Use as a Hand Strap
Using the Grip Belt as the hand strap makes it
easier to handle and carry a Camcorder. It is
more convenient to use with the Magic Wire
Remote Control with Narration Mic.
1 Detach the Grip Belt while pressing the Grip
Belt Release Button (32).
(32)
17
PV-GS400Eng.book 18 ページ
2004年6月4日 金曜日 午後3時17分
Before Use
2 Detach the end of the Grip Belt.
3 Slide A in the direction of the arrow and
reattach the Grip Belt.
Attaching the Shoulder Strap
A
4 Attach the Grip Belt around your wrist.
We recommend that you attach the Shoulder
Strap before going out to avoid dropping the
Camcorder.
1 Pull the end of the Shoulder Strap through
the Shoulder Strap Holder (57) on the
Camcorder.
2 Fold the end of the Shoulder Strap, run it
≥Reattach the Grip Belt to the Grip Belt
Attachment until it clicks.
Attaching the Lens Cap
To protect the Lens surface, attach the Lens Cap.
1 Pass the end of the Lens Cap Cord through
the hole in the Grip Belt Attachment part
and the Lens Cap through the Lens Cap
Cord.
through the Shoulder Strap Length
Adjuster, and pull it.
≥Pull it out more than 1 inch (2 cm) 1 from the
Shoulder Strap Length Adjuster so that it
cannot slip off.
≥Attach the other end of the Shoulder Strap to
the other Shoulder Strap Holder in the same
way.
1
Inserting a Cassette
1 Slide the [OPEN/EJECT] Lever (41) toward
the front and pull down to open the
Cassette Compartment Cover.
≥The removed Lens Cap can be hooked onto the
Grip Belt. (It is not possible when using as a
hand strap.)
≥When you are not recording, be sure to cover
the Lens with the Lens Cap for protection.
18
2 Insert a Cassette.
OPEN/
EJECT
(41)
PV-GS400Eng.book 19 ページ
2004年6月4日 金曜日 午後3時17分
Before Use
3 Close the Cassette Holder by pressing the
[PUSH] mark 1.
1
1
PUSH
4 Close the Cassette Compartment Cover.
3 Close the Card Slot Cover (4) securely.
Removing the Card
Open the Card Slot Cover and then pull the Card
straight out.
≥After removing the Card, close the Card Slot
Cover.
ª [ACCESS] Lamp (11)
ª Accidental Erasure Prevention
Opening the accidental erasure prevention slider
1 on the cassette (by sliding it to the [SAVE]
arrow direction) prevents recording. To enable
recording, close the accidental erasure
prevention slider (by sliding it to the [REC] arrow
direction).
1
REC
SAVE
≥For other notes concerning this item, see -74-.
Using a Memory Card
A Card can be used to record pictures.
≥Use a genuine SD Memory Card or
MultiMediaCard manufactured by Panasonic
only.
ª Caution before inserting/removing a
Card
Be sure to turn off the Camcorder.
≥Otherwise, the Camcorder may not function
properly or it may cause the loss of recorded
data in a Card.
ª Inserting a Card
1 Slide the [OPEN] Lever (6) to open the Card
Slot Cover (4).
(11)
ACCESS
While the Camcorder is accessing the Card
(reading, recording, playback or erasing), the
[ACCESS] Lamp lights up.
≥While the [ACCESS] Lamp is on, never attempt
to open the Card Slot Cover, to pull out the
Card, to turn off the Camcorder. Such actions
will damage the Card, and recorded data, and
cause the Camcorder to malfunction.
≥It may take time to record pictures if you use
MultiMediaCard. (The [ACCESS] Lamp stays on
longer. However, this is not a malfunction.)
Turning on the Camcorder
When the Camcorder is turned on with the Lens
Cap on, the Automatic White Balance Adjustment
may not function properly. Please turn on the
Camcorder after removing the Lens Cap.
ª How to Turn on the Power
1 Set the [OFF/ON] Switch (48) to [ON] while
pressing the button 1.
≥The [POWER] Lamp (46) lights up.
(46)
POWER
O
ON
FF
(48)
OPEN
1
(4)
2 While holding the Memory Card with its cut
corner on top 1, insert it into the Card Slot.
ª How to Turn off the Power
1 Set the [OFF/ON] Switch (48) to [OFF] while
pressing the button 1.
ON
O
(6)
(48)
FF
1
19
PV-GS400Eng.book 20 ページ
2004年6月4日 金曜日 午後3時17分
Before Use
Selecting Modes
You can choose a desired mode by rotating the
Mode Dial.
1 Rotate the Mode Dial (44).
S
PC
D
(44)
:Tape Recording Mode
Use this mode when recording pictures on a tape.
Also, you can record still pictures on the card
simultaneously during recording on a tape.
:Tape Playback Mode
Use this mode when playing back the recorded
scene on a tape.
:Card Recording Mode
Use this mode when recording a still picture on a
card.
:Picture Playback Mode
Use this mode when playing back the recorded
still picture on a card.
PC :PC Mode
Use this mode when you want to connect the
Camcorder to your personal computer.
Using the Viewfinder/LCD Monitor
ª Using the Viewfinder
Before using the Viewfinder, adjust the field of
view so that the displays inside the Viewfinder
become clear and easy to read.
1 Tilt up the Viewfinder.
≥The Viewfinder can also be pulled out for use,
and the length can be adjusted in 2 steps.
≥Do not pull on the Eyecup to extend the
Viewfinder.
2 Adjust by sliding the Eyepiece Corrector
Knob (53).
(53)
12:30:45PM
12:30:45PM
OCT
OCT 15
15 2004
2004
12:30:45PM
OCT 15 2004
20
To Use the Viewfinder at the Same Time as the
LCD Monitor
Set [LCD/EVF] >> [EVF ON/AUTO] >> [ON].
≥The Viewfinder does not turn off even if the LCD
Monitor is opened.
≥When you turn the Camcorder off, this setting is
cancelled.
ª Using the LCD Monitor
With the LCD Monitor open, you can also record
the picture while watching it.
1 Press the [PUSH OPEN] Button (2) and pull
the LCD Monitor (3) out in the direction of
the arrow.
≥The Viewfinder is now deactivated.
≥The LCD Monitor can be opened a maximum
of 120o. If you open the LCD monitor to an
angle of 120o, it becomes easier to operate
menus or to play back pictures.
PUSH
OPEN
(2)
(3)
2 Adjust the LCD Monitor angle according to
the desired recording angle.
≥The LCD Monitor can rotate a maximum of
180o 1 from the vertical position upwards
and a maximum of 90o 2 to the downward
direction. Forcefully rotating the LCD Monitor
beyond these ranges will damage the
Camcorder. You cannot rotate the LCD
Monitor when it is opened to an angle of 120o.
Therefore, do not rotate it forcibly.
1180o
290o
Closing the LCD Monitor
Push the LCD Monitor until it is securely locked.
≥Make sure the Card Slot Cover is closed.
PV-GS400Eng.book 21 ページ
2004年6月4日 金曜日 午後3時17分
Before Use
ª Adjusting Brightness and Color Level
When [LCD/EVF SET] on the [LCD/EVF]
Sub-Menu is set to [YES], the following items are
displayed.
LCD/EVF SETUP
1LCD BRIGHTNESS
[-]||||----[+]
≥For other notes concerning this item, see -85-.
LCD COLOR LEVEL
[-]||||----[+]
Using the Menu Screen
EVF BRIGHTNESS
[-]||||----[+]
;/∫:SELECT
≥When Power LCD Lamp lights up, [LCD AI] is
automatically set to [ON]. You cannot change
this setting.
≥These adjustments do not affect the recorded
images.
&/%:SETUP
!/MENU:EXIT
LCD Brightness [LCD BRIGHTNESS]
Adjusts the brightness of the image on the LCD
screen.
LCD Color Level [LCD COLOR LEVEL]
Adjusts the color saturation of the image on the
LCD screen.
Brightness of the Viewfinder
[EVF BRIGHTNESS]
Adjusts the brightness of the image in the
Viewfinder.
POWER
LCD
(30)
≥The POWER LCD Lamp (30) lights up.
≥When turning the power on while using AC
Adaptor, [POWER LCD] function is
automatically effective.
≥When you rotate the LCD Monitor 180o and then
close it, it resumes normal brightness.
To Resume Normal Brightness
Press the [POWER LCD] Button again.
To Change the Picture Quality of the LCD
Monitor
Set the [LCD AI] on the [LCD/EVF] Sub-Menu to
[ON] or [OFF].
[ON]: The screen image becomes clear and
vivid. (The effect varies according to the
recording scene.)
STILL
ENTER
(16)
MENU
FADE
≥The Menu corresponding to the Mode
selected by using the Mode Dial (44) is
displayed.
(44)
SD
PC
To Adjust
Press the [;/∫] Button and select the item to be
adjusted, and then press the [6/5] Button to
raise or lower the number of vertical bars in the
Bar Indication.
≥More vertical bars indicates stronger brightness
or color saturation.
To Increase the Brightness of the Entire LCD
Monitor
Press the [POWER LCD] (30) Button.
When you press the [POWER LCD] Button, the
LCD monitor becomes about twice as bright as
usual.
To facilitate the selection of a desired function or
setup, this Camcorder displays various function
setups on Menus.
≥When operating the menu with the Viewfinder,
set [LCD/EVF] >> [EVF ON/AUTO] >> [ON] or
rotate the LCD monitor by 180o.
1 Press the [MENU] Button (16).
2 Press the [;/∫] Button to select a desired
Sub-Menu.
≥Press the [;/∫] Button to display the
highlighted item.
3 Press the [5] Button to display the
selected Sub-Menu.
4 Press the [;/∫] Button to select the item.
5 Press the [5] Button to display the
selected item.
6 Press the [;/∫] Button to select the desired
mode and press [ENTER] Button to
determine the setting.
≥While a Menu is displayed, you cannot record or
play back. Menus can be displayed during
playback but not during recording. The above
operations can be done using the [MENU]
Button, [π, ∑, ∏, ∫] Buttons and [ENTER]
Button on the Remote Controller. (-14-)
To Return to the Previous Screen
Press the [6] Button.
To Exit the Menu Screen
Press the [MENU] Button again.
21
PV-GS400Eng.book 22 ページ
2004年6月4日 金曜日 午後3時17分
Before Use
About the Menu Mode Setting
The setting selected on the Menu will be retained
even when the Camcorder is turned off. (The
setups of [EFFECT2] (-42-) are not retained.)
However, if the Battery or AC Adaptor is
disconnected before turning off the Camcorder,
the selected setup may not be retained.
≥Menu operation flow is shown in this text by >>.
ª File Selection in the Picture Playback
Mode
A File Selection Operation may be necessary
during Menu Operations. In this case, carry out
the following procedure.
1 Press the [;/∫/6/5] Button and select
a file.
≥The selected file is marked by a frame.
PICTURE
No.25
100-0012
2 Press the [ENTER] Button (19) to confirm
the selection of the file.
≥After the above File Selection Procedure, carry
out the various Menu Operations. (The above
procedure will not be repeated in the following
instructions.)
List of Menus
The figures of the Menus are for explanation
purposes only, and they are different from the
actual Menus.
ª
[TAPE RECORDING MENU]
Tape Recording Menu
TAPE RECORDING MENU
CAMERA
!PROG.AE
EIS
ADVANCED
DIGITAL
D.ZOOM
SELF TIMER
CARD
USB FUNCTION
RECORDING
DISPLAY
REC MODE
RED EYE
LCD/EVF
FLASH LEVEL
INITIAL
;/∫:SELECT
1) [CAMERA]
Camera Setup Sub-Menu
[PROG.AE]
Auto Exposure Mode -35[EIS]
Image Stabilizer -32[D.ZOOM]
Digital Zoom -32[SELF TIMER]
Self-timer Recording -31[USB FUNCTION]
USB Functions Mode -60-
22
%:NEXT
MENU:EXIT
[REC MODE]
Recording Mode
[RED EYE]
Red Eye Reduction -41[FLASH LEVEL]
Flash Level -41≥If you press [6] Button, the menu changes
back to the previous screen.
2) [ADVANCED]
Advanced Functions Sub-Menu
[ZEBRA]
Zebra Pattern -39[PICTURE ADJ.]
Picture Adjustment -39[MIC LEVEL]
Microphones Sensitivity Level -39[BASS ENHANCE]
Bass Enhancer -40[COLOR BAR]
Color Bar -403) [DIGITAL]
Digital Setup Sub-Menu
[EFFECT1]
Digital Effects 1 -41[EFFECT2]
Digital Effects 2 -42[MULTI MODE]
Multi-Picture Mode -42[TITLE IN]
Adding a Title -494) [CARD]
Card Setup Sub-Menu
[PICTURE SIZE]
Picture Size -30[PICT QUALITY]
Picture Quality -30[CREATE TITLE]
Title Creation -495) [RECORDING]
Recording Setup Sub-Menu
[REC SPEED]
Recording Speed Mode -26[AUDIO REC]
Audio Recording Mode -26[SCENE INDEX]
Scene Index Mode -46[WIND CUT]
Wind Noise Reduction -34[ZOOM MIC]
Zoom Microphone -32[CINEMA]
Cinema-like Format Recording -35[H.SHOE MIC]
Hot Shoe Microphone
≥This function reduces the low sound to avoid a
wind noise when using the Stereo Zoom
Microphone (optional). Please refer to page -91-.
PV-GS400Eng.book 23 ページ
2004年6月4日 金曜日 午後3時17分
Before Use
6) [DISPLAY]
Display Setup Sub-Menu
[DISPLAY]
Display Mode -72[DATE/TIME]
Date and Time Indication -72[C.DISPLAY]
Counter Display Mode -72[C.RESET]
Counter Reset -88≥It resets the counter to zero. However, it cannot
reset the Time Code.
7) [LCD/EVF]
LCD/EVF Setup Sub-Menu
[LCD AI]
Intelligent LCD Monitor -21[LCD/EVF SET]
LCD and Viewfinder Adjustment -21[SELF REC]
Recording Yourself -28[EVF ON/AUTO]
Using the Viewfinder -208) [INITIAL]
Initial Setup Sub-Menu
[BLANK SEARCH]
Blank Search -28[DEMO MODE]
Demonstration Mode
≥If no operation takes place for approximately
10 minutes after the AC Adaptor is connected to
the Camcorder and the [OFF/ON] Switch is
turned to [ON] without inserting a Cassette and
a Card, the Camcorder is automatically set to
Demonstration Mode for introducing its
functions. If any button is pressed or operated,
the Demonstration Mode is cancelled. The
Demonstration Mode can be started by setting
[DEMO MODE] to [ON] and by exiting the
Menu. To terminate the Demonstration Mode,
insert a Cassette or a Card, or set the
[DEMO MODE] to [OFF].
[AV JACK]
AV Jack -86[REMOTE]
Remote Controller Mode -16[REC LAMP]
Recording Lamp -27[BEEP SOUND]
Beep Sound -74[CLOCK SET]
Date and Time Setting -26[INITIAL SET]
Initial Setting Mode -72-
ª
[TAPE PLAYBACK MENU]
Tape Playback Menu
TAPE PLAYBACK MENU
PLAYBACK
!12bit AUDIO
AUDIO OUT
AV IN/OUT
USB FUNCTION
DIGITAL
CARD
RECORDING
DISPLAY
LCD/EVF
INITIAL
;/∫:SELECT
%:NEXT
MENU:EXIT
1) [PLAYBACK]
Playback Functions Sub-Menu
[12bit AUDIO]
Audio Selector -53[AUDIO OUT]
Audio Output Mode -79[USB FUNCTION]
USB Functions Mode -602) [AV IN/OUT]
Audio-Video Input/Output Setup Sub-Menu
[AV JACK]
AV Jack -53[A.DUB INPUT]
Audio Dubbing Input -53[DV OUT]
Analog-Digital Conversion Output -813) [DIGITAL]
Playback Digital Setup Sub-Menu
[EFFECT ON]
Digital Effect On/Off -47[EFFECT SEL]
Digital Effect Selection -47[TITLE IN]
Adding a Title -494) [CARD]
Card Setup Sub-Menu
[PICT QUALITY]
Picture Quality -30[CREATE TITLE]
Title Creation -495) [RECORDING]
Recording Setup Sub-Menu
[REC SPEED]
Recording Speed Mode -26[AUDIO REC]
Audio Recording Mode -26[AUDIO LEVEL]
Audio Level -786) [DISPLAY]
Display Setup Sub-Menu
[DISPLAY]
Display Mode -72[DATE/TIME]
Date and Time Indication -72[C.DISPLAY]
Counter Display Mode -72[C.RESET]
Counter Reset -88-
23
PV-GS400Eng.book 24 ページ
2004年6月4日 金曜日 午後3時17分
Before Use
[REC DATA]
Camera Data
≥If you set [REC DATA] to [ON], the settings
(shutter speed, iris and white balance settings
(-36-), etc.) used during the recordings are
displayed during playback. [---] appears on the
display when there is no data or during Slow
Motion Playback, Still Advance Playback or
Variable Speed Search.
≥The settings information may not be displayed
properly if the camera data of this Camcorder
are played back on other equipment.
≥The camera data will not be recorded in the
following cases:
≥When recording proceeds with no input
signals supplied.
≥When recording involves the use of the
S-Video or AV Jack.
≥When pictures with no camera data are
recorded using the DV Terminal.
≥When displaying a list of titles.
7) [LCD/EVF]
LCD/EVF Setup Sub-Menu
[LCD AI]
Intelligent LCD Monitor -21[LCD/EVF SET]
LCD and Viewfinder Adjustment -21[EVF ON/AUTO]
Using the Viewfinder -208) [INITIAL]
Initial Setup Sub-Menu
[BLANK SEARCH]
Blank Search -28[REMOTE]
Remote Controller Mode -16[BEEP SOUND]
Beep Sound -74-
24
ª
[CARD RECORDING MENU]
Card Recording Menu
CARD RECORDING MENU
CAMERA
!PROG.AE
ADVANCED
EIS
DIGITAL
SHTR EFFECT
CARD
SELF TIMER
RECORDING
RED EYE
DISPLAY
FLASH LEVEL
LCD/EVF
INITIAL
;/∫:SELECT
%:NEXT
MENU:EXIT
1) [CAMERA]
Camera Setup Sub-Menu
[PROG.AE]
Auto Exposure Mode -35[EIS]
Image Stabilizer -32[SHTR EFFECT]
Shutter Effect
≥You can add a sound such as when releasing
the shutter.
[SELF TIMER]
Self-timer Recording -31[RED EYE]
Red Eye Reduction -41[FLASH LEVEL]
Flash Level -412) [ADVANCED]
Advanced Functions Sub-Menu
[ZEBRA]
Zebra Pattern -39[PICTURE ADJ.]
Picture Adjustment -393) [DIGITAL]
Digital Setup Sub-Menu
[TITLE IN]
Adding a Title -494) [CARD]
Card Setup Sub-Menu
[PICTURE SIZE]
Picture Size -30[PICT QUALITY]
Picture Quality -30[CREATE TITLE]
Title Creation -49[BURST MODE]
RapidFire Consecutive Photoshot -305) [RECORDING]
Recording Setup Sub-Menu
[WIND CUT]
Wind Noise Reduction -34[H.SHOE MIC]
Hot Shoe Microphone
≥This function reduces the low sound to avoid
wind noise when using the Stereo Zoom
Microphone (optional). Please refer to page -91-.
PV-GS400Eng.book 25 ページ
2004年6月4日 金曜日 午後3時17分
Before Use
6) [DISPLAY]
Display Setup Sub-Menu
[DISPLAY]
Display Mode -72[DATE/TIME]
Date and Time Indication -727) [LCD/EVF]
LCD/EVF Setup Sub-Menu
[LCD AI]
Intelligent LCD Monitor -21[LCD/EVF SET]
LCD and Viewfinder Adjustment -21[SELF REC]
Recording Yourself -28[EVF ON/AUTO]
Using the Viewfinder -208) [INITIAL]
Initial Setup Sub-Menu
[AV JACK]
AV Jack -53[REMOTE]
Remote Controller Mode -16[REC LAMP]
Recording Lamp -27[BEEP SOUND]
Beep Sound -74[CLOCK SET]
Date and Time Setting -26[INITIAL SET]
Initial Setting Mode -72-
ª
[PICTURE PLAYBACK MENU]
Picture Playback Menu
PICTURE
DELETE
EDITING
PRINT
DIGITAL
DISPLAY
LCD/EVF
INITIAL
PLAYBACK MENU
!FILE BY SEL
ALL FILES
TITLE BY SEL
;/∫:SELECT
3) [PRINT]
Printing Setting Sub-Menu
[THIS PICTURE]
Printing Only the Displayed Picture -57[DATE]
Printing with Recording Date -574) [DIGITAL]
Playback Digital Setup Sub-Menu
[TITLE IN]
Adding a Title -495) [DISPLAY]
Display Setup Sub-Menu
[DISPLAY]
Display Mode -72[DATE/TIME]
Date and Time Indication -72[C.DISPLAY]
Counter Display Mode -72[C.RESET]
Counter Reset -886) [LCD/EVF]
LCD/EVF Setup Sub-Menu
[LCD AI]
Intelligent LCD Monitor -21[LCD/EVF SET]
LCD and Viewfinder Adjustment -21[EVF ON/AUTO]
Using the Viewfinder -207) [INITIAL]
Initial Setup Sub-Menu
[AV JACK]
AV Jack -86[REMOTE]
Remote Controller Mode -16-
%:NEXT
MENU:EXIT
1) [DELETE]
Deleting a File Sub-Menu
[FILE BY SEL]
Selecting and Deleting a File -51[ALL FILES]
Deleting All Files -51[TITLE BY SEL]
Selecting and Deleting a Title -512) [EDITING]
Editing a File Sub-Menu
[FILE LOCK]
Setting the Lock -50[DPOF SET]
Setting DPOF -50[CARD FORMAT]
Formatting a Card -51-
25
PV-GS400Eng.book 26 ページ
2004年6月4日 金曜日 午後3時17分
Before Use
Setting Date and Time
Internal Lithium Battery Recharge
Since the internal clock of the Camcorder has a
slight imprecision make sure to check the time
before recording.
1 Set [TAPE RECORDING MENU] or
[CARD RECORDING MENU] >> [INITIAL] >>
[CLOCK SET] >> [YES].
The internal lithium battery sustains the operation
of the clock. When the [0] or [--] Indication
flashes, the internal lithium battery is near
exhaustion.
1 Connect the AC Adaptor to the Camcorder
STILL
with the power turned off and then connect
to the AC Jack.
ENTER
(16)
MENU
FADE
CLOCK SET
1YEAR
MONTH
DAY
HOUR
MIN.
;/∫:SELECT
:2004
:JUL
:12
: 3PM
:17
&/%:SETUP
!/MENU:EXIT
2 Press the [;/∫] Button to select [YEAR],
[MONTH], [DAY], [HOUR] or [MIN.] and
press the [6/5] Button to set it to the
desired value.
≥Year will cycle in the order shown below.
2000, 2001, ..., 2089, 2000, ...
3 Press the [MENU] Button (16) to finish
setting the date and time.
≥The clock operation starts from [00] second.
≥If the built-in battery is weak, the [0] or [--]
Indication flashes. In this case, charge the
built-in battery.
≥The clock uses the 12-hour system.
≥After charging for 24 hours, the built-in lithium
battery can power the clock for approximately
6 months.
LP Mode
A desired recording speed can be selected with
[REC SPEED] on the [RECORDING] Sub-Menu.
If LP Mode is selected, the recording time
becomes 1.5 times longer than that of SP
Mode.
Although the image quality does not decrease
with the LP Mode recording, mosaic-pattern noise
may appear on a playback image, or some
normal functions may be restricted.
≥The contents that are recorded in LP Mode are
not completely compatible with other
equipment.
≥Audio dubbing is not possible with LP Mode.
(-53-)
Audio Recording Mode
The sound quality of the recorded sound can be
selected with [AUDIO REC] on the
[RECORDING] Sub-Menu.
High sound-quality recording is possible with
“16 bit 48 kHz 2 track” Mode. With the “12 bit
32 kHz 4 track” Mode, the original sound can be
recorded on 2 tracks in stereo, while the other
2 tracks can be used for Audio Dubbing.
26
PV-GS400Eng.book 27 ページ
2004年6月4日 金曜日 午後3時17分
Recording Mode
Recording Mode
Recording on a Tape
1 Set the [OFF/ON] Switch (48) to [ON].
When recording pictures on a tape, set the Mode
Dial to Tape Recording Mode [
].
When recording still pictures on a card, set the
Mode Dial to Card Recording Mode [
].
When recording with the
[AUTO/MANUAL/AE LOCK] Switch (31) set to
[AUTO], the Camcorder automatically adjusts the
focus and white balance. In some cases, they
cannot be adjusted automatically and need to be
adjusted manually. (-36-, -37-, -38-)
≥The [POWER] Lamp (46) lights up.
(46)
POWER
ON
O
About Recording
FF
(48)
2 Set the Mode Dial (44) to Tape Recording
Mode.
S
AUTO
MANUAL
PC
D
(44)
(31)
AE LOCK
≥Before turning on the power, remove the
Lens Cap. If the Lens Cap is still attached
when the power is turned on, Automatic
White Balance Adjustment (-36-) may not
function correctly.
≥When the Recording Pause Mode continues for
more than 5 minutes, the power is turned off
automatically for tape protection and power
conservation. (If the AC Adaptor is used, the
power is turned off only when the tape is
inserted in Tape Recording Mode.) When the
tape is inserted in Tape Recording Mode and if
the Recording Pause Mode continues for more
than 5 minutes the power is turned off
automatically. To resume recording from this
condition, turn off, then turn on the power again.
ª Recording Lamp
The Recording Lamp (34) lights up during
recording and alerts those being recorded that
recording is in progress.
(34)
≥The Recording Lamp does not light up if the
[REC LAMP] on the [INITIAL] Sub-Menu is set
to [OFF].
3 Press the Recording Start/Stop Button (47).
≥Recording starts.
≥After [RECORD] is displayed, it changes to
[REC].
REC
(47)
RECORD
4 Press the Recording Start/Stop Button (47)
again to pause the recording.
≥The [PAUSE] Indication is displayed.
PAUSE
PAUSE
Recording “Simultaneous Motion/Still Record
Mode”
≥Even if the Mode Dial is set to Tape Recording
Mode and the recording to a tape is in progress,
you can also record a still picture on a card by
pressing the [PHOTO SHOT] Button.
ª To Check the Recording
By pressing the [S] Button (9) briefly in the
Recording Pause Mode, you can play back the
last few seconds of the recorded scene.
(9)
REC
BACK
LIGHT
≥The [CHK] Indication is displayed. After
checking, the Camcorder resumes the
Recording Pause Mode.
≥For other notes concerning this item, see -74-.
27
PV-GS400Eng.book 28 ページ
2004年6月4日 金曜日 午後3時17分
Recording Mode
ª Finding the End of Recording
ª Progressive Photoshot
(Blank Search Function)
The Blank Search Function aids you in locating
the end of the recording on the Cassette quickly.
1 Set [TAPE RECORDING MENU] or
[TAPE PLAYBACK MENU] >> [INITIAL] >>
[BLANK SEARCH] >> [YES].
When the [æ] Indication is displayed,
Progressive Photoshot Function works.
You can record still pictures with higher quality by
using this function.
≥The Progressive Photoshot Function may not
be activated depending on the function you use.
(-72-)
≥To record still pictures with higher quality, we
recommend setting to the Card Recording
Mode. (To activate the progressive function
regardless of the function you use)
≥When you record onto the tape and the card
simultaneously, the progressive function will not
work.
STILL
ENTER
(16)
FADE
MENU
≥The [BLANK] Indication appears during the
Blank Search.
≥Approximately 1 second before the last
recorded scene, the Camcorder switches to
the Recording Pause Mode or the Still
Playback Mode.
≥If there is no blank left on the Cassette, the
Camcorder stops at the end of the tape.
ª Recording Yourself
By opening the LCD Monitor and rotating it
forward (to the lens side), you can let the subject
in front of the Camcorder monitor the shot while
recording is in progress.
To Cancel Blank Search Before Completion
Press the [∫] Button.
ª To Add a Sound while Recording
With the supplied Magic Wire Remote Control
with Narration Mic connected to the [REMOTE]
Jack (38), you can add a narration while
recording is in progress.
While the [TALK] Button (92) is pressed, the [ ]
Indication is displayed and the sound is recorded
from [MIC] (88).
(88)
REC
(92)
≥While the [TALK] Button is pressed, the built-in
microphone does not operate.
ª Digital Still Picture
You can record images stilled by Digital Still
Picture Mode onto a tape.
When the [STILL] Button (17) is pressed, images
become still pictures. When the button is pressed
again, the Digital Still Picture Mode is cancelled.
≥When the [EVF ON/AUTO] is set to [AUTO] and
the LCD Monitor is opened, the Viewfinder is
disabled automatically. However, when the LCD
Monitor is rotated forward, the image is also
shown in the Viewfinder.
≥If you prefer to have the image on the LCD
Monitor to look like an image in a mirror, set
[SELF REC] on the [LCD/EVF] Sub-Menu to
[MIRROR]. Images are recorded normally and
no left and right reversal occurs.
ª Frame Moving Pictures (Frame Mode)
Frame moving-picture recording enables you to
obtain natural still pictures with a high picture
quality, even when the scenes involve a lot of
movement recording frame still pictures
continuously at a rate of 30 frames a second. (It is
also possible to record sound.)
1 Set [TAPE RECORDING MENU] >>
[CAMERA] >> [REC MODE] >> [FRAME].
STILL
(17)
STILL
ENTER
FADE
ENTER
≥You can also record pictures onto a Card by
pressing the [PHOTO SHOT] Button after
setting to the Digital Still Picture Mode and then
checking the image.
28
(16)
MENU
FADE
≥The [FRAME] Indication appears.
PV-GS400Eng.book 29 ページ
2004年6月4日 金曜日 午後3時17分
Recording Mode
2 Press the Recording Start/Stop Button (47).
2 Press the [PHOTO SHOT] Button (52)
halfway.
(52)
PHOTO
SHOT
1
(47)
2
≥For other notes concerning this item, see -74-.
Recording a Still Picture on a Card
(Photoshot)
Still pictures can be recorded on the Memory
Card from the Camcorder.
The size of images that are recorded using this
Camcorder is approximately 4.0 million pixels.
Recording of images with a size that is larger than
a million pixels is called mega-pixel still-picture
recording. Compared to images of normal
recording, images that are created by mega-pixel
still-picture recording can be printed out clearly.
When recording in Tape Recording Mode:
1 Set the Mode Dial (44) to Tape Recording
Mode.
≥The aperture value and gain are fixed and the
Camcorder automatically focuses on the
subject.
1 Shutter Chance Mark
2 Focus Area
Shutter Chance Mark
Lights (green): The subject is adequately
focused. (The focus is stable
and you can record pictures
more clearly.)
Lights (white): The subject is almost focused.
Blinks (white): The Camcorder is focusing on
the subject.
No Mark:
The Camcorder cannot focus
on the subject.
≥When the Image Stabilizer Function (-32-) is
set to [ON], the Image Stabilizer Function
works more effectively. ([ MEGA EIS] Indication
appears.)
S
PC
D
(44)
MEGA
EIS
2 Press the [PHOTO SHOT] Button (52).
(52)
≥The [PHOTO SHOT] Button on the Magic Wire
Remote Control with Narration Mic cannot be
pressed halfway.
3 Press the [PHOTO SHOT] Button (52) fully.
PHOTO
SHOT
≥To record still pictures with higher quality, we
recommend recording in the Card Recording
Mode.
When recording in the Card Recording Mode:
1 Set the Mode Dial (44) to Card Recording
Mode.
S
PC
(44)
D
(52)
PHOTO
SHOT
≥The [ PICTURE ] Indication lights up in red.
≥The Shutter Chance Mark appears even when
the [PHOTO SHOT] Button is not pressed.
Check it for your reference.
≥Even if the [PHOTO SHOT] Button is pressed
halfway, the Shutter Chance Mark does not
appear in Manual Focus Mode.
29
PV-GS400Eng.book 30 ページ
2004年6月4日 金曜日 午後3時17分
Recording Mode
Selecting the Size of Photoshot Images
1 Tape Recording Mode:
Set [TAPE RECORDING MENU] >> [CARD]
>> [PICTURE SIZE] >> [1280k960] or
[640k480].
Card Recording Mode:
Set [CARD RECORDING MENU] >> [CARD]
>> [PICTURE SIZE] >> [2288k1728],
[1600k1200], [1280k960] or [640k480].
ª RapidFire Consecutive Photoshot
The still pictures can be recorded on a Card at
regular intervals.
≥Available only with [640k480] picture size.
1 Set [CARD RECORDING MENU] >> [CARD]
>> [BURST MODE] >> [ON].
STILL
ENTER
(16)
FADE
MENU
STILL
(16)
ENTER
MENU
≥The [
] Indication appears.
FADE
Selecting the Quality of Photoshot images
1 Set [TAPE RECORDING MENU],
[TAPE PLAYBACK MENU] or
[CARD RECORDING MENU] >> [CARD] >>
[PICT QUALITY] >> a desired image quality.
2 Keep pressing the [PHOTO SHOT] Button
(52).
(52)
PHOTO
SHOT
STILL
ENTER
(16)
MENU
FADE
≥You can also activate RapidFire Consecutive
Photoshot Function after pressing the
[PHOTO SHOT] Button halfway. In this case,
if the Image Stabilizer Function (-32-) is set to
[ON], the Image Stabilizer Function works
more effectively.
≥When [ON] is selected, the still pictures can
be recorded in approximately 0.7 second
intervals until the [PHOTO SHOT] Button is
released or 10 pictures are recorded. (You
cannot use the RapidFire Consecutive
Photoshot if the shutter speed is set to 1/2,
1/4, 1/8 or 1/15.)
≥For other notes concerning this item, see -75-.
30
PV-GS400Eng.book 31 ページ
2004年6月4日 金曜日 午後3時17分
Recording Mode
Quick Start
By pressing the [QUICK START] Button (45), the
Camcorder will be ready for recording in
approximately 1.7 seconds after the Camcorder is
turned on.
1 Press the [QUICK START] Button (45).
≥The Quick Start Recording Lamp lights up.
≥To cancel the Self-timer Recording while the
[ ] Indication is blinking, press the [MENU]
Button.
≥You can also use the RapidFire Consecutive
Photoshot. (-30-)
≥For other notes concerning this item, see -76-.
Zoom In/Out Functions
(45) QUICK START
2 Set the [OFF/ON] Switch (48) to [OFF].
≥The Quick Start Recording Lamp remains lit.
O
ON
FF
This feature gives special effects to the picture by
recording objects close by or with wide-angle
shot.
When using [W/T] Lever (51)
1 For wide-angle shots (zoom out):
Push the [W/T] Lever (51) towards [W].
For close-ups (zoom in):
Push the [W/T] Lever towards [T].
VOL/JOG
(48)
(51)
3 Set the [OFF/ON] Switch (48) to [ON].
W
T
≥The Camcorder will be ready for recording in
approximately 1.7 seconds.
To Cancel the Quick Start
Keep the [QUICK START] Button pressed for
approximately 2 seconds and make sure the
Quick Start Recording Lamp is not lit.
When using Multi Manual Ring (24)
1 Set the [AUTO/MANUAL/AE LOCK] Switch
(31) to [MANUAL].
AUTO
≥For other notes concerning this item, see -75-.
MNL
1MZ
(31)
AE LOCK
Self-timer Recording
When you set the self-timer, the recording starts
automatically after 10 seconds on the Card.
1 Set [TAPE RECORDING MENU] or
[CARD RECORDING MENU] >> [CAMERA]
>> [SELF TIMER] >> [ON].
MANUAL
≥The [MNL] Indication and [1MZ] (Manual
Zoom Mode) Indication appear. (When
[1MZ] Indication appears, the Camcorder is
set to Auto Focus Mode.)
2 Turn the Multi Manual Ring (24) to zoom
in/out.
STILL
ENTER
(16)
≥The [
] Indication appears.
2 Press the [PHOTO SHOT] Button (52).
(52)
(24)
FADE
MENU
PHOTO
SHOT
≥Zoom speed changes according to the speed
to turn the ring or to push the [W/T] Lever.
≥Zoom Magnification Indication is displayed for
a few seconds.
1tW
T
5tW
≥The Recording Lamp (34) and the [ ]
Indication flash and the recording starts after
10 seconds.
T
12tW
T
31
PV-GS400Eng.book 32 ページ
2004年6月4日 金曜日 午後3時17分
Recording Mode
ª To Take Close-up Shots of Small
Subjects
(Macro Close-up Function)
When the zoom magnification is 1k, the
Camcorder can focus on a subject that is as close
as approximately 1.6 inches (4 cm) from the
Lens. Small subjects like insects can be recorded
with this function.
ª To Use the Tele-Macro Function
With the zoom magnification of 12k, the
Camcorder can bring the subject into focus as
close as approximately 19 inch (50 cm) from the
Lens. Focusing only on the subject and displaying
the background out of focus makes the picture
more impressive.
1 Press the [TELE MACRO] Button (15).
Digital Zoom Function
This function is useful when you want to record
close-up shots of subjects located beyond a
normal zoom range of 1k to 12k magnification.
With the Digital Zoom Function, you can select a
magnification from 30k up to 700k.
1 Set [TAPE RECORDING MENU] >>
[CAMERA] >> [D.ZOOM] >> [30t] or [700t].
STILL
ENTER
(16)
FADE
MENU
≥30k: Digital zooming to 30k
≥700k: Digital zooming to 700k
30tW
T
D.ZOOM
(15)
TELE
MACRO
2 Push the [W/T] Lever (51) towards [W] or
≥The zoom magnification is temporarily set to
12k and the subject can be focused on as
close as approximately 19 inch (50 cm).
≥The [ T.MACRO ] Indication appears.
towards [T] to zoom in or out.
VOL/JOG
(51)
W
T
T.MACRO
2 Press the Recording Start/Stop Button (47)
or the [PHOTO SHOT] Button (52).
(52)
To Cancel the Digital Zoom Function
Set [TAPE RECORDING MENU] >> [CAMERA]
>> [D.ZOOM] >> [OFF].
≥For other notes concerning this item, see -76-.
PHOTO
SHOT
Image Stabilizer Function
(47)
To Cancel the Tele-Macro Function
Press the [TELE MACRO] Button (in this case,
the zoom magnification is not restored). Or push
the [W/T] Lever.
ª To Use the Zoom Microphone
Function
Along with the zooming operation, the
microphone’s directional angle and sensitivity are
varied for recording sounds.
≥Set [TAPE RECORDING MENU] >>
[RECORDING] >> [ZOOM MIC] >> [ON]. (The
[ Z.MIC ] Indication is displayed.)
If the Camcorder is shaken while recording, the
camera shake in the image can be corrected.
≥If the Camcorder shakes too much, the images
may not be stabilized.
1 Set [TAPE RECORDING MENU] or
[CARD RECORDING MENU] >> [CAMERA]
>> [EIS] >> [ON].
STILL
ENTER
(16)
MENU
FADE
≥The [EIS] Indication appears.
EIS
Z.MIC
≥For other notes concerning this item, see -76-.
32
PV-GS400Eng.book 33 ページ
2004年6月4日 金曜日 午後3時17分
Recording Mode
2 Press the Recording Start/Stop Button (47)
or [PHOTO SHOT] Button (52) to start
recording.
(52)
Fade Out
Fade Out causes images and sounds to
disappear gradually, leaving a black screen at the
end of a scene.
PHOTO
SHOT
(47)
To Cancel Image Stabilizer Function
Set [TAPE RECORDING MENU] or
[CARD RECORDING MENU] >> [CAMERA] >>
[EIS] >> [OFF].
1 Keep pressing the [FADE] Button (20) while
recording.
≥For other notes concerning this item, see -76-.
Fade In/Out Functions
Fade In
Fade In brings out images and sounds gradually
from a black screen at the beginning of a scene.
STILL
ENTER
(20)
FADE
≥The image fades out gradually.
2 When the image is completely gone, press
the Recording Start/Stop Button (47) to stop
recording.
(47)
1 Keep pressing the [FADE] Button (20)
during the Recording Pause Mode.
STILL
ENTER
(20)
FADE
≥The image fades out gradually.
2 When the image is completely gone, press
the Recording Start/Stop Button (47) to start
recording.
3 Release the [FADE] Button (20).
≥The still picture cannot fade in or fade out.
Backlight Compensation Function
This prevents the subject from being recorded too
darkly when backlit. (Backlight is the light that
shines from behind the subject being recorded.)
1 Press the [BACK LIGHT] Button (10).
(10)
REC
BACK
LIGHT
(47)
3 Release the [FADE] Button (20) about
3 seconds after starting recording.
≥The image reappears gradually.
≥The [ª] Indication flashes and then is
displayed.
≥The entire screen becomes brighter.
ª
To Resume Normal Recording
Press the [BACK LIGHT] Button.
≥For other notes concerning this item, see -76-.
33
PV-GS400Eng.book 34 ページ
2004年6月4日 金曜日 午後3時17分
Recording Mode
MagicPix Functions
Soft Skin Function
Advanced MagicPix Function
This function allows you to record color images
brightly in a dark place.
1 Press the [ADVANCED MAGICPIX] Button
(13) until the [MAGICPIX] Indication
appears.
This enables you to record skin colors in a softer
tone. In order to get the best result, avoid
background colors similar to the skin color of the
subject. Otherwise, this may result in a softer
background lacking in detail.
1 Press the [SOFT SKIN] Button (14).
(13)
ADVANCED
MAGIC
PIX
(14)
SOFT
SKIN
≥The [ SOFT SKIN ] Indication appears.
MAGICPIX
0 Lux MagicPix Function
Using the LCD Monitor light, a dark scene of
almost 0 lux can be recorded.
1 Press the [ADVANCED MAGICPIX] Button
(13) until the [0LUX MAGICPIX] Indication
appears.
MAGICPIX
0LUX
MAGICPIX
≥The [REVERSE THE LCD MONITOR]
Indication appears.
2 Rotate the LCD Monitor forward (to the lens
side).
SOFT SKIN
≥To obtain the best effect, we recommend taking
an upper body shot, so that the upper part of the
subject can be framed in the screen.
To Cancel the Soft Skin Function
Press the [SOFT SKIN] Button.
Wind Noise Reduction Function
This function reduces the sound of wind hitting
the microphone when recording.
1 Set [TAPE RECORDING MENU] or
[CARD RECORDING MENU] >>
[RECORDING] >> [WIND CUT] >> [ON].
STILL
ENTER
(16)
MENU
FADE
≥The [WIND CUT] Indication appears.
≥The screen becomes white and the
Viewfinder turns on.
≥The available range of the LCD Monitor light
is within approximately 3.9 feet (1.2 meter).
WIND CUT
To Cancel the MagicPix Functions
Press the [ADVANCED MAGICPIX] Button
repeatedly until neither the [MAGICPIX] Indication
nor the [0LUX MAGICPIX] Indication appears.
To Cancel the Wind Noise Reduction Function
Set [TAPE RECORDING MENU] or
[CARD RECORDING MENU] >> [RECORDING]
>> [WIND CUT] >> [OFF].
≥For other notes concerning this item, see -76-.
≥For other notes concerning this item, see -77-.
34
PV-GS400Eng.book 35 ページ
2004年6月4日 金曜日 午後3時17分
Recording Mode
Wide/Pro-Cinema Function
You can record images compatible with a
wide-screen format TV which has a Video
terminal.
The image looks vertically stretched on the
screen of the Camcorder.
≥The aspect ratio of the playback images in the
tape differs depending on the TV to be
connected.
Wide Function
The image is recorded with an aspect ratio of
16:9.
1 Press the [WIDE/PRO-CINEMA] Button (7).
(7)
WIDE/
PRO-CINEMA
≥The [WIDE] Indication appears.
Pro-Cinema Function
In addition to the effects on Wide Function,
images are recorded at a rate of 30 frames a
second similar to cinema quality.
1 Press the [WIDE/PRO-CINEMA] Button (7)
twice.
(7)
≥Black bars appear at the top and bottom of
the screen.
CINEMA
To Cancel the Cinema Mode
Set [TAPE RECORDING MENU] >>
[RECORDING] >> [CINEMA] >> [OFF].
≥For other notes concerning this item, see -77-.
Recording in Special Situations
(Program AE)
You can select optimal automatic exposure under
specific recording situations.
1 Set the [AUTO/MANUAL/AE LOCK] Switch
(31) to [MANUAL].
AUTO
MANUAL
(31)
AE LOCK
≥The [MNL] Indication appears.
2 Set [TAPE RECORDING MENU] or
[CARD RECORDING MENU] >> [CAMERA]
>> [PROG.AE] >> a desired mode ([5],
[7], [4], [Ω] or [º]).
WIDE/
PRO-CINEMA
STILL
≥The [PRO.CINE]/[FRAME] Indication
appears.
To Cancel the Wide/Pro-Cinema Function
Press the [WIDE/PRO-CINEMA] Button until the
[WIDE] or [PRO.CINE]/[FRAME] Indication
disappears.
≥For other notes concerning this item, see -77-.
Cinema Function
This function is used for recording a cinema-like
image.
1 Set [TAPE RECORDING MENU] >>
[RECORDING] >> [CINEMA] >> [ON].
STILL
ENTER
(16)
MENU
FADE
(16)
ENTER
MENU
FADE
≥The Indication of the selected Mode appears.
1)
2)
3)
4)
5)
1) [5] Sports Mode
≥For recording scenes involving quick
movements, such as sports scenes.
2) [7] Portrait Mode
≥Use when you want to make people
(subjects) stand out from the background.
3) [4] Low Light Mode
≥For brightening a dark scene.
4) [Ω] Spotlight Mode
≥For recording a subject under a spotlight.
35
PV-GS400Eng.book 36 ページ
2004年6月4日 金曜日 午後3時17分
Recording Mode
5) [º] Surf & Snow Mode
≥For recording in glaring surroundings, such
as ski slopes, beaches, etc.
To Cancel the Program AE Function
Set the [PROG.AE] on the [CAMERA] Sub-Menu
to [OFF]. Or, set the [AUTO/MANUAL/AE LOCK]
Switch to [AUTO].
≥For other notes concerning this item, see -77-.
Recording in Natural Colors
(White Balance)
Depending on the scene or light condition, the
Automatic White Balance Adjustment Mode may
not be able to bring out natural colors. In this
case, the white balance can be adjusted
manually.
When the Camcorder is turned on with the Lens
Cap on, the Automatic White Balance Adjustment
may not function properly. Please turn on the
Camcorder after removing the Lens Cap.
1 Set the [AUTO/MANUAL/AE LOCK] Switch
(31) to [MANUAL].
AUTO
MANUAL
(31)
AE LOCK
≥The [MNL] Indication appears.
2 Repeatedly press the [WB] Button (28) to
select a desired White Balance Mode.
To Resume Automatic Adjustment
Press the [WB] Button repeatedly until none of
the White Balance Mode Indications ([1], [z],
[{]) appear. Or, set the
[AUTO/MANUAL/AE LOCK] Switch to [AUTO].
ª About Black Balance Adjustment
Black Balance Adjustment is one of the functions
of the 3CCD system. It automatically adjusts the
hue of black color in the picture. When the Black
Balance Adjustment is activated, the screen
becomes dark for a moment.
1
2
3
1 Adjusting the Black Balance (Blinking)
2 Adjusting the White Balance (Blinking)
3 Adjustment is completed. (Lit)
Adjusting White Balance Manually
White Balance Adjustment recognizes the color of
light and adjusts so that white will become pure
white. The Camcorder determines the hue of light
that comes through the Lens and the White
Balance Sensor, thereby judging the recording
condition, and selects the closest hue setting.
This function is called Automatic White Balance
Adjustment.
For light outside the functional Auto White
Balance Adjustment range, use the Manual White
Balance Adjustment Mode.
1 Set the [AUTO/MANUAL/AE LOCK] Switch
(31) to [MANUAL].
WB
(28)
AUTO
MANUAL
(31)
AE LOCK
1)
2)
≥The [MNL] Indication appears.
2 Press the [WB] Button (28) until the [1]
3)
4)
Indication is displayed.
WB
≥If you hold down the [WB] Button when the
[AUTO/MANUAL/AE LOCK] Switch is set to
[MANUAL] or [AE LOCK], the Manual White
Balance Adjustment Mode (1) is set.
1) Automatic White Balance Adjustment
2) Indoor Mode (recording under incandescent
lamp) [{]
3) Outdoor Mode [z]
4) The white balance setting that was previously
set manually [1]
36
MNL
(28)
3 Point the Camcorder at a full-screen white
subject.
4 Keep pressing [WB] Button (28) until the
[1] Indication stops flashing.
PV-GS400Eng.book 37 ページ
2004年6月4日 金曜日 午後3時17分
Recording Mode
To Resume Automatic Adjustment
Press the [WB] Button repeatedly until none of
the White Balance Mode Indications ([1], [z],
[{]) appear. Or, set the
[AUTO/MANUAL/AE LOCK] Switch to [AUTO].
Manual Shutter Speed Adjustment
Useful for recording fast-moving subjects.
1 Set the [AUTO/MANUAL/AE LOCK] Switch
(31) to [MANUAL].
ª About White Balance Sensor
The White Balance Sensor (33) determines the
nature of the light source during recording.
(34)
AUTO
MANUAL
(31)
AE LOCK
≥The [MNL] Indication appears.
2 Press the [SHUTTER/IRIS] Button (27) once.
(33)
SHUTTER/IRIS
MNL
1/1000
≥Do not cover the White Balance Sensor with
your hand during recording because White
Balance will not function normally.
≥The red light from the Recording Lamp (34) will
be reflected off your hand or an object, possibly
causing the White Balance sensor to operate
incorrectly and changing the coloring.
2)
10 000K
9 000K
8 000K
7 000K
≥The Shutter Speed Indication appears.
3 Turn the Multi Manual Ring (24) to adjust
the shutter speed.
(24)
3)
4)
6 000K
5)
5 000K
6)
1)
4 000K
7)
3 000K
8)
2 000K
(27)
9)
10)
1 000K
Outside of the effective range of Automatic White
Balance Adjustment, the image will become
reddish or bluish. Even within the effective range
of Automatic White Balance Adjustment, the
Automatic White Balance Adjustment may not
function properly if there is more than one light
source. In this case, adjust the White Balance.
1) The effective range of Automatic White
Balance Adjustment on this Camcorder
2) Blue sky
3) Cloudy sky (rain)
4) TV screen
5) Sunlight
6) White fluorescent lamp
7) Halogen light bulb
8) Incandescent light bulb
9) Sunrise or sunset
10) Candlelight
≥For other notes concerning this item, see -77-.
Range of Shutter Speed Adjustment
1/60–1/8000 s in Tape Recording Mode
1/2–1/2000 s in Card Recording Mode
The standard shutter speed is 1/60 s.
Selecting a speed closer to [1/8000] causes faster
shutter speed.
To Resume Automatic Adjustment
Set the [AUTO/MANUAL/AE LOCK] Switch to
[AUTO], or keep pressing the [SHUTTER/IRIS]
Button.
ª About the Card Slow Shutter
When you adjust the shutter speed to 1/2, 1/4, 1/8
or 1/15 in Card Recording Mode, the Card Slow
Shutter Mode is activated.
≥The Slow Shutter Mode is cancelled and the
shutter speed is set to 1/30 when the [OFF/ON]
Switch or the Mode Dial is operated.
≥In the Slow Shutter Mode:
≥the White Balance cannot be changed.
≥the Camcorder focuses on the subject
manually.
≥When you set to the Manual Focus Mode, the
shutter speed is already set to 1/60 of a second.
It will later return to the previous shutter speed
of 1/60 when you go back to automatic mode.
[MF] blinks while the subject is focused.
MF
≥For other notes concerning this item, see -77-.
37
PV-GS400Eng.book 38 ページ
2004年6月4日 金曜日 午後3時17分
Recording Mode
Manual Iris Adjustment
Manual Focus Adjustment
(F Number)
You can use this function when the screen is too
bright or too dark.
1 Set the [AUTO/MANUAL/AE LOCK] Switch
(31) to [MANUAL].
Focus can be adjusted manually for recording in a
situation where auto focus may not function well.
1 Set the [AUTO/MANUAL/AE LOCK] Switch
(31) to [MANUAL].
AUTO
AUTO
MANUAL
(31)
MANUAL
(31)
AE LOCK
AE LOCK
≥The [MNL] Indication appears.
≥The [MNL] Indication appears.
2 Press the [SHUTTER/IRIS] Button (27) twice.
2 Press the [FOCUS/ZOOM] Button (26).
FOCUS/ZOOM
SHUTTER/IRIS
(27)
MNL
1MF
MNL
(26)
1/60
F1.7
0dB
≥The Iris Indication appears.
3 Turn the Multi Manual Ring (24) to adjust
the iris.
≥The [1MF] Indication (Manual Focus Mode)
appears.
3 Turn the Multi Manual Ring (24) to adjust
the focus.
(24)
(24)
Range of Iris Adjustment
CLOSE (Closed), F16, ..., F1.7,
OPEN (Opened) 0dB, ..., 18dB
When a value closer to [CLOSE] is selected, the
image becomes darker.
When a value closer to [18dB] is selected, the
image becomes brighter.
The value to which dB is attached indicates a
Gain-up value. If this value is too large, the quality
of the image deteriorates.
To Resume Automatic Adjustment
Set the [AUTO/MANUAL/AE LOCK] Switch to
[AUTO], or keep pressing the [SHUTTER/IRIS]
Button.
≥For other notes concerning this item, see -78-.
To Resume Automatic Adjustment
Set the [AUTO/MANUAL/AE LOCK] Switch to
[AUTO].
Recording with Fixed Brightness
(AE Lock)
This is a function for setting a fixed brightness.
When recording in light with an extreme
difference in the brightness of the background
and the subject, such as a person standing in
front of a dark background, the person can be
recorded brightly if the brightness is adjusted to
the person.
1 Push the [W/T] Lever (51) toward [T] to
zoom in on the subject.
VOL/JOG
(51)
W
38
T
PV-GS400Eng.book 39 ページ
2004年6月4日 金曜日 午後3時17分
Recording Mode
2 Set the [AUTO/MANUAL/AE LOCK] Switch
(31) to [AE LOCK].
AUTO
MANUAL
(31)
AE LOCK
≥The [ AELOCK ] Indication flashes and then
lights. The brightness of the picture is now
locked to the value it had at the moment of
setting the switch to [AE LOCK].
≥To prevent recording of overexposed, whitish
pictures, manually adjust the iris/gain (-38-) so
that the Zebra Pattern disappears. The
recorded picture may become dark.
≥The Zebra Pattern is not recorded.
ª Picture Adjustment
This enables the sharpness and color levels of
the pictures to be adjusted during recording.
1 Set the [AUTO/MANUAL/AE LOCK] Switch
(31) to [MANUAL].
To Cancel the AE Lock
Set the [AUTO/MANUAL/AE LOCK] Switch to
[AUTO] or [MANUAL].
To Lock the Brightness at a Desired Level
After Step 1, set the [AUTO/MANUAL/AE LOCK]
Switch to [MANUAL] to adjust the iris/gain
manually (-38-) and then set the
[AUTO/MANUAL/AE LOCK] Switch to
[AE LOCK].
≥Set the AE Lock again when the
[AUTO/MANUAL/AE LOCK] Switch is switched
after the AE Lock has been set. (The brightness
setting may be changed.)
AUTO
2 Set [TAPE RECORDING MENU] or
[CARD RECORDING MENU] >>
[ADVANCED] >> [PICTURE ADJ.] >> [YES].
STILL
ENTER
(16)
Using the Zebra Pattern makes it easy to adjust
the brightness of the picture to an optimum level,
even before you start recording.
1 Set [TAPE RECORDING MENU] or
[CARD RECORDING MENU] >>
[ADVANCED] >> [ZEBRA] >> [ON].
MENU
FADE
PICTURE ADJ.
1SHARPNESS
4
[-]|||||-----[+]
COLOR
4
[-]|||||-----[+]
EXPOSURE
4
[-]|||||-----[+]
CONTRAST
4
[-]|||||-----[+]
Advanced Functions
ª Zebra Pattern
(31)
AE LOCK
≥For other notes concerning this item, see -78-.
This Camcorder comes with 5 professional
functions (Advanced Functions) which come in
handy for different recording conditions.
MANUAL
;/∫:SELECT
&/%:SETUP
!/MENU:EXIT
≥When the level of the Bar Indication is set to a
position other than [4], the [ P·ADJ ] Indication
appears.
≥The setting procedure is the same as for
[LCD/EVF SET] on the [LCD/EVF]
Sub-Menu. (-21-)
ª Microphone Sensitivity Level
You can adjust the microphone sensitivity for
recording.
1 Set [TAPE RECORDING MENU] >>
[ADVANCED] >> [MIC LEVEL] >> [YES].
STILL
ENTER
(16)
MENU
FADE
STILL
≥Diagonal white bands (Zebra Pattern) and
[ ZEBRA ] Indication appear on parts of the
picture which are overexposed (extremely
brightly lit and shiny subjects).
ZEBRA
ENTER
(16)
MENU
FADE
2 Press the [;/∫] Button to select the
[MNL (AGC*, NO-AGC)].
≥AGC*: Auto Gain Control
≥When you set [MODE] to any other setting
than [AUTO], the Microphone Sensitivity
Level appears.
39
PV-GS400Eng.book 40 ページ
2004年6月4日 金曜日 午後3時17分
Recording Mode
Using the Auto Pop-up Flash
MIC LEVEL SETUP
MODE AUTO
1MNL(AGC)
MNL(NO-AGC)
(dB)-30
0
+6
GAIN |||||||||-----
(dB)-30
0 +6
LEVEL .............
(MIC)
;/∫:SELECT
&/%:SETUP
!/MENU:EXIT
AUTO:
AGC is activated, and the recording level is
adjusted automatically.
MNL (AGC):
The desired recording level can be set. AGC
will also be activated to reduce the amount of
distortion in the audio.
MNL (NO-AGC):
AGC is not activated and so natural recording
can be performed. Adjust in such a way that
the sound will not be distorted at the maximum
volume level. When the Zoom Microphone
Function is set to [ON], adjust the recording
level after pushing the [W/T] Lever toward [T].
3 Press the [5] Button (18) or [6] Button
(21) to increase or decrease the bars of the
[GAIN] Indication.
≥Adjust the [GAIN] value so that the last three
Bars of the [LEVEL (MIC)] will not light red.
(Otherwise, the Sound will be distorted.)
ª Bass Enhancer
It strengthens the lower area of the audio to
record more powerful audio.
1 Set [TAPE RECORDING MENU] >>
[ADVANCED] >> [BASS ENHANCE] >>
[3dB] or [6dB].
STILL
ENTER
(16)
MENU
FADE
To Cancel the Bass Enhancer Function
Set [TAPE RECORDING MENU] >>
[ADVANCED] >> [BASS ENHANCE] >> [0dB].
ª Color Bar
This Camcorder displays a color bar chart which
is useful for adjusting the picture quality of the TV
or external monitor.
1 Set [TAPE RECORDING MENU] >>
[ADVANCED] >> [COLOR BAR] >> [ON].
STILL
ENTER
(16)
MENU
FADE
≥The color bars are not recorded onto the card.
≥For other notes concerning this item, see -78-.
40
The Auto Pop-up Flash enables you to record still
pictures in a dark place.
1 Repeatedly press the [ß] Button (8) to
select a desired flash mode.
(8)
1)
2)
3)
1) Auto: The Camcorder perceives the
brightness around the subject and the
Auto Pop-up Flash is automatically
popped up and activated. (In bright
places, the indication disappears and
the Auto pop-up Flash does not light.)
2) OFF: The Auto Pop-up Flash is not popped
up and activated.
3) ON: The Auto Pop-up Flash is always
popped up and activated.
2 Press the [PHOTO SHOT] Button (52)
halfway to pop up the Flash.
(52)
PHOTO
SHOT
≥The Auto Pop-up Flash is not activated
depending on the setting on the flash and the
brightness around the subject.
3 Press the [PHOTO SHOT] Button (52) fully
which is already pressed halfway.
≥The flash lights and a still picture is recorded.
≥After recording, close the Auto Pop-up Flash
by pressing on it.
To Activate the Auto Pop-up Flash with the
[STILL] Button
If you press the [STILL] Button (17) in Step 2, the
image becomes still. (It is canceled when you
press the [STILL] Button again.)
Record your favourite scene.
PV-GS400Eng.book 41 ページ
2004年6月4日 金曜日 午後3時17分
Recording Mode
Adjusting Brightness of the Video Flash
Set [TAPE RECORDING MENU] or
[CARD RECORDING MENU] >> [CAMERA] >>
[FLASH LEVEL] >> a desired Flash Level.
≥Normally, set it to [NORMAL]. (The [ß]
Indication appears.)
≥If the brightness is not enough in [NORMAL]
setting, set it to [i] (the [ßi] Indication
appears), if it is too much, set it to [j] (the [ßj]
Indication appears).
Digital Effect Functions
This Camcorder is equipped with Digital Effect
Functions that add special effects to the scene.
Digital Effects 1 [EFFECT1]
1) MULTI
4) MIX
2) P-IN-P
5) STROBE
3) WIPE
6) TRAIL
≥For other notes concerning this item, see -78-.
Red Eye Reduction Function
7) MOSAIC
This function reduces a phenomenon which
causes the subject’s eyes to turn red when you
record pictures with a flash.
1 Set [TAPE RECORDING MENU] or
[CARD RECORDING MENU] >> [CAMERA]
>> [RED EYE] >> [ON].
STILL
ENTER
(16)
MENU
FADE
≥The [£] Indication appears.
1)
2)
3)
4)
5)
7)
640 P
≥For other notes concerning this item, see -79-.
9) STRETCH
10) SLIM
6)
To Cancel the Red Eye Reduction Function
Set [TAPE RECORDING MENU] or
[CARD RECORDING MENU] >> [CAMERA] >>
[RED EYE] >> [OFF].
8) MIRROR
8)
9)
10)
Multi Mode [MULTI]
Picture-In-Picture Mode [P-IN-P]
Wipe Mode [WIPE]
Mix Mode [MIX]
Strobe Mode [STROBE]
≥Records images with a stroboscopic effect.
Trailing Effect Mode [TRAIL]
≥Records images with a trailing effect.
Mosaic Mode [MOSAIC]
≥Produces a mosaic-like image.
Mirror Mode [MIRROR]
≥The right half of an image becomes a mirror
image of the left half.
Stretch Mode [STRETCH]
≥The picture is expanded horizontally.
Slim Mode [SLIM]
≥The picture is expanded vertically.
41
PV-GS400Eng.book 42 ページ
2004年6月4日 金曜日 午後3時17分
Recording Mode
Digital Effects 2 [EFFECT2]
11) NEGA
12) SEPIA
13) B/W
14) SOLARI
ª Multi-Picture Mode
Strobe Multi-Picture Mode:
You can capture and record 9 consecutive small
still pictures.
Manual Multi-Picture Mode:
11) Negative Mode [NEGA]
≥The colors of the recorded image are
inverted as seen in a negative.
12) Sepia Mode [SEPIA]
≥Records a scene with a brownish tint, like
the color of old pictures.
13) Black & White Mode [B/W]
≥Records an image in black and white.
14) Solarisation Mode [SOLARI]
≥Records an image with a painting-like effect.
To Select a Desired Digital Effect
Set [TAPE RECORDING MENU] >> [DIGITAL]
>> [EFFECT1] or [EFFECT2] >> a desired Digital
Effect.
To Cancel the Digital Effect
Set [TAPE RECORDING MENU] >> [DIGITAL]
>> [EFFECT1] or [EFFECT2] >> [OFF].
≥If the Camcorder is turned off, the [EFFECT2]
settings are cancelled.
You can manually capture and record 9 small still
pictures.
1 Set [TAPE RECORDING MENU] >>
[DIGITAL] >> [EFFECT1] >> [MULTI].
STILL
ENTER
(16)
MENU
FADE
2 Set [TAPE RECORDING MENU] >>
[DIGITAL] >> [MULTI MODE] >> [STROBE]
or [MANUAL].
3 Press the [MULTI] Button (12).
≥For other notes concerning this item, see -79-.
(12)
MULTI/
P-IN-P
≥If [MANUAL] is selected, press the [MULTI]
Button at each scene you want to capture.
Deleting All the Captured Multi-Pictures
While 9 multi-pictures are displayed, press the
[MULTI] Button.
≥If [MANUAL] has been selected, press the
[MULTI] Button after 9 pictures are displayed.
To Display the Multi-Pictures Again
Press the [MULTI] Button for 1 second or longer.
To Delete Multi-Pictures One by One
(When pictures were captured in [MANUAL])
When the [MULTI] Button is pressed for 1 second
or longer while the still pictures are displayed, the
pictures captured last are deleted continuously.
≥After still pictures are deleted one by one, they
cannot be displayed again.
≥For other notes concerning this item, see -79-.
42
PV-GS400Eng.book 43 ページ
2004年6月4日 金曜日 午後3時17分
Recording Mode
ª Picture-in-Picture Mode
ª Wipe Mode and Mix Mode
Wipe Mode:
Like drawing a curtain, the still picture of the last
recorded scene gradually changes to the moving
image of a new scene.
You can display a sub-screen (still picture) inside
the screen.
1 Set [TAPE RECORDING MENU] >>
[DIGITAL] >> [EFFECT1] >> [P-IN-P].
STILL
ENTER
(16)
MENU
FADE
2 Aim the Camcorder at the scene you want
WIPE
WIPE
WIPE
Mix Mode:
While the moving image of a new scene fades in,
the still image of the last recorded scene
gradually fades out.
to capture and press the [P-IN-P] Button
(12) to insert a small still picture.
MIX
MIX
MIX
(12)
MULTI/
P-IN-P
1 Set [TAPE RECORDING MENU] >>
[DIGITAL] >> [EFFECT1] >> [WIPE] or [MIX].
≥A small still picture is displayed in a normal
picture.
≥If the [P-IN-P] Button is pressed again, the
small still picture is cleared.
≥For other notes concerning this item, see -79-.
STILL
(16)
ENTER
MENU
FADE
≥The [WIPE] or [MIX] Indication appears.
2 Press the Recording Start/Stop Button (47)
to start recording.
(47)
3 Press the Recording Start/Stop Button (47)
to pause the recording.
≥The last scene is stored in memory. The
[WIPE] or [MIX] Indication changes to [B]
or [C].
4 Press the Recording Start/Stop Button (47)
to restart the recording.
≥The last image of the previous scene
gradually changes to the new scene.
≥For other notes concerning this item, see -79-.
43
PV-GS400Eng.book 44 ページ
2004年6月4日 金曜日 午後3時17分
Playback Mode
Playback Mode
Playing Back a Tape
The recorded scene can be played back
immediately after the recording.
1 Set the [OFF/ON] Switch (48) to [ON].
≥The [POWER] Lamp (46) lights up.
(46)
ª Adjusting the Sound Volume
To adjust the volume, push the [`VOL/JOG_]
Lever (51) to display the [VOLUME] Indication.
Push the [`VOL/JOG_] Lever towards [T] to
increase the volume or push the [`VOL/JOG_]
Lever towards [W] to decrease the volume. The
[VOLUME] Indication goes off after the
adjustment is finished.
POWER
VOL/JOG
O
ON
FF
W
(48)
2 Set the Mode Dial (44) to Tape Playback
Mode.
SD
PC
(44)
T
(51)
To adjust the volume with the Remote Controller,
press the [T] or [W] Button to display the
[VOLUME] Indication. Press the [T] Button to
increase the volume or press the [W] Button to
decrease the volume. The [VOLUME] Indication
goes off after the adjustment is finished.
3 Press the [6] Button (21) to rewind the
tape.
STILL
(21)
ENTER
≥The sound volume cannot be adjusted using the
Remote Controller in Playback Zoom Mode.
(-46-)
FADE
≥Rewind the tape to the point where you want
to start playback.
≥When the tape reaches the beginning,
rewinding stops automatically.
4 Press the [1] Button (19) to start playback.
≥The [!] Indication appears.
≥For other notes concerning this item, see -79-.
Finding a Scene You Want to Play
Back
ª Cue/Review Playback
STILL
STILL
(19)
ENTER
ENTER
FADE
FADE
(21)
≥If a cassette recorded with a copyright
protection signal is played back, the picture is
distorted by mosaic-like patterns.
To Stop Playback
Press the [∫] Button (20).
(18)
If the [5] Button (18) or [6] Button (21) is
pressed during Playback, it turns to Cue Playback
A or Review Playback B.
A
B
STILL
ENTER
(20)
44
FADE
≥If the Button is held continuously, it turns to Cue
Playback or Review Playback until you release
it.
PV-GS400Eng.book 45 ページ
2004年6月4日 金曜日 午後3時17分
Playback Mode
ª Variable Speed Search Function
The speed of Cue Playback or Review Playback
can be varied.
1 During playback, press the [1] Button (19).
≥The [1k!] Indication appears.
STILL
ENTER
FADE
2 Push the [sVOL/JOGr] Lever (51) to select
a desired search speed.
Still Playback/Still Advance Playback
VOL/JOG
W
To Resume Normal Playback
Press the [1] Button (84).
≥If the Camcorder is left in the Slow Motion
Playback Mode for more than 10 minutes, the
Camcorder switches to Stop Mode to protect the
video heads from excessive wear and tear. (It
takes 10 minutes to play about 2 minutes of
tape in SP mode, and about 3 minutes of tape in
LP Mode.)
This Camcorder is capable of still picture
playback and frame-advance playback.
T
(51)
(84)
s
(19)
Scenes recorded in the LP Mode are played back
at approximately 1/3rd of the normal speed.
V
/REW
The following 6 playback speeds are available for
the Variable Speed Search Function in both the
fast-forwarding and rewinding directions:
1/5k (slow playback in SP Mode only), 1/3k
(slow playback in LP Mode only), 1k, 2k, 5k,
10k and 20k.
≥This function works by pressing the
[VAR. SEARCH] and [T] or [W] Button on the
Remote Controller. (-14-)
To Resume Normal Playback
Press the [1] Button (19).
≥During Cue or Review Playback, fast-moving
images may show mosaic-like patterns.
≥The sound is muted during search.
Slow Motion Playback
s
This Camcorder can play back at a slow speed.
(84)
(69)
V
/REW
6
PLAY
FF/W
1
5
E
;
D
INDEX
K
STOP
INDEX
L
∫
6
PLAY
FF/W
1
5
W
STILL ADV PAUSE STILL ADV
(69)
E
;
D
INDEX
K
STOP
INDEX
L
∫
P.B. ZOOM
(69)
SELECT
1 Press the [1] Button (84).
2 Press the [;] Button (81).
≥The playback image stops in the Still
Playback Mode.
3 Press the [E] Button or [D] Button (69) on
the Remote Controller.
≥With each press of the [E] Button, still
pictures advance in the reverse direction.
With each press of the [D] Button, still
pictures advance in the forward direction. If
one of the buttons continues to be pressed,
still pictures advance continuously 1 frame at
a time until the button is released.
To Resume Normal Playback
Press the [1] Button (84).
ª Playback with Volume/Jog Lever
W
STILL ADV PAUSE STILL ADV
(81)
(69)
P.B. ZOOM
SELECT
1 Press the [1] Button (84).
2 Press the [E] Button or [D] Button (69) on
the Remote Controller.
≥The [}] or [~] Indication appears.
}
By pushing the [`VOL/JOG_] Lever (51) of the
Camcorder in the Still Playback Mode, still
pictures can be advanced one frame at a time in
the forward or backward direction. If you keep
pushing the Lever, still pictures advance
continuously.
VOL/JOG
W
T
(51)
≥When the [E] Button is pressed, Slow Motion
Playback proceeds in the reverse direction.
When the [D] Button is pressed, Slow Motion
Playback proceeds in the forward direction.
Scenes recorded in the SP Mode are played back
at approximately 1/5th of the normal speed.
≥If the Camcorder is left in the Still Playback
Mode for more than 5 minutes, the Camcorder
switches to the Stop Mode to protect the video
heads from excessive wear and tear.
45
PV-GS400Eng.book 46 ページ
2004年6月4日 金曜日 午後3時17分
Playback Mode
To facilitate searching for desired scenes, this
Camcorder automatically records index signals
during recording, as explained in the following.
Scene Index Signal
Scene Index Signals are automatically recorded
when you start recording after inserting a
Cassette.
≥If [SCENE INDEX] of [RECORDING] Sub-Menu
on the [TAPE RECORDING MENU] is set to
[2HOUR], an index signal is recorded when
recording is restarted after a lapse of 2 hours or
longer. If it is set to [DAY], an index signal is
recorded when recording is restarted after the
date has changed since the last recording.
(While the index signal is being recorded, the
[INDEX] Indication flashes for a few seconds.)
INDEX
Continuous Index Search
If the [9] Button or the [:] Button (70) is
pressed for 2 seconds or longer, search can be
continued at several-second intervals. (To cancel,
press the [1] Button (84) or the [∫] Button (82).)
sV
Index Search Function
V
/REW
(84)
(82)
5
W
E
;
D
STOP
INDEX
L
∫
P.B. ZOOM
SELECT
≥For other notes concerning this item, see -80-.
Playback Zoom Function
A part of the image can be enlarged up to
10 times during playback.
1 During playback, press the [P.B. ZOOM]
Button (86) on the Remote Controller.
INDEX
K
ª Scene Index Search
1 Press the [9] Button or [:] Button (70)
FF/W
1
INDEX
K
SELECT
≥If the Camcorder is switched from the Tape
Playback Mode to Tape Recording Mode or if
the date and time is set before the start of
recording, the index signal is not recorded.
PLAY
6
STILL ADV PAUSE STILL ADV
(68)
STOP
∫
INDEX
L
P.B. ZOOM
VAR.
SEARCH
(86)
MENU
STORE
(68)
ENTER
OFF/ON
P B DIGITAL
≥The center of the image is enlarged by
approximately 2 times.
on the Remote Controller.
ZOOM 2t
sV
V
/REW
6
PLAY
FF/W
1
5
W
STILL ADV PAUSE STILL ADV
E
;
D
INDEX
K
STOP
INDEX
L
∫
P.B. ZOOM
(70)
SELECT
≥When the corresponding button is pressed
once, the [S 1] Indication appears, and
searching for the subsequent scene marked
with an index signal starts. Each time the button
is pressed after the start of Scene Index Search,
the indication changes, from [S 2] to [S 9], and
the beginning of the scene corresponding to the
selected number will be searched.
To Change the Zoom Magnification
2 Change the magnification by pressing the
[W] Button or [T] Button (74) on the Remote
Controller.
OSD
DATE/
TIME
PHOTO
SHOT
DISPLAY RESET
TITLE
MULTI/
P-IN-P
¥REC
A.DUB
V
PLAY
FF/W
1
5
/REW
6
START/
STOP
ZOOM
T
sVOL r
(70)
(74)
W
S 1
≥Up to 9 scene numbers can be selected.
To Change the Enlarging Area of an Image
3 Press the Arrow Button (π, ∑, ∏, ∫) (68)
on the Remote Controller that points to the
area you want to enlarge.
To Cancel the Playback Zoom Function
Press the [P.B. ZOOM] Button (86) on the
Remote Controller.
≥For other notes concerning this item, see -80-.
46
PV-GS400Eng.book 47 ページ
2004年6月4日 金曜日 午後3時17分
Playback Mode
Playback Digital Effect Functions
sV
During playback, special digital effects can be
added to the recorded pictures. The same effects
as those of Digital Effects 1 and 2, which are used
during recording, are obtained.
1 Press the [1] Button (84).
V
/REW
6
PLAY
FF/W
1
5
W
STILL ADV PAUSE STILL ADV
E
;
D
INDEX
K
STOP
INDEX
L
S
∫
P.B. ZOOM
C
2 Press the [SELECT] Button (71) on the
Remote Controller to select a desired digital
effect.
SELECT
(71)
VAR.
SEARCH
MENU
STORE
moment you want to save as a still picture.
≥The [B] or [C] Indication appears, and
the image is saved.
4 Press the [OFF/ON] Button (73) in the scene
in which you want to use the Wipe or Mix
effect.
≥The scene changes as a result of the Wipe or
Mix effect.
≥The Wipe Function and Mix Function can only
be accessed by using the Remote Controller
during playback.
≥If the [OFF/ON] Button (73) is pressed while
Wipe or Mix is carried out, the effect will stop
temporarily at that point. Pressing the [OFF/ON]
Button (73) again will bring back the effect.
≥For other notes concerning this item, see -80-.
Playing Back a Card
ENTER
OFF/ON
(73)
P.B.DIGITAL
To suspend Playback Digital Effect
Temporarily
Press the [OFF/ON] Button (73) to suspend or
restart the digital effect. When the digital effect is
paused temporarily, the selected effect’s
indication flashes.
To Cancel the Digital Effect
Press the [SELECT] Button on the Remote
Controller and clear the digital effect indication.
PC
≥When the [SELECT] Button is pressed
repeatedly, the digital effect selection
changes.
≥The same setting can be done using
[EFFECT SEL] Sub-Menu on the
[TAPE PLAYBACK MENU].
It plays back files recorded on a Card.
1 Set the Mode Dial (44) to Picture Playback
Mode.
(44)
SD
(84)
3 Press the [STORE] Button (72) at the
2 Start Playback.
1: Starting the Slide Show
5: Playing back the next picture
6: Playing back the previous picture
∫: Stop the Slide Show
;: Pause the Slide Show
1
100-0001
2
ª Wipe Mode and Mix Mode
1 Press the [1] Button (84).
3
sV
(84)
V
/REW
6
PLAY
FF/W
1
5
W
STILL ADV PAUSE STILL ADV
E
;
D
INDEX
K
STOP
INDEX
L
S
∫
P.B. ZOOM
1 Folder File Number
2 Picture Size (-72-)
3 File Number
C
2 Press the [SELECT] Button (71) on the
Remote Controller and select [WIPE] or
[MIX].
K
(71)
SELECT
(72)
STORE
(73)
∫
L
VAR.
SEARCH
MENU
ENTER
OFF/ON
P.B.DIGITAL
47
PV-GS400Eng.book 48 ページ
2004年6月4日 金曜日 午後3時17分
Playback Mode
To Select a Desired File and Playing Back
1 Set the Mode Dial (44) to Picture Playback
Mode.
SD
PC
(44)
Slide Show
The recorded still pictures in the Card can be
played back like a Slide Show.
1 Set the Mode Dial (44) to Picture Playback
Mode.
(44)
SD
PC
2 Press the [MULTI] Button (12).
2 Press the [1] Button (19).
(12)
MULTI/
P-IN-P
STILL
≥The files recorded on the Card are displayed
in Multi-Picture Mode.
(19)
ENTER
FADE
≥The [SLIDE!] Indication is displayed.
PICTURE
SLIDE
640
640
640
640
No.25
1 2
640
640
100-0014
3
1 Picture Size
2 File Number
3 Folder File Number
3 Press the [;/∫/6/5] Button to select a
desired file.
STILL
ENTER
≥Each of the pictures are played back for
several seconds.
To Pause the Slide Show
Press the [;] Button.
≥The [SLIDE;] Indication is displayed.
SLIDE
To Stop the Slide Show
Press the [∫] Button.
FADE
≥The selected file is marked with a frame.
4 Press either the [ENTER] Button (19) or the
[MULTI] Button (12).
≥The selected file is shown on the entire
screen.
≥For other notes concerning this item, see -80-.
48
≥For other notes concerning this item, see -80-.
PV-GS400Eng.book 49 ページ
2004年6月4日 金曜日 午後3時17分
Playback Mode
Creating a Title
You can create a title and record on a Card.
1 Recording Mode:
Set the Mode Dial (44) to Tape Recording
Mode or Card Recording Mode.
Set the Lens to the image you want to use
for creating a title.
≥The dark portion of the image is missing 1,
and the colors of the bright portion change in
order of white, yellow, magenta, red, cyan,
green, blue and black, after which the bright
portion of the image is missing 2 and the
colors of the dark portion change in the above
order.
6 Select [RECORDING] and press the
[ENTER] Button (19).
≥The title is recorded on the Card.
S
PC
(44)
D
≥For other notes concerning this item, see -80-.
Adding a Title
A title can be added to the picture. It is displayed
in Tape/Card Recording Mode and Tape/Picture
Playback Mode.
1 Tape Playback Mode:
Search for the image you want to use for
creating a title and set the Camcorder to the
Still Playback Mode.
(17)
r
STILL
ENTER
FADE
1 Set [DIGITAL] >> [TITLE IN] >> [ON].
2 Set [CARD] >> [CREATE TITLE] >> [YES].
STILL
ENTER
STILL
(16)
(16)
MENU
FADE
ENTER
MENU
FADE
2 Press the [MENU] Button (16).
3 Press the [PHOTO SHOT] Button (52).
(52)
≥The title is displayed.
3 Press the [MULTI] Button (12).
PHOTO
SHOT
(12)
≥The title is stored.
≥To perform Photoshot again, select
[RETURN].
4 Select [LUMINANCE] and press the [ENTER]
Button (19), then press the [5] Button (18)
or [6] Button (21) to adjust the title
contrast and press the [ENTER] Button (19).
5 Press the [5] Button (18) or [6] Button
(21) to adjust the color and press the
[ENTER] Button (19).
1
MULTI/
P-IN-P
≥A list of titles is displayed.
TITLE
USR00002.TTL
1
≥File Name 1
2
49
PV-GS400Eng.book 50 ページ
2004年6月4日 金曜日 午後3時17分
Playback Mode
4 Press the [;/∫/6/5] Button to select a
desired title.
STILL
ENTER
FADE
≥The selected title is marked with a frame.
5 Press the [ENTER] Button (19) or press the
[MULTI] Button (12).
≥The selected title is displayed.
≥Recording and Photoshot Recording can be
made with pictures that have titles.
≥A title can be displayed also by pushing [TITLE]
Button (78) on the Remote Controller.
To Clear the Title Display
Set [DIGITAL] >> [TITLE IN] >> [OFF].
Or press [TITLE] Button on the Remote
Controller.
≥For other notes concerning this item, see -80-.
Writing Printing Data on a Card
(DPOF Setting)
DPOF Setting Printing data (DPOF Settings),
such as the number of images to be printed, can
be written to the Card. “DPOF” means Digital
Print Order Format.
1 Set the Mode Dial (44) to Picture Playback
Mode.
3 Select a desired picture and press the
[ENTER] Button (19).
≥The selected picture is marked with a frame.
≥The number of prints set by DPOF 1 is
displayed.
4 Press the [5] Button (18) or [6] Button
(21) to select the number of pictures to be
printed, and press the [ENTER] Button (19).
≥[¥] Indication 2 is displayed in the picture
set. (-72-)
≥This is not the setting of the number of prints
for printing on PictBridge. (-56-)
5 Repeat Steps 3 and 4 and press the [MENU]
Button (16) when the setup is completed.
To Verify DPOF Setting
Select [VERIFY] in Step 2. The pictures for which
1 or more print is set in DPOF are played back
continuously.
≥For other notes concerning this item, see -80-.
Protecting the Files on a Card
(Lock Setting)
Precious files recorded on a Card can be locked
to prevent accidental erasure. (Even if files are
locked, the files will be deleted if the Card is
formatted.)
1 Set [PICTURE PLAYBACK MENU] >>
[EDITING] >> [FILE LOCK] >> [YES].
STILL
ENTER
PC
(16)
SD
(44)
FADE
MENU
FILE LOCK
2 Set [PICTURE PLAYBACK MENU] >>
[EDITING] >> [DPOF SET] >> [YES] >>
[VARIABLE].
640
640
640
640
!:ENTER
640
640
MENU:EXIT
1
2 Select the file to be locked, and press the
STILL
ENTER
(16)
FADE
MENU
DPOF SETTING
2
1
!:ENTER
MENU:EXIT
≥When all images are not printed, select
[ALL 0].
50
[ENTER] Button (19).
≥The selected file is locked and the [
]
Indication 1 appears. Repeat this procedure
to lock 2 or more files.
≥Press the [ENTER] Button (19) again to
cancel.
≥The SD Memory Card has a write protection
switch. (-80-)
≥For other notes concerning this item, see -80-.
PV-GS400Eng.book 51 ページ
2004年6月4日 金曜日 午後3時17分
Playback Mode
Deleting the Files Recorded on a
Card
Using the Camcorder, you can delete the files
recorded on a Card. After the file is deleted, it
cannot be restored.
≥If files conforming to DCF standard are deleted,
all the data related to the files will be deleted.
Formatting a Card
If a Card becomes unreadable by the Camcorder,
format it for reuse. Formatting erases all the data
recorded on a Card.
1 Set [PICTURE PLAYBACK MENU] >>
[EDITING] >> [CARD FORMAT] >> [YES].
To Select and Delete Files or Titles
1 Set [PICTURE PLAYBACK MENU] >>
[DELETE] >> [FILE BY SEL] >> [YES].
STILL
ENTER
(16)
STILL
MENU
FADE
≥A confirmation message appears, select
[YES] and formatting will be carried out.
ENTER
(16)
FADE
MENU
CARD
≥To erase a title in
[PICTURE PLAYBACK MENU], select
[TITLE BY SEL].
2 Select the file you wish to delete and press
the [ENTER] Button (19).
≥The selected picture is marked with a frame.
≥To erase 2 files or more, repeat this step.
3 Press the [PHOTO SHOT] Button (52).
PHOTO
SHOT
(52)
≥A verification message appears.
FORMAT
FORMAT WILL
ALL FILES
;:NO --∫:YES
!:ENTER
DELETE
RETURN
MENU:EXIT
≥When the formatting is completed, the screen
becomes white.
≥It may not be possible to use a Card formatted
by this Camcorder on another unit. In this case,
format the Card on the unit which will be using
the Card. Make sure that valuable pictures are
stored on the PC before proceeding.
≥A Card formatted on other equipment (e.g. PC)
might be unusable or it might take more time for
recording. We recommend that you use this
Camcorder to format the Card.
4 Select [YES] and press the [ENTER] Button
(19).
≥The selected file is deleted from the Card.
≥If [NO] is selected, the file selection is
cancelled.
To Select and Delete All Files
1 Set [PICTURE PLAYBACK MENU] >>
[DELETE] >> [ALL FILES] >> [YES].
STILL
ENTER
(16)
MENU
FADE
≥A verification message appears.
2 Select [YES] and press the [ENTER] Button
(19).
≥All files of Picture Playback Mode are erased.
≥A locked file cannot be erased.
≥If there are many files in a card, it takes
several minutes for deleting.
51
PV-GS400Eng.book 52 ページ
2004年6月4日 金曜日 午後3時17分
Playback Mode
Playing Back on Your TV
By connecting your Camcorder to your TV, the
recorded scenes can be viewed on your TV
screen.
≥Before connecting them, turn off the power of
both the Camcorder and TV.
1 Connect the [AV IN/OUT] Jack of the
Camcorder and the Video and Audio Input
Jacks of the TV.
[VIDEO IN]
[S-VIDEO IN]
2
[AUDIO IN]
1
AV IN/OUT
PHONES
DV
S-VIDEO
IN/OUT
≥Connect to the TV with the AV Cable 1. If the
TV has an S-Video Jack, connect the S-Video
Cable 2, too.
≥Plug the AV Cable as shown 3 so that the
cord hangs down.
3
≥When plugging the pin plug of the AV Cable
into the [AV IN/OUT] Jack, plug it in as far as
it goes.
To Make the Indications Appear on the TV
Screen
Press the [OSD] Button (63) on the Remote
Controller.
(63)
OSD
DATE/
TIME
DISPLAY RESET
PHOTO
SHOT
TITLE
START/
STOP
ZOOM
≥For other notes concerning this item, see -81-.
52
PV-GS400Eng.book 53 ページ
2004年6月4日 金曜日 午後3時17分
Editing Mode
Recording from a Tape onto a Card
Still pictures can be recorded on a Memory Card
from scenes that have already been recorded on
a cassette.
1 Set the Mode Dial (44) to Tape Playback
Mode.
3 Press the [;] Button (81) on the Remote
Controller where you want to add new
sound.
T
MULTI/
P-IN-P
¥REC
A.DUB
V
PLAY
FF/W
1
5
/REW
6
sVOL r
Editing Mode
(67)
W
STILL ADV PAUSE STILL ADV
E
;
D
INDEX
K
STOP
INDEX
L
∫
(81)
P.B. ZOOM
SELECT
PC
SD
(44)
4 Press the [A.DUB] Button (67) on the
Remote Controller.
5 To start Audio Dubbing, press the [;]
Button (81) on the Remote Controller.
2 Start playback and set the Camcorder to
Still Playback Mode at the scene you wish
to record, and press the [PHOTO SHOT]
Button (52).
(52)
PHOTO
SHOT
Audio Dubbing
You can add music or narration to the recorded
Cassette.
≥If a tape recorded in the [16bit] Mode is dubbed
with the Audio Dubbing function, the original
sound is erased. (If you wish to preserve the
original sound, use the [12bit] Mode when
recording.)
≥Audio Dubbing cannot be performed on a
recording made in LP Mode. (-26-)
1 Set [TAPE PLAYBACK MENU] >>
[AV IN/OUT] >> [AV JACK] >> [IN/OUT].
STILL
To Cancel Audio Dubbing
Press the [;] Button (81) on the Remote
Controller.
The Camcorder is in the Still Playback Mode
again.
To Play Back the Sound Recorded by 12bit
Audio Dubbing
Set [TAPE PLAYBACK MENU] >> [PLAYBACK]
>> [12bit AUDIO] >> [ST2] or [MIX].
ST1: It plays back only the original sound.
ST2: It plays back only the sound added by Audio
Dubbing.
MIX: It plays back both the original sound and the
sound added by Audio Dubbing
simultaneously.
To Dub Audio While Listening to a
Pre-recorded Sound
When pausing the audio dubbing, set the
[12bit AUDIO] on the [PLAYBACK] Sub-Menu to
[ST2] and you can check the pre-recorded sound.
When a microphone is used for audio dubbing,
use headphones to listen to the pre-recorded
sound while dubbing the audio. (When using
headphones, set [AV JACK] to [OUT/PHONES].)
When the line input is used, you can dub audio
while listening to the pre-recorded sound from the
speaker.
ENTER
(16)
MENU
FADE
≥For other notes concerning this item, see -81-.
2 Next, select [A.DUB INPUT] >> [MIC] or
[AV IN].
≥Set to [AV IN] when an external device is
used, and to [MIC] when an external or
built-in microphone is used.
53
PV-GS400Eng.book 54 ページ
2004年6月4日 金曜日 午後3時17分
Editing Mode
Copying on a DVD-R or an S-VHS (or
a VHS) Cassette
(Dubbing)
After connecting the Camcorder to the DVD
Recorder or the VCR as illustrated, start the
following procedures.
S
/
2
(L2)
[S-VIDEO IN]
[VIDEO IN]
2
[AUDIO IN]
≥If various setups (such as external input, tape
speed, etc.) are required, please refer to the
operating instructions of your DVD Recorder
or VCR.
Camcorder:
3 Press the [1] Button (19) to start playback.
DVD Recorder/VCR:
4 Start recording.
5 Press the Pause or Stop Button to stop
recording.
Camcorder:
6 Press the [∫] Button (20) to stop playback.
Recording the Contents of Other
Equipment
After connecting the Camcorder and the other
equipment as illustrated, start the following
procedures.
1
AV IN/OUT
PHONES
S
/
2
(L2)
DV
S-VIDEO
IN/OUT
[VIDEO OUT]
[S-VIDEO OUT]
1 AV Cable
2 S-Video Cable
When connecting with DV Cable (Only for
models equipped with the DV terminal)
2
[AUDIO OUT]
1
AV IN/OUT
PHONES
S
/
2
(L2)
DV
3
3 DV Cable (optional)
Be sure to press the [OSD] Button (-14-) on the
Remote Controller prior to copying so that no
indications are visible. Otherwise, the displayed
tape counter and function indications are also
copied. (When connecting with DV Cable, the
indications may not appear.)
≥Also read the operating instructions of the DVD
Recorder or the VCR carefully.
Camcorder:
1 Insert the recorded Cassette.
DVD Recorder/VCR:
2 Insert an unrecorded DVD-R or Cassette
with an erasure prevention tab.
54
DV
S-VIDEO
IN/OUT
1 AV Cable
2 S-Video Cable
Camcorder:
1 Set [TAPE PLAYBACK MENU] >>
[AV IN/OUT] >> [AV JACK] >> [IN/OUT].
STILL
(16)
ENTER
MENU
FADE
2 Insert an unrecorded Cassette.
Other Equipment:
3 Insert a recorded Cassette and start
playback.
PV-GS400Eng.book 55 ページ
2004年6月4日 金曜日 午後3時17分
Editing Mode
A.DUB
V
PLAY
FF/W
1
5
/REW
(84)
6
sVOL r
¥REC
(84)
(81)
(82)
T
MULTI/
P-IN-P
Player:
2 Press the [1] Button (84) to start playback.
T
MULTI/
P-IN-P
¥REC
A.DUB
V
PLAY
FF/W
1
5
/REW
6
sVOL r
Camcorder:
4 While pressing the [¥REC] Button (66),
press the [1] Button (84) on the Remote
Controller.
Or while pressing the [REC] Button (9),
press the [BACK LIGHT] Button (10) on the
Camcorder.
(66)
W
STILL ADV PAUSE STILL ADV
E
;
D
INDEX
K
STOP
INDEX
L
∫
P.B. ZOOM
(66)
W
STILL ADV PAUSE STILL ADV
(81)
(82)
E
;
D
INDEX
K
STOP
INDEX
L
∫
P.B. ZOOM
(9)
REC
(10)
BACK
LIGHT
Recorder:
3 While pressing the [¥REC] Button (66),
(9)
REC
(10)
BACK
LIGHT
≥When recording on a card, press the
[PHOTO SHOT] Button.
5 Press the [;] Button (81) or [∫] Button (82)
to stop recording.
Other Equipment:
6 Press the Stop Button to stop playback.
≥For other notes concerning this item, see -81-.
Using the DV Cable for Recording
(Digital Dubbing)
By connecting this Camcorder with other digital
video equipment (such as another Camcorder of
the same format/model) that has a DV
input/output terminal, and using a 4-pin to 4-pin
DV Interface cable PV-DDC9/PV-DDC9-K
(optional) 1, high quality images and sounds can
be dubbed in the digital mode.
press the [1] Button (84) on the Remote
Controller.
Or while pressing the [REC] Button (9),
press the [BACK LIGHT] Button (10) on the
Camcorder.
≥Recording starts.
To Stop Dubbing
Press the [;] Button (81) or the [∫] Button (82).
≥For other notes concerning this item, see -81-.
CAUTION:
Unauthorized exchanging and/or copying of
copyrighted recordings may be copyright
infringement.
DV
1
Player/Recorder:
1 Insert the Cassette and set to Tape
Playback Mode.
55
PV-GS400Eng.book 56 ページ
2004年6月4日 金曜日 午後3時17分
Editing Mode
PC Connection With DV Interface
Cable
A video clip can be transferred directly to your PC
(personal computer) via a DV Interface Cable
(optional) using products and software from a
number of video editing software companies.
Using products from video editing software
companies allows you to capture and edit video
clips using the DV Interface.
Panasonic DVC are OHCI compliant and
should have no problem working with any
OHCI compliant Firewire Card/Video —
Editing software package.
Printing pictures by directly
connecting to the printer
(PictBridge)
After connecting the Camcorder with a printer
compatible with PictBridge, start the following
procedures.
≥To print pictures by directly connecting the
Camcorder to the printer, prepare a printer
compatible with PictBridge. (Also read the
operating instructions of the printer.)
≥You cannot print images which cannot be played
on the Camcorder.
≥Check the settings for the paper size, quality of
print, etc. on the printer.
≥We recommend using the AC Adaptor as the
power source.
1 Set the Mode Dial (44) to Picture Playback
Mode.
DV
PC
≥Personal computer must be equipped with an
DV Terminal.
≥During Camcorder playback, do not disconnect
the DV Interface Cable or turn the Camcorder
off as this may cause a PC hang-up error.
≥1394 (i. LINK) Interface must conform to OHCI
(Open Host Controller Interface Specification).
SD
(44)
2 Connect the printer with the supplied USB
Cable.
REMOTE/MIC
(PLUG IN POWER)
AV IN/OUT
PHONES
1
1 USB Cable
PRINT
≥The [PRINT] Indication appears on the screen
of the Camcorder.
Highlighted: Printable
Blinking:
Printer is being recognized.
56
PV-GS400Eng.book 57 ページ
2004年6月4日 金曜日 午後3時17分
Editing Mode
≥The [PRINT] Indication does not appear when
the card is not inserted in the Camcorder. (You
cannot print pictures.)
≥When the [PRINT] Indication keeps blinking
(more than about 1 minute), the Camcorder and
the printer are not connected properly. Connect
the cable again or check the printer.
≥When the Camcorder and the printer are
connected in the Tape Recording/Playback
Mode, the [WEB
] or the [WEB
]
Indication may appear on the LCD Monitor.
However, images cannot be printed.
3 Select the desired picture.
≥Images cannot be printed when they are
displayed in Multi-Picture Mode.
4 When printing with date:
Set [PICTURE PLAYBACK MENU] >>
[PRINT] >> [DATE] >> [ON].
If you want to stop printing halfway
Press the [∫] Button (20).
≥Do not operate as follows during printing,
pictures cannot be printed properly.
≥Disconnecting the USB Cable
≥Removing the Card
≥Switching the operation mode
≥If the Camcorder is disabled while it is
connected to the printer, connect the USB
connection cable again or check the printer.
STILL
ENTER
(16)
FADE
MENU
≥You cannot set date printing when the printer
does not support it.
≥Proceed to the next step if you do not need
date printing.
5 Set [PICTURE PLAYBACK MENU] >>
[PRINT] >> [THIS PICTURE] >> a desired
paper size.
STILL
ENTER
(16)
FADE
MENU
≥You cannot set a paper size which is not
supported by the printer.
6 Press the [5] Button (18) or [6] Button
(21) to select a desired number of prints.
STILL
ENTER
FADE
(21)
(18)
≥You can set the number of prints up to 9.
7 Press the [ENTER] Button (19).
STILL
(19)
ENTER
FADE
57
PV-GS400Eng.book 58 ページ
2004年6月4日 金曜日 午後3時17分
With a PC
With a PC
Using the Software with a Computer
An image stored on the DV Cassette can be
transferred to your personal computer.
ª Software Installation (Windows)
1 Turn on Computer and start up Windows.
2 Insert supplied CD-ROM into the CD-ROM
drive.
≥[Setup Menu] appears.
3 Select the software to be installed from
[Setup Menu].
≥USB Driver -58-:
The USB driver to be installed is the
dedicated Mass Storage Driver for Windows
98SE.
≥Video Stream Driver -60-:
If the Camcorder is connected to your
personal computer, you can send video from
the Camcorder to the other parties via a
network or by the Internet. It is also needed
when you use MotionDV STUDIO with USB
connection.
≥DirectX
To activate SD Viewer, Microsoft DirectX 8.1
or later should be installed. To activate
MotionDV STUDIO, Microsoft DirectX 9.0b or
later should be installed. (If you install Video
Stream Driver, DirectX 9.0b is automatically
installed.)
≥MotionDV STUDIO -62-:
Using the MotionDV STUDIO software allows
you to capture video recorded on a tape or
images viewed through the lens of a camera.
Connecting the Camcorder with the DV cable
also allows you to output images edited on
the personal computer to the tape in the
Camcorder.
≥SD Viewer -65-:
The SD Viewer 3.1E software allows images
on a Card to be displayed in a thumbnail
format so that the contents of the Card can be
easily checked.
4 Follow the instructions on the computer
screen until the installation is complete.
≥Setup window will disappear when the
installation is complete.
58
Note:
If a window does not appear automatically, click
the “Start” Button on your desktop and then click
“Run”. When the “Run” Box is open, type in
“D:\InstMenu.exe” and click “OK”. (“D” is used
when the CD-ROM drive is drive D.)
Using USB Driver
ª Operating environment
≥Despite having the operating environment
indicated, it may not be possible to use the
program with some types of personal
computers.
≥A CD-ROM drive is required to install this
program.
OS:
IBM PC/AT compatible personal computer with
pre-installed;
Microsoft Windows 98 Second Edition
CPU:
Intel Pentium II/Celeron 300 MHz or higher
(including compatible CPU)
RAM:
32 MB or more (64 MB or more recommended)
Interface:
USB
ª Installing USB Driver
When your OS is Windows 98SE, please install
USB Driver first before connecting the Camcorder
to your personal computer with the USB
Connection Cable.
1 Turn on the personal computer and start up
Windows.
2 Insert the supplied CD-ROM into the
personal computer’s CD-ROM drive.
≥Quit all applications.
≥[Setup Menu] appears.
3 Click the [USB Driver].
≥The set up program starts running.
4 Click [Restart] if the [InstallShield] dialog
appears.
≥Do not remove the CD-ROM.
5 Finish installation by following the
on-screen instructions.
≥Click [Next] and proceed with installation.
≥After completing the installation, Click
[Finish].
6 After the USB Driver is installed, please
restart your computer.
≥Reboot the computer to finish installing USB
driver.
≥Installation continues after the computer
reboots if you selected additional software.
PV-GS400Eng.book 59 ページ
2004年6月4日 金曜日 午後3時17分
With a PC
≥A message indicating a conflict between
versions may be displayed during the
installation. This will not cause a problem.
Simply click [Yes] to proceed with the
installation.
Connecting Computer and
Camcorder
When your OS is Windows 98SE, install USB
Driver before connecting.
Never connect the USB Connecting Cable
until the USB Driver is installed.
Before making these connections, turn off all
devices which are to be connected.
≥When using the USB Connection Kit, it is
recommended that you use the AC Adaptor as
the power supply of the Camcorder.
ª For Using Built-in SD Drive
PC
D
By connecting the Camcorder and personal
computer with the USB Cable, you can transfer
still images saved on a Memory Card directly to
your personal computer.
1 Insert the Memory Card into the Camcorder.
2 Set the Camcorder to PC Mode.
S
3 Connect the Camcorder to your personal
≥Appropriate driver to recognize Camcorder is
automatically installed by Windows Plug and
Play when connected for the first time.
≥After the USB Driver is installed and USB
Connection Cable is connected to the
Camcorder, open [My Computer] or
[Windows Explorer] to check that the drive is
displayed as a removable disk drive (only when
card is inserted into the Camcorder). It enables
you to operate it in the same way as a floppy
disk drive, and you can use the same drag and
drop or copy methods.
Using as a Web Camera
If the Camcorder is connected to your personal
computer, you can send video and sound from
the Camcorder to other parties via the network.
(You can use the microphone equipped with the
personal computer instead of the one on the
Camcorder.)
Note:
≥Do not connect the USB Cable until the Video
Stream Driver is installed.
This feature can be used only if both parties
are using the same operating system. Please
see chart below:
[Send]
[Receive]
Windows XP
<OK> Windows XP
Windows XP
<NG> Windows
98SE/Me/
2000
Windows
98SE/Me/
2000
<OK> Windows
98SE/Me/
2000
computer with the USB Cable.
[Software]
Windows
Messenger
MSN
Messenger
ª Operating environment
≥It enters PC Connecting Mode.
4 Open [My Computer] and click
[Removable Disk] (For Windows 98SE/Me/
2000 users).
Click [Open folder to view files using
Windows Explorer] and then [OK] (For
Windows XP users).
≥You can view images stored on the Memory
Card and also save them to your hard disk.
≥Please do not change file or folder names on
the personal computer. The images on the
Memory Card may then not be viewable on
the Camcorder.
≥After making the connections, turn the
connected equipment on.
OS:
IBM PC/AT compatible personal computer with
preinstalled
Microsoft Windows XP Home Edition/
Professional SP1 or later
Microsoft Windows 2000 Professional SP4 or
later
Microsoft Windows Me (Millennium Edition)
Microsoft Windows 98 Second Edition
CPU:
Intel Pentium III 450 MHz or higher
Celeron 400 MHz or higher (including compatible
CPU)
RAM:
128 MB or more (256 MB or more recommended)
Free hard disk space:
250 MB or more
Interface:
USB
59
PV-GS400Eng.book 60 ページ
2004年6月4日 金曜日 午後3時17分
With a PC
Graphic display:
High Color (16 bit) or more
Desktop resolution of 800k600 pixels or more
Communication Speed:
56 kbps or faster is recommended
Necessary software:
Windows Messenger 5.0 or later (Windows XP)
MSN Messenger (Windows 98SE/Me/2000)
DirectX 9.0b or later (Windows XP)
Other requirements (to send/receive audio):
Sound card
Speaker or headphones
To use the Camcorder as a Web Camera, the
following conditions must be met.
≥In this case, Windows XP SP1 or later is
needed.
≥To upgrade Windows XP to SP1, click [Start] >>
[All Programs] >> [Windows Update]. (Requires
Internet connection.)
≥To upgrade Windows 2000 Professional to SP4,
click [Start] >> [All Programs] >>
[Windows Update]. (Requires Internet
connection.)
≥You have direct dial-up connection capability to
the Internet (minimum requirement). Also, you
and the other person(s) are on the same
Network (LAN).
≥Install Windows Messenger (Windows XP) or
MSN Messenger (Windows 98SE/Me/2000). If
you have a version older than 5.0, please
download the latest version (5.0 or later) from
the Microsoft Home Page.
http://www.microsoft.com/
http://www.msn.com/
(For download and installation instructions,
please refer to Help on the Home Page.)
≥If the installed version is not the latest, update it
by performing the Windows update.
≥If you are connected to the Internet through a
firewall or a router, proper communication will
not be possible.
ª Installing Video Stream Driver
DirectX 9.0b must be installed in your PC if it is
not already installed.
≥When DirectX 9.0b is installed, applications
supported by previous versions of DirectX may
not run. In this case, consult the manufacturers
of the applications disabled.
1 Insert the supplied CD-ROM into the
personal computer’s CD-ROM drive.
≥Quit all applications.
≥The [Setup] screen appears.
2 Click [Video Stream Driver].
≥The set up program starts running.
3 Depending on your system environment,
installation of “DirectX 9.0b” may be
60
required. Click [Yes] and continue with
installation.
≥After “DirectX 9.0b” is installed, the computer
will restart.
≥Do not remove the CD-ROM.
≥Installation may take a little while.
4 Finish installation by following the
on-screen instructions.
≥Click [Next] and proceed with installation.
≥After completing the installation, Click
[Finish].
5 Click [OK].
ª Connecting the Camcorder to
personal computer (For Use as a Web
Camera)
1 Install the supplied Video Stream Driver on
the provided CD-ROM.
2 Set the Mode Dial to Tape Recording Mode.
3 Set [CAMERA] >> [USB FUNCTION] >>
[WEB CAMERA].
STILL
ENTER
(16)
MENU
FADE
≥It enters WEB CAMERA Mode.
≥To send pictures recorded on a tape to
another personal computer using Windows
Messenger, set [PLAYBACK] >>
[USB FUNCTION] >> [WEB CAMERA] on
Tape Playback Mode before connecting the
Camcorder to your personal computer.
4 Connect the Camcorder to a personal
computer with the USB Connection Cable.
≥When the Camcorder and personal
computer (with Windows 2000) are
connected via USB Cable, a message, such
as the one below, is displayed. However,
testing by the manufacturer has confirmed
functionality of this Camcorder with
Windows 2000. Click [Yes] and proceed.
≥For Windows 98SE/Me users, “USB Audio
Device” is required. Click [Next] and
proceed.
≥If you use Windows 98SE, the OS installation
CD may be required.
PV-GS400Eng.book 61 ページ
2004年6月4日 金曜日 午後3時17分
With a PC
For Windows 98SE/Me Users
The following messages may be displayed during
the installation depending on the environment of
the personal computer. Install the USB Driver as
instructed below.
1) The message “The file ‘kstvtune.ax’ on
[Unknown] cannot be found...” is
displayed.
≥Enter “C:\Windows\system” for
Windows 98SE.
≥Enter “C:\Windows\options\CABS” for
Windows Me.
≥If the “kstvtune.ax” file is missing in one of
the 2 above-mentioned folders, insert the
OS CD-ROM and assign the path.
2) The message “The file ‘ksclockf.ax’ on
[Unknown] cannot be found...” is
displayed.
≥Enter “C:\Windows\system”.
≥If the “ksclockf.ax” file is missing in the
above mentioned folder, insert the OS
CD-ROM and assign the path.
≥You may click [Browse] to look for and assign
the path.
5 Start Windows Messenger (for Windows XP
users) or MSN Messenger (for Windows
98SE/Me/2000 users).
≥Click [Start] >> [Programs] >>
[Windows Messenger] or [MSN Messenger].
≥When you use Windows XP, the other parties
via the network have to use Windows
Messenger on Windows XP. When you use an
operating system other than Windows XP, the
other parties via the network have to use MSN
Messenger on an OS other than Windows XP.
≥If the Camcorder is used as a Web Camera, the
quality of the video to be exchanged will depend
on the Internet connection status.
≥In the WEB CAMERA mode, video cannot be
recorded onto a tape or a card.
≥You cannot output the video input from the DV
terminal to the display of the PC.
≥In the WEB CAMERA mode, the audio may be
interrupted in the middle of communication
depending on the communication environment
or the performance of the personal computer.
ª Setting up Windows Messenger
When starting Windows Messenger for the first
time, its setup screen is displayed. (However, the
screen is not displayed if the Windows
Messenger setup has already been done.)
1 Click [Click here to sign in].
2 Select [.NET Messaging Service] and click
[OK].
3 After the .NET Passport Wizard is displayed,
click [Next].
≥Please refer to the instruction manual of your
personal computer for how to configure the
audio and the microphone.
≥To communicate with persons using Windows
in other languages, setting up using
alphabets or numbers is recommended.
4 According to the procedures displayed on
the screen, continue the setup.
5 After the setup is completed, sign in and
start Windows Messenger.
≥Windows Messenger is activated.
6 Click on [Audio Tuning Wizard...] in the
[Tools] menu to confirm that equipment is
connected correctly.
7 Select [USB Video Device] in the [Camera]
menu.
8 Select [DVC] in the [Microphone] menu.
≥Please refer to the HELP file of Windows
Messenger to understand its operation.
≥During set up, if [Primary video capture
device] selection screen is displayed,
[Panasonic DVC Web Camera] is selected.
61
PV-GS400Eng.book 62 ページ
2004年6月4日 金曜日 午後3時17分
With a PC
ª Setting up MSN Messenger
When starting MSN Messenger for the first time,
its setup screen is displayed. (However, the
screen is not displayed if MSN Messenger setup
has already been done.) For more details, please
read the corresponding Help file.
1 Click [Sign In].
Using MotionDV STUDIO
When the OS is Windows XP/2000/Me, the
Camcorder can be connected to the personal
computer with the DV Cable.
When the OS is Windows XP/2000, the
Camcorder can be connected to the personal
computer with the USB Cable, however, Video
Stream Driver must be installed.
≥Do not connect the USB Cable until the Video
Stream Driver is installed.
ª Operating environment
2 Type in your Sign-in name and password.
≥If you do not have your Sign-in name and
password, click [Get one here]
3 Please carefully read the displayed
contents and then proceed.
4 After the setup is completed, sign in and
start MSN Messenger.
5 Click on [Audio Tuning Wizard...] in the
[Tools] menu to confirm that equipment is
connected correctly.
6 Select the microphone attached to the PC in
the [Microphone] menu.
7 Click [Web Camera Settings...] in the [Tools]
menu.
8 Confirm that the [Panasonic DVC Web
Camera Device] is selected.
≥For other information about MSN Messenger,
please refer to Help.
≥When access is finished, close MSN
Messenger, then turn off the Camcorder.
Finally, disconnect the USB Cable.
62
OS:
IBM PC/AT compatible personal computer with
pre-installed
Microsoft Windows XP Home Edition/
Professional SP1 or later
Microsoft Windows 2000 Professional SP4 or
later
Microsoft Windows Me (Millennium Edition)
(Only in DV connection)
CPU:
Intel Pentium III 700 MHz or higher/AMD Athlon
1 GHz or higher (including compatible CPU)
Graphic display:
High Color (16 bit) or more
(32 bit or more recommended)
Desktop resolution of 1024k768 pixels or more
(Supporting the overlay of DirectDraw)
4 MB or more video memory
Sound:
PCM sound source (Compatible Direct Sound)
Hard disk:
Ultra DMA – 33 or more
RAM:
256 MB or more
(Adding more memory enables you to operate the
personal computer more comfortably.)
Free hard disk space:
640 MB
(When you capture video, 1 GB is needed for
data of approx. 4 minutes.)
Interface:
DV (IEEE1394) terminal (IEEE1394.a)
USB 2.0 (Hi-Speed compliant)
DirectX 9.0b or later
Windows Media Player 6.4 or later
Other requirements:
Mouse
PV-GS400Eng.book 63 ページ
2004年6月4日 金曜日 午後3時17分
With a PC
ª Installing Video Stream Driver
Install this when your OS is Windows XP SP1 or
later, or Windows 2000 SP4 or later. Video
Stream Driver must be installed when you
connect the Camcorder to the PC with the USB
Cable and use MotionDV STUDIO.
DirectX 9.0b is installed in your PC if it is not
installed beforehand.
≥When DirectX 9.0b is installed, applications
supported by previous versions of DirectX may
not run. In this case, consult the manufacturers
of the applications disabled.
1 Insert the supplied CD-ROM into the
personal computer’s CD-ROM drive.
≥Quit all applications.
≥The [Setup] screen appears.
2 Click [Video Stream Driver].
≥The set up program starts running.
3 For Windows XP users:
Depending on your system environment,
installation of “DirectX 9.0b” may be
required. Click [Yes] and continue with
installation.
≥After “DirectX 9.0b” is installed, the computer
will restart.
≥Do not remove the CD-ROM.
≥Installation may take a little while.
4 Finish installation by following the
on-screen instructions.
≥Click [Next] and proceed with installation.
≥After completing the installation, Click
[Finish].
5 Click [OK].
ª Installation of MotionDV STUDIO
1 Insert the supplied CD-ROM into the
personal computer’s CD-ROM drive.
2 Click the [MotionDV STUDIO].
3 Click [Next].
≥After reading the displayed contents, please
carry out the installation according to
instructions.
4 Select the Video system.
5 After the completion of setup, click on
[Finish].
≥Sample data is installed concurrently with the
MotionDV STUDIO software.
6 Click [Finish] when the
[Restarting Windows] Dialogue appears.
≥Reboot the computer to finish installing
MotionDV STUDIO.
63
PV-GS400Eng.book 64 ページ
2004年6月4日 金曜日 午後3時17分
With a PC
ª To start MotionDV STUDIO
If you wish to capture data from a tape, set the
Camcorder to Tape Playback Mode and insert the
tape. If you wish to capture images from the lens
of the Camcorder, set the Camcorder to the Tape
Recording Mode and remove the tape and the
card.
With USB Connection Cable (supplied)
OS:
Windows XP SP1 or later
Windows 2000 SP4 or later
≥The personal computer should be compatible
with USB 2.0 Hi-Speed.
Confirmation before connection
(for Windows XP/2000)
When you connect the personal computer and the
Camcorder with the USB connection cable and
then use MotionDV STUDIO on Windows XP
(SP1 or later) or Windows 2000 (SP4 or later),
check the driver of the USB host controller.
≥It is required to use the driver for which
[Microsoft] is displayed on [Driver Provider] in
[Driver] tab.
1 Select [Start] >> [Settings] >>
[Control Panel] to start [System].
≥[System Properties] is displayed.
2 Click [Hardware] tab and then click
[Device Manager].
3 Right-click [Enhanced Host Controller] etc.
in [Device Manager] and then select
[Properties].
If a description other than [Microsoft] is
displayed
≥Update the driver with the following procedure.
1 Click [Update Driver...].
2 Check [Install from a list or specific location
(Advanced)] and then click [Next].
≥When your OS is Windows 2000, click [Next]
after [Update Device Driver Wizard] appears.
3 (For Windows XP Users)
Check [Don’t search. I will choose the driver
to install] and then click [Next].
(For Windows 2000 Users)
Check [Display a list of the known drivers
for this device so that I can choose a
specific driver] and then click [Next].
4 Click [Standard Universal PCI to USB Host
Controller] and then click [Next].
≥The indication [Enhanced Host Controller] is
changed as [EHCI] depending on the host
controller you use.
4 Click [Driver] tab to check the description
on [Driver Provider].
5 Click [Finish].
≥If [Microsoft] is displayed on [Driver Provider],
the confirmation procedure is completed.
64
≥The update of the driver is completed.
Connect the Camcorder.
PV-GS400Eng.book 65 ページ
2004年6月4日 金曜日 午後3時17分
With a PC
Connecting the Camcorder to a personal
computer
1 Set the Mode Dial to Tape Recording Mode
or Tape Playback Mode.
2 Set [CAMERA] or [PLAYBACK] >>
[USB FUNCTION] >> [MOTION DV].
STILL
ENTER
(16)
MENU
FADE
≥It enters MotionDV STUDIO Mode.
3 Connect the Camcorder to the personal
computer with USB Connection Cable.
4 Select [Start] >> [All Programs (Programs)]
>> [Panasonic] >>
[MotionDV STUDIO 5.1E LE for DV] >>
[MotionDV STUDIO].
≥Using the MotionDV STUDIO for Windows, a
variety of visual effects can be added and titles
can be created.
≥You cannot record a video edited by the PC
onto the Tape in the Camcorder.
With DV Cable (optional)
OS:
Windows Me/2000/XP
1 Set the Mode Dial to Tape Recording Mode
or Tape Playback Mode.
2 Connect the Camcorder to the personal
computer with DV Connection Cable.
Using the SD Viewer
ª Operating environment
OS:
IBM PC/AT compatible personal computer with
pre-installed
Microsoft Windows XP Home Edition/
Professional
Microsoft Windows 2000 Professional
Microsoft Windows Me (Millennium Edition)
Microsoft Windows 98 Second Edition
CPU:
Intel Pentium III 450 MHz or higher
Celeron 400 MHz or higher (including compatible
CPU)
Graphic display:
High Color (16 bit) or more
Desktop resolution of 800k600 pixels or more
(1024k768 pixels or more is recommended)
8 MB or more video memory
(3D Accelerator recommended, 16 MB or more
video memory recommended)
RAM:
64 MB or more (128 MB or more is
recommended) (Windows 98SE/Me)
128 MB or more (256 MB or more is
recommended) (Windows 2000/XP)
Free hard disk space:
300 MB
Interface:
USB
Necessary software:
Internet Explorer 5.0 or later
DirectX 8.1 or later
Windows Media Player 6.4 or later
Other requirements:
Mouse
ª Installation of SD Viewer
1 Insert the supplied CD-ROM into the
personal computer’s CD-ROM drive.
2 Click the [SD Viewer].
DV
3 Start MotionDV STUDIO 5.1E LE.
≥You can record the video edited by the PC onto
the Tape in the Camcorder.
≥If a message that indicates the absence of
DirectX 8.1 or later is displayed, install
DirectX first.
65
PV-GS400Eng.book 66 ページ
2004年6月4日 金曜日 午後3時17分
With a PC
3 Click [Next].
Using the ArcSoft Software
There are 4 types of image editing software in the
ArcSoft Software package.
1 Panorama Maker 3.0 (Windows, Mac)
≥After reading the displayed contents, please
carry out the installation according to
instructions.
4 Select the Video system.
≥Easy-to-use photo-stitching program
seamlessly combines multiple photos into a
single panoramic picture.
2 PhotoBase 4.0 (Windows), PhotoBase 2.0
(Mac)
≥The size and the frame rate of the slide show
with effects to be outputted are determined by
the selected Video System (PAL or NTSC).
5 After the completion of setup, click on
[Finish].
≥Create albums of image, video, audio, and
other electronic files for easy viewing,
retrieval, and management.
3 PhotoImpression 4.0 (Windows, Mac)
≥Installation will be completed.
ª To start SD Viewer
1 Set the Mode Dial to PC Mode.
2 Connect the Camcorder to the personal
computer with USB Connection Cable.
≥Easy-to-use photo editing program to edit,
enhance, retouch or add special effects to
any image. Also offers creative solutions for
making greeting cards and calendars.
4 PhotoPrinter 4.0 (Windows, Mac)
3 Select [Start] >> [All Programs (Programs)]
>> [Panasonic] >> [SD Viewer for DV] >>
[SD Viewer for DV].
≥Program to layout images in multiple sizes
quickly and effortlessly to create a collage or
photo album, all on one page.
66
PV-GS400Eng.book 67 ページ
2004年6月4日 金曜日 午後3時17分
With a PC
ª Operating environment
ª Installation of ArcSoft Software Suite
For Windows
OS:
IBM PC/AT compatible personal computer with
pre-installed
Microsoft Windows XP Home Edition/
Professional
Microsoft Windows 2000 Professional
Microsoft Windows Me (Millennium Edition)
Microsoft Windows 98 Second Edition
CPU:
Pentium-based PC or equivalent [1, 3, 4]
Pentium II-based PC or equivalent [2]
(Pentium II 300 MHz or higher recommended)
Graphic display:
High Color (16 bit) or more
Desktop resolution of 800k600 pixels or more
*QuickTime and/or VRML viewer needed. [1]
RAM:
64 MB or more (128 MB or more is
recommended)
Free hard disk space:
At least 625 MB
Other requirements:
Mouse
For Windows
1 Insert the supplied CD-ROM into the
personal computer’s CD-ROM drive.
2 Select the desired language on the
[Choose Setup Language] dialogue, and
click [OK].
≥Installation begins.
≥After reading the displayed contents, please
carry out the installation according to
instructions.
≥If a language other than the OS language is
selected, the characters may not be
presented correctly.
3 When the component selection screen is
displayed, check the software to be
installed and click [Next].
For Macintosh
OS:
Mac OS 9 – X
CPU:
PowerPC
Graphic display:
High Color (16 bit) or more
Desktop resolution of 800k600 pixels or more
*QuickTime and/or VRML viewer needed. [1]
RAM:
64 MB or more (128 MB or more is
recommended)
Free hard disk space:
At least 300 MB
≥This instruction manual describes only the
procedures for installation, connection and
start-up. Please read the Help messages of
your software for how to use the ArcSoft
Software Suite.
4 After the completion of setup, click on
[Finish].
≥Installation will be completed.
For Macintosh
1 Turn on Computer and start up Macintosh.
2 Insert supplied CD-ROM into the CD-ROM
drive.
3 Double click the CD-ROM icon that appears.
4 Double click [ArcSoft].
5 Double click [PhotoImpression] (or
[PhotoBase] or [PanoramaMaker] or
[PhotoPrinter]).
6 Double click [English] or [French].
67
PV-GS400Eng.book 68 ページ
2004年6月4日 金曜日 午後3時17分
With a PC
7 Double click [PhotoImpression Installer] (or
[PhotoBase Installer] or
[PanoramaMaker Installer] or
[PhotoPrinter Installer]).
8 Follow the instructions on the computer
screen until the installation is complete.
ª To start software in ArcSoft Software
Suite
1 Select [Start] >> [All Programs (Programs)]
>> [ArcSoft Software Suite] >>
[Panorama Maker 3] (or [PhotoBase 4] or
[PhotoImpression 4] or [PhotoPrinter 4]).
Note on the driver name displayed
The driver name displayed will differ depending
on your OS, operating environment and the mode
of the Camcorder.
≥Some Operating Systems, such as Windows
98SE, may not show the icon indicating that you
may safely disconnect in task tray. (OS may be
set not to show.) Make sure Camcorder’s Card
Access Lamp is off and disconnect the cable.
Also, with Windows Me, the icon will not be
displayed when in Tape Recording Mode or
Tape Playback Mode.
CAUTION:
If you disconnect the USB Cable while the
Card Access Lamp is on, it may damage the
Card data.
To disconnect USB Cable safely
If USB Cable is disconnected while computer is
on, error dialog box may appear. In such a case
click [OK] and close the dialog box. By following
the steps below you can disconnect the cable
safely.
1 Double click the
icon in task tray.
≥Hardware disconnect dialog box appears.
ON
O
Refer to Help information about application
operations and other Error messages.
≥When Mode Dial (44) is turned to change
modes.
2 Select [USB Mass Storage Device] and click
S
(44)
D
[Stop].
3 Verify [Matshita DVC USB Device] is
selected and click [OK].
FF
PC
For Information on ArcSoft Software:
TEL: 1-510-440-9901
Website: www.arcsoft.com
If the above operation is not performed correctly,
when data is copied from the personal computer
to an SD Memory Card, the copied data may be
damaged.
When the following operations are performed, the
same results will occur as when the USB Cable is
incorrectly removed (above). Therefore, it is
imperative that the above operation is completed
before proceeding.
≥When SD Memory Card is removed.
≥When Camcorder power is turned OFF.
If you no longer need software or
driver (Uninstall)
≥You can safely disconnect the cable.
68
The screens may vary with the type of OS.
1 Select [Start] (>> [Settings]) >>
[Control Panel], select the software or the
driver from [Add/Remove Programs] to
uninstall.
≥Uninstalling steps may vary depending on the
OS. Please refer to the user manual of your OS.
PV-GS400Eng.book 69 ページ
2004年6月4日 金曜日 午後3時17分
With a PC
Notes
≥Macintosh is a registered trademark of Apple
Computer, Inc. ArcSoft, the ArcSoft logo,
ArcSoft PhotoImpression 4.0, ArcSoft
PhotoBase 4.0, ArcSoft PhotoBase 2.0, ArcSoft
Panorama Maker 3.0 and PhotoPrinter 4.0 are
trademarks of ArcSoft, Inc.
≥Microsoft®, Windows®, Windows Messenger®
and DirectX® are either registered trademarks
or trademarks of the Microsoft Corporation in
the United States and/or other countries.
≥Intel®, Pentium® and Celeron® are the
registered trademarks or trademarks of the Intel
Corporation.
≥All other names, company names, product
names, etc. in these instructions are the
trademarks or registered trademarks of their
respective corporations.
≥The names of the products you are using may
differ from the names given in the text.
Depending on the operating environment and
other factors, the contents of the screens used
in these instructions may not necessarily match
what you will see on your screen.
≥Although the screens in these Operating
Instructions are shown in English for the sake of
example, other languages are supported as
well.
≥These instructions do not cover the basic
operations of the personal computer or define
any terms. For this information, refer to the
Operating Instructions which accompany your
personal computer.
≥Do not disconnect USB Connection Cable while
the operation light of Camcorder is on. It may
freeze the software or destroy the data in
transfer.
≥We recommend using the AC adaptor as the
power source for the Camcorder when using
USB Connection Kit. Data may be lost If the
battery power is lost while transferring data.
≥If the Camcorder is used as a Web Camera
while virus checking software is running, the
Camcorder’s operation may stop midway
through. In this case, exit the Windows
Messenger, reconnect the Camcorder and
restart the Windows Messenger.
≥Do not delete the folders in Memory Card such
as picture folder. Memory card may not be
recognized if folders are deleted.
≥When the Camcorder is switched to the PC
Mode while it is connected to the personal
computer, “PC ACCESSING” is displayed on
the Camcorder and the operation mode of the
Camcorder cannot be switched. In this case,
disconnect the USB Connection Cable. Switch
the operation mode of the Camcorder and
reconnect the Cable.
≥If the Camcorder is connected in the PC Mode,
the [Removable Disk] icon representing the
Memory Card drive is displayed in
[My Computer].
≥When the Tape Recording Mode of the
Camcorder is switched to the PC Mode, a
warning message may be displayed. You may
simply ignore it.
≥When you are using Windows XP or Windows
2000, you may install or uninstall this software
after logging ON by setting the user name to
Administrator or to a user name having
equivalent authority.
≥If you use Windows 98SE, the message, “File is
not found” may be displayed when the
Camcorder is connected for the first time. Enter
the following paths to complete the connection:
If the message “MTDV98M3.pdr is not found” is
displayed, enter
“C:\WINDOWS\system\IOSUBSYS”. If the
message “MTDV98M3.sys is not found” is
displayed, enter
“C:\WINDOWS\system32\DRIVERS”.
(The paths will differ depending on the
environment of your personal computer.)
≥If you install the USB Driver while the USB
Connecting Cable is being connected, or if you
do not follow these Operating Instructions, the
Camcorder will not be recognized correctly. In
this case, delete the USB Driver from
[Device Manager] as described below, uninstall
the USB Driver, and re-install it.
1 Set the Camcorder to Tape Recording Mode
or Tape Playback Mode, connect it to the
personal computer, and delete
[USB Video Device] (or [Panasonic DVC DV
Stream Device]) from [Device Manager].
2 Set the Camcorder to PC Mode and delete
[Panasonic DVC USB Storage] (Windows
98SE).
69
PV-GS400Eng.book 70 ページ
2004年6月4日 金曜日 午後3時17分
With a PC
ª About the SD Memory Card and
MultiMediaCard
SD Memory Card
The SD Memory Card is virtually the same size as
a MultiMediaCard. It is an external Memory Card
that is available in larger capacities. It has a write
protect switch to prevent data writing and card
formatting, as well as a copyright protection
function.
≥SD Logo is a trademark.
MultiMediaCard
The MultiMediaCard is a compact, lightweight
and removable external Memory Card.
ª About the folder structure when using
the Memory Card in a personal
computer
≥When a Card with data recorded on it is inserted
into a personal computer, folders will be
displayed as in the figure.
16
16
DCIM
DCIM
100CDPFP
≥All other company and product names in the
operating instructions are trademarks or
registered trademarks of their respective
corporations.
Files recorded on a SD Memory Card or
MultiMediaCard
It may not be possible to play back the files on
this Camcorder recorded on and created by other
equipment or vice versa. For this reason, check
the compatibility of the equipment in advance.
ª About the compatibility of the card
files
Data files recorded on an “SD Memory Card” or a
“MultiMediaCard” by this Camcorder conform with
DCF (Design rule for Camera File system)
established by JEITA (Japan Electronics and
Information Technology Industries Association).
≥If you attempt to play back files recorded with
this Camcorder on other equipment or to play
back files recorded with other equipment on this
Camcorder, you may not be able to play them
back. Please check the compatibility with the
other equipment in advance.
70
100CDPFP
IM01CDPF
MISC
MISC
PRIVATE
VTF
TITLE
TITLE
[100CDPFP]: The images (IMGA0001.JPG,
etc.) in this folder are recorded in
the JPEG format.
[MISC]:
Files in which DPOF Data has
been set to the image are in this
folder.
[TITLE]:
This contains the data of the
original titles (USR00001.TTL,
etc.).
≥[DCIM], [IM01CDPF], [PRIVATE], [VTF], etc.
are necessary items in the folder structure. They
have nothing to do with actual operations.
≥In Card Mode, the Camcorder automatically
saves file numbers (IMGA0001.JPG, etc.) along
with the images. The file numbers are recorded
with each image as consecutive numbers.
≥When using the software without indication
function, indication data, such as date, are not
displayed. Depending on the software in use,
the date and the time may not be displayed
correctly.
≥The memory capacity indicated on the SD Card
label corresponds to the total card capacity.
Some of this capacity is used to protect and
manage the copyright data, and not all capacity
is available as conventional memory for a
Camcorder, personal computer or others.
PV-GS400Eng.book 71 ページ
2004年6月4日 金曜日 午後3時17分
Others
Others
Indicators
Various functions and Camcorder status are
shown on the screen.
r:
Remaining Battery Power
≥When the battery power becomes low, the
Indicator changes. When the battery is
discharged completely, the u (v)
Indicator flashes.
R0:45:
Remaining Tape Time
≥Remaining tape time is indicated in minutes.
(When it reaches less than 3 minutes, the
indicator starts flashing.)
:
Tape Recording Mode -27:
Tape Playback Mode -44:
Card Recording Mode -29:
Picture Playback Mode -47PC Mode -59PC :
WIDE:
Wide Function -35PRO.CINE:
Pro-Cinema Function -35FRAME:
Frame Mode -28CINEMA:
Cinema Mode -35D.ZOOM:
Digital Zoom -32MULTI:
Multi Mode -41P-IN-P:
P-IN-P Mode -41WIPE:
Wipe Mode -41MIX:
Mix Mode -41STROBE:
Strobe Mode -41TRAIL:
Trailing Effect Mode -41MOSAIC:
Mosaic Mode -41MIRROR:
Mirror Mode -41STRETCH:
Stretch Mode -41SLIM:
Slim Mode -41NEGA:
Negative Mode -42SEPIA:
Sepia Mode -42B/W:
Black & White Mode -42SOLARI:
Solarisation Mode -42(PB) ZOOM:
Playback Zoom -46SP:
Standard Play Mode (Recording
Speed Mode) -26LP:
Long Play Mode (Recording
Speed Mode) -26INDEX:
Index signal recording -46S 1:
Search Number -46MZ:
Manual Zoom Mode -315k:
Zoom Magnification Indication
-31-
AUTO:
MNL:
AELOCK
:
EIS:
MEGA EIS:
MIC, AV IN:
12 bit, 16 bit:
MF:
Automatic Mode -27Manual Mode -35AE Lock Mode -39Image Stabilizer -32MEGA Image Stabilizer -29Audio Dubbing Input Display -53Audio Recording Mode -26Manual Focus -38-
ª:
5:
7:
4:
Back Light Mode -33Sports Mode (Program AE) -35Portrait Mode (Program AE) -35Low Light Mode (Program AE)
Ω:
º:
Spotlight Mode (Program AE) -35Surf & Snow Mode (Program AE)
REC:
PAUSE:
:
:
Recording -27Recording Pause -27Self-Timer Recording -31When connecting the Magic Wire
Remote Control with Narration
Mic to [REMOTE] Jack and the
[TALK] Button is pressed, this
indicator appears. -28External microphone supported
by the Smart Accessory Shoe -12External microphone supported
by the Smart Accessory Shoe
(LOW CUT) -22Playback -44Still Playback -45Fast-forward/Cue Playback -44Rewind/Review Playback -44Slow Motion Playback -45Still Advance Playback -45Index Search -46Recording Check -27Audio Dubbing -53Audio Dubbing Pause -53Blank Search -28Repeat Playback -79Variable Speed Search -45When you adjust shutter speed
manually, this indicator appears.
-35-
-36-
:
LOW CUT:
!:
;:
%:
&:
~, }:
";, ;!:
*, ):
CHK:
A.DUB !:
A.DUB ;:
BLANK:
R !:
2k%:
1/500:
-37-
SLIDE!:
SLIDE;:
F1.7:
Slide Show Playback -48Slide Show Playback Pause -48When you adjust the F Number
manually, this indication appears.
1:
White Balance Adjustment Mode
-38-36-
z:
{:
Outdoor Mode -36Indoor Mode (recording under
incandescent lamp) -36MAGICPIX:
Advanced MagicPix Function -340LUX MAGICPIX:
0 Lux MagicPix Function -34Zoom Microphone -32Z.MIC :
WIND CUT:
Wind Noise Reduction -34Zebra Pattern -39ZEBRA :
Picture Adjustment -39P·ADJ :
æ:
Progressive Photoshot Mode -28Tele Macro -32T.MACRO :
71
PV-GS400Eng.book 72 ページ
2004年6月4日 金曜日 午後3時17分
Others
SOFT SKIN :
PICTURE:
TITLE:
WEB
:
Soft Skin Mode -34Picture -47Title picture -49WEB CAMERA Mode (recording)
-60-
WEB
:
WEB CAMERA Mode (playback)
-60-
PRINT (Highlighted):
PictBridge Mode -56VOLUME:
Volume adjustment -443:30:45PM:
Date/Time Indication
N (F, E):
Photoshot Picture Quality (during
Photoshot recording)
[F] means Fine, [N] means
Normal and [E] means Economy.
-30-
0:
Remaining Number of Photoshot
pictures
:
RapidFire Consecutive Photoshot
Recording -30:
Lock Setting -50¥ (White):
DPOF Setting completed (set to
1 or more picture) -502288 :
[2288k1728] Image size
[1600k1200] Image size
1600 :
[1280k960] Image size
1280 :
[640k480] Image size
640 :
≥For images not recorded with this Camcorder,
the size display is determined as follows
according to the number of horizontal pixels.
640 or more, less than 800 (The
640 :
size is not displayed at under
640 pixels.)
800 or more, less than 1024
SVGA :
1024 or more, less than 1280
XGA :
1280 or more, less than 1600
SXGA :
1600 or more, less than 2048
UXGA :
2048 or more
QXGA :
PICTURE (Cyan): Photoshot Mode
While Photoshot recording is
PICTURE (Red):
activated
PICTURE (Green): While the card is being read
PICTURE (Red):
An unauthorized card is inserted.
ß:
Flash turned on -40ßi:
Flash (setting to [i]) -41ßj:
Flash (setting to [j]) -41ßA:
Flash (setting to [AUTO]) -40ßAi:
Flash (setting to [i] and [AUTO])
-40-, -41ßAj:
Flash (setting to [j] and [AUTO])
-40-, -41:
Video Flash turned off (when
lighted yellow, the Flash Sensor
determined that the light is
needed) -40-, -78£:
Red Eye Reduction -41-
72
ª To Change the Counter Display Mode
By changing [C.DISPLAY] on the [DISPLAY]
Sub-Menu, you can change the Counter Display
Mode to Tape Counter Indicator [COUNTER]
(0:00.00), Memory Counter Indicator [MEMORY]
(M0:00.00), or Time Code Indicator [TIMECODE]
(0h00m00s00f). (-23-) By repeatedly pressing the
[DISPLAY] Button on the Remote Controller, you
can change the Counter Display Mode.
≥You cannot reset the counter when the
[C.DISPLAY] is set to [TIME CODE].
ª To Display Date/Time Indicator
To display Date/Time Indicator, set the
appropriate Date/Time in [DATE/TIME] on the
[DISPLAY] Sub-Menu. (-23-)
You can also press the [DATE/TIME] Button of
the Remote Controller repeatedly to display or
change the Date/Time Indicator.
ª To Change the Display Mode
By changing [DISPLAY] on the [DISPLAY]
Sub-Menu, you can change the Display Mode to
All Function Display [ALL] and Minimum Display
[OFF]. (-23-)
ª Progressive Photoshot
You cannot use the Progressive Photoshot
Function in the following cases.
When using Tape Recording Mode
≥Digital Effect Modes in [EFFECT1]
≥Digital Zoom range
≥1/750 s or faster shutter speed
≥When the Iris is [6dB] or more
≥Frame Mode
≥Wide/Pro-Cinema Mode
≥When the [ ] Indication is displayed and the
brightness of the subject is insufficient
≥When the MagicPix Function is ON
≥When Portrait Mode is used
Initializing the Modes
You can change the Menu settings back to the
shipping condition.
1 Set [TAPE RECORDING MENU] or
[CARD RECORDING MENU] >> [INITIAL] >>
[INITIAL SET] >> [YES].
≥Initializing takes a little while.
≥After initializing is completed, the
[COMPLETED] Indicator appears.
≥Initializing will not erase the clock setting (-26-)
that has been adjusted.
PV-GS400Eng.book 73 ページ
2004年6月4日 金曜日 午後3時17分
Others
Warning/Alarm Indicators
If any one of the following indicators lights up or
flashes, please check the condition of the
Camcorder.
3DEW (DEW DETECT/EJECT TAPE):
Condensation has occurred. -83Y (CHECK REC TAB):
The accidental erasure prevention switch on
the inserted Cassette is open (that is, set to
[SAVE]).
You are attempting Audio dubbing or Digital
dubbing on a Tape while setting the
accidental erasure prevention switch to
[SAVE].
Y (TAPE NOT INSERTED):
No Cassette in inserted. -186 (LOW BATTERY):
The Battery is low. Recharge it. -160: The built-in battery is low. -26: (NEED HEAD CLEANING):
The video heads are dirty. -832END (TAPE END):
The Tape came to an end during recording.
REMOTE (CHECK REMOTE MODE):
Wrong Remote Controller Mode has been
selected. -16UNPLAYABLE TAPE
(OTHER FORMAT):
You are attempting to play back a tape
section that has been recorded with a
different TV system.
UNABLE TO A.DUB
(LP RECORDED):
Because the original recording was done in
LP Mode, audio dubbing cannot be
performed.
INCOMPATIBLE TAPE:
This cassette is incompatible.
PUSH THE RESET SWITCH:
Irregular mechanism is detected. Use
projection on the Lens Cap to press the
[RESET] Button (-13-). This may solve the
problem.
CARD FULL:
Card does not have sufficient memory
remaining.
Select Picture Playback Mode and delete
unnecessary files.
NO CARD:
Card is not inserted.
NO DATA:
There are no recorded files on the Card.
UNPLAYABLE CARD:
You are attempting to play back data which
is not compatible with this Camcorder.
CARD ERROR:
The Card is not compatible with this
Camcorder.
COPY INHIBITED:
Because the media is protected by a copy
guard, images cannot be recorded correctly.
CANNOT USE USB
CHANGE MODE:
The USB Cable is connected to the
Camcorder in Card Recording Mode.
CANNOT OPERATE:
You are attempting to turn the Camcorder
off while connecting the USB Cable to the
Camcorder.
You are attempting to record pictures on a
Card while connecting the USB Cable to the
Camcorder in Tape Recording/Playback
Mode.
UNABLE TO WRITE
(MULTI RECORDING):
The [PHOTO SHOT] Button is pressed
when you are recording pictures on a Tape
while setting the Digital Effect [MULTI] of
[EFFECT1].
UNABLE TO WRITE:
The [PHOTO SHOT] Button is pressed
when you are recording on a Tape and
while inserting a Title.
NO TITLE:
Titles are not recorded.
UNABLE TO INSERT TITLE:
You are attempting to perform Title In
Function when RapidFire Consecutive
Photoshot function is set.
UNABLE TO WRITE
(WIDE MODE):
You are attempting to record S1 signal
pictures (with aspect ratio 16:9) by pressing
the [PHOTO SHOT] Button.
FILE LOCKED:
You are attempting to erase protected files.
CARD LOCKED:
The write protection switch on the SD
Memory Card is set to [LOCK].
DISCONNECT USB CABLE:
You are attempting to turn the Mode Dial in
PC Mode while connecting the USB Cable
to the Camcorder.
PC DOES NOT SUPPORT USB2.0:
In the MotionDV STUDIO Mode, your
personal computer does not support USB
2.0 Hi-Speed.
CAN NOT USE USB:
You are attempting to connect the USB
Cable while the DV Cable is connected.
73
PV-GS400Eng.book 74 ページ
2004年6月4日 金曜日 午後3時17分
Others
CAN NOT OPERATE
(AE LOCK MODE):
You are attempting to press the
[ADVANCED MAGICPIX] Button with
setting the [AUTO/MANUAL/AE LOCK]
Switch to [AE LOCK].
UNABLE TO WRITE
(WIDE/PRO CINEMA MODE):
You are attempting to press the
[PHOTO SHOT] Button with setting the
Wide/Pro-Cinema Function in Tape
Recording Mode.
CHANGE TO 640k480:
You are attempting to use the function to
record still pictures which is not available
unless the [PICTURE SIZE] is set to
[640k480].
PRINTER ERROR:
Check the connected printer.
THERE IS NO INK:
There is no ink. Check the connected
printer.
THERE IS NO PAPER
There is no paper. Check the connected
printer.
Notes and Hints
ª Concerning the Power Supply
≥When the Camcorder is used for a long time,
the Camera body becomes warm, but this is not
a malfunction.
≥If the [CHARGE] Lamp does not light up
although the Battery is attached to the AC
Adaptor, detach the Battery and reattach it.
ª Inserting/Removing the Cassette
≥In the case of using a previously recorded
Cassette, you can use the Blank Search
Function to find the position where you want to
continue recording.
≥If a new Cassette is inserted, rewind to the
beginning of the tape before starting recording.
≥When inserting the cassette, make sure it faces
in the right direction and then push it in until it
stops.
≥When the Cassette Holder is in action, do not
touch anything except the [PUSH] mark.
≥When closing the Cassette Compartment
Cover, do not get anything caught in the cover,
such as a cable of the Magic Wire Remote
Control with Narration Mic.
ª Alarm Sounds
When [BEEP SOUND] on the [INITIAL]
Sub-Menu on the [TAPE RECORDING MENU] or
the [TAPE PLAYBACK MENU] is set to [ON],
confirmation/alarm beeps are issued as follows.
1 Beep
≥When you start recording
≥When you switch the [OFF/ON] Switch from
[OFF] to [ON]
2 Beeps
≥When you pause recording
2 Beeps 4 times
≥If you perform a wrong operation before or
during recording.
ª Recording Check
≥For Recording Check, the recording speed
mode (SP/LP) must be the same as the mode
used for the recording. If different, playback
images will be distorted.
ª Frame Moving Pictures (Frame Mode)
≥It is not possible to use the digital modes of
[EFFECT1]. (-41-)
≥Set [REC MODE] to [NORMAL] for regular
recording.
≥When the [PICTURE SIZE] is set to
[1280k960], you cannot set to the Frame Mode.
74
PV-GS400Eng.book 75 ページ
2004年6月4日 金曜日 午後3時17分
Others
ª Recording on a Card
≥Pictures with wide-screen format signals cannot
be copied.
≥When the color of the screen changes or blurs,
adjust the shutter speed manually to 1/60 or
1/100.
Photoshot
≥When you record pictures in the Tape
Recording Mode, the brightness of the picture
may differ from the one recorded in the Card
Recording Mode.
≥Sound cannot be recorded.
≥The file format supported by this Camcorder is
JPEG.
≥If [NORMAL] or [ECONOMY] is selected for
recording, mosaic-pattern noise may appear on
a playback image depending on the image
content.
≥It may not be possible to play back a mega-pixel
still-picture recorded by this Camcorder with
another Camcorder.
≥When there is a high-contrast object ahead or
behind the subject in the focus area, the subject
may not be in focus. In this case, move the
high-contrast object out of the focus area.
≥When the Picture size is set to [2288k1728],
[1600k1200] or [1280k960], the scene around
the subject can be recorded wider than that in
[640k480].
≥When the [PICTURE SIZE] is set to [1280k960]
in the Tape Recording Mode, the effect set in
Fade In/Out Function cannot be recorded on the
recorded still pictures.
To record still pictures clearly
≥When zooming in on the subject with
magnification of k4 to k12 or higher, it is
difficult to reduce slight jitters when holding the
Camcorder by hand. We recommend
decreasing the zoom magnification and
approaching the subject when recording.
≥When recording still pictures, hold the
Camcorder firmly with your hands and keep
arms stationary at your side to ensure you do
not shake the Camcorder.
≥You can record stable pictures without jitter
using a tripod and the Remote Controller.
About the Shutter Chance Mark
≥The Shutter Chance Mark does not appear in
manual focus mode.
≥When the subject is not easily focused, focus on
the subject manually.
≥You can record still pictures on the card even if
the Shutter Chance Mark does not appear.
However, images may be recorded without
being focused.
≥The Shutter Chance Mark does not appear or
may not be displayed in the following cases.
≥When the zoom magnification is high.
≥When the Camcorder is shaken.
≥When the subject is moving.
≥When the subject stands against the light
source.
≥When close subjects and far subjects are
included in the scene.
≥When the scene is dark.
≥When there is a bright part in the scene.
≥When the scene is filled with only horizontal
lines.
≥When the scene lacks contrast.
RapidFire Consecutive Photoshot
≥One more still picture may be recorded after you
release the [PHOTO SHOT] Button.
≥The RapidFire Consecutive Photoshot and Title
Function cannot be used simultaneously.
≥When the [SELF TIMER] is set to [ON], the
Camcorder records the maximum number of
pictures recordable depending on the
[BURST MODE] setting.
≥When using a card formatted by other
equipment, intervals between pictures may
become large.
≥If recording or erasing pictures is repeated
many times, intervals between pictures may
become large. In this case, back up your
important data on a PC, and format your card
using this Camcorder.
≥Intervals between recording pictures may
become large depending on the card. We
recommend using a Panasonic SD Memory
Card.
≥When the [PICTURE SIZE] is set to
[1280k960]/[1600k1200]/[2288k1728], the
RapidFire Consecutive Photoshot cannot be
used.
ª Quick Start
≥About half the amount of electricity used in
normal recording is consumed during the Quick
Start Standby Mode. Therefore, the available
recording time will be shortened when you
activate the Quick Start Standby Mode.
≥When the Camcorder is left in the Recording
Pause Mode for 5 minutes, it will switch to the
Quick Start Standby Mode. To turn the
Camcorder on again, set the [OFF/ON] Switch
to [OFF] and then set it to [ON] again. (The
Quick Start Mode will be restored.)
≥This Function is not activated in the following
cases:
≥A tape and a card are not inserted while in
Tape Recording Mode.
≥A card is not inserted, while in Card
Recording Mode.
75
PV-GS400Eng.book 76 ページ
2004年6月4日 金曜日 午後3時17分
Others
≥When you rotate the Mode Dial or remove the
battery, Quick Start Recording Lamp is turned
off and Quick Start Mode is canceled. However,
if the Camcorder is turned on and the
Tape/Card Recording Mode is set, the Lamp
turns on and Quick Start Mode is restored.
≥If the [QUICK START] Button is pressed and
held for approximately 2 seconds during the
Quick Start Standby Mode, the Lamp will go off
and the Camcorder will be completely turned
off.
≥If the Camcorder is not operated for
approximately 30 minutes when the Quick Start
Recording Lamp lights, the Lamp will go off and
the Camcorder will be completely turned off.
≥In the Automatic White Balance Mode, the color
may be recorded unnaturally at the beginning of
the recording.
≥The zoom magnification differs from when it is in
the Quick Start Standby Mode and when the
recording starts.
ª Zoom Microphone Function
ª Self-timer Recording
ª Backlight Compensation Function
≥When [BEEP SOUND] on the [INITIAL]
Sub-Menu is set to [ON], the beep sound will be
emitted along with Recording Lamp flashing in
the Self-timer Standby Mode.
≥By operating the [OFF/ON] Switch, Mode Dial or
Recording Start/Stop Button, the Self-timer
Standby Mode is cancelled.
≥In the Card Recording Mode, the
[PHOTO SHOT] Button does not work even if it
is pressed halfway. However, the subject is
focused in the Focus Area.
ª Zoom In/Out Functions
≥When you are zooming in on a faraway subject,
a sharper focus is achieved if the recording
subject is 4 feet (1.2 meters) or further from the
Camcorder.
≥When the MagicPix Functions are activated or
the Shutter speed is set to 1/15 or lower, the
zoom operation with the Multi Manual Ring is
disabled.
ª Tele-Macro Function
≥The Tele-Macro Function cannot be started
during recording.
≥When the [D.ZOOM] is set to [30k] or [700k],
the Tele-Macro Function with a magnification
greater than 12k is available.
≥If a sharper focus cannot be achieved, adjust
the focus manually.
In the following cases, the Tele-Macro
Function is cancelled.
≥The zoom magnification becomes lower than
12k.
≥Setting the [OFF/ON] Switch to [OFF].
76
≥The Zoom Microphone Function may not work
effectively if the surrounding noise is too loud.
≥Does not work with an external microphone.
ª Digital Zoom Function
≥As the magnification of digital zoom increases,
the quality of image may deteriorate.
≥White balance cannot be set in the digital zoom
range.
ª Image Stabilizer Function
≥When you press the [PHOTO SHOT] Button
halfway in the Card Recording Mode, the Image
Stabilizer Function works more effective.
([ MEGA EIS] Indication appears.)
≥When a tripod is used, it is recommended that
you turn the Image Stabilizer off.
≥Within the digital zoom range, or when
recording with a conversion lens (not supplied)
attached, the Image Stabilizer Function may not
work effectively.
≥When setting the Iris manually, the Backlight
Compensation Function does not work.
≥By operating the [OFF/ON] Switch, the
Backlight Compensation Function is cancelled.
ª MagicPix Functions
≥In a bright place, such as outdoors, the
recorded picture may become whitish.
≥In a dark place, the recorded picture is
presented in a time-lapse-like manner.
≥Adjust the Focus manually.
≥The Progressive Photoshot Function is
automatically turned off.
≥In the Card Recording Mode, using the
MagicPix Functions is not possible.
≥When the [PICTURE SIZE] is set to [1280k960]
in the Tape Recording Mode, the Photoshot
recording is disabled.
≥When using the MagicPix Functions, you cannot
use the Built-in Flash.
≥The shutter speed cannot be adjusted.
≥The Program AE or Digital Effect Modes in
[EFFECT1] cannot be set.
≥When recording with the MagicPix Functions, it
is recommended that you use a tripod.
≥The MagicPix Functions make the signal
charging time of CCD longer up to 16 times
longer than usual, so that the dark scenes that
are invisible to the naked eyes can be recorded
brightly. For this reason, bright dots may be
seen, but this is not a malfunction.
≥The White Balance setting, the Soft Skin
Function and the Backlight Compensation
Function cannot be changed.
PV-GS400Eng.book 77 ページ
2004年6月4日 金曜日 午後3時17分
Others
ª Wind Noise Reduction Function
≥Does not work with the microphone on the
Magic Wire Remote Control with Narration Mic
nor an external microphone.
≥When it is set to [ON], directivity of microphone
is regulated depending on the strength of wind
to reduce wind noise.
ª Wide/Pro-Cinema Function
≥You cannot use these modes when recording
on the card.
≥The Wide/Pro-Cinema Mode cannot be used
simultaneously with the following functions.
≥Progressive function
≥Cinema Mode
≥The Pro-Cinema Mode cannot be used
simultaneously with the following functions.
≥Digital Effect Function 1
≥MagicPix Functions
≥When the Pro-Cinema Mode is set, the
[REC MODE] is set to [FRAME] and the
[BASS ENHANCE] is set to [6dB] automatically.
≥When you use a TV with an aspect ratio of 4:3,
using the Wide/Pro-Cinema Mode is not
recommended. (The image will be stretched
vertically.)
ª Cinema Function
≥Using the Cinema Mode does not widen the
recording angle.
≥If you play back a tape recorded in Cinema
Mode on a wide-screen (16:9) format TV,
playback size is automatically adjusted to fit the
TV screen format. Please refer to the TV’s
operating instructions for details.
≥When images are displayed on a TV screen, the
Date/Time Indication may be erased in some
cases.
≥Depending on the TV, the picture quality may be
lower.
≥Cinema Mode is cancelled when a Title is
displayed.
≥Cinema Mode and the Title Creation cannot be
used simultaneously.
≥Using Cinema Mode deactivates [MULTI] and
[P-IN-P] of [EFFECT1].
≥Depending on the software in use, the imported
Cinema picture may not be displayed correctly.
ª Program AE
≥If any of the Program AE Modes are selected,
you cannot adjust the shutter speed (-37-) or iris
(-38-).
≥Using the MagicPix Functions cancels any of
the Program AE modes.
Sports Mode
≥During normal playback, the image
movement may not look smooth.
≥Because the color and brightness of the
playback image may change, avoid recording
under fluorescent light, mercury light or
sodium light.
≥If you record a subject illuminated with strong
light or a highly reflective subject, vertical
lines of light may appear.
≥If the light is insufficient, the [5] Indicator
flashes.
Sports Mode/Portrait Mode
≥If you record a still picture in Progressive
Photoshot Mode, the brightness and hue of
the recorded still picture may become
unstable.
≥If this mode is used for indoor recording,
playback images may flicker.
Low Light Mode
≥Extremely dark scenes may not be able to be
made brighter to a satisfactory degree.
Spotlight Mode
≥With this mode, recorded images may
become extremely dark.
≥If the subject is extremely bright, its recorded
image may become whitish.
Surf & Snow Mode
≥If the subject is extremely bright, its recorded
image may turn out to be whitish.
ª White Balance
In the following cases, you cannot change
White Balance:
≥When you set [EFFECT2] to [SEPIA] or to
[B/W].
≥When you set the Zoom to 12k or higher.
≥During Digital Still Picture Mode.
≥When you display a Menu.
≥When you use the MagicPix Mode.
In the following cases, the [1] Indicator
flashes:
≥The flashing indicates that the previously
adjusted White Balance setting is still active.
This setting will be kept until White Balance is
adjusted again.
≥You may not be able to achieve correct White
Balance Adjustment manually under weak
illumination.
ª Manual Shutter Speed Adjustment
≥You may see vertical lines of light in the
playback image of a brightly shining subject or
highly reflective subject.
≥During normal playback, movement in the
images may not look smooth.
≥Because the color and brightness of the
playback image may become unstable, avoid
recording under fluorescent light, mercury light
or sodium light.
77
PV-GS400Eng.book 78 ページ
2004年6月4日 金曜日 午後3時17分
Others
≥If you are using MagicPix Mode (-34-) or
Program AE Mode (-35-), you cannot adjust the
shutter speed.
Card Slow Shutter Mode
≥The subject may not be focused in dark scenes
with less luminance or scenes with less
contrast.
≥Buttons cannot be activated except the
[OFF/ON] Switch, the Mode Dial and the
[AUTO/MANUAL/AE LOCK] Switch while the
Camcorder is focusing on the subject.
≥When you take a picture of people at night, you
can achieve adequate brightness for both the
people and the background in the picture by
using the flash in the Card Slow Shutter Mode.
ª Manual Iris Adjustment
≥Depending on zoom magnification, there are iris
values that will not be displayed.
≥If you are using MagicPix Mode (-34-) or
Program AE Mode (-35-), you cannot adjust the
iris.
≥If you attempt to adjust the Shutter Speed after
setting the Iris, the value set for the Iris will be
canceled.
ª Recording with Fixed Brightness
(AE Lock)
≥If you rotate the Mode Dial after the AE Lock is
set, the setting values may be changed.
≥When the AE Lock function is set and you
record the subject with the flash activated, the
shutter speed is fixed to 1/500 even if you set it
to 1/750 or more.
≥You cannot use the MagicPix Functions.
ª Advanced Functions
Zebra Pattern
≥When the Surf & Snow Mode of Program AE or
Backlight Compensation is used, the Zebra
Pattern no longer serves as the general
reference for adjusting the brightness.
≥When the Zebra Pattern appears on a face of a
person wearing a white shirt, and if you adjust
the Zebra Pattern on the white shirt to make it
disappear, the face of the person recorded may
become too dark.
Picture Adjustment
≥You cannot use the Picture Adjustment when
setting the Digital Effect 2.
≥You cannot use the Picture Adjustment when
the [AUTO/MANUAL/AE LOCK] Switch is set to
[AUTO].
78
≥Settings once performed will remain valid so
long as the [AUTO/MANUAL/AE LOCK] Switch
is set to [MANUAL]. It is therefore
recommended that the Picture Adjustment be
checked prior to recording at the [MANUAL]
setting.
Microphone Sensitivity Level
≥When this setting is changed, the
[AUDIO LEVEL] setting on the [RECORDING]
Sub-Menu of the [TAPE PLAYBACK MENU] will
likewise be changed.
≥If the last three Bars of the [LEVEL (MIC)]
Indication light red, the sound is distorted.
Select a lower setting for [GAIN] or set [MODE]
to [AUTO] or [MNL (AGC)].
≥It is recommended that you check through the
headphones before recording to ensure that the
sound is not distorted.
Bass Enhancer
≥It can be activated only when you use the
built-in microphone.
≥In Tape Playback Mode, it can be activated only
when you use Audio Dubbing Function with the
built-in microphone.
≥When you use the Pro-Cinema Function, it is
fixed to [6dB].
ª Using the Auto Pop-up Flash
≥The available range of the Flash is
approximately 3 to 7.5 feet (1 to 2.5 meters) in a
dark place. Pictures will appear dark when they
are recorded using the Flash at distances
greater than 7.5 feet (2.5 meters).
≥Object of recording may appear dark if Flash is
lighted in front of white background.
≥Using the Flash fixes the shutter speed of 1/750
s or faster to 1/500.
≥Do not carry the Camcorder with the Flash
popped up.
≥Do not cover the flash with your hand.
≥In the following cases, using the Flash is not
possible:
≥While Recording
≥Demo Mode -23≥Multi-Picture Mode -42≥RapidFire Consecutive Photoshot Function
-30-
≥MagicPix Function -34≥When the Color Bar is displayed.
≥The picture may become out of focus in a dark
place. In this case, adjust the focus manually.
≥Tele Conversion Lens (not supplied) or Wide
Conversion Lens (not supplied) can block flash
light and may cause vignetting effect.
PV-GS400Eng.book 79 ページ
2004年6月4日 金曜日 午後3時17分
Others
≥The Camcorder, even when its Flash has been
turned off, automatically determines whether the
flash light is necessary or not by detecting the
ambient brightness. (If it determines that the
flash light is necessary, the [ ] Indication is
displayed in yellow.)
≥When the [ß], [ßi], [ßj], [ßA], [ßAi] or [ßAj]
Indicator is displayed, the Flash can be lit.
(When flashing in white, the Flash is charging.)
When the [ ] Indication is displayed, the Flash
will not be lit.
≥Charging the Flash takes 4 seconds maximum
after lighting.
≥When the [P-IN-P] Button is pressed or Title is
created, Flash is also lit.
≥When the flash mode is set to Auto mode and
the Shutter Speed, Iris or Gain is adjusted, the
Indication ([ßA] etc.) may disappear and the
Video Flash may not be lighted.
Using the Video Flash (not supplied)
≥Using the Flash outdoors or with backlight or
other bright conditions may result in white
blotches (color blotches) on the pictures. In this
case, either adjust the iris manually or use the
Backlight Compensation Function.
≥Using the Video Flash (not supplied) enables
you to record still pictures farther than 8 feet
(2.5 meters) in a dark place. The available
range is approximately 3 to 13 feet (1 to
4 meters).
≥The Video Flash (not supplied) and the Auto
Pop-up Flash cannot be used simultaneously.
≥When using the Video Flash (not supplied), the
shutter speed, the iris and the white balance
become fixed.
≥When the Video Flash is ready, the [ß] Indicator
appears on the screen of the Camcorder.
≥The brightness of the Video Flash cannot be
adjusted.
≥Also refer to the operating instructions of the
Video Flash carefully.
ª Red Eye Reduction Function
≥Even if the [RED EYE] is set to [ON], you still
may get red eye phenomenon depending on the
recording condition.
ª Digital Effect Functions
≥If you have set [EFFECT2] to [B/W] or [SEPIA],
changing the selected White Balance Mode is
not possible. (-36-)
≥Setting the Cinema Mode cancels the
Picture-in-Picture Mode and the Multi-Picture
Mode.
≥During Digital Still Picture Mode, Digital Effect
Functions cannot be set.
≥When the [PICTURE SIZE] is set to [1280k960]
in the Tape Recording Mode, pictures cannot be
recorded with Photoshot although the Digital
Effect Functions are set.
In the following cases, using the [EFFECT1]
on the [DIGITAL] Sub-Menu is not possible.
≥When the MagicPix Mode is set (-34-)
In the following cases, using the Digital Effect
Function is not possible.
≥Title In
Multi-Picture Mode
≥If the [MULTI] Button is pressed while
self-recording Mirror Mode (-28-) is used, the still
picture is displayed from the upper right corner
of the screen, but, in reality, the picture is
recorded from the upper left corner as usual.
≥The quality of Multi images deteriorates slightly.
≥The top and bottom of Multi pictures will be cut
off slightly.
Picture-in-Picture Mode
≥If the Mode Dial is operated, the smaller picture
disappears.
≥Titles cannot be inserted into the smaller
picture.
Wipe Mode and Mix Mode
If one of the following operations is carried out,
stored images will be erased, and Wipe and Mix
Functions cannot be used.
≥Set another Digital Effect item.
≥Operate the [OFF/ON] switch or Mode Dial
≥Insert or eject a cassette
ª Playing Back
Repeat Playback
If you continue to press the [1] Button for
5 seconds or longer, the Camcorder switches to
Repeat Playback Mode, and the [R !] Indicator
appears. (To cancel Repeat Playback Mode, set
the [OFF/ON] Switch to [OFF].)
Listening to Playback Sound through
Headphones
If you want to use the headphones to listen to the
playback sound, set [AV JACK] to
[OUT/PHONES] and connect the headphones to
the [PHONES] Jack (-13-) on the Camcorder. In
this case, no sound (including warning and
shutter sounds) will be emitted through the built-in
speaker of the Camcorder.
Choosing Sound during Playback
You can select the sound setting by using the
[AUDIO OUT] setting on the [PLAYBACK]
Sub-Menu.
STEREO: Stereo Sound (main sound and sub
sound)
L:
Left channel sound (main sound)
R:
Right channel sound (sub sound)
79
PV-GS400Eng.book 80 ページ
2004年6月4日 金曜日 午後3時17分
Others
≥If you dub a tape recorded at [12bit] selected as
the [AUDIO REC] on the [RECORDING]
Sub-Menu, playback sound becomes stereo
sound regardless of the [AUDIO OUT] setting if
[12bit AUDIO] is set to [MIX].
ª Index Search Function
≥Index Search may not be possible at the
beginning of the tape.
≥Scene Index Search may not function properly if
the interval between 2 scene index signals is
less than 1 minute.
ª Playback Zoom Function
≥You cannot adjust the sound volume with the
Remote Controller in Playback Zoom Mode.
≥If you turn off the Camcorder power or if you
operate the Mode Dial, Playback Zoom Mode is
automatically cancelled.
≥Even if Playback Zoom Functions are being
used, images that are output from the DV
Terminal (-14-) are not enlarged.
≥As you enlarge an image, the quality of the
image deteriorates.
≥During Playback Zoom, the Variable Speed
Search Function cannot be changed with the
Remote Controller.
ª Playback Digital Effect Functions
≥Signals of images to which digital effects are
added during playback cannot be output from
the DV Terminal (-14-).
≥You cannot use the Wipe or Mix Function while
playing back the non-recorded portion of tape.
ª Playing Back a Card
≥The file format supported by this Camcorder is
JPEG. (Not all JPEG formatted files will be
played back.)
≥If a blank (nothing recorded) Card is played, the
screen becomes white.
≥If you attempt to play back a file recorded in a
different format or if file data is defective, the
whole display becomes bluish and the
[UNPLAYABLE CARD] Indicator may appear as
warning.
≥When playing back a picture recorded on other
equipment, its size and that of this Camcorder
may appear differently.
≥When playing back a picture recorded on other
equipment, the picture may not be played back
or the quality of pictures may be reduced.
≥When playing back a non standardized file, the
Folder File Number may not be displayed.
≥When changing the picture size to 640k480
with PC, black bars may appear, depending on
the playback device.
80
ª Slide Show
≥Playback time may take longer than usual
depending on the picture.
ª Creating a Title
≥If the [PICTURE SIZE] is set to a size other than
[640k480], a title cannot be created.
≥Even if the contrast of the Title is adjusted, the
portions where there is little difference between
light and dark and where the boundary between
light and dark is unclear may not appear.
≥The Title may not appear well if something small
is used for it.
≥If titles are created, the number of images that
can be recorded on a Card decreases.
≥If the number of images that can be recorded on
a Card is small, you may not be able to create a
title.
ª Adding a Title
≥The Title In Function and Digital Effects cannot
be used simultaneously.
≥The Title In Function and RapidFire
Consecutive Photoshot cannot be used
simultaneously.
≥When a title is displayed in Tape Playback
Mode, the title is not output from the DV
Terminal.
≥The Multi-Picture Mode cannot be used once
the title is inserted.
≥A full-colored title made on other equipment
cannot be played back or added to the picture
with this Camcorder.
≥A title with size other than 640k480 pixels
cannot be displayed.
≥When the title or the Multi screen is displayed,
recording and playback cannot be performed.
≥During external input or DV input, you cannot
use Title In Function or display titles on the Multi
screen. Select the desired titles to display them
on the screen before connecting the cable to the
Camcorder.
ª DPOF
≥Perform the DPOF Settings with your
Camcorder.
≥Verifying the DPOF Settings may take a little
time. Wait until the [ACCESS] Lamp goes out.
ª Lock Setting
≥The Lock Setting carried out by this Camcorder
is only effective for this Camcorder.
≥The SD Memory Card has a write protection
switch on it. If the switch is moved to the [LOCK]
side, you cannot write to or format the Card. If it
is moved back, you can.
PV-GS400Eng.book 81 ページ
2004年6月4日 金曜日 午後3時17分
Others
ª Playing Back on Your TV
≥Depending on your TV, nothing may be shown
even if you correctly connect the Camcorder
with your TV. In this case, set [AV JACK] on the
[AV IN/OUT] or [INITIAL] Sub-Menu to [OUT].
≥If you set [AV JACK] on the [AV IN/OUT]
Sub-Menu to [IN/OUT], nothing will be shown on
the TV screen except during playback.
≥Picture size may be displayed differently when
playing back a Cinema picture on a wide-screen
TV with Playback Digital Effect.
ª Audio Dubbing
≥The blank section of a tape cannot be dubbed.
≥Sounds sent through the DV Terminal cannot be
dubbed.
≥If a tape has a non-recorded portion when the
tape is dubbed, images and sounds may be
disturbed when this portion of the tape is played
back.
≥If you set the tape counter back to 0 at the
position where you want to stop Audio Dubbing
so as to make it possible to use the Memory
Stop Function (-88-), Audio Dubbing is
terminated automatically when the tape reaches
this position.
≥In the case of importing data recorded with
Audio Dubbing to a PC using the PC’s software,
only the original sound (ST1) may be imported,
depending on the software.
ª Using the DV Cable for Recording
(Digital Dubbing)
≥Regardless of the setting, digital dubbing is
carried out automatically in the same audio
recording mode as that of the playback
Cassette.
≥The images on the recorded monitor may be
disturbed, but it does not affect the recorded
images.
≥Even if Playback Digital Effects, Playback
Zoom, or Playback Title In have been used,
these effects are not output from the DV
Terminal.
≥Even if you use a device equipped with DV
Terminals, you may not be able to perform
Digital Dubbing in some cases.
≥Date or other information to be displayed cannot
be displayed if the software of the connected
equipment does not support the display
function.
≥You cannot record on a card when recording on
a tape from external input signals is in progress.
≥Disconnect the USB Cable since input signals
from external input terminal cannot be recorded
when the USB Cable is connected.
ª Recording the Contents of Other
Equipment
≥You cannot record on a card when recording on
a tape from external input signals is in progress.
Recording to a Card
If you set the Mode Dial to Card Recording Mode,
you can use the Photoshot function for external
input signals.
≥Black streaks may appear at the 4 edges of the
image.
Analog-Digital Conversion
≥When the Camcorder is connected with other
digital video equipment through its DV Terminal,
images recorded in analog form from other
external equipment can be output to the digital
video equipment through the DV Terminal.
≥To DV-output analog video signals sent from
other equipment, set [DV OUT] on the
[AV IN/OUT] Sub-Menu to [ON]. (Normally,
keep the [DV OUT] set to [OFF]. If it is set to
[ON], the quality of the image may be
disturbed.)
≥When using AV Cable and DV Cable (optional)
at the same time, detach the Grip Belt first for
easy connecting.
81
PV-GS400Eng.book 82 ページ
2004年6月4日 金曜日 午後3時17分
Others
Cautions for Use
ª After Use
1 Take out the Cassette. (-18-)
2 Set the [OFF/ON] Switch to [OFF].
3 Take out the Card. (-19-)
4 Detach the power supply and retract the
Viewfinder or the LCD Monitor. (-16-, -20-)
5 To protect the Lens, attach the supplied
Lens Cap.
ª Cautions for Use
When you use your Camcorder on a rainy or
snowy day or on a beach, make sure that no
water enters the Camcorder.
≥Water may cause the Camcorder or Cassette to
malfunction. (Irreparable failure may occur.)
≥If sea water splashes onto the Camcorder, wet
a soft cloth with tap water, wring it well, and use
it to wipe the camera body carefully. Then, wipe
it again thoroughly with a soft dry cloth.
Keep the Camcorder away from magnetized
equipment (such as a microwave oven, TV,
video game equipment, etc.).
≥If you use the Camcorder on or near a TV,
images or sounds may be disturbed due to
electromagnetic wave radiation.
≥Do not use near a cell phone because doing so
may cause noise to adversely affect the picture
and sound.
≥Recordings on the tape may be damaged, or
images may be distorted, by strong magnetic
fields created by speakers or large motors.
≥Electromagnetic wave radiation generated by a
microprocessor may adversely affect the
Camcorder, causing the disturbance of images
and sounds.
≥If the Camcorder is affected by magnetically
charged equipment and does not function
properly, turn off the Camcorder power and
detach the Battery or AC Adaptor and then
connect the Battery or AC Adaptor again.
Thereafter, turn on the Camcorder power.
Do not use your Camcorder near radio
transmitters or high-voltage cables.
≥If you record pictures near radio transmitters or
high-voltage cables, recorded images or sounds
may be adversely affected.
Do not use this Camcorder for surveillance
purposes or other business use.
≥If you use the Camcorder for a long period of
time, the internal temperature increases and,
consequently, this may cause malfunction.
≥This Camcorder is not intended for business
use.
82
When you use your Camcorder on a beach or
similar place, do not let sand or fine dust get
into the Camcorder.
≥Sand or dust may damage the Camcorder or
Cassette. (Care should be taken when inserting
and removing the Cassette.)
Do not spray insecticides or volatile
chemicals onto the Camcorder.
≥If the Camcorder is sprayed with such
chemicals, the camera body may be deformed
and the surface finish may peel off.
≥Do not keep rubber or plastic products in
contact with the Camcorder for a long period of
time.
Do not use benzine, thinner or alcohol for
cleaning the Camcorder.
≥The Camcorder body may be deformed and the
surface finish may peel off.
≥Before cleaning, detach the Battery or pull out
the AC Cable from the AC Jack.
≥Wipe the Camcorder with a soft dry cloth. To
remove stubborn stains, wipe with a cloth that is
soaked in a detergent diluted with water and
afterwards finish wiping with a dry cloth.
≥For storing or transporting the Camcorder, place
it in a bag or case lined with soft pads so as to
prevent the coating on the camera body from
being worn.
After use, be sure to take the Cassette out and
detach the Battery from the Camcorder or pull
out the AC Cable from AC Jack.
≥If the Cassette is left in the Camcorder, the tape
sags and deteriorates.
≥If the Battery is left in the Camcorder for a long
time, the voltage drops excessively, and the
Battery will not function even after it is
recharged.
ª About AC Adaptor
≥If the temperature of the Battery is extremely
high or extremely low, the [CHARGE] Lamp
may continue flashing, and the Battery may not
be charged. After the temperature of the Battery
has decreased or increased sufficiently,
charging starts automatically. If the [CHARGE]
Lamp continues to flash even after the Battery
temperature has decreased or increased
sufficiently, the Battery or AC Adaptor may be
faulty. In this case, please contact a dealer.
≥If the Battery is warm, charging takes a longer
time than normal.
≥If you use the AC Adaptor near a radio, radio
reception may be disturbed. Keep the AC
Adaptor 3 feet (1 meter) or more away from
radio.
≥When using the AC Adaptor, it may generate
whirring sounds. However, this is normal.
PV-GS400Eng.book 83 ページ
2004年6月4日 金曜日 午後3時17分
Others
≥After use, be sure to pull out the AC Cable from
the AC Jack. (If they are left connected, a
minute amount of current is consumed.)
≥Always keep the electrodes of the AC Adaptor
and Battery clean.
ª Condensation
If you turn the Camcorder on when there is
condensation on the head or the tape, the
Condensation Indicator [3 DEW] (yellow or red)
blinks on the Viewfinder or the LCD monitor and
the messages [DEW DETECT] or [EJECT TAPE]
(only when the tape is inserted) appear. In this
case, follow the procedure below.
Blinking in yellow:
Dew is slightly adhering to the head or the tape.
Blinking in red:
Dew is adhering to the head or the tape.
1 Remove the tape if it is inserted.
≥It takes about 20 seconds to open the
Cassette Holder. This is not a malfunction.
2 Leave the Camcorder with the Cassette
Compartment Cover closed to cool or warm
it to the ambient temperature.
When [3 DEW] blinks in yellow
≥You cannot use the Tape Recording/
Playback Mode. Leave the Camcorder for
about 30 minutes.
≥However, you can use the Card Recording
Mode or Picture Playback Mode when the
cassette is not inserted.
When [3 DEW] blinks in red
≥The Power Indicator Lamp blinks for about
1 minute and then the Camcorder
automatically turns off. Leave it for about
2 to 3 hours.
3 Turn the Camcorder on again, set it to the
Tape Recording/Playback Mode and then
check if the Condensation Indicator
disappears.
Especially in cold conditions, dew may be frozen.
In this case, it may take more time before the
Condensation Indication disappears.
Watch for Condensation even before the
Condensation Indicator is displayed.
≥The Condensation Indicator may not appear
depending on circumstances. When
condensation occurs on the lens or the
Camcorder, it also may occur on the head and
the tape. Do not open the Cassette
Compartment Cover.
When the Lens Is Fogged:
Set the [OFF/ON] Switch to [OFF] and leave the
Camcorder in this condition for about 1 hour.
When the lens temperature becomes close to the
ambient temperature, the fog disappears
naturally.
ª Video Head Clogging and Care
If the heads (the parts that make contact with the
tape) are dirty, mosaic-pattern noise may appear
on the playback image, or the screen as a whole
becomes black. If the heads are extremely dirty,
recording performance deteriorates, and, in the
worst case, the Camcorder cannot record at all.
Causes of Dirty Heads
≥Large quantity of dust in the air
≥High-temperature and high-humidity
environment
≥Damaged tape
≥Long operating hours
Using Mini-DV Format Digital Video Head
Cleaner
1 Insert the Head Cleaner into the Camcorder
in the same manner as a Video Cassette.
2 Press the [1] Button, and approximately
20 seconds later, press the [∫] Button. (Do
not rewind the tape.)
3 Take out the Head Cleaner. Insert a Video
Cassette and start recording. Then, play the
tape back to check the recorded image.
4 If the image is not still clear, repeat
Steps 1 to 3. (Do not use the Head Cleaner
3 times or more consecutively.)
Notes:
≥Do not rewind every time you use the Head
Cleaner. Rewind only when the tape reaches
the end, and then use it again from the
beginning in the same manner as before.
≥If the heads become dirty soon after cleaning,
the tape may be damaged. In this case,
immediately stop using that Cassette.
≥Do not clean the heads excessively. (Excessive
cleaning may cause excessive wear of the
heads. If the heads are worn, images cannot be
played back even after the heads are cleaned.)
≥If the dirty heads cannot be cleaned with the
Head Cleaner, the Camcorder needs to be
cleaned at a service center. Please consult a
dealer.
≥Video Head Cleaners can be purchased from
service centres.
≥Head cleaning due to dirty heads is not
considered a malfunction of the product. It is not
covered by the warranty.
Periodical Check-up
To maintain the highest image quality, we
recommend replacement of worn parts, such as
heads, etc., after approximately 1000 hours of
use. (This, however, depends on operating
conditions, such as temperature, humidity, dust,
etc.) Please contact a Panasonic Service Center.
83
PV-GS400Eng.book 84 ページ
2004年6月4日 金曜日 午後3時17分
Others
ª Optimal Use of the Battery
Battery Characteristics
This Battery is a rechargeable lithium ion battery.
Its ability to generate power is based upon the
chemical reaction that takes place inside it. This
reaction is susceptible to the surrounding
temperature and humidity, and, if the temperature
is too high or too low, the operating time of the
Battery becomes shorter. If the Battery is used in
an extremely cold environment, the Battery may
operate only for about 5 minutes. If the Battery
becomes extremely hot, a protective function may
be activated, and the Battery may become
unusable for a while.
Be Sure to Detach the Battery after Use
Be sure to detach the Battery from the
Camcorder. (If it is left attached to the
Camcorder, a minute amount of current is
consumed even when the Camcorder power is
off.) If the Battery is left attached to the
Camcorder for a long time, over-discharge takes
place. The Battery may become unusable after it
is charged.
Disposing of an Unusable Battery
≥The Battery has a limited life.
≥Do not throw the Battery into fire because it may
cause an explosion.
Always Keep the Terminals of the Battery
Clean
Prevent the terminals from getting clogged with
dirt, dust, or other substances.
If you drop the Battery accidentally, check to see
if the Battery body and terminals are deformed.
Attaching a deformed Battery to the Camcorder or
AC Adaptor may damage the Camcorder or AC
Adaptor.
ª Cautions for Storage
Before storing the Camcorder, take the
Cassette out and detach the Battery.
Store all the components in a dry place with a
relatively stable temperature.
Recommended Temperature: 59oF to 77oF (15oC
to 25oC), Recommended Humidity: 40% to 60%
Camcorder
≥Wrap it with a soft cloth to prevent dust from
getting into the Camera.
≥Do not leave the Camcorder in places that
expose it to high temperature.
Battery
≥Extremely high temperatures or low
temperatures will shorten the life of the Battery.
≥If the Battery is kept in smoky or dusty places,
the terminals may rust and cause malfunctions.
≥Do not allow the Battery terminals to come in
contact with metal objects (such as
necklaces, hairpins, etc.). This can result in
84
a short circuit or heat generation and, if you
touch the Battery in this condition, you may
be badly burned.
≥Store the Battery in a completely discharged
state. To store the Battery for a long period of
time, we recommend you charge it once every
year and store it again after you completely use
up the charged capacity.
Cassette
≥Before storing it, rewind the tape to the
beginning. If the Cassette is left for more than
6 months with the tape stopped midway, the
tape sags (although it depends on the storage
condition). Be sure to rewind to the beginning.
≥Store the Cassette in its case. Dust, direct
sunlight (ultraviolet rays), or humidity may
damage the tape. Dust contains hard mineral
particles, and dusty Cassettes damage the
heads of the Camcorder and other components.
Develop a habit of returning the Cassette back
to its case.
≥Twice a year, wind the tape to the end and then
rewind it to the beginning. If the Cassette is left
for 1 year or longer without winding or
rewinding, temperature and humidity changes
may cause the Cassette to deform due to
swelling, shrinking, and so forth. The wound
tape may stick to itself.
≥Do not place a Cassette near highly magnetic
substances or equipment.
≥The surface of the tape is covered with
extremely minute magnetic particles, upon
which signals are recorded. Magnetic
necklaces, toys, etc., have a magnetic force that
is stronger than you may expect, and they may
erase the contents of a recording or may cause
noise in images and sounds.
Card
≥When the Card is being read, do not remove the
Card, turn off the power, or subject it to vibration
or impact.
≥Do not leave the Card in places where there is
high temperature or direct sunlight, or where
electromagnetic waves or static electricity are
easily generated.
≥Do not bend or drop the Card. The Card or the
recorded content may be damaged.
≥After use, be sure to remove the Card from the
Camcorder.
≥Do not touch the terminals on the back of the
Card with your fingers. Do not allow dirt, dust or
water to enter it.
≥Keep the Memory Card out of reach of children
to prevent swallowing.
PV-GS400Eng.book 85 ページ
2004年6月4日 金曜日 午後3時17分
Others
ª LCD Monitor/Viewfinder/Lens Hood
LCD Monitor
≥In a place with drastic temperature changes,
condensation may form on the LCD Monitor.
Wipe it with soft dry cloth.
≥If your Camcorder is extremely cold when you
turn its power on, the image on the LCD Monitor
is slightly darker than usual at first. However, as
the internal temperature increases, it goes back
to the normal brightness.
Extremely high precision technology is
employed to produce the LCD Monitor
screen featuring a total of approximately
200,000 pixels. The result is more than
99.99% effective pixels with a mere 0.01% of
the pixels inactive or always lit. However,
this is not a malfunction and does not affect
the recorded picture.
Viewfinder
≥Do not direct the Viewfinder or Lens at the sun.
Internal components may be seriously
damaged.
≥To clean the inside of the Viewfinder, keep
pressing 1 while holding the Eyecup 2 and
pull it out.
2
1
Lens Hood
≥When attaching the ND Filter or MC Protector of
the Filter Kit (not supplied), attach it on the
inside of the Lens Hood without removing the
Lens Hood.
≥Attach the MC Protector (not supplied) or the
ND Filter (not supplied) on the Lens Hood.
≥Do not attach anything other than the MC
Protector (not supplied) or the ND Filter (not
supplied) to the Lens Hood.
≥When you wish to attach the Tele Conversion
Lens (not supplied) or Wide Conversion Lens
(not supplied), first of all, turn the Lens Hood
counterclockwise and take it off. Then attach the
conversion lens by turning it clockwise. When
you attach the Lens Hood back, insert 1 into
the slot 2 and turn it clockwise.
2
1
≥If you push the [W/T] Lever toward [W] during
recording with the filter and conversion lens
attached together to the Camcorder, 4 corners
of the image may become dark (vignetting). For
details, please refer to the operating instructions
of your accessories.
≥Be sure to keep the Lens Hood attached to the
Camcorder so as to shut out unnecessary light.
Extremely high precision technology is
employed to produce the Viewfinder screen
featuring a total of approximately
123,000 pixels. The result is more than
99.99% effective pixels with a mere 0.01% of
the pixels inactive or always lit. However,
this is not a malfunction and does not affect
the recorded picture.
85
PV-GS400Eng.book 86 ページ
2004年6月4日 金曜日 午後3時17分
Others
Before Requesting Service
(Problems and Solutions)
Power
1: The Camcorder power cannot be turned on.
• Is the power source connected correctly? (-16-)
2: The Camcorder power is turned off
automatically.
• When the Recording Pause Mode continues for
more than 5 minutes, the power is turned off
automatically for tape protection and power
conservation. (If the AC Adaptor is used, the
power is turned off only when the tape is
inserted in Tape Recording Mode.) When the
tape is inserted in Tape Recording Mode and if
the Recording Pause Mode continues for more
than 5 minutes the power is turned off
automatically. To resume recording from this
condition, turn off, then turn on the power
again. (-27-, -29-)
3: The Camcorder power does not stay on
long enough.
• Is the Battery low? Charge the Battery or attach
a fully charged Battery. (-16-)
• Has condensation occurred? Wait until the
Condensation Indicator disappears. (-83-)
Battery
1: Battery runs down quickly.
• Is the Battery fully charged? Charge it with the
AC Adaptor. (-16-)
• Are you using the Battery in an extremely cold
place? In cold places, the operating time of the
Battery becomes shorter. (-84-)
• Has the Battery worn out? If the operating time
is still too short even after the Battery is fully
charged, the Battery has worn out.
2: The Battery cannot be charged.
• If the DC Cable is connected to the AC
Adaptor, charging cannot be performed.
Disconnect the DC Cable.
Normal Recording
1: Recording does not start although power is
supplied to the Camcorder and the Cassette
is correctly inserted.
• Is the accidental erasure prevention slider on
the Cassette open? If it is open (set to [SAVE]),
recording cannot be performed. (-19-)
• Is the tape wound to the end? Insert a new
Cassette. (-18-)
• Is the Camcorder power turned on? (-27-)
• Has condensation occurred? Wait until the
Condensation Indicator disappears. (-83-)
86
Other Recording
1: Auto Focus Function does not work.
• Is Manual Focus Mode selected? If Auto Focus
Mode is selected, focus is automatically
adjusted. (-38-)
• There are some recording subjects and
recording surroundings for which the Auto
Focus Function does not operate correctly. In
this case, use the Manual Focus Mode to
adjust the focus. (-88-)
Editing
1: Audio dubbing cannot be performed.
• Is the accidental erasure prevention slider on
the Cassette open? If it is open (set to [SAVE]),
recording cannot be performed. (-19-)
• Are you attempting to edit a tape portion that
was recorded in LP Mode? LP Mode does not
allow audio dubbing to operate. (-26-)
Indications
1: The Time Code becomes inaccurate.
0 The Time Code Indication counter may not be
constant in the reverse direction in Slow Motion
Playback Mode, but this is not a malfunction.
2: The Remaining Tape Time Indication does
not match the actual remaining tape time.
• If scenes of less than 15 seconds are
continuously recorded, the remaining tape time
cannot be displayed correctly.
• In some cases, the Remaining Tape Time
Indication may show remaining tape time that is
2 to 3 minutes shorter than the actual
remaining tape time.
Playback (Pictures)
1: Pictures cannot be played back even when
the [1] Button is pressed.
0 Is the Mode Dial set to Playback Mode? If not,
the playback function cannot be used. (-44-)
2: Mosaic-pattern noise appears on images
during Cue, Review or Slow Motion
Playback.
• This phenomenon is characteristic of digital
video systems. It is not a malfunction.
3: Although the Camcorder is correctly
connected to a TV, playback images cannot
be seen.
• Have you selected “Video Input” on the TV?
Please read the operating instructions of your
TV and select the channel that matches the
input jack used for the connection.
• Depending on your TV, nothing may be shown
even if you correctly connect the Camcorder
with your TV. In this case, set [AV JACK] to
[OUT].
PV-GS400Eng.book 87 ページ
2004年6月4日 金曜日 午後3時17分
Others
4: Playback picture is not clear.
• Are the heads of the Camcorder dirty? If the
heads are dirty, playback image cannot be
clear. (-83-)
5: Playing back or recording do not function,
the screen has frozen or the indicator has
disappeared.
• Turn the Camcorder off. If the Camcorder is not
turned off after operating the [OFF/ON] switch,
press the [RESET] Button (-13-) first. And
detach the Battery or AC Adaptor and then
reattach it.
Playback (Sound)
1: Sound is not played back from the built-in
speaker of the Camcorder or the
headphones.
0 Is the volume too low? During playback, push
the [`VOL/JOG_] Lever to display the
[VOLUME] Indicator and adjust the volume.
(-44-)
2: Different sounds are reproduced at the
same time.
• [12bit AUDIO] on the [PLAYBACK] Sub-Menu
of the [TAPE PLAYBACK MENU] has been set
to [MIX]. As a result, the original sound and
sound that was recorded by audio dubbing are
played back together. It is possible to
reproduce the sounds separately. (-53-)
3: The original sound was erased when audio
dubbing was performed.
• If you perform audio dubbing on a recording
made in [16bit] Mode, the original sound will be
erased. If you wish to preserve the original
sound, be sure to select [12bit] Mode at the
time of recording.
4: Sounds cannot be played back.
• Although a Cassette with no audio dubbing is
being played, is [12bit AUDIO] on the
[PLAYBACK] Sub-Menu of the
[TAPE PLAYBACK MENU] set to [ST2]? To
play back a Cassette with no audio dubbing,
[12bit AUDIO] must be set to [ST1]. (-53-)
• Is the Variable Speed Search Function
working? Press the [1] Button to cancel the
Variable Speed Search Function. (-45-)
Card
1: Recorded pictures are not clear.
0 Is [PICT QUALITY] on the [CARD] Sub-Menu
set to [NORMAL] or [ECONOMY]? If recording
is done with it set to [NORMAL] or
[ECONOMY], images with fine details may
include a mosaic-like pattern. Set
[PICT QUALITY] to [FINE]. (-30-)
2: Photoshot Playback images do not look
normal.
• The picture may be damaged. In order to
prevent the loss of image data, backing up on a
personal computer is recommended. (-58-)
3: During Playback [UNPLAYABLE CARD] is
displayed.
• The image was either recorded in a different
format, or data is damaged.
4: Even if a Card is formatted, it cannot be
used.
• Either the Camcorder or the Card may be
damaged. Please consult a dealer.
Others
1: The Magic Wire Remote Control with
Narration Mic does not operate correctly.
• If it is not plugged in tightly, it will not operate
correctly.
2: The Camcorder clatters when shaking it.
• It is the sound of the lens moving, not a
malfunction.
3: When the USB Cable is disconnected, an
error message will appear on PC.
• To disconnect the USB Cable safely,
double-click the [ ] Icon in the task tray and
follow the instructions on the screen. (-68-)
Explanation of Terms
ª Digital Video System
In a digital video system, images and sounds are
converted into digital signals and recorded on a
tape. This complete digital recording is capable of
recording and playback with minimal image and
sound deterioration.
In addition, it automatically records data, such as
Time Code and Date/Time, as digital signals.
Compatibility with S-VHS or VHS Cassettes
Because this Camcorder employs a digital
system for recording image and sound data, it is
not compatible with conventional S-VHS or VHS
video equipment that employs an analog
recording system.
The size and shape of the Cassettes are also
different.
Compatibility with Output Signals
Because AV signal output from the AV signal
output jack is analog (the same as conventional
video systems), this Camcorder can be
connected with S-VHS or VHS video or a TV for
playback.
87
PV-GS400Eng.book 88 ページ
2004年6月4日 金曜日 午後3時17分
Others
ª Focus
ª Time Code
Auto Focus Adjustment
The Auto Focus System automatically moves the
focusing lens inside the Camcorder forward and
backward to bring the subject into focus so that
the subject can be seen clearly.
However, the Auto Focus System does not
function properly for the following subjects or
under the following recording conditions.
Please use the Manual Focus Mode instead.
1) Recording a subject whose one end is
located close to the Camcorder and the
other end farther away from it
≥Because Auto Focus makes adjustments at
the center of an image, it may be impossible
to focus on a subject that is located in both
foreground and background.
2) Recording a subject behind dirty or dusty
glass
≥Because the focus is on the dirty glass, the
subject behind the glass will not be focused.
3) Recording a subject in dark surroundings
≥Because the light information that comes
through the lens decreases considerably,
the Camcorder cannot focus correctly.
4) Recording a subject that is surrounded by
objects with glossy surfaces or by highly
reflective objects
≥Because the Camcorder focuses on the
objects with glossy surfaces or on highly
reflective objects, the subject may become
blurry.
5) Recording a fast-moving subject
≥Because the focus lens inside moves
mechanically, it cannot keep up with a
fast-moving subject.
6) Recording a subject with little contrast
≥Because the Camcorder achieves focus
based upon the vertical lines of an image, a
subject with little contrast, such as a white
wall, may become blurry.
Time Code signals are data that indicate time
measured in hours, minutes, seconds, and
frames (30 frames per second). If this data is
included in a recording, an address is assigned to
each image on the tape.
≥The Time Code is automatically recorded as a
part of the sub-code at each recording.
≥When a new (previously unrecorded) Cassette
is inserted, the Time Code automatically starts
from zero. If a recorded Cassette is inserted, the
Time Code picks up from the point where the
last scene was recorded. (In this case, when the
Cassette is inserted, the zero display
[0h00m00s00f] may appear, but the Time Code
starts from the previous value.)
≥The Time Code cannot be reset to zero.
≥Unless the Time Code is continuously recorded
from the beginning of a tape, accurate editing
may not be possible. To ensure that the Time
Code will be recorded with no breaks, we
recommend the use of the Blank Search
Function (-28-) before recording a new scene.
88
ª Memory Stop Function
The Memory Stop Function is useful for the
following operations.
Rewinding or fast-forwarding a tape to a
desired position
1 Set [DISPLAY] >> [C.DISPLAY] >>
[MEMORY].
2 Reset the Tape Counter to zero at the tape
position from which you want to play it back
later. (-14-, -23-)
3 Start playback or recording.
4 After playback or recording has finished:
Set the Camcorder to Tape Playback Mode.
5 Rewind the tape.
≥The tape automatically stops approximately
at the position where the counter was set to
zero.
Stopping editing automatically during audio
dubbing
1 Set [DISPLAY] >> [C.DISPLAY] >>
[MEMORY].
2 Reset the Tape Counter to zero at the
position where you want to stop editing.
3 Play back the still picture where you want to
start audio dubbing.
4 Start audio dubbing. (-53-)
≥Audio dubbing automatically stops at the
position where the counter was set to zero.
PV-GS400Eng.book 89 ページ
2004年6月4日 金曜日 午後3時17分
Others
Specifications
Digital Video Camera
Information for your safety
Power Source:
DC 7.9/7.2 V
Power Consumption:
Recording
7.5 W
Recording Format:
Mini DV (Consumer-use Digital Video SD Format)
Tape Used:
6.35 mm digital video tape
Recording/Playback Time:
SP: 80 min.; LP: 120 min. (with DVM80)
Video
Recording System:
Digital Component
Television System:
EIA Standard: 525 lines, 60 fields NTSC color signal
Audio
Recording System:
PCM Digital Recording
16 bit (48 kHz/2ch), 12 bit (32 kHz/4ch)
Image Sensor:
1/4.7-inch 3CCD Image Sensor
(Effective Pixels: moving picture/700Kk3, still
picture/990Kk3, Total: 1070Kk3)
Lens:
Auto Iris, F1.6, Focal Length; 3.3–39.6 mm, Macro
(Full Range AF)
Filter Diameter:
43 mm
Zoom:
12:1 Power Zoom
Monitor:
3.5-inch LCD
Viewfinder:
Color Electronic Viewfinder
Microphone:
Stereo
Speaker:
1 round speaker 20 mm
Standard Illumination:
1,400 lx
Minimum Required Illumination:
2 lx (Advanced MagicPix Mode)
Video Output Level:
1.0 Vp-p, 75 ohm
S-Video Output Level:
Y Output: 1.0 Vp-p, 75 ohm
C Output: 0.286 Vp-p, 75 ohm
Audio Output Level (Line):
316 mV, 600 ohm
Video Input Level:
1.0 Vp-p, 75 ohm
S-Video Input Level:
Y Input: 1.0 Vp-p, 75 ohm
C Input: 0.286 Vp-p, 75 ohm
Audio Input Level (Line):
316 mV, 10 kohm or more
Mic Input:
Mic sensitivity –50 dB (0 dB=1 V/Pa, 1 kHz)
(Stereo mini jack)
USB:
Card reader/writer function, USB 2.0 compliant
(Hi-Speed)
No copyright protection support
PictBridge-compliant
Digital Interface:
DV Input/Output Terminal (IEEE1394, 4-pin)
Flash:
GN 6.0
Dimensions:
Approx. 3.19 inch (W)k3.15 inch (H)k7.01 inch (D)
Approx. 81 mm (W)k80 mm (H)k178 mm (D)
Weight:
Approx. 1.54 lbs. (700 g)
(without Battery, DV cassette and Lens Cap)
Operating Temperature:
32oF–104oF (0oC–40oC)
Operating Humidity:
10%–80%
Card Memory Functions
Recording Media:
MultiMediaCard (4 MB/8 MB/16 MB),
SD Memory Card (8 MB/16 MB/32 MB/64 MB/
128 MB/256 MB/512 MB/1 GB)
Still picture recording file format:
JPEG (Design rule for Camera File system, based
on Exif 2.2 standard), DPOF corresponding
Still Image Size:
Mega-Pixel Recording;
2288k1728 (4.0 million pixels)
1600k1200 (1.9 million pixels)
1280k960 (1.2 million pixels)
VGA Recording; 640k480
WEB Camera Compression:
Motion JPEG
Image Size:
320k240 pixels (QVGA)
Frame rate:
Approx. 6 fps
AC Adaptor
Information for your safety
Power Source:
AC 110–240 V, 50/60 Hz
Power Consumption:
19 W
DC Output:
DC 7.9 V, 1.4 A (Camcorder Operation)
DC 8.4 V, 0.65 A (Battery Charging)
Dimensions:
2.40 inch (W)k1.26 inch (H)k3.58 inch (D)
61 mm (W)k32 mm (H)k91 mm (D)
Weight:
Approx. 0.24 lbs. (110 g)
Weight and dimensions are approximate values.
Specifications may change without prior notice.
89
PV-GS400Eng.book 90 ページ
2004年6月4日 金曜日 午後3時17分
Others
Maximum number of still pictures recordable on an SD Memory Card (optional)
PICTURE
SIZE
PICTURE
QUALITY
640k480
1280k960
FINE NORMAL ECONOMY FINE
1600k1200
NORMAL
ECONOMY
FINE
2288k1728
NORMAL
ECONOMY
FINE
NORMAL
ECONOMY
8 MB
45
95
190
9
16
23
5
9
14
1
3
5
16 MB
100
200
400
22
36
51
13
22
32
5
9
14
32 MB
220
440
880
49
79
112
31
49
70
14
23
33
64 MB
440
880
1760
104
165
232
66
104
146
30
49
70
128 MB
880
1760
3520
214
337
473
136
214
298
64
102
144
256 MB
1760
3520
7040
428
674
945
273
428
597
130
206
290
512 MB
3520
7040
14080
866
1362
1908
553
866
1207
265
418
587
1 GB
7040
14080 28160
1668
2622
3672
1066
1668
2323
512
807
1132
≥These figures vary depending on the subject being photographed.
≥The numbers shown in the table are approximations.
90
PV-GS400Eng.book 91 ページ
2004年6月4日 金曜日 午後3時17分
Others
Camcorder Accessory System
Accessory#
Figure
Description
PV-DAC13
AC Adaptor with AC Cable
and DC Cable
*CGA-DU14
1360mAh/Rechargeable
Lithium Ion Battery Pack
*CGA-DU21
2040mAh/Rechargeable
Lithium Ion Battery Pack
PV-DDC9 (For USA)
PV-DDC9-K (For Canada)
DV Interface Cable (i.LINK)
(4-pin to 4-pin)
RP-SDH01GU1A
RP-SDH512U1A
RP-SDH256U1A/W
RP-SD128BU1A/W
RP-SD064BPPA/W
RP-SD032BPPA
1 GB SD Memory Card
512 MB SD Memory Card
256 MB SD Memory Card
128 MB SD Memory Card
64 MB SD Memory Card
32 MB SD Memory Card
BN-SDCAPE/1B (For USA)
BN-SDCAPU/1B (For Canada)
USB Reader/Writer for
SD Memory Card
(compatible with MultiMediaCard)
BN-SDABPE/1B (For USA)
BN-SDABPU/1B (For Canada)
SD PCMCIA Adaptor
N2QCBD000030
Magic Wire Remote Control
with Narration Mic
VW-LDC10
(compatible with MultiMediaCard)
Video DC Light (10 W)
(CGA-DU07 is necessary to activate it.)
VW-LDH3
Video DC Light (3 W)
VW-VMH3
Stereo Zoom Microphone
PV-H150 (USA only)
Carrying Case
PV-HB002 (USA only)
Carrying Case
*Please refer to page -17-, concerning the battery charging time and available recording time.
*NOTE: Accessories and/or model numbers may vary by country. Please consult your local
dealer.
91
PV-GS400Eng.book 92 ページ
2004年6月4日 金曜日 午後3時17分
Others
Camcorder Accessory Order Form (For USA Customers)
Please photocopy this form when placing an order.
1. Palmcorder Model #
2. Items Ordered
Accessory #
Description
Price Each
Quantity
Total Price
Subtotal
Your State & Local Sales Tax
Shipping & Handling
6.95
Total Enclosed
3. Method of payment (check one)
Check of Money Order enclosed (NO C.O.D.SHIPMENTS)
VISA
Credit Card #
MasterCard
Expiration Date
Discover
Customer Signature
Make Check or Money Order Payable to: PANASONIC ACCESSORIES
(Please do not send cash)
4. Shipping information (UPS delivery requires complete street address)
Ship To:
Mr.
Mrs.
Ms.
First
Phone#:
Last
Day
(
)
Night
(
)
Street Address
City
State
Zip
TO OBTAIN ANY OF OUR PALMCORDER ACCESSORIES YOU CAN DO ANY OF
THE FOLLOWING:
VISIT YOUR LOCAL PANASONIC DEALER
OR
CALL PANASONIC’S ACCESSORY ORDER LINE AT 1-800-332-5368
[6 AM-5 PM M-F, 6 AM-10:30 AM SAT, PACIFIC TIME]
OR
MAIL THIS ORDER TO: PANASONIC SERVICES COMPANY ACCESSORY ORDER OFFICE
20421 84th Avenue South Kent, WA. 98032
In CANADA, please contact your local Panasonic dealer for more information on Accessories.
92
PV-GS400Eng_warranty.fm
93 ページ
2004年6月4日 金曜日 午後7時40分
Others
Request for Service Notice (USA Only)
Please photocopy this form when making a request for service notice, in the
unlikely event this product needs service.
Request for Service Notice:
•Please include your proof of purchase.
(Failure to do so will delay your repair.)
•To further speed your repair, please provide
an explanation of what is wrong with the unit
and any symptom it is exhibiting.
Mail this completed form and your Proof of Purchase along with your unit to:
Panasonic Services Company
1705 N. Randall Road
Elgin, IL. 60123-7847
Attn: Camcorder Repair
93
PV-GS400Eng.book 94 ページ
2004年6月4日 金曜日 午後3時17分
Others
Limited Warranty (For USA Customers)
PANASONIC CONSUMER ELECTRONICS
COMPANY,DIVISION OF MATSUSHITA
ELECTRICCORPORATION OF AMERICA
One Panasonic Way Secaucus, New Jersey 07094
PANASONIC SALES COMPANY, DIVISION OF MATSUSHITA
ELECTRIC OF PUERTO RICO, INC.,
AVE. 65 de Infantería, Km. 9.5 San Gabriel Industrial Park,
Carolina, Puerto Rico 00985
Panasonic/Quasar Video Products
Limited Warranty
Limited Warranty Coverage
If your product does not work properly because of a defect in materials or workmanship, Panasonic Consumer Electronics Company or
Panasonic Sales Company (collectively referred to as “the warrantor”) will, for the length of the period indicated on the chart below,
which starts with the date of original purchase (“warranty period”), at its option either (a) repair your product with new or refurbished
parts, or (b) replace it with a new or a refurbished product. The decision to repair or replace will be made by the warrantor.
Product
Parts
Labor
Service
Contact Number
Camcorder
One (1) Year (except CCD Image Sensor)
CCD Image Sensor - 6 (Six) Months
Ninety (90) Days
Ninety (90) Days
Carry-In or Mail-In
1-800-211-PANA(7262)
DVD/VCR Deck,
A/V Mixer
One (1) Year
Ninety (90) Days
Carry-In or Mail-In
1-800-211-PANA(7262)
TV/VCR, TV/DVD, One (1) Year (except CRT)
TV/DVD/VCR
CRT - Two (2) Years
Combination
Ninety (90) Days
Ninety (90) Days
Carry-In: 21”
CRTand Smaller
1-800-211-PANA(7262)
In-Home or Carry-In:
22” CRT and Larger
One (1) Year (except CRT)
CRT - Two (2) Years
Ninety (90) Days
Ninety (90) Days
In-Home or Carry-In 1-888-843-9788
Ten (10) Days
Not Applicable
Carry-In or Mail-In
1-800-211-PANA(7262)
Five (5) Days
Not Applicable
Carry-In or Mail-In
1-800-211-PANA(7262)
Ninety (90) Days
Not Applicable
Carry-In or Mail-In
1-800-211-PANA(7262)
TV/HDR
Combination
Rechargeable
Batteries
(in exchange for
defective item)
Tape
(in exchange for
defective item)
Memory Cards
(in exchange for
defective item)
During the “Labor” warranty period there will be no charge for labor. During the “Parts” warranty period, there will be no charge for parts.
You must carry-in or mail-in your product or arrange for in-home service, as applicable, during the warranty period. If non-rechargeable
batteries are included, they are not warranted. This warranty only applies to products purchased and serviced in the United States or
Puerto Rico. This warranty is extended only to the original purchaser of a new product which was not sold “as is”. A purchase receipt or
other proof of the original purchase date is required for warranty service.
Carry-In, Mail-in or In-Home Service
For Carry-In, Mail-In or In-HomeService (as applicable) in the United States call toll free contact number listed above or visit Panasonic
Web Site: http://www.panasonic.com
For assistance in Puerto Rico call Panasonic Sales Company (787)-750-4300 or fax (787)-768-2910.
In-Home service, if applicable, requires clear, complete and easy access to the product by the authorized servicer and does not include
removal or re-installation of an installed product. It is possible that certain in-home repairs will not be completed in-home, but will require
that the product, or parts of the product, be removed for shop diagnosis and/or repair and then returned.
Limited Warranty Limits And Exclusions
This warranty ONLY COVERS failures due to defects in materials or workmanship, and DOES NOT COVER normal wear and tear or
cosmetic damage, nor does it cover markings or retained images on the picture tube resulting from viewing fixed images (including,
among other things, letterbox pictures on standard 4:3 screen TV’s, or non-expanded standard 4:3 pictures on wide screen TV’s, or
onscreen data in a stationary and fixed location). The warranty ALSO DOES NOT COVER damages which occurred in shipment, or
failures which are caused by products not supplied by the warrantor, or failures which result from accidents, misuse, abuse, neglect,
mishandling, misapplication, alteration, faulty installation, set-up adjustments, misadjustment of consumer controls, improper
maintenance, power line surge, lightning damage, modification, or commercial use (such as in a hotel, office, restaurant, or other
business), rental use of the product, service by anyone other than a Factory Servicenter or other Authorized Servicer, or damage that is
attributable to acts of God.
THERE ARE NO EXPRESS WARRANTIES EXCEPT AS LISTED UNDER “LIMITED WARRANTY COVERAGE”.
THE WARRANTOR IS NOT LIABLE FOR INCIDENTAL OR CONSEQUENTIAL DAMAGES RESULTING FROM
THE USE OF THIS PRODUCT, OR ARISING OUT OF ANYBREACH OF THIS WARRANTY.
(As examples, this excludes damages for lost time, cost of having someone remove or re-install an installed unit if applicable, or travel
to and from the servicer, loss of media or images, data or other memory or recorded content. The items listed are not exclusive, but are
for illustration only.)
ALL EXPRESS AND IMPLIED WARRANTIES, INCLUDING THE WARRANTY OF MERCHANTABILITY, ARE
LIMITED TO THE PERIOD OF THE LIMITED WARRANTY.
Some states do not allow the exclusion or limitation of incidental or consequential damages, or limitations on how long an implied
warranty lasts, so the exclusions may not apply to you. This warranty gives you specific legal rights and you may also have other rights
which vary from state to state. If a problem with this product develops during or after the warranty period, you may contact your dealer
or Servicenter. If the problem is not handled to your satisfaction, then write to the warrantor’s Consumer Affairs Department at the
addresses listed for the warrantor.
PARTS AND SERVICE (INCLUDING COST OF AN IN-HOME SERVICE CALL, WHERE APPLICABLE) WHICH
ARE NOT COVERED BY THIS LIMITED WARRANTY ARE YOUR RESPONSIBILITY.
94
PV-GS400Eng.book 95 ページ
2004年6月4日 金曜日 午後3時17分
Others
Customer Services Directory
Service in Canada: As per Sevicenter listed in Canadian warranty information on page -96-.
Obtain Product Information and Operating Assistance; locate your nearest Dealer
or Servicenter; purchase Parts and Accessories; or make Customer Service and
Literature requests by visiting our Web Site at:
http://www.panasonic.com/support
or, contact us via the web at:
http://www.panasonic.com/contactinfo
You may also contact us directly at:
1-800-211-PANA (7262),
Monday-Friday 9 am-9 pm; Saturday-Sunday 10 am-7 pm, EST
For hearing or speech impaired TTY users, TTY : 1-877-833-8855
Accessory Purchases
Purchase Parts, Accessories and Instruction Books online for all Panasonic Products
by visiting our Web Site at:
http://www.pasc.panasonic.com
or, send your request by E-mail to:
[email protected]
You may also contact us directly at:
1-800-332-5368 (Phone) 1-800-237-9080 (Fax Only) (Monday – Friday 9 am to 8 pm, EST.)
Panasonic Services Company
20421 84th Avenue South,
Kent, WA 98032
(We Accept Visa, MasterCard, Discover Card, American Express, and Personal Checks)
For hearing or speech impaired TTY users, TTY : 1-866-605-1277
Product Repairs
Centralized Factory Servicenter
Panasonic Services Company
1705 N. Randall Road,
Elgin, IL 60123-7847
Attention: Camcorder Repair
Please carefully pack and ship, prepaid and insured, to the Elgin Centralized Factory Servicenter
Customer’s in Puerto Rico, please ship or carry in to location below (“Service in Puerto Rico”).
MAIL TO:
Service in Puerto Rico
Matsushita Electric of Puerto Rico, Inc. Panasonic Sales Company
Factory Servicenter:
Ave. 65 de Infantería, Km. 9.5, San Gabriel Industrial Park,
Carolina, Puerto Rico 00985
Phone (787)750-4300, Fax (787)768-2910
As of October 2003
95
PV-GS400Eng.book 96 ページ
2004年6月4日 金曜日 午後3時17分
Others
Warranty (For Canadian Customers)
Panasonic Canada Inc.
5770 Ambler Drive, Mississauga, Ontario L4W 2T3
PANASONIC PRODUCT – LIMITED WARRANTY
Panasonic Canada Inc. warrants this product to be free from defects in material and workmanship and
agrees to remedy any such defect for a period as stated below from the date of original purchase.
Camcorder Product – One (1) year, parts and labour
LIMITATIONS AND EXCLUSIONS
This warranty does not apply to products purchased outside Canada or to any product which has been
improperly installed, subjected to usage for which the product was not designed, misused or abused,
damaged during shipping, or which has been altered or repaired in any way that affects the reliability or
detracts from the performance, nor does it cover any product which is used commercially. Dry cell
batteries are also excluded from coverage under this warranty.
This warranty is extended to the original end user purchaser only. A purchase receipt or other proof of
date of original purchase is required before warranty service is performed.
THIS EXPRESS, LIMITED WARRANTY IS IN LIEU OF ALL OTHER WARRANTIES, EXPRESS OR
IMPLIED, EXCLUDING ANY IMPLIED WARRANTIES OF MERCHANTABILITY OR FITNESS FOR A
PARTICULAR PURPOSE.
IN NO EVENT WILL PANASONIC CANADA INC. BE LIABLE FOR ANY SPECIAL, INDIRECT OR
CONSEQUENTIAL DAMAGES.
In certain instances, some jurisdictions do not allow the exclusion or limitation of incidental or
consequential damages, or the exclusion of implied warranties, so the above limitations and exclusions
may not be applicable.
WARRANTY SERVICE
For product operation and information assistance, please contact your Dealer or our Customer
Care Centre at:
Telephone #: (905) 624-5505
Fax #: (905) 238-2360
Web: www.panasonic.ca
For product repairs, please contact one of the following:
≥Your Dealer who will inform you of an authorized Servicentre nearest you.
≥Our Customer Care Centre at (905) 624-5505 or www.panasonic.ca
≥A Panasonic Factory Servicentre listed below:
Richmond, British Columbia
Panasonic Canada Inc.
12111 Riverside Way
Richmond, BC
V6W 1K8
Tel: (604) 278-4211
Fax: (604) 278-5627
Calgary, Alberta
Panasonic Canada Inc.
6835-8th St. N. E.
Calgary, AB
T2E 7H7
Tel: (403) 295-3955
Fax: (403) 274-5493
Mississauga, Ontario
Panasonic Canada Inc.
5770 Ambler Dr.
Mississauga, ON
L4W 2T3
Tel: (905) 624-8447
Fax: (905) 238-2418
Lachine, Québec
Panasonic Canada Inc.
3075, rue Louis A. Amos
Lachine, QC
H8T 1C4
Tel: (514) 633-8684
Fax: (514) 633-8020
IF YOU SHIP THE PRODUCT TO A SERVICENTRE
Carefully pack and send prepaid, adequately insured and preferably in the original carton.
Include details of the defect claimed, and proof of date of original purchase.
96
PV-GS400Eng.book 97 ページ
2004年6月4日 金曜日 午後3時17分
Others
Index
ªA
ªM
AC Adaptor ..............................................16, 82
AE Lock .........................................................38
ArcSoft ...........................................................66
Auto Focus .....................................................88
Auto Pop-up Flash .........................................40
Macro Close-up ............................................. 32
Magic Wire Remote Control with Narration
Mic .............................................................. 15
MagicPix Function ......................................... 34
Manual Focus ................................................ 38
Menu Screen ................................................. 22
Microphone Sensitivity Level ......................... 39
Mirror Mode ................................................... 41
Mix Mode ....................................................... 41
Mosaic Mode ................................................. 41
MotionDV STUDIO ........................................ 62
Multi-Picture Mode ........................................ 42
ªB
Backlight Compensation ................................33
Black & White Mode ......................................42
Blank Search .................................................28
ªC
Camcorder Accessory Order Form ................92
Charging the Battery ......................................16
Cinema Mode ................................................35
Condensation .................................................83
Cue Playback .................................................44
Customer Services Directory .........................95
ªD
Date/Time Indication ......................................72
Date/Time Setting ..........................................26
Digital Effects .................................................41
Digital Still Picture ..........................................28
Digital Zoom ...................................................32
DPOF Setting .................................................50
Dubbing ...................................................54, 55
ªE
Erasure Prevention Slider ..............................19
ªF
F Number .......................................................38
Fade ...............................................................33
Formatting ......................................................51
Frame Mode ..................................................28
ªI
Image Stabilizer Function ..............................32
Index Search ..................................................46
Initializing the Modes .....................................72
Iris ..................................................................38
ªL
LCD Monitor .............................................20, 85
Limited Warranty (Canada) ............................96
Limited Warranty (USA) .................................94
Lock Setting ...................................................50
Low Light Mode .............................................35
ªN
Negative Mode .............................................. 42
ªP
Photoshot ...................................................... 29
PictBridge ...................................................... 56
Picture Adjustment ........................................ 39
Picture Playback Mode .................................. 47
Picture-in-Picture Mode ................................. 43
Playback Digital Effects ................................. 47
Playback Zoom .............................................. 46
Playing Back on Your TV .............................. 52
Portrait Mode ................................................. 35
Pro Cinema Function ..................................... 35
Program AE ................................................... 35
ªQ
Quick Start ..................................................... 31
ªR
RapidFire Consecutive Photoshot ................. 30
Recording Check ........................................... 27
Recording Speed ........................................... 26
Red Eye Reduction Function ......................... 41
Remaining Tape Time ................................... 71
Remote Controller ......................................... 14
Repeat Playback ........................................... 79
Request for Service Notice (USA Only) ........ 93
Review Playback ........................................... 44
97
PV-GS400Eng.book 98 ページ
2004年6月4日 金曜日 午後3時17分
Others
ªS
SD Memory Card ...........................................70
SD Viewer ......................................................65
Self-Recording ...............................................28
Self-timer Recording ......................................31
Sepia Mode ....................................................42
Shutter Chance Mark .....................................29
Shutter Speed ................................................37
Slide Show .....................................................48
Slim Mode ......................................................41
Slow Motion Playback ....................................45
Smart Accessory Shoe ..................................12
Soft Skin Function ..........................................34
Solarisation Mode ..........................................42
Sound Volume ...............................................44
SP/LP Mode ...................................................26
Sports Mode ..................................................35
Spotlight Mode ...............................................35
Still Advance Playback ..................................45
Stretch Mode .................................................41
Strobe Mode ..................................................41
Surf & Snow Mode .........................................36
ªT
Tele-Macro Function ......................................32
Time Code .....................................................88
Title ................................................................49
Trailing Effect Mode .......................................41
ªU
USB Connection Kit .......................................58
ªV
Variable Speed Search ..................................45
Video Head Clogging .....................................83
Viewfinder ................................................20, 85
ªW
Web Camera ..................................................59
White Balance ................................................36
Wide Function ................................................35
Wind Noise Reduction ...................................34
Wipe Mode .....................................................41
ªZ
Zebra Pattern .................................................39
Zoom ..............................................................31
Zoom Microphone ..........................................32
98
PV-GS400Eng.book 99 ページ
2004年6月4日 金曜日 午後3時17分
Others
Spanish Quick Use Guide/
Guía española para el uso rápido
1 Una la batería al adaptador de CA y
ª Inserción de la tarjeta
1 Desplace la palanca [OPEN] 1 para abrir la
tapa del compartimento de tarjeta 2.
cárguela.
1
2
OPEN
2 Manteniendo la tarjeta de memoria con su
ángulo cortado hacia arriba 3, introdúzcala
en su ranura.
≥Antes de usar, cargue completamente la
batería.
≥Dado que la batería no se cargará cuando el
cable de entrada CC está conectado al
adaptador de CA, desconéctelo.
≥La [CHARGE] lámpara se enciende y
comienza la carga.
≥Cuando se apaga la luz [CHARGE], termina
la carga.
2 Meta la batería cargada en la videocámara.
3
3 Cierre firmemente la tapa del
compartimento de tarjeta 2.
ª Grabación en una cinta
1 Ponga el interruptor [OFF/ON] 1 en [ON].
≥La lámpara [POWER] 2 se enciende.
2
POWER
O
ON
FF
1
2 Ajuste el disco del modo al de la grabación
S
D
delante y tire hacia abajo para abrir el
compartimento del cassette.
2 Inserte el cassette.
de cinta.
PC
ª Colocación del cassette
1 Desplace la palanca [OPEN/EJECT] 1 hacia
3 Oprima el botón de inicio/parada de la
OPEN/
EJECT
1
grabación.
≥Comienza la grabación.
3 Cierre el soporte del cassette presionando
la marca [PUSH] 2.
4 Cierre la tapa del compartimento del
cassette.
4 Oprima de nuevo el botón de inicio/parada
2
de grabación para detener brevemente la
grabación.
PUSH
99
PV-GS400Eng.book 100 ページ
2004年6月4日 金曜日 午後3時17分
Others
ª Grabación de una imagen fija en una
tarjeta (Photoshot)
1 Ajuste en disco del modo al de la
grabación.
5 Oprima el botón [∫] para parar la
reproducción.
STILL
ENTER
S
PC
FADE
D
ª Reproducción de la tarjeta
2 Oprima el botón [PHOTO SHOT].
Reproduce las imágenes grabadas en la tarjeta.
1 Ajuste el disco del modo al de la
reproducción de imágen.
PHOTO
SHOT
SD
PC
ª Reproducción de una cinta
1 Ponga el interruptor [OFF/ON] 1 en [ON].
≥La lámpara [POWER] 2 se enciende.
2
POWER
O
ON
FF
1
2 Ajuste el disco del modo al de la
reproducción de cinta.
PC
SD
3 Oprima el botón [6] para rebobinar la
cinta.
STILL
ENTER
FADE
4 Oprima el botón [1] para comenzar la
reproducción.
STILL
ENTER
FADE
100
2 Inicio de la reproducción.
1: Inicio de la diapositiva
5: Reproducción del siguiente archivo
6: Reproducción del archivo anterior
∫: Parada de la diapositiva
;: Diapositiva en pausa
PV-GS400Eng.book 101 ページ
2004年6月4日 金曜日 午後3時17分
101
PV-GS400Eng.book 102 ページ
2004年6月4日 金曜日 午後3時17分
Panasonic Consumer Electronics Company,
Division of Matsushita Electric Corporation of America
One Panasonic Way, Secaucus, NJ 07094
Panasonic Sales Company (“PSC”)
Division of Matsushita Electric of Puerto Rico, Inc.
Ave. 65 de Infantería, Km. 9.5, San Gabriel Industrial Park, Carolina, Puerto Rico 00985
Panasonic Canada Inc.
5770 Ambler Drive, Mississauga, Ontario, L4W 2T3
P
LSQT0801 A
S0604Nm0 ( 1400 A )
© 2004 Matsushita Electric Industrial Co., Ltd.