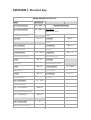
1
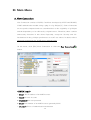
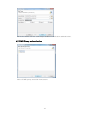
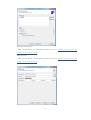
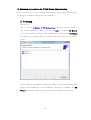
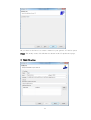
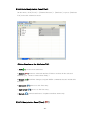
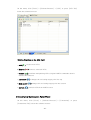
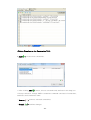
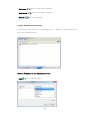
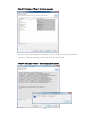
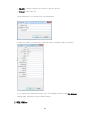
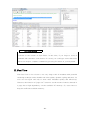
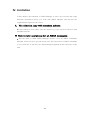
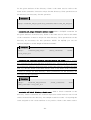
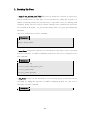
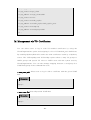
AMGA MANAGER
Us er MANUAL
(ver 1.2)
Authors
Taesang Huh
Korea Institute of Science and Technology Information
Supercomputing Center
Senior Researcher, MS
Belle II Computing group member
EMI AMGA product team member (WP3-SA1, WP5-JRA1)
Email: [email protected]
Geunchul Park
Korea Institute of Science and Technology Information
Supercomputing Center
Senior Researcher, MS
EMI AMGA product team member (WP3-SA1, WP5-JRA1)
Email: [email protected]
Jae-Hyuck Kwak
Korea Institute of Science and Technology Information
Supercomputing Center
Senior Researcher, MS
EMI AMGA product team member(WP3-SA1, WP5-JRA1)
Email: [email protected]
Soonwook Hwang
Korea Institute of Science and Technology Information
Supercomputing Center/Infrastructure Technology Development
Principal Researcher, PhD
Team Leader, EMI AMGA product team supervisor (WP3-SA1, WP5-JRA1)
Email: [email protected]
-2-
<Contents>
I. Overview .......................................................................................... 1
A. Introduction ....................................................................................................................... 1
B. Product Features .............................................................................................................. 2
C. Technical Support - AMGA ......................................................................................... 3
II. Installation ...................................................................................... 3
A. Requirements .................................................................................................................... 3
B. How to Install .................................................................................................................... 3
III. Main Menu .................................................................................... 4
A. New Connection .............................................................................................................. 4
1) ID/PW authorization (including authentication) ....................................................................... 5
2) Certificate authentication .................................................................................................................... 5
3) Globus Proxy authentication .............................................................................................................. 5
4) VOMS Proxy authentication ............................................................................................................... 6
B. Disconnection .................................................................................................................11
C. Change Password ..........................................................................................................11
D. Collection Panel(View).................................................................................................11
1) Collection Management .................................................................................................................... 12
2) Right-click Pop-up Menu with the Schema Browser ........................................................... 14
3) Collection ................................................................................................................................................. 16
4) Right-click Pop-up Menu in the case of focusing on the SQL Editor ......................... 17
5) How to create a new AMGA collection ..................................................................................... 18
E. Attributes Panel(View)..................................................................................................19
F. Schema Browser .............................................................................................................21
1) Data Manipulation Browser[
] .................................................................................................... 21
2) Attribute Manipulation Panel(View) ............................................................................................. 26
3) ACL Manipulation Panel(View) [
] ........................................................................................... 26
4) Constraints Manipulation Panel(View) ........................................................................................ 27
G. Data Import/Export and Rollback Wizard ..........................................................30
1) Data Import Wizard ............................................................................................................................ 30
2) Data Export Wizard ............................................................................................................................. 35
3) Data Rollback Wizard ......................................................................................................................... 39
H. Group/User Manager ..................................................................................................42
1) Group Management............................................................................................................................ 42
2) Edit Group Membership ................................................................................................................... 42
-3-
3) Users Manager ...................................................................................................................................... 43
I. Site Manager ....................................................................................................................45
J. SQL Editor ..........................................................................................................................46
J. Console Panel(View) ......................................................................................................50
K. Progress Panel(View) ....................................................................................................51
L. SQL Result Panel(View)................................................................................................52
M. Authentication Tokens Panel(View) ......................................................................52
O. HELP ...................................................................................................................................53
IV. Limitation ..................................................................................... 58
APPENDIX I. Shortcut Key .............................................................. 59
APPENDIX II. AMGA Query ............................................................ 61
APPENDIX III. Changelog................................................................ 91
-4-
I. Overview
A. Introduction
1) AMGA
AMGA is a gLite-metadata catalogue service designed to offer access to
metadata for files stored on the Grid. In a more general way this is a database
access service for Grid applications which allows user jobs running on the Grid to
access databases by providing a Grid style authentication as well as an opaque
layer which hides the differences of the different underlying database systems
from the user. To achieve this, AMGA is a service sitting between the RDBMS
and the user's client application[1].
2) AMGA Manager
The AMGA Manager is an easy-to-use, general-purpose GUI toolkit for AMGA
The AMGA Manager aims at providing an interactive exploration and searching
environment for metadata in an user-friendly manner, and hiding complexities for
accessing Grid service. It allows users to manipulate metadata schema, entries,
access control, user and group information through a user-friendly GUI. In
addition, it includes many features improving usability and convenience such as
the automatic query composition, importing and exporting metadata into a spread
sheet, and filtered metadata searching. Portability was one of the most important
considerations, and the Eclipse IDE helped the toolkit work in various
heterogeneous platforms; Linux, Windows, and Mac. We believe that these
diverse features in the AMGA Manager helps users to build metadata searching
environment more easily and faster and to boost productivity in managing large
size metadata on Grid. The AMGA Manager is compatible with AMGA.
-1-
B. Product Features
1) User Friendly Interface
The AMGA Manager allows users to manipulate metadata schema, entries, access
control, user and group information through a user-friendly, flexible and powerful
GUI. In addition, it includes many features improving usability and convenience
such as the automatic query composition.
2) Connections and Authentication
The AMGA Manager directly connects to an AMGA server through the AMGA
Java interface.
Currently it provides ID and password based authentication only.
It is planned to provide a certification based authentication sooner or later.
3) Powerful Schema Browser
The Schema Browser of the AMGA Manager allows users to collections, data
entries, attributes, ACLs, user permissions in a very flexible way.
4) Easy and Flexible Query Interface
The AMGA Manager provides an easy and flexible query interface through filters,
which behave similar to the where-clause and order-clause of SQL.
-2-
5) Easy and Fast Query Execution
Users can easily create and execute both AMGA SQL and AMGA Query Builder.
6) Prompt action about AMGA middleware upgrade
The AMGA Manager will be supported and maintained continuously by the main
AMGA development team. So, it will have immediate update whenever there are
changes in AMGA.
C. Technical Support - AMGA
If you have a question about the AMGA service or the AMGA Manager, please
contact the following sites.
- AMGA Homepage : http://cern.ch/AMGA
- AMGA Forum : http://amga.ct.infn.it/support/
- GGUS bug tracking : https://gus.fzk.de/pages/home.php
II. Installation
A. Pre-Requiements
1) JAVA version: A Java Runtime Environment(JRE) version 1.6 or higher
- download (http:/www.java.com or http://www.oracle.com)
2) OS : Linux(32bits or 64bits), Windows(32bits or 64bits) or Mac OS
B. How to Install
1) Download the AMGA Manager package corresponding to the
platform: http://cern.ch/amga/downloads/AMGA_Manager
2) Unzip the downloaded file to a proper directory
3) To run the AMGA Manager, Just execute the “AMGA Manager.exe”
file in case of the Windows platform
-3-
III. Main Menu
A. New Connection
New Connection consists of ID/PW, Certificate developed by KISTI and GLOBUS,
VOMS authentication module using a plug-in of g-Eclipse.[2] Some of functions
are not perfect imported and not customized due to the originality of g-Eclipse
and the dependency to be reflected by original source. Therefore, there could be
unnecessary functions in this client. Especially, except for Security and VODeclarations in the g-Eclipse preferences we won’t use others. In detail, refer to
advanced preparations for VOMS proxy authentication.
On the menu, click [File]>New Connection or click the New Connection[
button.
host URL
host URL
host URL
host URL
host URL
host URL
host URL
host URL
host URL
host URL
host URL
User ID
<AMGA Login>
- [Host]: The IP address of an AMGA server
- [User]: An user Account
- [Password]: An user password
- [Port]: Port Number of an AMGA server (generally 8822)
*
- [Access] : Choice of authentication mechanism
-4-
]
- [UseSSL]: Whether to use an SSL Connection
- [Save]: Whether the connection information is saved for later use
* Access: ID/PW, Certificate, Grid Proxy (VOMS Proxy, GLOBUS Proxy)
1) ID/PW authorization (including authentication)
Connection with ID/PW
2) Certificate authentication
Connection with Certificate authentication
Select user certificate and user key in your PC and key-in passphrase with
manipulating the proxy life cycle. And then click finish button.
3) Globus Proxy authentication
Connection with GLOBUS Proxy authentication
Select Globus and click Next button.
-5-
Fill in the blanks with the same ways as above certification authentication.
4) VOMS Proxy authentication
Select VOMS proxy and click Next button.
-6-
Edit VOs information
Add VO and Modify VO information. Please refer to Advanced preparations for
VOMS proxy authentication.
Edit Security
Add VO and Modify VO information. Please refer to Advanced preparations for
VOMS proxy authentication.
-7-
5) Advanced preparations for VOMS Proxy Authentication
Fill in your directory of user certificate and user key in your PC in order to make
VOMS proxy (included voms-proxy-init command)
□ VO Setting
Add new VO
You can use the g-Eclipse > VO-Declarations preference page to declare a
new Virtual Organization. There, you can click Add... to start the VO Wizard.
If you have installed g-Eclipse with a middleware extension, the VO Wizard
may show up a first page that let you choose the type of the VO you want to
create:
For the setup of a middleware specific VO, please see the corresponding help
pages of the middleware. If no middleware extension is available, the VO
Wizard will directly switch to the wizard page for setting up a generic VO:
-8-
All you have to do here is to enter a name for your generic VO and to press
Finish. The newly create VO will then be shown in the VO preference page.
□ VOMS VO setting
-9-
You may exactly fill several blanks (Name, Host, Port, Host DN). I let you
remind “services>Information system and end-point” dependent g-Eclipse
only but you don’t leave a blank.
□ Security Preference setting
The g-Eclipse security settings are the central point for managing trusted
certificates. These are used for accessing remote servers and services that
require some kind of authentication such as SSH handshake. From the central
security preference page you may add or import trusted certificates,
investigate your certificates or remove trusted or untrusted certificates.
Besides these settings, g-Eclipse hooks itself into HTTPS/TLS connections.
Whenever such a connection needs trust management, the Certificate Trust
Dialog is used to ask the user about how to trust a particular certificate or
certificate chain. The
following screenshot
shows two types adding
certificates that are adding trusted certificates and importing trusted
certificates. If you have trusted CA certificates, you may click Add… and
select one or more CA files in your PC using Grid file dialog. If you import CA
from some site, click Import… and select one of the available repositories
and choose your CA.
-10-
□ Preferences
Don’t be confused with inactivated functions.
B. Disconnection
To disconnect current connection.
On the menu, click[file] > Disconnect AMGA server, or click End Connection[
on the tool bar
C. Change Password
On the menu, click [File]>Change Password.
D. Collection Panel(View)
-11-
]
1) Collection Management
The Collection panel is located at the left side of the main window.
The Collection panel helps users to manipulate AMGA collections such as
creating, listing and deleting collections (directories/sub-directories).
-12-
Menu at collection
Schema
SQL
Browser
Editor
Go DATA
◯
◯
Go Attribute
◯
◯
Go ACL
◯
◯
Go Constraint
◯
◯
Go Index
◯
◯
Go SQL Editor
◯
MENU
Sub-MENU
Make
Manage Collection
◯
◯
◯
◯
◯
◯
◯
◯
collection
Permission
collection
Drop
collection
Manage Federation
Scripting
selectattr ...''
◯
insert ...
◯
update ...
◯
delete ...
◯
drop ...
◯
Data Import
◯
Data Export
◯
Data Rollback
◯
Refresh
◯
Property
◯
-13-
◯
The above depicts a pop-up menu when you right-click a collection at the
schema browser or at the SQL editor.
[Add]: create a new collection
[Delete]: delete the selected collection
[Expand all]: see all directories
[Collapse all]: hide sub-directories
[Refresh]: refresh collections [Send collection name]: send the collection
name into the SQL Editor
<Icon menu on the Collection Panel>
- Add[
1
] : creates new collection having attributes with data type under the
selected directory.
- Delete[
]: drop the selected collection
- Expand all[
- Collapse all[
- Refresh[
]: see all directories
]: hide sub-directories
]: refresh session
- Send collection name[
]: import collection name into SQL Editor
2) Right-click Pop-up Menu with the Schema Browser
The pop-up menu differs depending on a type of the right-side panel.
1
If you’d like to know how to use “Make Table”, refer to 4) How to create a new AMGA
collection
-14-
In the case of focusing on the Schema Browser
- [Go Data]: go to data browser
- [Go Attribute]: go to Attribute browser
- [Go ACL]: go to Attribute browser
- [Go Constraint]: go to Constraint browser
- [Go Index]: go to Index browser
- [Collection]: Chapter 3) describes in detail
- [Manage Federation]: make a federation in target directory
-15-
It also behaves as an input interface when selecting a collection at the schema
browser or at the SQL editor.
3) Collection
2
- [Make Collection] : make a collection with directory path
- [Permission Collection]: change the permission and the owner of target
collection with the current path
Change the current path by clicking Browser button. And then change the owner
and the permission in the above dialog.
2
If you’d like to know how to create a new collection with table, refer to 4) How to create a
new AMGA collection
-16-
- [Drop collection]: Delete the selected collection with metadata
4) Right-click Pop-up Menu in the case of focusing on the SQL Editor
In case of the SQL Editor
- [Scripting]: compose automatically an AMGA query with the SQL Editor
>> selectattr .... '' :
selectattr attribute1 attribute2 ... ' '
>> insert .... :
insert current_directory/<FILE_name> FILE <value> attribute1 <value>
attribute2 <value> ...
>> update .... :
update
current_directory
FILE
<value> ...
>> delete .... :
rm current_directory ' '
>> drop .... :
rm -r current_directory
-17-
<value> attribute1 <value> attribute2
- Send collection name[
]: import the collection name into the SQL Editor from
the Collection Panel
- [Drop Collection]: drop the selected collection
- [Data Import]: Import data from file having artificial data into AMGA server
- [Data Export]: Export data limited by the selected attributes and where-clause
to file formats like xls, txt, xml and so on
- [Refresh]: refresh session
5) How to create a new AMGA collection
Detail Add[ ]: Create AMGA New Collection
<Functions of Pop-Up Browser>
- [Collection Name]: A Collection Name
- [Attributes]: Attributes
- [Back]: Previous Step
- [Next]: Next Step
- [Finish]: Complete creating a new collection
-18-
- [Cancel]: Cancel
creating a new collection
6) Copy AMGA collection(Wizard)
Copy collection function provides users to copy target collection with metadata
including all entries and own properties.
On the collection pop-up menu, click Copy Collection[
] (shortcut: Alt + c)
<Step 1> Choose collection(s)
Select all collections under the target directory to copy and then click Next
button.
<Step 2> Format options and Location
Users can set copied collections with its own formats(data, attributes, ACL,
constraints), which they select, to the directory they want. But ACLs can’t be
copied in the same as the data of ACL in original entries and in some cases, ACLs
can be filled with new access definition.
-19-
Select formats and specify the path. And then click Next button.
<Step 3> Confirmation
The aim of this step is to confirm the directory structure and the formats of your
copied collection(s).
After that, click finish button to complete copy.
E. Attributes Panel(View)
The Attributes panel is located at the right side of the main window.
-20-
- Radio boxes:
; During activating the SQL Editor
▪ In case of “With Dir”, put attributes with selected collection path into the editor
▪ In case of “Only attr”, put attributes without any path into the editor
- Send attribute name[
]: let
the “directory:attribute” name imported into the
SQL Editor
- All Columns: import all “directory:attribute” names into SQL Editor(Only SQL
Editor, no schema browser)
- Attribute List: Attributes in the selected collection
F. Schema Browser
The Schema browser provides a total solution for managing AMGA metadata
catalogue such as adding, modifying and deleting metadata schema, entries,
access controls, user and group information, and so on.
To use the schema browser, select [Schema Browser] menu at the main window
or press SQL Editor[
] icon on the menu bar
1) Data Manipulation Browser[ ]
It is possible to search and manipulate entries from a selected collection through
the data panel of the Schema Browser. The data view is displayed in a grid form
when a user selects a collection. It helps users to easily understand entries and
attributes of the selected collection.
-21-
To use the data view, click [Tools] > [Schema Browser] > [Data] menu or press
[Data Tab] below the schema browser
*
3
- Filter [
] : sets the data range in the target collection which you want to see
- Add [
]: creates the new entries in the catalogue and needs to click commit
button to confirm the final incoming data.
- Remove [
]: removes selected entries.(automatically commit)
- Commit [
]: confirms manipulating data.(original AMGA commands doesn't
include this function)
- Left arrow [
- Right arrow [
- Refresh [
- Pause [
play[
3
]: changes the activating target point into top
]: changes the activating target point into bottom
]: refresh data from AMGA server
]: pause deriving data (a large scale data) after that, it’s toggle to
]button
If you’d like to know how to use filter, refer to A) How to use a filter at the data
manipulation browser
-22-
Click : Pause
Click : Play
In the case of viewing a large metadata, it takes so long time to get all metadata.
If users want to stop getting data, a user could push pause button. (If users want
to get data again, a user could push play button) This function limits the quantity
of streaming data up to default 100,000 entries. Thus if a user want to get more
data, double-click the counting entries and set the range of preference as
indicated below figure.
Double-click
A) How to use a filter at the data manipulation browser
The filter allows a user to select some of interested columns at the data panel.
-23-
(a) Included Columns Tab
<View of the Included Columns >
- [Check boxes]: check selected attributes to show data in the schema
browser;Data
- [SQL Query viewer]: show the AMGA query sentences made via filter GUI.
- [Clear]: remove filtering features
- [OK]: complete filter
- [Close]: close this browser without saving
<Click right mouse button>
- [select all]: select all attributes
- [empty select]: no select in the activating position entry
- [Order by(ASC)]: make ordering attribute(only ascending)
- [Remove Order by]: remove ordering feature from the selected attribute
(b) Where Clause Tab
The WHERE statements of the SQL queries
-24-
<View of Condition Operators>
<View of Condition Functions and Joins>
Tips show how to use selected function at the bottom side.
<View of Attributes>
The view of attributes is a list of attributes which are able to give selectingattributes function and completing where-clause.
(c) Order By(ASC) Tab
in order to order data set, select attribute in the right side.
-25-
2) Attribute Manipulation Panel(View)
On the menu, click [Tools] > [Schema Browser] > [Attribute] or press [Attribute
Tab] below the schema browser
<Button Function on the Attributes Tab>
- Add [
]: creates new attributes.
- Remove [ ]: removes selected attribute.(If there are data in the selected
attribute, you need to remove data firstly.)
- Commit [
function)
]: confirms changes.(original AMGA commands doesn't include this
- Left arrow [
- Right arrow [
- Refresh [
]: moves to the first entry.
]: moves to the last entry.
]: refresh attributes. It updates attribute name only.
3) ACL Manipulation Panel(View) [
-26-
]
On the menu, click [Tools] > [Schema Browser] > [ACL] or press [ACL Tab]
below the schema browser
<Button Function on the ACL Tab>
- Add [
]: creates new ACLs.
- Remove [
]: removes selected ACLs.
- Commit [ ]: confirms manipulating ACLs.(original AMGA commands doesn't
include this function)
- Left arrow [
- Right arrow [
- Refresh [
]: changes the activating target point into top
]: changes the activating target point into bottom
]: refresh ACLs from AMGA server
4) Constraints Manipulation Panel(View)
On the menu, click [Tools] > [Schema Browser] > [Constraints] or press
[Constraints Tab] below the schema browser
-27-
<Button Function on the Constraints Tab>
- Add [
]: creates new constraints.
* After clicking Add[
] button, choose constraint and, attribute in the drag box
* Except collection, change AMGA constraints command consisted of constraints,
attributes and constraint's name
- Remove [
]: removes selected constraints.
- Commit [
]: confirms changes
-28-
- Left arrow [
- Right arrow [
- Refresh [
]: moves to the first constraint.
]: moves to the last constraint.
]: refresh constraints
5) Index Manipulation Panel(View)
On the menu, click [Tools] > [Schema Browser] > [Index] or press [Index tab]
below the schema browser
<Button Function on the Constraints Tab>
- Add [
]: creates a new index.
-29-
* After clicking Add[ ] button, change the index name and choose index
attributes in the drag box.
- Remove [
]: removes selected the target index
- Commit [
]: confirms changes
- Left arrow [
- Right arrow [
- Refresh [
]: moves to the first index.
]: moves to the last index.
]: refresh indices
G. Data Import/Export and Rollback Wizard
1) Data Import Wizard
The AMGA Manager allows users to import data from a wider variety of formats
like excel, text and xml files into AMGA metadata catalogue.
On the menu, click [Tools] > [Data Import] or select DATA Import[
the menu bar (shortcut: Ctrl+I)
<Step 1> Data Import Wizard – Open File Data
-30-
] icon on
Click Import button[
] then select file data at opening window browser
Select file data then click next button
-31-
<Step 2> Data Import Wizard – Set-up first data row
This browser allows a data format inside a file to be selected. If a user selects
delimited text format, the user has to choose the delimiter; a tab, a space or a
comma. We recommend users to select a tab in order to minimize import failure.
Then, select the first data row and click the next button.
<Step 3> Data Import Wizard – Check Information; start position
-32-
This step gives users a preview of imported dataset. With this step, users can
check whether importing is properly processed. Then, click the next button.
<Step 4> Data Import Wizard – Select target collection
Select the collection where you want to import and click the next button.
-33-
<Step 5> Data Import Wizard – Attribute mapping
The next step goes through a confirmation process that file fields match AMGA
attributes. If finished matching check, then click the next button.
<Step 6> Data Import Wizard – Monitoring upload queries
-34-
This browser gives users a chance to double check whether importing is
processed properly. (Users can use these queries in development of their
applications.)
After this click the finish button then the importing success message box comes
up.
2) Data Export Wizard
Users can export metadata in AMGA to external files with different forms; MS
excel, text files, etc through the ‘Data Export’ menu.
On the menu, click [Tools] > [Data Export] or select DATA Export[
] icon on
the menu bar (shortcut: Ctrl+K)
- Data Export[
]: Export data limited by the selected attributes and where-
clause to file formats like xls, txt and so on.
<Step 1> Data Export Wizard – Select target collection
-35-
Data export wizard provides two types of data exporting which consists of all
data and some of data with your queries.
If you want to export a large scale of data which is some part of full dataset, you
may check some entries radio box and export some data.
Select a collection and type of exporting data which you want to export into a file
format and click next button.
P.S. In the all entries case, go to <step 2-1>, in the some entries(query), go to
<step 2-2>. And other steps are the same as step 2.
<Step 2-1> Data Export Wizard – Select Output Options: All Entries
In this step, you can decide output format and string quote character and confirm
information of output file(s). In the case that output file(s) is excel, data exporting
wizard may generate a few files with a few sheets. Therefore you must check the
information of output file(s) and some tips.
The above figure is the case that output format is excel and contains the
information that includes the number of entries, file(s) and excel sheet(s). If
possible, I recommend you to export a large scale of data in text form.
-36-
The above figure shows output format is text which has string quote characters
like tab, space and comma and includes the number of entries and file.
This two browsers help user to choose from two file formats for exporting
metadata; an Excel file format and a delimited file format. If a user wants an
Excel file format, just click the next button. Otherwise a user needs to select a
delimited text and select a (Tab, Space and Comma). Then click the next button.
<Step 2-2> Complete query: Some Entries
This assists you to complete your query and add query’s conditions in order to
export output text file with some entries which you want.
-37-
This step is applicable to only text case.
Complete your query and click next button.
<Step 3> Data Export Wizard – Check matching fields
-38-
Make sure that the origin attributes and exported data fields are correct. Then
click the next button.
<Step 4> Data Export Wizard – Make file
Make a file name and select a file path which is used to save exported file.
If you export a large scale data in only excel form, you could find a couple of files
with
a
couple
of
sheets
as
I
mentioned
before.
(e.g.
outputfile(0).xls,
outputfile(1).xls … including sheet0, sheet2, …)
Click the next button. The Exporting success message box should come up.
3) Data Rollback Wizard
On the menu, click [Tools] > [Data Rollback] or select DATA Rollback[
] icon
on the menu bar (shortcut: Ctrl+U)
Tip: Data Rollback Wizard
This Data Rollback Wizard is temporary function when the transferring error,
closing session occurred for some unknown reasons or network disconnection
happen during importing huge data into AMGA server.
-39-
<Step 1> Data Rollback Wizard – Select target file
Click Import button[
] then select file data at opening window browser
<Step 2> Select Objects for rollback
-40-
Select the collection where you want to rollback and click the next button.
<Step 3> Set the range of removal
This step is temporary and can force to remove failed rollback data since AMGA
API doesn’t support to transfer a huge data more than 50,000 entries.
-41-
In the first step, click “Import Log View” and check which row was failed.
In the second step, select target sheet and During the third step, manipulate both
first data row and end data row.
[If you don’t set up that, it could take long time
to remove failed rollback data because of trying all entries in the file(s)]
After this, click the finish button then rollback success message box comes up.
H. Group/User Manager
On the menu, click [Tools] > [Group/User Manager] or press Gourp/User
Manager[
] on the tool bar
1) Group Management
<Group/User Manager>
- Add[
]:creates a new group
- Delete[
]: deletes the selected group
- [Search]: search a group name
2) Edit Group Membership
In order to change(add, delete) a group membership, click Edit User Groups[
in the Group/User Manager pop-up browser.
-42-
]
<Edit User Groups>
- Import User[
]: Imports a user into the selected group.
3) Users Manager
<Users>
- [Search]: search a user
- Add User[
]: adds a new user to the selected group
- Delete User[
]: delete the selected user
A) How to create a user ID
(1) Create a new user ID
You should be a root user to create a new user. To create a new user, click
“create user” icon at the user panel. Then the following pop-up window will
show up. Type a new user’s name and press the OK button.
-43-
(2) Create a temporary password
After typing an ID, the following window will pop up and ask a temporary
password.
(3) Save a new user information(ID/Password)
The next pop-up browser menu helps to save the composed authentication
information into a file.
-44-
I. Site Manager
The Site Manager is to store the information about other sites in the backend.
After registration of new site, additional site information can be modified with
following modify browser. This is useful to set-up replication and federation.
On the menu, click [Tools] > [Site Manager] or select Site Manager[
the menu bar
<Site Manager>
- [Add]: adds a new site
-45-
] icon on
- [Modify]: change a preference values in specific options
- [Delete]: delete the site
Click Add button, you can fill brief site information
In Add site dialog, you may write down site name, hostname and port number.
If you want more information at the site, Click Modify button in the Site Manager
and fill other information above Modify dialog.
J. SQL Editor
-46-
The SQL Editor is an effective tool to manipulate and manage AMGA metadata
based on a Command-Line-Interface. This provides several functions like a
automatic composition of AMGA query, Importing Collection/Attribute names and
Reusing previous AMGA queries via saved query files.
On the menu, click [Tools] > [SQL Editor] or press [SQL Editor tab] or select
SQL Editor[
] icon on the menu bar
①
① indicates help commands
<Button Function on the SQL Editor Browser>
- Save[
]: Save used AMGA queries
- Open file[
- Run[
]: Open an existing AMGA file
]: Run AMGA queries
- [Complete Query]: complete an AMGA query; during typing some character in
the queries, press F1 key
press the arrow button on your
keyboard or point the mouse cursor into
the target query then select an AMGA
query syntax (Enter key or double click
in left button of the mouse)
-47-
* Via moving a mouse cursor or an arrow key, it shows syntax and a description
of the selected AMGA query as balloon help.
- [SQL]: makes some
simple queries
<Button Function on another Panels>
- Send collection name[
]: import a collection name into the SQL Editor from
the Collection Panel
- Send attribute name[
]: import a directory:attribute name into the SQL
Editor(Only SQL Editor, no schema browser) from the Attribute Panel
- [All Columns]: import all directory:attribute names into the SQL Editor(Only
SQL Editor, no schema browser)
<Clicking right mouse button at Collection Panel>
- [Scripting]: compose automatically a
Browser
-48-
simple AMGA query
at the SQL Editor
* After clicking the 'insert' at the scripting menu, the SQL Editor browser shows
full AMGA commands with all attributes and input value colums.
<Execute blocked query and Add block Comment>
Although there are many queries in the SQL Editor, you can choose and execute
one of them by dragging some of command lines which changes the background
color into blue. If you want to write a description that is to be inctivated while
making queries, you can comment them out with the “//” symbol.
Below figure, there are several command lines which are comprised of two
comments and one query with a description about listattr. If you want to activate
and run the first line query dealt with blocked comment, you may drag/activate
and run(F5).
-49-
Tip: Help function
Help function is that the grammar, which let you know how to complete a query,
is shown on the bottom of SQL Editor. In this time, if you forget a word of
command and remember some letters of a word, you could type some characters
and receive help to complete command by pressing F1 button on your keyboard.
K. Fast View
The Fast View is nice viewer to see very large scale of metadata with powerful
rendering technique and to handle real-time update, dynamic styling and more. Its
uses are not legion and only to show mass metadata quickly and effectively.
However, the function of “page size” button to set the mount of entries showed in
a page has a high dependency on the available PC memory. So, users have to
keep the sufficient available memory.
-50-
This viewer is working to show metadata by the page controlling page drag box
or some arrows. And the page size settings at the bottom of a page can decide
the range of entries per a page. Considering performance according to memory,
set less than 1,000,000 entries at each page.
L. Console Panel(View)
The Console view is a program designed to be used as a AMGA CLI interface,
which works very similar to the mdclient tool. The Console view shows outputs
from the AMGA server on the users’ given queries.
M. Progress Panel(View)
The Progress Panel shows the progress state in case of background process.
-51-
N. SQL Result Panel(View)
The SQL Result View shows the results on the AMGA queries typed at the SQL
Editor browser. According to queries categorization as the number of result
column, data grid type will be decided in order to recognize data intelligibly.
O. Authentication Tokens Panel(View)
The Authentication Tokens view shows the type and status of Proxy generated
with time left information. Remember that time left doesn’t decide AMGA service
session. If you extends session time, you should have to modify AMGA server
configuration.
※ If you want to start another session and connect other AMGA service in case of
being proxy information in authentication tokens, you should have to clear it firstly
before any action.
-52-
P. HELP
1) Program Help
The Program Help gives you this on-line Manual.
- Direct link URL:
http://amga.web.cern.ch/amga/downloads/AMGA_Manager/1.2/AMGA_Manager_U
ser_Manual_v1.2.0.pdf
2) AMGA Homepage
If you have a question about AMGA with using AMGA Manager, please refer to
this AMGA homepage(http://cern.ch/amga)
-53-
3) Update AMGA Manager
The AMGA Manager provides automatic updater from program version 1.2 so
that users can use new version program without re-installation. Therefore, it is
possible to minimize download and installation time and to make reuse private
configuration information.
On the menu, click [Help] > [Update Manager]
<Step 1> Search Results
This step is to select target features to install.
Below popup, users can see only the latest version of a feature or all features to
install. ※ Default settings are recommended.
-54-
Click Next button[
] to move on.
<Step 2> Feature License
This step is to seek your signature of license.
Check your acceptance of license agreement.
Click Next button[
] to move on.
<Step 3> Installation
The following features will be installed. You can select a feature and change the
location to be installed.
-55-
If all process was done, click Finish button.
And then you can see new popup showing that this program needs to be restarted.
4) About Program
This menu shows some Introduction about the AMGA Manager.
- Contact us: [email protected]
- Reference URL: http://cern.ch/AMGA
5) My AMGA Version
This page shows the two types of AMGA Service version.
If AMGA service is version-up, stored AMGA version in the database is past
AMGA service version and you should have to change AMGA Service Version to
new one in order to use new functions matched with new version.
-56-
Ex) If your AMGA service: 2.1, you meet critical problems at
handling a large scale of metadata
<Button Function on the My AMGA Dialog>
- Change[change]: change AMGA service version
-57-
IV. Limitation
In this chapter, the limitation of AMGA Manager is aim to let you know the usage
limitation information before you work with AMGA Manager and describe the
supplementation plan for the issues.
A. No collection copy with metadata schema
• In the collection view, there isn’t the function to copy selected collection with
metadata schema.
※ Not yet fully operational for all AMGA commands
• This GUI that is called AMGA Manager doesn’t cover all AMGA commands,
although we have tried to provide many basic GUI functions for AMGA commands
to you. We’d like to ask for your understanding regarding all GUI functions in this
time.
-58-
APPENDIX I. Shortcut Key
AMGA Manager Shortcut key
MENU
Shortcut key
File -> new Connection
Ctrl + Shift + O
File -> end Connection
Ctrl + Shift + X Popup Menu
Collection shortcut key
[right-button/mouse]
File -> change password
File -> exit
Alt + F4
Tool -> Collection
-> Data
Alt + 1
-> Attribute
Alt + 2
-> ACL
Alt + 3
-> Constraints
Alt + 4
Alt + 5
-> Make Collection
Ctrl + Insert
-> Index
-> Drop Collection
Ctrl + Delete
-> SQL Editor
Tool -> Schema Browser
-> Make Collection
Alt + 6
Ctrl + Insert
-> Data
Alt + 1
-> Scripting
-> Attribute
Alt + 2
-> Send Collection name
-> ACL
Alt + 3
-> Drop Collection
-> Constraints
Alt + 4
-> Data Import
Ctrl + I
-> Index
Alt + 5
-> Data Export
Ctrl + K
Tool -> SQL Editor
Alt + 6
-> Refresh
Tool -> Data Import
Ctrl + Insert
Tool -> Data Export
Ctrl + End
Tool -> Data Rollback
Ctrl + U
Tool -> Group/User Manager
Ctrl + G
Tool -> Site Manager
Ctrl + T
Help -> Progam Help
F9
Help -> AMGA Homepage
F10
-59-
Ctrl + Delete
F5
Help -> About AMGA Manager
Key Assist
F10
Ctrl+Shift+L
Schema Browser Shortcut key
SQL Result Shortcut key
Popup Menu
Popup Menu
[right-button/mouse]
[right-button/mouse]
-> All Seclect
Ctrl + F
-> Copy
Ctrl + C
-> All UnSelect
Ctrl + D
-> Select All
Ctrl + A
-> Select
Ctrl + S
-> unSelect
Ctrl + Shift + S
-> Copy
Ctrl + C
-> Pause
Ctrl + P
-> Refresh
Space Bar
SQL Editor Shortcut key
Popup Menu
[right-button/mouse]
-> Undo
Ctrl + Z
-> Redo
Ctrl + Y
-> Cut
Ctrl + X
-> Copy
Ctrl + C
-> Paste
Ctrl + V
-> Select All
Ctrl + A
-60-
APPENDIX II. AMGA Query
This chapter, AMGA Query, supports you to be easy to manage your AMGA data
and develop your systems with AMGA server. Especially, this helps using the SQL
Editor of AMGA Manager.
A. Commands for entry manipulation
• addentry entry (attr value)+: Creates a new entry and assigns the given values
to the provided attributes.
Examples
Query> addentry /testdir/a id 10
Query> addentry b id 10 finished 'Oct-10-2004'
• insert entry (attr value)+: Creates a new entry and assigns the given evaluated
values to the provided attributes. Same as addentry, except that the values are
evaluated first, similar to an INSERT statement in SQL.
Examples
Query> insert /cities/Chungju altitude 25 latitude 23
• addentries (entry)+: Creates the given entries in the catalogue. This command
is done in a transaction, that is either all entries are inserted or none. Entries can
be spread over several directories.
Examples
Query> addentry cities/Seoul altitude 86 latitude 37
Query> addentry cities/Hamburg altitude 6 latitude 53
• rm [-options] pattern [condition]: Removes all files matching pattern, where
pattern may only contain wild cards in the file part. If a condition is given, than
-61-
that condition needs to be met by the entry's metadata. In order to remove an
entry you need write permissions on the parent directory. The pattern can also
be the name of a directory if a condition is given, if the table is a plain table, the
pattern _must_ be a directory name and there must be a condition given.
Examples
Query> rm /cities latitude=65
Examples
Query> rm -r /test1 # remove recursively - remove selected 'test1'
directory, in addition to files and sub-directories under 'test' directory.
• listentries [directory/schema]: Returns the name of all entries in a given
directory or schema. This differs from the dir command in that it will not show
any directories but also that it shows only entries attached to a schema in the
case of an AMGA catalogue collaborating with a file-catalogue.
Examples
Query> listentries /TEST
• transaction: Starts a transaction. Any changes to the backend of AMGA are done
only when committed. To cancel a transaction use abort.
Examples
Query> transaction
• upload dir (attribute)+: Starts an upload of entries into the catalogue. Currently
a static restriction of the prototype is that there can be only up to 98 attributes
assigned like this. After the upload is initialized, the put, abort and commit
commands are allowed. Errors are returned by the call immediately, the OK code
is delayed till the entire upload is successfully committed.
-62-
Examples
Query> upload /cities altitude latitude
... >put 'Hamburg' '66' '413'
... >put 'Geneva' '77' '62'
... >put 'Pusan' '99' '73'
... >commit
Query>
• put file (values)+: Inserts a new entry during upload. Errors are returned by the
call immediately, OK is delayed until upload is committed.
• abort: Aborts upload or transaction. Errors and OK are returned by the call
immediately.
Examples
Query> abort
• commit: Commits upload or transaction. Errors and OK are returned by the call
immediately.
Examples
Query> Commit
B. Commands for Manipulating Attributes
• addattr dir (key type)+: Adds new keys to the list of keys of a directory. In a
relational database backend these keys become the columns of a table associated
to a directory. You should only use one key/type pair currently for compatibility
reasons because some older backends like PostgreSQL <=7.4 do not allow to
alter a table adding several columns.
-63-
Possible types are explained in AMGA data types(p. 25). The type is only used as
a hint for the back end to store the data efficiently and allow efficient queries.
The type may be ignored by the implementation (e.g. if the back end is a
filesystem). In a filesystem the types and defined keys could be stored as
attributes of directories. Some storage backend may allow you to dene keys on a
per-entry basis.
Examples
Query> addattr /TEST manager varchar(50)
• renameattr
Examples
Query> renameattr /TEST manager MGer
• removeattr dir/entry key+: Removes the attributes or keys from the list of
attributes of the directory dir or the directory of the given entry, or if the
implementation allows it from the list of attributes of a given entry. Attributes can
only be removed if they are not used by any entry. So you either have to remove
all entries for which this key is set or use clearattr to set the value of the
attributes to NULL In order to remove an attribute, write permissions on the
directory are necessary.
Examples
Query> removeattr /TEST remove_attr_name
Examples
#in case of the attributes with value
Query> clearattr /TEST remove_attr_name #make it to NULL
Query> removeattr /TEST remove_attr_name
-64-
• schema_create dir (attr type)+ [option]: Creates a new directory with a given
schema. This is an atomic replacement for a sequence of createdir and addattr.
The meaning of the optional option argument is backend dependent and you
should not use it if you want to retain this independence. With a MySQL backend
you can give here the name of the table engine, for PostgreSQL the keyword
inherit will make the table inherit its schema from the parent directory.
Examples
Query>
Query>
• setattr file (attribute value)+: Sets a list of attributes of a file to given values.
The attributes must exist.
Examples
Query> setattr /weather/img132.jpg temp_lo 23 temp_hi 54
#collection must have entry name and a set of attributes
• getattr pattern (attribute)+: Returns the filename and all attributes in turn for
every file matching pattern.
Examples
Query> getattr /cities/ altitude latitude
>> Hamburg
>> 6
>> 53
>> Geneva
>> 374
>> 46
>> ...
• listattr file: Returns a list of all attributes
Examples
-65-
Query> listattr /weather
>> city
>> varchar(30)
>> temp_lo
>> float
>> temp_hi
>> float
>> precip
>> int
>> taken
>> timestamp
• clearattr path attribute: Sets the attributes of all files matching path to NULL.
Path may currently contain wildcards only in the file-part.
Examples
Query> clearattr /weather precip
Query>
Sets the attribute of matching path/entry_name to NULL.
Examples
Query> clearattr /weather/File6 precip
C. Finding and Updating Entries
• find path query: Returns a list of filenames matching path and fulling the query
with their attributes. The path may currently contain only wild cards in the file
name part. Query must be enclosed in single quotes. Strings in the query must be
quoted with double quotes.
WARNING: Be careful with patterns which also match a subdirectory, the result is
undefined.
-66-
Examples
Query> find /cities 'like(FILE, "H%")'
>> Hamburg
Query> find /weather 'temp_hi = 23'
>> img1.jpg
>> img2.jpg
• updateattr pattern (attribute value)+ condition: Updates attributes of entries
matching a pattern in a single collection based on a condition. The values to
which the attributes are updated can contain attributes as variables. Complex
expressions are allowed as values. The condition may reference attributes of
other collections. Updates are atomic.
Examples
Query> updateattr /testdir1/* events events+1 'events>100'
Query> updateattr /testdir1/* events events+1 '/testdir2:key > 0'
The first example increases the number of events of every file in /testdir1 which
has more than 100 events by one. The second example increases the number of
events of every file in testdir1 provided there is an entry in the collection
/testdir2 which has the attribute "key" set to anything larger than 1 (usefull to do
locking by clients: putting such an entry into /testdir2 would lock /testdir1).
• updateattr_single pattern (attribute value)+ condition: Almost same as updateattr,
but this updates attributes of a random single entry matching a pattern in a single
collection based on a condition. This command is useful when AMGA is used as a
placeholer for task retrieval.
Examples
Query> updateattr_single /task status "running" 'status="waiting"'
>> /task/simulration-005
• update pattern (attribute value)+ condition: Same as updateattr, but the values
are not evaluated prior to insertion into the table. This command works with
-67-
bound variables, which will also x problems with SQL command length limitations
in Oracle.
Examples
Query> update /cities altitude 33 latitude 44 'like(FILE, "Ottawa")'
Query>
• selectattr (attribute)+ condition: Selects attributes from several collections
based on a condition doing an inner join on the collections based on a join
condition. The FILE attribute is used to select the entry name of an entry.
Example:
Examples
Query> selectattr /jobdir:FILE /configdir:id /jobdir:eventGen /configdir:id
'/jobdir:events>1000 and /configdir:key=/jobdir:key'
Query>
selectattr
/weather:FILE
/weather:OWNER
/weather/:city
/weather/:temp_hi /weather/:temp_lo /weather/:taken 'like(city, "%a%")
and isnull(precip)) order city'
# the results are selected FILE, OWNER, some attributes
with like clause, isnull and ranked in ascending order
Query> selectattr /t1:num /t1:name /t2:num /t2:value '/t1:num = 1
join_left_on(/t1:, /t2:, /t1:num = /t2:num) limit 1'
Query> selectattr /t1:name /t2:value 'join_right_on(/t1:, /t2:, /t1:num =
/t2:num)'
This selects the entry-name of a job, the id in the configuration, the event
generator name of a job and the id in a configuration for all jobs and
configurations where the job has more than 1000 events and the keys attributes
of the jobs and congurations match.
As of AMGA 0.9 selectattr also supports constraints to the query similar to a
SELECT clause.
Queries can now take the form:
query [distinct] [limit xx [offset yy]] [order exp] [group_by exp]
-68-
where the distinct keyword translates into a SELECT DISTINCT, the limit and
offset clause limits the number of rows returned and with the order clause rows
can be ordered according to
the given expression. The group_by construct corresponds to the GROUP BY SQL
statement.
Queries can contain the following operators: +, -, *, /, =, and, or, not, >=, <=, <>
or !=
The following is a list of the supported joins and their translation into SQL:
- join_left_on(<left>, <right>, <condition>) left LEFT OUTER JOIN right ON
condition
- join_right_on(<left>, <right>, <condition>) left RIGHT OUTER JOIN right ON
condition
- join_inner_on(<left>, <right>, <condition>) left INNER JOIN right ON
condition
- join_cross(<left>, <right>) left C JOIN right ON condition
D. Native SQL Query
Supporting native SQL query greatly eases the work needed to port existing
SQL-based database applications to the Grid using AMGA and complements the
existing metadata query language in AMGA.
The followings are currently supported commands for native SQL queries.
• SELECT
Examples
Query>SELECT * FROM /weather WHERE /weather:temp_hi > '20'
>> /weather.FILE
>> /weather.city
>> /weather.temp_lo
>> /weather.temp_hi
-69-
>> /weather.precip
>> /weather.taken
>> img1.jpg
>> Hamburg
>> 15
>> 23
>>
>> 2008-07-17 11:03:17
>> img2.jpg
>> Hamburg
>> 13
>> 23
>>
>> 2008-07-18 11:03:17
>> img1S.jpg
>> Seoul
>> 21
>> 31
>>
>> 2008-07-17 11:03:17
• INSERT
Examples
Query> INSERT INTO /weather (FILE, city, temp_lo, temp_hi, precip,
taken) VALUES ('img2','Pusan','24','22','21','2010-06-22');
• UPDATE
Examples
Query> UPDATE /weather SET city = 'Daejeon', temp_hi ='38' WHERE
precip = '0';
-70-
• DELETE
Examples
Query> DELETE FROM /weather WHERE temp_lo = '21' AND temp_hi =
'29'
E. Manipulating Collections
• createdir /parentdir/dir [option]: Creates the directory dir if it does not yet exist
but parentdir already exists. The directory is created with the current owner and
the same ACLs as the parent directory. The option led is a comma separated list of
options (no spaces allowed). The following options are available as of AMGA 1.1:
- shared: Subdirectories created under this directory share the same schema
and database table of the parent directory
- acls: Creates a directory with acls for every entry, this is currently only
supported by PostgreSQL and MySQL5 and only if the necessary supporting
stored procedures have been installed first.
- type=<type> Species the data type of the entry column. Explicitely supported
are int, oat, date.
- table=<tabletype>: Only MySQL. Allows to specify the storage type of the
table, e.g. InnoDB. Neccessary because not all tables are alike. Specify e.g.
MyIsam, this allows for example GIS functionality.
Examples
Query> createdir /TEST/test1
Query>
• dir [directory]: Returns the name of all subdirectories and files in the directory.
where the entry-type is either 'entry' or 'collection'. If AMGA collaborates with a
file catalogue this command will effectively show the content of the file catalogue.
If you want to see which entries have already been attached to a schema in the
AMGA part use the listentries command.
-71-
Examples
Query> dir /TEST
Query>
• stat [dir/entry]: Returns information on a given entry or directory. They can
also be a pattern in the case of several entries. You need read permission to get
this information.
Examples
Query> stat /cities
>> /cities
>> collection perms
>> rwx
>> root
>> |system:anyuser rx|
• rmdir path: Removes all directories matching path. Directories are only deleted
if they are empty and they have no attributes defined.
Examples
Query> rmdir /test2 #directory must have no entries.
Query>
• pwd: Prints the current directory which you can change with cd.
Examples
Query> pwd
>> /weather/
• cd path: Changes the directory to the given path.
Examples
Query> cd /weather
Query>
-72-
F. Permission Handling
• whoami: Prints out the name of the current user. Note that this command does
not need any connections of the AMGA server and can thus be also used to do a
test on whether an
AMGA server is alive and what response time it has.
Examples
Query> whoami
Query>
• chown entry/dir new_owner: Changes the owner of a directory or entry. Only
the owner of an entry is allowed to execute this, or the root-user. chown does
not check whether ser exists, since user management is considered to be handled
outside of AMGA (ideally).
Examples
Query> chown /TEST tshuh
Query> acl_show /TEST
>> tshuh rwx
>> system:anyuser rx
• chmod entry/dir new_permissions: Changes the access permissions of an entry
or directory. Entries have owner and group-permissions, while directories have
owner permissions and group permissions are handled via ACLs. Group
permissions for entries allow you to remove privileges granted for all entries in a
directory via the directories ACLs. The format of new_permissions is rwxrwx for
entries and rwx for directories where "-"-signs can be substituted for the letters
if you do not want to give a certain privilege. The permissions for entries are the
concatenation of first user and then the group rights. The x-Flag allows a user to
enter a directory or respectively list an entry. r-and w-flags allow users to
read/write metadata while the w-flag for directories allows users to create or
delete entries in the given directory. Users cannot list directories for which they
-73-
don't have read permissions. The command works also for patterns and uses a
transaction.
Examples
Query> chmod /TEST r-x
Query>
G. Capabilities
Capabilities are additional attributes assigned to individual users. They are used
for example to allow a user to replicate login information. Currently no mapping
of VOMS capabilities is done, but this could be a future use-case.
• capabilities_add <user> <capability>: Adds the given capability to the user's
capabilities. Only root can do this.
Examples
Query>
Query>
• capabilities_remove <user> <capability>: Removes the given capability from
user's capabilities. Only root can do this.
Examples
Query>
Query>
• capabilities_list [user]: Lists all capabilities of a user, default is the current user.
Examples
Query>
Query>
-74-
H. Index Management
• index_create name collection '(attribute)+' [algorithm]: Creates an index name
on a collection directory using several attributes and a given algorithm.
Algorithms
depend
on
the
backend.
The
index
is
later
referred
/collection/name in index_remove.
Examples
Query> index_create indexname /TEST_index 'Attr1'
• ls collection: show index list
Examples
Query> ls /TEST_index
>> /TEST_index/indexname
>> FILE1
>> FILE2
>> ...
Query > ls /TEST_index
>> /TEST_index/indexname
• index_remove index_remove /path: Removes an index.
Examples
Query> index_remove /TEST_index/index1
I. Table Constraints
• constraint_add_not_null directory attribute name: Adds a not NULL constraint
-75-
to
for the given attribute of the directory. Name is the name used to refer to the
name of the constraint. It must be unique for that directory. Write permissions on
the directory are necessary for this operation.
Examples
Query> constraint_add_not_null /test_constraints Attr1 const_not_null_no1
• constraint_add_unique directory attribute name: Adds a UNIQUE constraint for
the given attribute of the directory. Name is the name used to refer to the name
of the constraint. It must be unique for that directory. Write permissions on the
directory are necessary for this operation. NOTE: On MySQL you can use
attribute(length) to set the length of indexed columns.
Examples
Query>
constraint_add_unique
/TEST_constraints
Name1
const_unique_no1
• constraint_add_reference directory attribute reffered_attr name: Adds a foreign
key constraint for the given attribute of the directory. The foreign key is given by
the referenced attribute which must fully qualify that attribute including the table
part, e.g. /dir:attr. Name is the name used to refer to the name of the constraint.
It must be unique for that directory. Write permissions on the directory are
necessary for this operation.
Examples
Query>
constraint_add_reference
/TEST_constraints
Attr2
/REF_test1:Attr1 const_refer_no1
• constraint_add_check directory check name: Adds a check constraint to the
directory. Check constraints are boolean expression which must be true for all
entries inserted into the directory. An example would be events > 0 requiring the
value assigned to the events attribute to be positive. Name is the name used to
-76-
refer to the name of the constraint. It must be unique for that directory. Write
permissions on the directory are necessary for this operation.
Examples
Query>
constraint_add_check
/TEST_constraints
'Attr2>100'
const_check_no1
• constraint_add_primary_key directory key(s): Adds primary key constraint of the
given directory, which by default is on the entry name only.
Examples
Query> constraint_add_primary_key /TEST_constraints Attr1
• constraint_drop directory name: Drops the constraint with the given name from
the directory. Write permissions on the directory are necessary for this operation.
The primary key of a table can be removed by specifying the name "p_key".
Examples
Query> constraint_drop /TEST_constraints const_name
Query> constraint_drop /TEST_constraints p_key #remove primary key
• constraint_list directory: Prints all constraints of a directory. You need read
permissions on the concerned directory.
Examples
Query> constraint_list /TEST_constraints
>>
constraint_add_check
/TEST_constraints
"user:Name2"
>
100
const_check_name1
>>
constraint_add_not_null
/TEST_constraints
Name1
const_not_null_name1
>> constraint_add_check /TEST_constraints ("user:Name2" > 45) and
("user:Name2" < 75) const_check2
>> ...
-77-
J. Views
Views allow you to create virtual new tables (directories) that combine the
information of other tables, similar to what selectattr does. AMGA uses the native
support of the database to provide views, so the actual behaviour depends on the
database backend. For example some backends (like PostgreSQL) allow you to
update an existing view, which actually updates the
tables behind it.
An important use-case of views are to support access restrictions to attributes
(the columns of the underlying table). This is a typical use-case for views also in
normal database usage. Views can be accessed and deleted like normal
directories.
• view_create name maindir attr_1 ... attr_n condition: Creates a view with the
given name based on the entries in the given directory, attaching the attributes
given in the list to these entries, based on the join condition.
In the following examples, the first one shows a use case where a view (view1) is
created using all the entries in the current directory, but using only the attr1 or
attr2 columns. After assigning the right permissions to the resulting new
directory (./view1), this can be made readable for users who need to read these
attributes. In the second example a view (view2) is created combining attributes
from the current directory and the dir subdirectory.
Examples
Query> view_create ppl /population rank
population
country_territory
percent_of_world
date_of_estimate source new_remarks 'rank<=10'
Query> //execute above query in the target path which you want
Query> view_remove ppl
K. Sequences
-78-
Sequences allow the creation of a sequence of integer numbers, which are
guaranteed to be unique. They are also monotonically increasing at least during a
single AMGA connection. The exact implementation depends on the database
backend, which can optimize handing out parts of the sequence in batches, so that
two consecutive connections not necessarily get first a smaller number in the
sequence and then the larger. Sequences are not supported by MySQL <5.0 and
SQLite. On MySQL and Oracle sequences are implemented through stored
procedures. In PostgreSQL the native mechanism is used. Sequences behave like
another directory in a directory. They cannot be deleted with rmdir, however,
instead sequence_remove must be used. The name of the sequence must be
lower case due to limitations in some backends.
• sequence_create name dir [increment] [start value]: Creates a new sequences
with the given name in the given directory. The name of the sequence is then
/dir/name. It is possible to dene the increment as well as the start value. Note
that backends may not necessarily follow this behaviour strictly if multiple
connections are being used.
Examples
Query> sequence_create id /cities 1 10
Query>
• sequence_next sequence: Gets the next value from a sequence.
Examples
Query> sequence_next /cities/id
Query>
• sequence_remove sequence: Deletes a sequence.
Examples
Query> sequence_remove /cities/id
Query>
-79-
L. Backing Up Data
• dump [-sec_all|sec_none] [dir]: Recursively dumps the contents of a directory
and all subdirectories so that they can be recreated by calling the sequence of
AMGA commands printed out. If no directory is specified, it uses "/", making a full
catalogue dump. The first option controls whether entry permissions and ACLs
are included in the dump: -sec_all includes them, while -sec_none only dumps the
metadata.
Only root is allowed to use this command.
Examples
Query> dump /TEST
• user_dump: Dumps the contents of a user database such that it can be recreated
from the sequence of AMGA commands printed out. Only root is allowed to use
this command.
Examples
Query> user_dump
>> user_create belle_replica_user
>> user_create tshuh
>> user_create choinody
• grp_dump: Dumps out the information on all existing groups so that they can be
recreated by calling the sequence of AMGA commands printed out. Only root is
allowed to use this command.
Examples
-80-
Query> grp_dump
>> grp_create root:gui_client
>> grp_adduser root:gui_client tshuh
>> grp_create root:root
>> grp_create root:belle_replica
>> grp_adduser root:belle_replica belle_replica_user
>> grp_create root:testgroup
>> grp_adduser root:testgroup tshuh
>> ...
M. Management via VO-Certificates
You can allow users to log in with VO-enabled certificates by using the
VirtualOrganizations option and assigning it a list of VO(default_user) definitions.
By enabling MyProxyHack this works also with certificates issued by a MyProxy
server. The VOGroupMap and VOUserMap options allow to map VO groups to
AMGA groups and special VO roles to AMGA users with the syntax used by
VirtualOrganizations. You can also manage mapping between a user/group & a
VOMS Role/group in the command line tools.
• user_voms_add: Allows user to log in with a certificate with the given VOMS
Role
Examples
Query>
Query>
• user_voms_list: Lists all possible VOMS Role
Examples
Query> user_voms_list
Query>
-81-
• user_voms_remove: Removes VOMS Role allowed for user
Examples
Query>
Query>
N. Users, Groups and ACLs
The standalone AMGA server comes with a powerful system to manage users as
well as to control access to entries and metadata. If AMGA is run as an add on to
a le catalogue, however, these features are not available and the access controls
of the file catalogue is used instead. The permission schema tries to copy the
semantics of POSIX APIs. Some of the semantics are different from the POSIX
semantics for a file system as AMGA is a metadata catalogue. As an example, it is
necessary to have the 'x' permission for a directory to read the attribute list,
while 'r' permissions for any file are necessary to read the values of the
attributes for a file. The exact behaviour is described together with the
respective commands.
1) Users
The size of a username is limited to 64 lower-case latin alphabet characters.
2) Groups
Any user can create groups. Group names are scoped with the name of the user
creating them. A fully qualified group name has the form user:groupname. If the
user scope of the group is the current user, it does not need to be specified in a
command. The size of groupname is limited to 64 lower-case latin alphabet
characters. A special group exists and is maintained by AMGA internally, the
system:anyuser
group
which
contains
automatically
any
user
which
is
authenticated to the system. Using this group it is possible to emulate the
-82-
permissions for 'other'-users in a Unix filesystem which are missing in AMGA.
The following commands can be used to manage groups:
• grp_create groupname: Creates a new group with name groupname. It is not
possible to create groups belonging to others.
Examples
Query> grp_create test1
• grp_delete groupname: Deletes a group with name groupname. Only root can
delete groups of other users.
Examples
Query> grp_delete test1
• grp_show groupname: Shows all the members belonging to group groupname.
You can only look into groups of which you are a member or your own groups.
Root can list all groups.
Examples
Query> grp_show test2
• grp_adduser groupname user: Adds a user to a group. Only owners of a group or
root can change group memebership.
Examples
Query> grp_adduser test1 tshuh
Query> grp_removeuser test1 tshuh
• grp_removeuser groupname user: Removes a user from a group. Only owners of
a group or root can change group memebership.
Examples
-83-
Query> grp_removeuser test1 tshuh
• grp_member [user]: Shows to which groups a user belongs. Only root can ask
this question for other users.
Examples
Query> grp_member tshuh
• grp_list [-a] [user]: Shows the groups owned by user, by default the current
user. If the -a option is given, all groups are shown.
Examples
Query> grp_list tshuh
O. Access Control Lists
ACLs (Access Control Lists) can be assigned to any directory. The following
commands exist to manipulate ACLs of a directory.
• acl_add directory group rights :
Examples
Query> acl_add /TEST/ test_group rwx
• acl_remove directory group: You can use the "" to remove all ACLs of a
directory.
Examples
-84-
Query> acl_remove /TEST/ test_group
• acl_show directory :
On MySQL5 or PostgreSQL you can create directories with the "acls" option,
which will allow you to put ACLs also on individual files.
Examples
Query> acl_show /TEST/
-85-
P. Access Control Lists
□ Replication
• rep_umount <remoteDirectory>
- description: Unmounts a replication point. Local data is deleted.
• rep_mount [-perms] master remoteDirectory
- description: Mounts a directory from the server running at the given address.
• rep_mount_users master
- description: Replicate user and groups information from a remote node..
• rep_umount_users
- description: Drops the user and group information that was being replicated
from a master.
• rep_list_mounts
- description: Lists all mount points.
• rep_start_receive master
- description: Connects to the master and starts listening for the logs of all mount
points from this master.
• rep_stop_receive master
- description: Stops listening for the logs of all mount points from this master.
• rep_allow directory group
- description: Grants to group the right to replicate <directory> and all its
subdirectories.
• rep_disallow directory group
-86-
- description: Remove from group the right to replicate directory and all its
subdirectories.
• rep_users_allow user
- description: Grants to user the right to replicate login information for users.
• rep_users_disallow user
- description: Remove from user the right to replicate login information for users.
• rep_show_permissions
- description: Show the replication rights for all directories.
• rep_list_subscribers
- description: Show the current subscribers and their subscriptions.
• rep_drop_subscriber <subscriberID>
- description: Drops a subscriber and all related subscriptions.
□ Entry
• import table directory
- description: Imports an existing table in the database as the given directory.
• lfn_lookup guid ...
- description: Looks up the lfn which belongs to given guids.
□ Group
• grp_voms_add groupname voms_group
- description: Allows user to have group permission with a certificate with the
given VOMS Group.
• grp_voms_add groupname voms_group
-87-
- description: Allows user to have group permission with a certificate with the
given VOMS Group.
• grp_voms_list
- description: List all possible VOMS Group.
• grp_voms_remove voms_group
- description: Removes VOMS Group allowed.
□ Schema
• schema_cp source_dir dest_dir
- description: Copies a schema from one directory to another by adding attributes.
□ User
• user_subject_add user subject
- description: Allows user to log in with a certificate with the given subject.
• user_subject_remove user subject
- description: Removes the certificate given by the subject from the list of
subject allowed for user.
• user_list
- description: Lists all users known to the authentication subsystem.
• user_listcred user
- description: Lists all possible credentials of a user. Only for root.
□ View
• view_create_union view dirs... condition
- description: Creates a view as a union of the entries in the directories under
given condition.
□ Site
• site_list
-88-
- description: Lists all sites and their ID.
• site_dump [site]*
- description: Outputs the metadata commands to recreate the given sites.
• site_add site_name hostname:port
- description: Registers a site.
• site_remove site
- description: Removes a site.
• site_set_properties site property value [property value]*
- description: Updates one or more configuration property of a site.
• site_get_properties site property [property]*
- description: Gets one or more configuration property of a site.
• site_list_properties site
- description: List all configuration properties of a site.
□ Replicas
• replica_list [guid ... | -l lfn ...l]
- description: Lists the sites with replicas of files given as guids or lfns.
• replica_get [guid ... | -l lfn ...l]
- description: Lists the SURL replicas of files given as guids or lfns.
• replica_add guid SURL
- description: Adds a replica at SURL to the replicas of the file with the given
GUID.
• replica_remove replica [guid]
- description: Removes a replica for a GUID.
-89-
• replica_register guid site
- description: Registers a site to a central catalogue that has a certain file.
• replica_unregister guid site
- description: Un-Registers a replica on a site at a central catalogue.
□ Ticket
• ticket_get
- description: Asks for a new ticket to be issued.
• ticket_check ticket
- description: Validates a ticket.
□ Admin
• sudo user
-90-
APPENDIX III. Changelog
A. Change in 1.2
1) Copy Collection Wizard
• New: Copy collection to target directory with metadata and some properties
2) Fast View
• New: view streaming datagrid faster using NatTable(high performance SWT
data-grid)
3) SQL editor
• Fixed: modifying to allow "://" character set
4) Import/Export
• Fixed : bugs in data import wizard (matching attribute with null column)
5) Common
• New : automatically program update(Wizard)
• Fixed : moving focus on the target column with tab key at every pages in AMGA
Manager
B. Change in 1.1
1) User login and Access information management
• Add : access with several authentication importing g-Eclipse plug-in
(Certificate, VOMS proxy and GLOBUS)
2) Collection management
• Add : show the list of directory in each AMGA version(only for more than
AMGA version 2.1.1, new command “ls –s”)
• Add : graphically show collection status (plan, index, sequence, view, federation,
replication and so on)
• Add : make ACL at the same time in the generation of collection
-91-
• Add : change permission and owner in a directory
2) schema browser:Data
• Add : view streaming datagrid that is a large scale of metadata deriving
recursively and continuously default 500 entries with pause function and play
function to stop getting metadata for a large scale of metadata
• Add : setup deriving rules which are the number of metadata and the starting
point to get in a time
• Fixed : present shorter character set about long character set in a data column
• Add : sort metadata
• Add : edit ACL in the case of several entries at the same time after target
dataset area is selected
3) SQL editor
• Add : show current path on the top of SQL editor browser
• Fixed : register new AMGA commands to provide completed CLI
• Fixed : make the attribute’s value column go away when focusing on it
supported by scripting with mouse or keyboard
• Add : show changed path in current working path information positioned at the
top of SQL Editor according to change working path
• Fixed : deal double slash(//) in the middle of symbols ‘ ’ as data
• Fixed : arrange the directories in fast sql maker clicking sql icon in the menu
bar
4) Import/Export
• Fixed : change Import/Export process with efficiency
• Fixed : import and export a large scale of metadata (but it doesn’t support to
import/export data at one go in the internal process of import/export wizard)
• Add : Data Rollback function in the case that network error, disconnect session
and socket fail happen due to an unknown cause
5) Federation management
• New : mount federation site
6) Site management
-92-
• New : add site and modify site information
7) Group/User management
• Fixed : bug that insert unnecessary symbols while generating id/password
8) Common
• New : automatically program update
• Add : show connection information such as port number, AMGA service version
on the top of AMGA Manager
• Add : exporting AMGA Manager for windows 64
C. Change in 1.0
1) schema browser:Data
• Add : Save the selected target data to the file at schema browser:Data
2) Console and Result view
• Add : Save the selected target rows or data to the file at console and result
view
• Add : the menu function
Menu
Console
SQL Result
copy
○
○
select all
○
○
find
○
clear
○
○
3) User/Group management
• Add : Make temporary ID/Password (only Administrator)
D. Change in 0.9
1) User login and Access information management
-93-
2) Collection management
• Fixed : collection tree(expand and collapse) to be feasible to check lower
directories
• Fixed : Make collections GUI procedure with making attributes/types
3) Schema Browser: Data
• Add : Filter at schema browser:Data
• Fixed : handling data grid using keyboard
• Add : the function of CRUD at schema browser:Attribute
• Add : the function of CRUD at schema browser:ACL
• Add : the function of CRUD at schema browser:Constraints
• Add : the function of CRUD at schema browser:Index
4) SQL editor
• Add : import all attributes names
• Add : import collections/entry name
• Add : completed CLI(completing commands, simple query)
• Add : support for making AMGA commands with balloon tip(usage way)
• Fixed : support multi-Queries using ";" notation
• Add : comments function about AMGA queris using "//" notation
• Add : save/open AMGA queries
5) Console and Result view
• Add : shows the results related collection panel and schema browser: Attributes,
ACL, Constraints, Index
• Add : shows user query from all views
• Add : shows data grid for data results
6) User/Group management
• New: user management GUI procedure, group management GUI procedure
• New: relating with schema browser: ACL
-94-
7) Import/Export
• New: Import/Export GUI procedure for various file formats such as excel,
delimited text including Tab, Space and Comma
E. Change in 0.8
1) User login and Access information management
• ID/PW login
• Save Access Information management
• AMGA Mdclient call
2) Collection management
• collection tree
• Make collections
• relating with schema browser and attributes panel
3) schema browser
• the function of CRUD at schema browser:Data
• get data from AMGA server
• show data grid
4) SQL editor
• import attributes names
• activating 1 line command dragged and selected
• making basic query using SQL GUI
5) Console and Result view
• shows the results related schema browser: Data
-95-
REFERENCES
[1] AMGA. Available at: http://amga.web.cern.ch/amga/
[2] g-Eclipse. Available at: http://www.geclipse.org
-96-