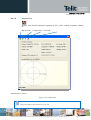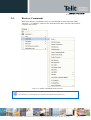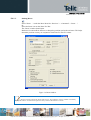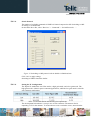
1
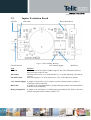
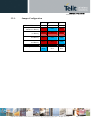
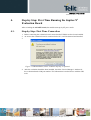
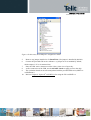
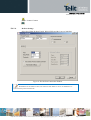
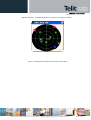
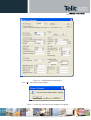
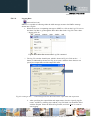
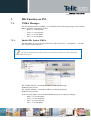
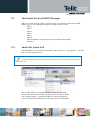
JN3 EVK User Manual 1vv0300986 Rev.0 – 2012-01-20 JN3 EVK User Manual 1vv0300986 Rev.0 – 2012-01-20 APPLICABILITY TABLE PRODUCT JN3 Reproduction forbidden without written authorization from Telit Communications S.p.A. - All Rights Reserved. Mod. 0809 2011-07 Rev.2 Page 2 of 34 JN3 EVK User Manual 1vv0300986 Rev.0 – 2012-01-20 SPECIFICATIONS SUBJECT TO CHANGE WITHOUT NOTICE Notice While reasonable efforts have been made to assure the accuracy of this document, Telit assumes no liability resulting from any inaccuracies or omissions in this document, or from use of the information obtained herein. The information in this document has been carefully checked and is believed to be entirely reliable. However, no responsibility is assumed for inaccuracies or omissions. Telit reserves the right to make changes to any products described herein and reserves the right to revise this document and to make changes from time to time in content hereof with no obligation to notify any person of revisions or changes. Telit does not assume any liability arising out of the application or use of any product, software, or circuit described herein; neither does it convey license under its patent rights or the rights of others. It is possible that this publication may contain references to, or information about Telit products (machines and programs), programming, or services that are not announced in your country. Such references or information must not be construed to mean that Telit intends to announce such Telit products, programming, or services in your country. Copyrights This instruction manual and the Telit products described in this instruction manual may be, include or describe copyrighted Telit material, such as computer programs stored in semiconductor memories or other media. Laws in the Italy and other countries preserve for Telit and its licensors certain exclusive rights for copyrighted material, including the exclusive right to copy, reproduce in any form, distribute and make derivative works of the copyrighted material. Accordingly, any copyrighted material of Telit and its licensors contained herein or in the Telit products described in this instruction manual may not be copied, reproduced, distributed, merged or modified in any manner without the express written permission of Telit. Furthermore, the purchase of Telit products shall not be deemed to grant either directly or by implication, estoppel, or otherwise, any license under the copyrights, patents or patent applications of Telit, as arises by operation of law in the sale of a product. Computer Software Copyrights The Telit and 3rd Party supplied Software (SW) products described in this instruction manual may include copyrighted Telit and other 3rd Party supplied computer programs stored in semiconductor memories or other media. Laws in the Italy and other countries preserve for Telit and other 3rd Party supplied SW certain exclusive rights for copyrighted computer programs, including the exclusive right to copy or reproduce in any form the copyrighted computer program. Accordingly, any copyrighted Telit or other 3rd Party supplied SW computer programs contained in the Telit products described in this instruction manual may not be copied (reverse engineered) or reproduced in any manner without the express written permission of Telit or the 3rd Party SW supplier. Furthermore, the purchase of Telit products shall not be deemed to grant either directly or by implication, estoppel, or otherwise, any license under the copyrights, patents or patent applications of Telit or other 3rd Party supplied SW, except for the normal non-exclusive, royalty free license to use that arises by operation of law in the sale of a product. Reproduction forbidden without written authorization from Telit Communications S.p.A. - All Rights Reserved. Mod. 0809 2011-07 Rev.2 Page 3 of 34 JN3 EVK User Manual 1vv0300986 Rev.0 – 2012-01-20 Usage and Disclosure Restrictions License Agreements The software described in this document is the property of Telit and its licensors. It is furnished by express license agreement only and may be used only in accordance with the terms of such an agreement. Copyrighted Materials Software and documentation are copyrighted materials. Making unauthorized copies is prohibited by law. No part of the software or documentation may be reproduced, transmitted, transcribed, stored in a retrieval system, or translated into any language or computer language, in any form or by any means, without prior written permission of Telit High Risk Materials Components, units, or third-party products used in the product described herein are NOT fault-tolerant and are NOT designed, manufactured, or intended for use as on-line control equipment in the following hazardous environments requiring fail-safe controls: the operation of Nuclear Facilities, Aircraft Navigation or Aircraft Communication Systems, Air Traffic Control, Life Support, or Weapons Systems (High Risk Activities"). Telit and its supplier(s) specifically disclaim any expressed or implied warranty of fitness for such High Risk Activities. Trademarks TELIT and the Stylized T Logo are registered in Trademark Office. All other product or service names are the property of their respective owners. Copyright © Telit Communications S.p.A. 2011. Reproduction forbidden without written authorization from Telit Communications S.p.A. - All Rights Reserved. Mod. 0809 2011-07 Rev.2 Page 4 of 34 JN3 EVK User Manual 1vv0300986 Rev.0 – 2012-01-20 Contents 1. Introduction ..................................................................................................................................7 1.1. Scope .......................................................................................................................................7 1.2. Audience..................................................................................................................................7 1.3. Contact Information, Support..................................................................................................7 1.4. Text Conventions ....................................................................................................................8 1.5. Related Documents .................................................................................................................8 2. Preparing for the Jupiter-N3 .....................................................................................................10 2.1. What is Necessary .................................................................................................................10 2.2. Installing the USB Drivers ....................................................................................................10 2.3. Installing SiRFLive ...............................................................................................................10 3. Jupiter-N3 Evaluation Kit..........................................................................................................11 3.1. What’s in the Box..................................................................................................................11 3.2. Jupiter Evaluation Board.......................................................................................................12 3.2.1. Jumper Configuration ................................................................................................................ 13 4. Step-by-Step: First Time Running the Jupiter-N3 Evaluation Board ...................................14 4.1. Step-by-Step: First Time Connection....................................................................................14 5. Jupiter-N3 on SiRFLive..............................................................................................................16 5.1. Main Interface .......................................................................................................................16 5.2. Connecting To the Jupiter-N3 ................................................................................................16 5.3. SiRFLive Windows ...............................................................................................................18 5.4. ....................................................................................................................................................22 5.5. Receiver Commands .............................................................................................................22 6. Battery Function on JN3............................................................................................................28 7. 5Hz Function on JN3..................................................................................................................29 7.1. NMEA Messages...................................................................................................................29 7.1.1. 7.2. Enable 5Hz Update NMEA........................................................................................................ 29 One Socket Protocol (OSP) Messages ..................................................................................30 7.2.1. 7.2.2. Enable 5Hz Update OSP ............................................................................................................ 30 MID 136 – Mode Control .......................................................................................................... 31 Reproduction forbidden without written authorization from Telit Communications S.p.A. - All Rights Reserved. Mod. 0809 2011-07 Rev.2 Page 5 of 34 JN3 EVK User Manual 1vv0300986 Rev.0 – 2012-01-20 8. APPENDIX .................................................................................................................................32 8.1. Flashing the Jupiter-N3 ..........................................................................................................32 8.2. Going into Boot Mode...........................................................................................................33 8.3. Internal LNA and Antenna....................................................................................................33 9. Document History.......................................................................................................................34 Reproduction forbidden without written authorization from Telit Communications S.p.A. - All Rights Reserved. Mod. 0809 2011-07 Rev.2 Page 6 of 34 JN3 EVK User Manual 1vv0300986 Rev.0 – 2012-01-20 1. Introduction 1.1. Scope Scope of this document is to give an overview of the Evaluation kit of the GPS standalone module JN3 1.2. Audience This document is intended for customers who are evaluating one or more products in the applicability table. 1.3. Contact Information, Support For general contact, technical support, to report documentation errors and to order manuals, contact Telit Technical Support Center (TTSC) at: [email protected] [email protected] [email protected] [email protected] Alternatively, use: http://www.telit.com/en/products/technical-support-center/contact.php For detailed information about where you can buy the Telit modules or for recommendations on accessories and components visit: http://www.telit.com To register for product news and announcements or for product questions contact Telit Technical Support Center (TTSC). Our aim is to make this guide as helpful as possible. Keep us informed of your comments and suggestions for improvements. Telit appreciates feedback from the users of our information. Reproduction forbidden without written authorization from Telit Communications S.p.A. - All Rights Reserved. Mod. 0809 2011-07 Rev.2 Page 7 of 34 JN3 EVK User Manual 1vv0300986 Rev.0 – 2012-01-20 1.4. Text Conventions Danger – This information MUST be followed or catastrophic equipment failure or bodily injury may occur. Caution or Warning – Alerts the user to important points about integrating the module, if these points are not followed, the module and end user equipment may fail or malfunction. Tip or Information – Provides advice and suggestions that may be useful when integrating the module. All dates are in ISO 8601 format, i.e. YYYY-MM-DD. 1.5. Related Documents • JN3 HW User Guide, • JN3 Product Descritption, NOTE: Reproduction forbidden without written authorization from Telit Communications S.p.A. - All Rights Reserved. Mod. 0809 2011-07 Rev.2 Page 8 of 34 JN3 EVK User Manual 1vv0300986 Rev.0 – 2012-01-20 • • • To prevent ESD and EOS damage, a properly grounded ESD wrist strap should be worn when working inside the EVK. Do not remove or install jumpers while USB power is applied. Do not short the RF signal to ground if the antenna voltage jumper is installed. Damage to the EVK may result. NOTE: Always follow ESD safety precautions when utilizing the Jupiter-N3 evaluation kit. For additional information on the Jupiter-N3, ask your sales representative for additional manuals, datasheets, support, etc Reproduction forbidden without written authorization from Telit Communications S.p.A. - All Rights Reserved. Mod. 0809 2011-07 Rev.2 Page 9 of 34 JN3 EVK User Manual 1vv0300986 Rev.0 – 2012-01-20 2. Preparing for the Jupiter-N3 2.1. What is Necessary • • • • • 2.2. To use the Jupiter-N3 Evaluation kit, you will need: FTDI USB Drivers SiRFLive2.0 and above or SiRFDemo A PC with a USB port that fulfills the minimum software requirements: o Windows XP o .NET Framework 2.0 This will be automatically installed by the SiRFLive package if necessary (internet connection is required). A programmed/flashed Jupiter-N3 evaluation device. o SiRFlash_402 and above if needed to flash the Jupiter-N3 device. o GSD4e v4.1.0-P1 firmware to be flashed on the Jupiter-N3 device if needed. Installing the USB Drivers Before connecting the Jupiter-N3 Evaluation Kit, install the necessary USB drivers. 1 Double-click the USB driver executable and follow the directions to install the USB drivers. 2.3. Installing SiRFLive ***NOTE*** SiRFLive does not work on 64-bit OS machine at this time! Minimum PC requirements: • Pentium CPU 2 GHz • 1 GB of RAM • 100 MB hard drive Recommended • 2 GB of RAM • 1280 x 1024 screen resolution Ensure that all previous installation versions of SiRFLive have been uninstalled before installing any newer versions! Install the current SiRFLive with the attached installer. Follow the installer directions until finished. Users should allow SiRFLive to install to the default location – C:\Program Files\SiRF\SiRFLive, but it can be changed if necessary. Reproduction forbidden without written authorization from Telit Communications S.p.A. - All Rights Reserved. Mod. 0809 2011-07 Rev.2 Page 10 of 34 JN3 EVK User Manual 1vv0300986 Rev.0 – 2012-01-20 3. Jupiter-N3 Evaluation Kit 3.1. What’s in the Box USB Cable Antenna Jupiter Eval Kit USB Drive Reproduction forbidden without written authorization from Telit Communications S.p.A. - All Rights Reserved. Mod. 0809 2011-07 Rev.2 Page 11 of 34 JN3 EVK User Manual 1vv0300986 Rev.0 – 2012-01-20 3.2. Jupiter Evaluation Board TX LED 1PPS LED ON/OFF Switch Item TX LED 1PPS LED ON/OFF Switch Battery Backup Pin Figure 2: JN3 assembly drawing. 3.3V Antenna Supply BOOT Pin Function LED that is tied to the USB to UART bridge TX line. The LED blinks whenever there is activity on the TX line. LED that pulses ON at ¼ a second and OFF at ¾ a second, indicating a fix with the receiver. Switch that applies 3.3V to the main power, VCC, of the Jupiter-N3 module. 3.3V Antenna Supply A jumper on J6 provides a 3.3V output to an active antenna (remove jumper if connecting a passive antenna). BOOT Pin A jumper on J3 will pull the BOOT_0 high, putting the module into internal BOOT mode for firmware flashing. Battery Backup Pin A jumper on J2 will utilize a 3V lithium battery installed on BT1. Refer to Section 5 on how to properly utilize a battery with the J-F2. Reproduction forbidden without written authorization from Telit Communications S.p.A. - All Rights Reserved. Mod. 0809 2011-07 Rev.2 Page 12 of 34 JN3 EVK User Manual 1vv0300986 Rev.0 – 2012-01-20 3.2.1. Jumper Configuration J3 J6 Normal GPS (BOOT) (Active Ant) w/ provided Active NO YES Antenna no Battery J7 (Battery) NO w/ Passive Antenna no Battery NO NO NO w/ Active Antenna and Battery NO YES YES w/ Passive Antenna and Battery NO NO YES YES N/A N/A Flashing the GPS Reproduction forbidden without written authorization from Telit Communications S.p.A. - All Rights Reserved. Mod. 0809 2011-07 Rev.2 Page 13 of 34 JN3 EVK User Manual 1vv0300986 Rev.0 – 2012-01-20 4. Step-by-Step: First Time Running the Jupiter-N3 Evaluation Board After switching the ON/OFF Switch, the module starts up in full power mode. 4.1. Step-by-Step: First Time Connection 1. Before connecting the evaluation board, ensure that the USB drivers have been installed. 2. As soon as the evaluation board is connected to the PC, it will be detected and installed. 3. Figure 3: USB installation, select “Continue Anyway” to proceed. 4. After the evaluation board has been installed, check the “Device Manager” window for the evaluation board COM port number. This information is needed for use with the GPS tools. Reproduction forbidden without written authorization from Telit Communications S.p.A. - All Rights Reserved. Mod. 0809 2011-07 Rev.2 Page 14 of 34 JN3 EVK User Manual 1vv0300986 Rev.0 – 2012-01-20 Figure 4: In this case, the COM port is assigned as COM5 5. 6. 7. 8. 9. 10. Remove any jumper installed on J3 (BOOT Pin). (No jumper is installed by default). Connect the provided GPS Active Antenna. (A jumper on J6 is installed by default, which outputs 3.3V on its antenna line) Place the GPS Active Antenna to where it has a clear view of open sky. At first connection of the USB, use the ON/OFF Switch to apply power to the chip. The evaluation board can now be manipulated with the provided GPS tools (SiRFLive or SiRFDemo). Refer to Chapter 4: Jupiter-N3 on SiRFLive for using the JN3 on SiRFLive. Reproduction forbidden without written authorization from Telit Communications S.p.A. - All Rights Reserved. Mod. 0809 2011-07 Rev.2 Page 15 of 34 JN3 EVK User Manual 1vv0300986 Rev.0 – 2012-01-20 5. Jupiter-N3 on SiRFLive Launch the SiRFLive application. 5.1. Main Interface After launching SiRFLive, first notice the application’s main interface. Figure 5: Main Menu Bar Figure 6: Main Tool Bar 5.2. Connecting To the Jupiter-N3 The user can utilize either the Main Menu Bar or the Main Tool Bar. 5.2.1.1. Main Menu Bar Under the option “Receiver” on the Main Menu Bar, there is a selection “Connect. . .” This will open the Receiver settings for connection. Figure 7: Connect to Receiver 5.2.1.2. Main Tool Bar Select the “Receiver Settings” button Reproduction forbidden without written authorization from Telit Communications S.p.A. - All Rights Reserved. Mod. 0809 2011-07 Rev.2 Page 16 of 34 JN3 EVK User Manual 1vv0300986 Rev.0 – 2012-01-20 Or the “Connect” button 5.2.1.3. Rx Port Settings Select the GSD4e Product Family, RS232/USB, and the Correct COM Port. Figure 8: The Rx Port Connection Window Default Baud rate for NMEA is 4800, and 115200 for OSP. SiRFLive can use AUTODETECT to synchronize the protocol and baud rate. Reproduction forbidden without written authorization from Telit Communications S.p.A. - All Rights Reserved. Mod. 0809 2011-07 Rev.2 Page 17 of 34 JN3 EVK User Manual 1vv0300986 Rev.0 – 2012-01-20 5.3. SiRFLive Windows After a successful connection with the receiver is established, the default SiRFLive windows should be arranged and become filled with data. If not all the default windows are arranged or opened, under the Main Menu Bar, go to “Window” > “Restore Layout” > “Default.” 5.3.1.1. SSignal View (main tool bar icon) Type of Fix Satellite Data Figure 9 Shows the satellite signal levels. 5.3.1.2. Radar View (main tool bar icon) Red satellites – 0 C/N0 Blue satellites – nonzero C/N0 but not being used in the navigation solution Green satellites – nonzero C/N0 and are being used in the navigation solution Skyblue satellites – SBAS satellites Orange satellites – ABP is being used to acquire satellites Reproduction forbidden without written authorization from Telit Communications S.p.A. - All Rights Reserved. Mod. 0809 2011-07 Rev.2 Page 18 of 34 JN3 EVK User Manual 1vv0300986 Rev.0 – 2012-01-20 Magenta satellites – Extended Ephemeris is being used to acquire satellites. Figure 10: Displays the satellites by azimuth and elevation. Reproduction forbidden without written authorization from Telit Communications S.p.A. - All Rights Reserved. Mod. 0809 2011-07 Rev.2 Page 19 of 34 JN3 EVK User Manual 1vv0300986 Rev.0 – 2012-01-20 5.3.1.3. Debug View (main tool bar icon) Shows the communication messages with the receiver. Figure 11: Debug view with One Socket Protocol messages. Reproduction forbidden without written authorization from Telit Communications S.p.A. - All Rights Reserved. Mod. 0809 2011-07 Rev.2 Page 20 of 34 JN3 EVK User Manual 1vv0300986 Rev.0 – 2012-01-20 5.3.1.4. Location View Displays more detailed information regarding the UTC, TOW, Latitude, Longitude, Altitude, etc. Map Position Configuration Clear Data Set Reference Location Figure 12: Location view Map position button requires Internet access to work. Reproduction forbidden without written authorization from Telit Communications S.p.A. - All Rights Reserved. Mod. 0809 2011-07 Rev.2 Page 21 of 34 JN3 EVK User Manual 1vv0300986 Rev.0 – 2012-01-20 5.4. Receiver Commands Most of the Receiver Commands can be accessed through the Main Menu Bar under “Receiver” > “Command.” There are also shortcuts on the Main Tool Bar which will be covered in this section. Figure 13: All the commands for the receiver. All of the Receiver Commands become available in One Socket Protocol (OSP) only. Reproduction forbidden without written authorization from Telit Communications S.p.A. - All Rights Reserved. Mod. 0809 2011-07 Rev.2 Page 22 of 34 JN3 EVK User Manual 1vv0300986 Rev.0 – 2012-01-20 5.4.1.1. Sending Resets Select “Reset. . .” under the Main Menu Bar “Receiver” > “Command” > “Reset. . .” Or Select the Reset icon on the Main Tool Bar. The “Reset” window should open. Reference Location allows the user to change the position used as the reference. This helps determine position accuracy in conjunction with Time-To-First-Fix values. Figure 14: Reset window. Resets are used to measure the TTFF of the receiver. The TTFF/Nav Accuracy window conveniently displays the TTFF in seconds and Navigation accuracy based on the Reference Location. Reproduction forbidden without written authorization from Telit Communications S.p.A. - All Rights Reserved. Mod. 0809 2011-07 Rev.2 Page 23 of 34 JN3 EVK User Manual 1vv0300986 Rev.0 – 2012-01-20 5.4.1.2. Switch Protocol The number of available commands in NMEA is limited compared to OSP. Switching to OSP for testing is recommended. On the Main Menu Bar, select “Receiver” > “Command” > “Switch Protocols. . .” Figure 15: Switching to OSP protocol with its default 115200 baud rate Click “Set” to apply settings. Switching to NMEA should be similar. 5.4.1.3. Setting the IC Configuration The Jupiter-N3 module has two LNA modes, a high gain mode, and a low gain mode. The high gain mode is ideal for passive antenna applications, while the low gain mode is ideal for active antenna applications. Table 1: LNA information and antenna gain requirements The development kit hardware is set up to use an active antenna. The antenna feed is outputting 3.3V for the antenna. To ensure that no cross-correlation occurs, ensure that the Reproduction forbidden without written authorization from Telit Communications S.p.A. - All Rights Reserved. Mod. 0809 2011-07 Rev.2 Page 24 of 34 JN3 EVK User Manual 1vv0300986 Rev.0 – 2012-01-20 correct LNA gain setting is selected for the chosen GPS antenna for use. In this case, the provided GPS antenna, the M820B-S, has 16dB typical gain. On the Main Menu Bar, select “Receiver” > “Command” > “IC Configure. . .” Click on “Advanced. . .” to open the IC Configuration fields. A message will pop up warning about incorrectly configuring the IC parameters. Ensure that you are aware of the correct parameter changes so as not to render your receiver non-operational. Click “Yes” to proceed. Under the selection “LNA Gain Mode:” choose “Low” from the drop down menu. Choosing Low will configure the internal LNA to its low gain mode. This will make the Evaluation Kit better fitted to work with an active antenna. Figure 16 displays the IC Configuration window. Reproduction forbidden without written authorization from Telit Communications S.p.A. - All Rights Reserved. Mod. 0809 2011-07 Rev.2 Page 25 of 34 JN3 EVK User Manual 1vv0300986 Rev.0 – 2012-01-20 Figure 16: Configuring the IC parameters. Click “OK” after all necessary changes. Figure 17: Click “Yes” in order for new changes to be applied. Reproduction forbidden without written authorization from Telit Communications S.p.A. - All Rights Reserved. Mod. 0809 2011-07 Rev.2 Page 26 of 34 JN3 EVK User Manual 1vv0300986 Rev.0 – 2012-01-20 5.4.1.4. Logging Data (main tool bar icon) SiRFLive is capable of collecting either the OSP message stream or the NMEA message stream into a log file. 1. While the receiver is outputting messages to SiRFLive, click on the Log File icon on the Main Tool Bar or go through the Main Menu Bar under “Log File” then “Start. . .” shown in Fig 18. Fig 18: Main Menu Bar access to the Log File command. i. The Log File window should open, which is shown in Fig 19. Click on the “. . .” button, as indicated by the arrow in Fig 19, to open a window where the user can specify the output folder and the output file name. Fig 19: Clicking on the “. . .” button will give the user the control of the output folder and output name 2. After specifying the output folder and output name, close the “Specify log file name:” window by clicking Open and the “Log File Path:” bar should be filled with the file path. Select the desired Log Format, and click “Start” in order to start logging. Reproduction forbidden without written authorization from Telit Communications S.p.A. - All Rights Reserved. Mod. 0809 2011-07 Rev.2 Page 27 of 34 JN3 EVK User Manual 1vv0300986 Rev.0 – 2012-01-20 6. Battery Function on JN3 The JN3 evaluation kit supports the use of battery backup. If the 3V lithium coin cell is installed, and the jumper on the Battery Backup pin (J7) is installed then the evaluation kit will support battery backup. To use battery backup: 1. From the Full Power state (as indicated by output messages), toggle the ON/OFF Switch. Verify the message stream has stopped. 2. The USB cable can be pulled and the battery backed RAM and RTC time will be maintained as long as there is a 3V lithium battery and J7 pin is installed. Note that if the battery is not installed, the EVK will still support the low power state with preserved battery backed RAM and RTC time as long as the USB cable is still installed and the battery backup jumper is installed. If these features are not desired, then the USB cable must be removed To exit battery backup: 1. While the EVK is in low power state, connect the USB cable to the computer. Wait until the computer enumerates the USB port and applies power. 2. Toggle the ON/OFF Switch to the ON position, the EVK will automatically start up. Reproduction forbidden without written authorization from Telit Communications S.p.A. - All Rights Reserved. Mod. 0809 2011-07 Rev.2 Page 28 of 34 JN3 EVK User Manual 1vv0300986 Rev.0 – 2012-01-20 7. 5Hz Function on JN3 7.1. NMEA Messages The JN3 default protocol is NMEA v3.0 at 4800 baud. The following messages are the default NMEA messages outputted by the JN3: ‐ RMC = 1 second update ‐ GGA = 1 second update ‐ GSA = 1 second update ‐ GSV = 5 second update 7.1.1. Enable 5Hz Update NMEA Through SiRFLive, access the Main Menu Bar, under “Receiver” > “Navigation” > “Set 5Hz Nav” select “Enable 5Hz Nav.” Note that for 5Hz update rate in NMEA mode, the receiver baud rate needs to be at least 38400 with all default NMEA messages On. The “Enable 5Hz Nav” command in SiRFLive sends the following: $PSRF103,00,6,00,0*23 The “Disable 5Hz Nav” command in SiRFLive sends the following: $PSRF103,00,7,00,0*22 At the new 5Hz update rate, the default NMEA messages are output accordingly: ‐ RMC = 0.2 second update ‐ GGA = 0.2 second update ‐ GSA = 0.2 second update ‐ GSV = 1 second update Reproduction forbidden without written authorization from Telit Communications S.p.A. - All Rights Reserved. Mod. 0809 2011-07 Rev.2 Page 29 of 34 JN3 EVK User Manual 1vv0300986 Rev.0 – 2012-01-20 7.2. One Socket Protocol (OSP) Messages SiRF One Socket Protocol (OSP) is supported. This is an extension of the existing SiRF Binary protocol. The following messages are output once per second: ‐ MID 2 ‐ MID 3 ‐ MID 4 ‐ MID 7 ‐ MID 9 ‐ MID 41 ‐ MID 64 SUB ID 2 (One message for each satellite being tracked). ‐ MID 138 7.2.1. Enable 5Hz Update OSP Through SiRFLive, access the Main Menu Bar, under “Receiver” > “Navigation” > “Set 5Hz Nav” select “Enable 5Hz Nav.” Note that for 5Hz update rate in OSP mode, the receiver baud rate needs to be at least 57600 with all default OSP messages On. The “Enable 5Hz Nav” command in SiRFLive sends the following: A0 A2 00 0E 88 00 00 04 04 00 00 00 00 00 00 00 0F 02 00 A1 B0 B3 The “Disable 5Hz Nav” command in SiRFLive sends the following: A0 A2 00 0E 88 00 00 04 00 00 00 00 00 00 00 00 0F 02 00 9D B0 B3 Reproduction forbidden without written authorization from Telit Communications S.p.A. - All Rights Reserved. Mod. 0809 2011-07 Rev.2 Page 30 of 34 JN3 EVK User Manual 1vv0300986 Rev.0 – 2012-01-20 7.2.2. MID 136 – Mode Control Name Bytes Binary (Hex) Unit Scale Example 88 0000 01 Message ID Reserved Degraded Mode Position Calc Mode 1U 2U 1U Reserved Altitude Alt Hold Mode Alt Hold Source 1U 2S 1U 1U 00 0000 00 00 Reserved Degraded Time Out 1U 1U 00 05 sec DR Time Out 1U 02 sec Measurement and Track Smoothing 1U 00000011 1U 01 Description Decimal 136 Reserved Controls use of 2-SV and 1-SV solutions xxxx xxx0 = ABP, OFF xxxx xxx1 = ABP, ON xxxx xx0x = Reverse EE OFF xxxx xx1x = Reverse EE ON xxxx x0xx = 5Hz nav update OFF xxxx x1xx = 5Hz nav update ON xxxx 0xxx = SBAS Ranging use OFF xxxx 1xxx = SBAS Ranging use ON meters Reserved User specified altitude, range - 1,000 to 10,000 Controls use of 3-SV solution 0 = Use last computed altitude 1 = User user-input altitude Reserved 0 = disable degraded mode, 1 to 120 seconds degraded mode time limit 0 = disable dead reckoning, 1 to 120 seconds dead reckoning mode time limit xxxxxxx0 = disable track smoothing xxxxxxx1 = enable track smoothing xxxxxx0x = use raw measurements xxxxxx1x = use smooth measurements Reproduction forbidden without written authorization from Telit Communications S.p.A. - All Rights Reserved. Mod. 0809 2011-07 Rev.2 Page 31 of 34 JN3 EVK User Manual 1vv0300986 Rev.0 – 2012-01-20 8. APPENDIX 8.1. Flashing the Jupiter-N3 It is usually not necessary for users to keep re-flashing the evaluation kit. New firmware will only be provided if necessary. 1 2 3 4 5 6 From the OFF state, place a jumper across J3 then turn ON the module with the ON/OFF Switch in order to go into Internal Boot mode. Fig. 2. Double click the SiRFlash.exe icon to open the program. Select Program, Internal Boot mode, Erase whole chip, and browse for the device firmware. Select Execute. After a successful flashing, toggle ON/OFF Switch to the OFF state. Remove the jumper across J3, then reapply the power through the ON/OFF Switch and the module will be in Full Power Mode ready to communicate. The evaluation Jupiter-N3 device needs to be in BOOT mode in order to flash. A jumper across J3 needs to be placed. Refer to Figure 2 for placement location. Figure 20: SiRFflash tool setting. Reproduction forbidden without written authorization from Telit Communications S.p.A. - All Rights Reserved. Mod. 0809 2011-07 Rev.2 Page 32 of 34 JN3 EVK User Manual 1vv0300986 Rev.0 – 2012-01-20 8.2. Going into Boot Mode The Jupiter-N3 Evaluation Board’s main power comes from its USB port. Upon connection to a USB port, the evaluation kit defaults to Full Power mode. 8.2.1.1. Going into Boot Mode 1. From the OFF state, place a jumper on the BOOT Pin J3. 2. Turn ON the module with the ON/OFF Switch. 3. It is now in Boot mode and ready to be flashed with firmware. 8.3. Internal LNA and Antenna The Internal LNA has two modes, each are specific to the amount of gain that a connected antenna will have. Usually, in high gain internal LNA mode, the antenna connected will be a passive antenna, while the low gain internal LNA mode will require an active antenna or an external LNA. It is recommended for the AGC to be in mid-range(between 1 and 62). If the total system gain is too high, the AGC will be high, therefore it will not be able to compensate as well if the receiver is in a noisy environment. The Jupiter-N3 evaluation is bundled with an Active Antenna, providing an amplifier gain of 16dB typical. 8.3.1.1. Active Antenna The bundled M820B antenna requires a DC voltage between 2.7V to 6.0V. The Evaluation Kit can provide 3.3V to the active antenna by adding a jumper on J6. The active antenna should be low gain variety. For passive antenna connection, ensure that jumper J6 is not installed in order to prevent damage. 8.3.1.2. Passive Antenna Open the box and ensure that there are no jumpers installed on J6. Reproduction forbidden without written authorization from Telit Communications S.p.A. - All Rights Reserved. Mod. 0809 2011-07 Rev.2 Page 33 of 34 JN3 EVK User Manual 1vv0300986 Rev.0 – 2012-01-20 9. Document History Revision 0 Date 2011-11-08 Changes First issue Reproduction forbidden without written authorization from Telit Communications S.p.A. - All Rights Reserved. Mod. 0809 2011-07 Rev.2 Page 34 of 34