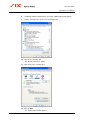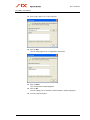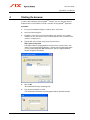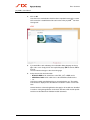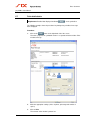
1
payCOM
web
User Manual
for submitting files and
obtaining electronic approval via the Internet
Base document
Version 1.2 / 06.06.2014
1
Base document
Information
No guarantee can be given for the information contained in this user manual, which is subject to change
without notice.
SIX Payment Services reserves all rights for this user manual including the rights of photomechanical
reproduction, storage on electronic media and the translation into foreign languages.
Although great care has been taken in the compilation and preparation of this work to ensure accuracy,
errors and omissions cannot be entirely ruled out.
SIX Payment Services cannot be held liable for any decision made or action taken in reliance on the
information in this manual or for any consequential, special or similar damages.
If you detect any errors or omissions in this user manual or have any ideas or suggestions for improvements we would be extremely grateful if you would notify these to SIX Payment Services Technical
Support by sending an e-mail to [email protected].
payCOMweb is a registered trademark of SIX Payment Services Ltd
Windows and Internet Explorer are registered trademarks of Microsoft Corp.
GEMALTO and GemSAFE are registered trademarks of Gemalto SA.
All other trademarks are the property of the respective legal owner.
© Copyright 2014 SIX Payment Services Ltd, CH-8021 Zurich
2
Version 1.2 / 06.06.2014
Base document
payCOMweb User Manual
Amendment control
Amendment control
All significant amendments carried out on this document are listed below, with the date
of the amendment, a brief amendment description and a statement of the section
concerned.
Date
Version
Amendment description
Section
02.11.2009
1.0
First edition
–
06.06.2014
1.1
Charges indicated incl. VAT
1.10
Display duration corrected
2.3, 2.5
Security settings added
3.3
Forms available as Word files
6.8
Change of Company name and Logo, impact on
pictures
All
Change of Document location with impact on pictures
3
06.06.2014
1.2
Description of amendments
The previous amendments from the preceding version are marked in the document
using the track changes facility, to the extent that these amendments are meaningful.
Layout amendments, corrections of spelling mistakes and altered terms that are
repeated several times throughout the entire document, are not marked. Older
amendments from other versions should be removed from the amendment control.
The amendments are marked in the document as follows:
• General: New text is formatted in blue, deleted text is blanked out. Both types of
amendment are denoted with a vertical blue line in the margin.
• Figures: Since it is not possible to indicate specific modifications to a figure, the
entire modified figure is marked.
• Tables: New or deleted text is also formatted in blue or blanked out in tables. However, these amendments are always marked over the total height of the table row.
Version 1.2 / 06.06.2014
3
Base document
payCOMweb User Manual
Table of contents
Table of contents
1
Introduction................................................................................................................................. 6
1.1
Welcome to payCOM
1.2
Purpose of this user manual ......................................................................................................... 6
1.3
Structure ....................................................................................................................................... 6
1.4
Assumed knowledge .................................................................................................................... 6
1.5
Related documents....................................................................................................................... 7
1.6
Structure and typographical conventions ..................................................................................... 7
1.7
Agreements .................................................................................................................................. 7
1.8
Availability ..................................................................................................................................... 7
1.9
Service and support ...................................................................................................................... 8
2
Overview ..................................................................................................................................... 9
2.1
Tasks of payCOMweb .................................................................................................................... 9
2.2
Benefits......................................................................................................................................... 9
2.3
Workflow....................................................................................................................................... 9
2.4
Delivery time frame..................................................................................................................... 10
2.5
Security aspects ......................................................................................................................... 11
2.6
Data access authorizations ........................................................................................................ 13
2.7
User profile ................................................................................................................................. 13
3
Installation/Getting started ...................................................................................................... 14
3.1
Preconditions .............................................................................................................................. 14
3.2
Installing the card reader ............................................................................................................ 14
3.3
Settings for Internet Explorer Browser........................................................................................ 14
4
Starting the browser ................................................................................................................ 18
5
User interface............................................................................................................................ 20
5.1
Overview ..................................................................................................................................... 20
5.2
Language selection bar .............................................................................................................. 20
5.3
Top navigation bar ...................................................................................................................... 21
5.4
Module navigation menu ............................................................................................................ 21
5.5
Footer ......................................................................................................................................... 21
5.6
Download area ........................................................................................................................... 22
5.7
Function buttons ......................................................................................................................... 22
5.8
Toolbar ....................................................................................................................................... 22
5.9
Detailed data icon ....................................................................................................................... 22
5.10
Summary lists ............................................................................................................................. 22
6
Using the application ............................................................................................................... 24
4
Version 1.2 / 06.06.2014
web
............................................................................................................... 6
Base document
payCOMweb User Manual
Table of contents
6.1
General information for use ........................................................................................................ 24
6.2
Change dialog language ............................................................................................................. 24
6.3
Query contact addresses and/or send an e-mail to SIX ............................................................. 25
6.4
Display user data......................................................................................................................... 26
6.5
Filter and/or sort overview list ..................................................................................................... 28
6.6
Print overview list ........................................................................................................................ 30
6.7
Print detailed data ....................................................................................................................... 31
6.8
Display disclaimer ....................................................................................................................... 32
6.9
Logout ......................................................................................................................................... 32
7
Error messages and troubleshooting procedures ................................................................ 33
7.1
General information..................................................................................................................... 33
7.2
HTTP messages ......................................................................................................................... 33
7.3
Troubleshooting tips .................................................................................................................... 35
8
Glossary of key terms ............................................................................................................... 36
Version 1.2 / 06.06.2014
5
Base document
payCOMweb User Manual
1
Introduction
1.1
Welcome to payCOMweb
Thank you for the trust you have placed in us by choosing and participating in the
web
payCOM service. This product will provide you with optimal support when conducting funds transfer operations via the Internet.
1.2
Purpose of this user manual
This user manual provides you with the information you may need when using
web
payCOM . On the one hand it contains detailed information about the functional
scope, general workflows and the security measures involved when transmitting data,
web
whilst offering detailed and illustrated instructions for using payCOM on the other.
1.3
Structure
In keeping with the payCOM
modular:
web
modular structure, the user manual structure is also
• This base document contains general information on the payCOMweb application,
installing and using it, and general instructions for use that apply to all payCOMweb
versions.
web
• The module documents – one each per payCOM module – contain modulespecific information and user instructions for the payCOMweb module in question,
e.g. "SEPA Direct Debit", "DTA/LSV+/BDD", etc.
payCOMweb User Manual
Base document
(for all modules)
Module
Module "SEPA
"SEPA Direct Debit"
Debit"
Module
Module "DTA
"DTA/
DTA/LSV+/
LSV+/BDD
+/BDD"
BDD"
Further future modules
Weitere zukünftige Module
Module
Weitere zukünftige Module
Module
1.4
Assumed knowledge
web
Internet access is gained to the payCOM application via a browser running under
the Microsoft Windows desktop on your personal computer. In order to take full advantage of this user guide you should have a working knowledge of the Microsoft
Internet Explorer browser, Microsoft Windows and the terminology used in this environment, as well as general personal computer application know-how.
6
Version 1.2 / 06.06.2014
Base document
payCOMweb User Manual
1.5
Related documents
Application-specific information, e.g. about applicable time windows, can be found in
the documentation for the individual services, which can be viewed on the following
websites:
• www.six-interbank-clearing.com under SEPA Direct Debit Service,
• www.lsv.ch for LSV+ and BDD,
• www.dta.ch for DTA.
1.6
Structure and typographical conventions
This user manual in structured in terms of activities. Each activity that is described is
accompanied, where necessary, by an introductory explanation and detailed step-bystep instructions for use.
The following conventions are used:
1.7
1. 2. 3.
Numbers identify the individual steps of the process in question. Additional explanations accompanying the instructions appear in italics.
OK
Buttons, menu names and individual menu options are indicated in
bold type.
"File name"
Windows, lists, check boxes, options, directories and field names are
enclosed in quotation marks.
Agreements
In order to obtain the required identification needed as a precondition for taking ad+
vantage of the SEPA Direct Debit Service and/or the DTA, LSV or BDD service, you
must sign an appropriate agreement with the financial institution managing your accounts. New partners or those who wish to have their orders approved electronically by
web
payCOM , must submit a signed copy of the corresponding conditions for participation to their financial institution.
web
web
To use payCOM , you must agree to the payCOM conditions for use (these are
accepted by signing the "payCOMweb Registration / Order Form").
1.8
Availability
Essentially, files can be transmitted 7 days a week, 24 hours a day, with the exception
of extraordinary system interruptions and maintenance activities (usually at weekends).
From Saturday 12:00 to Sunday 17:00 hrs as well as on public holidays, there will be
web
no validation carried out of the files delivered with payCOM . During this time there
will therefore be no acknowledgement to the sender, and neither will it be possible to
approve the orders delivered.
Version 1.2 / 06.06.2014
7
Base document
payCOMweb User Manual
1.9
Service and support
If, in spite of this user manual, you are confronted with a problem which you cannot
resolve, please don't hesitate to contact our rapid and free of charge support facility by
sending an e-mail to [email protected]. Alternatively call the
following number (calls are charged at CHF 3.13/minute incl. VAT):
English, French, Italian: 0900 57 3520
German: 0900 57 6520
Please note that for telephone queries our office is staffed from 8 a.m. to 12 noon and
from 2 p.m. to 5 p.m. CET (workdays).
When making queries please have your partner identification ready. This information is
contained on your SmartCard (see illustration in section 8 "Glossary of key terms").
8
Version 1.2 / 06.06.2014
Base document
payCOMweb User Manual
2
Overview
2.1
Tasks of payCOMweb
payCOMweb is a service for transmitting payment and collection orders via the Internet
to the SIX computer center and/or for electronically approving orders submitted in the
same manner.
2.2
Benefits
Using payCOMweb offers you the following benefits:
• You can transmit files with ease via the Internet.
• Rapid feedback (transmission and validation results) informs you of the submission
status.
• You can approve submitted orders electronically thus eliminating the need for
sending paper payment or collection orders to the financial institution managing
your accounts.
• You can determine who should be authorized for submission and/or electronic
approval operations (one or two persons for single or collective approval).
• You receive continuously updated information showing you the current processing
status of the orders approved.
• The multi-bank capability even allows you to submit instructions affecting accounts
with different financial institutions via a single channel.
• The HTML solution using a standard browser requires neither major hardware nor
software investment and the installation effort is minimal.
2.3
Workflow
Note: Since the procedures for different orders are effectively the same, the following description of the procedure will not refer explicitly to a specific service.
It is also assumed that the processing of orders will be paperless1, i.e. they will be
web
approved via payCOM .
An order submitted via payCOM
web
is processed in the following manner:
1.
Using his own standard generation software the user creates files containing
order data and stores them in a suitable directory either on his personal computer's hard disk or another data storage medium.
2.
The user starts the Internet Explorer browser and dials up to establish an Internet
connection to SIX. Having logged on successfully and passed the authentication
web
check access is gained to the payCOM application in the SIX computer center.
The user is now able to transmit the generated files electronically via the secure
HTTPS Internet link to the computer center.
1
SEPA direct debits are always processed electronically. To process DTA or LSV+/BDD orders, the
customer can also, instead of paperless processing, send a paper order to the financial institution where
his or her account is held – provided that it supports order processing using paper orders – instead of
approving the order that has been delivered in payCOMweb himself.
Version 1.2 / 06.06.2014
9
Base document
payCOMweb User Manual
2.4
3.
The computer center checks the received data and places feedback details in the
file overview for the user who can view and download them in his browser, in
addition to the files that have been sent and the order data, for up to 90 days
(SEPA Direct Debit) or up to 60 days (DTA/LSV+/BDD orders) after processing.
4.
payCOMweb users who are entitled to issue approvals authorize the orders via the
Internet on the secure transmission channel. Depending on the database entries
for the user in question, a single approval may be sufficient, or a second approval
by another user entitled to issue collective approval may be required. Once
approval has been issued it cannot be revoked. Note: if orders are not approved
in good time, it is not possible to comply with the requested processing date.
5.
SIX begins the processing and settlement of the orders in partnership with the
account-holding financial institution of the ordering party or the financial institution
of the debtor respectively.
6.
After settlement, the financial institutions undertake the relevant debits and credits on the accounts of the involved parties.
Delivery time frame
The result of the validation check for the transmitted files is usually available in the file
list shortly after delivery has been made. The order data are visible in payCOMweb at
the same time and are ready for electronic approval − on condition that you are in
possession of the required authorization.
The submission times – the time stamp denoting receipt by SIX is decisive – according
to the guideline of the respective service must be observed when a booking entry to an
account is required on a specific business day (value date).
If the file has not been received by the prescribed time, processing and value date will
be delayed correspondingly, and it will no longer be possible to keep to the required
processing date.
10
Version 1.2 / 06.06.2014
Base document
payCOMweb User Manual
2.5
Security aspects
The security requirements for web solutions involving funds transfer operations are
extremely demanding. On the one hand, sensitive data is being exchanged whilst on
the other, the Internet, as a publicly accessible network, is open to all kinds of abuse
(e.g. unauthorized persons who attempt to infiltrate the systems in order to steal, manipulate or delete data or bring the system to a standstill by transmitting vast volumes
of data).
Data exchange between the customers and SIX over the Internet, therefore, is made
secure by the implementation of appropriate security procedures so that:
• the confidentiality of transmitted data is guaranteed
• the authenticity (source) of the data received can be determined, i.e. the recipient
can identify the sender explicitly. This applies not only to the customer but also to
SIX
• the integrity of the data received is guaranteed by the SSL-encrypted transmission
path
• authorization (a validation check) is undertaken each time the application is accessed and suitable measures are employed to deny unauthorized persons access
The Internet connection between the browser on the user's PC and the SIX entry portal
(Web Entry Service) fulfils these security requirements by taking advantage of the
HTTPS/SSL V3.0 protocol.
The SSL protocol (SSL = Secure Socket Layer) permits client/server applications to
run securely over a transmission path and guards against:
• eavesdropping
• message tampering
• message forgery
The SSL protocol is currently the generally accepted standard for client and server
authentication and encryption over the Internet. SSL is supported and used by all
modern browsers in order to encrypt – and thus safeguard against eavesdropping on –
confidential data that is to be transmitted over the Internet (World Wide Web).
The URL (Uniform Resource Locator) for an SSL connection can be identified by the
prefix https://. The status bar of the browser window displays the secure icon when a
secure connection has been established.
Secure icon in Internet Explorer
An SSL connection is created by integrating digital certificates on the server or additionally on the client. Asymmetrical encryption (public/private key encryption) and
symmetrical encryption are combined for use. SSL certificates are based on the X.509
standard.
Apart from encryption which safeguards the transmitted data from unauthorized inspection, SSL makes it possible to unequivocally establish the identity of a web server
being addressed (server authentication). The browser on the client side is able to
automatically select the server certificate which had been presented and compare the
data received using the trustworthy CAs (Certificate Authorities) root certificates installed in the browser. Client authentication is also supported by the server unequivocally identifying the accessing browser (or the user) and either granting or denying
access.
Version 1.2 / 06.06.2014
11
Base document
payCOMweb User Manual
Encryption strength: as already mentioned, SSL uses a combination of symmetrical
and asymmetrical encryption. Symmetrical processes currently use keys up to 256 bits
long for the "session key" (Internet Explorer 6.0 currently uses a key length of 128
bits). Asymmetrical encryption uses keys with 512 bits and more (for transmitting the
"session keys"). Today, symmetrical key lengths of 128 bits and asymmetrical key
web
lengths of 1024 bits can be considered as secure. payCOM uses a key length of
1024 bits for asymmetrical encryption.
Authentication, i.e. the explicit identification of the user system takes place in the
Web Entry Service of SIX by using an electronic certificate. The Web Entry Service
web
returns the payCOM application electronic certificate to the user system once a
connection has been established and authentication was deemed successful. This is
also confirmation to the user that he is connected to the correct partner.
Electronic certificates ensure that unique identification of both parties is established
thus creating the basis for trust over the Internet. The user of the certificate can be
determined unambiguously. The electronic certificate is stored on the SmartCard and
has to be read in via a card reader on the user's PC before a connection can be established.
Note: In spite of established security procedures a residual, even if very small, risk
remains that unauthorized persons may gain access to data being transmitted or
gain access to the system by assuming the identity of the user. This residual risk is
borne solely by the user of the payCOMweb service. The user is therefore responsible
for ensuring that his PC is sufficiently protected against unauthorized access over the
Internet, e.g. by installing a firewall on his PC. Furthermore, he is also responsible for
ensuring that access to his place of work by unauthorized persons is denied and that
the SmartCard and corresponding User PIN are kept separately from one another
and in a secure place.
The customer is also responsible for backing up his transmitted data if he feels this is
necessary.
All submitted files can be viewed for a period of up to 90 days (SEPA Direct Debit) or
up to 60 days (DTA/LSV+/BDD orders) after the processing in the payCOMweb file list.
In order to answer queries or facilitate researches, all transaction data are held in
safecustody by SIX for a period of 10 years.
12
Version 1.2 / 06.06.2014
Base document
payCOMweb User Manual
2.6
Data access authorizations
When registering for payCOMweb the customer can determine whether all registered
users may view all submitted payment and collection order data, or whether different
user groups should be created with viewing privileges solely for their own data.
If several user groups are desired each user is to be assigned to one or more groups.
Any number of users can belong to a user group. This approach allows access authorization to be freely determined.
Before files can be submitted, users belonging to several groups must indicate in advance to which user group the files in question belong. For users only belonging to a
single user group the submitted files are automatically assigned to this group.
web
In the payCOM files overview, users belonging to several user groups can choose
whether they would like to view data belonging to all the assigned groups or whether
the data should be filtered for a single user group. For users belonging to a single
group, only the data applicable to that group is visible.
Users who have been assigned approval privileges (see section 2.7 "User profile")
have access to all orders in relation to the accounts (based on BIC/BC number, IBAN/
account number and identification) for which they have received payCOMweb approval
authorization regardless of their user group.
2.7
User profile
Each user is assigned a profile that determines the payCOM
ted to use. The user profile embraces:
web
functions he is permit-
• User group affiliation (see section 2.6),
• User role (submission authorization only, approval authorization only or both submission and approval authorization),
• Account access authorization (BIC or BC number, IBAN or account number and
identification) for users with approval authorization and
• Type of approval authorization (individual or collective) for users with approval
authorization.
Note: a user may be assigned access authorization for several accounts and may
even have different approval authorizations for individual accounts.
Version 1.2 / 06.06.2014
13
Base document
payCOMweb User Manual
3
Installation/Getting started
web
Before you can use payCOM you must connect the SmartCard card reader to your
personal computer and install the associated card reader software (see section 3.2).
Moreover, you must configure your Internet Explorer browser as described in section
3.3.
3.1
Preconditions
As a precondition for the installation and getting up and running you must:
• have submitted a signed copy of the participation conditions of the corresponding
services to the branch of the financial institution managing the accounts
• be in possession of a personal computer and be able to access the Internet, for
minimum requirements see www.lsv.ch Companies -> Data transfer
web
• have registered for payCOM with SIX Payment Services and be in possession of
the payCOMweb starter kit (SmartCard card reader, SmartCard User PIN, installation CD with card reader software including installation and user guide) and
• have received the certificate on the SmartCard by separate, registered post.
3.2
Installing the card reader
You have received the instructions for installing the card reader with the SmartCard
card reader and the installation CD with the card reader software. On completing the
installation you accept the licence provisions specified by Gemalto SA.
3.3
Settings for Internet Explorer Browser
In order to participate in the payCOMweb service, a privacy setting must be selected in
the Internet Explorer browser which permits cookies. In addition, the option "Show
pictures" must be activated. It is also recommended that the "Reuse windows for
launching shortcuts" option is deactivated.
Procedure:
14
1.
Start Internet Explorer.
2.
From the Tools menu choose Internet Options....
The "Internet Options" window appears.
3.
Click on the "Privacy" tab.
The "Privacy" options are visible.
4.
Use the slider to select a privacy setting which permits cookies, e.g. the setting
"Medium High".
Version 1.2 / 06.06.2014
Base document
payCOMweb User Manual
5.
Click on the "Advanced" tab.
The "Advanced" options are visible.
6.
Scroll down until the "Reuse windows for launching shortcuts" check box
("Browsing" group) appears.
7.
Untick the "Reuse windows for launching shortcuts" check box if not already
inactive.
Version 1.2 / 06.06.2014
15
Base document
payCOMweb User Manual
8.
Scroll down until the "Show pictures" check box ("Multimedia" group) appears.
9.
Tick the "Show pictures" check box if not already active.
10. Click on the «Security» tab.
The "Security" options are visible.
11. Click on the zone «Trusted sites».
12. Click on Sites.
The "Trusted sites" window appears.
16
Version 1.2 / 06.06.2014
Base document
payCOMweb User Manual
13. Enter «https://gate.sic.ch» in the entry field.
14. Click on Add.
The site «https://gate.sic.ch» is registered as trusted site.
15. Click on Close.
The "Trusted sites" window disappears.
16. Click on OK.
The new settings are saved and the "Internet Options" window disappears.
17. Close the Internet Explorer.
Version 1.2 / 06.06.2014
17
Base document
payCOMweb User Manual
4
Starting the browser
web
In order to take advantage of the payCOM functions you must start your Internet
Explorer browser and establish a network connection to the payCOMweb application.
Procedure:
18
1.
Insert your SmartCard bearing the certificate in the card reader.
2.
Start your Internet Explorer.
3.
Establish a connection to your Internet provider (this operation can usually be
omitted if you are connected to a local company intranet since a permanent connection is usually in place).
4.
Type the URL of the SIX web entry service in your browser:
https://gate.sic.ch/pcweb
If the option "Warn if changing between secure and non-secure mode" is activated on your Internet Explorer Browser, a warning message will appear which
you must acknowledge with OK. Otherwise the "Choose a digital certificate"
window will appear immediately.
5.
Click on OK.
The SmartCard PIN entry window appears.
6.
Type in your SmartCard User PIN.
You received the SmartCard User PIN together with the SmartCard reader.
Version 1.2 / 06.06.2014
Base document
payCOMweb User Manual
7.
Click on OK.
Once the access authorization check has been completed successfully a secure
SSL connection is established and the start screen of the payCOMweb user interface appears.
8.
If you would like to take advantage of an alternative dialog language at the top
right of the screen simply click on the required language (DE for German, FR for
French).
The user interface changes to the chosen language.
9.
Select the tab of the desired module:
− DTA/LSV+/BDD for file submissions to the DTA, LSV+ or BDD service.
− SEPA Direct Debit for file submissions to the SEPA Direct Debit Service
− etc.
Only those modules are displayed that you are authorized to use. The module
user interface is displayed. It is described in more detail in section 5 "User interface".
General functions of the web applications that apply to all modules are described
in section 6 "Using the application" of this basic document, while module-specific
functions are described in the individual module documents.
Version 1.2 / 06.06.2014
19
Base document
payCOMweb User Manual
5
User interface
5.1
Overview
The user interface displayed in the browser window contains the following areas:
• language selection bar (1)
• top navigation bar (2)
• module navigation menu (3)
• footer (4)
5.2
Language selection bar
The language selection bar offers menu options for selecting the language:
• DE changes the dialog language to German
• FR changes the dialog language to French
• EN changes the dialog language to English
The abbreviation for the dialog language that has been selected is marked in grey.
Whenever the language is changed, the Start screen (Home) is displayed.
20
Version 1.2 / 06.06.2014
Base document
payCOMweb User Manual
5.3
Top navigation bar
The top navigation bar contains menu options for calling up the available modules (depending on your user profile as set in your application form, i.e. only those modules are
displayed which you are entitled to use) and, always, a "Home" tab and a "Contacts"
tab. The tab for the module that is currently selected is shown in red font.
Home displays the Start screen for payCOMweb. This also comes up automatically
whenever the language is changed.
Contacts enables users to look up addresses and telephone numbers for relevant
offices and send messages to SIX. You can find more information on this in section 6.3
"Query contact addresses and/or send an e-mail to SIX".
5.4
Module navigation menu
The module navigation menu on the left-hand side contains all the menu options for
calling up functions in the selected module. The menu options vary between modules.
The option for the function that is currently selected is shown in red font.
You can find more information about the module functions that can be selected in the
relevant module document.
5.5
Footer
In the footer, click on the links
• Contacts – to look up addresses and telephone numbers of the relevant offices
and send messages to SIX,
web
• Disclaimer – to see the conditions of use for payCOM
• Logout – to end the current session using payCOM
,
web
.
So that you can always be sure about which system you are currently working on, this
is displayed in the footer: P r o d u c t i o n or T e s t S y s t e m .
Version 1.2 / 06.06.2014
21
Base document
payCOMweb User Manual
5.6
Download area
If you click on the relevant link on the right-hand side of the screen in the grey "Downloads" area, the user instructions for the module you have selected will be displayed in
a new browser window.
5.7
Function buttons
In the modules, buttons for calling up processing functions (e.g. Approve, Cancel or
Print) or for navigation (e.g. Back) are displayed, depending on the context.
5.8
Toolbar
In the individual modules, a toolbar is displayed on the right-hand side, with one or
more of the following icons, depending on the context:
Updates the data displayed, without changing the filters and sort sequences
that have been set.
Displays data in PDF format in a separate browser window, where it can be
printed (see also section 6.6 "Print overview list").
Exports data to an XML file (XML = Extensible Markup Language). This file can
be further processed or viewed in an XML Editor. You can choose whether to
save the XML file in any directory or view it directly in a separate browser winweb
dow. The export process is described in the user manual for the payCOM
module "SEPA Direct Debits".
5.9
Detailed data icon
By clicking on the
icon in the summary lists, you can display the detailed data which
belongs with the relevant dataset. The icon is only there if detailed data is available.
5.10
Summary lists
The summary lists in the individual modules can hold a maximum of 20 datasets per
page. At the bottom right, you can see how many datasets are displayed and the total
number of datasets there are to be displayed.
Note: if filters have been set (see section 6.5 "Filter and/or sort overview list", then the
number of datasets to be displayed does not equate to the total number of existing
datasets.
You can use the
and
icons to page forwards and backwards and the
icons to move directly to the last or first page.
22
and
Version 1.2 / 06.06.2014
Base document
payCOMweb User Manual
Example of an overview list with order data:
The line in an overview list that you clicked on most recently is highlighted in yellow.
This yellow highlighting does not remain if you temporarily change to detailed view and
back again.
Version 1.2 / 06.06.2014
23
Base document
payCOMweb User Manual
6
Using the application
6.1
General information for use
A condition for all functions described in the subsequent chapters is a network conweb
nection to the payCOM application in accordance with section 4 "Starting the
browser". In addition, you must be authorized to execute the relevant function in
accordance with your user profile (see also chapter 2.7).
web
Important note: The payCOM user interface is presented to you in your browser
window. In contrast to normal surfing in the Internet, navigation within the payCOMweb
web
application only requires the use of control features built into the payCOM user
interface and under no circumstances the browser's navigation buttons such as
"Back", "Forward" or "Reload" (including the pop-up menus visible by clicking the
right mouse button). If, in spite of this warning you accidentally use the browser
navigation features, the connection to the application might be terminated.
When implementing the payCOMweb functions, therefore, adhere to the instructions
given in the following sections. Should a problem nevertheless arise refer to section 7
"Error messages and troubleshooting procedures".
Note: The screenshots used in the manuals are examples, i.e. all data displayed is
fictitious and the selection menu displayed on the basis of your user profile may
contain fewer options than the example given.
6.2
Change dialog language
You can switch the user interface to a different dialog language at any time. The available languages are DE = German, FR = French and EN = English.
When payCOMweb starts, the dialog language displayed is always that chosen when
you registered/ordered the service. Any change to the dialog language made during
use is not saved.
Procedure:
On the language selection bar at the top of the screen click on the required language
symbol, FR, EN or DE.
The user interface will switch to the newly selected language. At the same time the
screen will change to the Start screen, if this is not displayed already.
24
Version 1.2 / 06.06.2014
Base document
payCOMweb User Manual
6.3
Query contact addresses and/or send an e-mail to SIX
The "Contacts" function displays a number of useful contact addresses for the
web
payCOM application. This function can be used to compose and transmit an e-mail
to a contact address.
Procedure:
1.
Either on the top navigation bar or in the footer, click on Contacts.
The "Contacts" screen is displayed.
The contact addresses are listed on the right, and on the left you can compose
and send an e-mail as follows.
2.
Select the required contact in the selection field.
3.
Compose your message, describing the situation as accurately as possible.
4.
Click on Submit.
The e-mail is transmitted. After a short time, you will receive a response from the
contact you have selected.
Version 1.2 / 06.06.2014
25
Base document
payCOMweb User Manual
6.4
Display user data
You can use the "User data" function to display your saved user data.
Procedure:
1.
Click on Home on the top navigation bar.
web
The start screen for the payCOM user interface is displayed.
2.
Click on User data in the module navigation menu.
The "User data" screen showing your user data is displayed.
The individual fields of the detailed view contain the data listed below (sorted by
area).
USER DATA
26
Certificate Id
Certificate number for your certificate on
SmartCard
Company
Name of your company
First name
Your first name
Name
Your last name
Version 1.2 / 06.06.2014
Base document
payCOMweb User Manual
DELIVERY AUTHORIZATION DTA/LSV+/BDD AND SEPA DIRECT DEBIT
You may be assigned several user groups.
Group
Name of the user group
APPROVAL AUTHORIZATION DTA/LSV+/BDD
You may be assigned several authorizations. For each authorization, you can
see the assigned approval method, the service and the authorization (account
number, BC number and DTA/LSV+/BDD identification).
Approval method
Designation of the approval method:
– Collective approval
– Single approval
Service
Designation of the service (DTA or LSV+/BDD)
Account number
Account number of the authorized account.
BC number
Bank clearing number of the authorized account.
DTA/LSV+/BDD-Id
DTA/LSV+/BDD identification of the authorized account.
APPROVAL AUTHORIZATION SEPA DIRECT DEBIT
You may be assigned several authorizations. For each authorization, you can
see the assigned approval method, the service and the authorization (account
number, BIC and Creditor Identifier).
Approval method
Designation of the approval method:
– Collective approval
– Single approval
Service
Designation of the service (always SEPA)
Account number
Account number of the authorized account.
BIC
Bank Identifier Code number of the authorized account.
Creditor Id
Creditor Identifier of the authorized account.
Version 1.2 / 06.06.2014
27
Base document
payCOMweb User Manual
6.5
Filter and/or sort overview list
Requirement: overview list displayed.
You can use filters to further reduce the number of datasets displayed, to raise the
criteria for the overview and find the dataset you want more quickly. Filters can be
applied to any column of the list (or more than one at a time), by selecting the filter
criteria in the selection lists on the filter toolbar. You can also set each column to be
sorted in either ascending or descending order. The results of the filters you have set
and the method of sorting are visible immediately. At the bottom on the right you can
see for information purposes how many datasets are in the list altogether and which of
them are displayed.
Specified filters can be suppressed individually, by selecting "*" for the relevant selection, or all together, by clicking on the
button outside left on the filter bar.
The following example shows the procedure for filtering using an overview list of orders. This list is only to display cancelled first collections (sequence type FRST). The
list should also be sorted in ascending order of amount.
Procedure:
28
1.
Click on
in the selection field above the column that you want to filter.
A selection of possible filter conditions is provided. All values applying to the column plus an asterisk appear (at the top, for suppressing the filter).
2.
Choose the required filter condition from the options list.
The options disappear and only the entries matching the chosen filter condition
are displayed in the list. The chosen filter condition is visible in the field above the
column heading (* indicates that no filter is active for the relevant column).
Version 1.2 / 06.06.2014
Base document
payCOMweb User Manual
3.
If necessary, set additional filters for other columns.
The list only displays those orders which satisfy all the selected filter conditions.
4.
To sort the list, click the column heading of the column to be sorted.
In the example illustrated below the list is sorted according to the amount and in
ascending order. The sorted column and the sort order (ascending or descending) are displayed by means of a red arrow.
5.
To reverse the sorting order of the list (ascending or descending) simply click the
corresponding column heading again.
In the example illustrated below the list is sorted with the amount appearing in
descending order.
Version 1.2 / 06.06.2014
29
Base document
payCOMweb User Manual
6.6
Print overview list
Requirement: The overview list is displayed and the
icon is on the symbol bar
You can display data from overview lists as a PDF print preview on the screen and
from there print it using the "Print" function. You will need Acrobat Reader.
If Adobe Acrobat Reader is not already installed on your PC, you can download it free
from the Adobe website and install it.
The following example shows the procedure for printing using an overview list of
orders.
Procedure:
30
1.
icon in the toolbar on the right of the screen.
Click on the
A PDF print preview is displayed in a new browser window with the Adobe Acrobat Reader symbol bar displayed. If the list consists of more than 20 entries, the
PDF file will occupy more than one page (see footer).
2.
Click on the
icon in the Adobe toolbar to print out the data.
The PDF file that is displayed will be printed out.
3.
Close the browser window.
Version 1.2 / 06.06.2014
Base document
payCOMweb User Manual
6.7
Print detailed data
Requirement: Detailed data displayed and button
is on the symbol bar.
The following example shows the procedure for printing using a feedback message
that is displayed.
Procedure:
1.
Click on the
button on the right-hand side of the screen.
The data is prepared in a printable version in a separate window and the "Print"
window comes up.
2.
Make the appropriate settings (choice of printer, print range and number of
copies).
3.
Click on Print.
The contents of the window is printed out.
Version 1.2 / 06.06.2014
31
Base document
payCOMweb User Manual
6.8
Display disclaimer
You can use the "Disclaimer" function to display the conditions of use that apply to
web
payCOM .
Procedure:
6.9
1.
Click on the Disclaimer link in the footer.
The screen "TERMS AND CONDITIONS GOVERNING THE USE OF payCOM"
is displayed.
2.
Read carefully the conditions of use that are displayed.
web
In using payCOM you accept these terms and conditions.
Logout
Once you have completed your tasks with the payCOMweb application you should log
off in an orderly manner. If you fail to do this an automatic timeout will occur after a
period of inactivity and the connection will be terminated.
Procedure:
32
1.
Click on the Logout link in the footer.
The "Logout" screen is displayed, asking you whether you really want to logout.
2.
Click on Confirm.
web
The payCOM application is terminated and the link "Click here to login again" is
displayed upper left in the browser window allowing you to log in again.
3.
Disconnect from the Internet if this doesn't take place automatically.
4.
As a precaution empty your browser cache memory.
5.
Remove your SmartCard from the card reader.
Version 1.2 / 06.06.2014
Base document
payCOMweb User Manual
7
Error messages and troubleshooting procedures
7.1
General information
This chapter is designed to assist you in taking appropriate action should a malfunction
occur whilst you are using payCOMweb.
It is assumed that your personal computer, the Windows user interface, and all other
Windows applications are functioning correctly. In other words, the malfunction is only
web
affecting the payCOM application. If this is not the case, you should consult the appropriate hardware and software user manuals to try and resolve the problem.
When a problem occurs, try and rectify it first yourself by taking advantage of the information provided below. Only if you are unable to resolve the problem with the help
of this information should you request assistance from SIX Payment Services. The
e-mail address and the hotline telephone number are both listed in chapter 1.9
"Service and support".
7.2
HTTP messages
The following HTTP messages might occur in the browser when working with payCOMweb:
Information
100 Continue
101 Switching Protocols
Confirmation messages
200 OK
201 Created (request successful, new resource created)
202 Accepted
203 Non-Authoritative Information
204 No Content (request executed but no contents returned)
205 Reset Content
206 Partial Content
Re-routing information
300 Multiple Choices
301 Moved Permanently
302 Found
303 See Other
304 Not Modified
305 Use Proxy
307 Temporary Redirect
Version 1.2 / 06.06.2014
33
Base document
payCOMweb User Manual
Client error messages
400 Bad Request
401 Unauthorized (user identification required)
402 Payment Required (reserved)
403 Forbidden (request understood but server refuses to act)
404 Not Found (resource cannot be identified)
405 Method Not Allowed (request not applicable to the resource)
406 Not Acceptable
407 Proxy Authentication Required (as for 401)
408 Request Timeout
409 Conflict (due to resource problems request cannot be terminated, user action
expected)
410 Gone
411 Length Required
412 Precondition Failed
413 Request Entity Too Large
414 Request-URL Too Long
415 Unsupported Media Type)
416 Requested Range not satisfiable
417 Expectation Failed
Server error messages
500 Internal Server Error
501 Not Implemented
502 Bad Gateway
503 Service Unavailable
504 Gateway Timeout
505 HTTP Version Not Supported
These error messages are not particularly explicit. However, in conjunction with their
occurrence it is often possible to determine the cause of the malfunction.
34
Version 1.2 / 06.06.2014
Base document
payCOMweb User Manual
7.3
Troubleshooting tips
The following is a selection of possible error symptoms and recommendations for rectification.
Network connection to the payCOMweb application cannot be established
Check your Internet connection. If your Internet connection is not in order, check your
modem and your Internet provider. Have you correctly typed in the URL for the payweb
COM application https://gate.sic.ch/pcweb? Have you configured your browser as
explained in chapter 3.3?
SmartCard is rejected when logging in
Check whether your SmartCard bearing the certificate is inserted correctly in the card
reader. Have you entered the SmartCard User PIN correctly?
The connection to the payCOMweb application is repeatedly terminated
Are you using the navigation functions of your browser such as "Back", "Forward",
"Reload" or "Refresh"? This is not permitted (see chapter 6.1 "General information for
use").
Message "Page cannot be displayed" appears
As a precaution empty the browser cache memory, close all browser windows and
web
then restart payCOM .
Version 1.2 / 06.06.2014
35
Base document
payCOMweb User Manual
8
Glossary of key terms
The following, listed in alphabetical order, is an explanation of some of the key terms
appearing in this user manual.
Approval
The term "Approval" is reserved for activities undertaken by the customer: as a
web
payCOM partner with appropriate privileges you can electronically approve submitted orders (payment groups) (paperless processing). Further processing can begin
once the approval process has been completed.
BDD
Business Direct Debit: common payment transfer service (operated by SIX Payment
Services) from the Swiss banks for the efficient collection of payments using standardized payment transactions (direct debits). In contrast to LSV+, the DEB has no
right of objection in respect of the DEB-FI. BDD may only be used in corporate
banking. Otherwise, BDD displays the same technical features as LSV+.
Certificate
A certificate confirms the partner's access authorization, i.e. a Certification Authority
guarantees that the Public Key of the certificate really belongs to the registered partner. The electronic certificate is stored on a SmartCard which has to be scanned by a
card reader on the user's PC before a network connection can be established.
Clearing
The clearing system SIC was introduced by the financial institutions in order to conduct
electronic funds transfer operations between themselves. The clearing center of the
Swiss National Bank (SNB) books the incoming and outgoing payment data to the
accounts of the participating financial institutions daily on the basis of data.
Cookies
A cookie is a small text file, which is downloaded and stored, either temporarily or
permanently, on the hard disk of your computer to allow a web company to keep track
of where you have been on the net and other information (e.g. language chosen, etc.).
The www.lsv.ch website uses so-called "Session Cookies" which are only enabled
during a user session. When starting the website the system issues you with a unique
number which is stored in the cookie and which allows you to be identified when navigating between sites in order to present your personal data. As soon as you quit the
website by logging off, or by closing the browser, the cookie is deleted. SIX DOES
NOT use cookies to track your behaviour on the web or to visit the websites following a
visit. Cookies do not transmit viruses.
DTA
DTA, CH format, is a service provided by Swiss banks for processing payment orders.
Payments in the DTA format are usually submitted over a direct delivery channel to the
assigned financial institution. In arrangement with the financial institution they can also
web
be submitted electronically with payCOM via SIX to the assigned financial institution.
Detailed information regarding the DTA service can be obtained either from your
financial institution or by visiting www.lsv.ch.
36
Version 1.2 / 06.06.2014
Base document
payCOMweb User Manual
DTA payment group
A DTA payment group embraces all payment orders in the same file and displays the
following characteristics:
− same BC number for the ordering party's bank
− same account number to be debited
− same ordering party identification
− same requested processing date (value-date)
− same currency.
Group identification
web
As a payCOM user SIX Payment Services issues you with further identification in
addition to the certificate-related partner identification. One is the group identification
(you receive group identification for each user group to which you belong. This has the
same format as the partner identification (e.g. G12345) but is related to a user group.
This allows the unequivocal assignment of users to a user group within a company and
regulates the access to data (members of a specific user group can only view and
process data for their own group. The group identification for the user group currently
selected is visible in the upper right corner in the majority of payCOMweb screens
together with the user's name and company.
IBAN
IBAN is the acronym for International Bank Account Number, a payment transactions standard
in Switzerland and throughout Europe. Displaying standard account numbers in IBAN for-
mat makes it easier to record, forward and process payment data.
LSV
Lastschriftverfahren (Direct Debit Scheme): Joint payment transfer service provided by
the Swiss banks (operated by SIX Payment Services) for the rational collection of
accounts receivable using standardized payment transactions (direct debits), which is
+
offered in two versions: LSV (= LSV with right of objection), and BDD for corporate
banking (= LSV without right of objection).
+
LSV (LSV or BDD) payment group
A LSV payment group embraces all collection payments in the same file and displays
the following characteristics:
− same BC number for the creditor's bank
− same account number to be credited
− same LSV identification of the creditor
− same requested processing date
− same currency
+
LSV
LSV+ is a Swiss process for domestic and cross-border payments in CHF and EUR.
+
With LSV the debtor has always a right of objection. Its legal foundation is formed by
+
the LSV participation conditions and the direct debit authorization. The participation
conditions regulate the handling of payment orders between the creditor and his bank.
The direct debit authorization documents the legal relationship between the creditor,
his bank and the debtor on the one hand, and that between the debtor and his bank on
the other hand.
Ordering party/Sender identification
+
As a DTA, LSV or BDD partner the customer is provided with identification (ID), referred to as the party identification, on concluding an agreement with his financial institution. When the customer submits a file, the financial institution responsible for the
funds transfer operations and the sender of the file, must identify themselves on the
basis of the party identification. This party identification is stored in every file.
Version 1.2 / 06.06.2014
37
Base document
payCOMweb User Manual
Partner identification
web
As a payCOM user SIX Payment Services provides you with partner identification.
This comprises a single letter followed by 5 digits, e.g. X01234. The partner identification is embossed on the SmartCard.
PIN
Personal Identification Number (see also SmartCard User PIN)
SEPA
Single Euro Payments Area. SEPA is the area of the EU/EEA member states plus
Monaco and Switzerland, where citizens, companies and other economic actors will be
able to make and receive payments in euro, whether between or within national
boundaries under the same basic conditions, rights and obligations, regardless of their
location.
SEPA direct debit
A SEPA direct debit is the payment instrument governed by the rules of the SEPA
Direct Debit Scheme for making direct debit payments in euro throughout SEPA from
bank accounts to other bank accounts.
SEPA Direct Debit Scheme
The SEPA Direct Debit Scheme is the payments scheme for making euro direct debits
across SEPA, as set out in the respective Rulebook. You can find further terms and
abbreviations in a separate Glossary for the SEPA Direct Debit Scheme on the website
www.sepa.ch.
SEPA Direct Debit Service
A SEPA direct debit processing service by SIX Payment Services and SECB Swiss
Euro Clearing Bank.
SmartCard
A SmartCard is a plastic card in credit card format with an integrated chip (see the
following illustration) on which the certificate data is stored. In order to be able to use
the certificate the SmartCard must be inserted in a card reader and the user must authenticate his access rights by entering the associated User PIN.
Company
Name or department
Partner identification
SmartCard User PIN
The SmartCard User PIN serves to evidence user authorization for the SmartCard.
38
Version 1.2 / 06.06.2014
Base document
payCOMweb User Manual
URL
The URL (Uniform Resource Locator) specifies the complete path for a document, a
graphic or any file on the Internet or intranet. To visit payCOMweb, for example, you must
web
type in the URL for the payCOM application: https://gate.sic.ch/pcweb
User groups
web
Each payCOM user can belong to one or more user groups. Since members of a
specific user group can only view and process data for their group, greater clarity is
provided and, more importantly, sensitive data (e.g. salary payments) are only available to a predetermined category of users. Administrators in a large company, therefore, can be assigned to a user group based on their activities (e.g. payroll accounting,
accounts receivable or accounts payable) whilst the superior is in possession of
access rights to all user groups. In a small company only a single user group might be
specified so that all users in the company have access to all data.
User identification
As a payCOMweb user Swiss Interbank Clearing issues you with further identification in
addition to the certificate-related partner identification. One is the user identification.
This has the same format as the partner identification (e.g. U12345) but is related to
the user. It serves for uniquely assigning each user to one or more user groups in a
company.
Version 1.2 / 06.06.2014
39