1
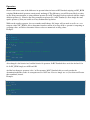
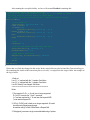
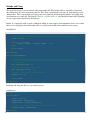
RC_BVM New User Guide
Introduction
RC_BVM is a version of the RC Standard server with an enhanced scripting engine. RC_BVM utilizes a
commercial scripting engine, Brisk Virtual Machine 2, whose language is strongly influenced by the Blitz
Basic family of languages.
RC_BVM brings many enhancements to the Realm Crafter scripting language. Among these changes are the
additions of Include files, traditional Basic style control loops, custom user defined types, arrays and the
ability to create and Use functions from precompiled modules, among other exciting changes.
There are also some features of the current RC scripting language that will no longer be valid. This list is
much shorter than the list of additions. The functions GoTo(), GoToIf() and .Label are not supported in the
RC_BVM Server.
Most of the commands which users of the standard RC scripting language are familiar with can be found in
RC_BVM with little or no changes. Many commands have been tweaked to use more default values. This
results in fewer script failures for failing to supply arguments which often seem more intuitive with default
values. More on these changes later.
Sample Scripting
RC_BVM scripts will use a new file extension, .rsl to keep the scripts for RC_BVM and RC Standard more
easily separated. Let’s look at a simple RC_BVM script:
; RC_BVM utilizes a different character for commenting than does
; RC Standard. The semicolon (;) is now used for commenting
Function Main()
; Just as in RC Standard all script logic should begin within the Main function.
Player = Actor() ; Note the identical syntax to RC standard
; Note that you can now use numbers and many symbols within variable names
Player2 = ContextActor()
; String concatenation is now performed using the addition operator
; and no longer uses the $+ operator.
Output(Player, “Hello “ + Name(Player) + “!”)
End Function
You will notice that there is very little about this script which is different than you would write for a RC
Standard script. In general, if you can write a RC Standard script, you can write a simple RC_BVM script. If
you are more familiar with any of the Blitz Basic family of languages, you will be even more at home with the
RC_BVM style of scripting.
Variable Types
In Realm Crafter Standard, we are accustomed to a fully typeless system of variables. Variables can be any
type at any time, all handled just about transparently. By type, we mean that variables are one of several types
of values. Primarily, these will fall into Int, Float or String types. A Int or integer is a whole number either
positive or negative. The maximum range of an integer in RC_BVM is -2147483648 to +2147483647. Floats
or floating point numbers are numbers with fractional values, usually expressed in a decimal format. Strings
are basically text values, or a collection of characters.
RC_BVM is not a typeless language. This means that variables are assigned a type at creation. While it is
generally not necessary to explicitly declare the type, since RC_BVM will attempt to make that determination
when the variable is first assigned a value, it is good practice to do so and may help to avoid hours of bug
searches because the value you think is a float turns out to be a int because it wasn’t properly initiated.
RC_BVM supports the same type shortcuts that Blitz basic uses, namely % for int, # for float and $ for string.
Declaring the variable at creation is generally done as in the following example:
; Integer Declaration
X% = 10
; Float Declaration
Y# = 5.5
; String Declaration
Z$ = “One”
Many operators can apply to more than one variable type, in this situation RC_BVM has a few simple rules to
determine what the resulting type will be. This only applies to the three basic types and does not apply to user
defined types.
If at least one of the supplied arguments is a string, then the result of the operation is a string.
If at least one of the supplied arguments is a float, then the result of the operation is a float
If none of the arguments is a float or a string, then the result is a int.
Arrays
Arrays are simply a list of values. Arrays are created outside of functions using the Dim command. Arrays
can be created from any data type, but can only hold that data type. You cannot create a int array and put a
string value into one of the positions.
Example:
Dim myList%(10)
Function Main()
myList(1) = 10
myList(2) = 9
myList(5) = 5
Output(Actor(), myList(2))
End Function
The above is an example of a single dimensional array, as it’s simply a single list. RC_BVM supports
multidimensional arrays as well by simply declaring it like so: Dim myList%(10,10,10) giving you ten arrays
of ten arrays of ten values. For most RC scripting purposes a single dimensional array will be sufficient,
however if a situation does arise, there is full support for multidimensional arrays.
Remember, if your arrays don’t seem to be working properly, there are a couple of things which you should
check. First, was the array declared outside of any functions? Next, is the declared type consistent with the
type of data being placed into it?
Operators
Now we will cover some of the difference in operator behavior between RC Standard scripting and RC_BVM
scripting. Mathematical operators remain nearly unchanged. The differences you will be more likely to notice
are the string concatenation, or string addition operator ($+ in RC Standard) has been replaced with the simple
addition operator (+). Likewise the string comparison operator ($=, in RC Standard) is now simply the same
equals operator (=) that you would use in any mathematical operation.
While on the equality operator, lets cover another small change. No longer will you need to use $= or = = to
compare values. RC_BVM is able to determine from the context of its usage if the = operator is comparing or
assigning values, and able to determine if those values are numerical or string values.
Example:
X%
Y%
Z$
W$
=
=
=
=
10
5
“Hello”
“ World!”
; Compare AND assign using the = operator
If X = Y
Y = X
EndIf
; Compare And assign strings using the = operator
If Z$ = W$
; Do Nothing
Else
Z$ = Z$ + W$
EndIf
Also changed is the bitwise And and the bitwise Or operators. In RC Standard these are & for And and | for
Or. In RC_BVM simply use AND and OR.
And the last change to operators is the ! or Not operator. In RC Standard, this was used to make the
determination that the results of a comparison were NOT true. Now we simply use <> (Less than and Greater
than combined) instead.
Example:
; RC Standard version
If X != Y
X = Y
EndIf
; RC_BVM version
If X <> Y
X = Y
EndIf
Control Structures and Loops
Now, let’s briefly cover the standard control structures available in RC_BVM.
We’ll begin with the If..EndIf statements. While there is very little difference here from RC Standard there are
a few small changes. To begin with, RC_BVM supports the Then statement.
Example:
If X > 10 Then
Y = 1
Else
Y = 0
EndIf
Notice that If no longer requires that the argument being tested be within parenthesis. It is certainly still
acceptable, but no longer required. Also note that the Then keyword is now fully supported in RC_BVM.
Next we’ll look at the For…Next statement. This type of loop is used to iterate through a set of instructions a
given number of times. For example counting from one to ten.
Example:
For X = 1 To 10
; This will output the numbers 1 to 10 to the player
Output(Actor(), X)
Next
Now we come to While…Wend which allows you to continue to loop through a set of instructions until a
given condition is met.
Example
While X < 10
; This will output the numbers 0 thru 9 to the player
Output(Actor(), X)
X = X + 1
Wend
For another method of looping we can use the Repeat…Until loop. This, like the While loop allows us to
operate on a set of instructions until a certain condition is met.
Example:
Repeat
; This will output the numbers 0 thru 9 to the player
Output(Actor(), X)
X = X + 1
Until X = 10
It is possible to repeat a loop indefinitely, simply use Repeat…Forever. Instead of placing a condition using
Until, as in the above example, replace it with Forever for a perpetually looping section of script. While
possible, perpetually looping scripts are not recommended, as this will impact server performance.
This covers the new looping controls in RC_BVM, next we will look at the Select…Case statement. The
Select statement allows us to collect a value, and perform various actions depending on the current value of
the Select statement. A Default value can be set that is run if any of the Case values aren’t present.
Example:
X = 3
Select X
Case 1
Output(Actor(), “One”)
Case 2
Output(Actor(), “Two”)
Case 3
Output(Actor(), “Three”)
Default
Output(Actor(), “Number not found”)
End Select
This covers the new forms of control functions found in RC_BVM.
User defined Types
User defined types are essentially a collection of different variables under a single structure. Each type (or
class) contains fields(or members) which hold values unique to each instance of the type.
Example:
Type TPlayer
Field Name$
Field Level%
End Type
This creates a new type named TPlayer which holds several values of differing variable types. The above is
simply the structure of the new user type and must be declared outside of any functions. This deserves
repeating, all types must be declared at the top of the script, before the Main function.
There can be many instances of each type, each with unique values in each of the fields. New type instances
are created using the new keyword.
Example:
Type TPlayer
Field Name$
Field Level%
End Type
Function Main()
thisPlayer.TPlayer = New TPlayer
End Function
Accessing the fields of the types is done using the member access operator or \ like so:
Type TPlayer
Field Name$
Field Level%
End Type
Function Main()
thisPlayer.TPlayer = New TPlayer
thisPlayer\Name = “Bill”
thisPlayer\Level = 39
End Function
It is possible to create many instances of the type, each with its own set of field values that can each be
accessed and manipulated independently. Here is an example of creating multiple instances of a single type.
Next we will iterate through each of the instances and assign a value to the Level field.
Example:
Function Main()
For I = 1 To 10
thisPlayer.TPlayer = New TPlayer
thisPlayer\Name = “Player “ + I
Next
For thisPlayer.TPlayer = Each TPlayer
thisPlayer\Level = Rand(1, 10)
Next
End Function
As you can see types can be a great way to hold together groups of related data for easy access. Another
feature of types in RC_BVM is the ability to use methods. A method is essentially a function within the type
that is accessed in the same way you would access a field of the type.
Type TPlayer
Field Name$
Field Class$
Field Level%
; Adds a last name to the Name field
Method SetLastName(N$)
Name = Name + “ “ + N$
End Method
End Type
Function Main()
thisPlayer.TPlayer = New TPlayer
thisPlayer\Name = “Bill the Mighty”
thisPlayer\Class = “Scholar”
thisPlayer\Level = 39
thisPlayer\SetLastName(“the Mighty”)
End Function
Methods can be a very powerful tool in RC_BVM. We are just scratching the surface of types and methods in
this manual, as this can be a tricky subject for beginning programmers to get their heads around. The Brisk
VM2 Scripting Language manual goes into more detail on types and methods and can be found [manual
location]
Server And Scripting Enhancements
In the course of creating the BVM version of the RC Standard server, a few small changes to the server were
made, some for security purposes some for stability purposes. Many of these changes have since been made a
part of the RC Standard server. Some, however, are specific to the RC_BVM server. Among these changes
are many new default values to the core RC scripting command set. Most of these will not be noticed by most
of the users, but will make some commands behave a little more intuitively.
The biggest change to the existing command set is that DialogInput() no longer accepts multiple arguments.
Instead all arguments should be in a single comma delimited string. The reason for this change is so that we
can more easily include commas within the option strings. We do this by adding an optional delimiter which
can be used instead of commas. Instead of:
DialogInput(Actor(), D, “one”, “two”, “three”)
We instead use:
DialogInput(Actor(), D, “one,two,three”)
Or:
DialogInput(Actor(), D, “one, please|two, please|three, please”, “|”)
Among the other changes are: new default color values for the DialogOutput command. Now unspecified text
color will result in white text, rather than black. Default color values for most commands which accept a RGB
color value have been set as white (255,255,255) so that forgetting to set the value will not result in a crashed
script.
The GiveItem command now defaults to 1 if no number of items is set. This allows the command to be used as
GiveItem(Actor(), “Razor Mace”) to give a single item. If you think a command should have a default value,
try it, it just may be in there.
Also, in the list of enhancements, due to the confusion regarding the ActorGroup() and SetActorGroup()
commands, it was decided to create a mirror commands ActorGuild() and SetActorGuild() which have the
same usage as the ActorGroup() commands.
Now for some of the new commands which are currently only present in the BVM version of the scripting
language. BanPlayer(), KickPlayer() and RefreshScripts() have been added to the Scripting language and
should be self explanatory. BanPlayer() will ban the account of the supplied Actor(), KickPlayer() will boot
the Actor() from the server and RefreshScripts()will allow for reloading all scripts from disk into memory.
Currently running scripts will not be affected, but all newly created script instances will be from the scripts
which were last reloaded.
There is now a new optional script which will run at server shutdown, named Shutdown.rsl. This script can
be used to perform various backup procedures prior to a server shutdown. Unlike all other scripts, the
Shutdown script will not release any time back to the server and will run exclusively until its completion.
Project conversion
Converting a project for use with RC_BVM is generally not a difficult process. This primarily involves
exchanging the old operators for the new ones, replacing the RC Standard comment characters (//) for the new
RC_BVM comment character (;), reworking the DialogInput commands and rewriting the old GoTo and
GoToIf loop structures to use the new standard control structures.
To aid in the conversion process, RC_BVM comes with a utility which will do the bulk of the work for you,
on every script in a specified folder. This utility will replace all of the changed assignment and comparison
operators, replace all logic operators, replace all comment characters, make changes to the DialogInput
command and create a log file detailing the changes made for each script file.
The utility will NOT rewrite the GoTo and GoToIf commands, but will instead comment them out and make a
note in the log file that the loops need to be rewritten.
Let’s have a look at converting a small script for use with RC_BVM. We’ll be using the default
Death.rcscript file which ships with RC Standard. Here is the script before conversion:
// Default death script for player characters
// You may alter this script however you like, but DO NOT RENAME OR DELETE IT
// The entry function for this script is always "Main"
// The context actor for the script is set to whoever killed the player
Function Main()
// Death animation
Output(Actor(), "You have died...")
Death = Rand(1, 3)
If (Death == 1)
AnimateActor(Actor(), "Death 1", 0.2, 0)
ElseIf (Death == 2)
AnimateActor(Actor(), "Death 2", 0.2, 0)
Else
AnimateActor(Actor(), "Death 3", 0.2, 0)
EndIf
// Wait
DoEvents(1000)
// Restore some health and take away some gold
SetAttribute(Actor(), "Health", 50)
ChangeGold(Actor(), -10)
// Warp back to area start
Warp(Actor(), ActorZone(Actor()), "Start")
// Done
Return()
End Function
After running the rcscript2rsl utility, we have a file named Death.rsl containing this:
; Default death script for player characters
; You may alter this script however you like, but DO NOT RENAME OR DELETE IT
; The entry function for this script is always "Main"
; The context actor for the script is set to whoever killed the player
Function Main()
; Death animation
Output(Actor(), "You have died...")
Death = Rand(1, 3)
If (Death = 1)
AnimateActor(Actor(), "Death 1", 0.2, 0)
ElseIf (Death = 2)
AnimateActor(Actor(), "Death 2", 0.2, 0)
Else
AnimateActor(Actor(), "Death 3", 0.2, 0)
EndIf
; Wait
DoEvents(1000)
; Restore some health and take away some gold
SetAttribute(Actor(), "Health", 50)
ChangeGold(Actor(), -10)
; Warp back to area start
Warp(Actor(), ActorZone(Actor()), "Start")
; Done
Return
End Function
Notice that very little has changed in this script. In the script folder can also be found the Conversion Log.txt
file containing the details of the conversion process of every *.rcscript file in the scripts folder. An example of
the log is below:
--Death.rsl
Line 10: '==' replaced with the '=' operator. See Notes.
Line 12: '==' replaced with the '=' operator. See Notes.
Line 29: 'Return()' has changed. See Notes.
===========================================
Notes:
1. The operators $+, $=, ==, & and | are no longer supported.
'$+' And '$=' now use the '+' And '=' operators.
'==' has been replaced by '='. & now uses the keyword AND.
'|' now uses the keyword Or.
2. GoTo(), GoToIf() and .Labels are no longer supported. All control
structures using these keywords must
be rewritten using For/Next, While/Wend or Repeat/Until.
3. DialogInput() now uses a single comma delimited string of options.
An optional delimiter can be used If neccessary.
Example: DialogInput(Actor(), D, "Option1,Option2,Option3")
Or DialogInput(Actor(), D, "Option1|Option2|Option3", "|")
4. Return() causes problems due to the '()' Simply use 'Return'
Or do Not use Return when nothing is returned.
5. The '!' (NOT) symbol is no longer supported, use '<>' instead of '!' or '!='.
In this instance, the conversion is complete. There is no need to perform any further editing for this script to
work with RC_BVM. In some instances it will be necessary to rewrite any loops present. Now would also be
a good time to go through and explicitly declare any variables to avoid possible errors due to expecting the
wrong data type.
Include and Using
The include keyword is used to include code from another file. The included file is essentially inserted into
the calling file as if it were written into that file. This allows spreading the code for you script among several
different files. This is one method of keeping your code organized into manageable chunks, or keeping often
used functions in a single file. The format is Include “myIncludeFile.rsl” and should be found at the beginning
of your script before any function declarations.
Below, is a sample file with a couple of functions which do some simple text manipulation. If we were to find
that we were using these functions rather often, we could easily include these functions in our scripts.
TextStuff.rsl:
Function RevText$(S$)
; This function reverses the order of the characters of a supplied string
Length = Len(S)
For i = 0 To Length
Result$ = Result + Mid$(S, Length - i, 1)
Next
Return Result
End Function
Function FirstCap$(S$)
; This function capitalizes the first character in a supplied string
; A holds the upper case version of the first character on the left side
; of the string
A$ = Upper$(Left$(S, 1))
; B holds the rest of the string
B$ = Right$(S, Len(S) - 1)
; Result now holds the reunited string
Result$ = A + B
Return Result
End Function
Including and using this file is a very simple process:
myScript.rsl:
Include “TextStuff.rsl”
Function Main()
Player = Actor()
namePlayer$ = Name(Player)
nameReverse$ = RevText(namePlayer)
; Change the players name to it’s reverse spelling
SetName(Player, nameReverse)
End Function
Module Creation
Taking the include concept to the next level, we have the Using keyword. Like the Include keyword, Using
allows us to access functions from another file, except Using links to functions from a pre-compiled module.
Unlike Include, Using does not copy any data into our script, instead it makes the functions from the module
available to our script. These precompiled modules can be thought of as a library of functions that any script
can access at any time by simply using the Using keyword. The format is Using “myModule.rcm” and, like
Include, should be located at the beginning of your script.
As an exercise, lets go through the process of creating a module. In our example, we wish to precompile the
file which we included earlier. Notice that there is only one difference between this file and the file we
included earlier.
[module source]
!Compile
Function RevText$(S$)
; This function reverses the order of the characters of a supplied string
Length = Len(S)
For i = 0 To Length
Result$ = Result + Mid$(S, Length - i, 1)
Next
Return Result
End Function
Function FirstCap$(S$)
; This function capitalizes the first character in a supplied string
; A holds the upper case version of the first character on the left side
; of the string
A$ = Upper$(Left$(S, 1))
; B holds the rest of the string
B$ = Right$(S, Len(S) - 1)
; Result now holds the reunited string
Result$ = A + B
Return Result
End Function
When the first line of a script is !Compile this tells the server to compile this .rsl file into a byte code module
named sourcefile.rcm and place it into the scripts folder. Using this module is much the same as using the
include file:
myScript.rsl:
Using “TextStuff.rcm”
Function Main()
Player = Actor()
namePlayer$ = Name(Player)
nameReverse$ = RevText(namePlayer)
; Change the players name to it’s reverse spelling
SetName(Player, nameReverse)
End Function
Just as with the Include file our functions become available to the script. Unlike the Include file the code is
not actually copied into the script. One of the benefits of using modules is that it then becomes possible to
share your code without having to share the source. Your functions can be compiled into a module and
distributed to other users of RC_BVM for use in their projects, and your source code is never exposed.
Another runtime flag which can be used with RC_BVM is the !altsyntax flag. Simply place the keyword
!altsyntax at the beginning of your script and this tells the server to use an alternate syntax when processing
the script. The alternate syntax makes the scripting language a little more like other Object Oriented languages
in style. The differences are in the comment designation character ( ‘ rather than ; ) and in the method which
the scripting language accesses types.
A more detailed explanation of the core scripting language can be found in the Brisk VM scripting language
manual, and this manual almost exclusively covers the alternate syntax. The BVM_SL manual can be found
by opening the RC_BVM script editor.
This covers the major changes incorporated in RC_BVM. Now that we are at the end of this guide, I would
like to encourage everyone with an interest in Virtual Machines and scripting languages to download the
BVM2 trial, and see how easy it is to incorporate and how powerful it can be.
http://www.koriolis-fx.com/