1
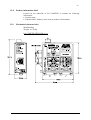
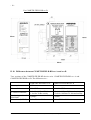
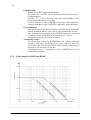
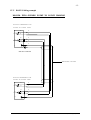
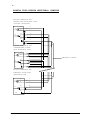
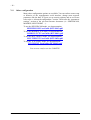
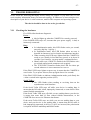
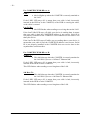
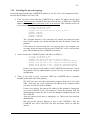
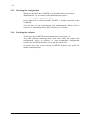
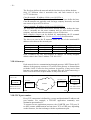
COMETH-FIELD-RD
USER’S GUIDE
D
D
T
U
DT
TU
USSS000333666
-iCOMETH-FIELD-RD USER’S GUIDE
COPYRIGHT (©) ACKSYS 2003-2010
This document contains information protected by Copyright.
The present document may not be wholly or partially reproduced, transcribed, stored in any
computer or other system whatsoever, or translated into any language or computer language
whatsoever without prior written consent from ACKSYS Communications & Systems - ZA Val
Joyeux - 10, rue des Entrepreneurs - 78450 VILLEPREUX - FRANCE.
REGISTERED TRADEMARKS ®
• ACKSYS is a registered trademark of ACKSYS.
• Windows is a registered trademark of MICROSOFT.
NOTICE
ACKSYS ® gives no guarantee as to the content of the present document and takes no
responsibility for the profitability or the suitability of the equipment for the requirements of
the user.
ACKSYS ® will in no case be held responsible for any errors that may be contained in this
document, nor for any damage, no matter how substantial, occasioned by the provision,
operation or use of the equipment.
ACKSYS ® reserves the right to revise this document periodically or change its contents
without notice.
ZA Val Joyeux
10, rue des Entrepreneurs
78450 VILLEPREUX
FRANCE
Telephone:
+33 (0)1 30 56 46 46
Fax:
+33 (0)1 30 56 12 95
Web:
www.acksys.fr
Hotline:
[email protected]
Sales:
[email protected]
COMETH-FIELD-RD USER’S MANUAL (D
D
T
U
DT
TU
USSS000333666) Release A.7, February 22, 2010
- ii -
PPA
AG
GE
E IIN
NT
TE
EN
NT
TIIO
ON
NA
AL
LL
LY
YL
LE
EFFT
TB
BL
LA
AN
NK
K
COMETH-FIELD-RD USER’S MANUAL (D
D
T
U
DT
TU
USSS000333666) Release A.7, February 22, 2010
- iii -
TABLE OF CONTENTS
I.
INTRODUCTION .......................................................................................................... 5
I.1
I.2
PURPOSE OF THIS MANUAL ...................................................................................... 5
THE SOFTWARE ....................................................................................................... 6
II. PRODUCT SPECIFICATIONS.................................................................................... 7
II.1
II.2
II.3
II.4
II.5
II.6
II.7
II.8
II.9
II.10
III.
CONNECTORS.......................................................................................................... 11
III.1
III.2
III.3
III.4
IV.
POWER CONNECTOR CABLING J3 ....................................................................... 11
ETHERNET CONNECTOR CABLING J6 .................................................................... 11
RS232 CONNECTOR CABLING J1 .......................................................................... 12
RS422/RS485 CONNECTOR CABLING J2 .............................................................. 12
CABLING RECOMMENDATIONS ....................................................................... 13
IV.1
IV.2
IV.3
IV.4
IV.5
IV.6
V.
CHARACTERISTICS .................................................................................................. 7
POWER .................................................................................................................... 7
LAN INTERFACE ..................................................................................................... 7
SERIAL INTERFACE .................................................................................................. 7
LED INDICATORS ..................................................................................................... 8
SWITCHES................................................................................................................ 8
ENVIRONMENTAL LIMITATIONS ............................................................................... 8
PRODUCT INFORMATION LABEL ............................................................................... 9
MECHANICAL CHARACTERISTICS ............................................................................ 9
DIFFERENCES BETWEEN COMETH-FIELD-RD REV A AND REV B .................... 10
ETHERNET CABLING RECOMMENDATIONS ............................................................ 13
RS232 CABLING RECOMMENDATIONS .................................................................. 13
RS422/RS485 CABLING RECOMMENDATIONS ...................................................... 13
CABLE LENGTH FOR RS422 AND RS485 .............................................................. 14
RS422 CABLING EXAMPLE .................................................................................. 15
RS485 CABLING EXAMPLE ................................................................................... 17
GETTING STARTED.................................................................................................. 19
V.1
V.2
V.3
V.4
V.5
V.6
V.7
V.8
V.9
DETERMINE THE NEEDS OF YOUR APPLICATION ..................................................... 19
COLLECT NETWORK CHARACTERISTICS ................................................................. 20
CONNECT POWER ADAPTER ................................................................................... 20
ADMINISTRATION BY RS232 SERIAL PORT ............................................................ 21
ADMINISTRATION BY LAN.................................................................................... 21
TCP/IP CONFIGURATION ....................................................................................... 22
ACTIVATE THE RELEVANT FIRMWARE ................................................................... 25
INSTALL THE COMETH IN ITS FINAL LOCATION ................................................... 25
OTHER CONFIGURATION ........................................................................................ 26
COMETH-FIELD-RD USER’S MANUAL (D
D
T
U
DT
TU
USSS000333666) Release A.7, February 22, 2010
- iv -
VI.
TROUBLESHOOTING............................................................................................. 27
VI.1
VI.2
VI.3
VI.4
CHECKING THE HARDWARE .................................................................................. 27
CHECKING THE NETWORK TOPOLOGY .................................................................. 29
CHECKING THE CONFIGURATION .......................................................................... 30
CHECKING THE SOFTWARE ................................................................................... 30
VII. ADVANCED CONFIGURATION ........................................................................... 31
VII.1
VII.2
VII.3
VII.4
VII.5
ACCESS TO ADMINISTRATION COMMANDS ........................................................... 31
SECURITY ............................................................................................................. 31
HANDLING DISCONNECTIONS IN TCP................................................................... 31
COMMANDS LIST .................................................................................................. 32
FACTORY SETTINGS COMMON TO ALL FIRMWARES ............................................... 36
VIII. ADDRESSING IN NETWORK PROTOCOLS ...................................................... 37
VIII.1
VIII.2
VIII.3
VIII.4
VIII.5
IX.
TCP/IP NETWORK LAYERS ................................................................................... 37
ETHERNET ADDRESS ............................................................................................ 37
IP ADDRESS .......................................................................................................... 37
GATEWAYS .......................................................................................................... 38
TCP PORT NUMBER .............................................................................................. 38
REFERENCES ........................................................................................................... 39
COMETH-FIELD-RD USER’S MANUAL (D
D
T
U
DT
TU
USSS000333666) Release A.7, February 22, 2010
-5-
I.
INTRODUCTION
I.1
Purpose of this manual
This manual provides instructions to easily install and configure the
COMETH product on your network.
Chapter II “Product specifications” describes the fundamental possibilities
of the product.
Chapter III “Connectors” describes the Serial and LAN connectors of the
COMETH.
Chapter IV “Cabling recommendations” gives some background required to
install the COMETH.
Chapter V “Getting started” is a step-by-step description of a typical
COMETH installation in a simple application context.
Chapter VI “Troubleshooting” gives hints on what to do when the
installation fails.
Chapter VII “Advanced configuration” describes all the configuration
parameters you can use, and how to use them.
Chapter VIII “Addressing in Network protocols” gives some background in
networking, required to install the COMETH.
It is expected that the reader of this manual has some background
knowledge of TCP/IP and how to setup and use TCP/IP on a Windowsbased PC. As well, anyone installing a COMETH should know how his/her
network is organized.
COMETH-FIELD-RD USER’S MANUAL (D
D
T
U
DT
TU
USSS000333666) Release A.7, February 22, 2010
-6-
I.2
The software
The COMETH FLASH EPROM can contain up to six different firmwares,
including client and server software, tunnelling, modbus support, etc. New
firmwares can be developed by ACKSYS to meet specific needs. To list all
firmwares flashed in the COMETH FLASH EPROM, a dedicated
administration command (show prog list) can be run (see chapter VII.4)
See download firmware user guide(DTUS040).pdf documentation to
understand in details the software architecture.
All the embedded firmwares have an administration system relying on a
Command Line Interpreter. The administration system is accessible through
the serial port as well as through the network. It’s also accessible with
windows browser.
Administration commands common to all firmwares are documented in
chapter VII.4 “Commands list”.
The commands specific to other firmwares (SERVERCOM, MODBUS
TCP, MULTIPOINT, TCPCLIENT…) are documented in a dedicated
manual (See the ACKSYS CDROM or the ACKSYS web site at
http://www.acksys.fr)
Upon delivery, the default firmware enabled is “SERVERCOM”, which
enables two main functionalities:
TCP server: To use COMETH in raw mode with a network (socket)
application
Telnet RFC2217: To use COMETH with a com application (needs a
COM port redirector like VIP)
COMETH-FIELD-RD USER’S MANUAL (D
D
T
U
DT
TU
USSS000333666) Release A.7, February 22, 2010
-7-
II.
PRODUCT SPECIFICATIONS
II.1
Characteristics
RS232 or RS422/RS485 to Ethernet 10/100 BASE T (excepted for
COMETH-FIELD-RD rev A: 10 BASE T only) adapter with high frequency
filter and surge protection
Din Rail metal housing including DB9 male connector on the RS232 side,
DB9 female on the RS422/RS485 side and RJ45 on the Ethernet side
RS232, RS422/RS485 Master or Slave selection by software (built-in
automatic turn-around in RS422 and RS485 mode)
External power supply 9 to 36 VDC
Power supply protection by current limitation
RS422/RS485 protection against temporary line voltage surges by peaks :
300 W (8/20µs), breakdown voltage +/-6.5V in common and differential
mode, high surge capability (40A-8/20µs), ESD protection up to 15kV.
RS232 15 kV ESD protection
Ethernet isolation 1.5 KV
II.2
Power
External power 9 to 36 VDC
DC POWER via 3 pins screw terminal connector
For COMETH-FIELD-RD rev A
Maximum current 125 mA at 9 VDC
Power consumption : 1.1W max
For COMETH-FIELD-RD rev B
Maximum current 220 mA at 9 VDC
Power consumption : 2W max
II.3
LAN interface
RJ45 Ethernet connector Ethernet 10/100 BASE T (excepted for COMETHFIELD-RD rev A : 10 BASE T only)
Ethernet II, IEEE 802.3
IP Protocols: ARP, IPv4, ICMP, UDP, TCP, DHCP, Telnet, RFC 2217
Two TCP ports: port 23 for TELNET administration, one UDP port (port
68) when DHCP is used, other TCP and UDP ports available and
configurable for data exchange
II.4
Serial interface
The serial interface mode is selectable by the COMETH administration
mode. You can use RS232 or RS422/RS485 but not both simultaneously.
COMETH-FIELD-RD USER’S MANUAL (D
D
T
U
DT
TU
USSS000333666) Release A.7, February 22, 2010
-8-
II.4.1 RS232
Full RS232 EIA/TIA 574 Serial interface
DB9 male connector with DTE pinout
Control signals: TxD, RxD, RTS, DTR, CTS, DSR, DCD and RI signals
Maximum RS232 distance : 15 meters
Speed: 10 to 230400 bps
Parity: none, even, odd, space or mark
Data bits: 7 or 8
Stop bits: 1 or 2
II.4.2 RS422/RS485
EIA RS422/RS485 – CCITTV11 Serial interface
DB9 female connector
Control signals: TxD, RxD
Built-in automatic turn-around
Line polarization selection by strap
Terminating resistor selection by jumper
Maximum load in RS422 : 10 receivers
Maximum load in RS485 : 32 receivers
Maximum transmission distance : 1200 meters at 115200 bps
Speed: 10 to 230400 bps
Parity: none, even, odd, space or mark
Data : 7 or 8 bits – 1 or 2 stop bits
II.5
Led indicators
Five LED indicators :
For COMETH-FIELD-RD rev A :
Power
Diagnostic / general-purpose mode / error detection / reboot indicator
Asynchronous interface Rx/Tx activity
Ethernet LINK active indication
Lan interface Rx/Tx activity
For COMETH-FIELD-RD rev B :
Power
Diagnostic / general-purpose mode / error detection / reboot indicator
Asynchronous interface Rx/Tx activity
10 Base T Link and interface Rx/Tx activity
100 Base Tx Link and interface Rx/Tx activity
II.6
Switches
One switch allows asynchronous serial interface mode selection
(Administration / Data)
II.7
Environmental limitations
Operating temperature: 0°C to 65°C
Storage temperature: -40°C to +85°C
Humidity: 0-95% RH (without condensation)
COMETH-FIELD-RD USER’S MANUAL (D
D
T
U
DT
TU
USSS000333666) Release A.7, February 22, 2010
-9-
II.8
Product information label
Located on the underside of the COMETH, it contains the following
information:
• Product name
• Ethernet MAC Address (Also used as product serial number)
II.9
Mechanical characteristics
Metal housing
Weight : 0.120 Kg
For COMETH-FIELD-RD rev A
COMETH-FIELD-RD USER’S MANUAL (D
D
T
U
DT
TU
USSS000333666) Release A.7, February 22, 2010
- 10 For COMETH-FIELD-RD rev B
II.10 Differences between COMETH-FIELD-RD rev A and rev B
Two versions of the COMETH-FILED-RD device exist. COMETH-FILED-RD rev A and
COMETH-FILED-RD rev B. The differences are :
COMETH-FIELD-RD rev A
COMETH-FIELD-RD rev B
Consumption max.
1.1W
2W
Ethernet link
10 BASE T
1* Led for 10 Base T link
1* Led for Tx/Rx activity
10/100 BASE T
1* Led for 10 Base T link and activity
1* Led for 100 Base Tx link and activity
2* LEDs for Ethernet
Terminating resistor for
A jumper
RS422/485
Dimensions (L*W*H) 93.00 x 73.00 x 28.00 mm
A switch
93.00 x 73.00 x 29.00 mm
COMETH-FIELD-RD USER’S MANUAL (D
D
T
U
DT
TU
USSS000333666) Release A.7, February 22, 2010
- 11 -
III.
CONNECTORS
III.1 POWER connector cabling J3
Screw terminal connector (3 pins)
PIN
1
2
3
Signal name
EARTH
+VDC
GND
Description
Protective ground
Positive power supply
Ground power supply
III.2 Ethernet connector cabling J6
RJ45 connector (8 pins)
PIN
1
2
3
4
5
6
7
8
Signal name
TxD+
TxDRxD+
N.C.
N.C.
RxDN.C.
N.C.
Direction
Output
Output
Input
Not Connected
Not Connected
Input
Not Connected
Not Connected
COMETH-FIELD-RD USER’S MANUAL (D
D
T
U
DT
TU
USSS000333666) Release A.7, February 22, 2010
- 12 -
III.3 RS232 connector cabling J1
DB9 male with DTE cabling
PIN
1
2
3
4
5
6
7
8
9
Signal name
DCD
RxD
TxD
DTR
GND
DSR
RTS
CTS
RI
Direction
Input (to Cometh)
Input (to Cometh)
Output (from Cometh)
Output (from Cometh)
Digital ground
Input (to Cometh)
Output (from Cometh)
Input (to Cometh)
Input (to Cometh)
III.4 RS422/RS485 connector cabling J2
DB9 female
PIN
1
2
3
4
5
6
7
8
9
RS422
RS485
Connect together for Connect together for line
line polarization
polarization
B (-TxD)
Unused
B’ (-RxD)
BB’ (-TxD/RxD)
Digital ground
Digital ground
Connect together for Connect together for line
line polarization
polarization
A (+TxD)
Unused
A’ (+RxD)
AA’ (+TxD/RxD)
For COMETH-FIELD-RD rev A :
Terminating resistor enable
Connect the jumper to ON position
Terminating resistor disable
Connect the jumper to OFF position or left unconnected
For COMETH-FIELD-RD rev B :
Terminating resistor enable
Switch to ON position
Terminating resistor disable
Switch to OFF position
COMETH-FIELD-RD USER’S MANUAL (D
D
T
U
DT
TU
USSS000333666) Release A.7, February 22, 2010
- 13 -
IV.
CABLING RECOMMENDATIONS
IV.1 Ethernet cabling recommendations
Plug the Ethernet jack from your HUB into the COMETH.
The COMETH does not normally require a crossing cable.
If the Ethernet cable is good and correctly inserted on both ends, the LINK
light should go on on the COMETH (and also on the HUB if it has a LINK
led).
IV.2 RS232 cabling recommendations
In RS232 mode, the 9-pins male connector is a standard (EIA/TIA574) Data
Terminal Equipment (DTE) connector.
To connect COMETH to a DTE peripheral, use a crossover (nullmodem) cable
To connect COMETH to a DCE peripheral (for example a modem),
use a straight cable.
IV.3 RS422/RS485 cabling recommendations
To avoid any cable inversion caused by using the non-standard + and –
convention (one manufacturer will describe as + what another will describe
as -), make up your cable as follows:
Software configuration:
Check section VII “Advanced configuration” to select your
electrical interface
In RS422 mode :
Identify A, A’, B & B’ signals on the equipment side. Some
equipments document these signals with other names as follows:
A
=
Tx+
A’
=
Rx+
B
=
Tx–
B’
=
Rx–
The points A, B, A’ and B’ are as defined in the EIA-422 and V11
recommendations, such that: VA < VB and VA’ < VB’ when idle, state
also called MARK or OFF (Transmission/Reception of stop bits).
Connect signal A of the COMETH to signal A’ of the equipment.
Connect signal B of the COMETH to signal B’ of the equipment.
Connect signal A’ of the COMETH to signal A of the equipment.
Connect signal B’ of the COMETH to signal B of the equipment.
COMETH-FIELD-RD USER’S MANUAL (D
D
T
U
DT
TU
USSS000333666) Release A.7, February 22, 2010
- 14 In RS485 mode :
Identify AA’& BB’ signals equipment side
The points AA’ and BB’ are as defined in the EIA-485 and V11
recommendations,
such that: VAA’ < VBB’ when idle, state also called MARK or OFF
(Transmission/Reception of stop bits).
Connect signal AA’ of the COMETH to signal AA’ of the equipment.
Connect signal BB’ of the COMETH to signal BB’ of the equipment.
Line polarization
Line polarization is needed for stability in RS485 mode and RS422
mode in multidrop Master / Slave set-up (also called RS485 4 wires).
Line polarization is integrated to the COMETH and can be connected
by cabling 2 straps on the DB9 female connector (1-2 & 6-7).
A single polarization is necessary on the bus.
Terminating resistor :
The terminating resistor for RS422/RS485 line reduces reflections
created by long lines at high speeds. It is not required in noise-free
environment and if the distance and the rate are within 1000 meters at
9600 bps or 100 meters at 115200 bps.
Terminating resistor is integrated to the COMETH and can be
connected by a jumper.
IV.4 Cable length for RS422 and RS485
COMETH-FIELD-RD USER’S MANUAL (D
D
T
U
DT
TU
USSS000333666) Release A.7, February 22, 2010
- 15 -
IV.5 RS422 Cabling example
RS422A FULL-DUPLEX POINT TO POINT CABLING
RS422A INTERFACE FOR
POINT TO POINT LINK
D
A
8
B
3
A'
9
R
B'
RT
4
5
1
DB9 Pin COMETH
TWISTED PAIRS
RS422A INTERFACE FOR
POINT TO POINT LINK
A
8
B
3
D
A'
R
B'
2
9
RT
4
5
COMETH-FIELD-RD USER’S MANUAL (D
D
T
U
DT
TU
USSS000333666) Release A.7, February 22, 2010
- 16 -
RS422A FULL-DUPLEX MULTIDROP CABLING
RS422A INTERFACE FOR
MASTER-TYPE MULTIDROP LINK
(POLLING SELECTING)
A
8
B
3
D
A'
R
B'
RP
9
RT
4
RP
5
VCC
1
RS422A INTERFACE FOR
INTERMEDIATE SLAVETYPE MULTIDROP LINK
A
D
B
TWISTED PAIRS
A'
R
B'
2
RS422A INTERFACE FOR
TERMINAL SLAVE-TYPE
MULTIDROP LINK
A
8
B
3
A'
9
D
R
RT
4
B'
10
5
COMETH-FIELD-RD USER’S MANUAL (D
D
T
U
DT
TU
USSS000333666) Release A.7, February 22, 2010
- 17 -
IV.6 RS485 cabling example
RS485 HALF-DUPLEX MULTIDROP CABLING
INTERFACE RS485 FOR MASTERTYPE MULTIDROP LINK
(POLLING-SELECTING)
RP
A-A'
D
9
RT
R
4
B-B'
DE/REB
RP
VCC
5
1
RS485 INTERFACE FOR
INTERMEDIATE SLAVE-TYPE
MULTIDROP LINKS
(POLLING-SELECTING)
D
A-A'
TWISTED PAIRS
9
R
4
B-B'
GND
DE/REB
5
2
RS485 INTERFACE FOR
TERMINAL SLAVE-TYPE
MULTIDROP LINKS
(POLLING-SELECTING)
D
9
A-A'
RT
R
4
B-B'
DE/REB
5
32
COMETH-FIELD-RD USER’S MANUAL (D
D
T
U
DT
TU
USSS000333666) Release A.7, February 22, 2010
- 18 -
PPA
AG
GE
E IIN
NT
TE
EN
NT
TIIO
ON
NA
AL
LL
LY
YL
LE
EFFT
TB
BL
LA
AN
NK
K
COMETH-FIELD-RD USER’S MANUAL (D
D
T
U
DT
TU
USSS000333666) Release A.7, February 22, 2010
- 19 -
V.
GETTING STARTED
This chapter describes the required steps to get COMETH device on-line and working.
V.1
Determine the needs of your application
•
•
•
•
Serial data format and baudrate
Serial control signals driving source
Electrical type of your serial interface
What kind of application will use the COMETH. This will determine the
COMETH firmware to use, as follows:
Firmware selection criterions
use
to upgrade the other firmwares.
for MODBUS/TCP or MODBUS tunnelling.
for COM port emulation or raw data tunnelling.
allows a serial device to call in a network server, or raw
data tunnelling.
MULTIPOINT for multidrop applications and master/slave replacement
Firmware
DOWNLOAD
MODBUS
SERVERCOM
TCPCLIENT
If you want to use the MODBUS protocol:
• in any case you can use the COMETH MODBUS firmware;
• if there is only one serial master, and one serial slave or several serial
slaves all connected on the same RS485 cable, you can also use a couple
of SERVERCOM and TCPCLIENT;
• if the masters are on the network, not on a serial link (they use
MODBUS/TCP) you must use the COMETH MODBUS firmware on
the slave side only;
• if the slaves are scattered among several access points in the network,
you must use the COMETH MODBUS firmware on each slave side.
If you want to access a remote serial device in the same manner as a
local port (including control signals):
• usually COMETH SERVERCOM on the device side and a COM port
redirector on the computer will do that;
If you want to exchange serial data (no control signals) between two or
more devices through a LAN:
• use COMETH MULTIPOINT on all the serial attachements involved.
• if you have only two devices, and not loosing data is more important
than speed and network bandwidth, you must use COMETH
SERVERCOM on one side, COMETH TCPCLIENT on the other side.
If you want to write a SOCKET application to access remote devices:
• use COMETH SERVERCOM in raw mode (TCP) to handle unrelated
devices;
• use COMETH MULTIPOINT (UDP) to broadcast to several devices at
the same time.
If you want a remote serial device to call into your application:
• COMETH TCPCLIENT is what you need.
COMETH-FIELD-RD USER’S MANUAL (D
D
T
U
DT
TU
USSS000333666) Release A.7, February 22, 2010
- 20 -
V.2
Collect network characteristics
You will need at hand the following information about your LAN:
Will the COMETH use DHCP :
If DHCP is used:
• Does the network administrator (or the
DHCP server) require a specially crafted
Client ID (DHCP option 61)?
client identifier:
___________________
• Does the network administrator (or the
DHCP server) require a Client Host Name
(DHCP option 12)?
hostname identifier:
___________________
If DHCP is not used:
• IP address for the COMETH (see below):
___.___.___.___
• Does your LAN need use of a netmask?
Netmask value :
___.___.___.___
• Will the data connection or the admin
connection cross a gateway?
Gateway address:
___.___.___.___
COMETH IP address: You must assign an IP address to the COMETH.
YOU CANNOT JUST PICK ONE AT RANDOM and wish it will work!
The chosen address must meet the following requirements :
•
•
•
Its network part must match the network part of other devices on the
same LAN,
Its host part must be different from any other devices on the same LAN
(beware of printers, routers and gateways),
Its host part must not be a reserved value like 0 or 255.
NETMASKS: If no netmask applies, it can be deduced from the IP address
class:
Class A
netmask 255.0.0.0
Class B
netmask 255. 255.0.0
Class C
netmask 255. 255. 255.0
If in doubt, please ask to the local Network Administrator.
V.3
Connect power adapter
Connect the power supply to the COMETH.
Notice COMETH has no ON/OFF switch. It turns on automatically when
power supply is connected.
COMETH-FIELD-RD USER’S MANUAL (D
D
T
U
DT
TU
USSS000333666) Release A.7, February 22, 2010
- 21 -
V.4
Administration by RS232 serial port
This is the recommended procedure to install a new COMETH. In some cases you can install
a new COMETH through the LAN (refer to paragraph V.5 “Administration by LAN”)
V.4.1 Select Administrator mode
Push the switch towards the « Adm » position. The red (DIAG) light should
blink twice per second. If it is not the case, try pushing the switch in the
opposite direction.
V.4.2 Connect to a serial port
This step is required to set up the COMETH IP address. Below we describe
how to do this with a PC with Windows. Other devices (ANSI console...) or
operating systems (Linux with “minicom” or “cu”...) can be used, but this is
beyond the scope of this manual.
The COMETH FIELD has one male DB9 RS232 connector with DTE
cabling. You can use the provided null modem cable and plug it directly,
into a standard DB9 male connector (PC COM port for example)
V.4.3 Run Hyperterminal
When asked to choose a modem or port, select a direct connection to COMx
(COMx being the COM port on which you plugged the COMETH).
Select the following port parameters : 2400 bauds (bits/second), 8 bits,
parity none, 1 stop bit, no flow control.
Hyperterminal now displays a blank window. Hit the « ENTER » key to
display the admin prompt.
V.4.4 Proceed to paragraph V.6 “TCP/IP configuration”
V.5
Administration by LAN
The default IP address of the COMETH is 192.168.1.253. You can install the COMETH
for the first time by LAN only if your network can match this requirement. Only one
new COMETH can be plugged on the LAN at a given time, until you have assigned a
different IP address on each COMETH. Otherwise conflicts will result.
V.5.1 Computer configuration
No switch is needed.
Configure a computer with 192.168.1.x IP address where x ≠ 253 and x ≠
255 and x ≠ 0 and x ≠ any address already assigned.
Check that the computer is connected to the same LAN than the COMETH.
V.5.2 Run Telnet
C:\> telnet 192.168.1.253
Telnet displays a banner and a prompt from the COMETH
Type : login root
Password : root
V.5.3 Proceed to paragraph V.6 “TCP/IP configuration”
COMETH-FIELD-RD USER’S MANUAL (D
D
T
U
DT
TU
USSS000333666) Release A.7, February 22, 2010
- 22 -
V.6
TCP/IP configuration
The IP address of the COMETH must be unique on the network. You can statically
specify the address you want by means of the administration commands, or you can use
an existing DHCP server on the network to give you an available address. If you define
both DHCP and static IP address, the DHCP configuration will override the static IP.
V.6.1 Static IP address configuration
In the following lines, replace XXX.YYY.ZZZ.TTT by the IP address and
netmask you chose for the COMETH :
root> set net ip XXX.YYY.ZZZ.TTT
root> set net mask XXX.YYY.ZZZ.TTT
Now you should save the configuration changes :
root> save
root> reset
Example: this sample session will reinstall factory values:
root>
OK
root>
OK
root>
OK
root>
OK
root>
set net dhcp off
set net ip 192.168.1.253
set net mask 255.255.255.0
save
reset
COMETH SERVERCOM version 2.12.0.0, Administration mode ready
V.6.2 Static router / gateway configuration
If the COMETH and the network application using it, are not on the same
Ethernet LAN (i.e., if they are separated by one or more gateways (also
caller routers), you must set the nearest gateway address into the COMETH,
and you must set the maximum number of gateways to cross (if the factory
default of 10 is not enough).
The following line is required only if you will cross more than ten gateways:
root> set net metric n
“n” is the number of gateways to cross . If you use a DHCP server that
provides gateway information to the COMETH, you won’t need the
following command. Otherwise, the following command is required if you
need to cross one or more gateways :
root> set net gateway XXX.YYY.ZZZ.TTT
“XXX.YYY.ZZZ.TTT” is the address of the gateway closest to the COMETH
(here, ‘closest’ means that it is on the same Ethernet LAN).
Do not forget to save the configuration changes :
root> save
root> reset
COMETH-FIELD-RD USER’S MANUAL (D
D
T
U
DT
TU
USSS000333666) Release A.7, February 22, 2010
- 23 -
V.6.3 Dynamic IP address and gateway configuration with DHCP
Note: DHCP is not available in early revisions of the firmwares. On a
COMETH delivered in 2002, check the existence of the ‘show dhcp’
command to know if you need a firmware upgrade.
Diag LED blink in DHCP mode: When the diagnostic LED (red LED) is
blinking once per second, the COMETH is requesting a network
configuration to DHCP server.
Functionality of the DHCP client:
• supports all kinds of IP configuration (Manual, Automatic, Dynamic)
(see RFC 1541).
• supports option 12 of RFC 2132 (Host name).
• supports option 61 of RFC 2132 (client ID). The default client ID used
is the MAC address of the COMETH, or a ClientID configured by the
“set net dhcp clientid” command. The MAC address is used if ClientID
is empty.
• supports DHCP agent or BOOTP agent specified in RFC 2134.
• supports the infinite lease.
Limitation of DHCP client in COMETH
• the lease of DHCP server must be less than 24,9 days.
• RFC 2136 (DNS update with DHCP information) is not supported on
the COMETH side. So, you need a DHCP server which supports RFC
2136. (for example, the Windows 2000 DHCP server).
• the COMETH has no IP address as long as the diag LED blinks.
• only the IP address, subnet mask, gateway address and lease time are
used in the configuration information returned by the DHCP server.
In order to give an IP address to a COMETH, the DHCP server must be able
to uniquely identify the requesting device (i.e. the COMETH). Hence the
COMETH must provide a unique identification to the DHCP server.
Usually the MAC address is used for this purpose. Some administrators or
DHCP servers require other kinds of identification. Hence you can either set
up manually the “Client ID” (DHCP option 61), else the MAC address will
be used as a string identifier. If you need, you can also set up a “Host
Name” (DHCP option 12). The “Client ID” is always sent to the server. The
“Host Name” is sent only if set manually.
Example 1: this sample session will use only the MAC address :
root> set net dhcp on
OK
root> show net dhcp clientid
undefined client id
root> show net dhcp hname
undefined host name
Now you should save the configuration changes :
root> save
root> reset
COMETH-FIELD-RD USER’S MANUAL (D
D
T
U
DT
TU
USSS000333666) Release A.7, February 22, 2010
- 24 Example 2: use a network administrator-provided name ‘cometh-b12a27’
for the COMETH device:
root> set net dhcp on
OK
root> set net dhcp clientid cometh-b12a27
OK
root> show net dhcp
DHCP on
root> show net dhcp clientid
cometh-b12a27
root> show net dhcp hname
undefined host name
Now you should save the configuration changes :
root> save
root> reset
Example 3: use the MAC address for client id, and also a network
administrator-provided host name “cometh12.mydomain.com”:
root> set net dhcp on
OK
root> set net dhcp clientid
OK
root> set net dhcp hname cometh12.mydomain.com
OK
root> show net dhcp
DHCP on
root> show net dhcp clientid
undefined client id
root> show net dhcp hname
cometh12.mydomain.com
Now you should save the configuration changes :
root> save
root> reset
COMETH-FIELD-RD USER’S MANUAL (D
D
T
U
DT
TU
USSS000333666) Release A.7, February 22, 2010
- 25 -
V.7
Activate the relevant firmware
In the first installation step you chose the COMETH firmware that most
suited your needs. Now it is time to activate this firmware and set its own
parameters.
Say that you determined that you need to activate the MULTIPOINT
firmware. Connect to the administration (either through the network or the
serial interface), identify yourself, then display the list of available
firmwares:
root> show prog list
file
/0
/1
/2
/3
/4
/5
OK
| status
| valid
| valid
| valid
| valid
| valid
| valid
|
|
|
|
|
|
|
name
DOWNLOAD STD
DOWNLOAD STD
SERVERCOM
MULTIPOINT
MODBUS-TCP
TCPCLIENT
|
|
|
|
|
|
|
version
2.6.0.1
2.6.0.1
3.4.0.0
1.0.0.0
2.6.0.0
2.2.0.3
|
|
|
|
|
|
|
update…
2.2
2.2
2.6
2.6
2.6
2.6
Now check the currently active firmware:
root> show prog enable
enable software :2
loading software : 2
In the list you can see the number of the file holding the desired firmware:
the MULTIPOINT firmware is in file /3. Until now the active firmware was
2, which is SERVERCOM. You must now activate the desired firmware:
root> set prog enable 3
root> save
root> reset
Other information about firmware download, installation and selection is
given in :
download firmware user guide(DTUS040).pdf
V.8
Install the COMETH in its final location
Now you can unplug the COMETH from the administration PC.
If administration by serial mode has been selected push the mode
switch on the other side (thus allowing data to go from Ethernet to the
asynchronous interface).
Check the cabling of your device against the cabling of the COMETH (see
section « III Connectors ».
Plug the Ethernet jack from your HUB into the COMETH. The COMETH
does not normally require a crossing cable. If the Ethernet cable is good and
correctly inserted on both ends, the LINK light should go on on the
COMETH (and also on the HUB if it has a LINK led).
COMETH-FIELD-RD USER’S MANUAL (D
D
T
U
DT
TU
USSS000333666) Release A.7, February 22, 2010
- 26 -
V.9
Other configuration
Many other configuration options are available. You can enforce some setup
or behavior of the asynchronous serial interface, change more network
parameters like the data TCP port, set up security options, and so on. Please
refer to the « Advanced configuration » section. Check also the “parameters
settings” section of the relevant firmware document (i.e. SERVERCOM,
MODBUS, MULTIPOINT …).
To use the SERVERCOM mode, see documentation:
SERVERCOM UserGuide (DTUS043).pdf
To use the MODBUS TCP mode, see documentation:
MODBUS-TCP UserGuide (DTUS041).pdf
To use the MULTIPOINT mode, see documentation:
MULTIPOINT UserGuide (DTUS056).pdf
To use the TCPCLIENT mode, see documentation:
TCPCLIENT UserGuide (DTUS045).pdf
You are now ready to use the COMETH.
COMETH-FIELD-RD USER’S MANUAL (D
D
T
U
DT
TU
USSS000333666) Release A.7, February 22, 2010
- 27 -
VI.
TROUBLESHOOTING
Please check the following thoroughly before calling for support. If you must call, we will
need complete information about your network topology, IP addresses of intervening devices,
description of your device’s serial connector, model of the computer and operating system.
The checks should be done in the order given below.
VI.1 Checking the hardware
Five LEDs allow hardware diagnostic.
Power :
• this led lights up when the COMETH is correctly powered.
If the POWER LED stays off, it means that your power supply is bad, or
incorrectly connected.
Diag :
• In Administration mode, this LED flashes twice per second,
unevenly (bip bip... bip bip...)
• In Exploitation mode, this LED flashes when an error is
detected in characters received on the asynchronous interface
• When resetting, this LED stays lighten until the COMETH is
ready to use (usually in less than one second, or in about 10
seconds if you issued a “set prog enable” command before)
• Shortly after reset, if DHCP is enabled, the LED flashes once
per second until network parameters are acquired
• The TCPCLIENT firmware flashes this LED five times per
second whenever it is not connected to a server.
If the DIAG LED stays lighten at power up, it means that the COMETH is
out of order. Try to power it down, then up again after a few seconds.
If the DIAG LED flashes to indicate Administration mode, push firmly the
« Adm » switch in the opposite position (OFF).
Serial Tx/Rx :
• this LED flashes when sending or receiving data on the
asynchronous serial interface.
If the Serial Tx/Rx LED stays off while your device is sending data, it
means that the RS cable is bad, improperly connected, or some kind of flow
control forbids transmission.
If the Serial Tx/Rx LED stays off while you are sending data to your device,
it means that some kind of flow control forbids transmission, or the
COMETH does not receive Ethernet data frames.
If the serial Tx/Rx LED stays on while you are not sending data to your
device and your device is not sending data, it means that the RS cable is
bad, improperly connected, A & B or A’ & B’ are inverted, line polarization
is required in RS422 multidrop and RS485 mode.
COMETH-FIELD-RD USER’S MANUAL (D
D
T
U
DT
TU
USSS000333666) Release A.7, February 22, 2010
- 28 For COMETH-FIELD-RD rev A :
Link :
• this led lights up when the COMETH is correctly attached to
the LAN.
If the LINK LED stays off, it means that your cable is bad, incorrectly
inserted in the HUB or in the COMETH, or the HUB is crossing the cable,
or the cable is crossed.
Lan Tx/Rx :
• this LED flashes when sending or receiving data on the LAN.
If the Lan Tx/Rx LED stays off while your device is sending data, it means
that your cable is bad, the COMETH IP address is not correct, Serial IP is
not properly installed or the COMETH is not connected to the same LAN
than your device.
If the Lan Tx/Rx LED stays off while you are sending data to your device, it
means that your cable is bad, the COMETH IP address is not correct, Serial
IP is not properly installed or the COMETH does not receive data on the
asynchronous serial interface.
For COMETH-FIELD-RD rev B:
10 Base-T :
• This led lights up when the COMETH is correctly attached to
the LAN and if you use a 10 Base T Ethernet link.
If the LINK LED stays off, it means that your cable is bad, incorrectly
inserted in the HUB or in the COMETH.
This LED flashes when sending or receiving data of the LAN.
100 Base-Tx :
• This led lights up when the COMETH is correctly attached to
the LAN and if you use a 100 Base Tx Ethernet link.
If the LINK LED stays off, it means that your cable is bad, incorrectly
inserted in the HUB or in the COMETH.
This LED flashes when sending or receiving data of the LAN.
COMETH-FIELD-RD USER’S MANUAL (D
D
T
U
DT
TU
USSS000333666) Release A.7, February 22, 2010
- 29 -
VI.2 Checking the network topology
In the following examples the COMETH IP address is 192.168.1.253 ; the computer used for
the tests has IP address 192.168.1.244.
•
First you must ensure that the COMETH has a unique IP address on the local
network. Disconnect the COMETH from the LAN, then try to PING the COMETH
address from a computer connected to the local network. This should result in an
error or timeout :
C:\>arp –d 192.168.1.253
C:\>ping 192.168.1.253
Pinging 192.168.1.244 with 32 bytes of data :
Request timeout.
Request timeout.
Request timeout.
Request timeout.
The « Request timeout » error messages are normal and expected in this
case. If this is not the case, another host has the same IP address. Correct the
problem.
If the answer is some message like « no route to host », the computer you
are using for the test has no access to the COMETH’s LAN, or the network
part of the IP address of the COMETH is incorrect.
•
Now reconnect the COMETH to the LAN and try to PING it :
C:\>arp –d 192.168.1.253
C:\>ping 192.168.1.253
Pinging 192.168.1.244 with 32 bytes of data :
Answer from 192.168.1.253 : bytes=32 time<10ms
Answer from 192.168.1.253 : bytes=32 time<10ms
Answer from 192.168.1.253 : bytes=32 time<10ms
Answer from 192.168.1.253 : bytes=32 time<10ms
TTL=64
TTL=64
TTL=64
TTL=64
If there is no answer, the IP address of the COMETH is not this one. Correct
the problem with the administration system. Be sure to save the changed
configuration.
•
Then, if you need to cross a gateway, PING the COMETH from a computer
installed on the other side of the gateway.
DO NOT just move the above-mentioned computer from one LAN to the
other ! You must set a new, appropriate IP address in the computer when
you move it from one LAN to another.
If there is no answer, the gateway IP address or the netmask is improperly
set in the COMETH or in your computer. Correct the problem with the
administration system. Be sure to save the changed configuration and reset
the COMETH.
Also the gateway itself may be improperly set. Check with your network
administrator.
Did you set the gateway address (if any) in the COMETH ? Else the
COMETH can receive the PING but does not know where to send the
answer.
COMETH-FIELD-RD USER’S MANUAL (D
D
T
U
DT
TU
USSS000333666) Release A.7, February 22, 2010
- 30 -
VI.3 Checking the configuration
When you can PING the COMETH, you should be able to use remote
administration. Try to connect to the administration system :
C:\> telnet 192.168.1.253
If the connection is refused, another TELNET is already connected to the
COMETH.
You can also use the asynchronous port administration. Please refer to
section V.4 “Administration by RS232 serial port” to do this.
VI.4 Checking the software
At this step, the COMETH network parameters are correctly set.
Any other problem remaining must come from either the remote side
configuration, driver or software, or from mismatched configuration
between the COMETH firmware in use and the remote side.
So please now refer to the relevant COMETH firmware user guide for
further troubleshooting.
COMETH-FIELD-RD USER’S MANUAL (D
D
T
U
DT
TU
USSS000333666) Release A.7, February 22, 2010
- 31 -
VII. ADVANCED CONFIGURATION
VII.1 Access to administration commands
You can access the administration system by two means : the RS232
interface, or TELNET through the LAN.
The RS232 administration is activated by pushing the « ADM » switch to
the ON position. This forbids parallel use of the COMETH for data transfer.
The TELNET administration is activated by TELNETing to the IP address
of the COMETH, on port 23 (which is the default port for TELNET). In this
way data transfer can proceed in parallel. This is useful for probing the
configuration without changing it.
When TELNETing to one out of many COMETH, you can wonder where is
the device you are accessing. There is a field called « location » that you can
set up and display, to reflect the physical location of the device.
VII.2 Security
By default, using the administration system through TELNET allows you to
display the COMETH configuration without logging in, but you cannot
change it. Changing the configuration is protected with a username (login)
and password, which you can change at will. The default setting is:
• login root
• password root
Optionally you can require the administrator to log in before he is allowed
even to display the configuration.
You can forbid administration from the network, after which the COMETH
configuration can only be achieved by administering through serial port.
VII.3 Handling disconnections in TCP
Some COMETH firmwares use the TCP protocol to communicate with their
client application. While this protocol provides reliable data transfers, it
requires the client to establish a “virtual link” with the COMETH and to
relinquish this link in order to allow another client to call in the COMETH.
If the client software crashes, it has no time to relinquish the link and the
COMETH keeps thinking that the link is established with a client that has
disappeared. Now, if the client application is restarted and tries to connect,
the COMETH will reject the call because it thinks it’s already connected.
Two features of the COMETH allow the management of such cases.
Note: These features were not available in early revisions of the firmwares.
On a COMETH delivered in 2002, check the existence of the ‘show net
reconnect’ command to know if you need a firmware upgrade.
Keep-alive and segment timeout: These features allow a COMETH device
to detect a possible loss of connection with the remote client, thus
COMETH-FIELD-RD USER’S MANUAL (D
D
T
U
DT
TU
USSS000333666) Release A.7, February 22, 2010
- 32 relinquishing the obsolete link and allowing a new connection request to be
accepted.
When no data exchange takes place between the client and the COMETH,
the keep-alive feature will wait for a defined amount of time (say, the
activation delay). Then it will probe the client several times, waiting a bit
(say, the interval delay) between each probe for an answer from the client. If
none of the probes is answered, the COMETH closes the TCP connection.
In the process, it may also drop control signals on the asynchronous serial
port, depending on the serial dtr and rts settings.
The “set net keepalive…” and “show net keepalive…” series of commands
allow you to set up this mechanism.
When data sent from the COMETH is not acknowledged by the remote
client, the COMETH will retransmit. By default it will retry indefinitely.
The optional data segment timout feature defines a maximum delay, after
which the TCP connection will close, dropping the current data and possibly
control signals on the asynchronous serial port, on the assumption that the
client will reestablish the connection when it detects that it was lost.
The “set net keepalive…” command also sets the segtmo parameter for a
corresponding amount of time. The “set net segtmo…” and “show net
segtmo…” commands allow you to set up this parameter independantly.
Forced reconnection: The 'reconnect' feature, as an alternative to the keepalive mechanism, allows the Cometh to accept unconditionally, at any time,
a new connection request emanating from the same IP address as the
currently opened connection (this one is then closed immediately).
The “set net reconnect…” and “show net reconnect…” series of commands
allow you to set up this mechanism.
Security note: Although the “forced reconnection” method seems more
attractive than keep-alive, it may lead to security weakness that should be
carefully considered in sensitive environments (since connection request
packets may be forged by a malevolent user on an open network, a denial of
service to the legitimate user can be induced when this feature is used).
VII.4 Commands list
General-purpose commands :
login username
start the administrator identification sequence. Ask password.
save
save the current configuration to the permanent configuration
memory which is used after reboot and remains when the COMETH
is powered off.
reset
close the administration session and reboot the COMETH, to ignore
parameters changed but not saved, or to reload saved parameters.
The following parameters do not need a reset to take effect: location,
id2217, showperm, netconfigperm, serial termtype, serial interface.
quit
close administration session (TELNET only).
COMETH-FIELD-RD USER’S MANUAL (D
D
T
U
DT
TU
USSS000333666) Release A.7, February 22, 2010
- 33 General parameters changes :
change administrator name. 8 bytes max. Upper and lower cases.
set login username
set password password change administrator password. 8 bytes max. Upper and lower cases.
set location location
change location description. 30 bytes max. Upper and lower cases.
set showperm allow
set showperm deny
allow or deny the right to display configuration information without
entering the administrator password.
set netconfigperm allow allow or deny the right to use the administration system from the
set netconfigperm deny network.
firmwares parameters changes : (See download firmware user guide(DTUS040).pdf)
Enable firmware located in segment ‘Seg’.
set prog enable Seg
Network parameters changes :
set net ethernet XX:XX:XX:XX:XX:XX
change COMETH Ethernet address. 6 hex digits separated
by columns. DO NOT CHANGE if you don’t know
exactly the consequences.
set net dhcp on
set net dhcp off
These two commands turn on or off the DHCP client.
When DHCP is on, the manually specified IP address is
not used.
set net dhcp clientid ident
replace the standard client ID (MAC address as a string)
by the custom string ident. 15 bytes max, upper and lower
cases allowed.
set net dhcp clientid
delete the custom client ID and use the standard client ID.
set net dhcp hname hostname
provide the DHCP server with the supplementary Host
Name option, with value hostname. 19 bytes max, no
spaces allowed, upper and lower cases allowed.
set net ip aaa.bbb.ccc.ddd
change COMETH IP address in dotted decimal notation.
set net mask aaa.bbb.ccc.ddd
change the subnet mask.
set net gateway aaa.bbb.ccc.ddd change the default gateway IP address.
set net metric mmm
number of gateway hops. mmm is 1 to 255.
set net keepalive n t1 t2
n defines the number of probes to send before closing the
connection. t1 defines the time in seconds before sending
the first probe since the connection is inactive (the
“activation delay” mentioned earlier). t2 defines the time
in seconds between each probes (the “interval delay
mentioned earlier). n ranges from 1 to 255. t1 and t2 range
from 1 to 65535.
set net keepalive 0 0 0
disables use of the keep-alive feature.
set net segtmo nsec
nsec is the retransmission timeout (in seconds). Set to 0 to
retransmit indefinitely.
set net reconnect on
set net reconnect off
These two commands turn on or off the “forced
reconnection” feature.
COMETH-FIELD-RD USER’S MANUAL (D
D
T
U
DT
TU
USSS000333666) Release A.7, February 22, 2010
- 34 Setting/displaying a group of parameters :
The following commands allow to retrieve and set globally the COMETH configuration.
Security note: sensitive data, like login and password information, are conveyed in clear text
by the following commands. You must take any step to protect these data from disclosure. As
a basic protective step, the commands themselves can only be used by a logged-in operator.
Usage note: Some data conveyed by these commands should be kept unique to a COMETH.
This applies especially to the IP and MAC addresses in the ‘common’ parameters. You should
either avoid to change this unique data or to restore them after using the ‘set’ commands.
Usage note: Some parameters take effect immediately, as specified elsewhere. Beware that
the parameters you change do not affect the COMETH at the moment you set them. For
example, if you change the DHCP Client Id, this will take effect at the next lease expiration,
which could happen soon. If you change the MAC address, it could adversely affect ARP
responses if such a request is received. For these reasons a ‘set common’ command should be
followed by a ‘save’ and a ‘reset’ command.
set default
restore factory defaults, except the MAC address, the save
count, the current firmware and the next firmware to run.
set common offset hex:hex:hex… insert the specified values in the data area which holds all
the configuration parameters common to all firmwares in
the COMETH.
This command should be copied and pasted from the
output of the corresponding ‘show’ command below. Its
purpose is to copy exactly a COMETH’s configuration in
another COMETH, or to restore a lost configuration.
show common offset
display all the configuration parameters common to all
firmwares in the COMETH. offset must be 0.
The purpose of this command is to display the ‘set
common’ commands (see above) necessary to fully restore
common parameters in a COMETH.
set local offset hex:hex:hex…
insert the specified values in the data area which holds all
the configuration parameters specific to one of the
firmwares in the COMETH.
This command should be copied and pasted from the
output of the corresponding ‘show’ command below. Its
purpose is to copy exactly a COMETH’s configuration in
another COMETH, or to restore a lost configuration.
BEWARE! There are as many parameter sets as firmware
segments in the COMETH FLASH EPROM. The same
firmware can be downloaded in several segments in the
COMETH; for example for testing purpose. In this case
there will be several parameter sets for this firmware
show local offset
display all the configuration parameters specific to one of
the firmwares in the COMETH. offset must be 0.
The purpose of this command is to display the ‘set local’
commands (see above) necessary to fully restore common
parameters in a COMETH.
COMETH-FIELD-RD USER’S MANUAL (D
D
T
U
DT
TU
USSS000333666) Release A.7, February 22, 2010
- 35 Parameters display :
Displaying the configuration parameters is allowed if the showperm parameter is set to
« allow ». If it is set to « deny », the configuration parameters can only be displayed by the
administrator after logging in..
Some parameters can be displayed for your information but cannot be changed.
show version
show location
show showperm
show netconfigperm
show savecount
firmware version
physical location of the COMETH
is anybody allowed to display configuration ? allowed / denied
is it allowed to administer from the network ? allowed / denied
number of times the ‘save’ command has been used
show net ethernet
show net dhcp
show net dhcp clientid
show net dhcp hname
show net ip
show net mask
show net gateway
show net configport
show net txsize
show net rxsize
show net metric
show net keepalive
show net segtmo
show net reconnect
assigned Ethernet address
DHCP use: on/off
value enforced on DHCP option 61, if any.
value assigned to DHCP option 12, if any.
assigned IP address
local subnet mask
default gateway IP address
administration port (telnet = 23)
max. size of sent frames
max. size of received frames
number of allowed gateway hops for outgoing traffic. 0-255.
keepalive parameters as n probes, t1/t2 sec; else “Keepalive off”.
segment retransmission timeout in seconds.
forced reconnection feature use: on/off
show prog info Seg
show prog data Seg
show prog list
show prog enable
Display information about firmware located in segment Seg.
same, in computer-readable format.
Display information about all 6 firmwares.
Display the currently running firmware and the one that will run
after the next reset.
COMETH-FIELD-RD USER’S MANUAL (D
D
T
U
DT
TU
USSS000333666) Release A.7, February 22, 2010
- 36 -
VII.5 Factory settings common to all firmwares
login
password
location
showperm
netconfigperm
SERVERCOM firmware located in segment /2
Functionnalities : Raw TCP server, TELNET & TELNET 2217
root
root
unknown location
allowed
allowed
net ethernet
net dhcp
net dhcp hname
net dhcp clientid
net ip
net mask
net gateway
net configport
net txsize
net rxsize
net metric
net keepalive
net segtmo
net reconnect
device serial number written on the label
off
empty (not sent)
empty (MAC address sent as string)
192.168.1.253
255.255.255.0
0.0.0.0 (no gateway/router)
23
576
576
10
off
off
off
prog enable
COMETH-FIELD-RD USER’S MANUAL (D
D
T
U
DT
TU
USSS000333666) Release A.7, February 22, 2010
- 37 -
VIII. ADDRESSING IN NETWORK PROTOCOLS
VIII.1 TCP/IP network layers
TCP/IP is the name of the protocols used by Internet and many Intranets.
In a device participating in a TCP/IP network, there are four software layers:
the application layer, the transport layer (TCP or UDP), the network
layer (IP), the LAN layer (Ethernet, WIFI, point-to-point modems, etc.)
The LAN layer address allows a device to send data to another device
connected to the same LAN. But there is not enough information in a LAN
address to send to a device connected on another LAN through a router.
The Network (IP) address solves this problem by defining addresses which
can be subject to routing. When the source and destination devices are not
on the same LAN, the source device can send data to an intermediate
gateway (also called router). The gateway has routing tables which allows it
to forward data to the destination device, maybe through other gateways.
The transport layer address, called a “port”, is used inside a destination
device to deliver data to the correct application process.
VIII.2 Ethernet Address
The Ethernet address is also referred to as the hardware address or MAC
address. The first three bytes are fixed to Hex 00 09 90 and identify an
ACKSYS product. The last three bytes are specific to each COMETH
product. This address is assigned at the factory and should not be changed.
An Ethernet LAN can be made of hubs, switches, bridges. These must not
be confused with IP gateways (see below).
VIII.3 IP address
The IP address is a 4 bytes number unique to each device on the network,
which hosts can use to communicate.
IP addresses can be private or public. Public ones are reserved to devices
that require to send data over a public network, such as internet. They are
usually purchased or leased from a local ISP.
The IP address is usually represented in the “decimal dotted notation” which
consists of the decimal value of each of the four bytes, separated by dots.
The IP address is divided into two parts : network and host. To support
different needs, three network classes have been defined. In the following,
‘x’ stands for the host part of the IP address.
A host part with all bits set to 1 is the broadcast address, meaning for « for
every device ».
A host part with all bits fixed to 0 addresses the network as a whole (for
example, in routing entries).
Class A network : IP address 1.x.x.x to 127.x.x.x
COMETH-FIELD-RD USER’S MANUAL (D
D
T
U
DT
TU
USSS000333666) Release A.7, February 22, 2010
- 38 The first byte defines the network and the last three bytes define the host.
Only 127 different class A networks exist, and each consist of up to
16.777.216 devices
Class B network : IP address 128.0.x.x to 191.255.x.x
The first two bytes define the network and the last two bytes define the host.
Class B networks are typically used for large company networks, and each
can consist of up to 65,534 devices.
Class C network : IP address 192.0.0.x to 223.255.255.x
The first three bytes define the network and the last byte defines the host.
Class C networks are the most common and are often used in smaller
company, and each network can consist of up to 254 devices.
More complex classes can be defined by manipulating the IP netmask
associated with the IP address. See the www.ietf.org documentation.
The bits set to one in the IP netmask define the bits of the associated IP
address to be taken as the network part.
Network class
A
B
C
Network bits
8
16
24
Host bits
24
16
8
Netmask
255.0.0.0
255.255.0.0
255.255.255.0
Each COMETH has one user-assigned IP address. Its factory-assigned
default value is the Class C address “192.168.1.253”.
VIII.4 Gateways
Each network device communicating through gateways MUST know the IP
address of the gateway nearest to it. It will use this gateway to forward data
to farther LANs. If a device does not know its gateway, it may receive data
but may not return an answer. For example this can forbid answering a
PING even if the PING request makes its way to the device.
CONNECTING THROUGH GATEWAYS - EXAMPLE
192.168.1.12
10.1.2.30
Device#1
(COMETH)
Must know about
address 10.1.2.1 to
send to Device#2
192.168.1.254
10.1.2.1
Gateway#1
LAN
Internet
Gateway#2
Device#2
(computer)
Must know about
address
192.168.1.254 to
send to Device#1
LAN
VIII.5 TCP port number
Every TCP connection is defined by a source and destination IP address and
port number. For example, a TELNET application commonly uses
destination port number 23.
To support its two application processes, the COMETH, uses TCP port 23
to allow remote administration and one more TCP or UDP port, depending
on the firmware, for data exchange with the asynchronous port.
COMETH-FIELD-RD USER’S MANUAL (D
D
T
U
DT
TU
USSS000333666) Release A.7, February 22, 2010
- 39 -
IX.
REFERENCES
COM port redirection
http://www.ietf.org/rfc/rfc2217.txt
DHCP
http://www.ietf.org/rfc/rfc1541.txt
http://www.ietf.org/rfc/rfc2132.txt
http://www.ietf.org/rfc/rfc2134.txt
http://www.ietf.org/rfc/rfc2136.txt
Keep-Alives
http://www.ietf.org/rfc/rfc1122.txt
ACKSYS documentations
For the latest versions please check the download section of http://www.acksys.fr
CD-ROM documentations:
download firmware user guide(DTUS040).pdf
SERVERCOM UserGuide (DTUS043).pdf
MODBUS-TCP UserGuide (DTUS041).pdf
MULTIPOINT UserGuide (DTUS056).pdf
TCPCLIENT UserGuide (DTUS045).pdf
COMETH-FIELD-RD USER’S MANUAL (D
D
T
U
DT
TU
USSS000333666) Release A.7, February 22, 2010
ZA Val Joyeux
10, rue des Entrepreneurs
78450 VILLEPREUX
FRANCE
Telephone:
Fax:
Web:
Hotline:
Sales:
+33 (0)1 30 56 46 46
+33 (0)1 30 56 12 95
www.acksys.fr
[email protected]
[email protected]