1
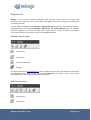
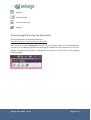
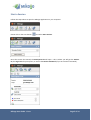
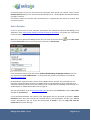
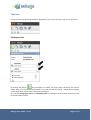
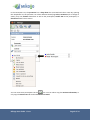
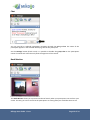
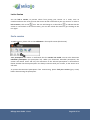
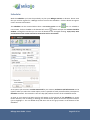
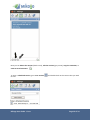
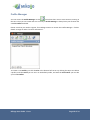
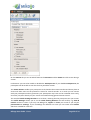
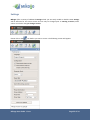
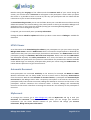
Mikogo User Guide
Linux Version
Table of Contents
Registration
3
Downloading & Running the Application
4
Start a Session
5
Join a Session
6
Features
7
Participant List
7
Switch Presenter
8
Remote Control
8
Chat
10
Back Monitor
10
File Transfer
11
Settings
12
Pause Transmission
13
Recording
13
Lock a Session
14
End a session
14
Scheduler
15
Profile Manager
18
Account Information
21
Settings
22
HTML Viewer
23
Automatic Reconnect
23
MyAccount
23
Mikogo User Guide - Linux
Page 2 of 24
Registration
Mikogo is an easy-to-use software application that provides a fast solution for sharing your
computer screen with others live over the Web. Participants do not have to register in order to join
your Mikogo session.
You can organize Mikogo sessions without a registered account. However, note that with the nonregistered version the features Scheduler, MyAccount and Profile Manager are not available.
Therefore, organizers can choose to either start sessions with an account or without. Participants
never have to register an account in order to join a Mikogo session.
Without User Account
Start Session
Join Session
Account Information
Settings
To register please go to www.mikogo.com, click on Register (at the top of the website) and complete
the registration form. Entering user details is only required if you wish to start a session with
extended features and to login to the MyAccount section.
With User Account
Start Session
Join Session
Mikogo User Guide - Linux
Page 3 of 24
Scheduler
Profile Manager
Account Information
Settings
Downloading & Running the Application
The Linux application can be downloaded from:
http://www.mikogo.com/download/linux-download/
Once you have saved the mikogo.tar.gz Linux file to your computer, right-click the downloaded file
and extract it. The Mikogo application will then appear. Double-click on the application icon to start
Mikogo. The application will launch, a Mikogo M icon will appear in the Taskbar, and the Mikogo
Panel will appear.
Mikogo User Guide - Linux
Page 4 of 24
Start a Session
Follow the steps above to open the Mikogo application on your computer.
Please click on the start button
and select Start Session.
Once the session has started, the Participant List will open – this is where you will get the Session
ID, the Login Link for participants, as well as the Session Password (if you set a Session Password).
Mikogo User Guide - Linux
Page 5 of 24
In the Participant List you can see how many participants have joined your session. There are also
multiple features that you can access from the Participant List – further details about these features
on pages 7-9 below.
For security reasons the session ends automatically if no participants join within 15 minutes after
you start a session.
Join a Session
To join a session from a Linux computer, participants are advised to download the Mikogo Linux
application from http://www.mikogo.com/download/linux-download/ and follow the instructions
under “Downloading & Running the Application” (on page 4 above).
When they have opened the Mikogo Panel, they can click on the Join button
and the session ID from the session organizer, and click on Join Session.
, enter their name
If the participant wishes to join the session without downloading the Mikogo software, they can
join a session using the HTML Viewer – an even easier way to join a presentation via a website,
http://go.mikogo.com.
No download is required to join a session via the HTML Viewer. ActiveX, Java, and Flash are not
required. Another benefit is that the new HTML viewer works seamlessly with PC, Mac and Linux
computers because it allows you to join a session from a web browser, including a web browser on a
mobile device or mobile phone. More info on page 23.
Ask your participants to go to http://go.mikogo.com and enter the session ID as well as their name
and click on Join Session.
If you password-protected your session, your participants will also be asked to provide a Session
Password. After they have entered the required details, your participants will join your Mikogo
session. Alternatively, you can invite your participants by email or you can copy and send the
session link via instant message.
Mikogo User Guide - Linux
Page 6 of 24
Features
During a session the following window is displayed on your screen as long as you do not minimize it.
Participant List
By clicking the button
the participant list drawer will open below containing the session
details. Here you can see who the presenter is and who has remote control – which can be changed
via the drop-down menus (note the black arrows above).
You can also change your status and identifying color by clicking on the drop-down list buttons next
to the participants names.
Mikogo User Guide - Linux
Page 7 of 24
Switch Presenter
By opening the drop-down list at the two black arrows (
over remote control.
) you can change the presenter or hand
To the right of the current presenter’s name, there is an arrow for a drop-down menu. By clicking on
this arrow, you will see a list of the current participants and can then choose who you want to hand
over the presenting rights to.
The participant who you choose is now asked if they are willing to show their screen - only when this
has been accepted by the participant will you and the other participants be able to see their screen.
The organizer of the session can re-claim the presenting rights at any given time or make someone
else the presenter. Mikogo will also show your current role by changing the color of the M icon in
the taskbar on your screen: red means that you are the presenter and green means that you are
watching the screen of someone else.
Remote Control
During a session you can hand over remote keyboard and mouse control of your own computer or
you can request remote control of the computer of a participant. To take remote control of a
participant’s computer, that participant would need to be the presenter and would need to give
explicit consent that they allow you to control their computer – this is for security reasons. As the
organizer of a session you can then gain control by selecting your own name.
To give remote control over your own computer to a participant please click on the drop-down
arrow under the title of “Control” then select the participant who should take control of your
computer.
This participant then has the rights to control your computer with their own mouse and keyboard.
Please don’t use your own mouse and keyboard while a participant has remote control of your
computer as you share the rights with them. To deactivate someone from remote controlling your
computer, click on the drop-down list and select your own name or use the shortcut key: Ctrl + F12
Mikogo User Guide - Linux
Page 8 of 24
In the Participant List, the presenter has a drop-down list associated with their name. By opening
this drop-down list, the presenter can select different identifying colors, emoticons (for a change of
status), they can rename themselves as well as the participants, send a URL to the participants, or
disconnect them from a session.
You can invite more participants via the
icon. You can either copy the Session Information, or
only copy the Session ID and send an invitation via Email.
Mikogo User Guide - Linux
Page 9 of 24
Chat
You can send all or selected participants messages through the Mikogo Chat. The name of the
participant appears in the selected identifying color of this participant
Via the Settings button (black arrow) it is possible to disable the group chat so the participants
cannot chat with each other but only with the organizer of the session.
Back Monitor
The Back Monitor shows you a preview window of exactly what your participants can see from your
screen. This way you can be sure that the participants are seeing what you would like them to see.
Mikogo User Guide - Linux
Page 10 of 24
File Transfer
You can transfer Files to your participants during a session. Click on the
drawer will open underneath.
icon. The File Transfer
Upon clicking Add, a new window will open where you can select the file(s) you want to transfer to
your participants. You can either send the file(s) to all or selected participants. Just remove the tick
from the box in front of the participant’s name and he/she won’t receive the file(s).
After you have sent the file, all recipients obtain the notification that they shall receive a file. Every
participant can then decide where the file should be saved or if the file transfer should be refused.
Mikogo User Guide - Linux
Page 11 of 24
Settings
During a session you can set the following Settings, such as: Language, Picture Quality and
Presenter Scale. You can decide if you want to activate the Instant screen build-up (shows changes
first and is optimized for remote support, not recommended for presentations), show the balloon
help tips to the left of the user panel or if a connection log should be saved (only for support
purposes).
In the Feature tab (grey arrow) you can decide who is able to use which features (also see Profile
Manager on page 18):
Mikogo User Guide - Linux
Page 12 of 24
Pause Transmission
Via the Pause Transmission feature (black arrow) you can pause the transmission of your screen in
order to browse through confidential files or applications. During this time, your participants are
unable to see any changes that take place on your screen. To continue the transmission, click on the
icon and the live screen sharing will resume.
Recording
You can record and save your entire Mikogo session. To start recording, click on the
icon and
select a location for your saved recording. From this point onwards, the session will be recorded. A
red dot in the recording symbol
can always end and save it.
shows that the recording has started. During the recording you
The recordings are saved in the Mikogo audit compliant proprietary BS4 format. By default the
location of a saved recording is the same location as where you started the Mikogo Linux application
from. In many cases this would be /home/[your username]/Desktop/Mikogo 4.5
You can playback any recorded session using the Mikogo Session Player for Linux available free of
charge from the Mikogo website: http://www.mikogo.com/downloads/beta/sessionplayer
Mikogo User Guide - Linux
Page 13 of 24
Lock a Session
You can lock a session, to prevent others from joining your session. As a result, even an
unauthorized user who came to know the session ID will not be able to join your session. In order to
lock a session, click on the
icon. The icon will change to a closed lock
to indicate that the
session is now locked. In the same manner, you can also unlock the session by just clicking on the
icon again.
End a session
To end a session, please click on the red button in the top-left corner (black arrow).
Your participants will receive a notification that the session has ended. You can also disconnect
individual participants (see participant list). When you disconnect individual participants, the
session will remain active and only the connection to the selected participants is disconnected.
Please consider that those participants can always reconnect with your session, as the session ID is
still valid.
To prevent disconnected participants from reconnecting, please lock your session (grey arrow)
before disconnecting the participants.
Mikogo User Guide - Linux
Page 14 of 24
Scheduler
With the Scheduler you have the possibility to plan your Mikogo sessions in advance. Please note
that you need to register for a Mikogo account to access the Scheduler – further details on Page 21
under “Account Information”.
The Scheduler can be accessed when there is no session active via the
icon. To schedule a
new session, click on the Plus in the bottom-left corner
, which will open the session scheduler
window. Through this window you can enter all details for the arranged meeting. Topic, Date, Start
and Duration of the session need to be entered as well as Your Name.
As an option you can enter a Session Password for your session, Conference Call Information can be
typed in when you select the custom option, and it is possible to send yourself and the participants a
Reminder via Email. The reminder is sent one day (24h) before the start of the scheduled session.
As soon as your session has been saved it will appear in the overview of the Scheduler. To access
further features, such as editing or deleting your saved session, please click on the respective session
(just to highlight it - do not double-click) and then click on the grey buttons at the bottom of the
Scheduler.
Mikogo User Guide - Linux
Page 15 of 24
Now you can delete the session (black arrow), edit the session (grey arrow), copy the invitation, or
send an email invitation (
).
To start a scheduled session, go to start session
to start.
Mikogo User Guide - Linux
and double-click on the session that you wish
Page 16 of 24
Instantly your scheduled session with the pre-defined session ID starts. You can edit your scheduled
session at any time and hence keep the reserved session ID.
If your participants log on to the scheduled session before it has started, they will see a waiting
room with the most important details of the session.
Your participants will be forwarded automatically in to your session and will see your screen as soon
as you start the session.
Mikogo User Guide - Linux
Page 17 of 24
Profile Manager
You can access the Profile Manager via the
icon when there are no active sessions running at
the time. Then you can create and save a variety of Profile Settings to always have your favorite and
suitable Profiles available.
Please note that you need to register for a Mikogo account to access the Profile Manager – further
details on Page 21 under “Account Information”.
To create a new Profile, just click the Plus in the bottom-left corner. By clicking the X you can delete
a profile, with the Arrow you can set it as the default profile, and with the Tool button you can edit
your saved Profiles.
Mikogo User Guide - Linux
Page 18 of 24
If you click on the Plus you will have the following options:
By setting the Picture Quality you can influence the transmission speed. If you select the maximum
quality, the image will be transmitted in true color and if you select the minimum quality, the image
will be transmitted in grey-scale however the speed of the desktop sharing increases.
The Instant Screen Build-up shows image changes on the participants’ screens as soon as they are
transmitted. As a result, the image within a participant’s screen changes immediately after the first
changes are transmitted. Due to the effect of screen piecing together (screen changes will appear
moving from top to bottom), we recommend that you only enable it for support sessions (as you can
move faster) or when showing a presentation with many pictures.
You can define if a session password is always needed or if the recording should start automatically.
With this feature you can ensure that all your sessions are recorded automatically.
Mikogo User Guide - Linux
Page 19 of 24
On the Feature tab you can set which features the Presenter and the Viewer are able to use during a
session.
Furthermore you can either enable or disable the Participant List. If you disable Participant List, the
participants will be unable to see who else has joined the session.
The Viewer Pointer enables your participants to click within their viewer window and hence place an
arrow with their name on the presenter’s screen for several seconds. As a result you can interact
with your participants and any questions your participants may have can be answered more easily,
since they can point directly on your screen even without being granted remote control.
The standard Initial Viewing Direction is set to Show, meaning that the participants see your screen.
The Profile Manager allows you to set the Initial Viewing Direction for each Profile, e.g. View &
Control another’s screen if you only use Mikogo for support or show your screen if you only do
presentations or trainings. If you use Mikogo for different use cases you can create more Profiles
which are suitable for each case.
Mikogo User Guide - Linux
Page 20 of 24
After you have selected your options, please click on Save to complete your Profile.
Account Information
Here you can save your Username and Password, so you don’t have to login with every start of the
program. Registering a Mikogo account and saving your details under Account Information also
enables you to use the Scheduler and Profile Manager features.
If you forget your Password, you can retrieve it by clicking on the link Forgot your password?
Mikogo User Guide - Linux
Page 21 of 24
Settings
Mikogo offers a variety of additional settings which you can easily enable or disable. Some settings
will be effective for the entire session and can only be changed prior to starting a session, while
others can also be changed during a session.
Please click on the
icon before you start a session. The following section will appear:
Mikogo User Guide - Linux
Page 22 of 24
Besides setting the Language of the software and the Presenter Scale of your screen during the
session, you can also enter a Pause Text. It will appear on the participants’ screens when you pause
the session. It is possible to enter no text at all, this way your participants will not realize that the
transmission of your screen has been paused.
Via Saved Recording Location you can set the folder where your recorded sessions will be stored. By
default the location of a saved recording is the same location as where you started the Mikogo Linux
application from. In many cases this would be /home/[your username]/Desktop/Mikogo 4.5
However this can be changed at any time.
If required, you can manually enter your Proxy Information.
Clicking the button Check for updates will inform you when a new version of Mikogo is available for
download.
HTML Viewer
As an alternative to the downloading the software, your participants can join your session using the
Mikogo HTML Viewer. With the HTML Viewer there is no need for the participants to download any
software since they view your screen simply from within a web browser. The HTML Viewer works for
participants joining from Windows, Mac and Linux computers. Please note that the HTML Viewer
was developed especially for online presentations. As a result, the feature set available with the
HTML Viewer was optimized for this special use case and does not provide all the features available
via the default login. For example, participants who joined your session using the HTML Viewer can
neither become presenter nor gain remote control.
Automatic Reconnect
Some participants are connected wirelessly to the Internet, for example, via WLAN or UMTS.
Wireless connections are not always stable, and can at times result in temporary disconnections
from the Internet. With the new automatic re-connect function, a participant will automatically be
reconnected to the Mikogo session after a temporary interruption in the Internet connection. If a
participant briefly loses Internet connection, Mikogo will attempt to reconnect to the session. If the
participant’s Internet connection has recovered within 3 minutes, Mikogo will automatically
reconnect to the session. Therefore re-entering the session ID is not necessary for the participant to
reconnect.
MyAccount
To manage your account, go to www.mikogo.com, click on MyAccount and log in with your
Username and Password. Under Passwords in the menu, you can change your Password.
Furthermore you can access detailed statistics of your sessions and change your Account
Information, Billing and Payment Information
Mikogo User Guide - Linux
Page 23 of 24
Under “Feature Settings” you can upload a welcome screen image, your logo or an individual image
for your waiting room. If you forget your password, you can retrieve it by visiting www.mikogo.com
and clicking on Reset Password which is located in the top-right corner of the homepage. Enter your
username and click on the Reset Password. Then check your Emails and follow the instructions.
Mikogo User Guide - Linux
Page 24 of 24