1
Tableau®TD3
VERSION 1.2
USER'S GUIDE
GUIDANCE SOFTWARE | USER'S GUIDE | TABLEAU TD3
Copyright © 2009-2013 Guidance Software, Inc. All rights reserved.
EnCase®, EnScript®, FastBloc®, Guidance Software® and EnCE® are registered trademarks or trademarks owned by Guidance Software
in the United States and other jurisdictions and may not be used without prior written permission. All other marks and brands may be
claimed as the property of their respective owners. Products and corporate names appearing in this work may or may not be
registered trademarks or copyrights of their respective companies, and are used only for identification or explanation into the
owners' benefit, without intent to infringe. Any use and duplication of this work is subject to the terms of the license agreement
between you and Guidance Software, Inc. Except as stated in the license agreement or as otherwise permitted under Sections 107 or
108 of the 1976 United States Copyright Act, no part of this work may be reproduced, stored in a retrieval system or transmitted in
any form or by any means, electronic, mechanical, photocopying, recording, scanning or otherwise. Product manuals and
documentation are specific to the software versions for which they are written. For previous or outdated versions of this work, please
contact Guidance Software, Inc. at http://www.guidancesoftware.com. Information contained in this work is furnished for
informational use only, and is subject to change at any time without notice.
Contents
Preface
3
About this Guide ................................................................................................................................................ 3
Disk Capacity and Transfer Rate Measurement Conventions ............................................................................ 3
Overview
1
Tableau TD3 ....................................................................................................................................................... 2
TD3 Kit Contents ................................................................................................................................................ 3
Navigating the TD3 ............................................................................................................................................. 6
Reading the LEDs................................................................................................................................................ 7
USB Keyboard Support ....................................................................................................................................... 7
Setting up the TD3
9
Startup Sequence ............................................................................................................................................. 10
Configuring the TD3 ......................................................................................................................................... 10
Settings ....................................................................................................................................................... 10
Updating TD3 Firmware ............................................................................................................................. 21
Connecting Hard Disks ..................................................................................................................................... 21
Connecting Notebook Hard Disks ............................................................................................................... 22
Drive Detection ................................................................................................................................................ 22
Using the TD3
23
Overview .......................................................................................................................................................... 24
Navigating TD3 Modules and Options ........................................................................................................ 24
Duplicate .......................................................................................................................................................... 26
Disk-To-File Duplication/Imaging ............................................................................................................... 26
Disk-to-Disk/Cloning ................................................................................................................................... 30
Hash ................................................................................................................................................................. 32
Preconditions Checking .................................................................................................................................... 33
Verify ................................................................................................................................................................ 35
HPA/DCO Disable ............................................................................................................................................. 36
Remove DCO & HPA ................................................................................................................................... 36
Blank Check ...................................................................................................................................................... 37
Format .............................................................................................................................................................. 38
Accessing ext2 and ext4 Destination Partitions in Windows ........................................................................... 39
Prerequisites, Assumptions, and Limitations ............................................................................................. 39
Procedure for Mounting ext Volumes ........................................................................................................ 40
Logs .................................................................................................................................................................. 45
Viewing Logs ............................................................................................................................................... 45
Sample Log ................................................................................................................................................. 46
Saving Logs ................................................................................................................................................. 47
Printing Logs ............................................................................................................................................... 47
Erasing Logs ................................................................................................................................................ 47
Troubleshooting and Support
49
Troubleshooting Common Problems ............................................................................................................... 50
Power Supply Issues ................................................................................................................................... 50
Problems with Disk Detection .................................................................................................................... 50
Replacing the Backup Battery for the Real-time Clock ............................................................................... 51
Support ............................................................................................................................................................ 53
Technical Support ....................................................................................................................................... 53
Online Support ........................................................................................................................................... 55
Professional Services .................................................................................................................................. 59
Training ....................................................................................................................................................... 59
Index
61
Preface
About this Guide
This guide presents a wide range of technical information and procedures for using the TD3. It is
divided into the following chapters.
Overview: Provides general information about the TD3 as well as unpacking, starting up, and
navigating the TD3's menus and LEDs.
Setting up the TD3: Provides system overview information about the TD3 as well as
procedures for configuring and connecting the TD3.
Using the TD3: Provides detailed information and procedures for TD3 operation.
Troubleshooting and Support: Provides a brief list of potential problems and solutions. For
more complete and current troubleshooting information as well as answers to frequently
asked questions (FAQ), visit the Tableau web site at www.tableau.com.
Disk Capacity and Transfer Rate Measurement Conventions
The computer industry generally adheres to two different conventions for the definitions of the terms
megabyte (MB) and gigabyte (GB). For computer RAM, 1 MB is defined as 2 20 = 1,048,576 bytes and 1
GB is defined as 230 = 1,073,741,824 bytes. For disk storage, 1 MB is defined as 10 6 = 1,000,000 bytes and
1 GB is defined as 109 = 1,000,000,000 bytes. These two conventions are known as powers of two and
powers of ten respectively. Microsoft deviates from the hard disk capacity measurement convention
and uses the powers of two convention for its operating systems.
Tableau reports disk capacities and transfer rates according to the industry standard powers of ten
convention. In TD2 screens, reports, and documentation, a 4 GB hard disk stores up to 4,000,000,000
bytes; a hard disk with a 150 MB/sec transfer rate transfers 150,000,000 bytes per second.
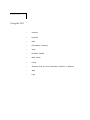
Chapter 1
Overview
In This Chapter
Tableau TD3
TD3 Kit Contents
Navigating the TD3
Reading the LEDs
USB Keyboard Support
2
Tableau® TD3 Version 1.2 User's Guide
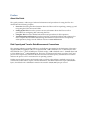
Tableau TD3
The Tableau TD3 is a forensic duplicator. With many of the functions traditionally found in generalpurpose, IT-oriented hard disk duplicators, the TD3 also provides features and functions that serve the
specialized needs of forensic practice, including:
Sustained data transfer rates of up to 7.2 GB/minute, while performing calculations of MD5
and SHA-1 hash values, also known as fingerprints.
Native support for SATA, USB 3.0 and FireWire hard disks from the source interface.
Detailed log generation for case documentation.
Automatic blank checking of source and destination drives.
HPA and DCO support for the detection and handling of hidden/protected data areas on
source drives.
The TD3, as shown above, can stand alone and interface with SATA source and destination hard disks.
You can also combine the TD3 with the TDPX5 IDE Protocol Module and the TDS1 SATA Storage
Module for performing IDE source duplications to a single large-capacity SATA destination hard disk.
The TDPX5 provides a reliable clip-in IDE interface for most legacy IDE desktop and laptop hard
disks. The TDS1 features two onboard fans and a modular top surface that snaps into and interfaces
directly with the TD3. The TD3 connects directly to the TDPX5 and TDS1, as shown in the following
figure.
Overview
TD3 Kit Contents
The TD3 ships in a boxed kit that includes the items shown in the following table.
Item
Model #
Description
TD3
TD3 Forensic Duplicator.
TP4-NC
High-output power supply. The TP4
provides enough power to supply the
TD3 and most common combinations
of source and destination hard disks.
The TP4 uses a universal 2-pin AC line
cord and is compatible with 110240VAC line voltages worldwide.
TDS1
SATA storage module for destination
SATA hard disk.
TDPX5
Forensic IDE expansion module to
adapt to IDE source hard disks.
TP4-LC-US
North America shipments include the
TP4-LC-US AC line cord for use with
the TP4-NC power supply. When
shipped to other geographic markets,
the local reseller typically adds an AC
line cord appropriate for the local
market.
3
4
Tableau® TD3 Version 1.2 User's Guide
Item
Model #
Description
TC2-8-R2
Hard disk power cable to connect IDE
and some legacy-style SATA hard disks
to the TD3 (3M to Molex).
TC3-8
SATA signal cable to connect SATA
hard disks to the TD3.
TC4-8-R2
SATA/SAS power/signal cable to
SATA/SAS signal and 3M power (2
pieces). This unified cable connects to
newer SATA hard disks with a unified
connector.
TC5-8-R2
Hard disk power cable to connect 15pin SATA power connectors to the TD3
(SATA to 3M).
TC6-8
IDE signal cable to connect IDE hard
disks to the TD3. Do not use the TC6-8
IDE cable to connect notebook drive
adapters to the TD3. Use the shorter
TC6-2 IDE cable shown with the TKA5AD adapter pack, below.
TC7-6-6
6-pin FireWire cable to connect
FireWire storage media devices as
source disk.
TCA7-6-9
FireWire cable adapter to adapt from
1394A 6-pin to 1394B 9-pin. Used to
connect FireWire devices with 1394A
6-pin connectors.
TC-USB3-18
USB 3.0 cable (A to B) to connect USB
3.0 storage media as source disk.
Overview
Item
Model #
Description
TC3-22-18
Unified SATA cable (22-pin male to 22pin female) to connect a destination
SATA hard disk. Used when imaging to
bare SATA hard disk instead of to
TDS1.
TKA5-AD
Adapter pack for notebook hard disks.
Includes TC6-2, TDA3-1, TDA5-18,
TDA5-25, and TDA5-ZIF w/TC20-BN.
TKDA3-LIF
SATA LIF hard disk adapter kit.
TPKG-VCT-5
Five pack of Velcro cable ties.
TQS-TD3
Quick Start card for TD3 kit.
Do not discard the foam packaging, as it is designed to fit several industry-standard hard-sided
carrying cases. If you received the TD3 kit in the cardboard box shipped by Tableau, you can buy a
hard-sided case and reuse the foam; insert directly into that case.
5
6
Tableau® TD3 Version 1.2 User's Guide
Navigating the TD3
Use the TD3's touchscreen display to navigate from module to module and choose or modify options.
Use the touchscreen keyboard or a USB keyboard (see USB Keyboard Support on page 7, below) to
enter alphanumeric text when prompted.
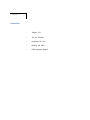
The Main Menu screen of the TD3 displays a sliding icon list for initiating the various modules:
Duplicate
Hash
Verify
HPA/DCO Disable
Blank Check
Format
Wipe
Logs
Settings
From the Main Menu screen, tap an icon to access a module screen. A module screen provides a set of
graphic icons, from which you can select options and suboptions, add/change information, or initiate a
task. A button on each screen takes you back to the previous screen or to the Main Menu screen.
Across the top of the display, the TD3 continually shows the chosen duplication profile and its
locked/unlocked status, the screen title, and the time.
The TD3 is shipped with a Quick Start card that illustrates the layout of the display, connectors, and
power switch on the TD3. Keep the Quick Start card with the TD3 as you familiarize yourself with its
operation.
Overview
7
Reading the LEDs
The top of the TD3 has one light emitting diode (LED) indicating that the unit is turned on. The back of
the TD3, near the power connector, has one LED indicating that the power supply is plugged in.
The right side of the TD3, on the RJ-45 Ethernet connector, has two LEDs. The following table provides
details for interpreting the status of these network interface card LEDs.
Green
LED
Yellow
LED
1000 Mbps Link – No Activity
On
Off
1000 Mbps Link – Activity
On
Blink
100 Mbps Link – No Activity
Off
Off
Blink
Blink
Off
On
Blink
On
On
On
Status
100 Mbps Link – Activity
10 Mbps Link – No Activity
10 Mbps Link – Activity
No Link
USB Keyboard Support
You can connect a standard USB keyboard to the USB port on the right side of the TD3. Using an
external keyboard can be more convenient than entering data using the touchscreen keyboard on the
TD3.
CHAPTER 2
Setting up the TD3
In This Chapter
Startup Sequence
Configuring the TD3
Connecting Hard Disks
Drive Detection
10
Tableau® TD3 Version 1.2 User's Guide
Startup Sequence
The TD3 is optimized for the needs of forensic practitioners and computer forensic processes. When
you turn on the TD3, an initialization screen appears for about 20 seconds followed by a prompt to
create an administrator password. The TD3 then loads the initial profile, detects any connected
devices, and displays the Main Menu screen. The TD3 displays icons indicating connected devices,
special settings, and warning messages about any detected faults.
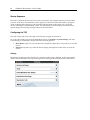
Configuring the TD3
The TD3 comes ready to be connected to the TP4 power supply and turned on.
To scroll to the Settings icon from the Main Menu screen, tap Settings > System Settings. The Start
Screen Settings screen displays and provides the following options:
Main Menu: Tap this if you want the TD3 to display the Main Menu screen when you turn the
unit on.
Duplicate: Tap this if you want the TD3 to display the Duplicate screen when you turn the
unit on.
Settings
The Settings module provides selections for configuring TD3 options, defaults, profile management,
and the current date/time. It also provides options for viewing TD3 information and current status.
Setting up the TD3
11
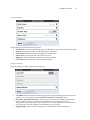
System Settings
System Settings provides the following options
Start Screen: Choose between starting from the Main Menu screen and the Duplicate module.
Network: Changes the settings for the Ethernet port (see below).
24-Hour Time: Enables 24-hour time display for the TD3 clock.
Date & Time: Sets the date and time for the TD3 clock.
Brightness: Sets the brightness of the TD3 touchscreen display.
Factory Reset: Resets the TD3 to factory default settings.
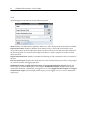
Network Settings
Network Settings provides options for the following:
Use DHCP: Enables automatic network configuration using the DHCP protocol if turned on,
otherwise, you are required to enter IP address, Netmask, and Gateway values.
IP Address, Netmask and Gateway: Set the respective values for IP address, netmask and
gateway. Please consult your network administrator for these settings. Incorrect or
inappropriate values may cause issues not only for the TD3, but other users on the network
may be affected. This is the address for the Ethernet port on the TD3.
Apply Settings: Applies network settings to the configuration of the Ethernet port.
12
Tableau® TD3 Version 1.2 User's Guide
iSCSI
iSCSI Settings provide selections for the following options.
iSCSI: Enables or disables iSCSI capabilities. When set to OFF, all TD3 iSCSI functionality is disabled.
Export Source Drive: Enables or disables iSCSI sharing of SATA, IDE, USB, and FireWire source
drives connected to the TD3. When these options are set to ON the source disk physically attached to
the TD3 is exported as a read-only iSCSI target. This allows a remote computer to connect to these
disks over iSCSI.
Export Destination Drive: Enables or disables iSCSI sharing of SATA destination drives connected to
the TD3.
Discover New Targets: Displays the iSCSI Discover screen. Initiates the process of discovering targets
on a remote machine and logging into them.
Bookmarked Targets, Logged in Source Targets and Logged in Destination Targets: Display the
iSCSI Target List screen and displays a list of targets. Bookmarked Targets displays all the targets
currently bookmarked, whether they are logged in or not. The Logged in Source Targets and Logged
in Destination Targets options display all the targets you are logged in to as a source or destination
respectively.
Setting up the TD3
13
iSCSI Discover
Address (IP or Hostname): The IP address or Hostname of the server on which the iSCSI
targets are located. This field is required.
Discovery Username, Discovery Password: Some iSCSI servers require a username and
password to perform the discovery process on them, and some do not. These may or may not
be the same username and password used to log into the targets. These fields are optional.
Discover: Pressing Discover displays the Discovered iSCSI targets screen and displays a list of
targets discovered on the server.
Discovered iSCSI Targets
Any target listed: Pressing any of the targets listed on this screen displays the iSCSI Login
screen where you can log into that share. Each target listed has two status icons in its button,
as shown below:
This icon indicates whether the target is logged in (first image) or logged out
(second image).
This icon indicates whether the target is bookmarked (first image) or not
bookmarked (second image).
14
Tableau® TD3 Version 1.2 User's Guide
iSCSI Login
Source Drive, Destination Drive: Determines whether the iSCSI target is logged into as a
source or destination drive. One must be selected. Defaults to Source Drive.
Login Username, Login Password: If a username and password is required to login to the
target, you enter it here. These fields are optional.
Bookmark Target: Set Bookmark Target to ON to bookmark a target for future use.
Connect at Startup: This option is valid only if the target has been bookmarked. If this is set to
ON, as soon as you log in to the TD3 with your profile, the TD3 attempts to connect to this
share in the background.
Nickname: This option is valid only if the target has been bookmarked. You may enter an
alphanumeric string here to give the target a nickname, displayed with the full target name.
Target Enable: After verifying that all of the above options are correct, switch this to ON to
begin logging in to the target. When complete, it displays the Source iSCSI Targets screen.
Setting up the TD3
15
Source
iSCSI Target List
Any target listed: Depending on which button you selected on the iSCSI Settings screen this
screen displays all your bookmarked targets, all the targets logged into as a source, or all the
targets logged into as a destination. Pressing any of the targets in this screen displays the iSCSI
Target Options screen, where you can log into or out of the target and edit its settings. Each
target button has two status icons, as shown below:
This icon indicates whether the target is logged in (first image) or logged out
(second image).
This icon indicates whether the target is bookmarked (first image) or not (second
image).
16
Tableau® TD3 Version 1.2 User's Guide
iSCSI Target Settings
Source Drive, Destination Drive: Determine whether the iSCSI target is logged in to as a
source or destination drive. One must be selected. Defaults to Source Drive.
Discovery Username, Discovery Password: Some iSCSI servers require a username and
password for the discovery process and some do not. These may or may not be the same
username and password used to log into the targets. These fields are optional.
Login Username, Login Password: If a username and password are required to log in to the
target, enter it here. These fields are optional.
Connect at Startup: If set to ON, as soon as you log in to the TD3 with your profile, the TD3
attempts to connect to this share in the background.
Nickname: You may enter a string here to give the target a nickname, displayed with the full
target name.
Setting up the TD3
17
Duplication Settings
Duplication Settings provides options for the following.
•
•
•
•
•
•
•
Examiner: The name of the case examiner.
Case ID: The case ID number.
Case Notes: Miscellaneous information about the case or duplication process for future
reference.
Duplication Type: Either Disk-to-File (imaging) or Disk-to-Disk (cloning) duplication. The
default setting is Disk-to-File.
Destination Dir: The path on the destination disk for a Disk-to-File duplication.
Image Dir Naming: The directory naming convention for a collection of Disk-to-File
duplications.
•
Date + Time: A time stamp identifies the directory. This is the default setting.
•
Serial Number: The serial number of the source disk identifies the directory.
•
Serial + Model Number: The model and serial number of the source disk identifies the
directory.
Image File Naming: The file naming convention for a Disk-to-File duplication.
•
Date + Time: A time stamp identifies the duplication. This is the default setting.
•
Serial Number: The serial number of the source disk identifies the duplication.
•
Serial Number + Model: The model and serial number of the source disk, identifies the
duplication.
•
User Defined: A predefined alphanumeric string identifies the duplication.
File Format: Choose the file format for a Disk-to-File duplication.
•
DD - raw binary data: The source disk data are coded as an uncompressed bit-for-bit
replica of the raw sector content.
•
E01 - EnCase format: The source disk data are coded as a legacy EnCase evidence file.
This is the default setting.
•
Ex01 – EnCase 7 format: The source disk data are coded as an EnCase Version 7compatible evidence file.
File Size: The source segment size for a series of image files in a Disk-to-File duplication. The
default setting is 2 GB.
Error Granularity: The granularity of failed reads. The default setting is Exhaustive, which
attempts to recover data down to a single sector; otherwise, the TD3 only retries at a 64-sector
resolution.
Error Retry: The number of times to retry a failed read. The default setting is Retry once.
Verification: Enables verification of the generated image. The default setting is Off.
18
Tableau® TD3 Version 1.2 User's Guide
Duplicator Info
Duplicator Info provides the following system information:
•
•
TD3 F/W Version: Shows the current firmware version of the TD3. Firmware is installed on
the SD card located at the back of the unit.
TD3 Build ID: Shows the build identifier for this firmware.
TD3 Serial Number: Shows the TD3 unit's serial number.
IP Address: Shows the IP address of the TD3.
MAC Address: Shows the Media Access Control address on the TD3 network interface card.
iSCSI Initiator: Shows the iSCSI qualifiedn name (ION) for iSCSI targets exposed by the TD3.
Profile Management
Profile Management provides options for managing duplication profile information and privileges.
You can configure each profile with default settings. The TD3 administrator can set a default profile.
Profile Management includes the following options:
Change Current Profile: Tap to activate a duplication profile from the list of available profiles.
The factory default profile is Profile1. The default password for Profile1 is "password".
Lock/Unlock Current Profile: Tap to lock or unlock the active profile using its password. You
must unlock a profile before making changes to it. If you do not first unlock a profile to make
changes, you are prompted to unlock the profile with its password. If the profile is locked,
Unlock Current Profile displays; if it is unlocked, Lock Current Profile displays.
Change Profile Password: Tap to change the active profile's password. To change the
password, enter the old password and the new password. Reenter the new password for
confirmation.
Setting up the TD3
19
Change Profile Lock Timeout: Tap to set the profile lock timeout period to 15 minutes, 30
minutes, 1 hour, or when changing the profile. This time period determines how long a profile
remains unlocked before the TD3 automatically locks it. An unlocked profile can be changed
by any user with physical access to the TD3.
Admin Settings: Tap to make administrative changes to the TD3. Admin Settings includes
the following:
•
Change Default Profile: Tap to select the default duplication profile from the list of
available profiles.
•
Delete Profile: Tap to delete a profile from the profile list.
•
Add Profile: Tap to add a profile to the profile list.
20
Tableau® TD3 Version 1.2 User's Guide
•
Change Profile Password: Tap to change the password of the active profile. Tap the active
profile name for the list of inactive profiles. After selecting a profile, enter the
administrator password and new profile password. Reenter the new password for
confirmation.
•
Change Admin Password: Tap to change the administrator password. Enter the old
password and new password. Reenter the new password for confirmation.
Setting up the TD3
21
Updating TD3 Firmware
The TD3 loads its firmware from an SD card located on the back of the unit. When a TD3 firmware
update becomes available on the Tableau Web site, you can use Tableau's TD3 firmware installer for
Windows to update the SD card. The SD cards can be updated via TFU.
To remove the SD card, turn the TD3 power off, then firmly push the SD card inward and release. The
SD card pops out. Gently remove the card and store it safely.
Connecting Hard Disks
The following procedure provides the steps necessary for safely connecting hard disks to the TD3. This
procedure applies to typical 3.5" SATA and IDE hard disks.
To connect hard disks to the TD3:
1.
2.
3.
4.
5.
6.
7.
Connect the Tableau SATA Storage Module ("brick") to the bottom of the TD3 by sliding the
TD3 on top of the brick from left to right until it is securely connected.
On the back of the TD3, connect the TP4 power supply to the TD3 power input.
Using the appropriate line cord, plug your TD3 into an AC power source. The green DC
Power In LED indicates that power is available at the power connector.
Confirm that the TD3 power switch is Off (the Power LED will be Off).
For a SATA source disk connect the drive directly to the TD3 using the appropriate cable.
TC4-8-R2: SATA drive unified cable (connected to the SATA power port on the front
edge).
For an IDE hard disk, attach the TDPX5 expansion module to the left side of the TD3. Connect
the source disk with its signal cable to the TDPX5 signal input using the appropriate cable.
TC6-8 IDE signal cable (connected to the TDPX5 IDE Expansion Module on the left side).
TC2-8-R2 Hard disk power cable (connected to the power connector on the side of the
TDPX5 IDE Expansion Module on the left side).
Turn On the TD3 by pressing the TD3 power switch located on the front of the unit to the
lower left. The green Power LED indicates that the duplicator is turned On.
Note: When connecting an IDE source disk to the TD3, always connect the blue end of the IDE cable (TC6-2 or
TC6-8) to the TD3, and the black end to the hard disk. If using a cable not supplied by Tableau, ensure that the
colored stripe on the cable aligns with Pin #1 on the hard disk. Failure to do so can result in unreliable
communication between the hard disk and the TD3.
22
Tableau® TD3 Version 1.2 User's Guide
Connecting Notebook Hard Disks
To connect a 1.8" or 2.5" notebook hard disk, use the TC6-2 IDE signal cable in conjunction with one of
the following notebook adapters:
TDA5-18 1.8" notebook adapter
TDA5-25 2.5" notebook adapter
TDA5-ZIF 1.8" ZIF adapter and cables
•
TC20-3-2 ZIF cable for 0.2mm ZIF connectors
•
TC20-3-3 ZIF cable for 0.3mm ZIF connectors
Note: Use only the shorter TC6-2 (2") IDE cable when connecting a notebook drive adapter to the TD3. Do not use
the longer TC6-8 (8") IDE cable with notebook drive adapters. ZIF drives and some notebook drives require a very
short data path between the drive and the controller, so using anything except the 2" cable can result in unreliable
communication between the disk drive and the TD3.
Drive Detection
After initialization, the TD3 begins drive detection. Icons display on the left and right sides of the Main
Menu indicating the types of source and destination drives that have been recognized. Source drives
are shown on the left side of the screen and destination drives on the right. Depending on the type of
operation to be performed, a source or destination drive must be selected before an operation can be
performed. Operations that require a source drive require that a single source is selected if more than
one source drive is present. Similarly, operations that require a destination require that a single
destination be selected, if more than one destination is available. If there is only one source or
destination, it is automatically selected and used.
CHAPTER 3
Using the TD3
In This Chapter
Overview
Duplicate
Hash
Preconditions Checking
Verify
HPA/DCO Disable
Blank Check
Format
Accessing Ext2 and Ext4 Destination Partitions in Windows
Wipe
Logs
24
Tableau® TD3 Version 1.2 User's Guide
Overview
This chapter covers detailed procedures and information for using the TD3. It is organized according
to the TD3 module options structure to facilitate navigation.
Navigating TD3 Modules and Options
You can navigate the various modules and options of the TD3 by sliding the module list back and
forth and tapping the module icons. The following outline maps the TD3 module options structure.
Main Menu Screen
Duplicate
Settings
Examiner
Case ID
Case Notes
Duplication Type
Destination Dir (Disk-to-File only)
Image Dir Naming (Disk-to-File only)
Image File Naming (Disk-to-File only)
File format (Disk-to-File only)
File Size (Disk-to-File only)
Error Granularity
Error Retry
Verification
Hash
Settings
Examiner
Case ID
Case Notes
Error Granularity
Error Retry
Verify
Settings
Examiner
Case ID
Case Notes
Path
HPA/DCO Disable
Blank Check
Format
Settings
Partition Table
Filesystem
Using the TD3
Wipe
Settings
Examiner
Case ID
Case Notes
Disk
Wipe Mode
Verification Mode
Logs
Save All
Settings
System Settings
Start Screen
Network
24-Hour Time
Date & Time
Brightness
Factory Reset
Duplication Settings
Examiner
Case ID
Case Notes
Duplication Type
Destination Dir (Disk-to-File only)
Image Dir Naming (Disk-to-File only)
Image File Naming (Disk-to-File only)
File Format (Disk-to-File only)
File Size (Disk-to-File only)
Error Granularity
Error Retry
Verification
Duplicator Info
Profile Management
Change Current Profile
Unlock Current Profile
Change Profile Password
Change Profile Lock Timeout
On change of profile
Admin Settings
Change Current Profile
Change Default Profile
Delete Profile
Add Profile
Change Profile Password
Change Admin Password
25
26
Tableau® TD3 Version 1.2 User's Guide
Duplicate
The TD3 duplicates hard disks by either cloning or imaging them.
Disk-To-Disk/Cloning
Cloning, also known as disk-to-disk duplication, is the process of copying a source disk, sector by
sector, to a destination disk. Source disk sector zero (first sector) is copied to destination disk sector
zero, then sector one is copied to sector one, and so on.
The TD3 allows cloning only if the destination disk is the same size as or larger than the source drive.
If the destination disk is larger than the source disk, you are prompted to select whether the
destination disk should be resized with a DCO command to match the size of the source disk. This is
caused by certain data being expected to be a fixed distance away from the end of the drive. Without
this feature some drives may not function as intended when the destination disk is even slightly larger
than the source. This process is also known as “clipping.”
Disk-To-File Duplication/Imaging
Imaging, also known as disk-to-file duplication, is the process of copying a source disk to a series of
files on destination disks.
If a destination disk already has an acceptable format, the TD3 uses that format, otherwise you must
format the destination disk. To perform disk-to-file duplication:
1.
2.
Follow the steps listed in Connecting Hard Disks on page 21 and turn the TD3 on.
From the Main Menu screen, tap Duplicate. The Duplicate screen displays.
Using the TD3
3.
Tap the Settings button. The Duplication Settings screen displays.
4.
Specify the following:
•
Examiner
•
Case ID
•
Case Notes
•
Duplication Type = Disk-to-File
•
Destination (default is Brick)
•
Destination Dir(ectory)
•
Image Dir Naming
•
Image File Naming
•
File Format
•
File Size
•
Error Granularity
•
Error Retry
•
Verification
Tap the Back button. The Duplicate screen displays.
5.
27
28
Tableau® TD3 Version 1.2 User's Guide
6.
Tap the Duplicate button. The Duplication Status screen displays and imaging begins. To
abort the process, press the Cancel button.
7.
When disk duplication is complete, tap the View Log button to Print or Save the log.
Using the TD3
29
Files Created During Disk-to-File Duplication
When performing disk-to-file duplication or imaging, the TD3 creates files on the destination hard
disk that contain the data copied from the source hard disk. Each of these files is called a segment.
Segments are written to the destination disk according to the following convention:
(root dir)/
[directory name]/
[filename].E01
[filename].E02
…
[filename].E99
yyyy-mm-dd hh-mm-ss_nnnnn_TTTTT.LOG
[directory name] is the name generated by the TD3 for each separate acquisition.
The [directory name] can be auto-generated by the TD3 or you can enter it yourself. Autogenerated names can be based on the date/time, the serial number of the source device, or the model
and serial number of the source device. The [filename] can also be auto-generated, or you can
choose to set it to a constant value.
[filename].001 is the first segment or portion of the data copied from the source disk. The segment
size is a user-settable option and may also be specified in the Settings > Duplication Settings > File
Size screen.
When creating a DD image, you can also specify .DMG naming for segments. DMG file extension can
be specified by selecting Main Menu > Settings > Duplication Settings > File Extension Setting.
.DMG refers to a file naming convention used by Apple operating systems. If the .DMG naming option
is selected, the first segment is named [filename].DMG instead of [filename].001. All other
segments have standard segment names (for example, [filename].002, [filename].003, and so
on).
A .LOG file is generated by the TD3 for each disk-to-file acquisition. yyyy-mm-dd hh-mm-ss is the
duplication task start date/time. The next five characters – nnnnn – are generated from the internal log
ID number assigned to the log by the TD3. The TTTTT in the filename refers to the type of task as
listed in the following table.
Label
Type of Log Entry/Task
clone
Disk-to-Disk Duplication
image
Disk-to-File Duplication
verify
Verify Disk Image
format
Disk Formatting (destination only)
hash
Disk Hashing (source only)
wipe
Disk Wiping (destination only)
30
Tableau® TD3 Version 1.2 User's Guide
Disk-to-Disk/Cloning
During disk-to-disk duplication, the contents of the subject disk are copied to the destination, sectorfor-sector. If a destination disk is not blank, the TD3 prompts for confirmation to overwrite the
contents of the destination disk. This reduces the risk of overwriting valuable data. The following
steps describe how to perform a disk-to-disk duplication.
1.
2.
Follow the steps listed in Connecting Hard Disks on page 21 and turn the TD3 On.
From the Main Menu screen, tap Duplicate. The Duplicate screen displays.
3.
Tap the Settings button. The Duplication Settings screen displays.
4.
Specify the following:
•
Examiner
•
Case ID
•
Case Notes
•
Duplication Type = Disk-to-Disk
•
Destination Dir
•
Image Dir Naming
•
Image File Naming
•
File Format
•
File Size
•
Error Granularity
•
Error Retry
•
Verification
Using the TD3
5.
6.
Tap the Back button. The Duplicate screen displays.
Tap the Duplicate button. The Duplication Status screen displays and imaging begins. To
abort the process, press the Cancel button.
7.
When disk duplication is complete, tap the View Log button to Print or Save the log.
31
32
Tableau® TD3 Version 1.2 User's Guide
Hash
Forensic practitioners may need to calculate the hash values, or fingerprints, for a source disk without
making a copy of the disk. The TD3 Hash module generates MD5 and SHA-1 hash values for a source
disk.
To calculate hash values for a source disk, tap the Hash icon from the Main Menu screen, and in the
Hash screen, tap the Hash button.
You can cancel the hashing operation at any time by tapping the Cancel button.
If the source disk has an HPA-protected region, the TD3 automatically disables the HPA before
performing the hash calculation. The TD3 functions the same way during duplication. If you compare
the hash values produced when duplicating a disk and when using the Hash module, the results
should be the same.
When the hashing operation is finished, tap the View Log button to view the MD5 and SHA-1 hash
results at the bottom of the log.
Using the TD3
33
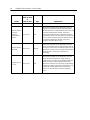
Preconditions Checking
Before starting a Disk-to-Disk or Disk-to-File duplication, the TD3 automatically checks for a number
of preconditions. Some preconditions are warnings, and you can choose to continue or cancel after
viewing each one. Some preconditions are fatal and require that the duplication process be aborted.
One condition pauses the process and prompts you to intervene.
The following table summarizes the preconditions checked by the TD3 prior to duplication.
Name
Disk-to-Disk
or
Disk-to-File
Type
Explanation
Reports that HPA is in use on the source disk.
Source Disk HPA
Both
Warning
Note: The TD3 automatically removes HPA on the
source disk. This warning serves to notify you that an
HPA was present on the source disk.
Reports that DCO is in use on the source disk.
Source Disk DCO Both
Warning
The TD3 does not automatically remove DCO on the
source disk. Removing DCO requires a permanent
modification of the source disk. You can cancel the
duplication and manually remove the DCO using the
HPA/DCO Removal module on the Main Menu
screen.
Reports that either HPA or DCO is in use on the
destination disk.
Destination Disk
HPA or DCO
Destination Disk
Too Small
Source Disk May
Be Blank
Destination Disk
Is Not Blank
Both
Disk-to-Disk
Both
Disk-to-Disk
Warning
The TD3 does not automatically remove HPA or DCO
on the destination disk. This warning serves to notify
you that the duplicator will not be using the total size
of the destination disk.
Warning
If the source disk is larger than the destination, you
may opt either to duplicate the portion of the source
disk that will fit on the destination or to cancel the
duplication.
Warning
The TD3 checks selected sectors on the source disk
looking for non-blank data patterns. If all of the
checked sectors appear to be blank, the TD3 warns
that the source may be blank. This does not mean
that the source is blank, but it could mean that either
the source has been partially wiped or an ATA
password has been set for the source drive.
Warning
The TD3 checks selected sectors on the destination
disk looking for non-blank data patterns. If the
destination disk is not blank, it could be
unintentionally overwritten. This warning provides the
34
Tableau® TD3 Version 1.2 User's Guide
Name
Disk-to-Disk
or
Disk-to-File
Type
Explanation
opportunity to abort the duplication.
Destination Disk
Does Not
Contain A
Supported File
System
Destination Disk
Too Small
Image directory
in in use.
Disk-to-File
Disk-to-File
Disk-to-File
Fatal
When performing disk-to-file duplication, the TD3
requires a supported file system. If the destination
disk already contains a supported file system, the TD3
proceeds with duplication without overwriting
existing files. If the destination disk does not have a
supported file system, the TD3 aborts the duplication.
You may either manually switch the destination disk
or format the destination disk with the Format
module on the Main Menu screen.
Warning
When performing disk-to-file duplication, the TD3
checks the available space on the destination disk. If
the content of the source exceeds the capacity of the
destination, the TD3 issues a warning and provides an
option for either canceling the duplication or
proceeding.
Fatal
When performing disk-to-file duplication, the TD3
checks whether the destination image directory
already exists on the disk. If the intended duplication
would overwrite an existing image directory, the
duplication is aborted. You may either go to Settings
and specify a different directory for duplication or go
to Duplication Settings and remove the existing
directory in the Destination Directory navigation
screen.
Using the TD3
35
Verify
The Verify module verifies the integrity of a legacy image file. The following procedure provides the
steps for verifying an image file on a destination disk.
1.
In the Main Menu screen, navigate to Verify > Settings.
2.
Specify the source and path of the image file you want to verify and navigate back to the
Image Verify screen.
Tap the Verify button. The Verify Status screen displays.
3.
36
Tableau® TD3 Version 1.2 User's Guide
4.
When image verification is complete, click the View Log button.
HPA/DCO Disable
The TD3 automatically detects the use of the ATA HPA (host protected area) and DCO (device
configuration overlay) feature sets. Both HPA and DCO feature sets can be used to reduce the
apparent capacity of a hard disk. From a forensic point of view it is valuable to know if HPA or DCO
are in use. With that knowledge, the forensic practitioner can make an informed decision about
whether or not to acquire data in the hidden regions of the drive.
You can disable HPA without making a permanent modification to the drive, so the TD3 automatically
disables HPA on any hard disk connected to the source side of the duplicator. It is not, however,
possible to disable DCO without making a permanent modification to the hard disk. For this reason,
the TD3 does not automatically disable DCO on the source hard disk.
The TD3 never makes automatic changes to HPA and DCO on a destination hard disk. The TD3 is
designed to give the forensic practitioner complete control over the destination hard disk. If you
choose to restrict the destination drive capacity using HPA or DCO, the TD3 will not override that
decision.
The options within the HPA and DCO Removal screen allow you to permanently disable the DCO and
HPA on the source hard disk under user control. You can access this module by tapping HPA/DCO
Disable in the Main Menu screen.
Remove DCO & HPA
You cannot remove a DCO-protected region on a hard disk without also removing any HPA-protected
region. If you want to permanently remove both the HPA and DCO on either the source or destination
hard disk, use this option.
Using the TD3
37
Blank Check
The Blank Check module does a quick blank check on the source drive.
To do a blank check, tap the Blank Check icon in the Main Menu screen and tap the Blank Check
button. This performs a quick check to determine if the selected disk appears to be blank. When
performing a Blank Check, the TD3 reads sectors in the Master Boot Record, the Primary GPT, and the
Secondary GPT. A sector is considered to be blank if it contains only a repeating pattern such as 00h,
E5h, or FFh. Any non-repeating pattern is considered to be non-blank. If all sectors read by the TD3
have repeating patterns (though not necessarily the same repeating pattern), the TD3 concludes the
drive may be blank.
A Blank Check is not an exhaustive check of the entire drive. It is possible for a drive to appear to be
blank according to the quick check while still storing forensically relevant information. A forensic
examiner should treat blank source disks with some suspicion and use other tools, like a Tableau write
blocker, to examine the drive to see if it contains forensically relevant information.
38
Tableau® TD3 Version 1.2 User's Guide
Format
When using disk-to-file imaging, the destination drive must be formatted with a file system that is
recognizable by the TD3. Currently, the TD3 supports destination disks that are formatted as ext4,
ext2, or exFAT. Use of ext4 is recommended for best performance, while exFAT is recommended for
ease of accessing image files with Microsoft Windows. USB drives connected to the read/write port on
the right side of the TD3 may be formatted with ext2, ext4 or exFAT.
From the Format menu you can manually format either the destination disk or a USB mass storage
device attached to the right-side USB port.
1.
2.
3.
In the Main Menu screen, navigate to Format > Settings.
Specify settings for Partition Table, and Filesystem.
Navigate back to the Format screen and tap the Format button. The formatting task begins.
Using the TD3
39
Accessing ext2 and ext4 Destination Partitions in Windows
One method of accessing the evidence files written to the destination drive is by connecting the
destination drive to a host computer using a Tableau write blocker. Microsoft Windows does not
natively support ext partitions. Therefore, a third-party driver must be used when accessing the files
on a destination drive which has an ext3 or ext4 partition, created using disk-to-file imaging on the
TD3.
This section describes how to use a free, open-source application and driver called Ext2FSD to mount
the ext2 or ext4 TD3 evidence drive from Windows.
You can download the application and driver from the Ext2Fsd Project site:
http://sourceforge.net/projects/ext2fsd/files/Ext2fsd/0.51/
Prerequisites, Assumptions, and Limitations
You have successfully created E01, Ex01, or RAW/DD images on the evidence storage drive
using the TD3.
The TD3 does not contain any error messages (reader threads, read errors, or write errors) in
the logs or the display.
You have a Windows XP or higher forensic computer and have successfully installed Ext2FSD
v0.51 (or higher).
You have a secondary hard drive that is Windows compatible and formatted as FAT32,
exFAT, or NTFS.
The secondary storage drive has enough space to store all the evidence files currently on the
TD3 ext2 or ext 4 evidence drive.
If using a FAT32 formatted secondary drive, the file size limit is 2000 MB or 2 GB per file. If
the TD3 was configured to write segments (RAW, DD, E01, or Ex01) larger than 2 GB, you
must choose a different format.
This method is recommended only for copying the files to a physical Windows compatible
secondary hard drive, not for running EnCase against the mounted ext2 or ext4 TD3 evidence
drive itself. Guidance Software recommends testing these processes first, before using them on
live evidence.
40
Tableau® TD3 Version 1.2 User's Guide
Procedure for Mounting ext Volumes
Because Ext2FSD v0.51 can parse ext2, ext3, and ext4 partitions, it can be used to view the files as long
as Windows can see the physical disk of the TD3 evidence drive. You can browse to the mounted ext
partition in Windows and copy the evidence files directly to a Windows compatible evidence drive.
1.
2.
Connect the TD3 ext2 or ext4 evidence drive to the forensic machine using a write-blocker
(optional, but recommended).
If Windows asks to format the drive, click No or Cancel.
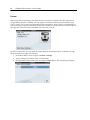
3.
Confirm that Windows can see the physical drive in Drive Management.
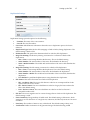
Using the TD3
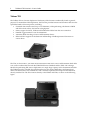
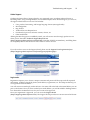
4.
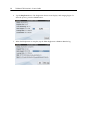
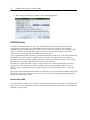
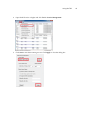
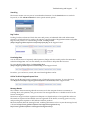
Open Ext2FSD v0.51 or higher and click Tools > Service Management.
5.
Click Start to start the mounting service. Click Apply to close the dialog box.
41
42
Tableau® TD3 Version 1.2 User's Guide
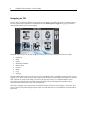
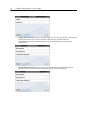
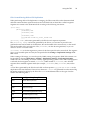
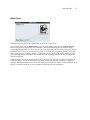
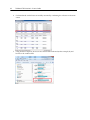
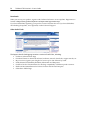
6.
Confirm that the ext has been successfully mounted by confirming the volumes on the main
screen.
7.
Using Windows Explorer, browse to the volume letter indicated (in this example, H) and
browse to the evidence files.
Using the TD3
43
Wipe
You may want to wipe the destination disk before use, especially when doing disk-to-disk cloning.
The TD3 gives you two options to wipe a destination disk: you can perform a fast, one-pass wipe or a
multi-pass wipe.
1.
2.
Follow the steps listed in Connecting Hard Disks on page 21 and turn the TD3 ON. No source
disk is necessary.
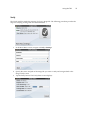
From the Main Menu screen, navigate to Wipe > Settings.
44
Tableau® TD3 Version 1.2 User's Guide
3.
Specify settings for Wipe Mode and Verification Mode:
4.
Navigate back to the Wipe Settings screen and tap the Wipe button. The Wipe Status screen
displays.
Using the TD3
45
Logs
Whenever the TD3 performs an operation of forensic relevance, it creates a log entry to record that
operation. The TD3 has internal flash memory with the capacity to store very large numbers of logged
operations. The Logs module lets you view, print, save, and erase log entries.
Viewing Logs
Tapping Logs from in the Main Menu screen displays a list of the logs currently recorded in the TD3
internal flash memory. The most recent log entry is displayed at the top of this list with the oldest log
entry at the bottom (end) of the list. Log entries are displayed as shown below:
The first part of the line specifies the type of entry. The second part specifies the day, date, and time.
The last part specifies the result of the logged operation.
46
Tableau® TD3 Version 1.2 User's Guide
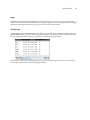
Sample Log
The TD3 maintains detailed logs for each task initiated by the user. Here is a sample of an error-free
log for a Disk-to-File acquisition.
-----------------------------Start of TD3 Log Entry----------------------------Task: Disk Image
Status: Ok
Created: Thu Dec 8 11:27:18 2011
Started: Thu Dec 8 11:27:18 2011
Closed: Thu Dec 8 11:46:31 2011
Elapsed: 19 min
User: <<not entered>>
Case ID: <<not entered>>
Case Notes: <<not entered>>
Imager App: TD3
Imager Ver: Preview Release
------------------------------Source Disk------------------------------Interface: SATA
Model: WDC WD740GD-00FLA2
Firmware revision: 31.08F31
Serial number: WD-WMAKE1826691
Capacity in bytes: 74,355,769,344 (74.3 GB)
Block Size: 512 bytes
Block Count: 145,226,112
Power-ON Block Count: 145,226,112
HPA Block Count: 145,226,112
DCO Block Count: 145,226,112
--------------------------Disk Imaging Results-------------------------Output file format: dd/raw
Destination filename convention: Default
Chunk size in bytes: 0 (0 bytes)
Chunks written: 1
Filename of first chunk: 2011-12-08_11-27-18/image.001
Total errors: 0
Acquisition MD5:
3a16235739236d13bc67c6edc3f6dd1f
Acquisition SHA-1: b1ba2b21b8874fce0e6c5f7aa5bca0c714c61721
------------------------------End of TD3 Log Entry------------------------------
If the TD3 detected any bad sectors on the source drive, it would have added a section at the end of the
TD3 log. This additional section would list the sector address and sector length of each unreadable
region of the source disk.
Using the TD3
47
Saving Logs
You can save all logs to a USB storage device connected to the right-side USB port. After connecting a
USB storage device, tap the Save All button. Logs are saved in an ASCII text format. Use a text editor
to view the logs.
Writing Logs to a USB Storage Device
The TD3 can write logs to a USB storage device attached to the USB port on the right side of the TD3.
1.
2.
3.
4.
5.
To see the log list, from the Main Menu screen, tap Logs.
To save all logs in the log list, tap the Save All button, then the Browse button to specify a
path.
You can tap the New Folder button to use the TD3's stamps for date/time, serial number, or
model number. Use a keyboard or the touchscreen to enter a folder name manually.
After you have specified a path for your logs, tap OK to get back to the Save Logs screen.
Tap the Save Logs button to save all logs in the log list.
Printing Logs
You can print logs to a USB printer attached to one of the TD3 USB ports. After connecting a USB
printer to one of the TD3 USB ports, tap a log in the Log List and then tap the Print button.
The TD3 is compatible with USB printers which support the USB Printer Class Specification. The USB
printer must support raw ASCII printing.
Erasing Logs
You can erase logs by tapping a log in the Log List and then tapping the Erase button.
CHAPTER 4
Troubleshooting and Support
In This Chapter
Troubleshooting Common Problems
Support
50
Tableau® TD3 Version 1.2 User's Guide
Troubleshooting Common Problems
This section covers the following troubleshooting issues and solutions:
Power supply issues
Problems with disk detection
Replacing the backup battery for the real-time clock
Power Supply Issues
The TP4 power supply provided with the TD3 is a 24-volt (16V-28V) power supply that uses a barrel
connector to interface with the TD3. It is capable of powering the TD3 and nearly all combinations of
one, two, or three hard disks. The TD3 also employs staggered power sequencing for the source and
destination hard disks. With staggered sequencing, power is first provided to one hard disk as it spins
up, then to the second hard disk as it spins up, and finally to the third hard disk. It is normal to hear
the source and destination drives spin up separately.
During power-On initialization and self-test, the TD3 checks the output voltages of the TP4 power
supply. If the voltage is below the minimum specification, the TD3 displays an on-screen warning.
There is a green DC power LED on the rear edge of the TD3, next to the female DC power barrel
connector. If the TP4 power supply is connected properly to the TD3 and to AC power, the green LED
illuminates. If you are having difficulty turning the TD3 On, check the status of the DC power LED to
ensure that the TD3 is receiving power from the TP4 power supply.
Problems with Disk Detection
When using a product like the TD3, the most common problem which users may encounter is a failure
to achieve drive detection. Most drive detection problems are the result of improper cabling. The
following table lists the most common drive detection problems and corrective actions.
Problem
Corrective Action
Hard disk does not spin up.
Check the power connection between the TD3 and the hard
disk. Be especially careful to ensure that the 4-pin power
connectors are properly seated in the connectors on the TD3
and on the hard disk (if using cable model TC2-8). The blue
connectors should be fully inserted, not loose, in the TD3 and
hard disk.
TD3 does not detect IDE hard disk.
IDE hard disks should be set for Master or Single Drive.
TD3 does not detect 3.5" IDE hard disk.
Typical 3.5" IDE hard disks can be connected to the TD3 using
either the 8" TC6-8 IDE cable or the 2" TC6-2 cable. In either
case, the blue end of the IDE cable must be connected to the
TD3.
You must not use an IDE cable longer than 8" with the TD3.
Always use the Tableau-provided, high-quality, 80-conductor
TC6-8 or TC6-2 cable.
TD3 does not detect notebook IDE hard
When using one of the notebook drive adapters provided with
Troubleshooting and Support
Problem
disk.
51
Corrective Action
the TD3 (model TDA5-18, TDA5-25, or TDA5-ZIF), you must
always use the 2" TC6-2 IDE cable. When using a notebook
drive adapter, do not use the 8" TC6-8 IDE cable or any nonTableau IDE cable.
When using notebook drive adapters, the blue end of the TC6-2
IDE cable must be connected to the TD3, and the black end of
the cable must be connected to the notebook drive adapter.
TD3 does not detect ZIF-style notebook
IDE hard disk.
There are several models of ZIF hard disks. When using the
TDA5-ZIF kit provided with the TD3, refer to the Support pages
on Tableau's Web site for documentation regarding the
proper selection and orientation of ZIF cables.
TD3 does not detect SATA hard disk.
Use only the 8" TC3-8 SATA cable provided by Tableau. With
some SATA hard disks, the SATA connector may be loose.
Ensure that the TC3-8 cable is seated properly in the hard disk's
SATA connector.
Tableau has tested the TD3 with an extensive in-house library of different hard disks spanning many
years of hard disk development, but there may be compatibility issues with some hard disks. Tableau
issues firmware updates to address most compatibility issues. If your hard disk is not recognized by
the TD3, check the Support pages on www.tableau.com OR “Tableau’s website” to see if any
firmware updates are available for the TD3.
Replacing the Backup Battery for the Real-time Clock
The TD3 uses a real-time clock (RTC) with a backup battery. The battery has a shelf life of 12-18
months. If you use the TD3 regularly, expect the battery to last longer than 18 months. As the battery
discharges, the TD3 displays a low battery warning message.
This section provides an illustrated procedure for replacing the RTC backup battery.
Compatible Batteries
The TD3 uses an ANSI/NEDA type 5012LC battery. The following table lists several common batteries
compatible with this type.
Manufacturer
Model #
Maxell
LR1130
Energizer
189
52
Tableau® TD3 Version 1.2 User's Guide
Opening the TD3
It is necessary to open the TD3 case to replace the battery. You need a #1 Phillips screwdriver to open
the TD3 case and a small flat-blade screwdriver to remove the battery.
The following procedure provides the steps for opening the TD3.
1.
2.
3.
4.
5.
6.
Disconnect the power supply and all cables from the TD3 before opening the TD3 case. Never
connect the power supply or operate the TD3 when the case is open.
Remove the SD card from the rear of the TD3.
Turn the TD3 upside down on a clean work surface.
Remove the four case screws and set them aside. The SATA connector on the bottom of the
TD3 is a tight fit. This prevents you from lifting the rear half of the case in a straight direction.
Carefully lift the rear half of the plastic case away from the TD3 pulling it toward you, while
gently pressing down on the SATA connector. Keep the TD3 secure on your work surface.
Lifting or tilting the TD3 might move the main circuit board, loosen a connector, and cause a
system failure.
Carefully set the rear half of the TD3 case aside.
Replacing the Battery
1.
2.
Using the flat-blade screwdriver, pry the battery gently from the battery holder.
Using a compatible battery, replace the RTC backup battery. For a list of compatible batteries,
see Compatible Batteries.
Note: Make sure the positive terminal of the battery is facing upward.
Closing the TD3
To replace the TD3 case:
1.
2.
3.
Gently lower the rear case into position, pay particular attention to the SATA connector on the
circuit board connected to the main PCB. Tilt the bottom edge of the rear case into position.
Ensure that the case and main circuit board are aligned and replace the four case screws. The
four screws that hold the TD3 case together also secure the main circuit board.
After replacing the four case screws, inspect the TD3 and determine whether the case is tightly
secured.
Testing the New Battery
After you have securely fastened the TD3 case, return it to its normal upright position and attach just
the TP4 power supply. Turn the TD3 On and observe the startup sequence. You should not see a
battery warning dialog, but you will probably see a date/time warning to reset the RTC.
To reset the date/time, from the TD3 Main Menu, select Settings > System Settings > Date and Time.
After resetting the date/time, turn the TD3 Off, wait two minutes, then turn the TD3 On. The time,
located in the upper-right corner of the display, should be correct.
Troubleshooting and Support
53
Support
Guidance Software develops solutions that search, identify, recover, and deliver digital information in
a forensically sound and cost effective manner. Since our founding in 1997, we have moved into
network enabled investigations and enterprise-wide integration with other security technologies.
This section provides information on our support for you through:
Technical Support
Online Support Portal
Professional Services
Training
Technical Support
Support for your Tableau product is provided by the vendor who sold the device. Additional support
can also be found by visiting the support pages on the Tableau Web site at:
www.tableau.com/support
Here you will find answers to common questions, information regarding specific compatibility issues,
and firmware updates for the TD3 Forensic Imager.
If you purchased your device from Guidance Software, technical support is available 24 hours a day,
excluding weekends and holidays. All technical support inquiries are automatically routed to the open
US or UK office: 10 PM Sunday – 6 PM Friday, US Pacific time (6 AM Monday – 4 PM Friday, GMT).
Guidance Software offers several support options, including:
Live Chat
Support Request Forms
Email
Telephone
Live Chat
From the Guidance Software Support Portal, users can chat live with a Technical Services engineer.
From the Support Portal main page, select Live Chat to connect directly to an engineer.
Technical Support Request Forms
Please use the Online Request Form to request assistance from a Technical Services engineer. To access
the form, click Request Form (https://support.guidancesoftware.com/node/381) in the Support Portal.
Note that all fields are mandatory, and filling them out completely reduces the amount of time it takes
to resolve an issue.
54
Tableau® TD3 Version 1.2 User's Guide
Email
Although technical support is available by email, you will receive more thorough, quicker service
when you use the online Technical Support Request Form, available at:
(https://support.guidancesoftware.com/node/381).
To request assistance by email, send to [email protected]. Please include as
much detail as possible about the issue and the best way to contact you.
Telephone
Telephone technical support is available 24 hours a day, excluding weekends and holidays. All
technical support calls are automatically routed to the open US or UK office: 10 PM Sunday – 7 PM
Friday, US Pacific time (6 AM Monday – 3 AM Saturday, UK time).
US Office hours: Monday–Thursday 5 AM–10 PM Pacific time, Friday 5 AM–7 PM Pacific time.
Tel: (626) 229-9191, Option 4
Fax: (626) 229-9199
215 North Marengo Avenue, Suite 250
Pasadena, CA 91101
UK Office hours: Monday–Friday 6 AM–4 PM UK time.
Tel: +44 (0) 175-355-2252, Option 4
Fax: +44 (0) 175-355-2232
Thames Central, 5th Floor
Hatfield Road
Slough, Berkshire UK SL1 1QE
For your convenience, the following numbers have been provided to our English-based support:
Germany: 0-800-181-4625
China: 10-800-130-0976
Australia: 1-800-750-639
Hong Kong: 800-96-4635
New Zealand: 0-800-45-0523
Japan: 00-531-13-0890
Troubleshooting and Support
55
Online Support
Guidance Software offers a Support Portal to our registered users, providing technical forums, a
knowledge base, a bug tracking database, and an Online Request form. The Portal gives you access to
all support-related issues in one site. This includes:
User, product, beta testing, and foreign language forums (message boards)
Knowledge Base
Bug Tracker
Technical Services Request form
Downloads of previous software versions, drivers, etc.
Other useful links
Although technical support is available by email, you will receive more thorough, quicker service
when you use the online Technical Support Request Form
(https://support.guidancesoftware.com/node/381). Note that all fields are mandatory, and filling them
out completely reduces the amount of time it takes to resolve an issue.
If you do not have access to the Support Portal, please use the Support Portal registration form
(https://support.guidancesoftware.com/forum/register.php?do=signup).
Registration
Registration requires you to choose a unique username and password. Please provide all requested
information, including dongle ID, phone, email address, organization, etc. This helps us identify you
as a registered owner of EnCase.
You will receive an email reply within 24 hours. You must follow the link in that email before you can
post on the forums. Once you have verified your email address, you will be added to the Registration
List. Please allow 24 business hours for your account to be approved.
Once your registration is approved, you can access the Support Portal
(https://support.guidancesoftware.com/). The Support Portal provides an overview tutorial of the site.
56
Tableau® TD3 Version 1.2 User's Guide
User, Product, and Foreign Language Forums
To access the forums, click the Forum Tab (https://support.guidancesoftware.com/forum/) in the
Support Portal.
The forums allow registered users to post questions, exchange information, and hold discussions with
Guidance Software and other users in the EnCase community. Several discussion groups are available,
including:
Foreign Language Groups
French
Arabic
German
Spanish
Japanese
Chinese
Korean
Forum Groups
User Group
Consultant and Practitioner
Computer Forensic Hardware Issues
EnScript Forum
Product Specific Groups
EnCase Neutrino
Enterprise
Field Intelligence Model (FIM)
eDiscovery
These groups are available only to customers who have purchased the respective products.
Enter a group by clicking the group name.
Posting to a Group
To create a new post, click the
Click the
icon.
icon to reply to a post, or use the Quick Reply icon at the bottom of each post.
Troubleshooting and Support
57
Searching
The forums contain over ten years of accumulated information. Use the Search button to search for
keywords, or click Advanced Search for more specific search options.
Bug Tracker
Use Bug Tracker to submit and check the status and priority of submitted defect and enhancement
requests. It is broken down by product, showing the current number of bugs/enhancements and public
bugs for each product. To access the Bug Tracker, click Bug Tracker
(https://support.guidancesoftware.com/forum/project.php) in the Support Portal.
Knowledge Base
You can find answers to frequently asked questions (FAQs) and other useful product documentation
in the Knowledge Base. You can also submit your own articles to help other EnCase users.
To access the Knowledge Base, click Knowledge Base
(https://support.guidancesoftware.com/directory) in the Support Portal.
From here, you can browse, search, and write Knowledge Base articles.
Online Technical Support Request Form
Please use the Request Form for assistance from a Technical Services engineer. To access the form,
click Request Form (https://support.guidancesoftware.com/node/381) in the Support Portal.
Message Boards
The Guidance Software message boards are resources for the computer forensics community to
exchange ideas, ask questions, and give answers. The message boards are a valuable resource for the
forensic investigator.
Discussions range from basic acquisition techniques to in-depth analysis of encrypted files and more.
Thousands of experienced and skilled users are registered on the boards, reviewing posts every day,
and providing their expertise on all Guidance Software products.
More information about the message boards, including information on how to join the message board,
is located at http://www.guidancesoftware.com/support/messageboards.asp
http://www.//guidancesoftware.com/support/messageboards.asp.
58
Tableau® TD3 Version 1.2 User's Guide
Downloads
When you receive your product, register with Guidance Software to receive updates. Registration is
located at https://www.guidancesoftware.com/myaccount/registration.aspx.
If you have difficulties registering your product, contact Customer Service. If you have difficulties
downloading the updates, once registered, contact Technical Support.
Other Useful Links
The Support Portal's landing page contains a section of useful links, including:
Guidance Software Home Page
Download Center to download software, hardware, manuals, boot disks, support articles, etc.
My Account to register your dongle id to receive up to date software by email
NVD (National Vulnerability Database) Information and Responses
Guidance Product Version Matrix for checking compatibility of different product versions
Hardware Recommendations for EnCase Forensic and EnCase Enterprise
Subscribe to Public Bugs
Troubleshooting and Support
59
Professional Services
The Guidance Software Professional Services Division (PSD) combines world-leading computer
investigation experts with world-leading forensic technology to deliver turnkey solutions to forensic
investigations.
Guidance Software has combined its industry-leading computer investigation technology with a team
of the most highly trained and capable investigators in the world to bring you complete turnkey
solutions for your business. When you face investigative issues that go beyond your internal
capabilities, our professional services group is able to respond either remotely or by coming on site to
provide the right technology and computer investigation personnel for the job.
Internal Investigations
Theft of intellectual property
Intrusion reconstruction
Wrongful termination suit
Compliance
Sarbanes-Oxley
PII risk assessment
California SB 1386
eDiscovery
Pending litigation
Responsive production
Forensic preservation
Information Security
Compromise of system integrity
Policy review
Unauthorized use
Forensic lab implementation
Training
Guidance Software offers a variety of professional courses for the beginner, intermediate, and
advanced user of all its applications. In addition to providing a solid grounding in our software, we
also provide our students with accepted best practices for investigation, report generation and
evidence preservation.
Guidance Software offers courses for law enforcement agencies, organizations concerned with
forensics and incident response, and gives training in advanced topics for all users.
Information about all Guidance Software training offerings is available at:
http://www.guidancesoftware.com/computer-forensics-training.htm.
Index
A
F
About this Guide • 3
Files Created During Disk-to-File Duplication • 29
Accessing Ext2 and Ext4 Destination Partitions in
Windows • 39
Format • 38
B
Blank Check • 37
C
Closing the TD3 • 52
Compatible Batteries • 51
Configuring the TD3 • 10
Connecting Hard Disks • 21
H
Hash • 32
HPA/DCO Disable • 36
I
ISCSI • 12
iSCSI Discover • 13
L
Live Chat • 53
Connecting Notebook Hard Disks • 22
Logs • 45
D
Disk Capacity and Transfer Rate Measurement
Conventions • 3
N
Navigating TD3 Modules and Options • 24
Disk-to-Disk/Cloning • 30
Navigating the TD3 • 6
Disk-To-File Duplication/Imaging • 26
Network Settings • 11
Drive Detection • 22
O
Duplicate • 26
Online Support • 55
Duplication Settings • 17
Opening the TD3 • 52
Duplicator Info • 18
Overview • 1, 24
E
Email • 54
Erasing Logs • 47
P
T
Power Supply Issues • 50
Tableau TD3 • 2
Preconditions Checking • 33
TD3 Kit Contents • 3
Preface • 3
Technical Support • 53
Prerequisites, Assumptions, and Limitations • 39
Technical Support Request Forms • 53
Printing Logs • 47
Telephone • 54
Problems with Disk Detection • 50
Testing the New Battery • 52
Procedure for Mounting Ext Volumes • 40
Training • 59
Professional Services • 59
Troubleshooting and Support • 49
Profile Management • 18
Troubleshooting Common Problems • 50
R
U
Reading the LEDs • 7
Updating TD3 Firmware • 21
Remove DCO & HPA • 36
USB Keyboard Support • 7
Replacing the Backup Battery for the Real-time
Clock • 51
Using the TD3 • 23
Replacing the Battery • 52
V
Verify • 35
S
Viewing Logs • 45
Sample Log • 46
Saving Logs • 47
W
Wipe • 43
Setting up the TD3 • 9
Writing Logs to a USB Storage Device • 47
Settings • 10
Startup Sequence • 10
Support • 53
System Settings • 11