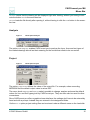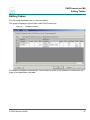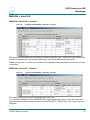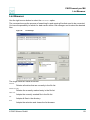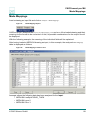
1
for Windows
Version M4 4.0
User Guide
CADConvert pro
www.cad-schroer.com
All rights reserved. No part of this documentation may be reproduced in any manner (print, photocopy or other) without the written
permission of CAD Schroer GmbH.
CAD Schroer GmbH has made its best effort to ensure that the information in this document is accurate and reliable, but cannot
guarantee the accuracy, timeliness, reliability or completeness of any of the information contained herein. CAD Schroer GmbH
will not make any warranty nor accept legal responsibility or liability of any kind for consequences resulting from errors or omissions.
Registered Trademarks of CAD Schroer GmbH:
MEDUSA, STHENO
Trademarks of CAD Schroer GmbH:
MEDUSA4, STHENO/PRO, MEDEA, MPDS
Third-Party Products and Trademarks:
Pro/ENGINEER, Pro/DETAIL and Pro/TOOLKIT are registered trademarks of Parametric Technology Corporation.
All other brand or product names are trademarks or registered trademarks of their respective owners.
February 2010
Copyright © CAD Schroer GmbH
Fritz-Peters-Str. 26 - 30
D - 47447 Moers
Germany
France
Italy
CAD Schroer GmbH
Fritz-Peters-Str. 26-30
47447 Moers
CAD Schroer France SAS
17, Rue du Docteur Lebel
94300 Vincennes
CAD Schroer Italia S.R.L.
Via Piave, 1/E
20030 Senago (MI)
Tel. +49 2841 91 84 - 0
Fax +49 2841 91 84 - 44
e-mail: [email protected]
www.cad-schroer.de
Tel. +33 1 41 94 51 40
Fax +33 1 43 77 17 68
e-mail: [email protected]
www.cad-schroer.fr
Tel.: +39 02-38303267
Fax: +39 02-33303399
e-mail: [email protected]
www.cad-schroer.it
Switzerland
United Kingdom
USA
CAD Schroer AG
Bettlistr. 35
8600 Dübendorf
CAD Schroer UK Ltd
39 Newnham Road
Cambridge
CB3 9EY
CAD Schroer US, Inc.
34 Rand Place
Pittsford, NY 14534
Tel. +41 44 802 89 - 80
Fax +41 44 802 89 - 88
e-mail: [email protected]
www.cad-schroer.ch
Tel. +44 1223 460 408
Fax +44 1223 460 409
e-mail: [email protected]
www.cad-schroer.co.uk
Tel: +1 866-SCHROER (866-724-7637)
Fax: +1 866-724-1701
e-mail: [email protected]
www.cad-schroer.com
2
© CAD Schroer GmbH
CADConvert pro M4
TABLE OF CONTENTS
Preface
5
Introduction
7
About this Guide. . . . . . . . . . . . . . . . . . . . . . . . . . . . . . . . . . . . . . . . . . . . . . . . . . . . . . . . . . . 8
Description of the Product . . . . . . . . . . . . . . . . . . . . . . . . . . . . . . . . . . . . . . . . . . . . . . . . . . . 9
Installation . . . . . . . . . . . . . . . . . . . . . . . . . . . . . . . . . . . . . . . . . . . . . . . . . . . . . . . . . . . . . . 10
License. . . . . . . . . . . . . . . . . . . . . . . . . . . . . . . . . . . . . . . . . . . . . . . . . . . . . . . . . . . . . . . . . 10
Overview
User Interface. . . . . . . . . . . . . . . . . . . . . . . . . . . . . . . . . . . . . . . . . . . . . . . . . . . . . . . . . . . .
Menu Bar . . . . . . . . . . . . . . . . . . . . . . . . . . . . . . . . . . . . . . . . . . . . . . . . . . . . . . . . . . . . . . .
Navigation . . . . . . . . . . . . . . . . . . . . . . . . . . . . . . . . . . . . . . . . . . . . . . . . . . . . . . . . . . . . . .
File Path . . . . . . . . . . . . . . . . . . . . . . . . . . . . . . . . . . . . . . . . . . . . . . . . . . . . . . . . . . . . . . . .
In- /Output . . . . . . . . . . . . . . . . . . . . . . . . . . . . . . . . . . . . . . . . . . . . . . . . . . . . . . . . . . . . . .
Execute . . . . . . . . . . . . . . . . . . . . . . . . . . . . . . . . . . . . . . . . . . . . . . . . . . . . . . . . . . . . . . . .
First Steps
11
12
14
17
18
19
20
21
Loading Sheets . . . . . . . . . . . . . . . . . . . . . . . . . . . . . . . . . . . . . . . . . . . . . . . . . . . . . . . . . . 22
Converting Drawings into the Destination System . . . . . . . . . . . . . . . . . . . . . . . . . . . . . . . . 24
Settings
Overview . . . . . . . . . . . . . . . . . . . . . . . . . . . . . . . . . . . . . . . . . . . . . . . . . . . . . . . . . . . . . . .
Editing Tables . . . . . . . . . . . . . . . . . . . . . . . . . . . . . . . . . . . . . . . . . . . . . . . . . . . . . . . . . . .
Output Format . . . . . . . . . . . . . . . . . . . . . . . . . . . . . . . . . . . . . . . . . . . . . . . . . . . . . . . . . . .
Mappings . . . . . . . . . . . . . . . . . . . . . . . . . . . . . . . . . . . . . . . . . . . . . . . . . . . . . . . . . . . . . . .
Settings . . . . . . . . . . . . . . . . . . . . . . . . . . . . . . . . . . . . . . . . . . . . . . . . . . . . . . . . . . . . . . . .
Save as . . . . . . . . . . . . . . . . . . . . . . . . . . . . . . . . . . . . . . . . . . . . . . . . . . . . . . . . . . . . . . . .
© CAD Schroer GmbH
25
26
27
32
33
43
64
3
CADConvert pro M4
Table of Contents
Load . . . . . . . . . . . . . . . . . . . . . . . . . . . . . . . . . . . . . . . . . . . . . . . . . . . . . . . . . . . . . . . . . . 65
Medstyle . . . . . . . . . . . . . . . . . . . . . . . . . . . . . . . . . . . . . . . . . . . . . . . . . . . . . . . . . . . . . . . 66
The Mapping-Concept
67
The Mapping File . . . . . . . . . . . . . . . . . . . . . . . . . . . . . . . . . . . . . . . . . . . . . . . . . . . . . . . . 68
The "Transfer" Switch. . . . . . . . . . . . . . . . . . . . . . . . . . . . . . . . . . . . . . . . . . . . . . . . . . . . . 72
Processing of Drawings
73
Input . . . . . . . . . . . . . . . . . . . . . . . . . . . . . . . . . . . . . . . . . . . . . . . . . . . . . . . . . . . . . . . . . .
Execute . . . . . . . . . . . . . . . . . . . . . . . . . . . . . . . . . . . . . . . . . . . . . . . . . . . . . . . . . . . . . . .
Viewing. . . . . . . . . . . . . . . . . . . . . . . . . . . . . . . . . . . . . . . . . . . . . . . . . . . . . . . . . . . . . . . .
Output. . . . . . . . . . . . . . . . . . . . . . . . . . . . . . . . . . . . . . . . . . . . . . . . . . . . . . . . . . . . . . . . .
List Processing
74
76
77
80
81
Input . . . . . . . . . . . . . . . . . . . . . . . . . . . . . . . . . . . . . . . . . . . . . . . . . . . . . . . . . . . . . . . . . .
List Browser . . . . . . . . . . . . . . . . . . . . . . . . . . . . . . . . . . . . . . . . . . . . . . . . . . . . . . . . . . . .
Source Directory. . . . . . . . . . . . . . . . . . . . . . . . . . . . . . . . . . . . . . . . . . . . . . . . . . . . . . . . .
Starting the Conversion . . . . . . . . . . . . . . . . . . . . . . . . . . . . . . . . . . . . . . . . . . . . . . . . . . .
Analysis
82
83
84
85
87
Overview . . . . . . . . . . . . . . . . . . . . . . . . . . . . . . . . . . . . . . . . . . . . . . . . . . . . . . . . . . . . . .
Made Mappings . . . . . . . . . . . . . . . . . . . . . . . . . . . . . . . . . . . . . . . . . . . . . . . . . . . . . . . . .
Changing Default . . . . . . . . . . . . . . . . . . . . . . . . . . . . . . . . . . . . . . . . . . . . . . . . . . . . . . . .
Template File . . . . . . . . . . . . . . . . . . . . . . . . . . . . . . . . . . . . . . . . . . . . . . . . . . . . . . . . . . .
Help
88
89
92
94
95
The Help Pulldown Menu . . . . . . . . . . . . . . . . . . . . . . . . . . . . . . . . . . . . . . . . . . . . . . . . . .
About CADConvert pro. . . . . . . . . . . . . . . . . . . . . . . . . . . . . . . . . . . . . . . . . . . . . . . . . . . .
Documentation . . . . . . . . . . . . . . . . . . . . . . . . . . . . . . . . . . . . . . . . . . . . . . . . . . . . . . . . . .
Info about Project . . . . . . . . . . . . . . . . . . . . . . . . . . . . . . . . . . . . . . . . . . . . . . . . . . . . . . . .
96
97
98
99
Limitations
101
Index
103
4
© CAD Schroer GmbH
CADConvert pro M4
PREFACE
Book Conventions
The following table illustrates and explains conventions used in writing about CADConvert pro
applications.
Convention
Example
Explanation
Menu
Choose Zoom from the View menu
Add button
Choose the tool Creates thin solid lines.
Indicates a command, function or
button that you can choose from a
menu, dialog or tooltray.
Syntax
acos 0.345
The ciaddobj command
Return or Control-g
User input,
commands, keywords and
keys to press on a keyboard.
SyntaxBold
Enter command> plot_config
Where system output and user input
are mixed, user input is in bold.
SyntaxItalic
tar -cvf /dev/rst0 filename
Supply an appropriate substitute for
each variable; for the given example
replace filename with an actual file
name.
Filename&path
ccp\med2d\m2d\src\
Shows path and filenames.
italic
left mouse button
User Guide
Indicates the buttons to press on a
mouse and names of books.
bold
A temporary group is a collection of ...
Emphasize text.
© CAD Schroer GmbH
5
CADConvert pro M4
Online User Documentation (HTML)
Online documentation is provided in HTML format. You can view this online documentation in
the installation directory and directly by calling it up within the CADConvert pro user interface.
Installation Directory
1. Navigate to the directory where CADConvert pro is installed.
<CADConvert pro installation directory>\doc\<language>\
where <language> is either gb (English) or ger (German).
2. Click on the file ccp_main.html.
CADConvert pro Interface
1. Click left on the entry Help inside the main menu.
2. Choose CADConvert pro Documentation from the pulldown menu.
Your default HTML browser opens showing the ccp_main.html.
Printing Version of the Documentation (PDF)
A PDF (Portable Document Format) file is included for each online book. You must have
Acrobat Reader installed to view and print PDF files. If you don‘t have the Acrobat Reader, you
can download it for free from the Adobe homepage:
http://www.adobe.com/products/acrobat/readstep.html
For displaying the PDF file, follow these steps:
1. Navigate to the directory where CADConvert pro is installed.
<CADConvert pro installation directory>\doc\<language>\ (Windows)
where <language> is either gb (English) or ger (German).
2. Click on the file ccp.pdf.
The file will be displayed in your Acrobat Reader.
6
© CAD Schroer GmbH
CADConvert pro M4
INTRODUCTION
• About this Guide ........................................................................ 8
• Description of the Product.......................................................... 9
• Installation................................................................................ 10
• License..................................................................................... 10
© CAD Schroer GmbH
7
CADConvert pro M4
Introduction
About this Guide
This documentation will give you an overview for the CADConvert pro program, regarding it’s
functions and implementations. It will start with the installation of the program which will be done
fast and convenient using the InstallShield®Wizard.
The documentation describes the individual modules of CADConvert pro. Each module will be
explained and most of it will be pointed up by using an example.
The chapter ”First Steps” will make it really easy for you to learn the usage of the program and
convert drawings right away, even if you have never worked with this program before. The single procedures are explained with the help of samples.
Furthermore you will learn the advanced functions regarding the Settings, Mappings and
Analysis.
Basic knowledge of the operating system and the operating knowledge of PC’s are the prerequisite.
8
© CAD Schroer GmbH
CADConvert pro M4
Description of the Product
Description of the Product
CADConvert pro is based on a new, specially developed converter technology. This technology is also the base for the development of the new MEDUSA - DXF Interface.
But CADConvert pro goes another step further regarding the configuration, analysis and comfort of operating.
CADConvert pro is fault-tolerant.
The system is able to intercept faulty inputs within the Input data. Missing input parameters are
occupied with reasonable defaults.
CADConvert pro is open for adjustments.
There are different mapping possibilities for almost all elements in the DXF format. Each manufacturer decides a form for the mappings when writing their data for the system. This way each
CAD System generates a different DXF "dialect". That means that the conversion results of
DXF data from different source systems will differ, since all dialects have to be interpreted when
reading the DXF data.
All possible information of a source system will first be transferred in a high-capacity graphical
core by CADConvert pro. After that the allocation (mapping) of the different elements to the
possible elements of the source system, will be done for the optimal setting for the conversion.
In CADConvert pro the mapping is supported by the graphical menu prompt. The settings can
be saved. With the help of this function data for the conversion of different source systems or
different customers, will be saved and is recallable at anytime.
This documentation will help you to take advantage of the capability characteristics of CADConvert pro and to achieve the best possible results. On the basis of detailed graphics and instructions you will be advised of the individual menu items and commands.
After just a few sessions you will be able to adjust the optimal configurations fast, effective and
accurate.
© CAD Schroer GmbH
9
CADConvert pro M4
Introduction
Installation
The installation of CADConvert pro will be executed just like with any other Windows NT product. Please follow the steps below:
How to download the CADConvert pro installation file:
1. Start a web browser and open the homepage of CAD Schroer.
www.cad-schroer.com
2. Click left on the link Customer Portal.
A web page for entering user name and password opens.
3. Enter user name and password and click left on Login.
The customer portal web page opens.
4. Click left on the link Download Area.
The download area for CSG Solution products opens.
5. There click left on the Windows link below MEDUSA4.
The MEDUSA4 products will be displayed.
6. Click left on the upper link CADConvert pro for saving the installation file of CADConvert
Pro.
7. After successful download, leave the customer portal by clicking on Logout.
How to install CADConvert pro:
8. Double click on the downloaded file (e.g. cadconvertpro_4_4.exe).
This will start the InstallShield®Wizard which will guide you through the rest of the
installation of CADConvert pro. Please follow the instructions.
License
For using CADConvert pro you have to obtain a license, which can be requested in the customers portal of our home page (the link is Customer portal and after log-in finally Keyfile request).
The license is announced to the program during installation.
The feature line of the license file must contain the entry cadconvert_pro and the version
number 10.4. An example of the feature line of a license is specified in the following:
FEATURE cadconvert_pro CSGLMD 10.40 30-jun-2010 1 \
DD0930510B9A1D6A2E65 VENDOR_STRING=CSG NOTICE=D001431 ck=11
10
© CAD Schroer GmbH
CADConvert pro M4
OVERVIEW
This chapter is designed to give you just an overview over the functions in CADConvert pro. For
more detailed information please read the chapter “Settings” on page 43.
• User Interface .......................................................................... 12
• Menu Bar ................................................................................. 14
• Navigation ................................................................................ 17
• File Path................................................................................... 18
• In- /Output ................................................................................ 19
• Execute .................................................................................... 20
© CAD Schroer GmbH
11
CADConvert pro M4
Overview
User Interface
CADConvert pro offers a complete graphical user interface. All commands are available
through buttons, or alternatively, input masks. This chapter explains the graphical surface of
CADConvert pro.
The program window is divided into 5 areas. The functionality of these 5 sectors is independent
of each other. Those areas are named as follows:
• MENU BAR
• NAVIGATION BAR
• INPUT
• OUTPUT
• EXECUTION
There is also a status line but you will find out more about that later on in this documentation.
Figure 1
Input Bar
Overview User Interface
Menu Bar
Navigation Bar
Output Bar
Execution Bar
12
© CAD Schroer GmbH
CADConvert pro M4
User Interface
The Menu bar contains pull-down menu’s for settings, analyze and so on.
With the activation of the Input bar you select the formatted input. With the help of the file manager you can select which drawing you would like to convert.
The Output bar specifies the format of the output. With the help of the file manager you can
select the name for the converted drawing and decide where it will be saved to.
The Execution bar will start the command.
© CAD Schroer GmbH
13
CADConvert pro M4
Overview
Menu Bar
File
Figure 2
Menu Option File
File > Quit quits
the current CADConvert pro application. In case you haven’t saved the current
document yet, CADConvert pro will ask you, how you want to quit the application:
• without saving the file
• save current file first
• do not quit CADConvert pro (abort)
You will automatically be directed to the Windows user interface after exiting CADConvert pro.
View
Figure 3
Menu Option View
The option Block structure enables you to view the hierarchical composition graphically. The structure is displayed with the help of blocks (definition of geometry). It either has to be turned on or
off.
The option Message window can also be either turned on or off. The window displays messages, for
example error messages. However these messages are only displayed, if the command
error handling is set on Off.
If the command error handling is set On, the messages that would be shown in the window, are written in the error handling.
Since the most current information is displayed in the message window, it should be set to On
when converting a whole list.
14
© CAD Schroer GmbH
CADConvert pro M4
Menu Bar
means that the drawing will be displayed right after loading, without you having to activate the button View in the execution bar.
auto draw
auto load loads the file directly after opening it, without having to click the Load button in the execution bar.
Analysis
Figure 4
Menu Option Analysis
The option Made Mappings enables CADConvert pro to analyze the layer, lines and text types of
the loaded drawings as well as their meaning for the format that needs to be converted.
Project
Figure 5
Menu Option Project
The option Output format defines the value of the output file. For example, when converting
MEDUSA files the default output value is set as DXF.
The menu levels Mappings and Settings make it possible to change, analyze and save the default
values for line- and text types given by CADConvert pro. They can then also be used for other
conversions.
Since CADConvert pro offers a graphical user interface, the settings don't have to be entered by
hand and with a prompt. Instead they are entered in the designated fields.
Via the Save as option project setting files can be stored under a different name on the hard disk.
© CAD Schroer GmbH
15
CADConvert pro M4
Overview
Via the Load option the project settings are loaded into the memory.
Help
Figure 6
Menu Option Help
shows the actual version number of the application as well as the address of
CADSchroer GmbH.
About CADConvert pro
Before calling up the online documentation with Documentation..., please read the chapter “Documentation” on page 98 first.
Info about project - standard
16
opens a text file, which gives the path to the standard project.
© CAD Schroer GmbH
CADConvert pro M4
Navigation
Navigation
Figure 7
Navigation Bar
These functions enable you to navigate within a loaded drawing.
Pan
Pan moves the center of the picture.
Win
Win
sets window clippings
2x
This function enables you to view a part of the window in double enlargement.
1/2
Use this button to minimize the window to 0.5.
Restore
Restore takes you back to the original view
Dynamic Pan
Selecting a scaling factor will automatically enlarge/minimize the area of the
center of the picture.
Subsequently, the center of the picture can be moved dynamically by pushing
and keeping down the middle mouse button.
In- / Output View
With the help of this function you are able to switch back and forth between
the in- and output format in the picture.
© CAD Schroer GmbH
17
CADConvert pro M4
Overview
File Path
After opening a drawing the file paths are displayed in the upper window. The path and the
name of the opened drawing are displayed on the left side. The default path of the output file will
be on the right. This means that the converted drawing in the input directory will be saved with
the file ending of the output format.
The display will be updated as soon as you enter a new directory and a new name with the help
of the output menu “In- /Output” on page 19.
18
© CAD Schroer GmbH
CADConvert pro M4
In- /Output
In- /Output
Input
The menu bar In loads the input file that needs to be converted. The
formats MEDUSA, DXF and DWG are inclosed in the program.
For your convenience, a file manager opens to enable you to select
a drawing.
Figure 8
File Manager
Output
The command Out defines the output format of the currently loaded drawing.
If no changes are being made, CADConvert pro will fall back on the default
output format.The following standard formats may be selected:
• MEDUSA
• DXF
• DWG
© CAD Schroer GmbH
19
CADConvert pro M4
Overview
Execute
The execution bar contains four commands: Load, Store, Go and View.
Figure 9
Execution Bar
Load
After selecting a drawing using the input field, the file is called up when you click on the Load button.That same file was in the list for conversions prior to being called up.The status line gives
you information about the further process of loading.
Store
The Store function converts the current drawing displayed in the main window into the standard
folder, but only if the latter has not been changed. However, the drawing has to be generated
into the main window by clicking on the View button prior.
Go
After you have selected a drawing, The Go command summarizes 4 different commands:
• Loading a drawing
• Analyzing a drawing
• Converting a drawing
• Saving a drawing
View
The View command generates the drawing into the main window.
20
© CAD Schroer GmbH
CADConvert pro M4
FIRST STEPS
This chapter you learn how to load a drawing and convert it into the destination system.
• Loading Sheets ........................................................................ 22
• Converting Drawings into the Destination System................... 24
© CAD Schroer GmbH
21
CADConvert pro M4
First Steps
Loading Sheets
The command menu Input loads the input file to be converted. The formats
MEDUSA, DXF and DWG are included in the program.
A typical loading process of a MEDUSA file is being described. This will be
the default setting after the installation. The process is identical for all Input
formats.
1. Click on MEDUSA
A file manager appears where you can select the file to be loaded.
Figure 10
File Manager
2. Use Open to verify the selection
The drawing is generated into the converting list. The output format for MEDUSA is set
on DXF by default.
3. Click on the Load button in the execution bar, to load the file.
4. In order to view the drawing, click on View.
The drawing is generated in the main window.
22
© CAD Schroer GmbH
CADConvert pro M4
Loading Sheets
The default setting of the output format for MEDUSA is DXF.
The upper part of the window displays both the name and path of the loaded drawing and the
default output name and path.
Figure 11
Main Window displaying the Loaded Drawing
Now you can modify the values of the loaded drawing within the different setting or mapping
tables.
© CAD Schroer GmbH
23
CADConvert pro M4
First Steps
Converting Drawings into the Destination System
The output format of the currently loaded drawing is defined by the Out
command. CADConvert pro pro falls back on the default output format provided that no changes have been made. The following formats are at
choice as standard:
• MEDUSA
• DXF
• DWG
It follows a description about the conversion of a MEDUSA drawing into the
output format. You need to have a drawing loaded in the input format:
1. Click on DXF.
The DXF format is appointed by default in a loaded MEDUSA drawing. The button
shines red. DWG is an alternative output format that can be used also.
A file browser appears.
Figure 12
File Browser
2. Enter the output directory and the file name for the drawing. If you are not indicating a
name for the drawing, the default-file name will be used.
3. Click on Go in the execution area.
The drawing is being converted.
The progress is displayed in the status bar
.
The drawing has now been converted and is filed in the output directory.
24
© CAD Schroer GmbH
CADConvert pro M4
SETTINGS
• Overview .................................................................................. 26
• Editing Tables........................................................................... 27
• Output Format.......................................................................... 32
• Mappings ................................................................................. 33
• Settings .................................................................................... 43
• Save as .................................................................................... 64
• Load ......................................................................................... 65
• Medstyle................................................................................... 66
© CAD Schroer GmbH
25
CADConvert pro M4
Settings
Overview
Figure 13
Project Pulldown Menu
CADConvert pro offers a graphical user interface and therefore the individual settings are
entered in the designated fields rather than entered by hand into a text file.
The following settings can be configured:
• Output format
• Mappings
• AutoCAD -> MEDUSA
• MEDUSA -> AutoCAD
• Load
• Save
• Settings
• Common
• MEDUSA common
• DXF -> MEDUSA
• MEDUSA -> DXF
• Load
• Save
• Save as
• Save as
• Load
• standard
• project1
• project2
• project3
Most of the settings will be displayed in the form of a table. Those tables can be edited. You can
add new lines, delete or move lines. A detailed description about the functioning is provided in
section “Editing Tables” on page 27
26
© CAD Schroer GmbH
CADConvert pro M4
Editing Tables
Editing Tables
The following describes how you can edit tables.
The graphic displays a typical table under CADConvert pro.
Figure 14
Example of a Table
Scroll bars will appear automatically, if the content of a row or the number of columns are too
large to be displayed in the table.
© CAD Schroer GmbH
27
CADConvert pro M4
Settings
Editing Rows
To edit a single field in a particular column, click on it using the left mouse button. Selection of
several cells works only within one column!
To edit several successive rows in a column at the same time you need to mark them with the
left mouse button and, at the same time, press down the shift key of your keyboard. All successive rows are marked as you can see on the black background color when dragging the
mouse key up and down.
To tag rows that are not connected, you need to mark them with the left mouse button and at the
same time press down the shift and the control key. When all the rows are selected,
enter the new text and finish the entry with the Enter key. The text will now be undertaken in
all the other fields.
28
© CAD Schroer GmbH
CADConvert pro M4
Editing Tables
Inserting Rows
1. To insert a new row move the cursor over a line and press the right mouse key.
A popup window will open.
If you did not select the line before, the following two options will be available.
Figure 15
Popup Menu
2. Move the cursor over the line over which respectively under which you want to insert
the row.
3. To insert a row over the current line, choose Insert line before.
4. To insert a row below the current line, choose Insert line after.
5. To fill the row, click into the single columns using the left mouse button.
Selecting Rows
To mark a complete row, click on the numbering on the left side of the table. The line is completely selected.
Deleting Rows
In order to be able to delete a row, you need to mark it first. Then
use the right mouse key and select the option Delete line from the
popup menu.
Alternatively you can use the Delete key on your keyboard.
© CAD Schroer GmbH
29
CADConvert pro M4
Settings
Editing Rows
To delete a selected row, choose the Cut option with the right
mouse key. The row will be deleted and it's contents copied into
the buffer. The marked row is now highlighted in dark blue color.
A row can be copied the same way as described above. The content will then be buffered but stays in the table.
To paste the content of the buffer into the table select the Paste
option. If no row has been marked, the new row will be inserted
above the current curser position. If you have marked a row prior
to that, the marked row will be overwritten with the content stored
in the memory.
30
© CAD Schroer GmbH
CADConvert pro M4
Editing Tables
Moving rows
To change the sequence of the table you can move entire rows. In this case, mark the row by
moving the cursor over the row with the left mouse key pressed down. The row will be marked
light blue.
Keep the mouse button pressed and drag the row to the new position.
Copying Rows
Select the desired row using the left mouse button. Keep the mouse button pressed and press
the Ctrl key at the same time. Move the row to the required position.
Adopting Changes
To adopt the changes you have made to table, press the Apply button. This
key is only activated, if alterations have been made before.
The changes are now in the table, but not saved yet.
Print
To print the current table, press the Print button.
© CAD Schroer GmbH
31
CADConvert pro M4
Settings
Output Format
Choosing the menu option Project > Output format to open the Default Output dialog, which provides you
several input and with it default output formats.
Here you can define the settings for the output format depending on the input format.
Figure 16
Dialog for Output Format
The input format is given on the left hand side, on the right hand side the default output format.
After the installation for default the options are set according to the figure above.
Behind the arrows popup menus are hidden, which can be used to change the settings.
Figure 17
Pulldown Menu in the Default Output Dialog
Choose a format from the list by moving the cursor over the item and press the left mouse button. The chosen format will be transferred into the field.
To quit the dialog and adopt the new settings click on Store.
32
© CAD Schroer GmbH
CADConvert pro M4
Mappings
Mappings
Overview
Open the pulldown menu shown in Figure 18 via Project > Mappings.
Figure 18
The Mapping Pulldown Menu
With the menu item Mappings you can enter the default settings for the mapping files.
There are individual mapping files available for:
• ”AutoCAD > MEDUSA”
• ”MEDUSA > AutoCAD”
You can load already generated mapping files into the memory:
• Load
• Save
© CAD Schroer GmbH
33
CADConvert pro M4
Settings
AutoCAD > MEDUSA
AutoCAD > MEDUSA - Linetype
With the help of the table below you can preset in which MEDUSA line type an AutoCAD line
(DXF / DWG) will be transferred. You can also add layer-, and color definitions for the lines.
Figure 19
Mapping Table AutoCAD > MEDUSA - Linetype
For new entries put the desired combinations into the table. They are inserted into the list, when
you press the Apply button.
When you click on Ok to leave the window, the mapping settings are taken over for the current
conversion.
34
© CAD Schroer GmbH
CADConvert pro M4
Mappings
AutoCAD > MEDUSA - Texttype
Figure 20
Mapping Table AutoCAD > MEDUSA - Texttype
This table helps you to define the default settings for the text. You can add specifications for Textstyle, FontFile, Layer, Color and Bold to the AutoCAD (DXF/DWG) text to convert it to MEDUSA TextStyle, Layer, Color, TextType, Font and Bold.
AutoCAD > MEDUSA - Attribute > Text
Figure 21
Mapping Table AutoCAD > MEDUSA - Attributes >Text
This table allows you to add certain text attributes to text types. The handling is identical with
the AutoCAD > MEDUSA Linetype.
© CAD Schroer GmbH
35
CADConvert pro M4
Settings
AutoCAD > MEDUSA - Block > Clump
Figure 22
Mapping Table AutoCAD > MEDUSA - Block > Clump
This table assigns AutoCAD (DXF / DWG) Blocknames to MEDUSA Clumps.
AutoCAD > MEDUSA - Symbolmapping
Figure 23
Mapping Table AutoCAD > MEDUSA - Symbolmapping
In MEDUSA you can have prims consisting of one or more line elements. When converting a
MEDUSA drawing into AutoCAD, prims are converted to blocks with a certain nomenclature.
For example, a prim PAP in MEDUSA gets the block name MEDPRIM_LAY6_PAP_ in AutoCAD,
if it is on layer 6, or MEDPRIM_LAY90_SUP_EAR_ is a superprim with picture EAR on layer 90.
To re-create prims or superprims from blocks in AutoCAD during the translation to MEDUSA,
MEDUSA Prims respectively Superprims are re-assigned to AutoCAD (DXF / DWG) Blocks
using the table shown above.
36
© CAD Schroer GmbH
CADConvert pro M4
Mappings
MEDUSA > AutoCAD
MEDUSA > AutoCAD - Linestyle
Figure 24
Mapping Table MEDUSA > AutoCAD - Linestyle
With the help of this table you can preset in which AutoCAD (DXF / DWG) line type a MEDUSA
line will be transferred. You can also add Layer-, and Color definitions for the lines.
When you click on OK to leave the window, the mapping settings are taken over for the current
conversion.
MEDUSA > AutoCAD - Textstyle
Figure 25
Mapping Table MEDUSA > AutoCAD - Textstyle
This table allows you to define the presetting for the text.
You can add definitions for the MEDUSA text, regarding the style, layer, color, text type, font
and boldness and then transform them into AutoCAD (DXF / DWG) style, font, layer, color and
boldness.
© CAD Schroer GmbH
37
CADConvert pro M4
Settings
MEDUSA > AutoCAD - Text>Attribute
Figure 26
Mapping Table MEDUSA > AutoCAD - Text > Attribute
This table allows you to add text attributes to specific text styles.
The handling is identical with the MEDUSA > AutoCAD Linestyle.
MEDUSA > AutoCAD - Clump>Block
Figure 27
Mapping Table MEDUSA > AutoCAD - Clump > Block
This table assigns MEDUSA clumps to AutoCAD (DXF) blocks.
The handling is identical with the MEDUSA > AutoCAD Linestyle.
38
© CAD Schroer GmbH
CADConvert pro M4
Mappings
MEDUSA > AutoCAD - Layer Status
Figure 28
Mapping Table MEDUSA > AutoCAD - Layer Status
In AutoCAD layers can have the states frozen (FROZEN), off (HIDDEN) or locked (LOCKED).
• Status FROZEN: The layer cannot be changed in AutoCAD.
• Status HIDDEN: The layer is not displayed in AutoCAD.
• Status LOCKED: The layer is locked in AutoCAD, no change and no display possible.
Combinations of the states are possible.
This table assigns MEDUSA layers a special layer status in AutoCAD (DXF).
© CAD Schroer GmbH
39
CADConvert pro M4
Settings
Load
Using the menu option Project > Load the following window opens. It loads mapping files into the
memory.
Figure 29
40
Window Load Mappings
© CAD Schroer GmbH
CADConvert pro M4
Mappings
Save
The procedure of saving mapping files is equal to the loading procedure.
Using the menu option Project > Save the following window opens.
Figure 30
Window Save Mappings
Clicking the check box activates the entry. You can activate several entries.
Clicking on an entry displays an icon on the right hand side of the entry.
Figure 31
Activated Entry
A click on the icon (or a double click on the entry) opens the file manager.
© CAD Schroer GmbH
41
CADConvert pro M4
Settings
Figure 32
File Manager
You can now define in which directory the mapping file will be saved.
42
© CAD Schroer GmbH
CADConvert pro M4
Settings
Settings
Overview
The pulldown menu shown in Figure 33 opens when choosing Project > Settings.
Figure 33
The Settings Pulldown Menu
This window lets you define general settings as well as the MEDUSA project and paths to the
mapping directories.
Common
e.g. auxiliary paths and message paths can be entered here
MEDUSA common
defines the settings for the MEDUSA project.
DXF -> MEDUSA
specifies the path to the mapping directories for AutoCAD > MEDUSA
MEDUSA -> DXF
specifies the path to the mapping directories for MEDUSA > AutoCAD.
Load
setting files will be loaded into the memory.
Save
setting files will be saved on the hard disc.
Save as
setting files will be saved on the hard disc under a specified name.
© CAD Schroer GmbH
43
CADConvert pro M4
Settings
Common
The Common dialog enables you to define auxiliary paths and other settings.
Figure 34
CADConvert pro Settings - Common
Also here you may use the file manager for entries. It can be started with the Browser button.
Project path
The Project Path toolbar always shows the, at the time of installation, selected path as an outputfolder. Other files are stored/entered in this folder. That includes, for example
CODE.BIN, DDL.BIN, and so on.
After installation, the project path can not be changed anymore!
44
© CAD Schroer GmbH
CADConvert pro M4
Settings
Helppath
You can state the path to a directory in which the help file is located, by using the command
Helppath. To do so you will need the complete name of the path in which the help file is located.
You can recognize the help file on the suffix.htm.
Message path
The command Messagepath enables the specification to the path of the directory in which the message files for the DXF>MED application are located. The complete name of the path in which
the message files are located, is needed.
HTML-Browser
The command HTML_ Browser states the path for the internet browser. The online documentation
of CADConvert pro will be started with the specified browser, “Documentation” on page 98
Error Handling
Errors, occurring during translation, will be shown in a reference display window. The program
will give you notice, telling you that there are messages in your error file.
If the field Error Logging is activated, the errors will be permitted in the file on which the path
is written. If no path name for the error file is given, the error file will be generated in the
current directory and receives the file name of the DXF-file to be converted, with the suffix.ERR.
No file will be generated, if the transformation was without an error. The error file is an ASCII-file
and can be viewed with a regular text editor after conversion.
Error file
If Append errors is activated, a new error message is added to already existing messages. If the
option is not activated, the error file is overwritten without keeping previous messages.
You also have the possibility to activate the message window during conversion. The message
window will keep you updated in case of occurring errors. No error file will be filed if the Error logging field is not activated.
© CAD Schroer GmbH
45
CADConvert pro M4
Settings
Overwriting Files
This menu item can operate whether or not the output file should be overwritten, if another file already
exists with the same name. If the field is not activated, you will be asked, if the existing file should
be overwritten.
The standard setting for Overwrite existing files is OFF.
When you have activated the check box, the file
will be automatically overwritten, without notice.
Workstation
The definition WORKSTATION allows you to declare a workstation for the color definitions. The
value is either the environment variable ws (see example), which is set automatically when
starting MEDUSA, or it is a workstation name, e.g. ws_white.
The possible names of workstations can be found in the directory
<path to the MEDUSA user project>\MED\WS.
The standard MEDUSA project provided with CADConvert pro does not contain a workstation
definition.
Default Output Directory
Here you can enter a target directory for the output files.
46
© CAD Schroer GmbH
CADConvert pro M4
Settings
MEDUSA Common
Using this window the MEDUSA project is set:
Figure 35
CADConvert pro Settings - MEDUSA common
You can use the file manager called up with the Browse button for inserting entries.
Project
C:\Programme\CADConvert_pro_M4
The command Project allows you to specify a MEDUSA project file for the purpose of conversion.
The complete path for the desired MEDUSA project needs to be entered.
Code
C:\Programme\CADConvert_pro_M4\m2d\bin\code.bin
Enter the complete path of the MEDUSA code for the conversion.
DDL
C:\Programme\CADConvert_pro_M4\med\bin\ddl.bin
The MEDUSA DDL file to be used during conversion is determined with the command DDL. The
complete path name of the desired DDL file is required.
Primsheet
C:\Programme\CADConvert_pro_M4\m2d\bin\prims.bin
Here you can enter where the prim definition is saved.
Special Characters
C:\Programme\CADConvert_pro_M4\CFG\character.map
Under this path you can find the description file of special characters.
© CAD Schroer GmbH
47
CADConvert pro M4
Settings
DXF / DWG -> MEDUSA
With this window the paths to the mapping directories for the conversion AutoCAD > MEDUSA
is specified.
Figure 36
CADConvert pro Settings - DXF ->MEDUSA
Also here a file manager can be used with the Browse button for the entries.
Linestyle
C:\Programme\CADConvert_pro_M4\cfg\dxf2med_lstyle.map
The command Linestyle states the path name of the line style mapping table for the
DXF>MEDUSA conversion. The complete path name of the line style mapping table is required.
Textstyle
C:\Programme\CADConvert_pro_M4\cfg\dxf2med_tstyle.map
48
© CAD Schroer GmbH
CADConvert pro M4
Settings
The command Textstyle states the name of the text style mapping table for the DXF>MEDUSA
conversion. The complete path name of the text style mapping table is required.
MM Textstyle
C:\Programme\CADConvert_pro_M4\cfg\med2med_tstyle.map
The command MM Textstyle states the name of the text style mapping table for the DXF-MEDUSA
conversion. The complete path name of the text style mapping table is required.
Attrib 2 Text
C:\Programme\CADConvert_pro_M4\cfg\dxf2med_textattr.map
The command Attrib2 Text gives the path name to the text attribute mapping table for the DXFMEDUSA conversion. The complete path name is needed.
Blocktype
C:\Programme\CADConvert_pro_M4\cfg\dxf2med_blktyp.map
The command Blocktype gives the path name to the block type mapping table for the DXFMEDUSA conversion. The complete path name is needed.
Symmapping
C:\Programme\CADConvert_pro_M4\CFG\dxf2med_symbol.map
The command Symmapping gives the path name to the symbol mapping table for the DXFMEDUSA conversion. The complete path name is needed.
Clumps
AutoCAD offers the possibility to organize blocks not only in width but also in depth.
The command Clumps defines, whether the entire depth or just the block-level of the actual elements should be adapted in the DXF-file when converting.
Clumps
on:
The entire depth of the block structure is
adapted, when converting into the MEDUSAfile format.
© CAD Schroer GmbH
Clumps
off:
Only the lowest level of the blocks (which organizes the actual elements), is adapted into the
MEDUSA file format, when converting. The
rest of the block structure will be lost.
49
CADConvert pro M4
Settings
Blockname
The command Blockname let you determine whether the name of the individual block should be
attached as attributes to the belonging clumps during the conversion of nested blocks.
Blockname
on:
Blockname
off:
The clumps generated during conversion are The clumps generated during conversion are
receiving the names of the belonging blocks as receiving the names of the belonging blocks as
attributes.
attributes.
Move
The minimal coordinate existent in the DXF file can be specified in the DXF file with the variable
EXTMIN.The command Move adjusts, if that coordinate should be moved to zero-point when
converting.
on:
Move
Move
Zero offset is permitted
off:
Zero offset is not permitted
Hidden Layer
Specifies, whether layers with status Frozen are converted to MEDUSA or not.
Hidden Layer
on:
Layer with status frozen or off are translated
Hidden Layer
off:
Layer with status frozen or off are not translated
Usetruecolor
With Usetruecolor set to on, True Color RGB values will be transferred, if defined. Usetruecolor
default is on. Note that True Color RGB values can be defined in AutoCAD since version 2004.
Usetruecolor
on:
True Color RGB will be transferred
Usetruecolor
off:
True Color RGB will be not transferred
XRef
The switch controls whether external references, which are content of a DWG sheet, are processed and transferred to MEDUSA or not.
XRef
50
on:
XRef
off:
© CAD Schroer GmbH
CADConvert pro M4
Settings
References within the DWG file are processed References within the DWG file are not produring conversion and appear as SET (Clump) cessed during conversion, i.e. they do not
in the MEDUSA sheet
appear within the MEDUSA sheet
ForceDxfInCS
The switch is directly associated with the DxfInCharset entry, see “DxfInCharset” on page 55. It
controls whether the DxfInCharset entry is used, even if a CODEPAGE is given within the DXF/
DWG file.
ForceDxfInCS
on:
ForceDxfInCS
off:
In any case the DxfInCharset entry is used, even if The code entry of the DXF/DWG file is used.
a CODEPAGE entry exists within the DXF/
DWG file
Dimension
The command Dimension offers the possibility of converting the dimensioning from DXF to
MEDUSA geometrically (GEO), or as a real dimensioning (DIM), or as a mixed dimensioning
(COM). The geometric image of the dimensioning will be kept when using the geometric conversion (GEO). But all functionalities will be lost!
With the real dimensioning (DIM) conversion, the functionalities are obtained. Differentials can
not be excluded due to differences between AutoCAD and MEDUSA regarding the dimensioning.
The real dimensioning will be obtained with the mixed conversion (COM). But a geometric image
will be deposited at first. If, due to the above mentioned reasons, differentials emerge between
the converted dimensioning and the geometric image of the original dimensioning, they will be
visible after the next editing.
During conversion, the scaling The conversion carries the
will be carried over to
genuine scaling over to
MEDUSA as a geometrical
MEDUSA.
image.
The functionality stays intact.
The functionality gets lost.
© CAD Schroer GmbH
The conversion carries the
genuine scaling but stores primary a geometrical image.
The functionality stays intact.
Differences will appear after
the first editing.
51
CADConvert pro M4
Settings
Sheet Precision
specifies the precision with which the MEDUSA drawing should be produced.
You can choose between LOW, MEDIUM and HIGH.
Sheet Precision
A MEDUSA sheet with lowprecision will be produced
when converting.
A MEDUSA sheet with
A MEDUSA sheet with highmedium-precision will be pro- precision will be produced
duced when converting.
when converting.
(6 decimal places)
(9 decimal places)
(12 decimal places)
Units
In opposition to AutoCAD, MEDUSA works with units. The command Units defines whether or
not the unit mm or inch will be entered into the MEDUSA file when converting.
The unit mm will be entered in the MEDUSA
file when converting.
The unit inch will be entered in the MEDUSA
file when converting.
Fillgap
For example:
AutoCAD generates arrows with an element that does not exist in MEDUSA
and therefore can only be reproduced. To do so, a contour is created. The
inside area of the emerged contour is hatched. The spacing within the hatching can get very narrow in large drawings, meaning that a large number of
lines will be created in MEDUSA. An adjustment with the Fillgap option makes
it possible to influence that the space within the hatching is not too narrow,
and therefore renders that the MEDUSA drawing does not contain too many
elements.
52
© CAD Schroer GmbH
CADConvert pro M4
Settings
Scaling
In opposition to AutoCAD, MEDUSA works with a scale factor for the sheet. The command Scale
specifies with which factor the conversion needs to be done. That same scale factor will then be
the sheet scale.
Enter the numerical value (bigger than 0.0) in
which the coordinate data is to be scaled.
The DXF file usually contains a DIMSCALE.
This factor, if available, will be automatically
used as the scale factor. Otherwise, 1.0 will be
used.
Sheetsize
The size of a MEDUSA sheet may either be determined by a size entry in the DXW/DWG file
(extmin, extmax), or it is calculated according to min., max. of the geometry.
Reading the value out of the file can resolve problems, because not every system writes this
entry correctly.
Sheet size is calculated from the max dimension of the geometry.
Sheet size is selected out of the DXF/DWG
file.
Area
Ever since the CADConvert pro version 2.0, both paper and model
areas from AutoCAD can be transferred to MEDUSA files.
Please note: But you can only view the model areas in
the CADConvert pro window!
With the help of this button you are able to define how the areas will
be handled during conversion. Click on the arrow with your left
mouse key to open the pop-up menu. You can then select the desired
conversion method.
© CAD Schroer GmbH
53
CADConvert pro M4
Settings
Standard
The model-, as well as the paper areas will be transferred from
AutoCAD to the MEDUSA file.
The file receives the standard name.
Model
Only the model area of the AutoCAD file will be taken into account
when converting. It will be saved as a MEDUSA file and receives the
standard name.
Paper
Only the paper area from AutoCAD will be transferred to MEDUSA.
If more than one paper area exists for an AutoCAD file, a dialog
appears listing them. Now you can choose a desired paper area from
the list.
The MEDUSA file receives the standard name.
Proxy
The Proxy switch provides the opportunity, to transfer Proxy elements, which contain Proxy
images from AutoCAD to MEDUSA. You can choose between OFF, BLOCK and ENTITY.
Proxy elements are not converted
Proxy elements are converted Proxy elements are converted
as Block
as single elements
Default Linewidth
In AutoCAD there is the possibility to control the line weight not only
directly but also by defining a default value. The value for the default is
defined in the AutoCAD installation file and is not part of the DXF format.
With Default Linewidth you can assign a value to the default line weight as it
will be used in MEDUSA. Default value is 1.0.
54
© CAD Schroer GmbH
CADConvert pro M4
Settings
SplineApprox
Controls the way how splines are approximated at curves in MEDUSA.
Approximation of curves is carried out by line
segments
Approximation of curves is carried out by conic
arcs
DxfInCharset
Usually a DXF/DWG file contains a text code entry. By default the
entry within the DXF/DWG file is DWGCODEPAGE ANSI_1252.
Via DxfInCharset you can specify different codes.
If CODEPAGE is not set within the DXF/DWG file, the DxfInCharset entry
is used.
Please note: The following codes are possible:
ANSI 932
ANSI 936
ANSI 950
ANSI 1250
ANSI 1251
ANSI 1252
ANSI 1253
ANSI 1255
EUC-JP
- japanese Microsoft Shift-JIS
- GBK simplified chinese
- BIG5 traditional chinese
- east european latin
- cyrillic
- west european latin
- greek
- hebrew
- UNIX japanese encoding
Map Logging
The command Map Logging enables you to create a mapping protocol file.
If Map Logging is deactivated, no mapping protocol is written.
If Map Logging
is activated, a mapping protocol is written
The complete path name is needed.
© CAD Schroer GmbH
55
CADConvert pro M4
Settings
MEDUSA -> DXF / DWG
The paths to the mapping tables are entered in the window below:
Figure 37
CADConvert pro Settings - MEDUSA -> DXF
You can also use the file manager for the entries. It can be started with the Browse button.
Linestyle
C:\Programme\CADConvert_pro_M4\cfg\med2dxf_lstyle.map
The command Line Type gives the path name of the line style mapping table for the MEDUSADXF conversion. The complete path name of the line style mapping table needs to be entered.
Textstyle
C:\Programme\CADConvert_pro_M4\cfg\med2dxf_tstyle.map
56
© CAD Schroer GmbH
CADConvert pro M4
Settings
The command Text Style gives the path name of the text style mapping table for the MEDUSADXF conversion. The complete path name of the text style mapping table needs to be given.
Text 2 Attrib
C:\Programme\CADConvert_pro_M4\cfg\med2dxf_textattr.map
The command Text 2 Attrib gives the path name to the text 2 attrib mapping table for the
MEDUSA-DXF conversion. The complete path name of the text 2 attrib mapping table has to be
entered.
Blocktype
C:\Programme\CADConvert_pro_M4\cfg\med2dxf_blktyp.map
The command Blocktype gives the path name of the block type mapping table for the MEDUSADXF conversion. The complete path name of the text style mapping table needs to be given.
Layer Status
C:\Programme\CADConvert_pro_M4\cfg\med2dxf_layerstatus.map
The command Layer status gives the path name of the layer status mapping table for the
MEDUSA-DXF conversion. The complete path name of the layer status mapping table needs to
be given.
Blocks
MEDUSA offers the possibility to organize clumps not only in width but also in depth. The command Blocks adjusts whether or not the entire depth of the Clump-level should be taken over into
the DXF file.
Blocks
on
Blocks
off
The entire depth of the clump structure will be The clump-structure disappears.
assumed into the DXF file when converting.
Colors
Compared to AutoCAD, MEDUSA does not know colored lines. But, in the code.bin file, it does
offer the possibility to assign MEDUSA line types to the plotter pens. The command Color
assigns whether the attribution should be maintained in the DXF file. That again offers the possibility to display the lines in the correct color in the AutoCAD application.
© CAD Schroer GmbH
57
CADConvert pro M4
Settings
The attribution of the plotter pens to the
MEDUSA line types stays maintained.
AutoCAD will display these lines in color.
The attribution of the plotter pens to the
MEDUSA line types does not stay maintained.
The DXF file does not receive information
about the color of the lines.
Polyline
In principle, MEDUSA saves objects drawn with lines as Polylines. AutoCAD again, saves such
objects as single lines. The command Polyline offers the possibility to decide, whether to save
such objects to the DXF file as a polyline or as a complex of singles lines.
Objects drawn with lines will be saved in the
DXF file as Polylines.
Objects drawn with lines will be saved in the
DXF file as a complex of single lines.
Unscale
The command Unscale transforms the actual scale and the drawing to 1:1.
Transforms the drawing to 1:1.
Converts the drawing in the sheet scale.
Textbox
The command Textbox optimizes the text display for DXF/DWG. DXF/DWG has a text alignment
called Adjust. The width of the text is configured exact within MEDUSA and the text receives the
text alignment Adjust. The original text alignment gets lost. If converting back, the text would
receive the justification 22, meaning, the text would be aligned in the left corner...
Optimized per Adjust.
58
Keeps the text justification, as far as tolerable
in DXF. The text display in DXF/DWG is determined according to the height.
© CAD Schroer GmbH
CADConvert pro M4
Settings
Uniqblk
When MEDUSA drawings are converted to AutoCAD, it can happen that the MEDUSA clumps
which were transferred in blocks, will lead to a conflict of names in AutoCAD. That can be
avoided by using the Uniqblk option. With that, an additional identification will be implemented in
the blockname.
Uniqblk is activated, additional identifier will be
implemented.
No additional identifier.
Context Check
The switch controls, if a drawing without fitting code and DDL can be opened.
If it is opened all line and text elements, which does not fit to standard, may be displayed wrong.
If the switch is unset, the default is ON.
MEDUSA sheets without fitting code and DDL The drawing is opened without code and DDL.
are not opened and a warning is displayed.
All line and text elements, not according to
standard may be displayed wrong.
Text as Graphic
Particular texts are converted as block, consisting of Text and graphic.
Particular texts are transferred as block.
Particular texts are only transferred as text.
Textheight
Determines whether texts with height zero are transferred or not.
Texts will be transferred.
Texts will be not transferred. This is the default.
Clumpname
Controls whether the group name from MEDUSA should be taken over as block name or not.
© CAD Schroer GmbH
59
CADConvert pro M4
Settings
Groupnames from MEDUSA are transferred as Groupnames from MEDUSA are not transblocknames to DXF.
ferred as blocknames to DXF. A standardname
Equal groupnames in MEDUSA receive auto- is used, MEDUSA_SET_<element_number>_
matically a sequential number added to the
blockname in DFX.
(blockname = grouplabel_sheet_no)
Usetruecolor
With Usetruecolor set to on, True Color RGB values will be transferred, if defined. Usetruecolor
default is on. Note that True Color RGB values can be defined in AutoCAD since version 2004.
Usetruecolor
on:
Usetruecolor
True Color RGB will be transferred
off:
True Color RGB will be not transferred
Dimension
The command Dimension offers the possibility to convert the dimensioning of MEDUSA into a
DXF file as a real dimensioning (DIM) or as a geometrical image (GEO). With the real dimensioning conversions, the functionality stays intact. Distinctions can not be excluded and are possible
due to the differential approach of AutoCAD and MEDUSA when it comes to the dimensioning!
The functionality disappears if the dimensioning is converted as an image. The dimensioning
will then only exist geometrically.
The dimensioning of the drawing is converted The dimensioning of the drawing is converted
geometrically. The functionality of the dimen- as a real dimensioning. The functionality of the
sioning disappears.
dimensioning stays intact.
AutoCAD
Using the AutoCAD pulldown menu you can choose the AutoCAD version of the DXF elements, in which the MEDUSA elements should be
converted.
60
© CAD Schroer GmbH
CADConvert pro M4
Settings
DxfOutCharset
Specifies the text code during the conversion from MEDUSA
to DXF/DWG. The code is entered as text string into the
DXF/DWG file.
Please note: The following codes are possible:
ANSI 932
ANSI 936
ANSI 950
ANSI 1250
ANSI 1251
ANSI 1252
ANSI 1253
ANSI 1255
EUC-JP
- japanese Microsoft Shift-JIS
- GBK simplified chinese
- BIG5 traditional chinese
- east european latin
- cyrillic
- west european latin
- greek
- hebrew
- UNIX japanese encoding
Textstyle
states which MEDUSA text font will be used for the convertion. It is medtext by default.
Textstyle
Textstyle GDT
With the Textstyle GDT you may specify which textfont to use for the
transfer of framed text. The transfer to DXf will be optimized so
that the display is equivalent to that of MEDUSA.
Superlinemode
With the help of this switch superlines can be translated as graphic into a DXF Block.
Transfer of the superline as line.
Transfer of the superline as a simple vector graphic into
a DXF Block.
Transfer of the superline as either graphic or line.
© CAD Schroer GmbH
61
CADConvert pro M4
Settings
Code No.
The command Code No. indicates the code number for the
MEDUSA codes.
DXF Precision
The command DXF Precision specifies the amount of internal
decimal places in the DXF file.
Blocktext
specifies a MEDUSA text type with whose help a block can have a
name assigned to it. The converter takes the content of the text of that texttype
and uses it as the name for the block to be created, when using such a text
type within a clump. At this, the text type can only be contained once in a
clump, respectively the content of the text type has to be definite. The text itself
will not be converted as text during such a conversion but rather as the name
of the block.
Blocktext
Blockattr
With the Blockattr command you can define a user attribute which again permits
you to assign a name to a block. This user attribute has to be attached to the
respective clump. If such an attribute is being used in a clump, the converter
will take the text content of the attribute and use it as the name for the block to
be created. This setting takes priority over a possibly already existing block
text mapping.
Template file
The option Template file allows you to integrate a file already created in AutoCAD, with all its typical data for the output file, prior to converting. The complete path name is needed.
C:\Programme\CADConvert_pro_M4\cfg\csg_template.dxf
62
© CAD Schroer GmbH
CADConvert pro M4
Settings
At this, the values favored by you for the file to be converted, will be used as long as the template file is integrated.
You also have the possibility to configure these settings with the options Made Mappings and
Used Tables. They contain all input and output values that are recognized by CADConvert pro
after the analysis - meaning the loading of a drawing into the INPUT. These values can be
modified and saved so that the file created with these values beforehand, can be loaded with
the same values before each conversion.
LTScale
In LtScale (scaling of the line types), 12.0 is inscribed
by default to the DXF/DWG-file. This value is suggestive for the standard definition of the MEDUSA
Pens.
Another LtScale may be suggestive, if the definition
for the pens has been changed (e.g. via mappings).
You now have the possibility to change <value>
with the entry LtScale.
An LTScale may be initialized in the file csg_template.
If you would like to take on the LT Scale, you
need to mark the box.
Bigfont
This switch is used for text fonts with more than 255 characters (e.g. Japanese text).
If the switch is activated, fonts with more than 255 characters can be used.
If the switch is not activated, fonts with more than 255 characters cannot be used.
© CAD Schroer GmbH
63
CADConvert pro M4
Settings
Save as
CADConvert pro provides the possibility to save project settings. Setting files can be stored
under a different name on the hard disk. Thereby any configuration and mapping files are saved
in a project directory. The settings can be called up via the Project Manager.
To open the Project Manager dialog choose the Save as option in the
Project pulldown menu.
You can enter a name in the Project input field
and transfer it using the Save button.
To delete an entry, select it in the list and
click Delete.
64
© CAD Schroer GmbH
CADConvert pro M4
Load
Load
Via the Load option in the Project pulldown menu the project settings are loaded into the memory.
When you click on Load, a pulldown menu opens,
where you can choose a project from a list.
Select the desired project, to load the setting files.
The Windows header displays the name of the
chosen project, in this example project1.
© CAD Schroer GmbH
65
CADConvert pro M4
Settings
Medstyle
In principal the display of intermitted lines is handled differently between MEDUSA and
AutoCAD. In AutoCAD the display depends on the solution and the size - that is not the case
with MEDUSA.
With the file .../cfg/medstyle.cfg the user has the possibility to change the appearance of a line in
AutoCAD to have it look just as a line in MEDUSA. Thereto, the file has to be edited and a new
style entry needs to be generated.
Example:
66
© CAD Schroer GmbH
CADConvert pro M4
THE MAPPING-CONCEPT
The mapping concept describes the mode in which input formats (that are acquired form the
drawing) are assigned to output formats for the target system. That happens primarily via the
mapping-files.
A drawing is being analyzed when loaded, that's how the made mapping table with the inputvalues is being created. To create the target system table, the respective mapping files are
being searched for entries. If none can be found the output fields will be filled with the default
settings.
The results can be viewed and also altered, in the made mapping table. The elements will be
taken over as described in this table, when writing the drawing into the target system.
Following, you will find the complete mapping process of MEDUSA>DXF for line attributes
explained exemplary.
• The Mapping File ..................................................................... 68
• The "Transfer" Switch .............................................................. 72
© CAD Schroer GmbH
67
CADConvert pro M4
The Mapping-Concept
The Mapping File
To create a mapping file you need first to open it up. In the menu bar you will find the Projects
option, selecting it opens a pulldown menu which contains the item Mappings (Figure 5, “Menu
Option Project” on page 15). All mapping files can be opened with this pulldown menu. You will
find the path to those files in the chapter ”Settings”, “MEDUSA -> DXF / DWG” on page 56.
Figure 38
Input
Mapping Table MEDUSA > AutoCAD - Linestyle
Output
Transfer Mode
The fields LineStyle, Layer, Color, LineType and Bold are available for the definition of the input elements, in this case MEDUSA lines. On the AutoCAD sheet, the fields LineStyle, Layer, Color and
Bold serve for the description. In addition, the field Transfer defines whether or not an element will
be transferred. The mapping file is always processed top down.
68
© CAD Schroer GmbH
CADConvert pro M4
The Mapping File
Line Mapping MEDUSA -> AutoCAD
Considering as example the assignment of a MEDUSA element should be explained according
to the mapping table shown before.
The MEDUSA element is a line of style SOLID_THIN, which is set on layer 11.
CADConvert pro starts scanning through the mapping table and searching for the entry
SOLID_THIN in the first line.
The corresponding line style is found in the first row of the mapping table, i.e. it is equal to the
input element.
Next, it is searched for layer 11.
In the first line the mapping table displays no entry, i.e. there is no setting, which means: match.
The same applies to Color and Bold.
For the output, it means, since the field is blank, there is no setting for a layer. At first a default
value will be inserted here. The element obtains color 2 and type CONTINOUS.
CADConvert pro continuous and searches for match to the input element in the next line.
The first cell is blank, meaning that it matches.
In the second cell 1018 is set as layer. However, the input element is set on layer 11, meaning
no match.
At this point CADConvert pro aborts and jumps to the next line.
Line type SOLID_THIN matches. Layer 11 matches. Color and Bold are matching, since
there are no settings.
As next, layer OUTLINE is defined on AutoCAD side. With it, all fields of the output have been
defined and CADConvert pro completes searching.
In this example the MEDUSA element becomes a DXF/DWG-element of type CONTINOUS,
with Color 2 and it is set on Layer OUTLINE.
© CAD Schroer GmbH
69
CADConvert pro M4
The Mapping-Concept
So, the mapping is searched top down as long as all columns for an input element have been
described during the analysis.
Special Mapping
The line styles of the following special mappings are „imaginary“ line style for CADConvert pro.
They are used for the graphical translation of the elements Prim, Point function, Superline and
for the graphical part of, i.e. boxed or underlined texts.
In the figure below you see the entries for the following elements:
• Prims, LPRM
• Point functions, LFUN
• Superlines, LSUP
• graphical elements, e.g. bordered or underlined texts, LTXT
Figure 39
70
Mapping-Table MEDUSA > AutoCAD - Special Mapping
© CAD Schroer GmbH
CADConvert pro M4
The Mapping File
Special Text Mapping MEDUSA -> AutoCAD
AutoCAD does not allow similar text styles with differential fonts. For that reason text styles with
the same font will be renamed to textstil_font, at the analysis of the conversion direction
MEDUSA -> AutoCAD.
Figure 40
Mapping Table - MED > DXF - Texttype
In this example, the style STANDARD with the font ARIAL was found in line 2 on the AutoCAD
sheet of the table. The style STANDARD with the font TXT was found in line 3. The latter will
automatically be renamed to STANDARD_TXT.
© CAD Schroer GmbH
71
CADConvert pro M4
The Mapping-Concept
The "Transfer" Switch
Both in the Mapping tables and in the Made Mappings the Tranfer switch is available for all entries
which are found.
The switch allows you to control, whether an element will be transferred into the target system
or not. For example: it gives you the control to decide that a MEDUSA dimensioning will not be
transferred to AutoCAD. (In standard MEDUSA the dimensioning always is on layer 4)
The switch is set via a pulldown menu. An arrow appears as soon as you click
into the field. A list with the options to choose will open when clicking on the
arrow with your left mouse button.
The following transfer modes are available:
• Is equal to a space in the other columns of the mapping rows.
That is, that the column Transfer is not registered in a mapping row. The mapping concept supposes that the file will be read until all fields are filled. Here, too, all rows will
be searched for a matching input format with a defined entry (yes/no) for the transfer
modes. That will then be assumed for the element. If no matching entry can be found,
'default' will be entered.
Default is always YES.
Old mapping files without that entry, can be used further on.
• ja (yes)
Elements are always transferred into the target system.
• nein (no)
Elements will not be converted into the target system.
72
© CAD Schroer GmbH
CADConvert pro M4
PROCESSING OF DRAWINGS
This chapter describes the process from input to output of the drawing, that is, the procedure
from loading of a drawing, over the conversion up to the output of the drawing in the new format.
• Input ......................................................................................... 74
• Execute .................................................................................... 76
• Viewing .................................................................................... 77
• Output ...................................................................................... 80
© CAD Schroer GmbH
73
CADConvert pro M4
Processing of Drawings
Input
The Input command bar (In) loads the file to be converted. The MEDUSA,
DXF, DWG formats are inclosed in the program.
A typical loading process of a MEDUSA file is being described. This process
is identical for all input formats.
1. Open a file manager for loading the file to be converted. You have two possibilities:
• Click on MEDUSA using the left mouse button, or
• Click on MEDUSA using the right mouse button.
In the opening pulldown menu click on Open File...
Figure 41
Context Menu
You can also perform a list conversion, which will be explained in detail in chapter “List
Processing” on page 81.
Figure 42
The File Manager
2. Select the requested file in the file manager and confirm the selection with Open.
74
© CAD Schroer GmbH
CADConvert pro M4
Input
The drawing has been entered into the conversion list.
3. Click on Load to load the file.
A status prompt
gives information about the loading status.
Click on View to view the drawing in the main window.
The drawings is generated in the main window.
The output format for MEDUSA is set on DXF by default.
Figure 43
Main Window with Loaded Drawing
Now you can modify the values in the different setting respectively mapping tables.
© CAD Schroer GmbH
75
CADConvert pro M4
Processing of Drawings
Execute
The Execute area contains four different commands: Load, Store, Go and View.
Load
When you click on the Load button after choosing a drawing via the input area, the file is
called up. Before it was in the conversion list. A status prompt gives information about
the loading status.
During the load process the drawing is analyzed and data, such as Made Mappings, are
generated into the according lists, where they can be modified. After this the loading
process is completed.
Store
Converts the current drawing, which is displayed in the main window, into the default
directory, unless it has been changed before.
First the drawing has to be generated into the main window by using the View button
(see below).
Go
The command combines four different commands after selecting a file.
• loading
• analyzing
• converting
• saving
the drawing
View
The View command generates the drawing in the main window.
The status line informs you, respectively commands, about any performed command.
76
© CAD Schroer GmbH
CADConvert pro M4
Viewing
Viewing
Overview
Via View in the menu bar you can open a pulldown menu which provides functions that will
give you additional, important information:
• ”Block structure”
• ”Message window”
• ”Auto. draw”
• ”Auto. load”
Block structure
The option Block structure enables you to view the hierarchical structure graphically. The structure is displayed with
the help of blocks (geometric definition).
This option is either set to ON or OFF.
© CAD Schroer GmbH
77
CADConvert pro M4
Processing of Drawings
Message window
Just like Block structure the Message window option can be either set ON or OFF.
The message window displays information, for example error messages. But these are only displayed, if the command error_handling is set OFF.
If it is set ON, the messages, that would be shown by the message window, will be written into
the Error handling.
Figure 44
Error Message
Since all current information is displayed in the message window, giving insight about the
progress of the list conversion, the window should be set on ON during list conversing.
Auto. draw
The command Auto. draw displays the desired drawing in the main window immediately after
loading it.
Thus the task of the View button is assumed in the execution area. This function can be either
set on ON or OFF.
78
© CAD Schroer GmbH
CADConvert pro M4
Viewing
Auto. load
Using the Auto. load switch a drawing can be loaded directly into the memory. The function can be
set ON or OFF.
© CAD Schroer GmbH
79
CADConvert pro M4
Processing of Drawings
Output
The command Out defines the output format of the currently loaded
drawing. If no alterations are being made, CADConvert pro falls back
on the preset output format.
The following formats are available as standard:
• MEDUSA
• DXF
• DWG
In the following it is described how to convert a MEDUSA drawing in OUTPUT. To do so the
drawing has to be first loaded as INPUT file.
By default the DXF format is set, if a MEDUSA drawing is loaded. The button shines red. DWG
is also available as an alternative output format.
1. Click on DXF
A file browser appears. You can now enter the output directory for the drawing as well
as the file name.
Figure 45
File Browser.
2. Click on Open.
The browser window disappears.
3. Click on the Store button of the execution bar.
The drawing will be converted. The status is displayed in the status line.
80
© CAD Schroer GmbH
CADConvert pro M4
LIST PROCESSING
With list conversion you have the ability to convert several files or even an entire folder with the
same settings and mappings.
By means of an example this chapter explains, how you create a conversion list and how it will
be executed subsequently.
• Input ......................................................................................... 82
• List Browser ............................................................................. 83
• Source Directory ...................................................................... 84
• Starting the Conversion............................................................ 85
© CAD Schroer GmbH
81
CADConvert pro M4
List Processing
Input
Click on MEDUSA with your right mouse button in the INPUT menu.
Figure 46
Input Menu
The following pulldown menu appears:
Figure 47
Pulldown Menu of the Input Menu
Open File
Has the same function as the left mouse button. A file manager opens up, you can now
select the INPUT files.
List Browser
Opens the list window
In / Out Directory
States the INPUT/OUTPUT directory for the conversion. If none is selected CADConvert pro converts the OUTPUT file with the same name in the respective directory in
which the INPUT file is, but with the attributed file identification for the respective format.
82
© CAD Schroer GmbH
CADConvert pro M4
List Browser
List Browser
Use the right mouse button to select the List browser option.
The command serves the purpose of searching for and opening files that need to be converted.
You have the possibility to search for data carrier within a file manager and to select the desired
files.
Figure 48
File Manager
The single fields are used as follows:
New list
Deletes all entries that are currently in the file list.
Delete list entry
Deletes the currently marked entry in the file list.
Take over
Adopts the currently marked file in the file list.
All
Adopts all files in the directory.
Exit
Adopts the selection and closes the list browser.
© CAD Schroer GmbH
83
CADConvert pro M4
List Processing
Source Directory
Click on In / Out Directory in the right mouse context menu.
The following window is called up.
Figure 49
The Input Directory Window
Here you can specify a working directory without directly starting the conversion. That process
won't be activated until you click the Go button.
This offers the possibility to create a list and to use the tool further on until the converting process is started.
Ok
Using this button you are leaving the window and assume the inserted drawings.
Cancel
with this button you will leave the window without any changes being made.
84
© CAD Schroer GmbH
CADConvert pro M4
Starting the Conversion
Starting the Conversion
To start the conversion of all drawings contained in the list, click on the Go button in the OUTPUT menu.
Figure 50
List Go Option in the Output Menu
The following window opens.
Figure 51
Dialog List Conversion
Prompt Conversion
1. Activate the desired input format by clicking on one of the boxes. All drawings with the
respective formats from the reading directory will be converted.
2. Activate Path.
You can now specify a target directory for the output format. Here also, a file manager
is provided. The completed drawings will be filled in the starting directory, if Path is not
activated.
3. Select the output format.
Click on the Go button, the conversion will start.
© CAD Schroer GmbH
85
CADConvert pro M4
List Processing
Timer Conversion
1. Follow the steps as described in chapter ”Prompt Conversion”, but without clicking on
the Go button.
2. Activate the check box Start time.
Figure 52
Switch Starttime
3. Please enter the time for the conversion to be started. With this option you are able to
convert large lists, e.g. overnight.
4. Press the Go button.
• If the switch Overwrite existing files in the Settings dialog (Project > Settings > Settings > Common)
has not been activated and one or more files with the same name are already existing in the output directory, the following query appears:
Figure 53
Query before Execution of the List Conversion
If you confirm with yes, a single file is overwritten. If still further files are existing, the
query occurs again.
If you confirm using all, any already existing files are overwritten and the window
closes.
The conversion will start at the time you entered.
• If the switch Overwrite existing files in the Settings dialog (Project > Settings > Settings > Common)
has not been activated, the conversion starts without prior query at the assigned
time.
The entire list will be processed. The converted drawings will be filed under the same
name, yet with the assigned file-identifier for the respective format.
You also have the possibility to admit another drawing into the conversion list with the
command List Add.
Figure 54
86
List Add in the Input Menu
© CAD Schroer GmbH
CADConvert pro M4
ANALYSIS
This chapter describes, how an input file is analyzed and the analyzed data are transmitted into
an output file using the mapping table. You can modify the default values, provided of CADConvert pro with the tables, according to your requirements and you can create template files, which
you can access with each conversion.
• Overview .................................................................................. 88
• Made Mappings ....................................................................... 89
• Changing Default ..................................................................... 92
• Template File............................................................................ 94
© CAD Schroer GmbH
87
CADConvert pro M4
Analysis
Overview
The Made Mappings option is available via the menu option Analysis.
Figure 55
Made Mappings Option
At the Analysis the individual elements of an input drawing are being recognized and all possible output combinations are generated.
The automatic analysis will only be started if a drawing has been loaded as an Input. Otherwise,
you will get and error messages, informing you that no drawing has been loaded.
Figure 56
Error Message
Only after loading the options for made mappings and used tables are selectable.
You have the extensive possibility to configure the data for the output format, after a completed
analysis. You may change the default values for line types, layers, text fonts and colors, given
by CADConvert pro. You may also save the same and re-use them to achieve the customization
desired by you. This assures the acceptance of your usual values for drawings (line types, text
types, etc.). You may also integrate a template file into the conversions that contains your company-specific output data for the conversion.
88
© CAD Schroer GmbH
CADConvert pro M4
Made Mappings
Made Mappings
Load a drawing as input file and click on Analysis > Made Mappings.
Figure 57
Made Mappings Option
CADConvert pro analyzes the Layer, Line and Texttypes, Color and Bold of the loaded drawing and their
meaning for the format to be converted. At this, all possible combinations for the output file will
be displayed.
With the following example, the meaning of the individual fields will be explained.
After having loaded a MEDUSA drawing as input, in this example, the analyzed Made Mappings
table is displayed as follows:
Figure 58
Made Mappings: Table for lines
Amongst others the following data has been analyzed for the Input:
• MEDUSA LineStyle SOLID_THICK
• MEDUSA Layer 0
• MEDUSA Color 3
© CAD Schroer GmbH
89
CADConvert pro M4
Analysis
• MEDUSA LineType L0
• MEDUSA Bold 0.35
If no other specifications have been made in the mapping table, CADConvert pro will set the
following default values for the Output:
• DXF LineStyle SOLID_THICK
• DXF Layer 0
• DXF Color 3 (@SRC means that the number from MEDUSA Input is used)
• DXF Bold 0.35
In the tab for MEDUSA>DXF texts, the following values have been analyzed:
Figure 59
Made Mappings: Table for texts
Amongst others the following data has been analyzed for a text style of the Input:
• MEDUSA text style DRAWING_NUMBER
• MEDUSA Layer 2
• MEDUSA Color 1
• MEDUSA text type TSH
• MEDUSA Font 0
• MEDUSA Bold 0.7
90
© CAD Schroer GmbH
CADConvert pro M4
Made Mappings
On the DXF sheet that would mean for the conversion (default values):
• DXF text style DRAWING_NUMBER
• DXF Font MEDTEXT
• DXF Layer 0
• DXF Color 1 (@SRC means that the MEDUSA definition is used)
• DXF text type TIS
Now you have the possibility to change the default values (see “Changing Default” on page 92)
given by CADConvert pro. Consequently, you are now able to achieve an analysis according to
your requirements.
© CAD Schroer GmbH
91
CADConvert pro M4
Analysis
Changing Default
By means of an example it should be explained how the analyzed default values can be
changed. Therefor we use the Made Mappings table of a MEDUSA drawing, analyzed by .
1. Click on Analysis > Made Mappings.
In the table MEDUSA and AutoCAD styles are opposite from each other. On the right
hand side you see the values for the AutoCAD (DXF) output file chosen by CADConvert pro.
Figure 60
Made Mappings Table
2. Please modify the entries as described in chapter “Editing Tables” on page 27.
Having inserted the values the Apply button
is activated.
3. Click on
• Apply
The values, that you choose for the output file, will be assumed without closing the
window.
• Ok
The values, that you choose for the output file, will be assumed and the window
closes.
• Cancel
to leave the window without transferring possibly made changes to the output file,
the following warning is displayed:
Figure 61
Message Window
4. To save the changes in the mapping table, click on Save.
92
© CAD Schroer GmbH
CADConvert pro M4
Changing Default
In the following you are able to use the made customization for other drawings. That
ensures the optimal customization to your company specific drawing data.
A file browser appears, where you can change into the desired directory.
Figure 62
The File Manager
5. Name the file.
A file extension is not needed.
6. Confirm the selection with Ok.
The file will be saved.
Please refer to chapter “Mappings” on page 33 to get instructions on how to load that
file again later on.
© CAD Schroer GmbH
93
CADConvert pro M4
Analysis
Template File
In the lower part of the Settings dialog for MEDUSA > DXF, which you call up via Project > Settings >
the Template file text field is provided. The option allows a file created in AutoCAD to be
integrated before the conversion.The file contains the typical data for the output file.
Settings,
The complete path name is required.
Here, the desired values will be used for all files to be converted, as long as the template file is
integrated.
You may also configure these settings via Made Mappings. They contain all input and output values
that will be recognized by CADConvert pro after the analysis (loading of a drawing into the
Input). These values can be modified as well as saved.
You may load the file created prior to that with these specifications before each conversion.
If you have made changes to Code and DDL, you also need to readapt the Template Sheet. It
needs to contain all line- and text types for the correct display.
94
© CAD Schroer GmbH
CADConvert pro M4
HELP
This chapter explains how to get information about the CADConvert pro product.
• The Help Pulldown Menu......................................................... 96
• About CADConvert pro ............................................................ 97
• Documentation......................................................................... 98
• Info about Project..................................................................... 99
© CAD Schroer GmbH
95
CADConvert pro M4
Help
The Help Pulldown Menu
Use the Help button in the menu bar to open a pulldown menu containing the items shown
below.
Figure 63
96
The Help Pulldown Menu
© CAD Schroer GmbH
CADConvert pro M4
About CADConvert pro
About CADConvert pro
Using the About CADConvert pro option in the Help pulldown menu an information window opens. It
will display both the current version number of the application and the address of the CAD
Schroer GmbH.
Figure 64
The About CADConvert pro Window
© CAD Schroer GmbH
97
CADConvert pro M4
Help
Documentation
The Documentation option opens the Online documentation.
To start this guide within the application, your favored internet browser has to be defined in the
file cadconvert.cfg. After installation you find this file in C:\Programme\CADConvert_pro_M4\cfg.
You can open this file with an editor and customize the line HELPVIEWER.
Figure 65
The CADConvert.cfg File
You can achieve the same by using the menu of the settings for the Internet browser. You find
the entry field for the HTML Browser via Project > Settings > Settings > Common (see ”Settings”, “HTMLBrowser” on page 45). As default the following s defined:
C:\PROGRAMME\INTERNET EXPLORER\IEXPLORE.EXE
After re-starting CADConvert pro you will be able to start the documentation from inside the program via Help > Documentation.
98
© CAD Schroer GmbH
CADConvert pro M4
Info about Project
Info about Project
The option Info about Project - ... opens a file via the Editor. You can enter information about the current project and call them up later on.
The name of the currently called up project appears behind the option, (in our case: ... - standard).
Figure 66
The Help Menu Option „Info about Project - ...“
Figure 67
Projectinfo Editor
© CAD Schroer GmbH
99
CADConvert pro M4
Help
100
© CAD Schroer GmbH
CADConvert pro M4
LIMITATIONS
Since MEDUSA and DXF are in different CAD formats, some information may not be translated
between them. MEDUSA is designed to save as much information as possible from each of the
two formats, but there are some restrictions. The most important restrictions are described
below.
Raster Transfer
Raster transfer is restricted to projects with the MEDCOLRASTER product.
With the conversion of raster images only rectangular clipping of images and rotation by steps
of 90 degrees is possible. Shearing is not transferred.
DXF/DWG -> MEDUSA
In the current CADConvert pro version the AutoCAD Revision 2000 DXF element Multiline is
not processed. Also Shapes are not processed.
Pattern hatchings are not exactly transferred into MEDUSA, they will be defined as standard
hatchings.
3D Elements are processed with X and Y values only. 3D volume elements and views are not
processed.
Width of start and end segments of poly lines are not evaluated.
MEDUSA -> DXF/DWG
Parallel dimension-chains and coordinate dimensions are converted to geometry.
In AutoCAD version R12 boldness is still unknown, nevertheless it appears in the settings of
line-style mapping. However this column is not analyzed. It is reserved for future use.
© CAD Schroer GmbH
101
CADConvert pro M4
Limitations
Elements from AutoCAD Inventor
It is not possible to convert elements from AutoCAD Inventor to MEDUSA. This data can only
be displayed with an AutoCAD internal add-on.
102
© CAD Schroer GmbH
CADConvert pro M4
INDEX
A
B
C
D
E
F G H
I J
K
L M
N
O
P Q
R S T U V W X Y Z
Symbols
D
@SRC 90, 91
DDL 47, 94
Default Linewidth 54
Default output directory 46
Default, change 92
Deleting rows 29
Dimension 60
Drawing, load 79
DxfInCharset 55
DxfOutCharset 61
Dyn 17
Dynamic Pan 17
Numeric
1/2 17
2x 17
A
Analysis 87
Area 53
Attrib 2 Text 49
Attribute >Texttype
AutoCAD > MEDUSA 35
Attribute->Texttype 38
Auto. draw 15, 78
Auto. load 15, 79
AutoCAD > MEDUSA 34
AutoCAD Inventor 102
E
Editing rows 28
Editing tables 27
Enlarge view 17
Error handling 45
Execute 76
Execute area 76
B
Bigfont 63
Block structure 77
Blockattr 62
Blockname 50
Blockname->Clump 36
Blocks 57
Blockstructure 77
Blocktext 62
Blocktype 49, 57
F
C
Go 20
Changing defaults 92
Clump->Blockname 38
Clumpname 59
Clumps 49
Code 47, 94
Code No. 62
Colors 57
Common, settings 44
Context Check 59
Copying rows 31
CAD Schroer GmbH
File path 18
Fillgap 52
First steps 21
ForceDxfInCS 51
Format, output 32
FROZEN 39
G
H
Help path 45
Helpviewer 98
HIDDEN 39
Hidden Layer 50
HTML-Browser 45
I
In- /Output, Overview 19
103
CADConvert pro M4
A B C D E F G H I J
Input 74
Input View 17
Input, First steps 22
Inserting rows 29
Installation 10
Internet browser 98
L
Layer Status 39, 57
LFUN 70
Linetype 48, 56
AutoCAD >MEDUSA 34
MEDUSA > AutoCAD 37
List browser 83
List conversion, start 85
List processing 81
Load 20
Loading drawing, auto 79
Loading mappings 40
Loading settings 65
LOCKED 39
LPRM 70
LSUP 70
LTScale 63
LTXT 70
M
Made Mappings 89
Map Logging 55
Mapping
Attribute > Texttype 35
AutoCAD > MEDUSA 34
Concept 67
MEDUSA > AutoCAD 37
Mappings 33
load 40
save 41
Medstyle 66
Message path 45
Message window 78
Minimize view 17
MM Textstyle 49
Move 50
Moving rows 31
Multiline 101
N
Navigation 17
O
Online Documentation 98
Output 80
Output directory 46
Output format 32
Output View 17
Output view 17
Output, First step 24
104
K L M N O P Q R S T U V W X Y Z
P
Pan 17
Point functions 70
Polyline 58
Precision 62
Prims 70
Primsheet 47
Print 31
Printing documentation from Portable Document Format
(PDF) files 6
Processing drawings 73
Project 47
Project path 44
Project settings, save 64
Proxy 54
R
raster images 101
Restore 17
Restore view 17
rows
copy 31
delete 29
edit 28
insert 29
move 31
select 29
S
Save as 64
Saving mappings 41
Scaling 53
Selecting rows 29
Settings 25
Common, 44
DXF/DWG -> MEDUSA 48
load 65
MEDUSA -> DXF/DWG 56
Overview 26
save as 64
Shapes 101
Sheet precision 52
Sheetsize 53
Source directory 84
Special characters 47
Special Textmapping 71
Spline 101
SplineApprox 55
Store 20
Superlinemode 61
Superlines 70
Symbolmapping 36
Symbols 36
T
Tables, edit 27
Template file 62, 94
Template sheet 94
Text 2 Attr 57
Text as Graphic 59
© CAD Schroer GmbH
CADConvert pro M4
A B C D E F G H I J
Textbox 58
Textheight 59
Textstyle 48, 56, 61
MEDUSA > AutoCAD 37
Textstyle GDT 61
Texttype
AutoCAD > MEDUSA 35
U
Uniqblk 59
Units 52
Unscale 58
User Interface 12
Usetruecolor 50, 60
© CAD Schroer GmbH
K L M N O P Q R S T U V W X Y Z
V
View 20
Input 17
Output 17
restore 17
Viewing 77
W
Win 17
X
XRef 50
105
CADConvert pro M4
A B C D E F G H I J
106
K L M N O P Q R S T U V W X Y Z
© CAD Schroer GmbH