1
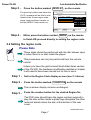
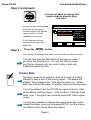
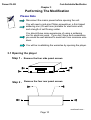
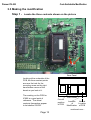
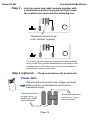
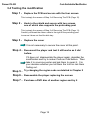
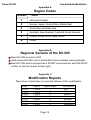
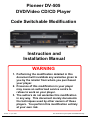
Pioneer DV-505
DVD/Video CD/CD Player
Code Switchable Modification
Instruction and
Installation Manual
WARNING
1. Performing the modification detailed in this
document will invalidate any warantee given to
you by the retailer from whom you purchased
your player.
2. Presence of this modification in your player
may cause an authorised service centre to
refuse to work on your player.
3. The authors do not warantee this modification
in any way. This document merely documents
the techniques used by other owners of these
players. You perform this modification entirely
at your own risk.
Revision: 1.0 June 1998
This document may be copied and distributed freely.
Pioneer DV-505
Code Switchable Modification Manual
Contents
1. Overview
1.1 What is Region Coding
1.2 Codefree Vs. Code Switchable
1.3 How it applies to the DV-505
3
4
5
2. Operating Instructions
2.1 Determining the current region code
2.2 Setting the region code
6
7
3. Performing the Modification
3.1
3.2
3.3
3.4
Opening the player
Removing the PCB
Making the modification
Testing The modification
Appendices
A. Region Codes
B. Regional Variants of the DV-505
C. Modification Reports
Page 2
10
11
13
15
Pioneer DV-505
Code Switchable Modification
Chapter 1
Overview
1.1 What Is Region Coding
For many years the movie industry has, for it’s own convience, divided up the world into
a number of territories. In each of these territories, a local distributor handles the
distribution and promotion of each movie. These days most movies follow a fairly basic
pattern of releases - first at movie theaters, then for video rental, then for subscription
cable channels, then for video sell-thru and finally for TV broadcast. Each of these
releases usually takes place a certain number of months after the previous one. However
over time for a number of reasons, the pattern has become staggered so that for any
given movie that is still in movie theaters in Europe or Africa, it may already be available
on video in the US and Canada.
With the reduction in global trade barriers and the growth of the Internet, it has become
very easy for people to import video cassettes and discs from other parts of the world.
Rather than accept this reality, the movie industry has sort to re-enforce the status quo
by forcing new technologies to include restrictions and devices to hinder the free flow of
international trade. The DVD Video format is a victim of exactly this kind of restriction in
the form of the "Region Coding" mechanism.
The region coding is designed to ensure that a consumer in a given territory is only able
to buy the DVD discs issued by the local distributor, and is thus forced to pay inflated
prices, wait longer for the release to be available, and accept a smaller range of titles and
often inferior versions without the enhancements available in the US version of the same
DVD disc.
The world is divided into six regions for the purposes of DVD Video, although it is clear
that some region codes have deliberately paired countries using different TV system to
further purturb the cross-importation of products within those regions. The main ones
are Region #1 - North America, Region #2 - Japan and Europe, Region #3 - South East
Asia, and Region #4 - Australia and South America.
Page 3
Code Switchable Modification
Pioneer DV-505
1.2 Codefree Vs. Code Switchable
In the terminology of making DVD Video players free of the constraints of region coding
there are two distinct types of modification, the Codefree player or the Code Switchable
player. The difference is an important one.
A codefree player is one that will attempt to play any disc. Since in the official
specification for DVD Video it is the responsibility of the player to enforce region coding,
it is possible to modify a DVD player so that it doesn’t do the enforcement. In some cases
this involves the player merely playing the disc despite a region code mismatch, but more
commonly it involves setting the player region code to #0 which theoretically allows it to
play anything. The constraint on this is that some recent US DVD releases - MGM and
Disney titles are notable examples - use the scripting language within the DVD Video
specification intended for writing on-screen menus etc to enforce the regional lockouts.
These titles will refuse to play on a region #0 player. Some more advanced codefree
modifications may now probe the disc for it’s region code number and answer back with
that number.
A code switchable player acts as if it is a genuine player of the region number to which it
is currently set. Thus if it is set to Region #2, it will refuse to play a Region #1 DVD
Video disc. A quick change of region number and it will of course play the disc without
further complaint. This approach has both advantages and disadvantages.
The advantages are that in many cases, this modification for the Pioneer DV-505
included, there are no changes required to the software that controls the player. The
method used in the factory to set the initial region code is merely re-enabled. Secondly,
it is hard to imagine that a DVD Video disc could detect that any given player is actually
capable of being re-configured to another region code making countermeasures of the
kind seen against Region #0 players difficult to devise.
The main disadvantage is that the user of the player has to be aware of the whole issue
of region coding, of which region each disc they want to play requires, and of the key
press sequence needed to effect the change of region number.
In part, this manual has been written to help people with these players explain the issues
to their family and friends who may have cause to use the modified player.
Page 4
Pioneer DV-505
Code Switchable Modification
1.3 How it applies to the DV-505
The Pioneer DV-505 player in itself demonstrates just how silly the whole region locking
mechanism is, since the player itself is built in a single version for the entire world. Even
those versions of it sold to the US market include full and complete support in hardware
and firmware for the PAL television system.
It has been known for some time that the Gold-coloured version of the DV-505 player
sold in South-East Asia is capable of being code switched as sold from Pioneer. This
modification details how to use the code switching feature, and how to re-enable it on
players sold in other markets around the world where Pioneer have choosen to disable
the code switch feature before the player leaves the factory.
The table in appendix C of this document shows the various versions of the DV-505
that are known to have been successfully modified by this proceedure.
Page 5
Pioneer DV-505
Code Switchable Modification
Chapter 2
Operating Instructions
2.1 Determining the current region code
Please Note
These steps should be performed with the disc drawer open
or when there is no disc inside the player.
This proceedure can only be performed from the remote
control.
Step 1 -
Press the button marked MENU on the remote
This will display a simple menu
with only one option on it - 1
INITIAL - for the initial setup
options.
MAIN
SETUP
1 INITIAL
MENU
EXIT
ENTER
ENTER
RETURN
Step 2 - Press the button marked 1 on the remote to select the
Initial setup menu.
The on-screen menu screen
changes to include a display
canvas which at present says
just OSD SET. (standing for
On Screen Display Settings).
INITIAL
SETUP
1 OSD SET.
2 B.G.COLOR
MENU
EXIT
ENTER
ENTER
OSD SET.
RETURN
continued over...
Page 6
Pioneer DV-505
Code Switchable Modification
Step 3 -
Press the button marked DISPLAY on the remote
The previously blank area below the
O.S.D. message will be filled in with
details of the current region code,
player control software version no
and the MPEG-2 chip version no.
INITIAL
SETUP
1 OSD SET.
2 B.G.COLOR
OSD SET.
REGION: 1
Ver:1.210/8
AV1:3.31RAM
MENU
EXIT
ENTER
ENTER
RETURN
Step 4 - EIther press the button marked MENU on the remote
to finish OR proceed directly to setting the region code.
2.2 Setting the region code
Please Note
These steps should be performed with the disc drawer open
or when there is no disc inside the player.
This proceedure can only be performed from the remote
control.
Unless you have the gold colored South-East Asian version
of the DV-505, the hardware modification detailed in chapter
3 will need to have been carried out for this to work.
Step 1 - Get to the Region Code display screen (see 2.1 above)
Step 2 - Press the button marked CONDITION on the remote
The on-screen display remains unchanged.
Step 3 - Press the number button for the desired Region No
The DVD case should have the region number required to
play the disc written inside a globe logo alongside the other
technical details about the disc at the bottom of the rear
cover.
continued over...
Page 7
Code Switchable Modification
Pioneer DV-505
Step 3 (continued) Press the number button for the desired Region No
Press 1
1
This symbol indicates that this disc is intended
for the USA and Canada and requires that the
player be set to region #1 in order to play it.
Press 2
2
on the remote
This symbol indicates that this disc is intended
for South-East Asia and requires that the
player be set to region #3 in order to play it.
Press 4
4
on the remote
This symbol indicates that this disc is intended
for Japan and/or Europe and requires that the
player be set to region #2 in order to play it.
Press 3
3
on the remote
on the remote
This symbol indicates that this disc is intended
for Australia/New Zealand or South America and
requires that the player be set to region #4 in
order to play it.
Press either 2 or 3 on the remote
2 3
This symbol indicates that this disc is intended
for use in Europe, Japan and South-East Asia
and can be played on either a region #2 or region
#3 player. You can set your DV-505 to either
when you want to play this disc.
There are other combinations of course, and the numbers
within the logo will reflect this. A disc playable in all regions
will either be marked as such using the logo below or may
not be marked at all. (Of course, it would not be surprising
to find a US distributor failing to mark it correctly...)
continued over...
Page 8
Code Switchable Modification
Pioneer DV-505
Step 3 (continued)
ALL
You do not need to change the
region code in order to play
this disc.
As soon as you have pressed
the button on the remote
corresponding to the desired
region number, it will be
updated on the screen.
In this example we have
switched from region #1 to
region #4.
Step 4 -
INITIAL
SETUP
1 OSD SET.
2 B.G.COLOR
OSD SET.
REGION: 4
Ver:1.210/8
AV1:3.31RAM
MENU
EXIT
ENTER
ENTER
RETURN
Press the MENU button
This confirms the change and returns you to the blue (or black) screen.
You can now play the DVD discs of the region number
you have set the player to. You will not have to make
any further changes until you wish to play a disc with
a different region number.
Please Note
No harm comes to the player or disc as a result of a failed
attempt to play a disc of the wrong region. The player will
display "Wrong Region No." and eject the disc tray. At this
point you can set the player to another region no and try again.
It is not possible to set the DV-505 to region code 0 in order
to emulate a codefree player. Only numbers 1 through 8 are
valid - only 1 through 6 are currently used DVD Video region
codes.
It is actually possible to change the region code with a disc
inside the player once you’ve pressed STOP, but the menus
are different from those described above.
Page 9
Code Switchable Modification
Pioneer DV-505
Chapter 3
Performing The Modification
Please Note
Disconnect the mains power before opening the unit.
You will need a mid-size Philips screwdriver, a thin-tipped
soldering iron (25 watt max) suitable for electronic work,
and a length of self-fluxing solder.
You should have some experience of using a soldering
iron for electronic work. If you don’t have such experience
you would be well advised to seek helo from someone who
does.
You will be invalidating the warantee by opening the player.
3.1 Opening the player
Step 1 - Remove the four side panel screws
Step 2 - Remove the four rear panel screws
continued over...
Page 10
Pioneer DV-505
Code Switchable Modification
Step 3 - Lift the cover and remove
Lift the cover at the rear
first and then hinge up to
about 45 degrees, then
move cover away from
the base.
3.2 Removing the PCB
Step 1 - Locate the Video/Logic PCB
Rear Panel
The Video/
Logic PCB
Shielding
Front Panel
Disk Tray
Step 2 - Remove the shielding from the board
Remove the two screws that
secure the left-hand side of
the shielding to the PCB.
Be careful to note how
the protruding post keeps
the ribbon cable from
fowling the disk tray.
Unhook the
shield from the
right hand side
notch in the PCB.
PCB
continued over...
Page 11
Pioneer DV-505
Code Switchable Modification
Step 3 - Remove the four screws holding the PCB in place
and turn the PCB over being careful to make sure
none of the ribbon cables are fowled.
Please Note
The PCB cannot be removed from the player easily. It is
perfectly possible to do the modification within the freedom
of movement allowed by the ribbon cables connecting the
Video/Logic PCB to the rest of the machine.
The underside of this part of the PCB is
where the modification needs to be
performed.
Once you have unscrewed the PCB, it should be fairly easy to
flip it over. Because most of the ribbon cables connect down
the left hand side of the board as it is situated in the player, it
is easiest to flip it such that it is sitting over the disc tray
assembly.
If you are perching the PCB over the disc tray assembly
it may be a good idea to insert a piece of paper under
the PCB to guard against solder splashes getting on the
disc tray assembly.
Page 12
Pioneer DV-505
Code Switchable Modification
3.3 Making the modification
Step 1 - Locate the three contacts shown on the picture
Rear Panel
Looking at the underside of the
PCB, the three contact points
are near the hole for the
mounting screw on the right
hand bottom corner of the
board as you look at it.
The marking on the PCB for
IC602 is a good point of
reference. The actual
contacts themselves appear
to be labelled CN705.
Front Panel
Current
position
of PCB
Normal
Location
Location
of
Modification of PCB
continued over...
Page 13
Pioneer DV-505
Code Switchable Modification
Step 2 - Join the center and right contacts together with
a small blob of solder; being careful not to heat
the contacts too much with the soldering iron.
E
These two contacts need
to be "shorted" together
E
You need to join the center and right hand contacts together
using a small blob of solder between the two as shown in the
illustration above. Be careful not to put too much solder on;
it just needs to make a connection.
Step 3 (optional) - Check connections will a test meter
Please Note
This should be done with a low voltage continuity
tester such as a multimeter set to the Ohms
impedance range.
This should show as
an open circuit - ie
greater than 100M
ohms resistance.
This should show as a
short circuit - ie zero
ohms resistance.
Page 14
Pioneer DV-505
Code Switchable Modification
3.4 Testing the modification
Step 1 - Replace the PCB and secure with the four screws
This is simply the reverse of Step 3 of Removing The PCB (Page 12)
Step 2 - Hook in the shield and secure with two screws
one of which also supports the protruding post
This is simply the reverse of Step 2 of Removing The PCB (Page 11).
Carefully re-thread the ribbon cable to the right of the protuding post
to ensure it does not fowl the disk tray.
Step 3 - Replace the cover
It is not necessary to secure the cover at this point.
Step 4 - Reconnect the player and test it still works as it did
before.
If it does not, disassemble the player again, desolder the
modification and try to make it look as it did before. Then
take it to a service center and ask them to repair it. It is
your decision whether you tell them the truth or risk them
finding out.
Step 5 - Try changing the region code as detailed in Chapter 2
Step 6 - Reassemble the player replacing the screws
Step 7 - Purchase a DVD disc of another region and try it
Page 15
Pioneer DV-505
Code Switchable Modification
Appendix A
Region Codes
Number
Areas
1
USA and Canada
2
Europe, Japan, South Africa, Middle East
3
South-East and East Asia
4
Australia, New Zealand, Central & South America
5
Former Soviet Union, India, Africa
6
China
Appendix B
Regional Variants of the DV-505
Basic DV-505 as sold in USA
Gold-colored DV-505 sold in South-East Asia is already code switchable
Black DV-505 sold in Europe has a SCART euroconnector and PAL/NTSC
written on the front panel, bottom right.
Appendix C
Modification Reports
There have to date been no reported failures of this modification.
Model
Version
Original Region
Purchased In
DV-505
DV-505
DV-505
DV-505
DV-505
DV-505
DV-505
1.210/8
1.000/8
1.304/4
1.304/4
1.304/4
N/A
1.210/8
1
2
2
3
4
2
2
USA
England
Holland
Taiwan
Australia
Spain
Luxemburg
Page 16